Phone Tree in HyperConnect
This article explains how to configure and use the Phone Tree (IVR) feature in HyperConnect. It provides step-by-step guidance on setting up automated call flows, using widgets to design caller journeys, and managing routing logic based on time and availability.
Overview
Phone Tree in HyperConnect is an Interactive Voice Response (IVR) system that automates the handling of incoming calls. It allows businesses to offer a structured, self-service experience by letting callers to interact using keypad inputs or voice commands. This streamlines routing, improves responsiveness, and enhances the caller experience, while also reducing the need for manual intervention in routine scenarios.
Key benefits
Directs callers to the appropriate department, team, or agent.
Offers intuitive menu options that allow guests to resolve queries independently.
Automatically handles common questions and tasks using SmartBots.
Captures caller messages when agents are not available to answer
Sends automated SMS messages for unresolved calls or missed interactions.
Dynamically routes calls based on business hours or time of day.
Prerequisites
To configure and manage the Phone Tree, users must have one of the following roles in HyperConnect: Administrator, Manager, or Owner.
Note
Before you begin, ensure you have the necessary permissions in Hyperconnect to manage phone settings, and that your business hours and teams are configured in the system for routing calls.
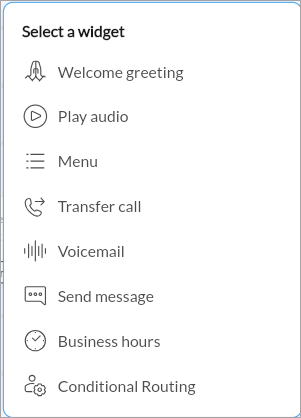
Phone Tree Widgets
HyperConnect's IVR flow is built using widgets, where widgets are modular elements you can add into your call flow. Each widget adds a specific action to the call experience:
Welcome Greeting- Plays a message using text-to-speech or a pre-recorded audio file.
Play audio- Plays a custom message or audio file.
Menu- Offers numbered options to callers (For example: Press 1 to talk to an agent)
Transfer call - Routes the call to a designated number, team, or user.
Voicemail - Directs the caller to leave a voice message.
SmartBot- Triggers a bot to handle the call
Send message- Sends a follow-up SMS to the caller.
Business hours- Routes call differently based on time and day
Conditional Routing- Directs calls based on predefined conditions like guest type, call source, or country code, enabling personalized and dynamic call flows.
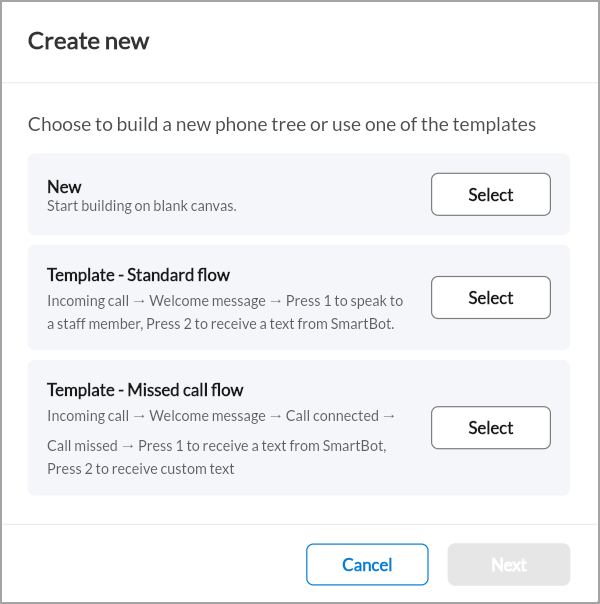
Flow Creation Options
When creating a new phone tree flow, you will be given the following three options:
New: Start from scratch on a blank canvas, where you can customize every widget and node.
Template – Standard flow: A pre-built flow that plays a greeting and presents the caller with menu options like speaking to a live agent or get a message from the SmartBot.
Template- Missed call flow: A pre-built flow designed to handle missed calls. In this flow first rings multiple users, plays greetings, and then routes the caller based on call success or failure.
Set Up a New Phone Tree
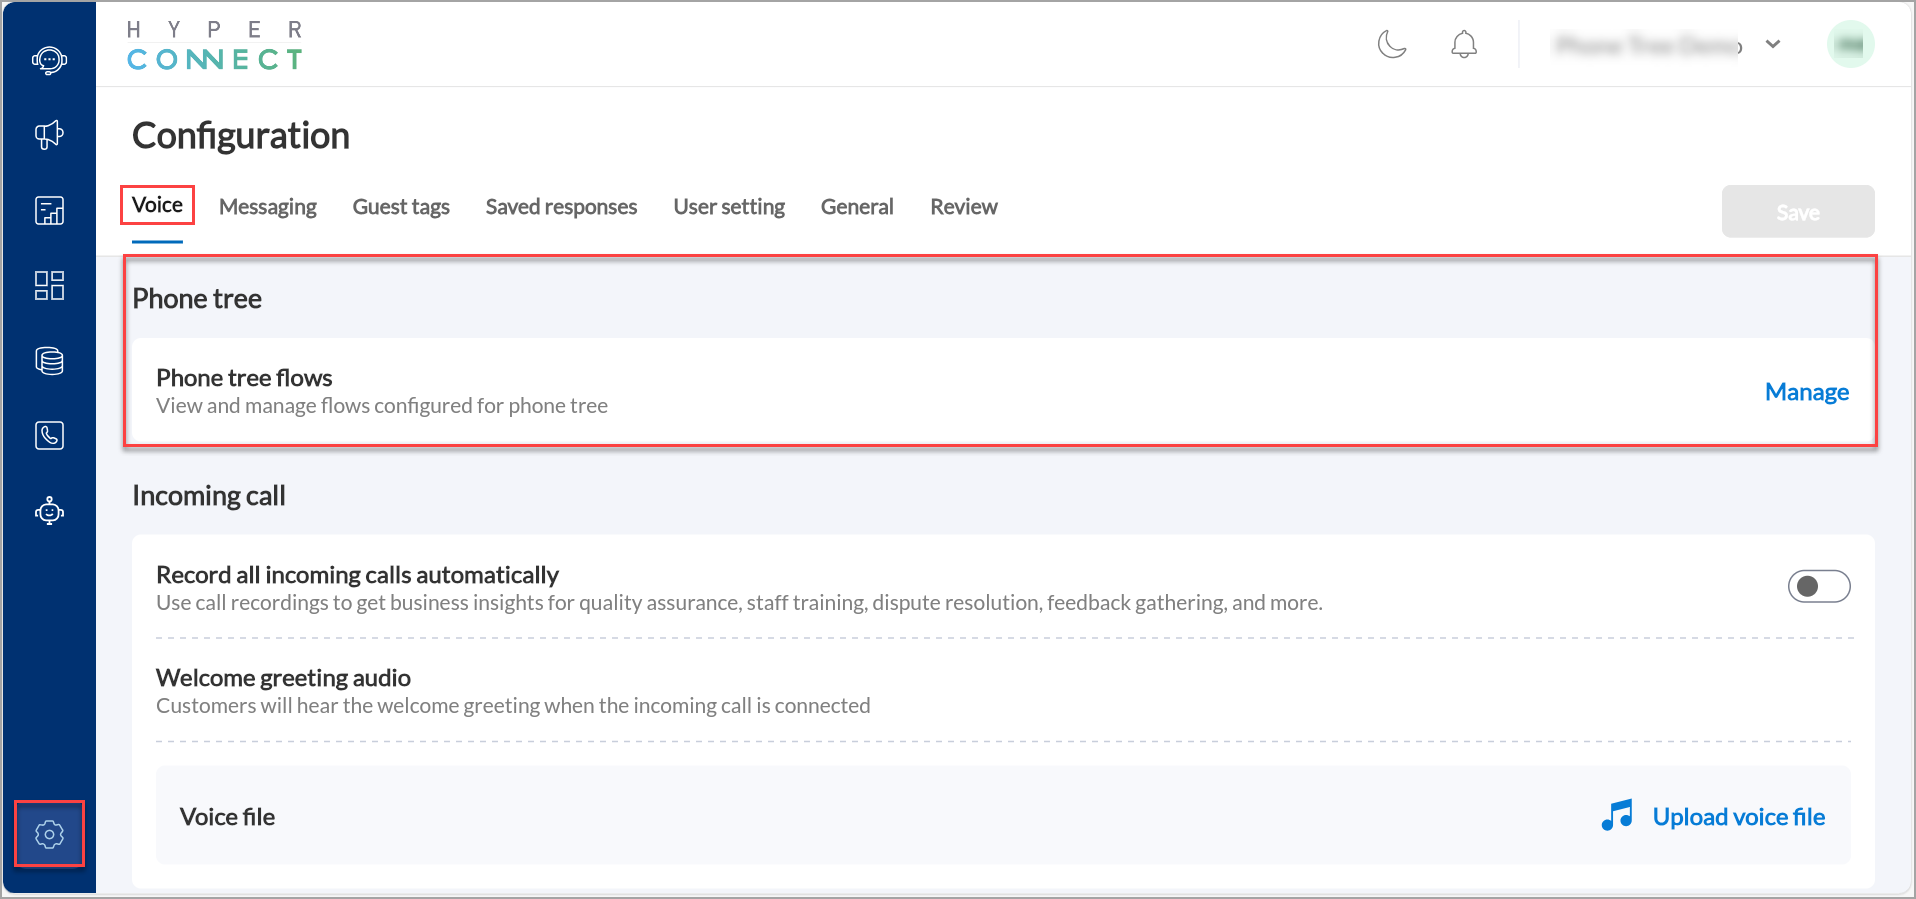
Launch HyperConnect.
Click the Settings icon.
Select the Voice tab.
Under Phone tree, click Manage.
Note
If you have not created any phone trees yet, you will see an empty screen prompting you to create a new configuration.
Click Create new.
Select New and click Next.

Enter a name for your phone tree flow (e.g., Main branch call flow).
Click Next.
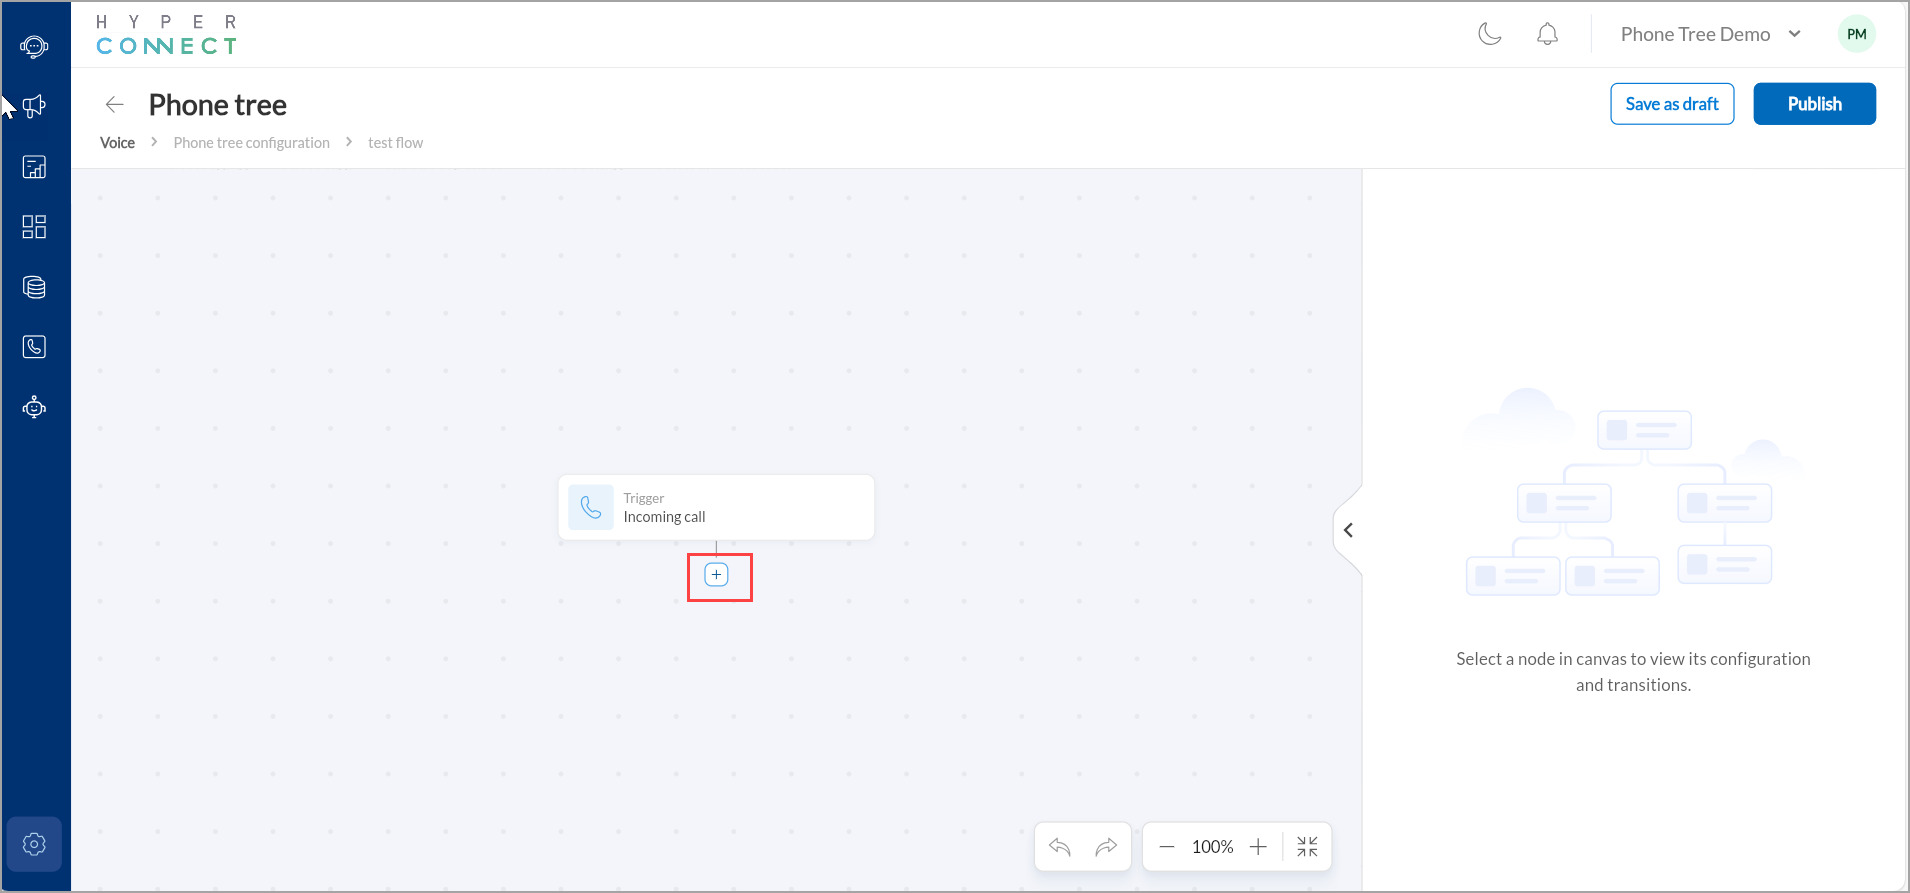
Start building your call flow.
You will now be taken to a visual flow editor, which shows a trigger node for an incoming call. This is your starting point for building the call journey.
Click the + icon below the incoming call trigger.
This opens a menu of widgets you can insert to build your call logic such as welcome greetings, menu prompts, and call transfers.
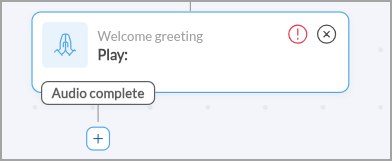
When you click the + icon under the Incoming call trigger node and select any widget, let’s say welcome greeting, the system adds a block labeled "Welcome greeting" into your flowchart.
The node will show:
A red warning icon if required configurations are not complete.
A transition prompt (like “Audio complete”) under the widget, which allows you to define what happens next.
This widget becomes the next step in the call journey once the call is received
Choose from a list of widgets to add.
Once your phone tree is configured:
Click Save as draft if you're still working on it.
Click Publish to make the phone tree live for incoming calls.
Note
If you created a new phone tree, publishing would make it the active call flow for the associated phone number. Hyperconnect typically allows you to assign the flow to your business number, so you must ensure the correct number is linked to this phone tree.
If you edited an existing phone tree, publishing it again will apply your changes immediately to new calls.
Widget Options
Welcome Greeting Widget
The Welcome greeting widget is one of the first interaction points for a caller in the Phone Tree flow. It's typically used immediately after the Incoming call trigger to greet the guest with a pre-recorded message.
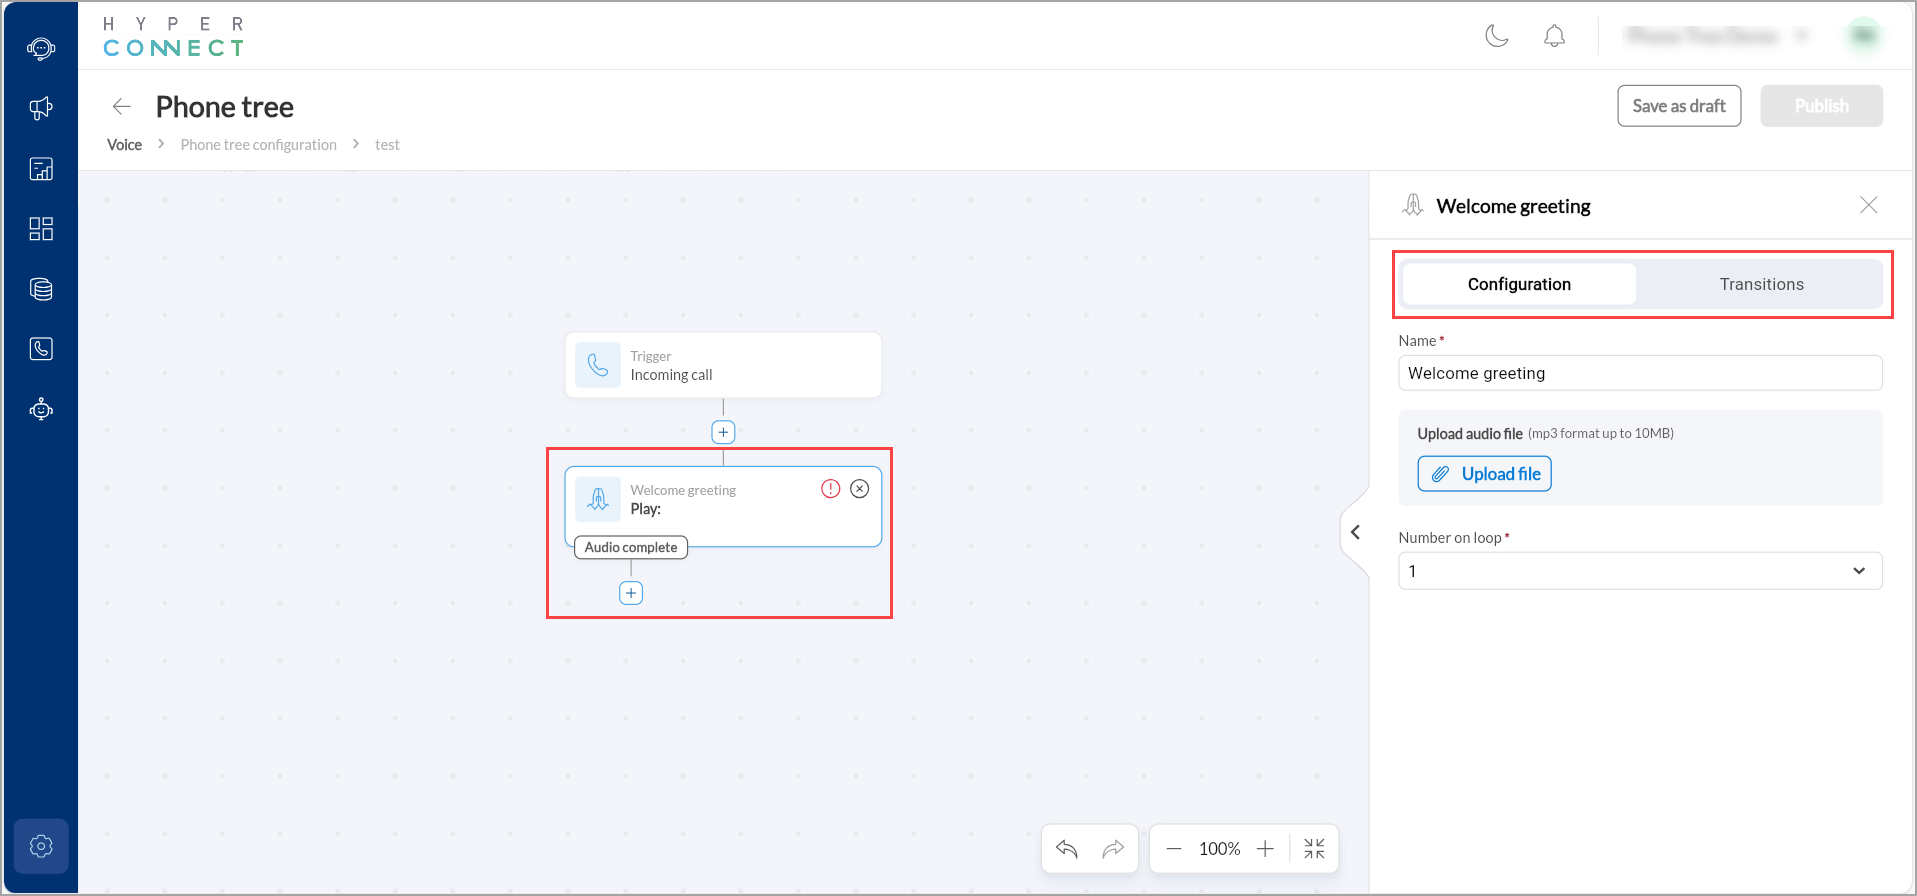
Once the widget is selected, the right panel displays its Configuration tab:
Give the widget a clear, identifiable name, such as “Initial greeting”.
Upload an .mp3 file of up to 10MB.
In the Number on loop drop-down menu select how many times the audio file will play in a loop.
The default loop value is 1.
For example: If the audio says, “Thank you for calling us, please hold while we connect you to an agent,” setting the loop to 2 will repeat this twice.
After configuring the greeting, navigate to the Transitions tab to define what happens next once the audio message completes.
From the If audio completes dropdown menu, decide the next action after the greeting. Options include choosing a new widget or linking to an existing widget. Alternately, you can use the + icon below the widget to add the transitions.
Play Audio Widget
The Play audio widget is used to play a recorded or uploaded message to guests during their interaction with the phone tree. This can include instructions, disclaimers, or promotional content.
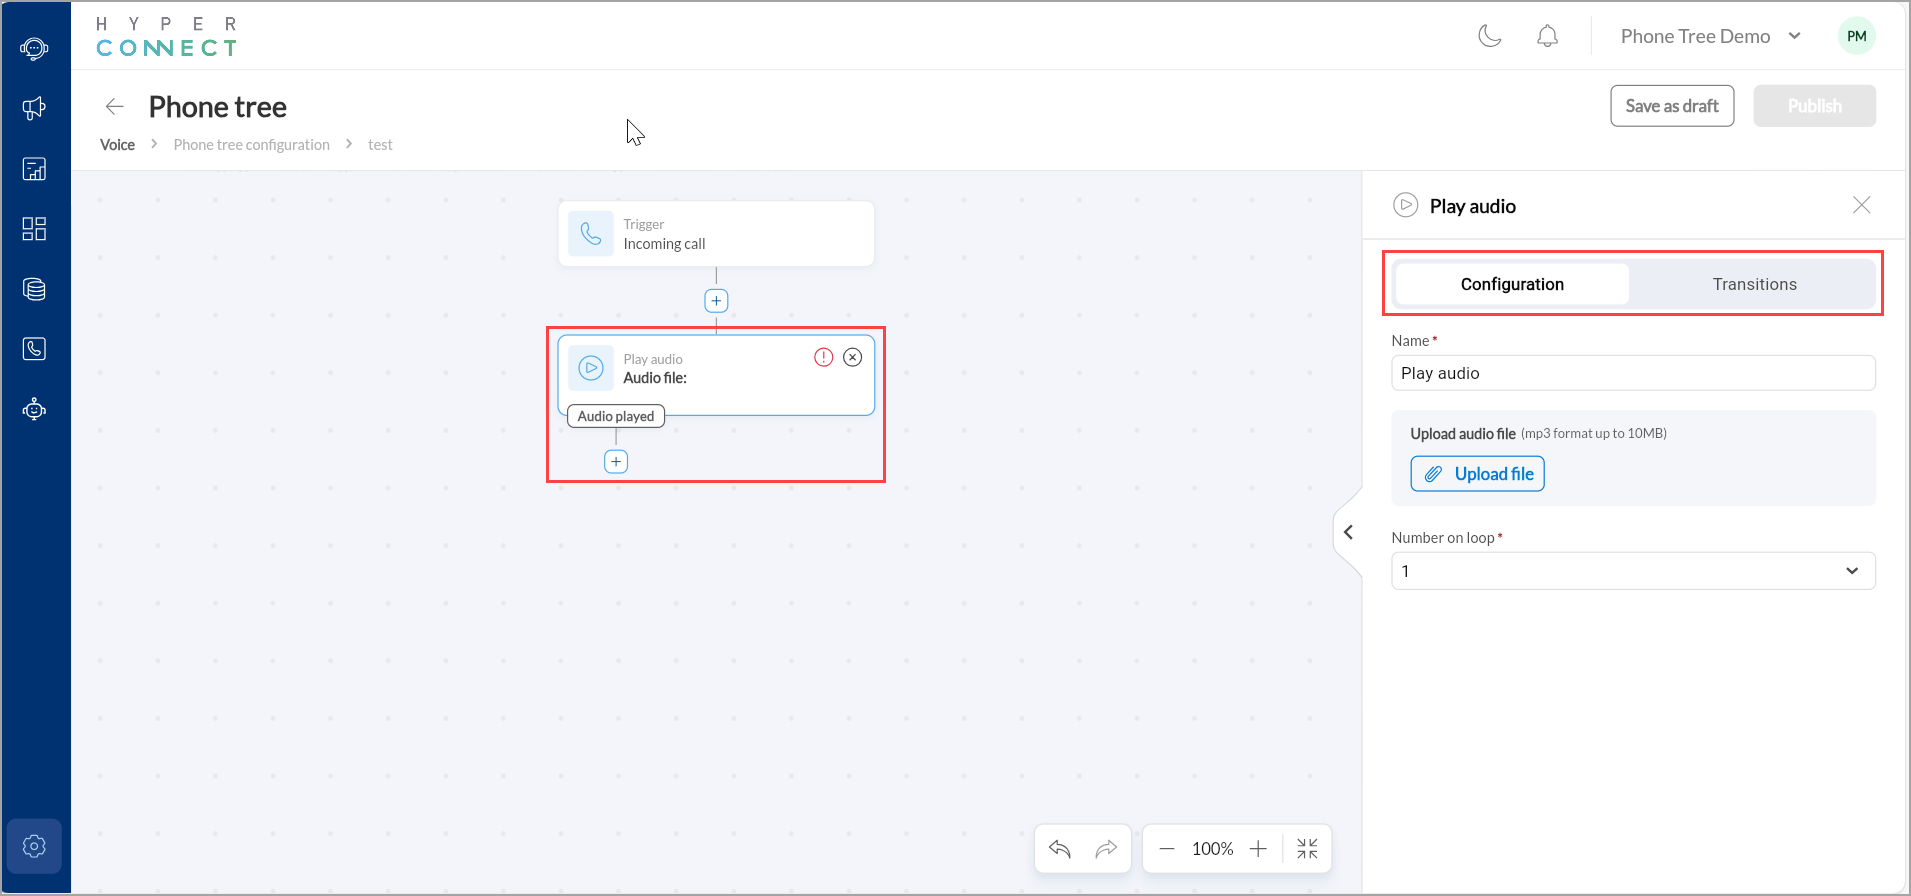
You can define the core behavior of the widget in the Configuration tab:
Give the widget a clear, identifiable name, such as “Holiday promo audio”.
Upload an .mp3 file of up to 10MB.
This is the message that callers will hear when they reach this point in the phone tree. Typically, you would record this in advance and upload it directly.
In the Number on loop drop-down menu select how many times the audio file will play in a loop.
For example: If you select a value of "4, it means the same message will be played four times consecutively unless interrupted by another action or when the call ends.
This tab defines what happens after the audio has been played. It's essential for linking one widget to the next action in your call flow.
Options include choosing a new widget or linking to an existing widget. Alternately, you can use the + icon below the widget to add the transitions.
Menu Widget
The Menu widget is a crucial element of an IVR (Interactive Voice Response) system. It allows businesses to present callers with a set of numbered keypad options enabling them to self-navigate to the right department or action. The caller hears the options configured and responds by pressing a number on their keypad. For example: “Press 1 for appointment related queries, Press 2 to talk to an agent”.
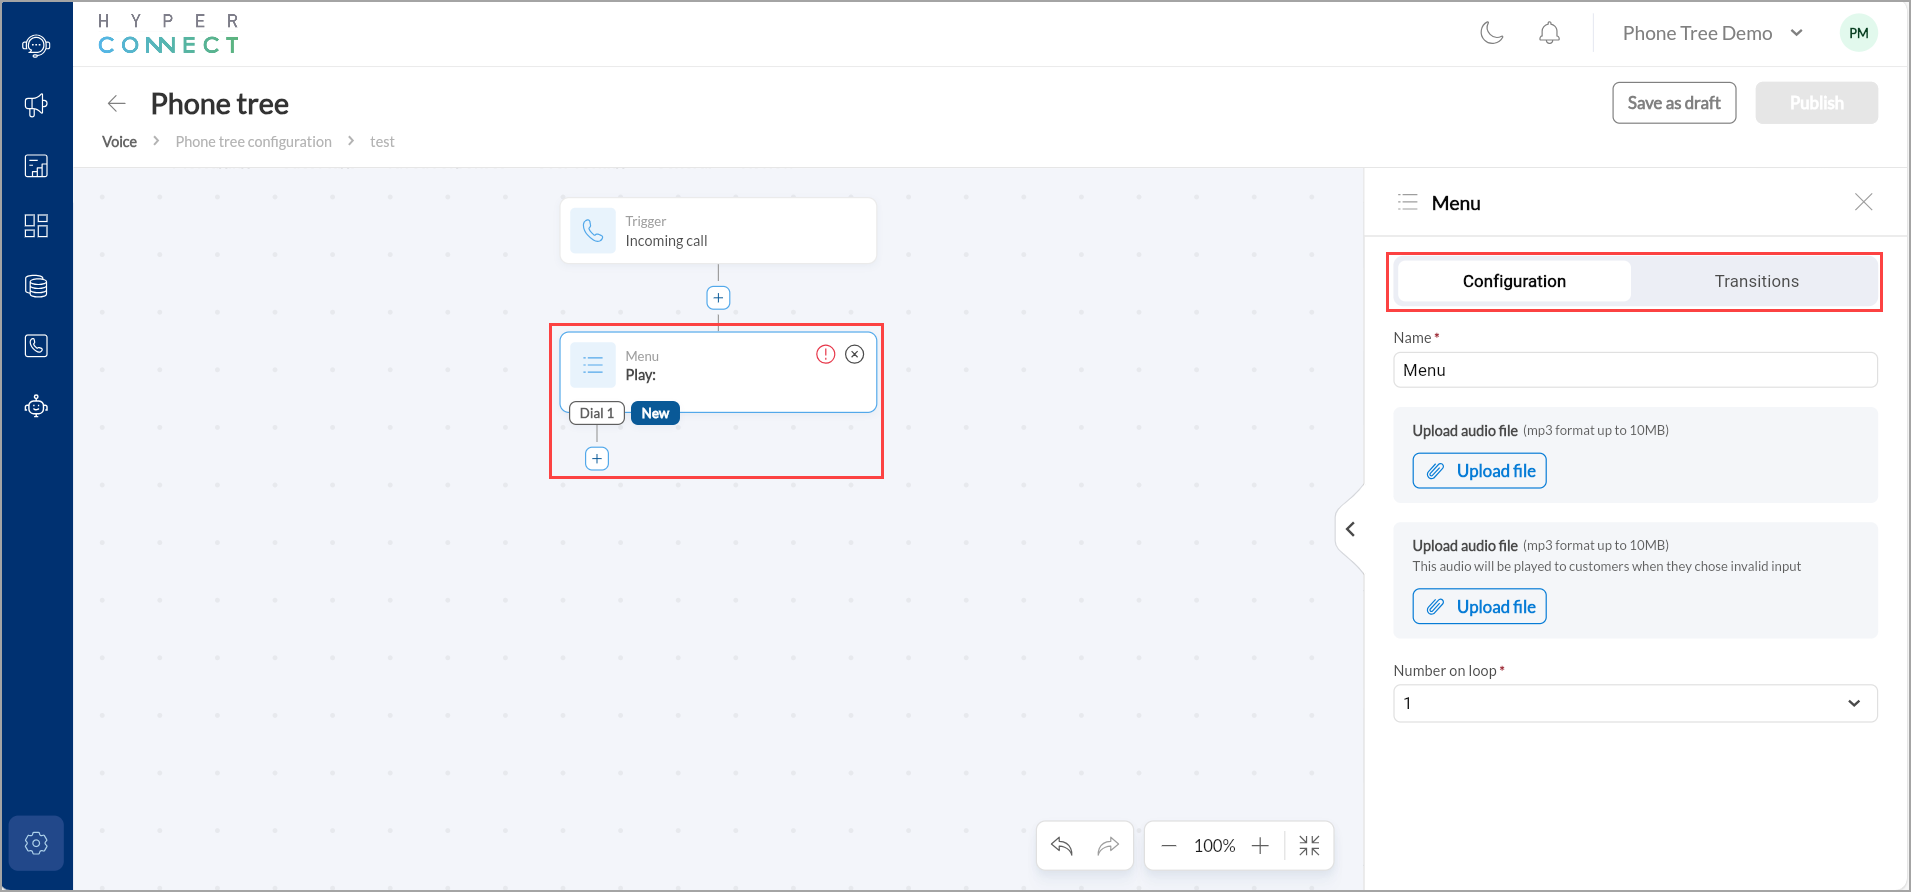
This tab defines how the menu behaves when presented to the caller.
Give the widget a clear, identifiable name, such as “Main menu”.
In the Upload audio file field, upload .mp3 file of up to 10MB that will be played to the caller when they reach this menu.
For example: Press 1 for appointment booking, press 2 for cancellation, press 3 to talk to a representative.
In the Upload invalid input audio file field, upload .mp3 file of up to 10MB when the caller enters an invalid input.
For example: “Sorry, that was not a valid option. Please try again.”
From the Number on loop drop-down menu, select how many times the audio will be replayed if the caller does not respond or enters invalid input.
This tab is where you define what happens when a caller presses a specific number.
You can create multiple conditions using the + Create condition button to map different digit presses to different follow-up actions. You can also click New on the visual editor to add a new condition.
You can link each key press to a new widget or an existing widget already in your call flow.
Alternately, you can use the + icon below the widget to add the transitions.
Transfer Call Widget
The Transfer call widget allows you to route an incoming call to another phone number, user, or team.
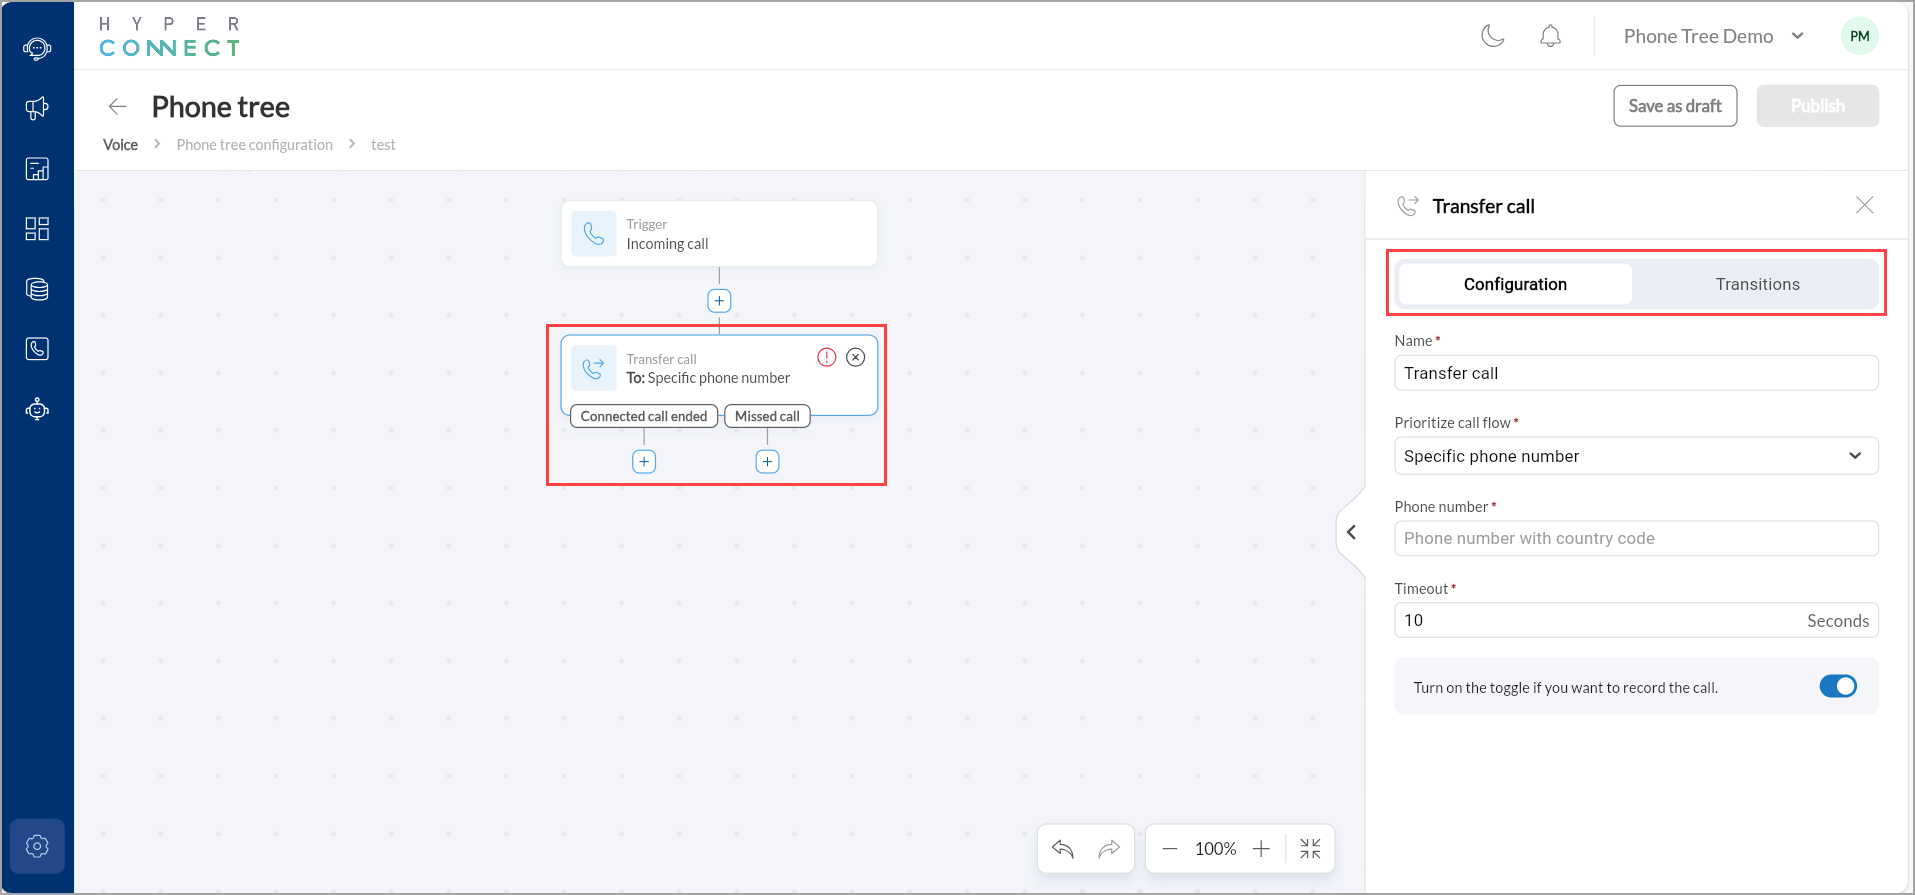
In this tab, you can set up how the call is transferred and to whom.
Give the widget a clear, identifiable name, such as “Transfer to agent”.
From the Prioritize call flow drop-down menu select how and to whom the call should be routed once the Transfer call widget is triggered.
Based on the selected option:
Enter the phone number with country code. This field is only visible when the Specific phone number option is selected.
Select the employee or agent to whom the call should be routed. This field is only visible when the Specific agent option is selected.
Select multiple employees from your organization. The order in which you add them will determine the ring sequence. Only one employee is rung at a time, if the first does not answer within the set timeout, the next is tried. This field is only visible when the Fixed order option is selected.
Create a group of employee and list them in the order they should be rung every single time. This field is only visible when the Ring groups in fixed order option is selected.
Set the maximum wait time (in seconds) to establish the connection. If the call is not answered within this time, the flow will proceed based on your Transitions configuration.
Once the call transfer logic is configured, you can use this tab to define what happens after the transfer, especially in case of failure or timeout.
If connected call ended- This option is triggered after a call has been successfully connected and then ends (either naturally or by hang-up).
If missed call: This option is triggered if the transfer fails due to either of these reasons:
Timeout occurs (no one picks up)
Call is rejected or goes unanswered
All users in a group fail to respond
Alternately, you can use the + icon below the widget to add the transitions.
To record the transferred call automatically enable the switch on the toggle.
Voicemail Widget
The Voicemail widget allows callers to leave a voice message when no agent is available or a call is missed. It’s an essential fallback mechanism for capturing customer intent and contact information outside business hours or during overflow.

You can set up the voicemail prompt and behavior in the Configuration tab.
Give the widget a clear, identifiable name, such as “Support voicemail”.
Upload an .mp3 file of up to 10MB that plays before the voicemail recording begins.
This message should instruct the caller clearly on what to do.
For example: Please leave your name, contact number, and a brief message after the beep. One of our representatives will get back to you shortly.
In the Number on loop drop-down menu select how many times the voicemail message should play before the recording begins.
Under Voicemail target, select Specific agents and choose the employees who should receive voicemails through this node.
This tab defines what happens after the voicemail is successfully recorded.
For example: After a voicemail is left, you might route the flow to a Send message widget that says “Thanks for reaching out. We will respond shortly.”
Alternately, you can use the + icon below the widget to add the transitions.
SmartBot Widget
The SmartBot widget allows you to integrate automated bot interactions directly into your phone tree. It can answer questions, guide users, or collect data without human intervention.
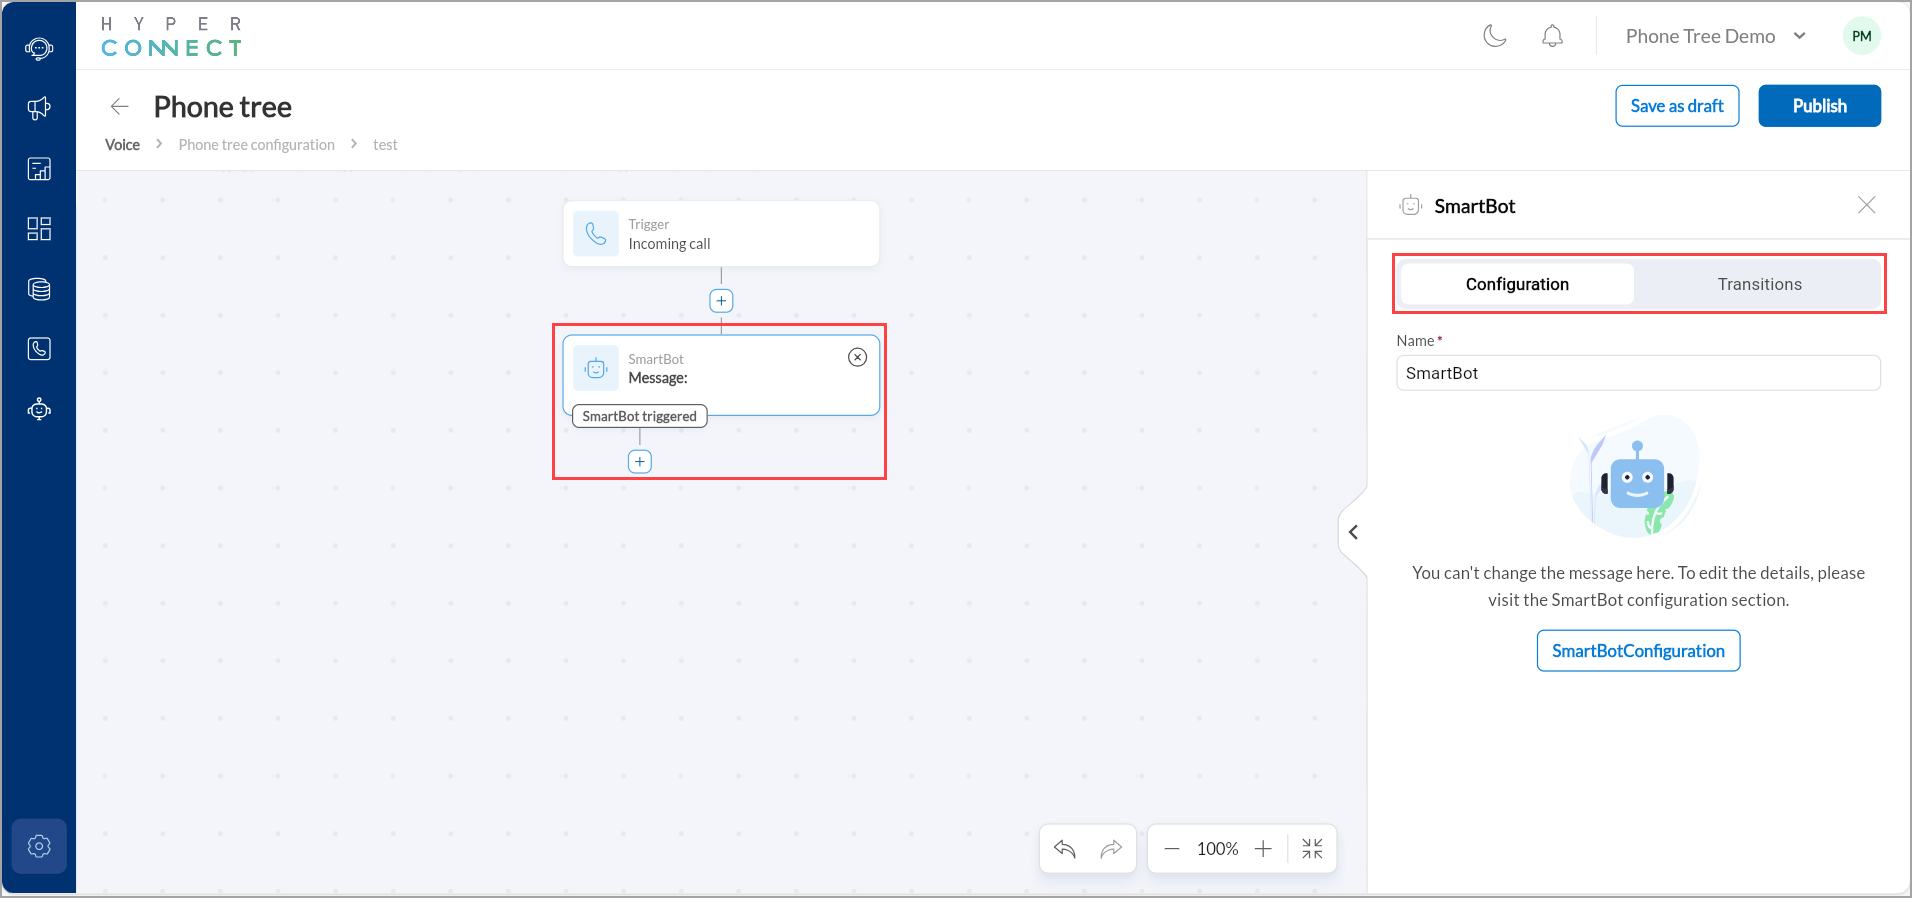
You can set up the voicemail prompt and behavior in the Configuration tab.
Give the widget a clear, identifiable name.
To update the SmartBot’s content, you must click SmartBotConfiguration.
You must configure what happens if SmartBot has been triggered and interaction ends or user input is complete. Options include choosing a new widget or linking to an existing widget.
For example: After the bot captures booking info, you could send a confirmation SMS or play a thank-you message.
Alternately, you can use the + icon below the widget to add the transitions.
Send Message Widget
The Send message widget enables you to send an SMS to the caller at any point in the call flow.
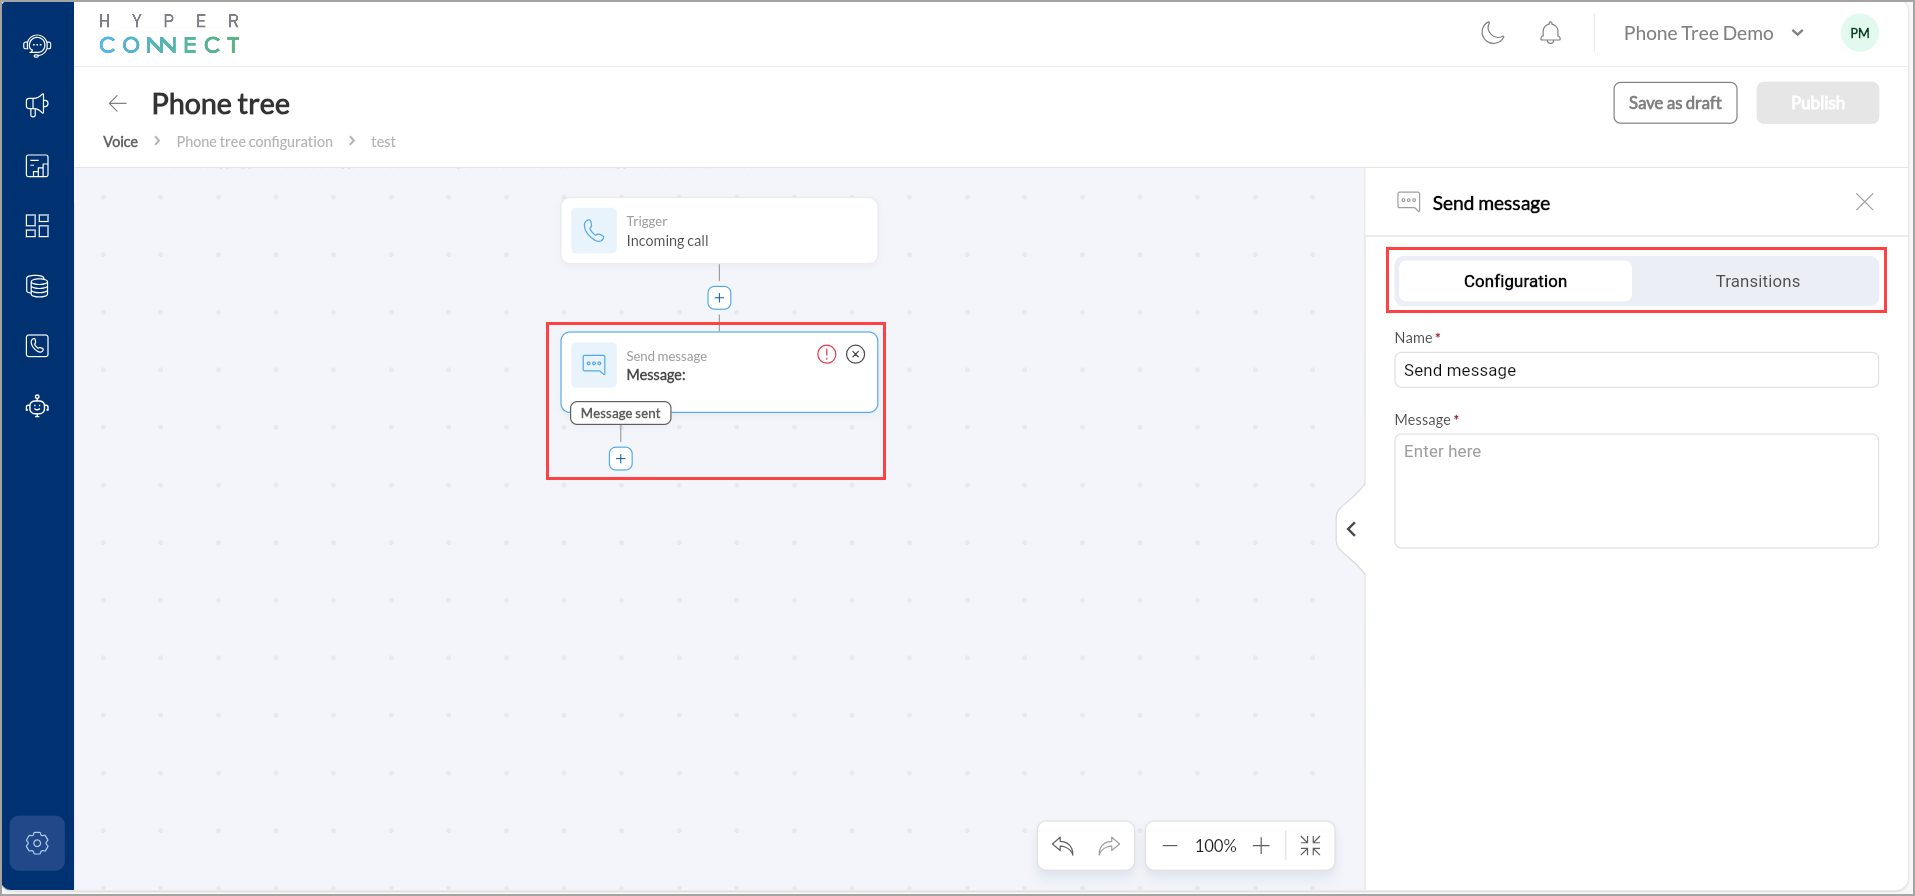
You can set up the voicemail prompt and behavior in the Configuration tab.
Give the widget a clear, identifiable name, such as “SMS Confirmation”.
Enter a customized message for the guests. For example: “Thank you for calling us. We will get back to you soon.”
You must configure what happens after the message is successfully sent. Options include choosing a new widget or linking to an existing widget. You can choose to select the next widget or end the flow.
Business Hours Widget
The Business hours widget enables conditional call routing based on the time and day of the week. It helps you design flows that behave differently during office hours and after working hours, ensuring responsiveness and efficiency.
Once you add the Business Hours widget to your Phone Tree flow, the system automatically creates two logical branches:
During business hours
Post business hours
Each of these conditions must be mapped to a subsequent widget to define what should happen depending on the time the call is received.

In the Transitions tab, you see two dropdown options:
During business hours: This drop-down is used to specify the widget that should be triggered only during your defined working hours. Upon selecting it you will be navigated to the Configuration tab, where you can define what happens during the business hours. Options include choosing a new widget or linking to an existing widget.
Post business hours: This drop-down lets you define the widget to use when calls come after working hours. Upon selecting it you will be navigated to the Configuration tab, where you can define what happens after the business hours. Options include choosing a new widget or linking to an existing widget
Conditional Routing Widget
The Conditional Routing widget allows businesses to dynamically direct incoming calls based on predefined guest or call-related criteria. It supports multiple phone numbers, enabling businesses to route calls from several lines into Hyperconnect simultaneously. This enhances the caller experience by automatically routing calls without requiring manual menu selections.
It is particularly useful when businesses use multiple phone numbers for different channels such as Google Ads or websites and want each to trigger a different call flow. For example, if a guest calls a number displayed in a Google ad, the widget can automatically skip the menu and route the call directly to a specific employee or team. It can also identify new versus existing guests, ensuring efficient call handling and improved conversions.
Once the widget is selected, the right panel displays its Configuration tab:
Give the widget a clear, identifiable name, such as “Route Google Ads Calls”.
Use the Condition dropdown to define the criteria that the system should use to evaluate the incoming call. Available conditions include:
New Guest – Identifies first-time callers.
Existing Guest – Recognizes callers based on their previous call history.
Call Forwarded Number – Matches calls that are forwarded from a specific phone number.
Guest Country Code– Detects the country based on the caller's number.
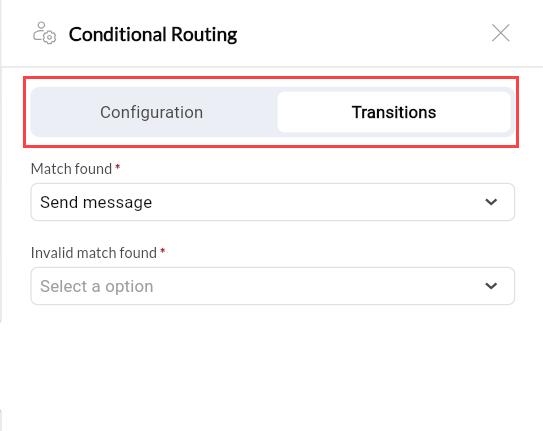
Navigate to the Transitions tab to define the next steps based on whether the condition is met:
Match Found: Choose the action to take if the condition is satisfied. For example: Route to a “Send message” widget or “Transfer call”.
Invalid Match Found: Define the fallback action if the condition is not met. For example: Redirect to the standard menu or voicemail.
You can add transitions using the dropdown options or use the + icon to link to an existing widget in the flow.
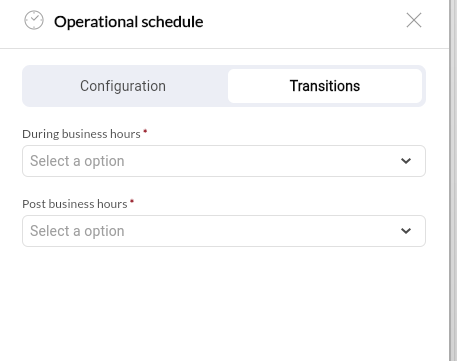
Operational Schedule Widget
The Operational Schedule widget is designed to help businesses dynamically manage call routing based on defined working schedules.
Instead of manually switching flows or maintaining multiple versions of a phone tree, this widget allows you to build a single, intelligent structure that adjusts in real time. You can choose to route based on your business’s regular operating hours, or define custom schedules for holidays, events, or special working days.
Configuration Tab
Once the widget is selected, the right panel displays its Configuration tab:
Give the widget a clear, identifiable name.
From the Type drop-down list, choose from:
Business hours: Uses the organization’s preset hours.
Custom schedule: Allows you to define unique working hours or special time ranges.
Transitions Tab
Define actions for two conditions:
During business hours: Specify what should happen during your defined schedule.
Post business hours: Define what should happen after hours (Example: voicemail or SMS).
Alternately, you can use the + icon below the widget to add the transitions.
For example A salon can use this widget to automatically route:
During business hours: Calls go to the AI Receptionist or live receptionist.
After business hours: Calls go to Voicemail or trigger an SMS message confirming a callback the next day.
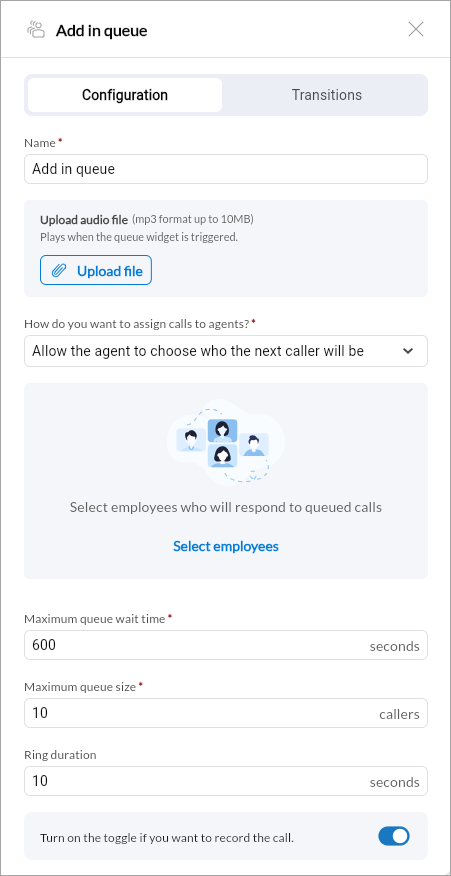
Add in Queue Widget
The Add in Queue widget helps manage high call volumes efficiently by placing callers in a waiting queue when all agents are busy. It creates a virtual waiting room experience, keeping callers engaged and informed while ensuring no call is missed. This widget is particularly useful for businesses with fluctuating call loads, such as salons, spas, or clinics, where peak hours often lead to multiple simultaneous calls. It improves customer satisfaction by avoiding immediate disconnections and giving callers a sense of progress.
Configuration Tab
Once the widget is selected, the right panel displays its Configuration tab:
Give your queue a recognizable name (Example: Front Desk Queue).
Upload a hold music file in .mp3 format (up to 10MB). This audio plays while the caller waits in the queue.
Use short audio loops (less than 1 minute) to maintain a smooth playback experience.
Use the Play Queue Notifications toggle to enable or disable queue position and wait-time announcements.
When enabled, callers hear updates such as their position in the queue and estimated wait time.
When disabled, only hold music plays without system announcements.
Choose how queued calls are assigned to agents:
Allow the agent to choose who the next caller will be, or
Automatically assign to available agents.
Select the language for system-generated queue notifications from the Queue Audio drop-down menu.
Available options:
English (United States)
French
French (Canadian)
If configured for bilingual playback, the system will play the message in English first, followed by French.
Note
Your uploaded hold music remains the same. Only system notifications (position and wait-time messages) are translated.
Enable the Allow Guests to Stay in Queue Till Timeout option to allow callers to remain in the queue until the configured maximum wait time is reached. If disabled, the call may follow the configured transition earlier based on your flow.
Define which employees will respond to queued calls.
You can add multiple agents and arrange them in order of priority or utilization.
Note: Call routing is determined by agent utilization. For example, if one employee has handled 8 out of 10 calls and another has handled 2, the next call will route to the less utilized agent.
Specify how long a caller can wait in the queue (in seconds). Example: 600 seconds = 10 minutes.
After this time, the call is marked as a missed call and follows the next step in your flow. Example: routed to voice
Set the maximum number of callers allowed in the queue at one time.
Example: If the limit is 5, the sixth caller will be treated as a missed call.
Define how long each agent’s device will ring before the system moves to the next agent. Example: 10 seconds
Enable the toggle to record calls for training or quality purposes.
Transitions Tab
Use the Transitions tab to define what happens after specific call outcomes:
If connected call ended: Choose the next step (Example: End Flow or Transfer).
If missed call: Choose what should happen when no agents are available or the queue limit/time is exceeded (Example: Route to Voicemail).
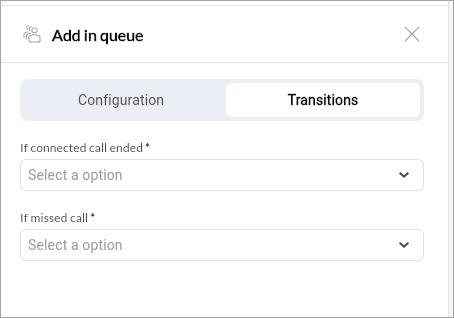
Self service- The Self-Serve option allows callers waiting in a queue to choose an alternative flow instead of remaining on hold.
Alternately, you can use the + icon below the widget to add the transitions.
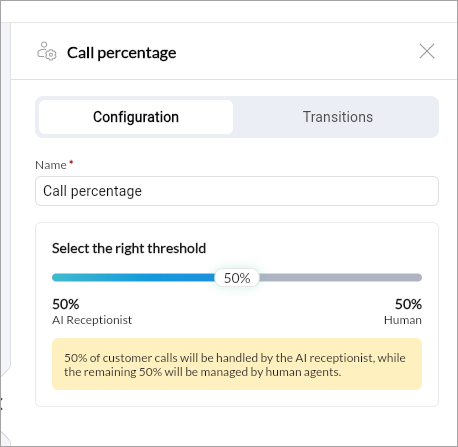
Call Percentage Widget
The Call Percentage widget intelligently splits incoming calls between two defined paths, typically between AI Receptionist and human agents based on a customizable percentage. It introduces load balancing and smart distribution, ensuring that no single team or system becomes overwhelmed during peak hours.
For example, a salon might choose to have the AI handle routine calls such as appointment confirmations or store hours inquiries, while human agents handle more complex or emotional conversations like complaints or reschedules. This widget helps maintain high responsiveness, ensures balanced workloads, and supports efficient human-AI collaboration in your phone flow.
Configuration Tab
Give the widget a descriptive name.
In the Select Threshold option, adjust the slider to determine call distribution:
For example, 50% handled by AI, 50% by human agents.
Transitions Tab
Use the Transitions tab to define what happens after specific call outcomes:
AI Receptionist: Link to the AI Receptionist widget or a new one.
Human: Link to the live agent workflow (e.g., Add in Queue or Transfer Call).
Alternately, you can use the + icon below the widget to add the transitions.
Example:
A salon can set: 50% of calls to be routed to AI Receptionist, which answers FAQs like “What are your working hours?” and 50% of calls routed to live receptionist, who handles custom appointment requests. This way, even during peak times, all calls are handled efficiently.
AI Receptionist Widget
The AI Receptionist widget is a conversational automation feature that uses AI to greet and assist callers. It acts as a virtual front desk assistant, capable of managing common interactions like answering FAQs, scheduling appointments, collecting information, or routing calls to the right department, without human intervention.
This widget reduces wait times and frees up staff to handle more complex interactions. It can identify when human assistance is required and seamlessly transfer the call. When paired with widgets like Call Percentage, Add in Queue, and Operational Schedule, it forms a key part of a hybrid AI-human call management strategy.
Configuration Tab
Give the widget a name like “AI Receptionist”.
Transitions Tab
The Transitions tab defines what happens after the AI Receptionist completes its part of the interaction. This determines how the system should handle different call outcomes, whether the AI successfully helps the caller, needs to transfer the call, or if the caller disconnects unexpectedly.
If call handled: This condition is triggered when the AI successfully completes the caller’s request or resolves the query without requiring human intervention. Once this occurs, you can define the next action to wrap up the call experience. Example: Route to a Send Message widget to send a thank-you or confirmation SMS.
If call handover: This condition applies when the AI determines that the caller’s request requires human attention, for example, a complex inquiry, a complaint, or an escalation. In such cases, you can use this transition to handover the call to a human agent or another flow segment. Example: Route to an Add in Queue widget so the caller waits for an available agent.
If call abandoned: This condition is triggered if the call ends unexpectedly before completion, for example, if the caller hangs up mid-conversation, the call drops, or the AI session times out. Example: Route to a Voicemail widget, prompting the caller to leave a message next time they call.
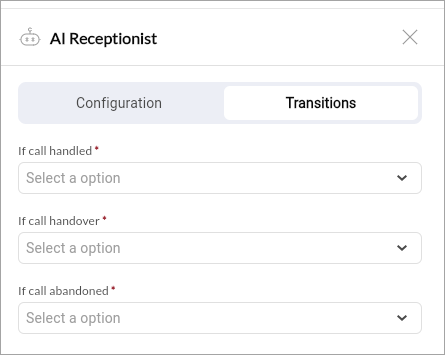
For each condition, select one of the following:
New Widget: Create a new step (Example: Voicemail, Transfer Call, Add in Queue).
Existing Widget: Connect to a previously configured widget in your call flow.
Direct Dial Extension Widget
The Direct Dial Extension node in the HyperConnect Phone Tree builder allows callers to bypass the IVR menu by entering an extension number on their phone keypad. When a caller dials a valid extension, the call routes directly to the matching agent, Ring Group, or Fixed Order group.
Callers who do not dial an extension stay on the line and proceed through the phone tree normally.
Prerequisites:
Ensure Call Extensions are configured with consistent, published extension numbers before placing this node.
Add a Direct Dial Extension Node
In HyperConnect, navigate to Settings > Voice > Phone tree and open an existing flow or create a new one.
In the node picker, select Direct Dial Extension.
Place the node immediately after the Trigger (Incoming call) node.
Configure the node: enter a name, upload prompt audio (mp3, up to 10MB), set loop count, set ring duration (default 10 seconds), toggle call recording on or off.
Wire up the three branch transitions: Connected call ended goes to a closing Play audio node or End Call node; Invalid routes back to the main menu or plays a not-valid message; Missed call routes to a Voicemail node.
Click Save.
Click Publish the flow.
How the Node Works for Callers
The caller hears the prompt audio.
If the caller dials a valid extension, the call routes to the matching agent, Ring Group, or Fixed Order group.
If the caller dials an invalid extension, it is routed to the Invalid branch.
If the caller dials a valid extension but no one answers within the ring duration, it is routed to the Missed call branch.
If the caller does not dial anything, the flow continues to the next node after the ring duration.
End Call Widget
The End Call node in the HyperConnect Phone Tree builder provides a clean, intentional exit point for any IVR branch. When a caller reaches an End Call node, the call terminates immediately after the preceding audio finishes.
The node has no outgoing transitions and requires no configuration beyond placement.
Use End Call nodes at the end of after-hours branches, information-only paths, and any other flow where the call should conclude gracefully rather than loop back to the main menu or time out.
Add an End Call Node
In HyperConnect, navigate to Settings > Voice > Phone tree and open an existing flow or create a new one.
Locate or create the branch where the call should terminate.
Ensure a Play audio node with the appropriate closing message is already in place.
After the Play audio node, click the node picker.
Select End Call.
The End Call node appears as a leaf node labeled “Call will be terminated.”
No further configuration is needed.
Click Save, then Publish the flow.
When a caller reaches the End Call node, any preceding Play audio completes in full, the call terminates immediately, and no further IVR steps execute.
Current Limitations
Cannot yet distinguish between new and existing guests automatically.
Limited to the defined node/widget types for now.