Release Notes - Apr 29, 2025
We’ve enhanced the structure of our release notes to better serve your needs. Updates are now categorized under clear headings based on Add-ons, Core Product, Product Edition, Personas, and Modules.
This new format ensures you can quickly find updates most relevant to your role, understand the value each change delivers, and seamlessly adopt new features or enhanced workflows.
This Release Notes contains the following sections:
Announcements: Key updates and important information related to the release.
New Features: Newly introduced functionalities designed to enhance the product experience.
Enhancements: Improvements made to existing features for better usability and performance. Categorized features as Core Product, Product Editions, and Add-ons.
Additional Resources: Links to supporting materials such as guides, training, and documentation. This also includes references to the release notes for the patches included in this update.
Icons used in this document
Icon | Description |
|---|---|
 | Automatic update for all users. |
 | Localization available. |
 | Employee: Enhancements or features for employee and payroll. |
 | Admin: Features specifically enhanced for admin users who manage the system configuration, including user roles, permissions, and system integrations. |
 | Business Owner/Center Manager: Updates implemented for the business owners or managers who are responsible for overall business strategy, growth, and decision-making. |
 | Front Desk Operator/Service Provider: Features that enhance the usability for front-desk staff who handle appointments, customer queries, payments, and guest interactions. |
 | Guests: Improvements made for the end-users or customers of the business who interact with Zenoti through online booking systems, self-service kiosks, and branded mobile apps. |
Announcements
New Features


 , Administrators, Guests, Business owners
Zenoti now honors Global Privacy Control (GPC) signals in the Webstore. GPC allows consumers to set their privacy preferences directly from their browser, functioning as a universal opt-out from data tracking and sharing. This ensures your business remains compliant with privacy regulations and builds customer trust, even if you are not using external advertising platforms.
At the organization level, click Configuration.
Navigate to Online booking > Online booking settings > CX V3 > Common settings for Webstore and CX V3.
In the Privacy Control section, switch on the Read and Honor Global Privacy Control toggle.
Note
This setting is turned off by default.
Switch on the Do not send events and user data to third-party analytics (Google Analytics + Pixel) toggle.
Note
Disabling third-party analytics tracking affects conversion metrics in tools like Google Ads and Meta Ads.
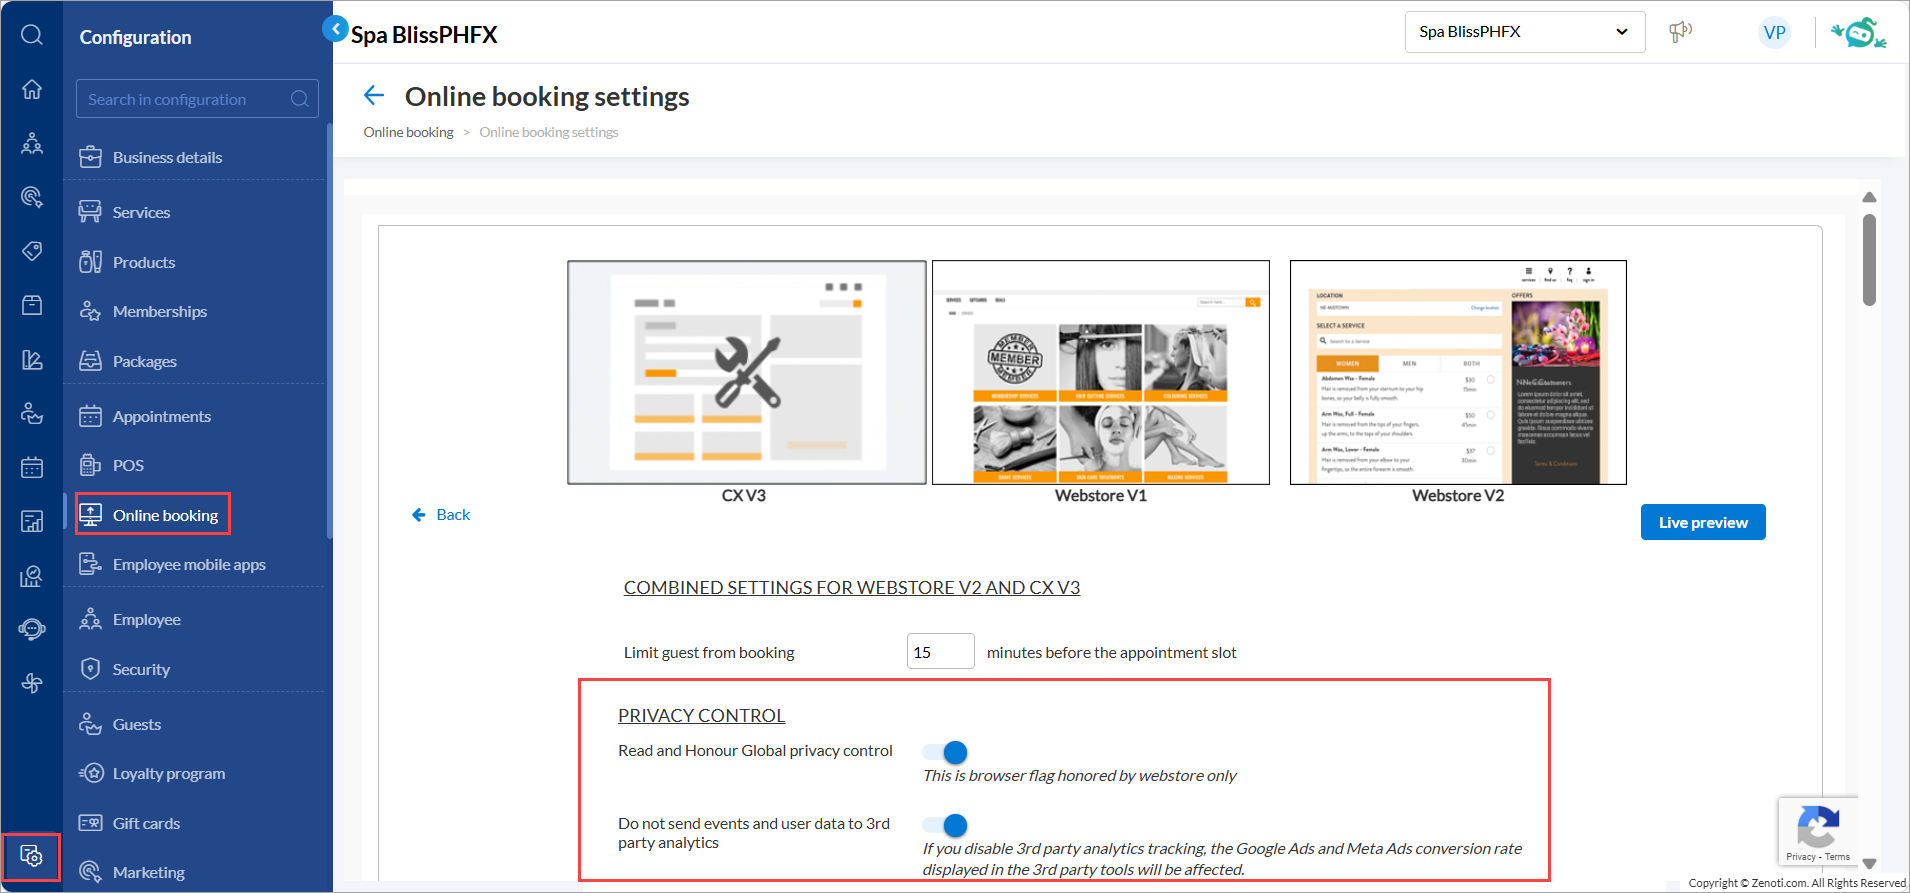
Click Save.
Learn More: For more information, refer to the Honor Global Privacy Control (GPC) in Webstore article.
Enhancements
Front Desk Operators/Service Providers
Previously, when staff attempted to open the Kiosk on a browser and were not logged in, they would see a blank screen or experience delays — requiring actions like refreshing the page, clearing cache, or repeated login attempts. This led to confusion and inefficiencies at the front desk.
Users can now log in directly from the Kiosk screen when accessed through a browser. This is for businesses that do not use an online Kiosk or do not support same-day online booking.
With the new Enable Online Kiosk setting, accessing Kiosk is now faster and more intuitive:
When disabled, users who are not logged in and access the Kiosk from a browser are now directly shown the login page on the Kiosk URL. This makes it easier to launch in-store Kiosks from a browser without requiring prior login.
When enabled, users who are not logged in and access the Kiosk from a browser are redirected to the online Kiosk. This behavior is designed for organizations that actively use online Kiosk.
How-to use:
At the organization level, click Configuration.
Navigate to Appointments > Kiosk > Setup.
Switch on the Enable online Kiosk toggle.

Click Save.
Learn more: For detailed instructions and further context, refer to the Enable Kiosk article.
Front Desk Operators/Service Providers
For queue-based businesses, managing high walk-in volumes quickly and visibly is essential. With the Launch Waitlist with a Link feature, stylists, managers, receptionists, or front desk staff—can display the live waitlist on any smart TV or shared screen, without logging in.
This is especially useful for walk-in guests, who can view either their queue position or estimated wait times, depending on the setup
Note
This setting supports both existing and new Kiosk. Once enabled, the generated link becomes universally accessible—anyone with the link, regardless of their location or login status, can view and interact with the waitlist. This includes individuals who are not employees or do not have a Zenoti account. Access control is no longer restricted by location or user authentication.
If you do not see this setting, reach out to your Zenoti CSM.
Front Desk Operators/Service Providers
Users previously faced challenges reading appointment details when zooming out to view an entire day in horizontal view—where providers are displayed on the left and time slots are shown at the top of the appointment book. In this layout, appointment cards became overly compressed, reducing overall readability.
With this update, the Redesigned Appointment Book now includes better formatting of information on the block to ensure most details are always visible, regardless of screen size or zoom level.
Key updates:
Responsive card layouts: Adapts appointment cards based on width and height to improve visibility, even when zoomed out.
Faster access: Opens the context menu with a single click anywhere on the appointment card.
Flexible visuals: Allows up to four appointment icons on onboarding cards for better visual scheduling (Previously limited to three icons).
Learn more: For more information, refer to the Redesigned overview article.
Front Desk Operators/Service Providers
Managing group bookings just got easier for front desk staff and service providers with two key updates designed to streamline scheduling and improve visibility.
Quickly identify host names on appointment blocks
When multiple group bookings are stacked in the Appointment Book, especially when additional guests are included, it can be difficult to distinguish which guest belongs to which group.
With this enhancement, the group booking owner is automatically labeled as the host, and their name appears directly on the appointment block. This makes it easier to identify group members immediately without switching screens.
Edit group appointments for unconfirmed additional guests
Previously, front desk staff couldn't make changes to an appointment for an unconfirmed additional guest in a group booking. Actions such as adding or updating services, changing time slots, or editing guest information were blocked until the guest was confirmed.
With this enhancement, front desk operators can now edit appointments for unconfirmed guests directly from the Appointment block. This helps front desk staff to manage bookings more flexibly and deliver a smoother guest experience.
How to use:
Navigate to Appointment Book.
Right-click the appointment block for the additional guest.
Click Edit.
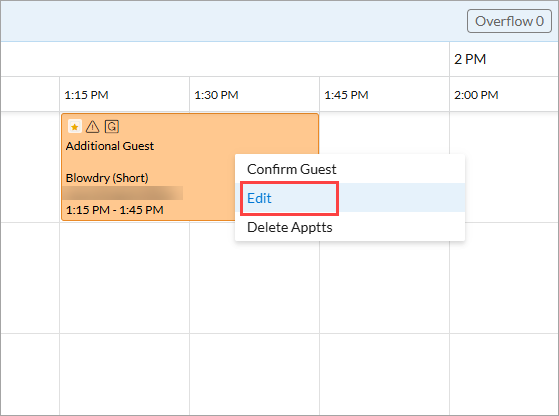
Modify the appointment details as required.
Click Review and save.
Learn more: For more information, refer to the New Kiosk check in article.
Business Owners/Center Managers
The membership fee modification process now provides additional information to support better pricing transparency. When updating fees for active memberships, staff with the appropriate permissions can view tax and discount details and adjust either the base or final price accordingly. Zenoti automatically calculates the corresponding price, ensuring all applicable taxes are included. Price updates are only allowed for memberships with Membership Status and Collection Status as active. You can verify this information on the Membership Details page.
Important
If a discount was applied during the original membership sale, a warning will appear stating that any price change will remove the discount. When the base or final price is edited, the discount is struck through and removed after saving. After this change, the discount and warning will no longer appear in future price edits.
How to Use:
Navigate to Guests > Manage Guests at the organization or center level.
Search for and select the required guest.
Navigate to the Memberships tab and select the membership for price update.
Click Change next to the Payment Amount field.
Enter the new Base Price or Final Price, then click the checkmark icon.
The base price does not include taxes and discounts.
Zenoti automatically calculates and displays the final or base price, with applicable taxes and discounts.
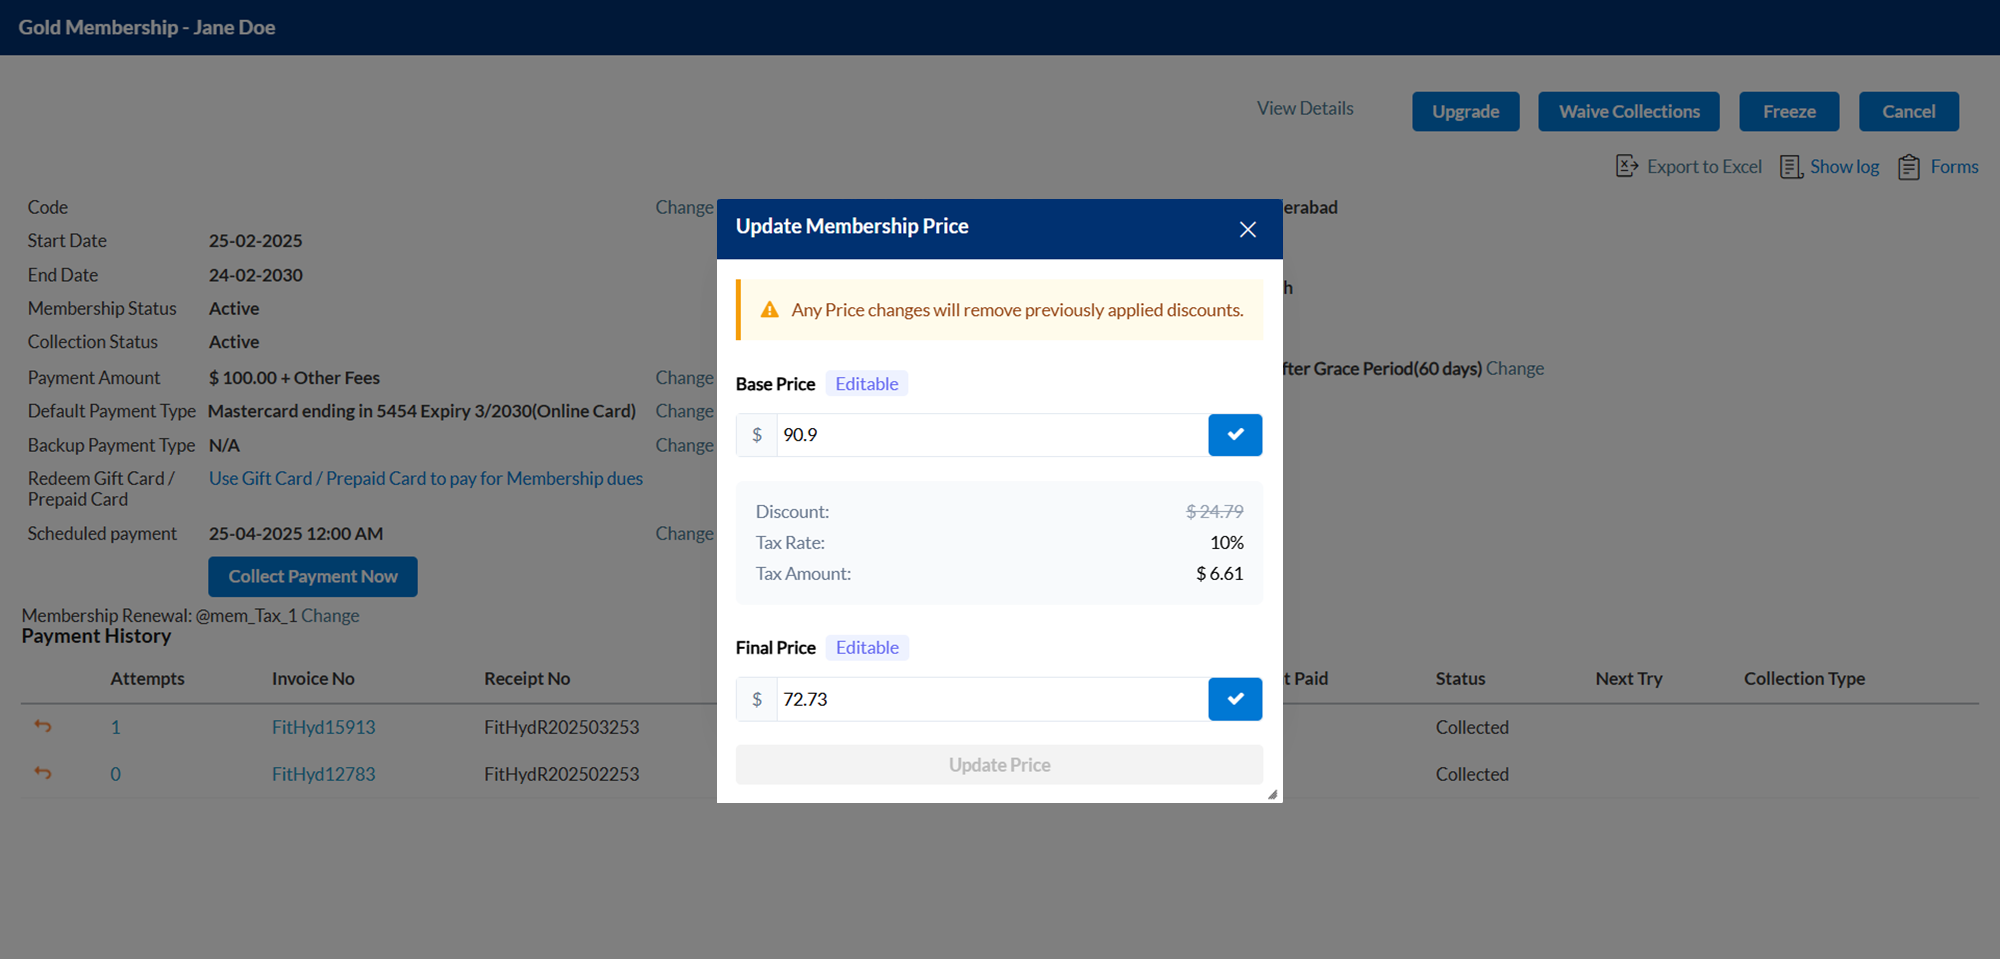
Click Update Price to save changes.
Learn More: For more information, refer to the Change membership recurring fee article.
Administrators, Guests, Business owners
Webstore recommendations have always featured frequently booked services powered by SmartKart. With this enhancement, businesses can now include bundles alongside services in the Recommendations and Popular Items sections. This allows guests to discover more value-packed options during their booking journey.
After a guest selects a service or bundle, SmartKart (if enabled) continues to show personalized suggestions, helping them find complementary offerings faster and boosting the overall booking value.
How to use:
Businesses can add their best-selling bundles alongside individual services in the Popular items section to catch guest attention early.
When a guest selects an item, SmartKart (if enabled) automatically suggests related bundles and services, helping them discover what they need more quickly.
Learn more: For more information, refer to the SmartKart article.
Administrators, Guests, Business owners
Businesses can now customize fields displayed during new guest sign-up when using verification code login. To keep process streamlined, only the First Name and a unique identifier (either Email or Mobile number, as defined in organization level settings) are mandatory and automatically selected. You can choose other fields such as Gender, Date of Birth, and Preferred Pronoun to customize the new guest sign-up.
How to use:
At the organization level, click Configuration.
Navigate to Online Booking > Online booking settings > CX V3 > Online Booking.
Switch on the Login with verification code toggle.
Select the mandatory fields you would like to collect from the new guests.
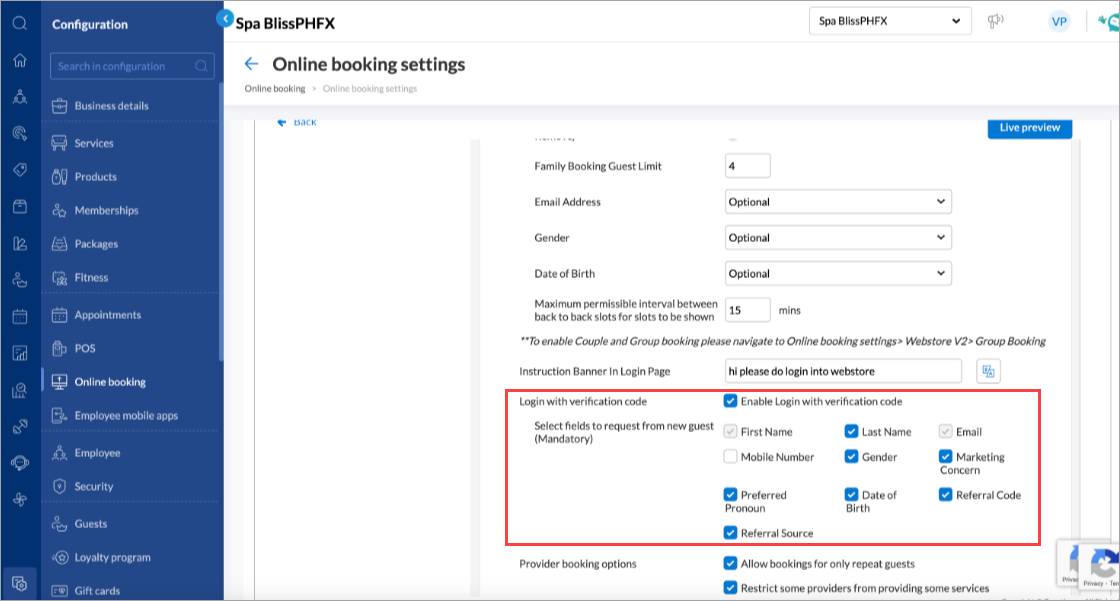
Note
First Name and Email or Mobile number are pre-selected and cannot be changed.
Choose any other fields you wish to collect such as Gender, Marketing Consent, and Referral Code.
Click Publish to save your changes.
Learn more: For more information, refer to the Allow guests to log in with verification code article.
Business Owners, Marketing Teams
You can now create target segments based on specific memberships and their current statuses—helping you craft personalized campaigns for the right guests.
For example, if the goal is to promote an upgrade from a “One Hour Massage” membership to a “Massage + Facial” membership at a discounted rate, you can now easily segment guests who currently hold the former—without the need for manual filtering or workarounds.
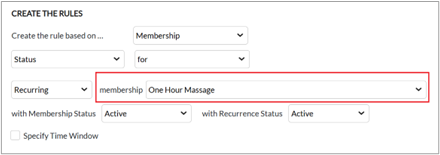

This feature is enabled by default.
Learn More: For more information, refer to the Create a target segment article.
Business Owners, Marketing Teams
To support Telephone Consumer Protection Act (TCPA) compliance and maintain consistent communication preferences across platforms, Zenoti now allows admins to automatically sync guest opt-in and opt-out data with connected systems such as CRM or marketing tools using two new webhook events.
This enhancement ensures communication preferences are honored in real-time across platforms, reducing manual effort and enhancing the guest experience.
This feature is enabled by default. Reach out to your administrator to configure the webhook.
How to use:
At the organization level, navigate to Configuration > Integrations > Webhooks.
Click Create a webhook.
Under the Guest section, select OptedIn and OptedOut, then click Next.
Enter the webhook configuration details:
Name
Description
Subscription Type
Request Type
URL
Secret
Header Key and Header Value
Click Complete.
Learn More: For more information, refer to the Webhooks in Zenoti article.
Business Owners, Marketing Teams
Businesses now have greater flexibility in managing abandoned cart notifications.
Previously, Zenoti sent these messages exclusively as transactional notifications within an hour of cart abandonment. With this enhancement, businesses can now choose to classify and send these messages either as marketing or transactional, helping align guest communications with regional compliance standards and audience engagement goals.
This feature is enabled by default.
How to use:
To configure abandoned cart notifications as marketing messages, contact your Zenoti representative.
Important
Once the abandoned cart message is set as a marketing notification, it cannot be changed back to transactional.
Learn more: For more information, refer to the Abandoned checkout cart reminder article.
Business Owners, Marketing Teams
The Advanced Marketing campaigns report now includes key performance metrics:
Number of direct bookings completed
Revenue generated from these direct bookings
Number of new memberships and packages purchased by guests who received and engaged with your campaign (though email or SMS)
These insights provide a clearer view of campaign performance and revenue impact, helping you make smarter decisions and optimize future campaigns.
This feature is enabled by default.
How to use:
At the organization or center level, navigate to Marketing > Advanced Marketing > Dashboard.
Enter the attribution time frame (in days) and click Continue.
On the top right, click Campaigns.
Select the desired date range and click Download.
Learn More: For more information, refer to the Advanced Marketing Dashboard article.
Business Owners, Marketing Teams
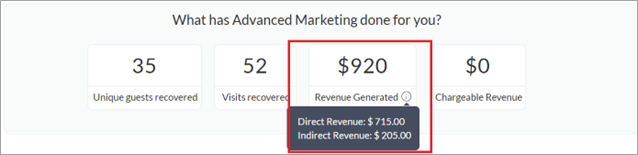
Businesses can now access more granular performance data for Advanced Marketing campaigns. The enhanced dashboard distinguishes between unique guests recovered and total visits recovered, making it easier to assess campaign reach. Additionally, revenue is now categorized into direct and indirect revenue, offering a clearer view of Return On Investment (ROI) and overall campaign effectiveness.
This feature is enabled by default
How to use:
At the organization or center level, navigate to Marketing > Advanced Marketing > Dashboard.
Enter the attribution time frame (in days) and click Continue.
View the Unique guests recovered metric.
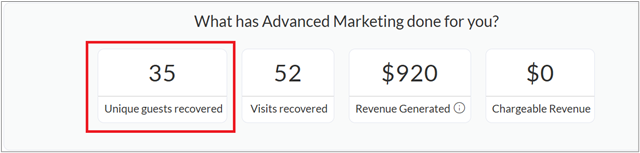
Hover over the info icon next to Revenue Generated to view the breakdown between Direct Revenue and Indirect Revenue.
Learn More: For more information, refer to the Advanced Marketing Dashboard article.
Module: HyperConnect
Front Desk Operators/Service Providers/Receptionists
The Voicemail Management enhancement enables staff to capture, track, and resolve missed call voicemails through a centralized Call Logs screen. This feature ensures that no customer interaction is missed, improving response quality, team accountability, and customer satisfaction.
Businesses often struggle with missed calls going untracked, leading to lost revenue opportunities and dissatisfied customers. With the new Voicemail capability in HyperConnect, teams can view playback progress, assign follow-ups, resolve issues with notes, and audit all actions—streamlining communication workflows and enhancing service quality.
How-to use:
Navigate to HyperConnect > Call Logs.
Click the Voicemail icon.
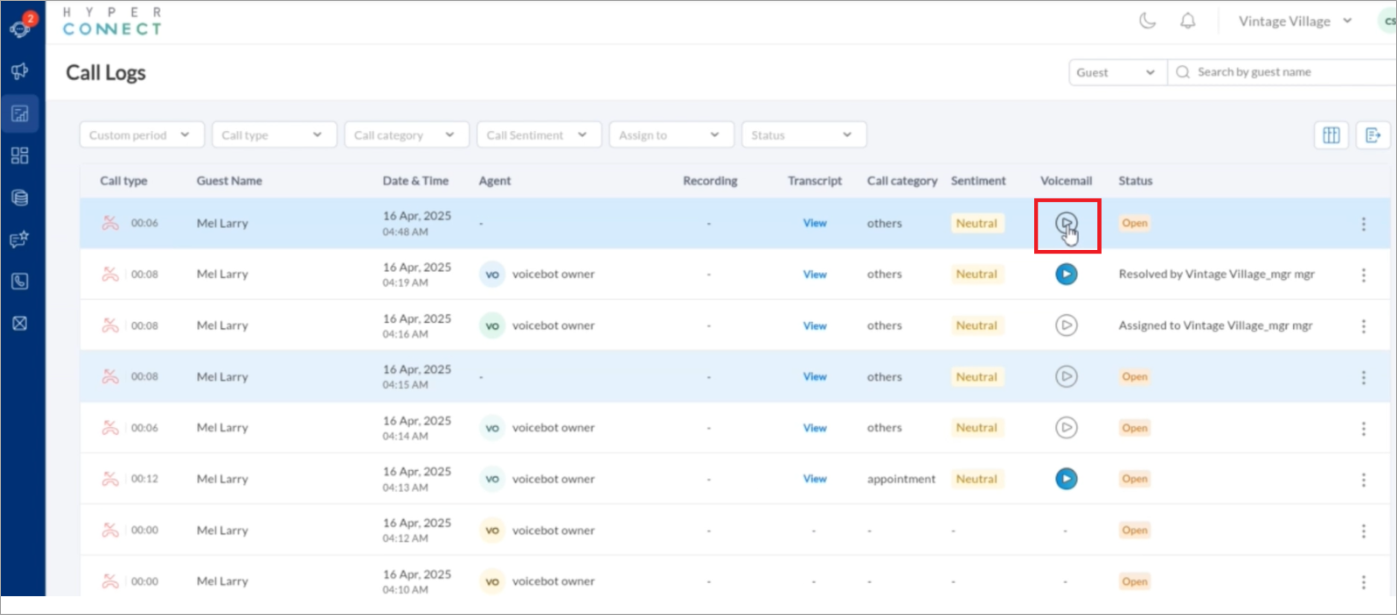
Click the three-dot menu next to a voicemail to assign it, mark it resolved, or add notes.
Use filters to sort voicemails by employee, status, or date for quicker resolution.
Learn more: For more information, refer to the Voicemail Management in Call Logs article.
Salon/Spa Business Owners, Center Managers
The Listing Management feature enables businesses to manage and update their Google Business Profiles directly from within Zenoti. This centralized control saves time, ensures consistency across listings, and improves visibility in local search results.
Businesses often struggle with outdated or inconsistent business information across online platforms, impacting customer trust and SEO performance. With this enhancement, users can edit details such as business hours, services, and contact information from one interface. Changes are automatically synced with Google, while mismatch alerts help users correct discrepancies quickly. Integrated reporting helps track customer engagement via impressions, clicks, and calls.
How-to use:
Navigate to the Listing Management > Configuration > Reviews tab > Integrate social accounts section within HyperConnect.
Follow the step-by-step on-screen prompts to connect your Google Business Account securely.
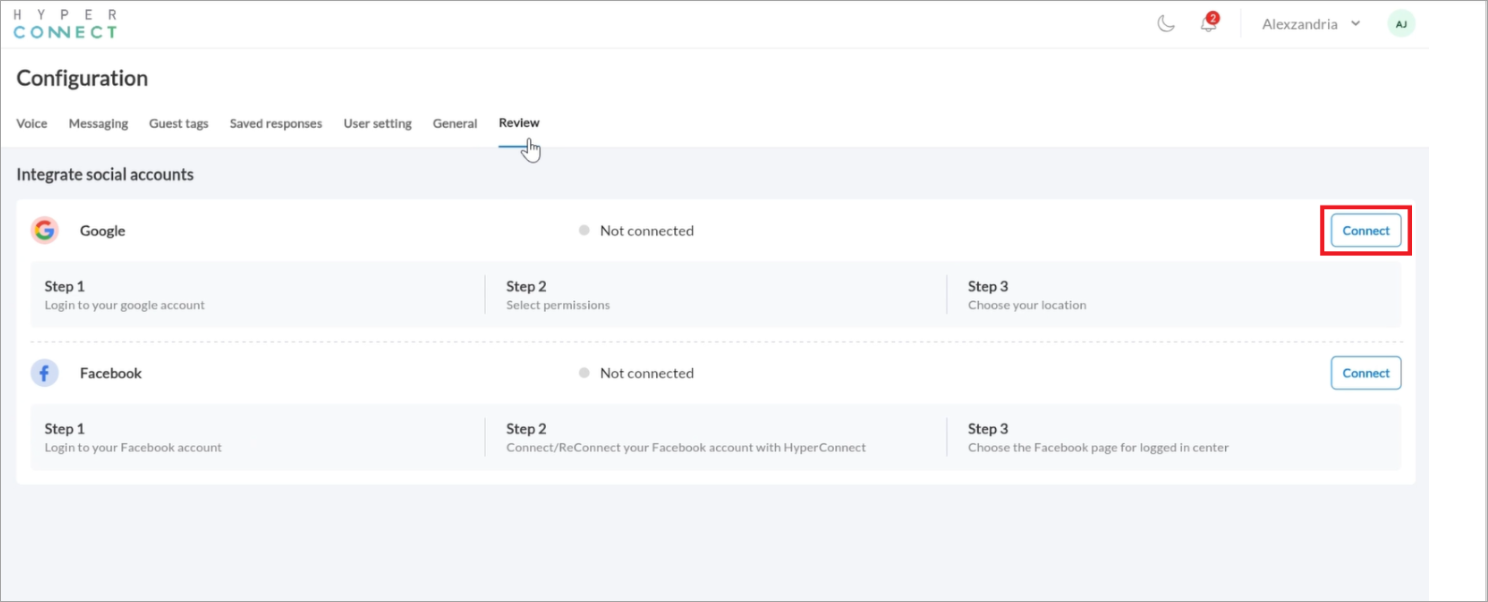
Save changes; updates are auto synced with Google within minutes.
For more information, refer to the Managing Business Listings Using HyperConnect article.
Salon/Spa Business Owners, Center Managers
The Smart Response feature powered by Zeenie enables businesses to respond to guest reviews with professionally drafted, AI-generated messages. By automatically analyzing review sentiment and star ratings, Zeenie crafts personalized replies that save time, ensure consistency, and improve brand perception across locations.
Responding to reviews is vital for reputation management, but it often gets delayed or lacks personalization. This enhancement lets staff instantly generate response drafts using Zeenie AI, adjust tone and length, and post or edit replies within seconds. It helps teams deliver consistent, timely, and brand-aligned communication, reinforcing trust and customer loyalty.
How to use:
Navigate to Reviews in the left pane and select a customer review.
Click Try Smart Responses powered by Zeenie, then choose Tone and Length.
Review the AI-generated message, edit if needed, and click Post to publish.
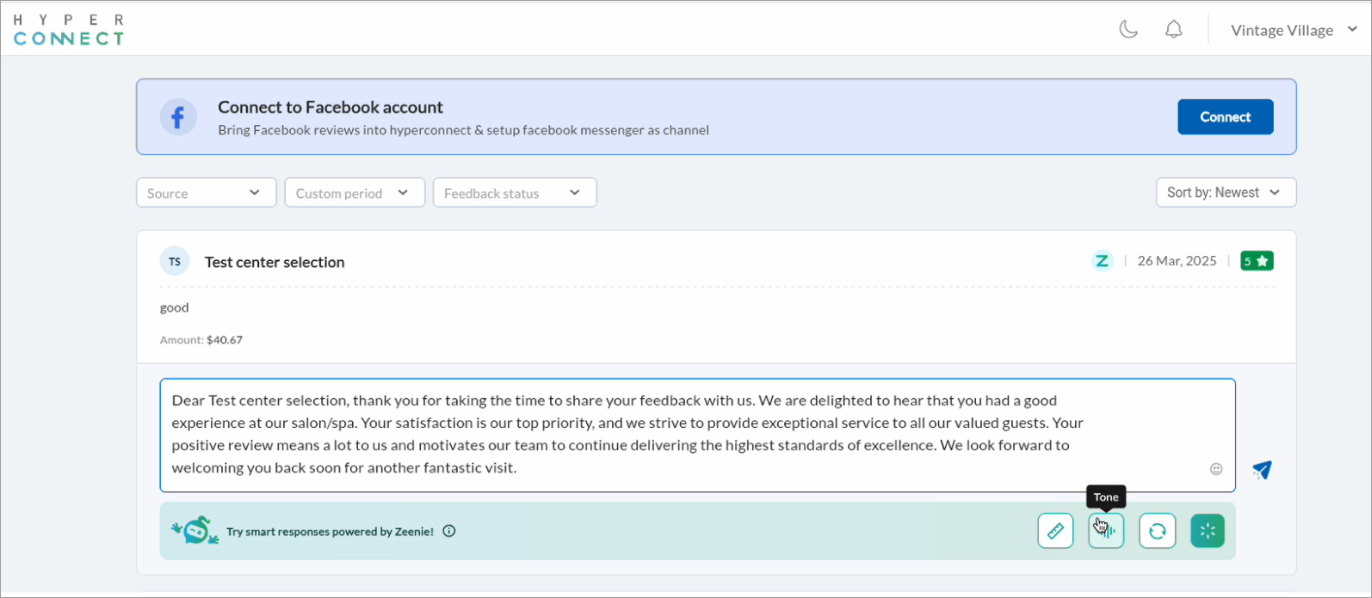
Learn more: For more information, refer to the Generate Smart Responses with Zeenie article.
Additional Resources
This section includes recently published patch release notes and a comprehensive up to date glossary for your reference.
Document type | Release date | Significant enhancements |
|---|---|---|
February 18, 2025 | ||
March 18, 2025 | ||
April 08, 2025 | ||
April 08, 2025 | A few key terms related to the new features introduced in this release have been added. |