Print barcode labels
After configuring barcode print settings for your center, you can print barcode labels for individual products or products in a purchase order. Once the purchase order is created, when it transitions to raising the purchase order, you can proceed to print the barcodes.
Important
You can print barcode labels only for products that have a barcode assigned.
Print barcode labels for individual products
Insert a sheet of adhesive labels or paper that is supported by the barcode print settings of your center.
At the center level, click the Master data icon.
Navigate to Products.
Choose the product you want to print barcode labels for and then click Print.
Based on the requirements, do the following:
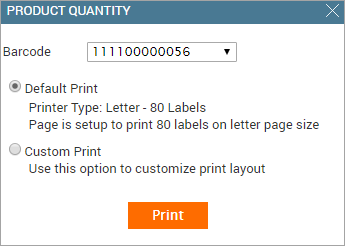
Barcode: This field lists all the barcodes associated with the product. Verify the accurate barcode from the listed options to be printed on the barcode labels.
Default Print: To the barcodes as per the default print format set up for your center, select this option (if not already selected).
In the screenshot above, the center is configured with Letter (80 Labels) - Avery 8167 print format. If you proceed with this option, Zenoti prints 80 barcodes (along with product name, code, and price) on Avery 8167 labels.
Custom Print: Ton optimize partially used barcode label sheets by selecting a specific starting row and column for printing as well as the number of labels to print, select this option.
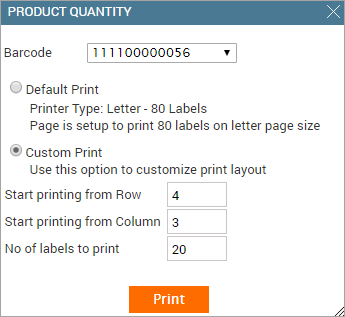
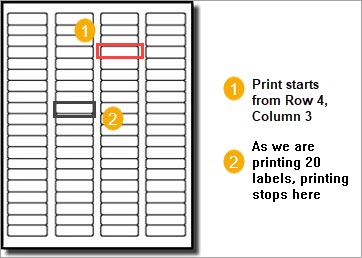
If you print with the above custom settings, for example, on an Avery 8167 labels sheet, the labels are printed as follows.
Click Print.
Based on the barcode print settings you have set for your center, set the paper size to one of the following:
Regular (65 labels): Set Paper Size to A4
Regular (65 labels) - Avery L7651: Set Paper Size to A4
Letter (80 labels) - Avery 8167: Set Paper Size to Letter
Label Printer: Set Paper Size to A4
Set the margins to None and click Print.
The barcode labels are printed.
Setting Margins to None in Chrome
Setting Margins to None in Firefox
Print barcodes for products in purchase order
Zenoti allows you to easily print barcode labels for all the products in a purchase order without you having to individually select products and specify the print quantity.
Example: If you have received a purchase order with 30 Green Tea Shampoos and 20 Green Tea Conditioners. Now, when you print barcodes for this purchase order, Zenoti prints a total of 50 labels - 30 barcode labels for Green Tea Shampoo and 20 labels for Green Tea Conditioner.
Insert a sheet of adhesive labels or paper that is supported by the barcode print settings of your center.
At the center level, navigate to Inventory > Orders.
Click Print Barcodes.
Select from the available product types:
All (default)
Retail only
Consumable only
Note
The selected option determines which product labels are printed. Only single selection is allowed. For example, when a product is tagged as both retail and consumable, and you select print for Retail only, only the retail portion of the product gets printed.
Based on the requirements, do the following:
Barcode: This field lists all the barcodes associated with the product. Verify the accurate barcode from the listed options to be printed on the barcode labels.
Default Print: To print the barcodes as per the default print format set up for your center, select this option (if not already selected).
Custom Print: To utlize a partially printed sheet of barcode labels or if you don't need to print an entire sheet of barcodes, select this option. You can specify the starting row and column for printing, allowing you to print barcodes on the unused labels.
Based on the barcode print settings for your center, set the Paper size to the following:
Regular (65 labels): Set Paper Size to A4
Regular (65 labels) - Avery L7651: Set Paper Size to A4
Letter (80 labels) - Avery 8167: Set Paper Size to Letter
Label Printer: Set Paper Size to A4
Set the Margins to None and click Print.
Setting Margins to None in Chrome
Setting Margins to None in Firefox