Display
Configure provider booking and display order
Configure provider booking and display order In busy locations, it may be helpful to control the order in which providers appear. This affects both provider prioritization for bookings (in the Booking Wizard and Webstore) and the display order in the Appointment Book. A consistent order makes it easier for staff and guests to find the right provider quickly.
Required roles: Administrator, owner
Required permissions: None
Configure provider order for bookings
At the center level, click the Configurations icon.
Search for and select the Define the order in which providers must be prioritized for bookings setting.
You can choose between booking the provider with lowest utilization first, or you can customize the order.
If you choose Custom, click Configure and reorder the list of therapists as you want.
Click Save.
This order is applied when a booking is being made via the Booking Wizard or the Webstore and the guest has not requested for a specific provider.
Configure provider display order
At the center level, click the Configurations icon.
Search for and select the Specify the display order for therapists setting.
Select the desired order: by name, job, schedule, booking value, or custom.
If you choose Custom, click Configure and reorder the list of providers as needed.
Click Save.
This order controls how providers are shown in the Appointment Book.
Considerations
If both Specify the display order for therapists and Define the order in which providers must be prioritized for bookings are set to Custom, the same provider order is applied for bookings and display on the Appointment Book.
The Custom option lists active providers for this center and employees deputed to this center as of that day. Any new employees that are added or newly deputed will appear last in the list.
Set number of commonly used services during booking
Select the number of most commonly booked services to show in Booking Wizard, Appointment Panel, Queue and ZMA. This allows your front-desk staff to quickly access the list of popular services when booking an appointment.
At the center level, click the Configurations icon.
Search for and select Number of most commonly used services to show during service selection.
From the dropdown list, select a number.
Click Save.
Customize job cards details
Businesses can customize both the format and content of job cards to suit their operational needs and maintain guest confidentiality.
Required roles: Any role with access to the Administrator mode
Required permissions: None
At the center level, click the Configurations icon.
Navigate to Appointment and Queue management → Interface → Display.
Scroll to the Custom job card details section.
Under Printer size, choose how job cards should be printed:
Receipt: Prints job cards in a receipt-sized format
Regular – A4 size: Prints job cards in an A4 layout
Configure the job card details you want to include by turning the following settings on or off.
Job card details
Description
Guest’s visit details
Enable this to print the guest’s visit details, including first visit date, total visits, and service and product history for the last three visits.
Guest's future appointments
Enable this to print details of services booked by the guest for their next three visits.
Appointment notes
Enable this to print notes for services booked during the guest’s last three visits.
Guest notes
Enable this to print the last five guest notes.
Include private notes
Enable this to print private notes on the job card (only for employees with permission to access private notes).
Include guest notes shown for Appointment Book operations
Enable this to print guest notes shown during appointment book actions such as opening the guest profile, check-in, booking, and taking payment.
Guest contact information
Enable this to include guest’s contact information.
Click Save.
Note
If you want to hide any of these details from the job card, turn off the corresponding toggle. These changes apply to both job cards from past and future appointments.
Configure guest profile display mode
This setting allows centers to define how the Guest Profile opens when launched from the Appointment Book. By setting a default display mode, staff experience a consistent and predictable layout when accessing guest details from appointment blocks or the search bar.
Required roles: Administrator, Owner, Manager Required permissions: None
Toconfigure the guest profile display mode:
At the organization or center level, click the Configurations icon.
Search for and select Appointment and Queue Management.
Turn on the New guest profile toggle.
Under Guest Profile Display Mode, choose one of the following options:
Compact View: Opens the guest profile in a compact side panel.
Expanded View: Opens the full guest profile in a slide-out panel.
New Window: Opens the guest profile in a separate window.
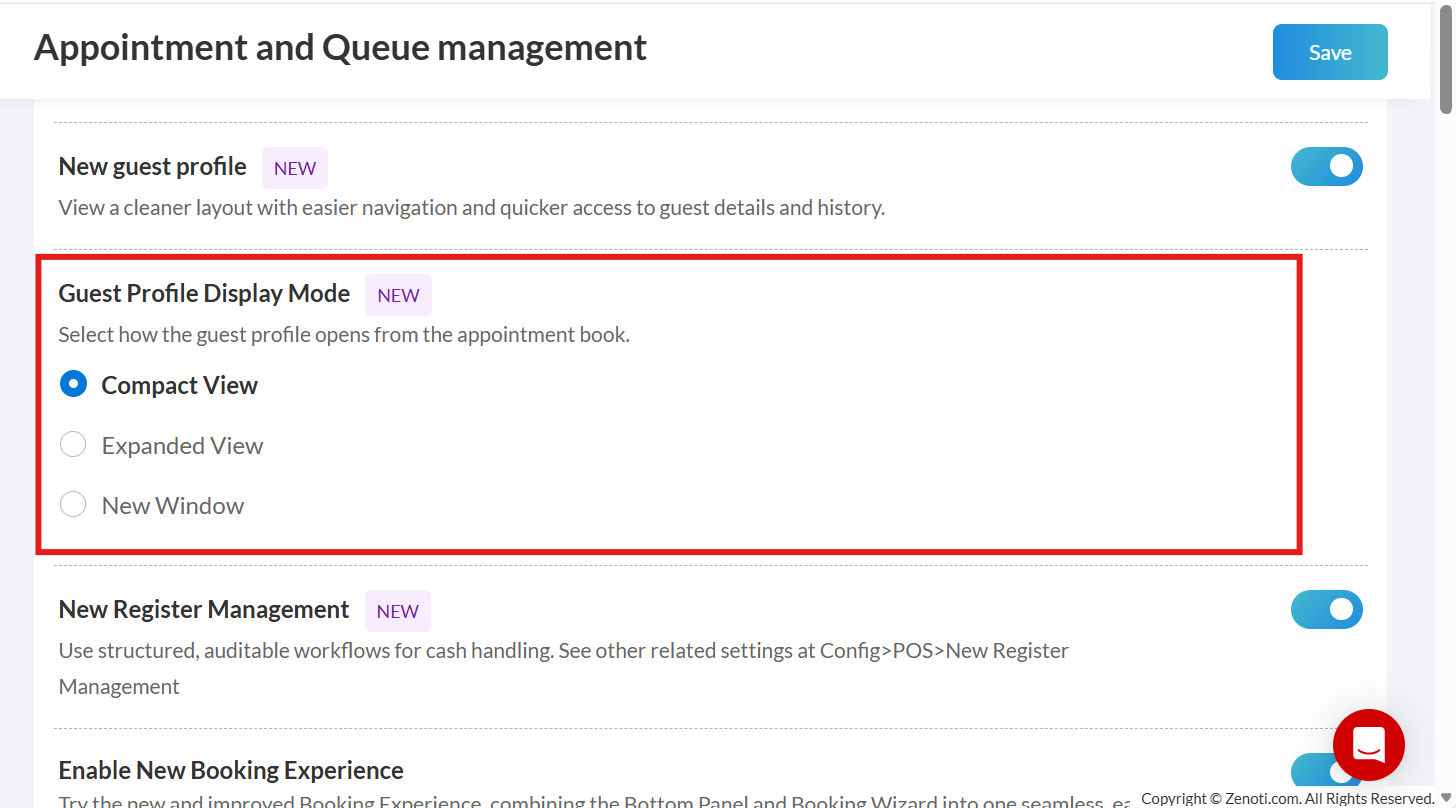
Click Save.
Once configured, when staff open a guest profile from the Appointment Book, it will open using the selected display mode.
Select default mode for Booking wizard
You can set the default mode of the Booking wizard to Basic or Advanced mode.
At the organization level, click the Configuration icon.
Search for and select the When editing an appointment, open the Booking wizard in:
Select the desired option either Basic mode or Advanced mode.
Click Save.
Impacts and considerations:
This setting becomes available when the Enable Advanced mode in booking wizard setting is enabled.
If the Recovery time optimization setting is activated, the wizard will open in Basic mode; you cannot switch to Advanced mode.
Always show calendar on booking wizard
Show the calendar always on the booking wizard for easy access. It also helps front-desk staff and guests quickly see which therapists are available and the open time slots.
At the center level, click the Configuration icon.
Search for and select Always show calendar on booking wizard.
Enable the setting.
Click Save.
Enable booking and payment in booking wizard
Enable this setting to allow front-desk staff to book services and take payments directly from the booking wizard.
At the center level, click the Configuration icon.
Search for and select Enable booking and payment in Booking wizard setting.
Enable the setting.
Click Save.
If you do not want to enable booking and payment in the booking wizard, turn off the setting.