Manage gift cards
Tip
You can view the details of all the gift cards that the guest purchased for herself and received from others. You can also edit the expiration date and balance of a gift card from this page.
View gift cards that a guest purchased or received
On the guest profile, click the Gift Cards tab.
To view a list of gift cards the guest purchased, see the Purchased History section.
To view a list of gift cards the guest received, see the Received History section.
To view the invoice details. from Purchase History or Received History, click the invoice number from Invoice No.
To view further details such as the amount paid, who redeemed, from where, from Purchase History or Received History, click the gift card Code.
View gift card details from Appointment Book
You can quickly check the details of a gift card of a guest from the Appointment Book. You can view details such as the gift card number and type, buyer and recipient name, price and value of the card, sold date and expiry date, and the redeemed and balance amounts.
From the redesigned Appointment Book and select Pre-paid/Gift Card Details from the context menu.
Pre-paid/Gift Card details window appears.
In the Code field, enter the gift card number, and click Show.
The card details appear.
You can view the following information:
Card Type and Number: Shows 'Amount Gift Card' if the gift card is purchased to gift a certain amount; shows 'Service/Package Gift Card' if the gift card is purchased to gift a service and/or a day package. Card number appears beside the card type.
If the guest purchased the gift card for self, the card shows Bought by field. Bought by: and shows the name of the buyer. Click the name to view the guest profile.
If the guest purchased the gift card for others, the card shows From and To fields.
From: Shows the buyer's name. Click the name to open the guest profile.
To: Shows the recipient's name.
Balance: Displays the redeemable amount of the gift card.
Status: Shows 'Available' for the cards that are still within the validity period. The status shows 'Expired' if the card has reached the expiry date.
Note
For the cards that never expire, the status always shows 'Available'.
Activation: Displays the activation date of the card.
Expiry Date: Displays the expiry date of the card.
Note
If this field displays "Never Expires", it means your center sells gift cards that never expire.
Occasion: Shows the occasion of gifting the card.
Note
Occasion appears only if it was selected (in the Recipient window) at the time of gift card sale.
Notes: shows the notes entered by the front desk, at the time of gift card sale in Zenoti web POS.
Services/Packages Included: The field appears only for Service/Packages gift cards. Shows the list of services or day packages bought by the guest, as part of the gift card.
Click Book to book the appointment for the service or day package.
The Appointment Info panel opens for you to create an appointment.
View bonus gift card details
Using the Pre-paid/Gift Card Details page from context menu, you can view the bonus gift card details.
In the Code field, enter the bonus gift card number and click Show.
Bonus gift card details appear.
The details show Buyer of the card, Balance in the card, Status, Expiry Date, whether the card expires after single use (only if the Expires after Single Use checkbox is selected during the gift card sale), and Redemption history of the card.
View gift cards purchased and received history
From the guest profile, you can view the history of all the gift cards purchased and received by the guest. You can also edit the expiration date and balance of a gift card from this page.
Navigate to the guest profile and click the Gift Cards tab.
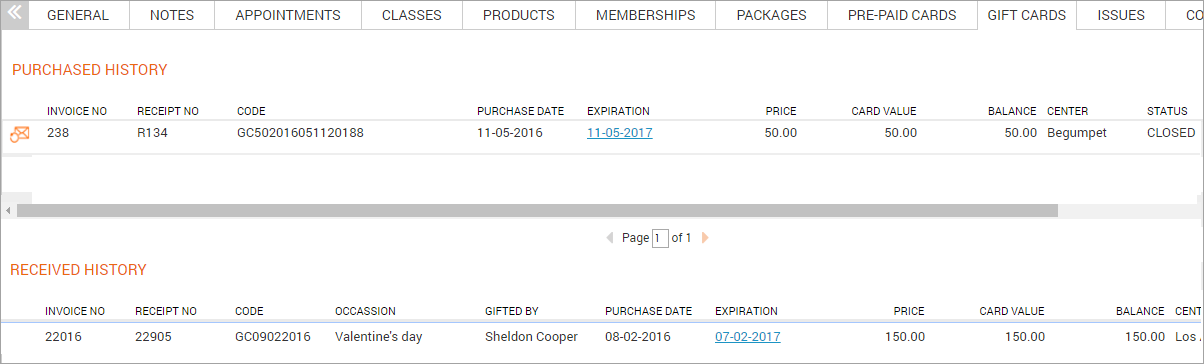
Field | Description |
|---|---|
Invoice No | Click the hyperlink to view the gift card purchase invoice details. |
Receipt No | The receipt number generated on the purchase of the gift card. |
Code | The gift card number. The card number is typically a code associated with the gift card. The front desk or guest can use this code to redeem a gift card, check the balance, or view other gift card details. |
Expiration date | Displays the gift card expiry date. If the expiry is “Never Expires”, it implies that the gift card was sold without an expiry. |
Note | This field is editable. However, the expiry date cannot be edited for cards that do not expire (“Never Expires”) and for one time use cards. |
Price | This field displays the price of the gift card. Price is the amount for which the gift card was sold to the guest (excluding taxes, if any). |
Card Value | This field displays the value of the gift card sold. This will be of a higher amount if the value and price are different. |
Balance | This field shows the existing card balance. It displays the current balance based on the value of the card. |
Center | Displays the center name where the gift card was purchased. |
Status | The status of the invoice (Open or Closed). |
Notes | Displays the notes entered pertaining to the gift card at the time of sale in the POS. |
Services | Displays the services associated to the gift card purchase. This is applicable for Service gift cards only. |
Change the expiration date of a gift card
On the guest profile, click the Gift Cards tab.
In the Purchase History section or in the Received History section, from the Expiration column, click the date link and select a new date from the calendar.
Note
To access a gift card from the Appointment Book, navigate to the far right of the appointment view and click the three vertical dots (⋮). Click Prepaid/Gift Card Details. In the Enter Code field, enter the gift card number provided by the guest, and then click Show.
Edit a gift card balance
There are times when you may need to edit the gift card balance to retain a guest or upsell a new service. For instance, when a service does not meet the guest expectations, you could compensate it by increasing the gift card balance.
However, editing the balance is not just restricted to these scenarios - it could be for any reason your center may think apt as a resolution for the guest.
Organizations usually restrict the rights to edit a gift card balance to the manager role.
Before you begin
The gift card details get stored under the card purchaser’s name, and not under the recipient’s name. So, when you need to edit the gift card balance, search for the card under the purchaser’s name.
Use one of the following methods to edit the balance of a gift card:
In situations when the guest is unable to provide the gift card number, you can ask a staff member with the required permission (by default, the owner role has the permission enabled) to look up the number from the guest profile.
Note
If the gift card number in the Code field is masked, then you must first obtain the gift card number from the guest, click the Code field, and then enter the gift card number. Only then will you be able to edit the gift card expiry date.
Navigate to the guest's profile and click the Gift Card tab.
The history of all the gift cards purchased and received by the guest appears.
Click the card balance amount that you want to edit.
Note
If you do not see the balance as a link, it means that you do not have the required permission to edit the balance.
In the Update Gift Card Balance window, enter the new balance.
You must enter the total amount after you have added the new balance to the existing balance.
Example: If the existing balance if $100 and you add $50 to it, then you must enter $150 in the new balance field.
Note
If the price and value are different, then the new balance is added to the value of the gift card. The price of the card does not change.
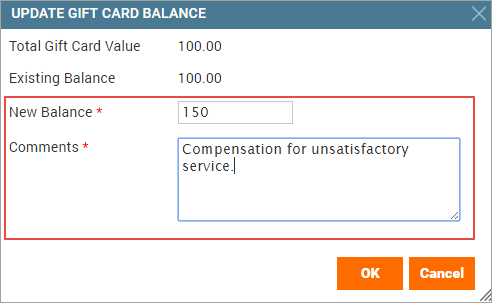
In the Comments field, add any useful notes.
Click OK.
The gift card balance is updated and you can now view the modified gift card balance when taking the payment in the POS window.
Open the Appointment Book and navigate to the far right of the appointment view and click the three vertical dots (⋮).
Click Prepaid/Gift Card Details from the context menu.
The Prepaid/Gift card details window opens.
In the Enter Code field, enter the gift card number provided by the guest, and then click Show.
The Prepaid Card/Gift Card Details window opens.
To learn more about the other fields in this window, read: View Gift Card Details from the Appointment Book.
Note
In cases where the guest is unable to provide the number, you can ask a staff member with the required permission (by default, the owner role has the permission enabled) to look up the complete gift card number from the guest’s profile.
Click the balance link beside the Balance field.
The Update Gift Card Balance window appears.
Enter the new balance.
You must enter the total amount after you have added the new balance to the existing balance.
Example: If the existing balance if $50 and you add $50 to it, then you must enter $100 in the new balance field.
Note
If the price and value are different, then the new balance is added to the value of the gift card. The price of the card does not change.
In the Comments field, add any useful notes.
Click OK.
The gift card balance is updated and you can now view the modified gift card balance when taking the payment in the POS window.
View gift card log
You can see a log of all changes made to a gift card in the guest profile and the gift card look-up screen.
From the redesigned Appointment Book, search for the guest.
Click the guest's name.
Go to the Gift Cards tab.
Locate the gift card for which you want to view the details.
Click the log icon.
The gift card log window opens.
The gift card log shows the following details:
Action performed
Old value of the gift card
New value of the gift card
Comments associated with the action
Username of the person who performed the action
Modification date
Center name
Other actions
Action | Perform these steps | Notes |
View the recipient of a gift card |
| |
Resend gift card email |
| |
Check whether the card is a service or an amount gift card |
| You can see the services covered by a Service/Package gift card from Purchase History, from the Item column and from Received History, from the Services column. |
Check who gifted a card |
|
Edit a gift card number
To edit the gift card number from the Online Gift Card Status report, follow these steps:
Navigate to the Online Gift Card Status report.
To edit the gift card number in the corresponding Status column, click New.
From the Gift Card Number field, edit the number as required.
Click Save.