Set up and manage levels for employees
Levels let you classify employees by expertise or seniority — for example, Junior Stylist, Senior Stylist, or Master Stylist — so that guests can book by expertise tier instead of by individual provider name. Levels are especially useful for institutes (where students perform services and the same provider is rarely available for repeat visits) and for businesses that price services by provider seniority. Levels are off by default. This article explains how to enable them for your organization, create and manage Levels at the org level, view Levels at the center level, and assign a Level to an employee.
Before you begin
You must have permission to enable organization-level settings.
You must have Create Levels and Edit Levels permissions to manage Levels. See Default security roles and permissions.
To assign a Level to an employee, you need View permission on Employee Manager and Edit permission on General Settings.
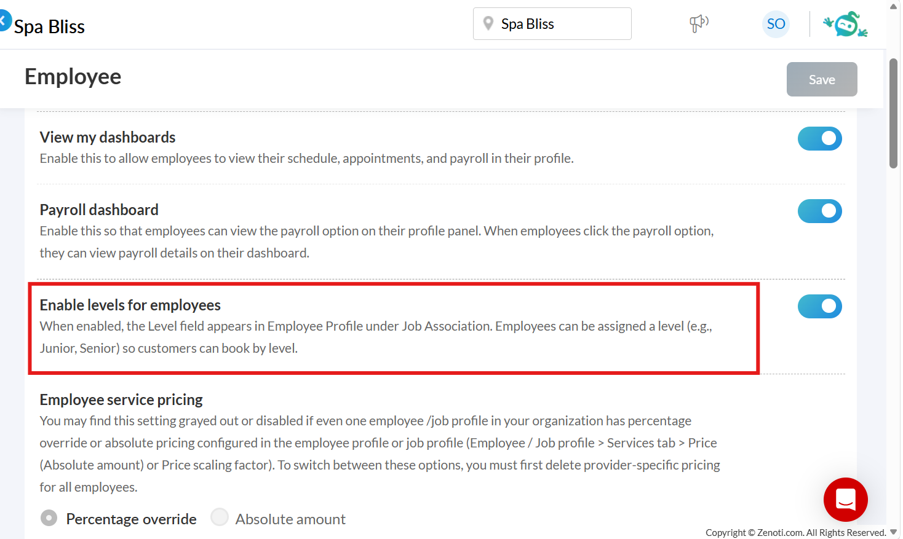
Enable Levels for your organization
At the organization level, click the Configuration icon.
Go to Employee.
Under Essentials, turn on the Enable levels for employees toggle.
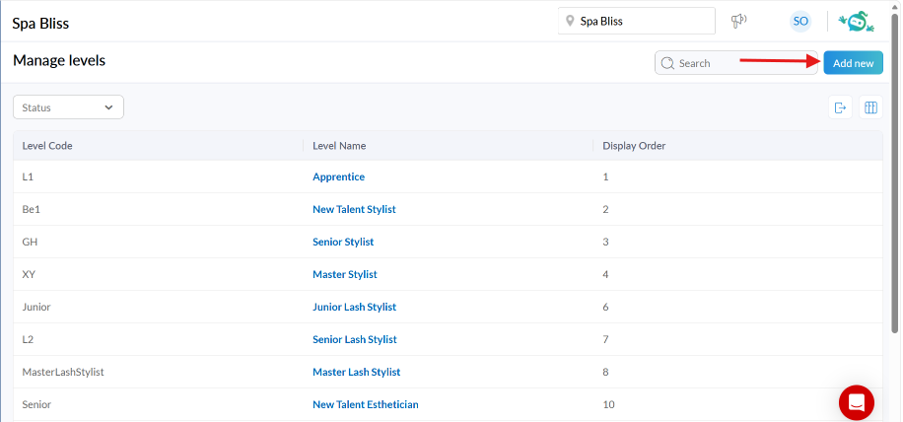
Create a Level at the organization
At the organization level, click the Employee icon.
Click on Levels next. The Manage levels page opens.
Click Add new.
On the General tab, enter the following:
Field
Mandatory?
Description
Level Name
Yes
Display name for the level (for example, Senior Stylist).
Level Code
Yes
Short code that identifies the level uniquely.
Description
No
Optional notes about the level.
Display Order
No
Order in which the level appears in lists. If left blank, levels are sorted alphabetically
Click the Centers tab. From the dropdown, select the centers you want to associate this level with.
Click the Employees tab to review the employees currently assigned to this level. This tab is read-only. You can filter the list by center using the Center Filter dropdown, but you cannot add or remove employees from this view. Level assignment happens on the employee profile (see Step 4).
Click Save.
The new Level appears in the Levels table on the organization-level page and on the center-level page for each associated center.
Manage existing Levels
At the organization level, on the Manage levels page, you can
Search and filter Levels by name or code using the search bar at the top.
Sort and paginate the table the same way as on the Jobs page.
Edit a Level by clicking its row, updating any of the three tabs, and clicking Save.
Export Levels to Excel or CSV. The export includes Level Code, Level Name, and Display Order.
Assign a Level to an employee
At the organization or center level, click the Employee icon.
Select Employees and open the employee's profile.
On the General tab, scroll to Job Association.
From the Level dropdown, select a level.
Note
The dropdown shows only the levels associated with the centers this employee is assigned to. An employee can have one level at a time. This field is optional.
Click Save.
The change is captured in the employee audit trail.
View Levels at a center
At the center level, the Manage levels page shows only the Levels associated with the current center.
At the center level, click the Employee icon.
Go to Employees > Levels.
The page is read-only — all Level creation and edits happen at the organization level. You can still search, filter, sort, and paginate the table.
How Level permissions work together
Levels use two new permissions in combination with existing permissions:
Action | Permission required |
|---|---|
Create a new Level | Create Levels (Employee Manager > Levels) |
Edit an existing Level | Edit Levels (Employee Manager > Levels) |
See the Level assigned on an employee profile | View (Employee Manager) |
Assign or change a Level on an employee profile | Edit (General Settings) |
A role that should fully administer Levels needs all four. See Default security roles and permissions for how to add these to a role.