Create forms using Form Builder
With the form builder, you can create forms or charts quickly and easily, using simple drag-and-drop actions.
At the organization level, click the Configuration icon.
Search for Custom forms, and under Forms, select Custom forms. The current list of forms is displayed.
Click Add.
Enter general details of the form
Perform these steps under the General tab
Enter the name and code of the form.
From the Form type list, select the type of form you want to create.
The fields after this field may vary depending upon the type of the form.
From the Create form using list, select Form builder.
From the Form Validity drop-down list, select the expiry option you want to apply to the form.
If you are creating a Guest form, select the number of days after which the form outdates. Once the form outdates, an 'Outdated' banner is displayed at the top of the form.
Select whether your form requires a review.
If you are creating a Guest form, here choose whether you want to display the guest form on Webstore.
Note: This option only controls whether the guest form appears in the guest’s profile on the Webstore. Guests can still access and fill out the form through a notification link, even if it's not shown on the Webstore.
Choose whether you want to make this form read-only for guests.
Select whether data from an old form can be copied to this form.
To set up the form-related general details in other languages, click the Localization icon, select one of the languages from the pop-up, and enter the respective language translation for phrases in your form.
Click Save & Proceed.
Note: You can also enable a form as 'read-only' for guest by navigating from the organization level:
Configurations > Forms > Custom forms > Open the form which you want to access through CMA > General tab > Enable 'Make this form read-only for guests (applies to Webstore and CMA)' > Save.
Design the form using form builder components
Perform these steps under the Design tab
From the form list, under the Sample tab, select a sample form, or a blank form.
To use a form that you created recently, from the Recent tab, select a form.
The Sample and Recent tabs display forms according to the type of form selected while creating the form.
For example, while creating a new form, you select the form type as membership, then the form list (Sample and Recent tabs) will only display membership forms.
Only the forms created using form builder can be edited using form builder. HTML or V1 forms cannot be edited using the form builder.
Click Use form.
To add fields to the form, from the Tools list, drag components onto the form.
To customize a component, place the mouse pointer on the component and click the Edit button.
Click Save.
After you finish building the form, you must select one of the following options:
Save
Save and close: Saves the form and redirects you back to the Manage custom forms page.
Close without saving: Redirects you back to the Manage custom forms page without saving the form.
Points to remember
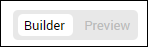
You can preview the form by using the Builder - Preview toggle.
By default, the preview is in desktop mode. However, you can also preview in mobile and tablet modes.
To automatically update the guest profile using the responses on this form, you must build the form with the components under the Guest info and Guest address sections.
Note: The sections Guest info and Guest address may be named differently depending on the label for "Guest" configured at the organization level.
To enhance performance and user experience, consider creating shorter forms. Aim to keep the form content within the following guidelines:
Limit to less than 10 panels.
Use no more than 5 tables or annotation pads.
You cannot export or print completed forms created using the form builder. However, you can export or print forms built in HTML format.
Assign reviewers to forms
This section explains how providers can assign reviewers, if required, while creating forms.
Overview
If a custom form requires review, providers can assign a reviewer before submitting the form. This ensures clear ownership, streamlines the approval process, and supports timely reviews and follow-ups.
Prerequisites
To allow providers to assign reviewers:
At the organization level, go to Configuration > Forms.
In the Forms settings section, enable the Allow assigning reviewers to forms toggle.
Note
This setting only applies to forms marked as requiring review.
Assign a reviewer before submitting a form
After filling out the form and before submitting it, the provider can assign a reviewer.
From the Select Reviewer drop-down list, select the reviewer.
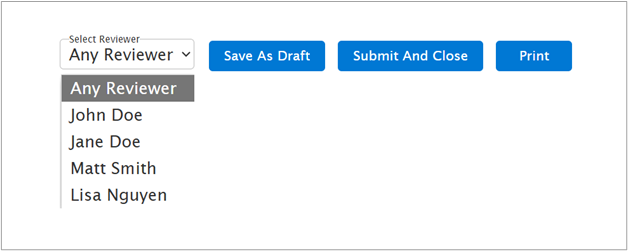
Tap the Select Reviewer drop-down list.
Select the reviewer from the drop-down list.

Note
The Select Reviewer dropdown only lists employees who have the Forms Review permission at the center where the appointment is scheduled.
If the provider has a supervising employee with Forms Review permission, they are selected by default as the reviewer. If not, the reviewer field defaults to Any Reviewer.
View and edit forms data
You can view form data at the center or the organization levels. However, only certain form fields can be modified at the center level.
To view or modify forms data, at the center or organization level click the Configuration icon.
Search for and select Custom forms under the Forms Creation module of Forms section.
Select the required custom form to view to modify from the list of available forms.
To modify guest forms, click Manage Guest Form link on the Custom Forms page.
Enable permissions to view and edit forms data
You need to have required permissions set at Security to be able to view and edit forms.
To enable permissions, from the Organization level:
Navigate to Configurations.
Select Security.
Click Security roles.
Select a role.
Click Permissions tab.
Hover over Appointment book and click Collapse all/Expand all.
Scroll down and locate ServiceCustomData.
Select the checkbox against View or Edit as per the role requirement.
View: Can only view forms.
Edit: Can view and edit forms.
Forms Review: Can review forms as well. For example, if you want to authorize a therapist who is also a qualified doctor to review forms, you need to enable the Forms Review option. In this case, any form the therapist fills out will have its status marked as "Reviewed" after submission.
Unlock Forms: Forms are automatically locked based on the criteria set at the organization level. If the Unlock Forms option is enabled for a role, only users with that role's permission can unlock forms for editing.
Click Save.
Alternatively, security role permissions can be set at the Job level as well. This enables you to manage employee access to forms.
To enable permissions, from the organization level:
Navigate to Configurations.
Select Forms.
Click Custom forms.
Select a form.
Click Permissions tab.
Select a Job from the dropdown.
Select Permission from the dropdown.
View: Can only view forms.
Edit: Can view and edit forms.
Click Add.
Note:
Permissions set at Custom forms level will override the permissions set at Security level.
At Custom forms level, permission that is set is applicable to the form you select. It is not a blanket application for all forms. For each form, permission needs to be set.
Custom form settings are not applicable to Guest forms.
For Guest forms, from the Organization level,navigate to:
Configuration > Security > Security roles.
Select a Role and click Permissions tab.
Hover over Guest Manager and click Collapse all/Expand all.
Select View or Edit or both for GuestCustomData.
Click Save.
Considerations
You can only add or create forms at the organization level.
You cannot modify the Form type and Create form using fields after a custom form is created.
There is only one guest form and one loyalty form per organization. If you already have those forms in HTML or V1 formats, you cannot create them again using Form Builder.
If you dissociate the existing HTML form and associate the new form builder form with the service, Zenoti considers the forms as two different forms as data does not flow between the two forms.
When editing a form, removing and re-adding a component clears any prefilled data.
To use a form you must associate it with Services, Packages, or Memberships.
To use Form Builder forms in Webstore, you must have Webstore v2 enabled for your organization. To enable Webstore v2, contact Zenoti Support.