Release Notes - June 17, 2025
Revision History
The table below lists the updates made to this document after the initial software release, including details of revisions made.
Date | Feature/Module Name | Section | Change Description |
|---|---|---|---|
06-26-2025 | Zenoti Integrated Payroll (ZIP) | Added Release Notes snippet | |
06-24-2025 | HyperConnect | Streamline call handling with Phone Tree (IVR) in HyperConnect | Added Release Notes snippet |
06-24-2025 | HyperConnect | Added Release Notes snippet | |
06-24-2025 | HyperConnect | Added Release Notes snippet |
We’ve enhanced the structure of our release notes to better serve your needs. Updates are now categorized under clear headings based on Add-ons, Core Product, Product Edition, Personas, and Modules.
This new format ensures you can quickly find updates most relevant to your role, understand the value each change delivers, and seamlessly adopt new features or enhanced workflows.
This Release Notes contains the following sections:
Announcements: Key updates and important information related to the release.
New Features: Newly introduced functionalities designed to enhance the product experience.
Enhancements: Improvements made to existing features for better usability and performance. Categorized features as Core Product, Product Editions, and Add-ons.
Additional Resources: Links to supporting materials such as guides, training, and documentation. This also includes references to the release notes for the patches included in this update.
Icons used in this document
Icon | Description |
|---|---|
 | Automatic update for all users. |
 | Localization available. |
 | Employee: Enhancements or features for employee and payroll. |
 | Admin: Features specifically enhanced for admin users who manage the system configuration, including user roles, permissions, and system integrations. |
 | Business Owner/Center Manager: Updates implemented for the business owners or managers who are responsible for overall business strategy, growth, and decision-making. |
 | Front Desk Operator/Service Provider: Features that enhance the usability for front-desk staff who handle appointments, customer queries, payments, and guest interactions. |
 | Guests: Improvements made for the end-users or customers of the business who interact with Zenoti through online booking systems, self-service kiosks, and branded mobile apps. |
Announcements
Module: Admin
Front Desk Operators/Center Managers
To ensure data security and comply with PCI DSS 4.0, Zenoti now blocks users from entering credit card numbers in the guest notes field. Zenoti can now automatically detect and prevent any credit card number formats—whether entered manually or through data imports—from being saved in guest notes. Zenoti has added smart validations using card pattern checks to stop sensitive card data from being stored.
Note
PCI DSS 4.0 is the newest standard version developed by the Payment Card Industry Security Standards Council (PCI SSC). It establishes a baseline standard for technical and operational requirements to keep sensitive account data secure as it is used and transmitted throughout the payment processing ecosystem.
Module: Online Booking
Business Owners, Guests
Zenoti Webstore now supports deep links for couple services. A deep link is a URL that takes guests directly to a specific service or booking flow—instead of starting from the homepage. When guests click on a deep link for a couple service, the Webstore now opens in Couple Booking mode, capturing information for both guests.
Previously, deep links opened a booking flow that only supported appointments for one guest (self). With this enhancement, guests can now book as self, couple, group, or family, even when using a direct deep link.
Learn more: For more information, refer to the Admin tasks for deep linking article.
Module: HyperConnect
Feature Released: May 20, 2025
Administrators, Business Owners
We’re excited to announce the release of Key Insights Analytics—a major enhancement to the HyperConnect module that redefines how businesses identify and act on opportunities for growth.
Traditionally, uncovering customer behavior required hours of manually reviewing call recordings or combing through fragmented data. Key Insights Analytics delivers real-time, actionable insights from your customer conversations, enabling you to make data-informed decisions that drive revenue and improve service quality.
Spot what guests love: Identify the most frequently mentioned services, best-performing gift card campaigns, and popular add-ons. These insights help you double down on what’s already working and craft targeted promotions based on guest preferences.
Pinpoint common guest frustrations: Understand recurring issues that negatively affect customer experience—such as long wait times, agent inefficiencies, or overly aggressive upsell attempts. Use these insights to fine-tune staff training, optimize scripts, and improve response strategies.
Track missed revenue opportunities: Reveal gaps where your business is losing potential revenue—whether it’s a service that wasn’t booked, an upsell that wasn’t suggested, or a gift card promotion that went unnoticed. These insights help you recover lost sales and refine your customer engagement process.
Learn more: For more information, refer to the Key Insights Anlaytics article.
Feature Released: May 27, 2025
Administrators, Business Owners
The AI-Generated Review Summary in HyperConnect transforms how you engage with customer feedback—making sentiment analysis faster, more intuitive, and deeply actionable.
Traditionally, sifting through hundreds of reviews to spot trends or pinpoint recurring themes was a time-consuming task. With this new capability, AI does the heavy lifting for you by automatically scanning reviews and generating an interactive word cloud of key terms and topics.
How it Works:
The word cloud dynamically highlights the most commonly used words and phrases from customer reviews. Each term reflects a recurring sentiment or theme—whether it’s praise for a specific service, concerns about wait times, or frequent mentions of staff performance. With just a click, you can:
Instantly filter reviews by any word in the cloud.
Dive into specific feedback clusters. For example, all reviews mentioning “cleanliness” or “front desk”).
Identify trends, spot emerging issues, and highlight what customers value most.
Why It Matters:
Whether you're a frontline manager or part of the corporate team, the AI-generated summary accelerates your ability to identify strengths and areas for improvement. It helps you stay ahead of service issues, recognize staff excellence, and fine-tune customer experience strategies—all in less time.
Learn more: For more information, refer to the AI-Generated Review Summary article.
Module: Reports
Business Owners
To simplify reporting and drive consistency, we are initiating the structured deprecation of V1 reports. Coexistence of V1 and V2 reports has resulted in duplication, inconsistent definitions, and confusion. V2 reports offer advanced flexibility, greater accuracy, and alignment with modern reporting standards.
Effective June 30, 2025, only a limited, approved list of V1 reports will remain active. All other V1 reports will be phased out in accordance with our deprecation timeline.
Next steps
Start using V2 equivalent reports where available. For help with migration or related concerns, contact your Zenoti representative or CSM.
Module: Zenoti Labs
Business Owners, Administrators
We’re excited to unveil Zenoti Labs—a dedicated space within your Zenoti platform where you can discover and explore our Innovation Features designed to elevate your business.
Positioned under Configuration, Zenoti Labs will be available by default to all Business Owners and Admins.
What is Zenoti Labs?
Zenoti Labs showcases early-access Innovation Features—fresh ideas crafted through internal R&D, now ready for you to explore. It’s your opportunity to:
Preview powerful features before they become mainstream.
Choose what to enable—customize the experience to your business needs.
Share feedback directly through a built-in feedback mechanism to help us improve and evolve these innovations.
Note
Zenoti Labs is a conceptual section. It’s seamlessly embedded into your existing Zenoti experience.
The upcoming Innovation Features, designed to enhance your experience, will be communicated very soon—stay tuned for exciting updates.
Start exploring today. Be a pioneer in shaping tomorrow’s Zenoti platform!
Learn More: For more information, refer to the Zenoti labs configurations article.
Enhancements
Module: Appointment Book
Front Desk Operator/Service Provider
If a session timed out during a task such as booking or payment, Zenoti immediately prompted for a PIN. After entering the PIN, users were redirected to the Queue page and any in-progress data was lost. This caused workflow disruptions and forced users to re-enter information from the beginning.
With this update, Zenoti now prompts the PIN only when the user takes an action after the session times out, not immediately.
Key updates:
If the same user re-authenticates using their PIN, their session is fully restored, allowing them to continue without losing data.
If a different user enters their PIN, Zenoti discards the previous session’s data and refreshes the page for the new user, ensuring privacy and data integrity.
Note
This behavior applies to the appointment/queue page, guest profile, booking wizard, POS (Point of Sale), and group invoices.
For more information, refer to the Use PIN mode article.
Business Owners/Center Manager
This feature allows businesses to configure prompts that confirm a guest’s allergy test results before a service begins. It helps ensure services are delivered safely and in compliance with health standards, especially for treatments that may not suit all guests.
Some services, such as facials with active ingredients, may not be suitable for all skin types. With this enhancement, Zenoti prompts guests or front desk staff to confirm relevant health details during booking. This helps reduce service risks, builds guest trust, and improves the overall experience.
How to use:
At the center level, click Configuration.
Navigate to Services.
Switch on the Prompt guests to confirm allergy test results toggle.
Click Configure allergy test.

Set up the details as required and click Save.
Note
This behavior is available across Bottom Panel, Booking Wizard, Appointment Book, and Webstore.
For more information, refer to the Configure allergy test article.
Front Desk Operator/Service Provider
This enhancement helps front-desk staff assign the right services to the right providers. For business owners or managers it also simplifies annual provider performance reviews. As a front-desk operator, you can now print provider-specific service lists that include pricing and duration details. This saves time for managers during evaluations.
Additionally, you can access internal employee notes, including service preferences and restrictions. This visibility ensures bookings align with each provider’s capabilities and preferences. It reduces errors and enhances the overall guest experience.
Note
The profile details are recorded from the Manage employee > General tab.
This feature is available by default.
How-to use:
Navigate to the Appointment Book.
From the provider panel, click the more options menu.
Click View details.
You can view the Profile details at the top of the screen.
Click Print all service details.
For more information, refer to View and print employee details and Create employee articles.
Front Desk Operator/Service Provider
As a front desk operator, you can now view and print up to 1,000 upcoming appointments for a guest. Previously limited to just five appointments and individual printouts, this enhanced functionality streamlines appointment management and improves efficiency.
This feature allows you to:
Print a complete list of a guest’s upcoming appointments (up to 1000).
Save as PDF for digital use or sharing.
Note
This feature is available by default.
How-to use:
Navigate to a guest’s profile.
Click the Appointments tab.
Click the Print all appointments button.
For more information, refer to the View a guest's appointment history article.
Front Desk Operator/Service Provider
Front desk staff and service providers can now see why an appointment was canceled, missed, or deleted—right from the Appointments tab of a guest’s profile.
This gives context that businesses can use to better understand guest behavior, reduce no-shows, and have more meaningful follow-up or rebooking conversations.
Note
This feature is available by default.
How-to use:
Navigate to a guest’s profile.
Click the Appointments tab.
View the Reason column in both the Upcoming and Past Appointments sections.
For more information, refer to the View a guest's appointment history article.
Front Desk Operator/Service Provider
To support businesses that rely on visual room cues during scheduling, Zenoti has added a room color capsule to the redesigned Appointment Book. This capsule appears on the appointment block, making it easier to identify room assignments at a glance. The enhancement helps centers transition smoothly to the new interface without losing key visual indicators.
For more information, refer to the Customize appointment blocks article.
Module: Web POS
Business Owners/Center Manager
The New Register now prevents tip payouts from exceeding a stylist’s tips earned on the same day. This enhancement helps staff avoid overpayments by automatically checking how much the stylist has already received. It compares the new payout amount with the total tips earned for the day. This reduces errors, simplifies end-of-day operations, and builds trust in how payouts are handled.
In busy salons, multiple team members manage registers and process end-of-day payouts. Emily, a stylist earns $120 in tips during her shift. Midway through the day, a manager processes an $80 tip payout for her. Later, another team member attempts to pay out $60 more, unaware of the earlier transaction. This update blocks such overpayments by validating the cumulative payouts against her actual earned tips. It safeguards businesses from financial errors and promotes operational transparency.
For more information, refer to the New Register Management article.
Administrators/ Business Owners/Center Manager
To prevent unintended double discounts, Zenoti now supports the ability to block certain payment methods when invoice-level discounts are applied. This allows you to prevent the use of gift cards when their price is lower than their value.
Similarly, you can restrict specific custom payment methods such as EMI from being used when a manual discount, campaign, voucher, or coupon is applied. If a discount is applied after selecting a restricted payment method (or vice versa), Zenoti prevents the action and displays an error message.
Note
Membership and package discounts are excluded from these restrictions. To enable the gift card and custom payment restriction, contact your Zenoti Customer Success Manager (CSM).
After the custom payment restriction is enabled, you can choose to block discounts for each custom payment type by selecting the Block discounts for this custom payment option.
How-to use:
At the organization level, click Configuration.
Navigate to Payments > Custom payments > Allow custom payments.
Select the custom payment.
Select the Block discounts for this custom payment option.
Click Save.
For more information, refer to the Block discounts for this custom payment and Allow custom payments articles.
Administrators/ Business Owners/Center Manager
To empower businesses to adhere to financial compliance requirements, Zenoti now allows administrators to set a daily cash payment limit. The Limit daily cash payments per guest and invoice setting limits the total cash a guest can pay per invoice and across all invoices on the same day.
Any attempt to exceed the configured limit is automatically blocked. This ensures accurate transaction monitoring and enhances regulatory compliance.
Business scenario:
A guest visits a salon and pays ₹1.5 lakh in cash for a premium service package in the morning. Later that day, the same guest returns to purchase an additional package worth another ₹1.5 lakh.
Since the organization has a daily cash payment limit of ₹2,00,000 lakh enabled, Zenoti automatically flags the second transaction and prevents it from being processed. However, the guest may return the following day to make the purchase. This helps the business stay compliant with regulatory guidelines and avoid exceeding daily cash handling thresholds.
Note
This setting is off by default for existing businesses already on Zenoti. Business owners can enable and configure the limit based on legal requirements.
The limit is enforced at the center level only. Guests who have reached the threshold at one center can still make payments or purchases at other centers within the same organization.
This does not apply to other charges such as SSG, tips, or similar fees, and these are also not honored for group billing.
How to use:
At the center level, click Configuration.
Navigate to POS > Financials > Payments and invoices.
Switch on the Limit daily cash payments per guest and invoice toggle.
Enter the daily cash limit amount based on your business's requirements.
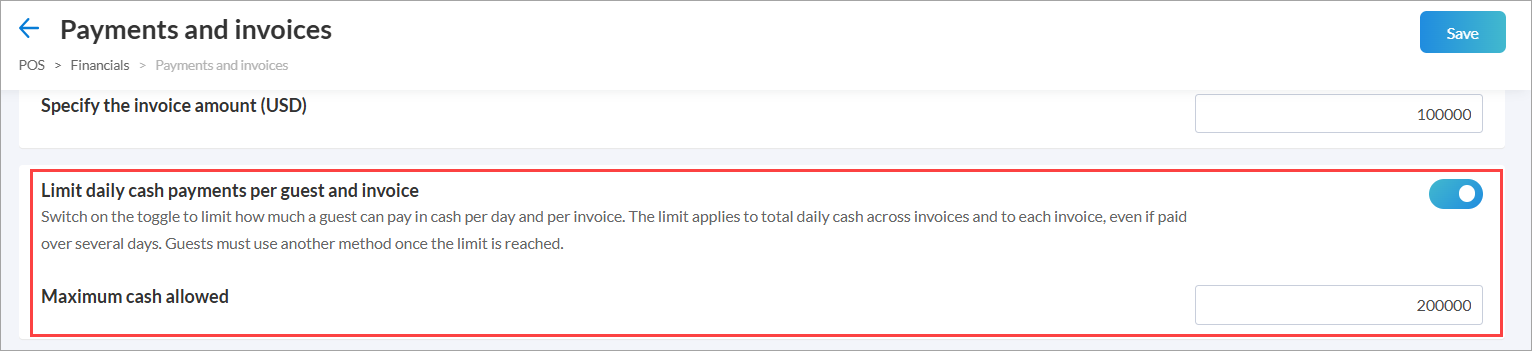
Click Save.
For more information, refer to the Limit daily cash payments article.
Administrators/ Business Owners/Center Manager
Previously, when guests exchanged products, regardless of whether the new item was of the same or greater value, Zenoti automatically issued a Prepaid Card (PPC) for the refund value. This led to confusion and incorrect balances, especially when no refund was truly due.
With this enhancement, Zenoti only generates a PPC when there’s an actual refund due that is, when the replacement product costs less than the original item. This ensures more accurate and logical handling of refunds.
Business scenario:
Guest exchanges Product A ($20) for Product B ($25).
Refund Invoice
Product A: -$20.00
Custom: -$20.00
Exchange Invoice
Product B: $25.00
Custom – exchange internal: $20.00
Cash/Due: $5.00
The original product is refunded correctly. The guest pays $5 for the price difference. No prepaid card is created.
Guest exchanges Product A ($20) for Product B ($15).
Refund Invoice
Product A: -$20.00
Custom: -$20.00
Exchange Invoice
Product B: $15.00
Custom – exchange internal: $20.00
PPC: $5.00
The guest receives a $5 balance via a prepaid card.
Zenoti automatically adds a Custom payment method internally to balance the invoice, ensuring the refund and exchange process remains seamless.
For more information, refer to the Exchange a product article.
Administrators/ Business Owners/Center Manager
Previously, when businesses processed cash transactions across multiple shifts, it was challenging to monitor real-time cash flow, identify discrepancies, and maintain accountability. This often resulted in errors, gaps in recordkeeping, and end-of-day reconciliation issues.
The enhanced Register Management feature solves this by introducing a structured, intuitive workflow that ensures accurate cash handling from start to finish each day.
Key improvements:
Mandatory Register Opening: Ensures staff start the day with a register that’s opened, establishing an opening cash balance.
Mid-Day Tracking: Enables real-time visibility into cash adjustments, whether adding petty cash, logging tips, or transferring cash to another register.
Secure Reconciliation: Enforces end-of-day closure only after reconciliation, reducing errors.
Note
The new Register Management feature is now in Beta! Reach out to your Zenoti Customer Success Manager (CSM) to join the program.
For more information, refer to the New Register Management article.
Administrators/ Business Owners/Center Manager
To enhance compliance with financial regulations, Zenoti now prompts for Permanent Account Number (PAN) details while collecting payments for high-value invoices and not just while closing invoices.
What's new:
Previously, PAN details were requested only when invoices were closed. Now, when a guest’s invoice value exceeds the set threshold, Zenoti will:
Prompt guests to enter PAN details when the invoice amount exceeds your configured threshold.
Block payment processing until valid PAN information is provided.
Display PAN details in the Sales Accrual and Sales Cash reports for easier tracking and reconciliation.
How-to use:
At the center level, click Reports.
Navigate to Finance > Sales.
Click to open the Sales Cash or Sales Accrual report to view the PAN details.
For more information, refer to the Sales - Accrual report (v2) and Sales-Cash report (v2), articles.
Front Desk Operator/Service Provider
Previously, redeeming deposit-based prepaid cards (PPC) during group appointments required staff to click each invoice, locate the deposit PPC number, manually copy and paste it into the PPC section, and then apply it. This was an error-prone and time-consuming process, especially for businesses handling group bookings frequently.
Zenoti has now simplified this workflow with automatic identification and redemption of deposit-based prepaid cards directly from the group invoice screen.
When a group invoice includes guests who have deposit-based prepaid balances, a pop-up appears automatically, indicating the available prepaid card balance for each guest. Staff can click Redeem to apply the balance with no further manual steps required. This promotes faster checkouts for group appointments.
If multiple guests in the group have prepaid balances:
A consolidated message appears, Multiple prepaid balances found. Redeem all?
An info icon within the pop-up reveals a tooltip with a detailed breakdown of prepaid balances for each guest.
Note
This enhancement is applicable only to deposit-based prepaid cards.
Module: Kiosk
Business Owners/Center Manager
As a business owner, you can now give your Kiosk a clean, neutral look with the new theme option that uses a flat background without gradients. This update allows businesses to present a more subtle and elegant check-in experience that better aligns with minimalistic or premium brand aesthetics.
Many businesses prefer a simple and refined interface, especially in settings like spas, clinics, or luxury salons. The neutral theme supports this by removing strong colors or gradient backgrounds, helping create a calming and professional first impression at check-in.
For more information, refer to Customize theme for new Kiosk article.
Front Desk Operator/Service Provider/ Guests
Guests can now check out independently at the kiosk without waiting at the front desk. As soon as their main services are completed, they can begin to checkout using their phone number or email ID.
Guests can:
Review their invoice
Add tips (including group tip-splitting)
Add donations (if configured)
Pay via saved card, new card, or swipe/tap at the card machine
Email or print their receipt
Provide feedback (if configured)
Note
Guests can check out only after their service has been marked as Complete by the front desk operator or service provider.
For more information, refer to the Guest check-out in new kiosk article.
Front Desk Operator/Service Provider
Previously, time scaling for add-ons wasn’t supported at check-in using Employee V2. This led to appointment conflicts or incorrect service durations. With this enhancement, Zenoti now adjusts the appointment duration dynamically based on the selected add-ons during Kiosk check-in.
Guests can now choose service add-ons that complement their primary service and tap Confirm Add-ons:
Smart Merge Add-ons: These fit within the existing appointment time. They're displayed at the top as high priority upsells.
Time-Extending Add-ons: Shown only if the provider and room are available after the current booking.
Note
This feature is only available for users who have Smart Merge enabled. To enable Smart Merge, please reach out to your Zenoti Customer Success Manager (CSM).
For more information, refer to the Guest check-in using new Kiosk article.
Module: Payments
Business Owners, Center Managers
You can now process payroll for multiple centers—including those under different business entities—in one streamlined workflow. No more running payroll center by center. With ZIP, multi-center businesses gain a faster, more accurate, and fully compliant payroll experience.
Key benefits:
Unified payroll run: Run payroll for all centers sharing the same pay period in one consolidated action.
Entity-aware processing: ZIP intelligently groups payroll by business entity and applies the respective tax, benefit, and payment configurations.
Time-saving and error-reducing: Cuts down on manual steps and minimizes the risk of inconsistencies.
How to use
Navigate to Employees > ZIP.
Select a Pay Period—ZIP auto-selects centers that follow the chosen frequency.
Click Run Payroll to:
Import earnings data from all eligible centers.
View employees grouped by business entity in the Payroll Input and Preview screens.
Expand each group in the Preview screen to review detailed, employee-level earnings.
Review and Submit payroll—ZIP takes care of deposits, taxes, and deductions.
Note: This feature is currently in Beta. To enable it, email payrolloperations@zenoti.com.
For more information, refer to the Run Payroll Using Zenoti Integrated Payroll article.
Module: Digital Forms
Administrators, Business Owners
Organizations now have granular control over who can add forms dynamically, what forms can be added, and their availability across centers—enhancing operational precision, reducing form clutter, and enabling center-specific customization.
This feature is enabled by default.
How to use:
At the organization level, click the Configuration icon.
Navigate to Forms > Dynamic forms setup.
Learn More: For more information, refer to the Set up dynamic forms article.
Administrators, Business Owners, Service Providers
The Forms Review report now offers deeper visibility and improved tracking of form activity, making it easier to monitor compliance and streamline reviews.
You can now identify forms that haven’t been filled ("Not Filled" status), filter by appointment status or job role, and track progress more accurately with enhanced Review Status values—including Flagged for Review and Review Skipped. These additions provide greater transparency into provider behavior and form handling across centers.
This feature is enabled by default.
How to use:
At the organization or center level, click the Reports icon.
On the Reports page, search for and select Custom Forms Review Report.
Learn More: For more information, refer to the Forms Review report article.
Module: Employee
Administrators, Business owners
Zenoti’s enhanced employee scheduling makes it easier to manage provider availability with precision. You can assign service providers to specific services, categories, or subcategories during defined time slots across different days. This helps optimize provider utilization and align provider availability with customer demand.
This feature allows businesses to assign service providers to specific services or categories at set times. For example, Liz can be scheduled to offer Facials from 9 AM to 12 PM and Hair Services from 12:30 PM to 4 PM.
This feature is not enabled by default. Reach out to your CSM or Zenoti representative to enable this feature for your business.
How to Use:
At the center level, navigate to Employee > Employees > Manage Employees > Edit Employee >Services tab.
Under Advanced Properties:
Select Service or Category or Subcategory.
Assign Day and time slots.
Click Add to save.
POS, Appointment Book, Booking Wizard, CMA, and Webstore automatically filter providers based on the selected service or category and displays only valid time slots for both single and multi-service bookings. Front desk staff can override the time slot if needed to accommodate other services.
Learn More: For more information, refer to the Configure Employee Availability Using Service-Based Time Slots article,
Administrators, Business owners
Zenoti now supports restricting specific employees or designations from being booked online for certain services. This enhancement brings flexibility in managing provider visibility across online booking platforms like Webstore, CMA, and Smartbot. The enhancement helps ensure compliance with policies, improves staff scheduling accuracy, and enhances guest experience by showing only eligible providers for each service.
How to use:
At the organization level, access Configurations > Online booking > Online booking settings.
Select CX V3 > Categories > Online booking.
Under Provider booking options, select the Restrict some providers from providing some services checkbox.
Click Save.
Once this setting is enabled, complete the provider-specific setup at the center level:
Navigate to Employee, select the desired employee and go to the Services tab.
In the Available Online column (next to Service Assignment), use the checkbox to allow or disallow online booking availability for each assigned service.
Note
When the org-level setting is re-enabled, the previously hidden Available Online column and its saved values are automatically restored—no reconfiguration needed.
Learn More: For more information, refer to the Configure CMA V3 template: Online Booking article.
Administrators, Business owners
This new feature lets organizations define custom thresholds to categorize check-ins as Early, On Time, or Late helping maintain consistent attendance tracking as per internal policies.
Business Scenario: A salon chain wants to enforce punctuality across locations; by setting attendance thresholds, managers can easily identify and address early, on-time, or late staff check-ins.
The Attendance Details Report now includes two new columns:
Actual – Schedule: Shows the time difference between scheduled and actual check-in\
Check-in Status: Reflects the status based on configured thresholds
These columns appear only when using the View by Date filter.
For example, if the scheduled time is 9:00 AM with a 15-minute threshold:
Check-ins before 8:45 AM are marked as Early
8:45–9:15 AM as On Time
After 9:15 AM as Late
If no check-in is recorded, the status shows Not Checked-in. If a center hasn’t set threshold rules, it shows Not Configured.
Note
These thresholds apply only to the Attendance Details Report. They do not affect visual indicators in the Appointment Book or other parts of the application.
How to use:
At the organization level, navigate to Configuration > Employee > Employee attendance > Attendance threshold rules.
Enable the Enable attendance threshold rules toggle.
Enter values for:
Early check-in limit (in minutes before scheduled time)
Late check-in limit (in minutes after scheduled time)
Click Save.
Center level configurations:
Navigate to Configurations > Employee > Attendance threshold rules, configure one of the following options:
Use organization default – applies the predefined rules from the organization level.
Override at center level – allows you to define center-specific early and late check-in limits.
When Override at center level is selected, you’ll also see the option to Disable attendance threshold rules for this center. Enable this option if you do not want to apply threshold rules at the center level.
This feature is not enabled by default. Reach out to your administrator to enable this feature.
Learn More: For more information, refer to the Standardize early and late check-ins using Attendance Threshold Rules article.
Administrators, Business owners
This enhancement introduces a new payroll calculation option that helps businesses fairly compensate employees based on total earnings. In addition to the existing functionality of comparing hourly pay and service commissions, businesses can now also compare hourly pay against the combined total of service and product commissions—ensuring employees are paid the higher of the two.
How to use:
At the center level, navigate to Employee > Payroll and Commissions > Payroll Controls.
Switch on the toggle for Compare employee pay calculation: Hourly vs Commission.
Choose one of the available options:
Based on higher of total hourly pay (including overtime hours) and service commission.
Based on higher of total hourly pay (including overtime hours) and (service commission + product commission)
Based on employee overtime exempt calculation
Click Save to apply.
Learn More: For more information, refer to the Configure Payroll Controls article.
Administrators, Business owners
Businesses can define how long a service or add-on takes based on the selected provider’s speed or skill level—offering more accurate appointment durations and better utilization of provider availability. With this update, admins can now manage provider-specific durations for add-ons directly from Zenoti.
Business Scenario: This empowers organizations to customize and fine-tune their appointment durations across all offerings—ensuring optimized booking, reduced wait times, and enhanced operational efficiency.
How to use:
At the organization level, access Configurations > Appointments > Employee rules.
Enable the setting Enable provider specific duration for services.
A new indented sub-setting appears: Enable provider specific duration for Add-ons.
Enable this sub-setting to allow duration customization for Add-ons per provider.
Note
The Add-ons setting is available to all businesses, but it is disabled by default to prevent unintended duration edits.
Learn More: For more information, refer to the Configure Provider-Specific Durations for Services and Add-ons article.
Module: Integrations
Administrators, Center Managers
Zenoti has expanded its Zapier integration by adding six new triggers to help automate room and employee blockout times—covering creation, update, and deletion events. With this update, organizations can automate more aspects of their operations, maintain synchronized schedules across systems, and improve responsiveness to changes.
Previously, Zapier users could only automate workflows using a limited set of triggers, such as employee creation or deletion. This made it challenging for businesses to handle schedule changes efficiently. The newly added triggers enable users to automate actions when blockout times are created, updated, or deleted for both rooms and employees. This supports use cases like calendar syncing, automated notifications, and real-time reporting.
This feature is enabled by default.
Learn More: For more information, refer to the Zapier Integration article.
Module: Inventory
Administrators, Inventory Managers
With this improvement, users can now choose whether they want to print barcodes for retail quantities, consumable quantities, or both. This flexibility ensures better resource usage and aligns with operational preferences.
The retail consumable option can be availed only from the Purchase Order (PO) screen.
How to use:
Navigate to Inventory > Orders.
Go to the desired PO and click the 3-dot menu.
Click Print Barcodes.
In the updated dialog box, choose one of the following radio buttons:
All
Retail Only
Consumable Only
Select Retail Only if you want to print only retail quantity barcodes.
Click Print to generate barcode labels accordingly.
Learn More: For more information, refer to the Print Barcode Labels article.
Administrators, Inventory Managers
This enhancement provides better financial visibility and analytical flexibility in the Inventory Adjustment log. A new Transaction Cost column automatically calculates the cost of each adjustment, while additional fields for Product Category and Product Sub-category enable more precise filtering. Users can now group data by multiple fields such as Adjusted By or Reason, and view footer totals for transaction costs, streamlining inventory reporting and reconciliation.
How to use:
Navigate to Inventory > Inventory Adjustments.
Filter by Category or Sub-category as needed.
Review the new Transaction Cost, Category, and Sub-category columns.
Drag columns into the grouping area to group adjustments.
Learn More: For more information, refer to the Adjust Stocks Using Inventory Adjustments article.
Module: Online Booking
Administrators, Guests, Front-Desk Operators
You can now reduce cart abandonment and boost revenue with automated reminders for series packages in the Webstore. When a customer adds a series package to their cart but does not complete the purchase within 60 minutes, Zenoti sends a one-time reminder email nudging them to finish their transaction.
These reminders help recover potentially lost sales and keep customers engaged by offering a seamless way to return to their cart.
How to use:
At the organization level, click Configuration.
Navigate to Marketing.
Switch on the Abandoned cart checkout reminder toggle.
Select the centers for which you want to enable the reminders.
Click Edit template for Series package.
You can choose to send reminders or alerts by email or text.
Select the language in which you want to send the notification.
Click Save.
Learn more: For more information, refer to the Abandoned Cart Checkout Reminder article.
Administrators, Guests
You can now offer your guests a more personalized and intuitive booking experience with the new provider-based booking flow. This flexibility lets you customize the booking journey, starting from center selection, followed by provider, service, and time slot, so guests can book based on which providers they want to see, not just what they want to book.
This is ideal for businesses that emphasize provider choice and want to showcase their team’s specialties. It enhances guest satisfaction and makes booking and promoting Providers (with deeplink for the provider that can be sent via Messages or added to the website) easier.
How to use:
For Webstore:
At the organization level, click Configuration.
Navigate to Online booking > Online booking settings > Webstore V2 > Appointment Booking Flow.
Switch on the Provider-Based Booking toggle.
Click Save.
For CMA:
At the organization level, click Configuration.
Navigate to Online booking > Online booking settings > CX V3 > General.
From the Booking flow option select Enable Provider based booking.
Click Save.
Learn more: For more information, refer to the Book an appointment using the provider-based booking flow article.
Administrators, Guests, Front-Desk Operators
Businesses can now display bundles in the Quickbook section of both the Customer Mobile App (CMA) and the Webstore. Bundles are pre-packaged combinations of services or products offered at a discounted price. If a guest has previously booked a bundle, it will now appear in their Quickbook suggestions, alongside their regular services. This makes it easier for guests to repeat past bundle bookings with their preferred provider and center, improving convenience and driving repeat sales.
By making these bundles clearly visible, simple to select, and transparently priced, businesses can increase average order values, improve customer engagement, and offer greater convenience during the booking journey.
How to use:
Log into Consumer Mobile Application (CMA) or Webstore and select the Quick Book panel.
Select a Location. The Webstore home page appears along with the Quick Book panel.
Note
The Quick Book panel consists of three distinct appointments taken by your guest earlier. If the guest is new and does not have any past appointments, then the Quick Book panel does not appear.
Select any one of the services or bundles.
Specify a date and time.
Review the details and tap Book now.
Learn more: For more information, refer to Quickly book appointments in Webstore and Quick Book and Rebook the services in CMA articles.
Administrators, Guests, Front-Desk Operators
We have enhanced the existing family booking capability by allowing organizations to set limits on the number of services that can be booked in one session. Additionally, we've introduced a new setting to disable back-to-back scheduling if it’s not suitable for your business needs.
Note:
Guests can book up to five services per session. If they go over the limit, the option disappears automatically.
How to use:
At the organization level, click Configuration.
Navigate to Online booking > Online booking settings > CX V3.
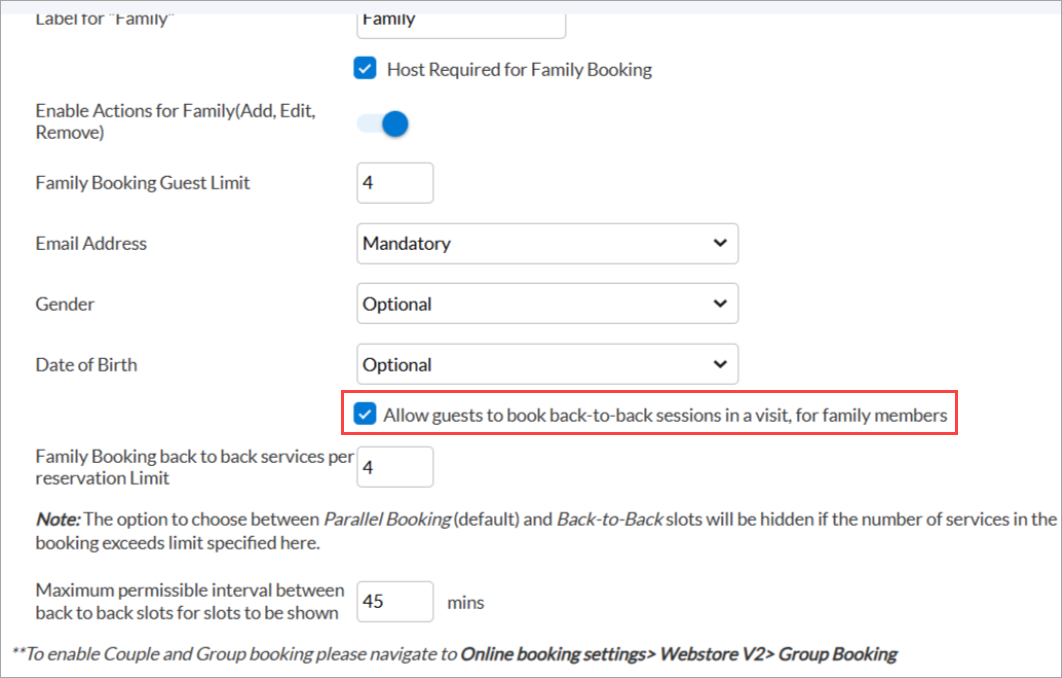
Select the Family Booking checkbox and add a family label (For example: "My Kids", "Parents") to group members other than the host.
Choose booking preferences:
Choose if the host must also avail the services along with the family members.
Define the guest limit (up to 4).
Mark Email, Gender, and Date of Birth as Mandatory or Optional.
Select the Allow guests to book back-to-back sessions in a visit, for family members checkbox.
Enter the maximum time gap (in minutes) between services in the Maximum permissible interval between back-to-back slots to be shown field.
For example, if you set a 10-minute interval and one service starts at 10:00 AM, the next must begin by 10:10 AM.
Click Save.
Learn more: For more information, refer to the Enable family booking article.
Module: HyperConnect
Business Owners, Front Desk Operators
You can now play your custom call hold-greetings on physical phone devices, not just web and softphones. This enhancement ensures no matter how your team answers a call, your callers always hear the same personalized message when placed on hold.
Key highlights:
Consistent caller experience: Guests now hear the same personalized hold message across all devices: physical phones, web, or softphones.
Stronger brand identity: Maintain a consistent voice and message for your business across all call-handling endpoints.
No extra setup: Supported physical phones will play the custom greeting without any additional configuration.
How to use:
You can enhance the caller experience by uploading a personalized hold message the guest hears while waiting. Here is how:
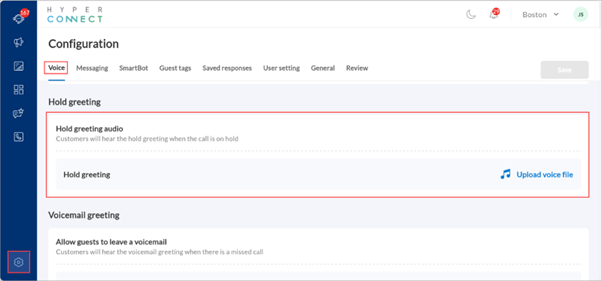
Launch HyperConnect.
Click the Settings icon.
In the Voice tab, navigate to Hold greeting.
Click Upload voice file to add your custom message.
File format: .mp3
Max size: 5MB
Click Save to apply the greeting.
Sample greeting message: Thank you for calling [Your business name]. We will be with you shortly. You can visit our website to explore our latest offers. We appreciate your patience!
Learn more: For more information, refer to the Set Up Call Hold Greeting article.
Business Owners, Front Desk Operators
Zenoti now supports transferring calls to external phone numbers during an ongoing call. This enhancement allows users to seamlessly route active calls to any external number outside their organization, offering greater flexibility and improved customer support and responsiveness.
Learn more: For more information, refer to the Transfer calls article.
Module: Marketing
Business Owners, Marketing Teams
You can create always-on campaigns that automatically trigger email campaigns to guests who book appointments without selecting any add-on services. This helps you promote relevant optional services after the booking, improve personalization, and reduce dependence on manual upselling by staff.
This feature is not available by default. Reach out to your Zenoti representative to enable this feature.
Note
For the campaign to be triggered, the booked service must have the relevant add-ons configured for upselling. Only guests who book services with upsell-enabled add-ons will receive this campaign.
How to use:
At the organization or center level, navigate to Marketing > Campaigns.
Click Create always on campaign.
On the Launch always on campaign pop-up, click Upsell add-on services.
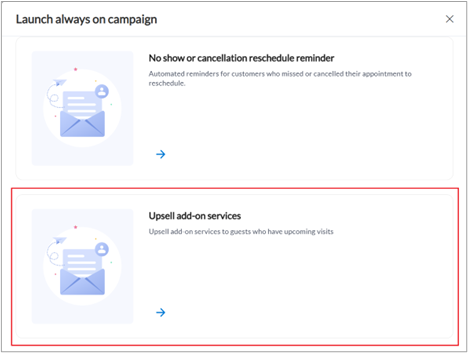
Edit the campaign details, if required, and click Launch campaign.
You can also click Customize campaign to further customize the campaign according to your requirements.
Learn more: For more information, refer to the Create add-on services and Goal-based campaigns articles.
Business Owners, Marketing Teams
You can now create target segments based on the number of available membership service credits guests have. This enables you to proactively reach out to members—via email, SMS, or push notifications—encouraging them to use their credits before they expire. It helps boost appointment bookings, reduce unused credits, and increase member engagement.
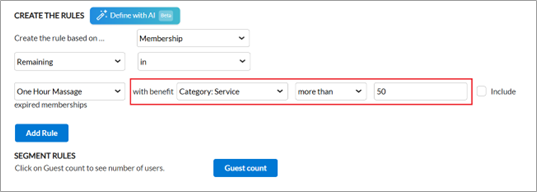
This feature is enabled by default.
Learn More: For more information, refer to the Create a target segment article.
Business Owners, Marketing Teams
The Advanced Marketing Campaigns report now includes the organization name, selected attribution window, and selected time period. These additions ensure the exported data reflects the exact context used during dashboard analysis, making reporting more accurate, traceable, and ready for cross-team review.
This feature is enabled by default.
How to use:
At the organization or center level, navigate to Marketing > Advanced Marketing > Dashboard.
Enter the attribution time frame (in days) and click Continue.
On the top right, click Campaigns.
Select the desired date range and click Download.
Learn More: For more information, refer to the Advanced marketing dashboard article.
Business Owners, Marketing Teams
The Guest opt-outs report now includes a Campaign Name column for marketing campaigns across SMS, Email, and WhatsApp. This gives you visibility into which campaigns are contributing to guest opt-outs—enabling you to fine-tune content, adjust targeting strategies, and reduce unsubscribe rates more effectively.
This feature is enabled by default.
How to use:
At the organization or center level, click the Reports icon.
On the Reports page, search for and select the Guest opt-outs report.
Locate the Campaign Name column to identify the campaigns that are driving guest opt-outs.
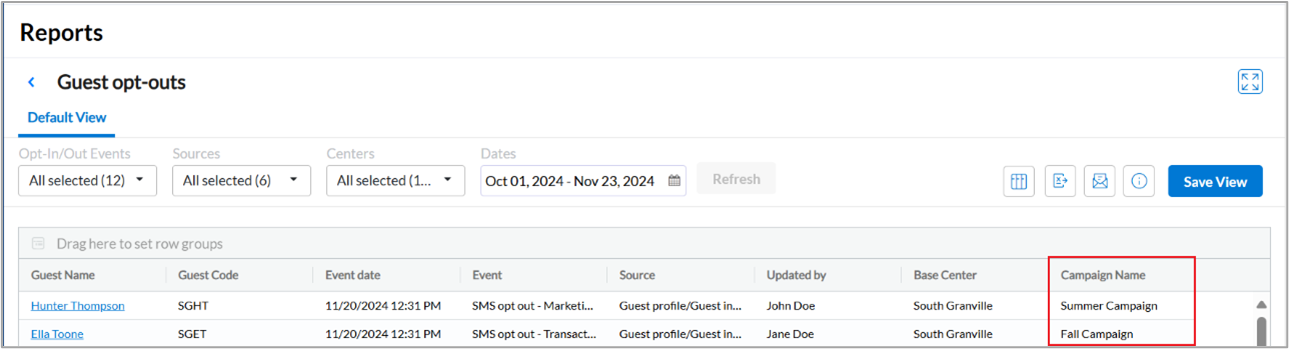
Learn More: For more information, refer to the Guest opt-outs report article.
Business Owners, Marketing Teams
Rebook reminder campaigns now include a service-level filter to improve precise messaging. You can tailor reminders based on the guest’s last appointment with specific services or service categories, sub-categories, or tags—ensuring reminders are relevant to each service’s typical rebooking frequency. This avoids sending generic rebook messages for services that don’t require follow-ups, increasing campaign effectiveness and guest satisfaction.
This feature is enabled by default.
How to use:
At the organization or center level, navigate to Marketing > Campaigns.
Click Create always on campaign.
On the Launch always on campaign pop-up, click Rebook reminders.
Use the Applicable on dropdown to select a specific service, category, sub-category, or tag for which the campaign should apply.
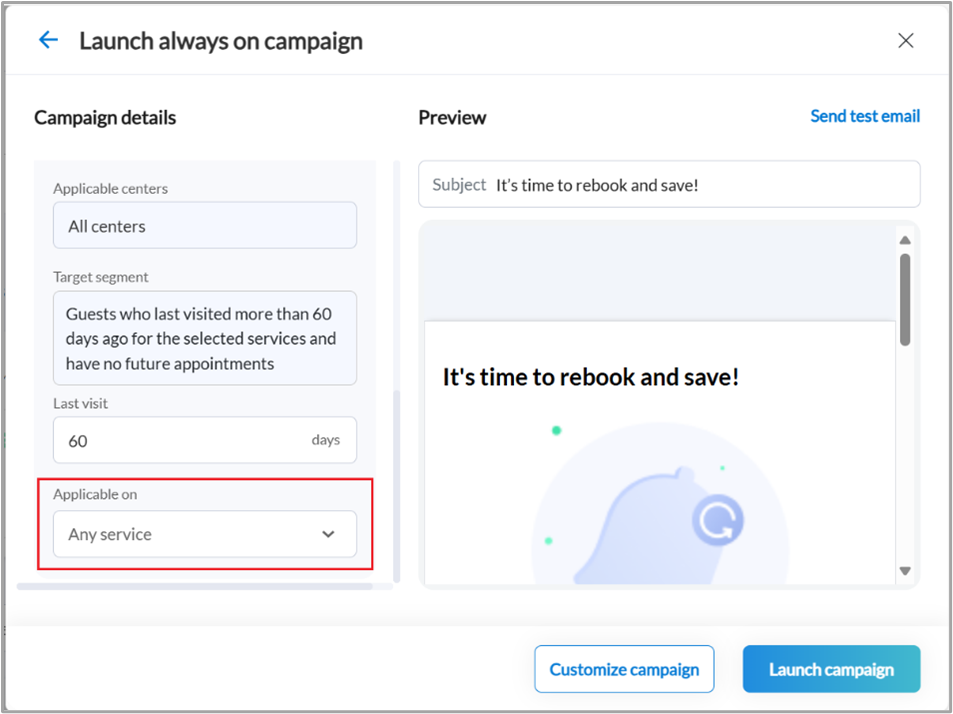
Click Launch campaign.
Learn More: For more information, refer to the Goal-based campaigns article.
Business Owners, Marketing Teams
The custom date range in the Advanced Marketing dashboard has been extended from 1 month to 6 months, allowing you to compare campaign performance and revenue across broader timeframes. This makes it easier to analyze month-over-month or quarter-over-quarter trends and make more strategic marketing decisions.
This feature is enabled by default.
How to use:
At the organization or center level, navigate to Marketing > Advanced Marketing > Dashboard.
Enter the attribution time frame (in days) and click Continue.
Click Custom.
Enter a date range of up to 6 months.
Click Apply.
Learn More: For more information, refer to the Advanced marketing dashboard article.
Module: Photo Manager
Administrators, Business Owners, Service Providers
Photo Sequences is a powerful feature that enables organizations to define structured, service-specific photo capture workflows using body-outline-based visual guides.
Administrators can create standardized sequences that reduce cognitive load on providers, ensure high-quality documentation, and improve consistency across appointments. By guiding the order and format of photo capture, this enhancement helps providers by streamlining their tasks and minimizing training time.
This feature is not enabled by default. Reach out to your CSM or Zenoti representative to enable this feature for your business.
Learn More: For more information, refer to the Create and Manage Photo Sequences and Capture photos using photo sequences articles.
Administrators, Business Owners, Service Providers
You can now select and delete multiple patient photos at once within the Photo Manager—both in the individual gallery and the global gallery. This significantly improves photo management efficiency while respecting role-based permissions. Deleting a photo from one gallery does not remove it from the other, ensuring you maintain control over how and where photos are stored.
This feature is enabled by default.
How to use:
Navigate to the individual patient gallery or the global gallery.
Tap Select, then select the images that you want to delete.
Tap Delete.
Tap Yes to confirm.
Learn More: For more information, refer to the Capture and manage treatment photos with Photo Manager article.
Module: Packages
Administrators, Front desk operators
Organizations can now control whether custom packages can be purchased using gift cards, a capability that is currently available only for series packages. This enhancement streamlines setup by automatically applying the correct default based on whether the package is created from a template or from scratch.
Business use case:
Some organizations may want to prevent specific packages from being purchased using gift cards.
How to use:
Click Packages under Master Data from the left panel.
Choose the package you want to edit.
In the GENERAL tab, scroll down to the PAYMENTS section.
Switch on or off the Purchase Package using Gift Card toggle.
The behavior of the gift card setting depends on how the package is created. When a package is created from a template, the gift card setting automatically follows the configuration defined in the template, requiring and no manual adjustments are necessary. However, if the package is created without using a template, the setting defaults to allowing the purchase of packages using gift cards. In such cases, this setting can be manually disabled if needed.
Learn More: For more information, refer to the Create a package article
Administrators, Managers
Organizations can now restrict the use of custom payment methods by item type using the new Restrict custom payment for setting under the custom payments master. This setting controls whether a custom payment method can be used for day, custom, or series packages and can be automatically enforced during invoicing to align with business policies. If a restricted method is applied to a disallowed item, the system blocks the action and shows an error, ensuring accurate billing and consistent rule enforcement.
How to use:
At the organization level, navigate to Configuration > Payments.
Navigate to Custom Payments.
Find the Allow custom payments option. Choose the custom payment you want to configure.
In the Restrict custom payment for field, use the checkboxes to enable or disable the applicability of each custom payment for item types such as day packages, custom packages, or series packages.
Click Save to save the configuration.
This feature is available by default.
Learn More: For more information, refer to the Block custom payments for selected package types article.
Module: Memberships
Administrators, Business Owners, Service Providers
This enhancement enables businesses to limit the number of membership service credits a guest can transfer in a year. The transfer limit is reset individually for each credit based on the date of transfer. The service credit becomes eligible for transfer again exactly one year after its transfer date.
Membership service credits are often shared with friends or family, but without limits, this can lead to excessive transfers and reduced service revenue. By setting a transfer limit, businesses can enforce consistent usage policies across all centers. Staff with the required permission can override the credit transfer limit for exceptions.
How to Use:
At the organization level, access Configurations.
Navigate to Memberships > Membership actions.
Select the Credit transfer and guest pass option.
Enable the Credit transfer limit toggle.
Enter a value in the Set annual limit on service credit transfers for memberships field. This field is mandatory when the Credit transfer limit toggle is enabled.
Click Save.
Learn more: For more information, refer to the Configure limit on service credit transfers article.
Module: Reports
Business Owners/Center Manager
Zenoti has improved how commissions are calculated when guests use loyalty points. These updates ensure consistent, accurate values across your reports.
This enhancement is dependent on the Calculate commission on point redemption amount as free service revenue setting, available under organization settings for Loyalty Points.
When this setting is enabled, the following report columns are calculated as follows:
Salon summary report:
Service Commissionable Sales includes loyalty point redemptions.
Commissionable Discounts includes loyalty point redemptions, which are treated as discounts
Product Commissionable Sales includes only actual product revenue and loyalty redemptions are excluded
Master center metrics report:
Commissionable Service Discount includes loyalty point redemptions.
For more information, refer to the Salon Summary report (v2) and Master center metrics report articles.
Business Owners/Center Manager
We have introduced the Sales - Realtime Recommendations report to help businesses understand how effective their point-of-sale (POS) recommendations are.
This report offers detailed insights into which services, products, and packages recommended by your staff and the POS are actually being purchased. It enables staff and management to track recommendation performance in real time and take action based on item-level insights, that is, detailed analytics about each individual service, product, or package recommended and whether it was purchased.
Key updates:
Monitor the performance of recommendations by analyzing sales conversions.
Track how many of those items are purchased and the revenue generated from them.
Identify which employees are converting most recommendations into sales.
How-to use:
At the organization level, click Reports.
Navigate to Finance > Sales.
Click Sales - Realtime Recommendations report.
Note
Webstore recommendations are currently not supported.
For more information, refer to the real-time recommendations report article.
Business Owners/Center Manager
Businesses rely heavily on the Pivot Tool to analyze performance across multiple centers. However, the taxable redemption and non-taxable redemption values were previously not available as default totals, limiting visibility into how much revenue was redeemed under each type.
With this enhancement, Zenoti has improved redemption visibility by introducing footer totals for these two columns. These totals now appear by default in pivot tables that include these columns, making them readily available for analysis. This means you can instantly track and compare taxable vs. non-taxable redemption amounts without extra steps or calculations.
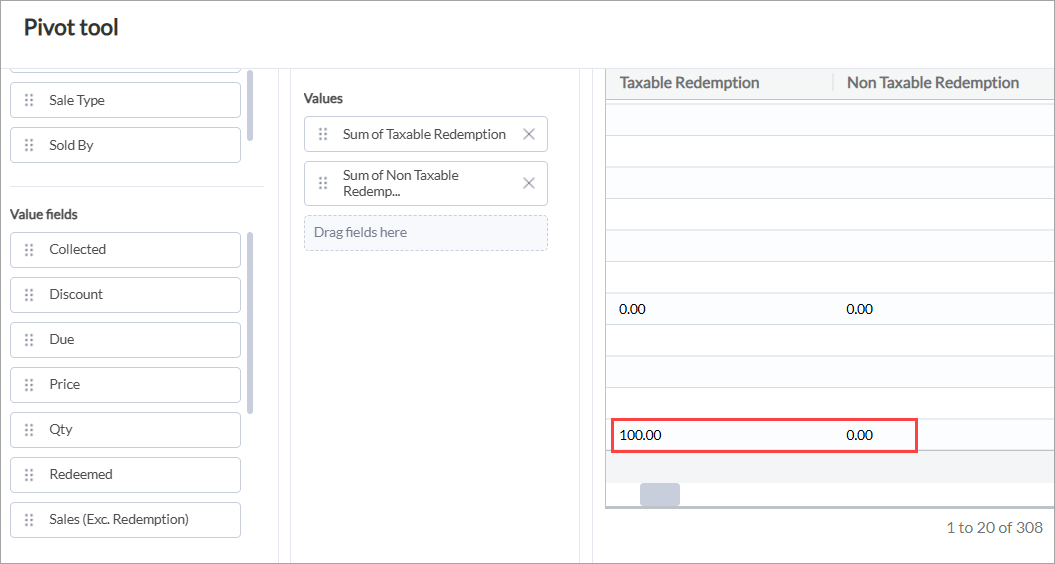
This enhancement is available in the Sales Accrual report and is retained when the report is exported or downloaded.
Module: Analytics
Business Owners/Center Manager
The Zenoti Driven Growth (previously Growth Features) dashboard has been enhanced to give businesses deeper insights into how Zenoti features are driving value. Features are sorted by impact to surface the most valuable metrics first and each feature now includes contextual help links for better understanding. This helps you prioritize areas of growth based on revenue, bookings, or operational time saved.
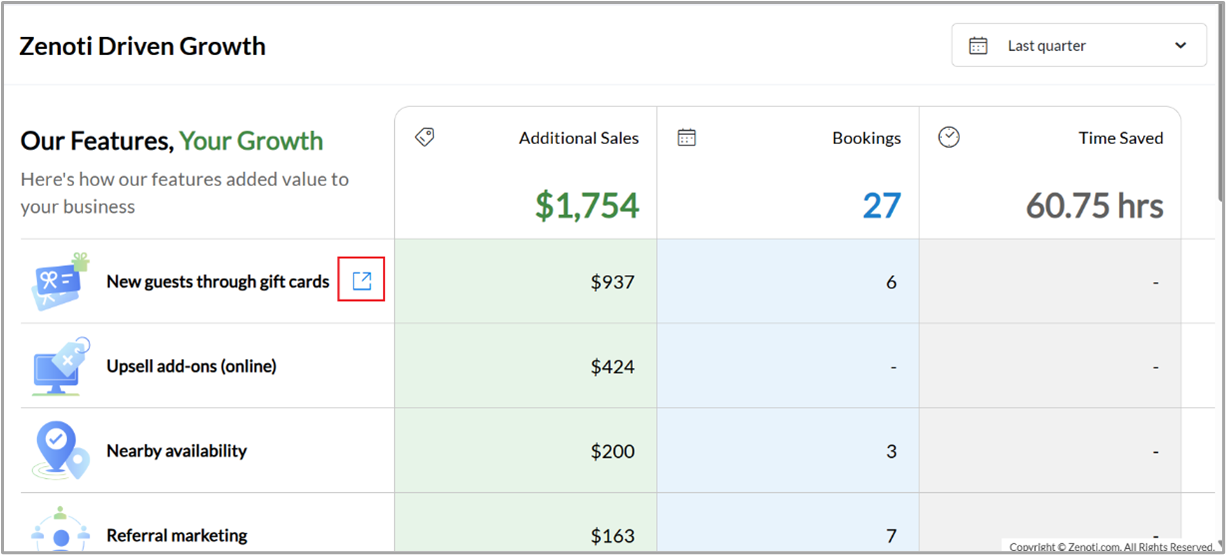
Additionally, two new metrics have been introduced to expand visibility into specific growth drivers:
New guests through gift cards: Measures how many new guests were acquired via gift card redemptions.
Upsell add-ons (online): Tracks incremental revenue from online upsells of add-on services post appointment bookings.
This feature is enabled by default.
Learn More: For more information, refer to the Access the Zenoti Driven Growth dashboard article.
Module: Zenoti Mobile
Business Owners/Center Manager
Front desk staff and service providers often collaborate in upselling retail products. Previously, splitting commissions meant manual edits and a higher risk of errors. With this enhancement, Zenoti introduces automated, equal commission splits for product sales involving multiple employees, ensuring fair distribution, reducing manual edits, and saving time at checkout.
Business scenario: When a service provider recommends a product and the front desk staff assists with the sale, both will automatically receive equal commission for the upsell.
How to use:
At the organizational level, navigate to Configurations > POS > Commission gains.
Enable the Enable auto-split for commissions setting.
To make use of the feature, navigate to the POS screen and add a product to an invoice.
Assign the primary employee in the Sold By field.
Click the Split Commission icon.
Add a second employee involved in the sale.
Zenoti automatically splits the commission equally (50-50). You may still manually adjust the values.
Note
The Auto Split checkbox is always visible by default; its default ON/OFF behavior is controlled by the org-level setting.
Learn More: For more information, refer to the Take a Payment in ZMA v2 and Take a Payment on Zenoti Mobile v2 (on phones) articles.
Business Owners/Center Manager
We have enhanced MyZen’s calendar to support long-term scheduling and improve provider efficiency. Providers can now view and manage appointments beyond 2 months in the past and future, enabling better planning and flexibility. Additionally, appointments on non-working days are clearly displayed, helping prevent double bookings and missed sessions.
This update is especially beneficial for centers that schedule far in advance or occasionally accommodate clients outside standard working hours.
Business Scenario: This enhancement empowers providers with comprehensive visibility and planning flexibility, supporting appointments scheduled years in advance. By displaying all booked slots—including those on non-working days—MyZen helps ensure providers stay informed, avoid scheduling conflicts, and deliver a seamless client experience.
How to use:
Open the Calendar View in MyZen.
Use the date selector to navigate to past or future dates.
View all appointments, including those on non-working days, marked with clear indicators.
Alternatively, you can use the Appointment List View to see all upcoming and past bookings.
Continue using rescheduling, editing, or cancellations workflows with complete visibility.
Learn more: For more information, refer to the View appointments for the day article.
Administrators, Center Managers
To ensure a consistent user experience across platforms, this update introduces alignment between the new appointment book design on the web and the Zenoti Mobile App (ZMA) for iPads, tablets, and phones. Centers can now manage alignment between the platforms during the beta rollout.
For centers already using the Redesigned Appointment Book on the web, the mobile app will automatically adopt this new design once the app is updated, ensuring seamless alignment across devices. Centers still have the flexibility to manage this experience using the provided toggle.
How to use:
Navigate to Configurations > Appointments > Interface at the center level.
Turn on the toggle: Enable New Appointment Book for Zenoti Mobile App
Note
This update and toggle are available only to centers already using the redesigned appointment book on the web.
Ensure that your Zenoti Mobile App is updated once you turn on the toggle. The redesigned appointment book will only be accessible after the app is updated.
If needed, administrators can turn the toggle OFF to temporarily revert to the original mobile experience.
Learn More: For more information, refer to the Redesigned Appointment Book on ZMA v2 article.
Administrators, Center Managers
Managers and business owners often need a quick, consolidated view of how their centers or zones are performing. Previously available only on the web, the Business Snapshot feature is now accessible on Zenoti Mobile App (ZMA) for both phones and tablets. This ensures decision-makers can track key metrics in real time—anytime, anywhere—without navigating multiple systems or dashboards.
How to use:
Open ZMA on your phone or tablet and log in.
Navigate to the More tab and select Business Snapshot.
Use the date range selector to choose between options such as Today, Yesterday, This Week, Last Week, and Last Month.
View up to ten default performance metric cards, tailored to your business type and user role.
Tap Provide Feedback to submit suggestions.
Learn More: For more information, refer to the Business Snapshot article.
Module: Accounting Integrations
Business Owners/Center Manager
Zenoti has resolved a discrepancy in tax values that caused sync issues with QuickBooks Online. Users previously experienced errors where the tax in Zenoti differed by a small amount (e.g., $0.01) from the value in QBO. This triggered overpayments when pushing payments to QBO, creating reconciliation challenges for finance teams.
A multi-location spa chain using Zenoti noticed discrepancies during monthly reconciliation. For example, an invoice showed a tax amount of $1,190.65 in Zenoti, but QBO reflected $1,190.64 due to tax recalculation rounding. This $0.01 difference prevented payment sync and delayed closing books. With the latest update, Zenoti ensures tax consistency, eliminating manual corrections and accelerating month-end processes.
For more information, refer to the Set up and authorize QuickBooks Desktop accounting article.
Business Owners/Center Managers
Financial reports in Zenoti are now easier to use, giving finance teams faster access to key data and tools to monitor and resolve failed transactions. The updates also improve data consistency with external accounting software, making it easier to manage discrepancies accurately and proactively.
Key updates:
Formatted response messages in the Integration sync status - Payments report
The report now displays structured response messages for each payment entry, enabling users to interpret payment statuses easily.
Made summary invoice numbers clickable
The report now supports clickable summary invoice numbers for each transaction, allowing users to quickly access detailed information and verify associated payment record from the Sale Order Summary Details report, allowing users to reconcile and audit transactions more efficiently. This is also applicable to Payments, Sale Order Summary Details, Misc Journal Entries, Items, Chart of Accounts, and Sale Order reports.
Added a Resync button for failed payments
The report now includes a Resync button for each failed payment, allowing users to retry synchronization of failed payments, reducing manual interventions and improving accounting accuracy.
To improve visibility and reduce errors during financial reviews, the following reports will now highlight any account or item that has been deleted in your connected accounting software:
Sale Order Summary Details
Misc Journal Entries
Items
Chart of Accounts
These visual highlights make it easier for users to spot discrepancies, investigate issues faster, and ensure that financial data remains accurate and aligned across systems.
For more information, refer to the Integration sync status report.
Additional Resources
This section includes recently published patch release notes and a comprehensive up to date glossary for your reference.
Document type | Release date |
|---|---|
N/A | |
April 29, 2025 | |
April 08, 2025 | |
March 18, 2025 |