Set up Zenoti Payments for your business
Zenoti Payments is an integrated payment processing system that allows you to provide a unified customer experience across all channels.
The system supports various payment types, including card swipes, dip transactions, contactless payment from Apple Pay, Android Pay, Samsung Pay, and credit cards stored on file.
Zenoti Payments is supported online (Webstore and Consumer Mobile App) and in-store (Zenoti Web, Mobile POS). It is a PCI-compliant payment system.
To set up Zenoti payments for your business, you must follow the process below
Verify your email ID with an OTP.
Set up your Zenoti Payments account.
Accept terms and conditions.
Prerequisites and verification process
Prerequisites & country-wise documents List
You must be signed in with either the Owner or Center manager roles.
You must maintain a unique email address and a unique payout bank account for the Zenoti Payments account.
If your business is in multiple countries, you must use a separate Zenoti Payments account for each country.
Note
Documents should be uploaded for each account. Verification will also be done for each account.
Country | Company Information | Personal Information /Document | Bank Documents (any one of the following) |
Australia | Australia Business Number (ABN) | NA/Passport, Government ID Card, Driver's License | a) Bank Statement b) Voided Check c) Online Banking Screenshot |
Austria | Firmenbuchnummer | NA/Passport, Government ID Card, Driver's License | |
Canada | Business Number | Social Insurance Number/Passport, Government ID Card, Driver's License | |
Czech Republic | ICO - Company Identification Number | NA/Passport, Government ID Card, Driver's License | |
Germany | Handelsregisternummer | NA/Passport, Government ID Card, Driver's License | |
Irelands | Company Number | NA/Passport, Government ID Card, Driver's License | |
Netherlands | Kamer van Koophandel (KvK) | NA/Passport, Government ID Card, Driver's License | |
Switzerland | UID/IDE/IDI - Unternehmens-Identifikationsnummer | NA/Passport, Government ID Card, Driver's License | |
United Kingdom (UK) | Company Number | NA/Passport, Government ID Card, Driver's License | |
United States (US) | Employer Identification Number (EIN) | Social Security Number/Passport, Government ID Card, Driver's License | |
Malta | Company Registration Number | NA/Passport, Government ID Card, Driver's License | |
Spain | Company Registration Number | NA/Passport, Government ID Card, Driver's License |
After you submit your documents and complete the configuration of Zenoti Payments, your account is sent for KYC (Know Your Customer) verification. This verification process constitutes the following:
Automatic verification, which takes up to two business days.
By default, a new account is sent for automatic verification. Here the system matches the business name in the Tax Identification Number (or any other submitted ID), and the business name entered in Zenoti. If there is a mismatch, the verification fails. You have three attempts to upload appropriate documents and pass the verification.
Manual verification, which takes up to seven or more business days.
If automatic verification fails even after three attempts, the account is sent for manual verification.
Important
You can process payments in Zenoti, while your account is under KYC verification or in KYC fail state.
However, you will not receive payouts. In addition, if the account is in a KYC fail state for more than 30 days, the transaction amount will be refunded to the guests. Hence, it is important to ensure the KYC passes for your account within 1 week.
If verification fails, Zenoti Payments will send you an email stating the reason and the next steps.
The business name on the Company details page and the business name in the Tax Identification Number (or other submitted ID) do not match.
The uploaded ID document does not meet the required quality criteria, such as.
Validity (of passport, or driving license)
Must be in color, cropped to fit, and straightened
For passports, the Machine Readable Zone (MRZ) should be visible.
File format: JPG, JPEG, PDF, and PNG
File size 4 MB (max)
Bank account details do not match the uploaded bank document.
After you set up the account in Zenoti and configure the card readers, Zenoti recommends you perform a test transaction to validate the amount credited to the bank account in T+2 days. This will confirm that your account is successfully verified and you are ready to accept payments.
Set up your account
After accepting the terms and conditions, and verifying your email ID with OTP, you must proceed with providing KYC details and store details.
Provide KYC details
Details | Points to remember |
|---|---|
Business details | The Legal Business Name field should match your business registration documents. In the Business Website field, you can use the URL of your Zenoti Webstore or the social media profile of your business. ImportantChanging bank account information will trigger KYC verification. If the KYC verification fails, you will see the details of the failed KYC verification here. It may take up to two business days for your new account to be verified and made live. You will not receive any payouts during the verification period. However, you can still continue to accept payments from your guests. |
Shareholders details | Provide the details of all the individuals who own 25% or more in your company. If no one owns more than 25%, provide the identity of the individual who can make decisions for your business. You can nominate one of the shareholders as the authorized signatory. If the authorized signatory is someone other than the shareholders, you must provide their details in the subsequent step. |
Signatory details | A signatory is authorized to authenticate or sign documents, contracts, or regulatory filings on behalf of a business. You may assign a shareholder as your authorized signatory. Otherwise, provide the details of your signatory. |
Payout bank Details | Routing numbers are unique to the US and Canada. For the United Kingdom, enter Sort Code and for Australia, enter the ABA or Fedwire number. When you upload the proof of account, ensure the bank's logo, your account number, and the routing number are visible in all the documents. The name on the bank proof should match the value in the Account Owner Name field. If the bank account is in the name of the company/business, the Account Owner Name field will be the business's name. Zenoti recommends you use a company bank account instead of a personal account. |
Provide store details
Guest Statement Descriptor: Statement descriptors explain charges or payments on bank statements. Using clear and accurate statement descriptors can reduce chargebacks and disputes. Banks and card networks require the inclusion of certain types of information that help customers understand their statements, and statement descriptors provide this useful information. Enter your business Statement Descriptor in this field.
Note
Zenoti recommends “Business Name - Center Name” as a format for statement descriptors. For example, if your business name is Spa Bliss and you have a center in New York, your statement descriptor will read Spa Bliss - New York.
Payout Descriptor: Payout descriptors explain payouts on your bank statement. This should be 5 - 15 characters and should not contain any special characters such as <,>,*,",'
Store Address: Enter the address of your store or center. If you have multiple stores or centers, you can enter your registered business address in this field.
Note
If your business has a store number and you want to update this information, you can add the Store Number and the house number in the field Enter House Number. Zenoti recommends you use the following format:
Format: "Building Number"-"Store Number". For example, if the building number is 3212, and if the store number is 1217, you will enter 3212-1217 in the Enter House Number field.
Set Up HSA and FSA Payments
HSA and FSA cards are only for healthcare services. To accept these cards, your business must be classified as Medspa, and all required information must be provided.
To simplify the setup of Health Savings Account (HSA) and Flexible Spending Account (FSA) payments, Zenoti includes these steps in the onboarding process.
During setup, if you select Medspa as your industry, the setup continues in the same flow and requires you to provide additional due diligence details, including eligible services, the process followed, and practitioner information with valid licenses.
Once this information is submitted, validated, and the updated terms and conditions are accepted, your business can accept HSA and FSA card payments..
You must complete all mandatory fields. Practitioner license details and other required information are validated as part of the setup.
National Provider Identifiers (NPI) numbers, along with all the mandatory information will be validated.
After successful validation of the mandatory information, accept the detailed terms and conditions.
After completing the setup, your business will be able to accept HSA and FSA cards seamlessly.
If you change your industry type from Medspa to any other category, you will no longer be able to accept HSA and FSA card payments.
Note
Businesses that have already completed their HSA and FSA DocuSign offline will be able to view the status but not the details they submitted, in Zenoti.
Configure payment details and transaction types
Configure payment options
The payment options allow you to configure important settings such as AVS, saving cards on the Web and Mobile, and signature collection.
At the organization or center level, click the Configuration icon.
Search for and select Payment processor onboarding
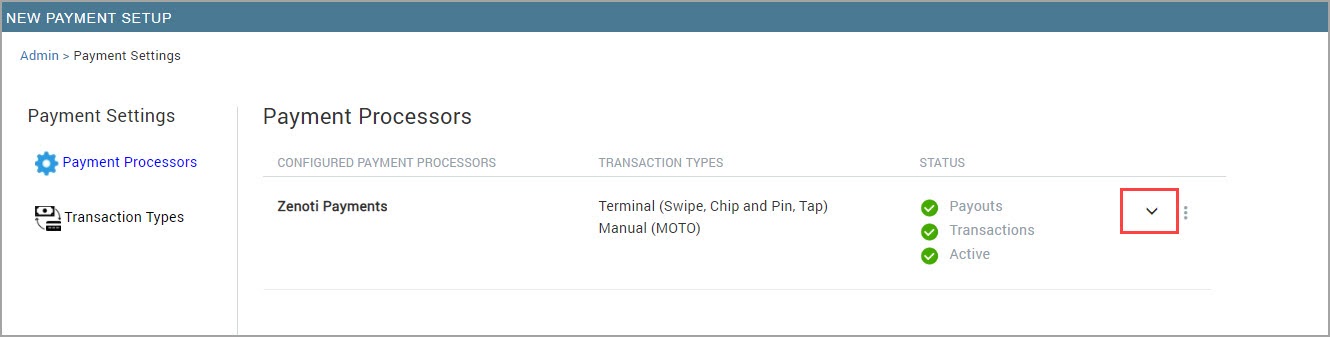
For the payment processor that you have configured, click the drop-down arrow.
Under the Payment options section configure the following settings:
Enable Address Verification (AVS): AVS or Address Verification System prevents fraudulent transactions by prompting the guest to enter the billing address while saving a card in Zenoti. Select this checkbox if you want to enable AVS for your business.
Make AVS Mandatory in POS: Select this checkbox to make the billing address mandatory while processing card payments in POS. The billing address includes PIN code which is mandatory.
Decline Transactions with Incorrect ZIP Code in POS: Select this to automatically decline POS transactions if the ZIP code entered does not match the ZIP code on file with the card issuer.
Decline Transactions with Incorrect ZIP Code in Webstore and Mobile App: Select this to decline transactions for guests using the Webstore or Customer Mobile App if the entered ZIP code is incorrect.
Decline Transactions with Incorrect ZIP Code for Recurring Transactions: Select this checkbox to prevent fraudulent recurring charges by validating the ZIP code associated with the payment method used for subscriptions, memberships, and other recurring payments.
Enable signature collection on POS: Select this checkbox if you want your business to collect the guest’s signature while taking payment.
Allow saving cards on web and mobile POS: Select this checkbox to save cards on Zenoti Web and Zenoti Mobile.
Auto-save cards for future use: Select this checkbox to autosave the guest’s cards for future use.
Allow saving cards on Webstore and Mobile app: Select this checkbox to save cards on Webstore and Mobile app.
Click Save.
Set Zenoti Payment as the processor for transaction types
Zenoti allows you to configure transaction types for all your business channels (in-store and online). This gives you the flexibility of accepting payments both online and offline.
At the organization level or center level, click the Configuration icon.
Search and select Payment processor onboarding.
Under Payment settings, select Transaction types.
For the transaction type you want to change, click Change, and then select Zenoti payments.
Click Save.
Add terminals
Required roles: Owner
After configuring payment options and selecting transaction types, the next crucial step is to add terminals to Zenoti Payments. This enables Zenoti to connect with card readers and process card payments seamlessly.
Zenoti Payments supports the following card readers:
Verifone E285 & Verifone E285P
Verifone P400 Plus
Castle S1F2
Verifone e355
Verifone V400m
Castle S1E
Castle S1E2L
P630
AMS1
m400
BBPOS WisePOS E/ BBPOS WisePOS E Cloud
The BBPOS WisePOS E Cloud is available so that you can have your terminal in a different network from the original terminal. After you configure this, your terminal can work remotely.
All of the card readers support swipe, chip and pin, and tap-based cards for easy payment collection.
At the organization or center level, click the Configuration icon.
Search for Payment processor onboarding and under Payments, select Payment processor onboarding.
Under Payment processors, select the processor you want to configure and click Setup.
Complete the required information for the sections.
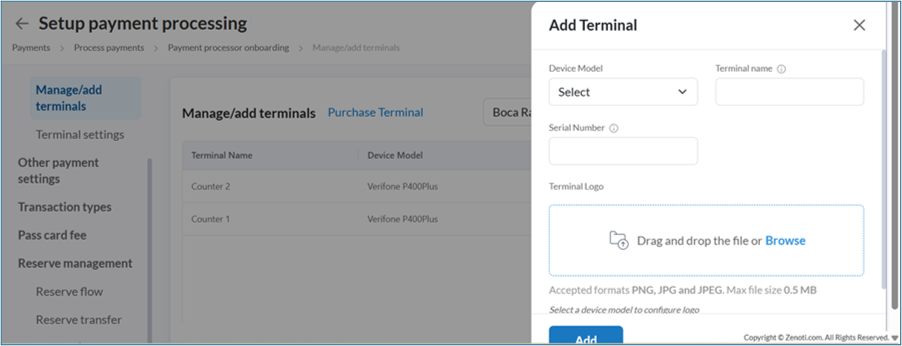
Click the Terminals tab, select the model to add, and provide the required information.
Choose a device model.
Terminal Name: You may have multiple terminals in your center. It is recommended that you name your terminals properly for easy identification and payment collection.
Serial No: The serial number will be on a label behind the terminal and will be denoted by S/N.
For Verifone terminals, the serial number is on a label under the device.
For WisePOS terminals, you must generate a pairing code on the device.
Terminal Logo: Upload a logo for the terminal. Drag and drop an image file or click Browse to select one.
Accepted formats are PNG, JPG, and JPEG, with a maximum file size of 0.5 MB. If no logo is uploaded, the Zenoti logo is used by default.
Note
The logo you upload applies to the specific terminal model. Editing it for one terminal will impact all other terminals of the same model within your center.
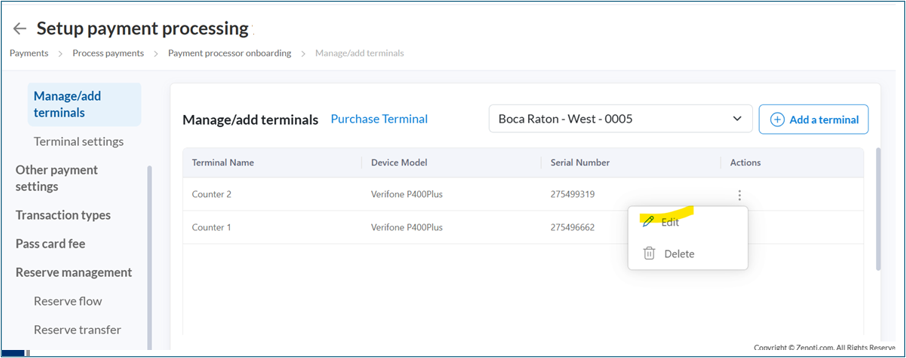
You can add or update the terminal logo at any time. On the Manage/add terminals page, click the three-dot menu (⋮) next to the terminal and select Edit.
Click Add.
Click Next.
Interchange fee
Interchange fee is a charge levied by the cardholder's bank for each transaction processed through a card network, such as Visa or Mastercard.
For every transaction that occurs through a card network:
The receiving bank pays an interchange fee to the cardholder's bank.
This fee covers the cost of processing the transaction, as outlined by financial regulations and card network rules.
Your business incurs this interchange fee as part of your overall credit card processing charges.
View the payment rates for your business
At the organization or the center level, click the Configuration icon.
Search for and select Payment processor onboarding from under Payments.
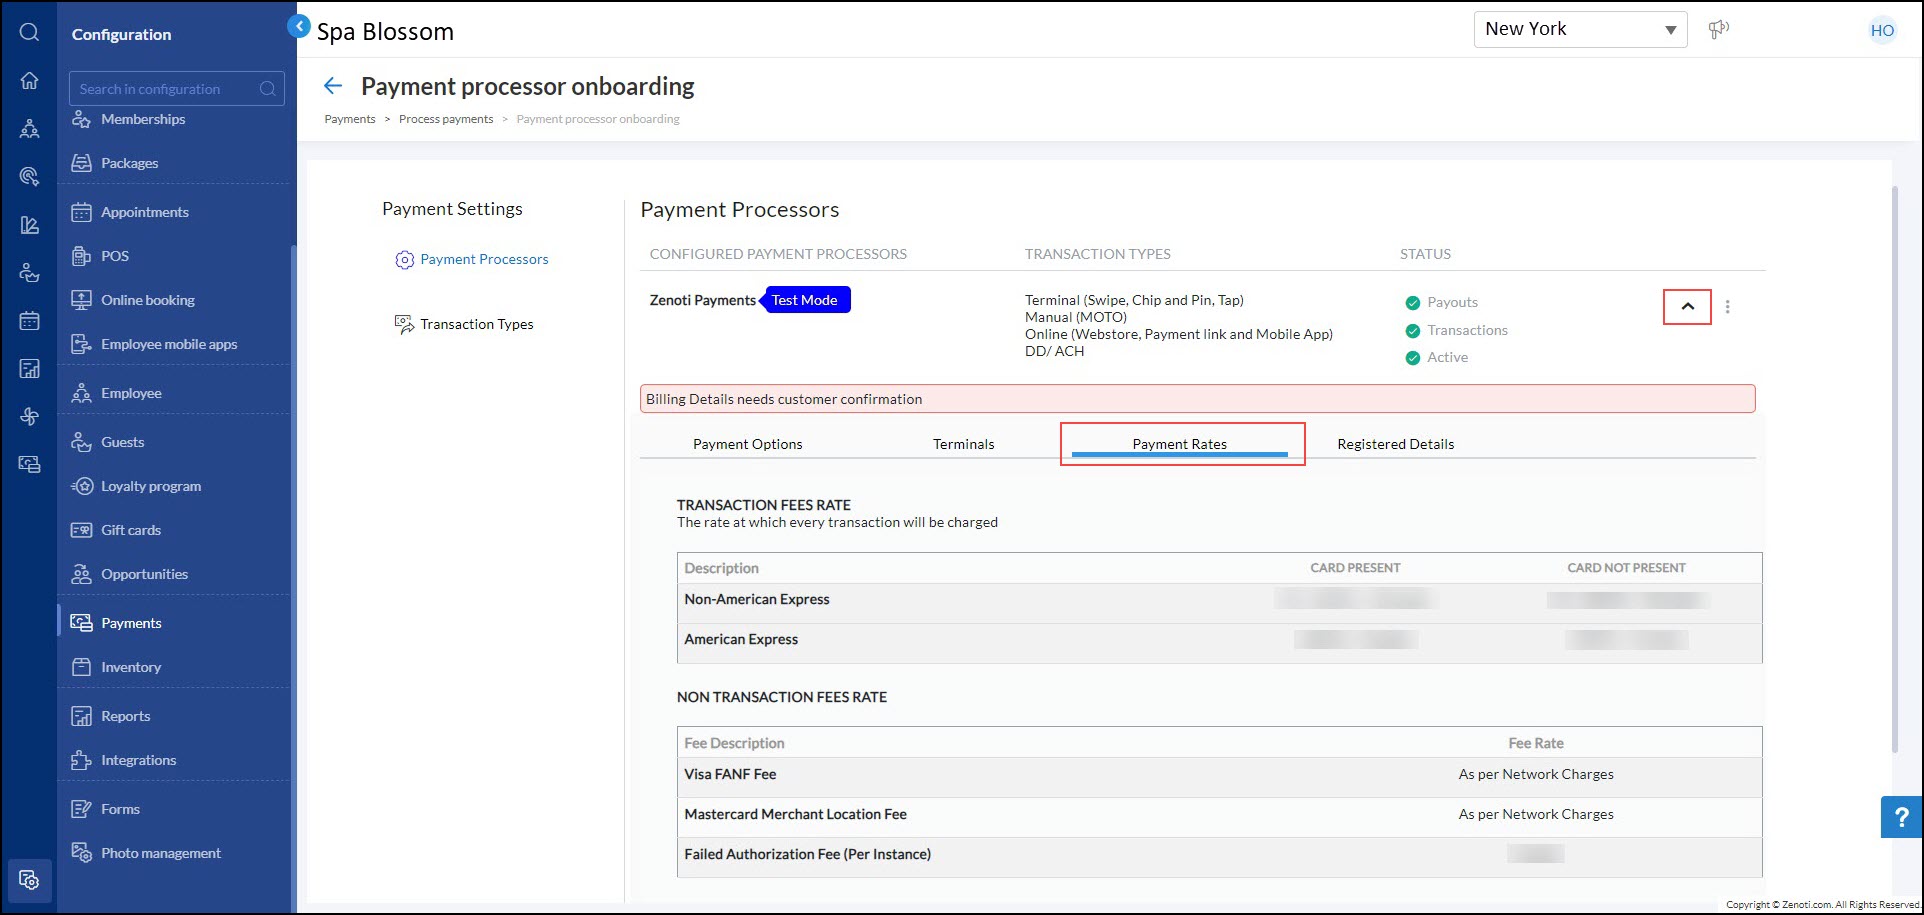
Expand the details for the configured Zenoti payments processor.
Select the Payment rates tab.
Points to remember
The card processing fee comprises the following three fees
Acquirer Markup: Charged by the acquirer for handling funds from your guests.
Card Scheme Fees: Imposed by the card scheme (e.g., Visa, MasterCard) for network usage.
Interchange Fee: Levied by the issuing bank (the cardholder’s or guest’s bank).
Interchange fees make up the most significant portion of card processing fees.