FAQ and troubleshooting
Create a service and product discount
Example: Create a discount that provides 10% off on all services and 15% off on all products.
Based on your role and access, at the organization or center level, click the Marketing icon and navigate to Offers > Discounts.
The Manage discounts page opens.
Click Add Discount.
The Create New Discount page appears.
Enter the name for the discount and optionally a description.
For Multiple campaigns can be applied on, select Single Invoice.
For Discount, select the Item level option.
As we want to provide discounts only on services and products, under Item level, select Define discount for each selected service and Define discount for each selected product.
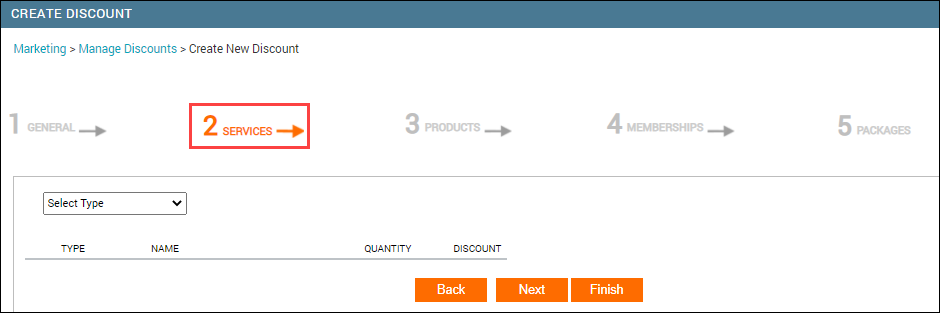
Click Next.
The fields in the Services tab appear.
As we want to provide a discount on all services, from the Select Type drop-down, select Category.
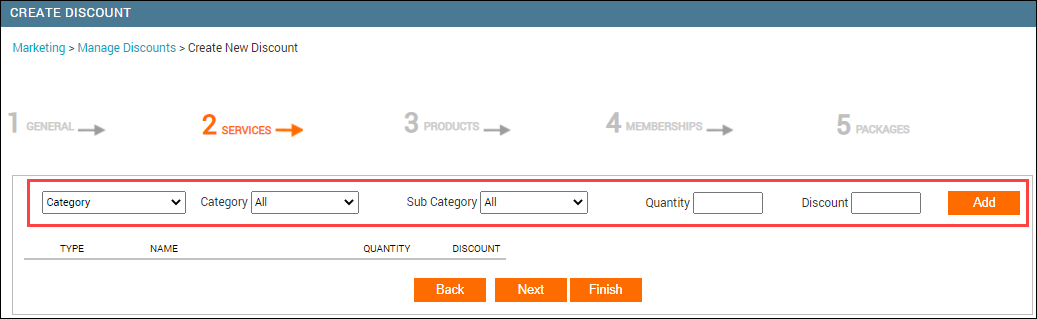
In the Discount box enter 10%.
Note
If you do not add % after the number, Zenoti assumes that you wish to give a cash discount of an amount you entered in the field.
Click Add.
The service discount is added.
Click Next.
The fields in the Product tab appear.
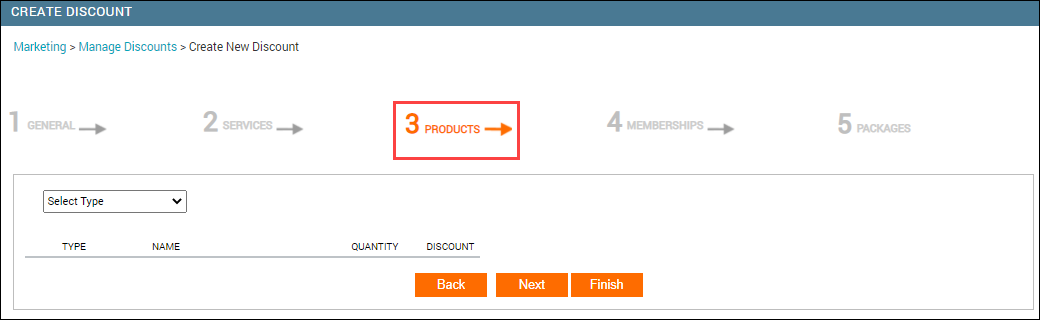
As we want to provide discount on all products, from the Select Type drop-down select Category.
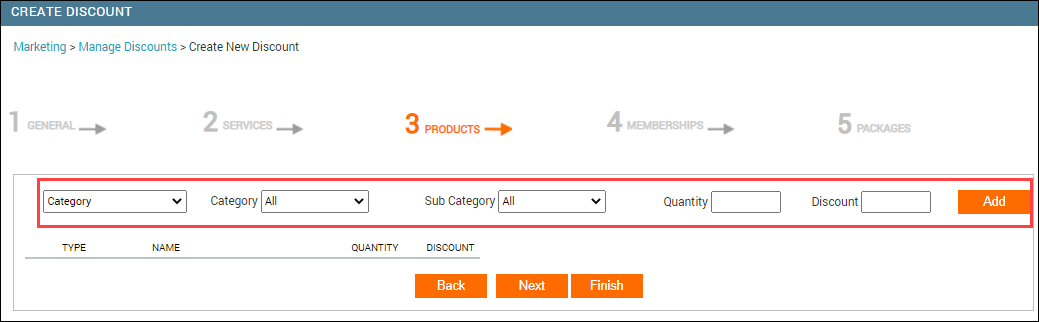
In the Discount box, enter 15%.
Click Add.
The product discount is added.
Click Finish.
The discount is created.
Note that the discount status shows as Not In Use. To make this discount active, you must assign this discount to a campaign.
Define product promotions based on final price discount
Businesses need a way to increase sales of not-so-popular products by offering a final price discount on such products.
Let’s say that the LA center has the following products for retail:
Hair Shampoo @ $38
Hair Conditioner @ $45
Hair Oil @ $120
Now, the LA center wants to run a promotion for Mother’s day and sell the three hair products at a discounted price of $150 (the actual total price of all the three items otherwise is $203). This is a final price discount, not a flat discount.
In Zenoti, you can define give promotional final price discounts on items.
Either at the organization or center level, navigate to Marketing > Discounts.
The Manage Discounts page appears.
Click Add Discount.
The Create a New Discount page opens and shows the General tab.
For Multiple campaigns can be applied on, select Single Invoice or None.
For Discount, select Item level and from the list, and then select the Define discount for each selected product option as the final price discount is applicable to only products.
Click Next thrice to go to the Products tab.
Complete the steps on the Products tab.
Important
You cannot combine Final Price discount with Percentage or Flat Value discounts.
Define Service Promotions Based on Final Price Discount
Businesses may run monthly promotions in which guests can buy a set of services at a discounted price.
Let’s say that the LA center has the following hair services :
Hair Shampoo @ $38
Hair Conditioner @ $45
Hair Oil @ $120
Now, the LA center wants to run a promotion for Mother’s day and sell the three hair services at a discounted price of $150 (the actual total price of all the three services otherwise is $203). This is a final price discount, not a flat discount.
In Zenoti you can define give promotional final price discounts on items.
To create a final price discount for services
Either at the organization or center level, click the Marketing icon. Navigate to Offers > Discounts.
The Manage Discounts page appears.
Click Add.
The Create a New Discount page opens and shows the Generaltab.

For Multiple campaigns can be applied on, select Single Invoice or None.
For Discount, select Item level and from the list, and then select the Define discount for each selected service option.
Click Next thrice to go to the Services tab.
Complete the steps in the Services tab.
Important
You cannot combine Final Price discount with Percentage or Flat Value discounts.

Give better discounts at an item level
If a discount campaign that applies to two different services or products is applied to an invoice, the discount applies to both services and products. If one of the items in the invoice is eligible for more discounts, you can remove the discount from that item by clicking the Remove option and then applying the other discount.
Important
You can apply multiple campaigns on an invoice, only if the Multiple campaigns can be applied on option is enabled.
Example: Let's say that your center offers a Flat 20% Off discount on all Hair Treatment services. If you add the Hair Color service and the Hair Shampoo service, then the discount is applicable to both services. But, if your center is promoting a hair shampoo, and you have a better discount of Flat 50% Off, then you can remove the Flat 20% Off discount applied on the Hair Shampoo service and apply the Flat 50% Off discount.
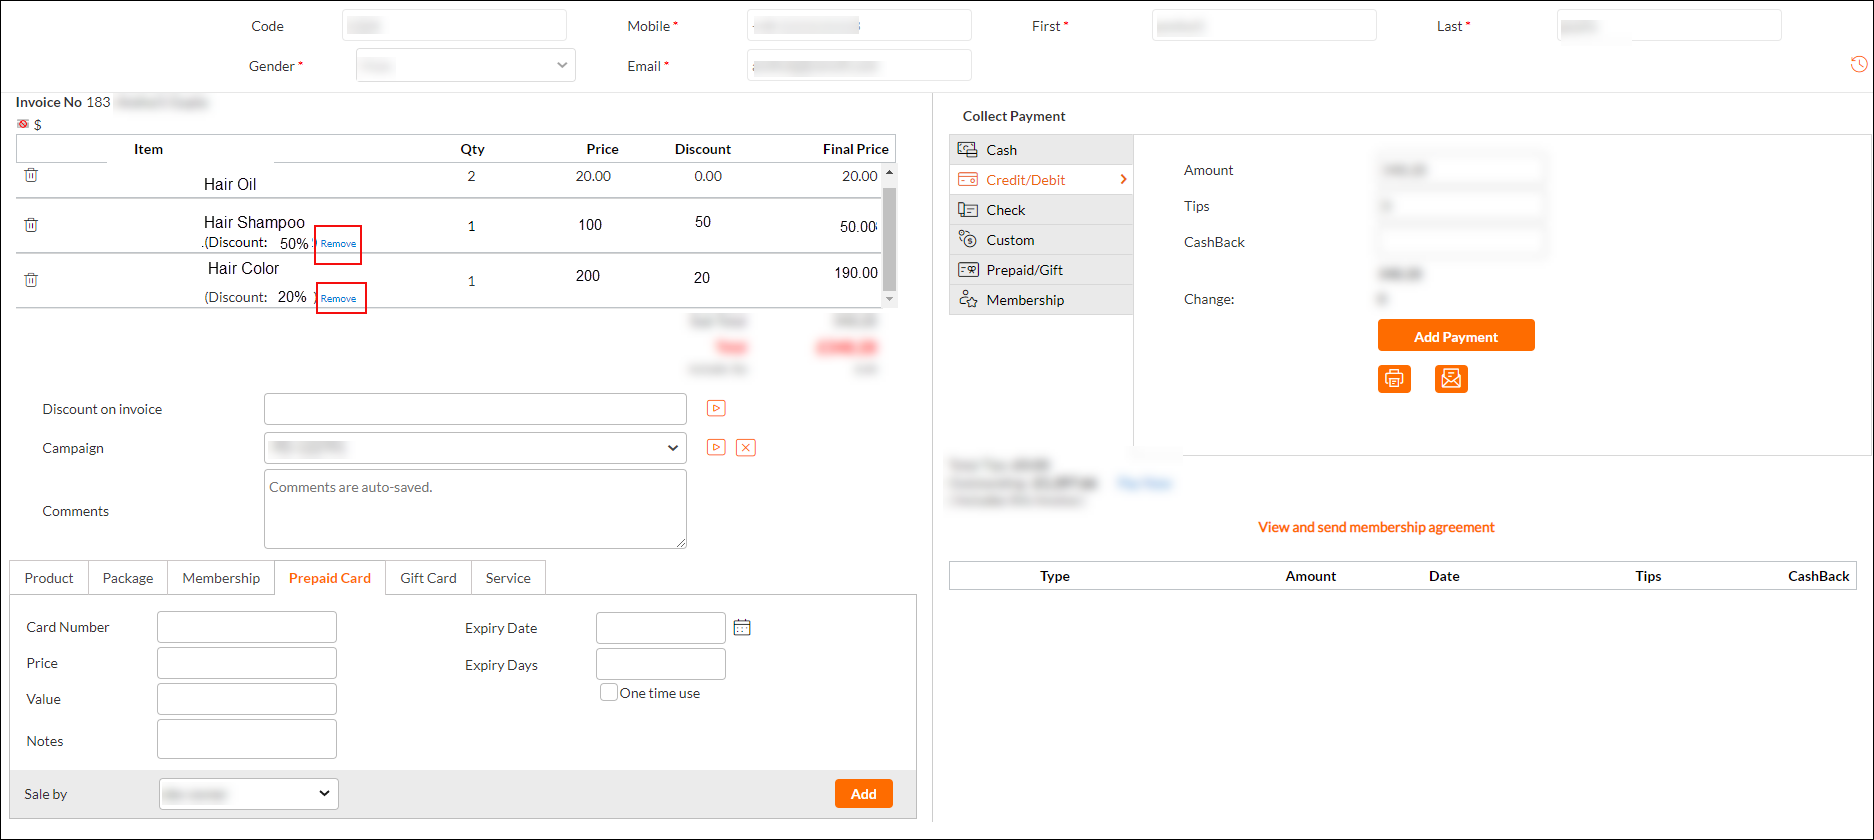
Note
By default, the Remove option is available for all types of discounts.
Apply discount on the most expensive item in an invoice
When you plan to offer discounts to your guests, especially on retail, you might want to decide on which item the discount be applied to. For example, if you want to make an offer such as: Get 40% discount on purchase of Cool Skin Care Combo that contains a Facial Mask (40$) + Skin Toner (60$) + Aloe Vera Cream (90$), you need to decide on which product in the combo, you would like to apply the 40% discount during the billing - the least priced product or the most expensive product.
When you create an item level discount in Zenoti, the discount, by default, is set to be applied to the least priced item in an invoice. If you want to apply a discount on the most expensive item, you can change the setting in the Create or Edit Discount page.
Open the Create Discount window. (Marketing > Offers > Discounts > Add)
Click the item level option.
Next to Apply On, select the Most Priced Items option.
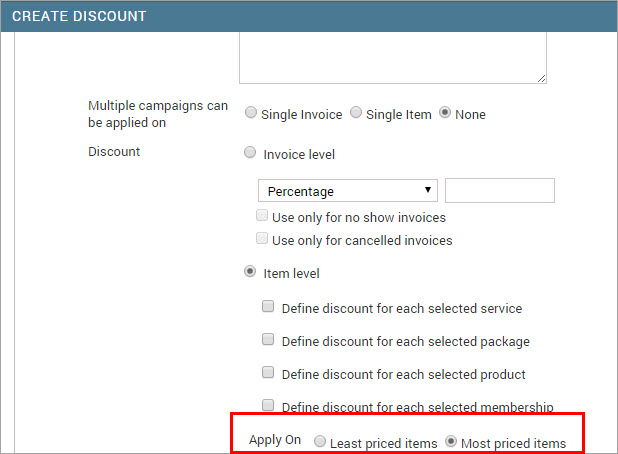
As per our example discount offer: Cool Skin Care Combo, if you select Least priced items, the discount will be applied on Facial Mask (40$) and if you select Most priced items then, the discount will be applied on Aloe Vera cream (90$).
Redeem a discount voucher
Open the guest invoice.
From the Campaign list, select the name of the discount campaign associated with the vouchers. After you select the campaign, the Voucher code box is displayed.
Discounts associated with Advanced Marketing campaigns are displayed with the prefix special promotion.
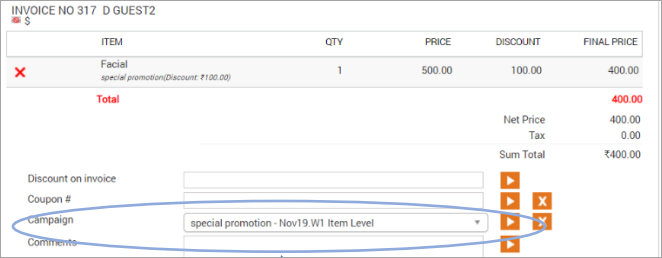
Enter the code and click the apply icon.
Click OK on the alert, and check if the discount is deducted from the amount.
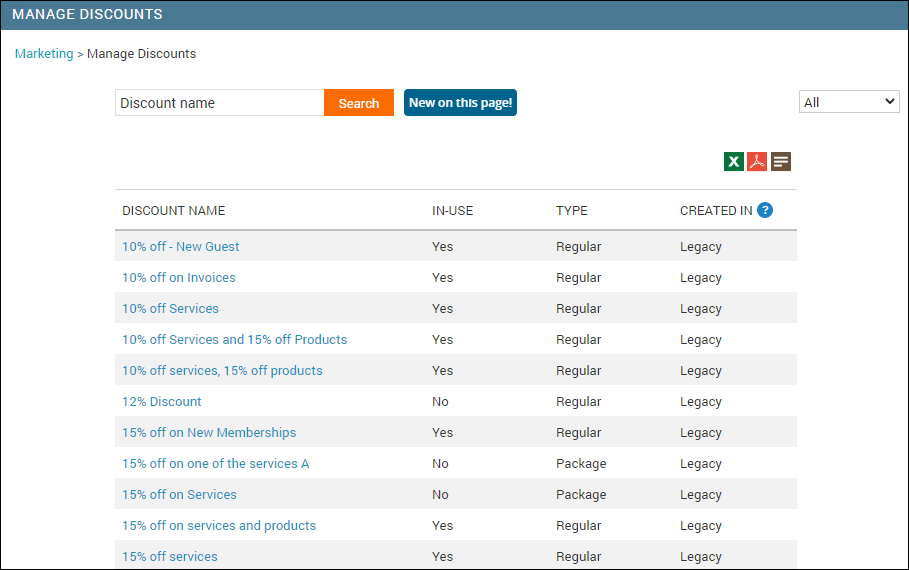
What are legacy discounts, and how do I manage them?
What is a legacy discount?
Any discount created before the Oct 28, 2020, release is considered a legacy discount and is not categorized by location.
Important
For single-center businesses, any discount will be created as a legacy discount.
How do I manage legacy discounts?
If you want to have the edit/delete restriction on legacy discounts, follow these steps:
Navigate to Marketing > Discounts.
The Manage Discounts page appears.
If you are at the organization level or zone level, you will see the following page:
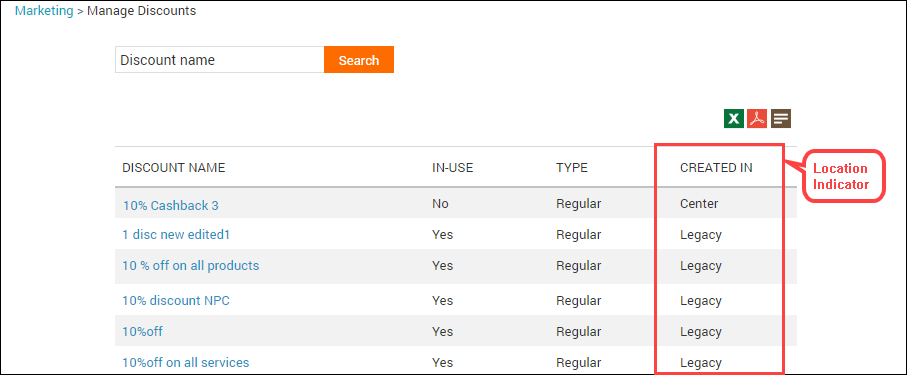
If you are at the center level, you will see the following page:
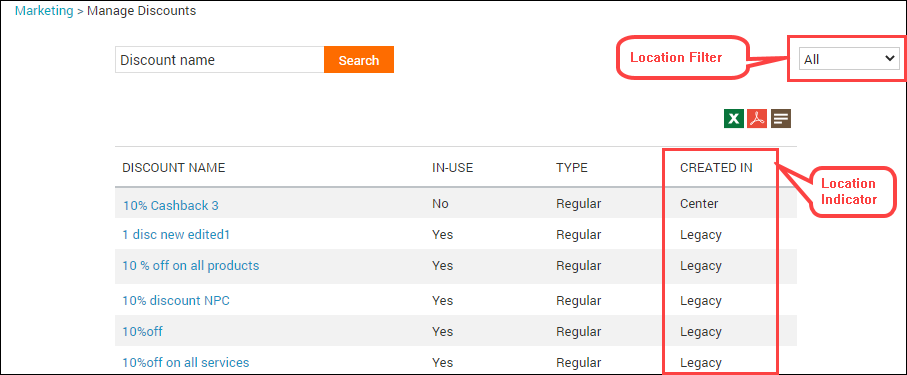
In addition to the Created In column, you can also see the filter to view discounts based on the location where discounts are created.
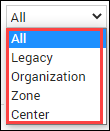
To view all legacy discounts, select Legacy from the filter.
For each legacy discount, create a new discount.
Replace the legacy discount with the newly created one for services, products, memberships, packages, campaigns, and coupons, wherever the legacy discount is associated.
FAQ: Why am I unable to apply or manage discounts in Zenoti?
Managing and applying discounts in Zenoti may involve challenges due to user permissions, system configurations, or financial constraints. This FAQ covers common issues and solutions to help you resolve discount-related problems.
Role Permissions and Discount Access
Why can't I apply discounts in Zenoti?
Zenoti uses role-based permissions to control discount application. If you cannot apply discounts, your role may not have the required permissions enabled.
To resolve this:
Contact an owner or administrator to review your role and grant the appropriate discount permissions.
Ensure your role has discount permissions enabled for the specific center where you are working.
Why can't I edit discounts even with a manager login?
Your role may lack the specific permission required for editing discounts. Contact your administrators to enable discount editing permissions for your role.
Why do I see the error "You are not allowed to give more than 0% discount"?
This error occurs when your job's discount limit is set to 0%. Even with a title like "Manager," your job's configured limit may restrict discount application. Contact an administrator to update your job-level discount limit.
System Constraints Affecting Discounts
Why can't I apply a discount to an older invoice?
Discounts cannot be manually applied to invoices that are older than the financial lock period, which is typically 90 days. Ensure the invoice is within this period before attempting to apply a discount.
Discount Code Issues
Why can't I edit certain discount codes?
Some discount codes are created at the organization or zone level, which restricts editing permissions to Zenoti administrators. If these codes are unavailable or uneditable, contact your organization's Zenoti administrator to enable access or make the codes available across all locations.
Why can't I create new discounts?
Discount creation is controlled by role permissions. Certain roles, such as franchisee roles, may not have the capability to create new discounts.
As a workaround, use an existing discount (for example, a 50% discount already available in your account) and attach it to your media campaign.
FAQ: Why can't I apply discounts after updating my service catalog?
Why are my discounts not applying after I changed my service names?
When service names in your catalog change, existing discounts that were associated with the old service names no longer apply. Discounts in Zenoti are linked to specific services, so any changes to the service name or service code require you to update your discount configurations.
How do I fix discounts that stopped working after a service catalog update?
To resolve this issue:
Navigate to Marketing > Discounts and open the discount.
Navigate to the Apply to Services tab.
Dissociate the old services that are no longer valid.
Associate the new services as needed.
Click Save.
What should I do with discounts that are no longer in use?
If certain discounts are no longer relevant after updating your service catalog, mark them as inactive:
Navigate to the discount you want to deactivate.
Set the discount status to Inactive.
Click Save.
This keeps your discount list organized and prevents confusion during checkout.
FAQ: How do I configure and troubleshoot BOGO discounts in Zenoti?
BOGO (Buy One Get One) discounts are a popular promotional tool that offers customers discounts based on predefined purchase conditions. This FAQ covers how to set up, apply, and troubleshoot BOGO discounts in Zenoti.
Setting Up BOGO Discounts
How do I configure a BOGO discount for products?
Navigate to the Product Prerequisites tab when you are setting up your discount.
Set the Quantity to 1 to ensure the BOGO discount applies correctly.
If specific prerequisites determine the discount application, set the logical condition to OR so the discount applies when any requirement is met.
How do I configure a BOGO discount for services?
Select Item Level as the discount type.
Navigate to the Services tab and define the discount for each service as 100%.
Navigate to the Service Prerequisites tab and add the qualifying service with Quantity = 2.
Adjust the logical condition to trigger the discount when the predefined services are added to the invoice.
This setup ensures that one service is free when a guest purchases two.
How do I allow multiple BOGO discounts on a single invoice?
Navigate to the General tab in your discount setup.
Select the Allow Multiples for Buy X Get Y Offers checkbox.
Configure the application method to ensure the discount is compatible with invoice-level purchases.
How do I set up a "Buy 1, get the second 50% off" offer?
Set the Trigger Quantity to 1. This ensures that two items on the invoice qualify, and the cheaper item receives the 50% discount.
Note: Do not set the quantity to 2, as this may misinterpret the offer as "Buy 2, get the third 50% off."
Troubleshooting BOGO Discounts
Why is my BOGO discount not applying correctly?
If a BOGO discount does not apply on an invoice, try the following:
Navigate to the Product Prerequisites tab and ensure the Quantity is set to 1.
Change the discount conditions from AND to OR to allow discounts to apply under broader prerequisite conditions.
Temporarily change the discount type in the campaign, save, and apply. Then revert the discount type and save again.
Why do I see the error "Cannot apply campaign to invoice"?
This error occurs when the campaign configuration does not align with the invoice. To resolve this, adjust the Trigger Quantity in the discount setup to match the promotional offer parameters.
Why does the discount apply to only one product when a guest purchases two?
This is expected behavior based on your configuration. For example, a correctly configured "Buy 2, get one 35% off" discount applies the discount to only one product, as defined in the setup.