Manage Payments on Roster
Check prices in the roster
You can use the Price Check option in the Roster to check the prices of products, packages, and memberships.
At the center level, click the Fitness icon and navigate to Roster.
Click the Price Check icon in the top-right corner of the Roster.
.
Based on the item type, select one of the tabs from Product, Package, or Membershipfrom the Price Check box.
Start typing the name or code of the product, package, or membership in the Search field, and select the item whose price you want to check from the list of suggestions.
Close the dialog box to return to the Roster.
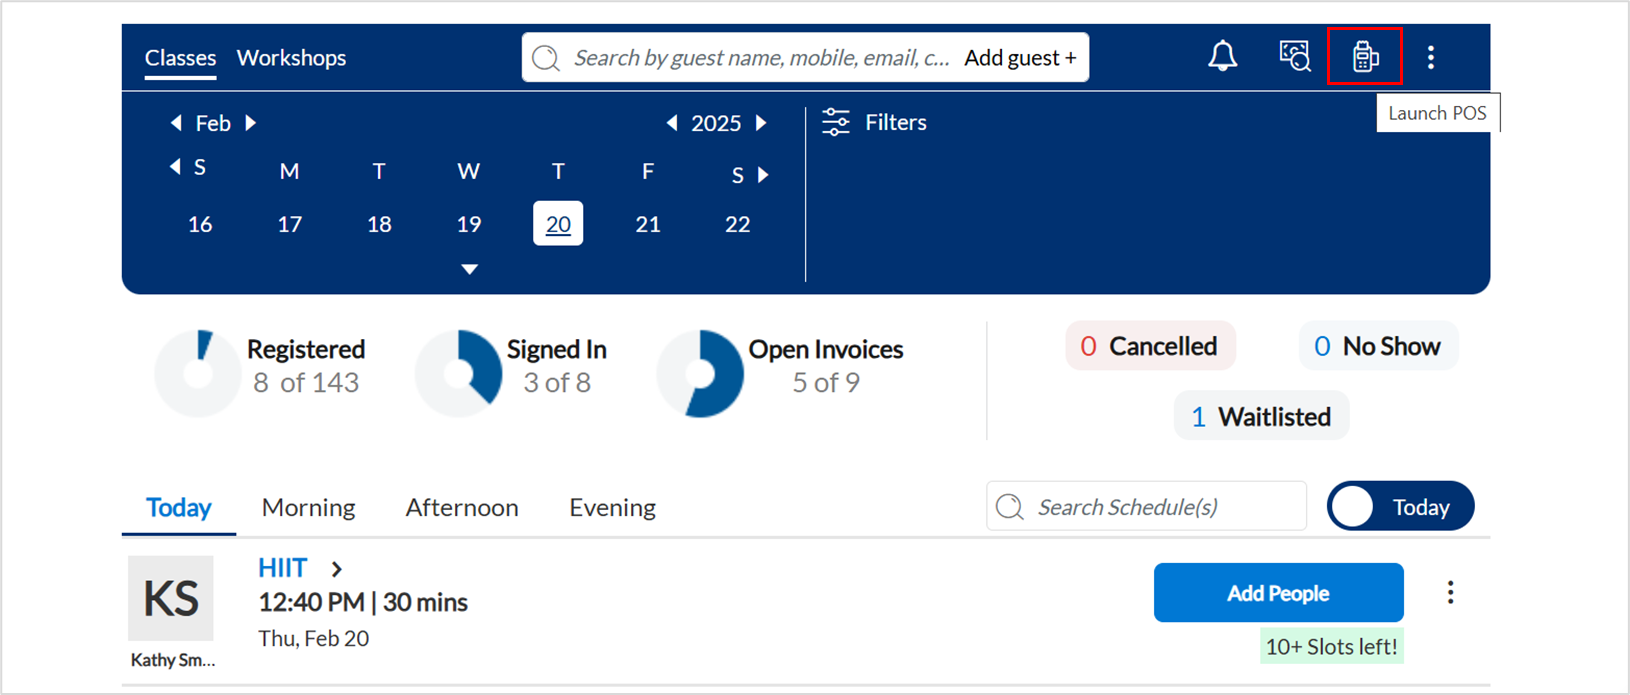
Launch point of sale (POS) from roster view
Point of Sale (POS) is a place on the appointment book where you can sell items to a student.
Launch POS.
You can launch POS from the roster view or a student entry on the roster.
On the invoice window, search for the student by name, email address, or phone number.
The left of the invoice is to add items and make adjustments such as discounts or campaigns. While the right side is to add payment.
Payment methods
The right-hand side of the invoice is to take payment from the student. There are various payment methods that you can choose from- cash, credit, custom, points, membership.
Some of these payment methods are:
Cash: To pay for the invoice through cash.
Amount: The amount paid by the student.
Tips: The amount the student paid for staff tips.
Change: The difference between the amount payable and the amount given by the student. This is auto-calculated.
Credit: To pay for the invoice through a card.
If the student has a card added to the profile, you can see the details.
Select the card on file and click Pay.
If the student wants to use a new card, select the Use a new card option and click Pay.
Custom: To pay from the invoice using a custom option such as a Groupon or a complimentary class.
Irrespective of which payment method you use, after selecting the payment method click Add Payment and close the invoice.
Close and print the invoice
Close and email the invoice (to the student)
Close invoice
For more actions on the point of sale, refer to the member actions on the POS article.
Transfer service credit for a class from one student to another
Students who have packages may want to share or gift one or more of their package class credits to their family or friends. Businesses that sell packages see this as an opportunity to attract new students to their classes; they can then run targeted campaigns on them to gain new clientele.
To transfer service credit for a class from one student to another:
From the Classes roster, search for and access the student profile of the student who wishes to transfer package credits.
Go to the Packages tab of the student profile.
From the Package Name column, click the name of the package from which the student wishes to transfer a package class credit.
If the package is active and has enough balance credits, you can transfer credits.
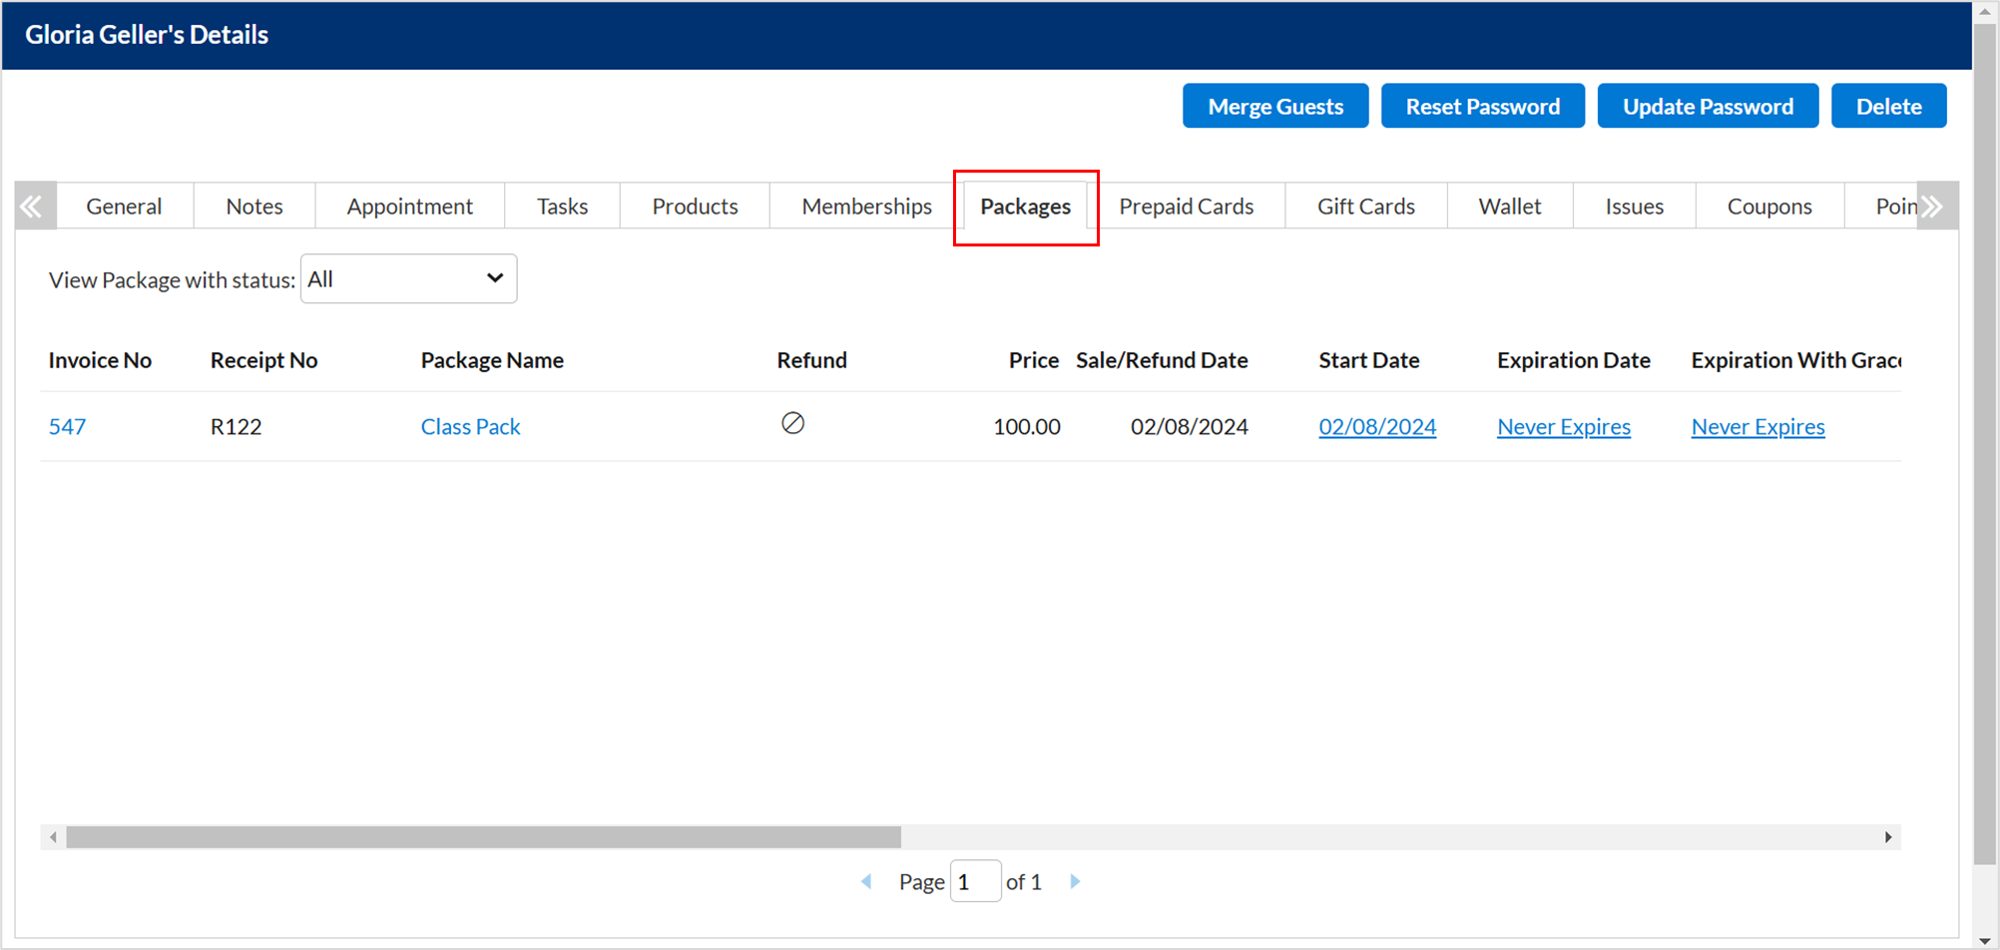
On the Packages Activity window, from the Balance column, click Transfer.
Enter the Quantity (number) of credits the student wishes to transfer and the Recipient name.
Click Save.
You get a confirmation message to say that the credit has been transferred successfully.
Notice that the number of credits in the student's profile under the Balance column is reduced.
The Wallet of the student (profile) to whom the credit was transferred, will show an increase in the Balance column for the credit transferred for this package.
Collect payment for drop-in students
Drop-in students do not have a package, membership, or a class pass but are dropping in to take a class.
Launch the Point of Sale.
Search for the student using the phone number.
Select the student from the list.
On the student invoice, go to the Package tab and select Drop In.
Click Add. The Drop In package is added to the invoice.
Sell the package to the student and close the invoice.
Navigate back to the original student invoice on the roster showing Not Paid.
To open the student invoice, click the payment status Not Paid.
From the Packages drop-down list, select the Drop In package.
To redeem the package benefit, click on the play button.
Close the invoice.
Add mat rental, towel rental, or water purchase
Launch Point Of Sale (POS) from the student's invoice or from the roster dashboard.
Under the Product tab, in the Product box, add the SKUs as follows:
1 for mat rental
2 for towel rental
3 for water purchase
Press Enter on your keyboard.
The SKU is added to the invoice.
Collect payment and close the invoice.
Refund membership EFT partially
At the center level, click the Fitness icon.
Navigate to Roster.
Search for the student by name, mobile number, email address, or code, and open the student profile.
Select the Memberships tab and click the arrow to refund the membership.
On the Refund window, select the checkbox for the membership.
On the Membership Refund window, in the Comments box, enter any notes that you want to add for the refund.
DO NOT select any checkboxes in this dialog box.
Click Save.
On the Refund window, in the Refund Amount box, enter the partial amount that you want to refund.
In the Comments box, enter any notes that you want to add for the partial refund.
Click Proceed to Refund.
Select how you want to pay the refund amount. By default, the payment method is auto-selected based on the payment method that the student prefers to purchase the membership.
Enter the refund amount for the desired payment method.
To issue a prepaid card (store credits), select Issue Prepaid Card.
Click Refund.
Click Process Refund & Close Invoice to complete the refund process.
Tip
Sell a retail item
Launch POS.
You can launch the Point of Sale from the roster dashboard or from a student entry on the roster.
Search for the student by scanning the key tag. Alternatively, you can also search by name, email address, or phone number.
However, if you selling to a new student, enter the student details. When you sell an item to a new student, along with the invoice, Zenoti also creates the student's profile.
If you've launched the POS from the student entry, the student details auto-populate.
At the bottom of the page, select the Product tab.
In the Product box, hit the Enter key on your keyboard and scan the barcode on the item. Alternatively, you can search for an item by entering the first three characters of the item name.
In the Quantity box, enter the quantity of the retail item.
From the Sale by list, select the employee who sold the item to the student.
Click Add.
Apply or remove a discount.
For a member with retail discounts, the discount is auto-applied to the applicable retail items. If you wish you remove this discount, click Remove.
For a non-member, if you are selling an item that's on sale, you can enter the discount (flat $ amount or %) in the Discount box.
For members, if you manually enter a discount, the original membership retail discount is removed automatically.
Add payment using any of the payment methods available.
Close the invoice.
Irrespective of which payment method you use, after selecting the payment method click Add Payment and close the invoice. You can perform additional steps listed below to close this activity.
Close and print the invoice.
Close and email the invoice (to the student).
Close invoice.
Refund a retail item
At the center level, click the Fitness icon and navigate to Roster.
Search for the student by name, mobile number, email address, or code, and open the student profile.
Select the Products tab.
Click the orange arrow for the item that the student wants to return.
On the Refund window, select the checkbox of the retail item.
In the Qty box, enter the quantity to be returned.
The refund amount is auto-calculated and displayed in the Refund Amount box.
In the Comments box, enter any notes that you want to add for the refund.
Click Proceed to Refund.
Select how want to pay the refund amount. By default, the payment method is auto-selected based on the payment method that the student prefers to purchase the item.
Enter the refund amount for the desired payment method.
If you want to issue a prepaid card (store credits), select Issue Prepaid Card.
Click Refund.
Click Process Refund & Close Invoice to complete the refund process.
Automatic invoice closure for signed-in students
Timely invoice management often diverts instructors' attention from delivering exceptional class experiences. Zenoti addresses this challenge with a feature that automatically closes class invoices for students who meet specific conditions. This streamlines studio operations and allows instructors to focus on student engagement instead of administrative follow-ups.
Zenoti checks for signed-in students on an hourly basis and automatically closes their invoices when:
The student is signed in for the class.
The student has an active membership or class package that applies to the class.
No invoice is closed if the student is not signed in, even if they have an active membership or package.
Manual Invoice Closure
If needed, instructors or front-desk staff can manually close invoices for a class.
Go to the Roster view for the class.
Click the Close Invoices icon at the top right.
The Invoice Status dialog box appears, showing open invoices.
Click Confirm to close all eligible invoices.
Impacts and Considerations
Only signed-in students with valid packages or memberships are eligible for automatic closure.
Invoices for no shows, cancellations, or unsigned students remain open.
The feature runs every hour, reducing manual follow-up for instructors and staff.