Manage e-Prescriptions on the ePrescribe Portal
Important
ePrescribe is available only in the US.
User roles in the ePrescribe portal
Full Admin
Identified as Admin in Zenoti.
This user has the authority to approve or deny prescribers for prescribing controlled substances.
Each time a new EPCS (Electronic Prescribing for Controlled Substances) prescriber is onboarded to the center, this user will receive a popup notification in the ePrescribe portal, allowing them to either approve or deny the prescriber’s access.
Approve EPCS prescribers
To approve an EPCS prescriber's access:
Open any guest profile in the ePrescribe portal. A pop-up appears, notifying you of pending EPCS requests and asking if you'd like to review them.

Click Yes.
The list of pending EPCS requests appears. You can either:
Click Approve next to individual requests, or
Click Approve All to approve all requests at once.

Note
In some cases, prescribers attempt to send EPCS prescriptions before receiving admin approval. When this happens, the portal displays an error message indicating that admin approval is still pending.
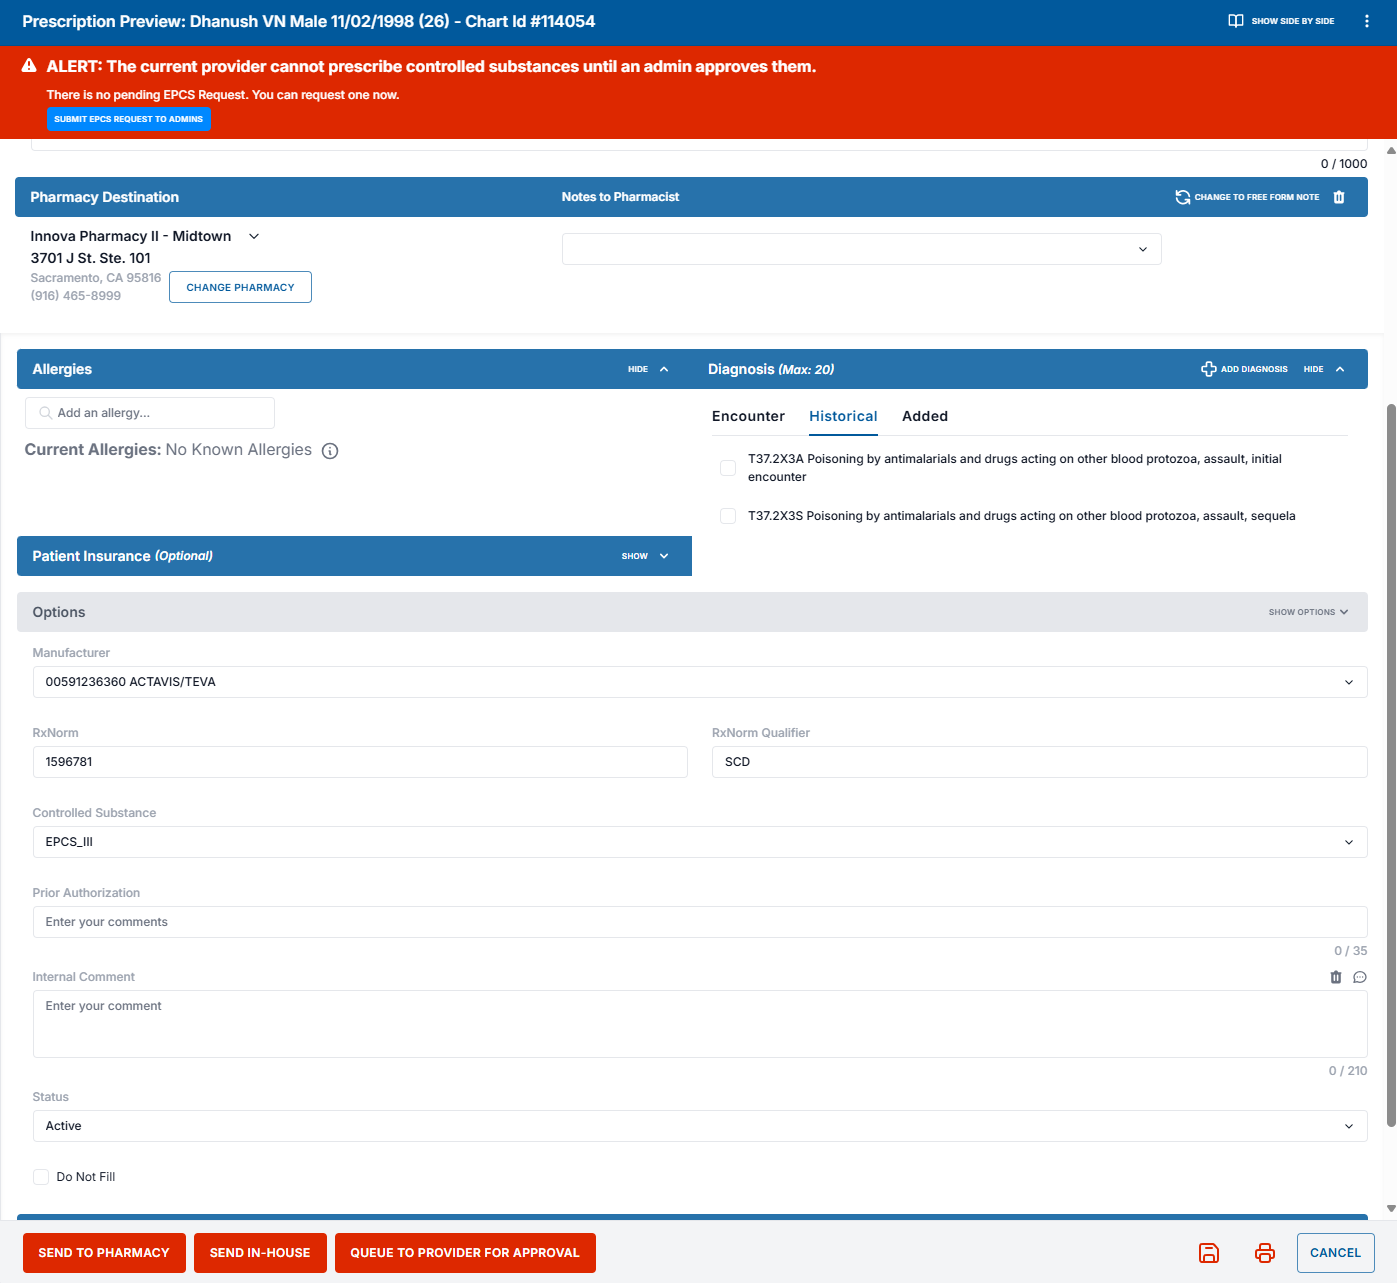
After an admin approves the request, the system does not automatically send the prescription. The prescriber must return to the saved prescription and manually click Send to Pharmacy.
To ensure a smooth workflow, prescribers should save the prescription and can return to it after admin approval to complete the submission.
Provider
Identified as Prescriber in Zenoti.
Has the ability to prescribe medications based on EPCS and Non-EPCS guidelines.
Can use the GRANT button to authorize support staff to queue and prescribe non-controlled substances on their behalf.
Authorize support staff to send prescriptions on behalf of a provider
As a prescriber or provider, you can authorize support staff to send non-EPCS prescriptions. To do so:
Select the provider and click Grant.
Select the user who should be the support staff and click Grant Access.

With these permissions, you can control:
Who can prescribe using your name and medical license.
What actions they are authorized to perform.
The provider can grant the following permissions to users prescribing on their behalf:
Users can send non-controlled prescriptions without provider approval
Selecting this setting means all the users that have permission to prescribe can prepare and send non-controlled e-prescriptions to the pharmacy.
If this setting is unchecked, users can only prepare and queue prescriptions to the provider. The provider then reviews, approves, and sends the prescription to the pharmacy.
Users cannot send controlled prescriptions
Users can prepare controlled prescriptions for you, but by law, only providers can approve and electronically prescribe controlled substances (EPCS).
Note
This setting cannot be removed, cleared, or modified.

Support Staff
Identified as Support Agent within Zenoti.
Can prescribe non-controlled drugs if granted permission by a prescriber.
Non-controlled substances:
Send directly to a pharmacy.
Queue for approval.
Each prescriber can set permissions to allow other prescribers and support agents to prescribe medications under their name and medical license. You can select the permissions you want to enable for all supporting users (support agents/other prescribers/admins).
View and print e-prescriptions
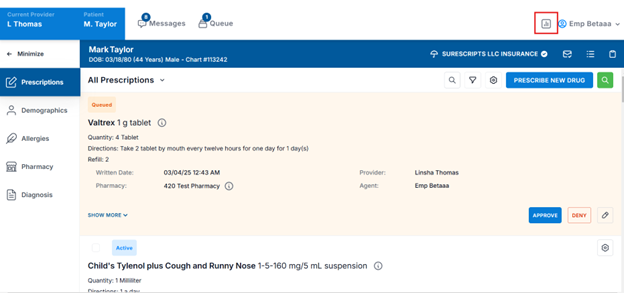
Open the guest's profile.
Go to the Prescriptions tab.

Click the View icon to view the prescription on the ePrescribe portal.
Click the Print icon to print the prescription.
Note
You cannot print prescriptions that were Denied or Deleted.
Note
The Prescriptions tab displays prescriptions across all centers at the organization level. At the center level, the Prescriptions tab displays prescriptions only from the selected center.
Add an e-prescription
Navigate to the guest’s profile and go to the Prescriptions tab.
Click Add Prescription.
This launches the ePrescribe portal.
Note
Ensure the guest profile includes Email, Date of Birth, Address Line 1, State, City, Country, and Pincode before adding a prescription.
The prescriber must have the required role permission to edit guest details.
On the ePrescribe portal, go to the Prescriptions tab, and click Prescribe New Drug or search for and select your desired medication from the Search for a Drug (Brand or Generic) search bar.
In the side panel that opens up, select the drug strength or click Add Format.
Complete the actions in Prescription Preview popup.
Click Send to Pharmacy or Queue to Provider for Approval.
Note
If you're prescribing a controlled substance, you must complete ID.me verification each time before sending the prescription to the pharmacy.
Prescribe as a support staff
Supporting users, such as nurses, medical assistants, or office staff, can assist in the prescription process within ePrescribe portal while ensuring compliance with provider approvals.
Their workflow is similar to that of a prescriber, except their actions only queue the prescription for provider approval. The prescriber will then review and approve it from their queue.
However, if a support staff member is creating a non-controlled drug prescription and has the necessary permission to send it directly to the pharmacy, they will have the option to send the prescription without requiring prescriber approval.
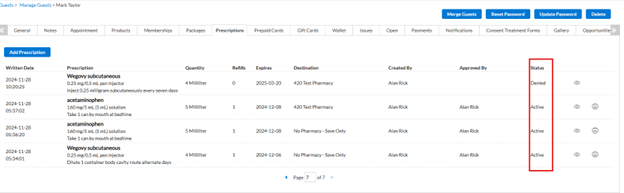
Status of prescriptions
A prescription can have one of the following statuses:
Active: The prescription is currently valid and ongoing, with possible refills remaining.
Archived: The prescription record is no longer in active use but retained for historical reference. This status must be manually set by the prescriber.
Cancel: The prescription was voided before being filled or accepted by the pharmacy.
Discontinued: The provider has intentionally stopped a medication that was previously prescribed, usually because this brand of medication is no longer manufactured.
Queued: The prescription is drafted and waiting to be sent to the pharmacy or requires further action.
Current Medication: Represents medications that the patient is currently taking.
In-House Pharmacy: Indicates that the prescription is being filled by the clinic’s internal pharmacy. To enable this status to appear on your ePrescribe portal page, contact ePrescribe Support.
Manage queued prescriptions on the ePrescribe portal
Approve or deny queued prescriptions
On the ePrescribe portal, go to the Prescriptions tab and click Queue.

Click Approve against the queued prescription to approve it.
Click Deny against the queued prescription to deny it.
Click Deny All in Queue at the top of the Prescription Queue popup to deny all the queued prescriptions.

Edit queued prescriptions
Navigate to the prescription queue and click the Edit icon against the queued prescription that requires modification.

Adjust details such as medication, dosage, quantity, directions, or pharmacy selection, as necessary.
After edits are complete, save the updated prescription for provider approval or send it directly to the pharmacy if permitted.

If the prescription requires provider review, it will remain in the queue until finalized and submitted.
Prescribe multiples of the same medication
You cannot prescribe a combination of different medications at once. However, you can prescribe multiples of the same medication at the same time.
Follow these steps to prescribe multiples of the same medication:
Click Schedule Multiple Rx on the Prescription Preview window.

Schedule multiple fills for each drug and change the quantity and pharmacy for each instance of the medication, as required.

Set up a compound medication on the ePrescribe portal
Click Prescribe New Drug.
Click Compound/Specialty.
Click Setup Compound.

Note
If you do not see the Setup Compound button, it means you do not have the necessary permissions to create a compound medication. However, you can still select an existing compound to prescribe for a patient, but you will not be able to create a new one.
Enter a Title and a Comment for the Compound and Click Add Compound.
Note
The Title will be the name of the compound you select onscreen; this name is only visible in the ePrescribe portal and does not appear in the prescription sent to the pharmacy. The Comment is also only visible in the ePrescribe Portal and will indicate to users what the medication is used for.

From the list of compound medications, select the compound you created and click Add.

In the Edit Compound window that opens, you can specify the Ingredients, Quantity, Directions, and Pharmacy for the compound medication.
Note
The Preferred Name and Ingredient 1 name can be the same.
Every compound medication must include at least one ingredient. If the preferred name sufficiently describes the medication, additional ingredients are not required.
However, you may choose to repeat the preferred name as Ingredient 1 in the drug description.
The Quantity for Ingredient 1 and the Final Quantity will be the same if there is only one ingredient in the compound.

Prescribe a compound medication on the ePrescribe portal
Click Prescribe New Drug.
In the medication search window that opens, click COMPOUND/SPECIALTY and select the medication you would like to prescribe from the list.

In the Compound selection window that opens, click Select next to the dosage of the medication you want to prescribe.

Note
If no compound medications are available for selection, you will need to either create a new compound medication or request an administrator to do so.
In the Create Compound preview window, you can verify and modify fields before you send the prescription.
Ensure that you set a pharmacy destination and complete any blank fields.

Click Send to Pharmacy or Queue to Provider for Approval to complete prescribing.
Note
If you're prescribing a controlled substance, you must complete ID.me verification each time before sending the prescription to the pharmacy.
View and manage drug details on the ePrescribe portal
Search for and select the medication.
You can also use the Filter option to further narrow down your search list or browse for the medication by Category or medication type.

In the Drug Details section, click the Favorite icon to add the medication to your favorites list. Click the Favorite icon again to remove the medication from your favorites list.

Click Settings and click Show Drug Information.
Choose a category to view detailed drug information.
If required, print the drug information by selecting a category and clicking Print.

To mark a medication as an allergy for the patient, click Set Allergy.
Fill fields such as Adverse Event Description, Reaction, and Severity, if needed.
Click Save.

To record a medication without prescribing it, click Set Current Medication.
Select either With Drug Name Only or With Detail (if you know the strength).
Complete the necessary fields and click Save.
The medication will now appear on the patient's profile with "No Pharmacy - Save Only" noted under "Pharmacy".

Manage pharmacies and preferred pharmacies on the ePrescribe portal
To search for a pharmacy:
On the ePrescribe portal, go to the Pharmacy tab.
Enter the Pharmacy Name in the search bar.
Enter the ZIP Code to find pharmacies in a specific area.
Enter the City and State for a broader search.
Click Search.
To search by Fax, Specialty, and NCPDP ID of the pharmacy click Show Advanced Fields.

To select a patient’s preferred pharmacy:
Click the pharmacy from the list of pharmacies displayed based on your search criteria.
If the pharmacy is frequently used, it appears under the Frequently Used Pharmacies section.
Click Add to Patient to set it as the patient’s pharmacy.
Click Set as Default to set it as the patient’s default pharmacy.

To remove a default pharmacy, click Remove Default.
To assign a nickname to a pharmacy, click Add Nickname and enter a custom label.
Note
If a patient's preferred pharmacy isn’t available in the ePrescribe portal, it means the portal doesn't support sending prescriptions to that location. In such cases, select an alternative pharmacy that the patient prefers and that is supported.
Closed pharmacy – Cannot find a pharmacy
All pharmacies in the United States that can receive an electronic prescription can be found in the ePrescribe portal.
It is possible for pharmacies to close and therefore not be available to electronically prescribe to. On the ePrescribe portal’s network, they are no longer listed when they close.
Although a web search may show that the pharmacy is still open, this typically means it is operating only for non-prescription items—such as over-the-counter medications, candy, or soda.
However, if the pharmacy cannot receive electronic prescriptions, it is considered Closed in the eRx network. In terms of e-prescribing, this means the pharmacy is not eligible to receive e-prescriptions, and a different pharmacy must be selected. Closed pharmacies do not appear in e-prescribe search results.
Manage messages on the ePrescribe portal
The Messages feature in ePrescribe helps users manage prescription-related communications between pharmacy and practice.
On the ePrescribe portal, click Messages.

Filter the messages by timeframe by specifying the Start Date and End Date.

Manage pending requests
Change Requests – Review modification requests and approve or reject them.
New Prescriptions – Approve, edit, or delete new prescriptions.
Errors – View and resolve prescriptions that were not accepted by the pharmacy.

View message history
Approved – List of approved refill requests.
Declined – Record of declined refill requests.
Cancelled – Details of prescriptions that were canceled.
Errors – Log of prescriptions with errors.
Additional message management options
Practice Selection: Choose the relevant practice location if you manage multiple practices.
Prescriber Selection: Filter messages by selecting a specific prescriber.
Manage Prior Authorizations (PA): Handle electronic Prior Authorizations (ePA) through the integrated CoverMyMeds system
Take action on messages
Approve or Decline prescription requests directly from the queue.
Use the edit option, if a prescription needs modifications, before approving.
Address any errors by reviewing pharmacy feedback and taking corrective action.
Add insurance information to the prescription
To add insurance information to a prescription:
On the Prescription Preview window of the prescription, click Patient Insurance.

Enter the required insurance details in the relevant fields.
After entering all the other required prescription details, click Send to Pharmacy.

Add insurance information to Quick Insurance Lookup
Click the icon highlighted and click +Add/Edit Insurance.

Fill in the required fields and click Save (all fields are optional). Select Add to Quick Insurance to easily access this information when you add prescriptions in the future.
Set Practice Defaults: The default settings below apply per Practice, ensuring that each prescription follows the selected practice’s preferences.
Default insurance means the same GoodRx coupon will be automatically added to every new prescription.

Cancel a prescription on the ePrescribe portal
On the ePrescribe portal, go to the Prescriptions tab.
Click Cancel against the prescription that you want to cancel.
This notifies the pharmacy of the cancel request.
Note
If the pharmacy has already filled the prescription and the patient has picked it up, the prescription can no longer be cancelled.

After you have initiated the cancellation by clicking Cancel Prescription, a pop-up message will appear, asking, "Are you sure you want to cancel the prescription?"
Click Yes.

The prescription shows the status as "Cancellation Pending".

If the pharmacy approves the cancellation, the status is updated to "Cancellation Approved".

The prescription line item in the Zenoti guest profile is marked as "Cancelled" after the pharmacy confirms the cancellation.
Access reports on the ePrescribe portal
To access reports on the ePrescribe portal, click the Reports icon.
You can access the following reports. Some are practice-related, while others are patient-related.
Report | Description |
|---|---|
Practice Report: Audit Log | Produces a log of user activities for a time frame showing primary application activities: Date, description of the activity, user and the patient info. |
Practice Report: Medication Users | Produces a list of all patients that have been prescribed a specific medication. |
Practice Report: Operational Record | List of patients and medications prescribed per provider with data metrics (total number of patients, age groups). |
Practice Report: Patient List | Lists all active and inactive patients per practice location. |
Practice Report: Patient Visits | Lists all patients a provider has seen at a practice over a period of time. |
Practice Report: Prescription Logs | Lists all medications prescribed at a practice. |
Practice Report: Prescription Logs by Prescriber | Lists all medications prescribed by a prescriber. |
Practice Report: User Controlled Substance | Lists all medications that have been prescribed over a period of time. |
Patient Report: All medication history | Prints report of all medications ever prescribed for a patient in the application. |