Create a membership
Zenoti allows you to create and sell two types of memberships:
Non-recurring memberships: Pre-paid memberships in which clients pay the membership fee at one go and use the membership benefits through the tenure of the membership. Zenoti lets you offer term-based memberships that expire after a specific period, such as 3, 6, or 12 months. For such membership plans, clients usually pay the membership fee in full and use the membership benefits throughout the tenure of the membership.
Recurring memberships: You can allow guests to pay the membership fee at regular intervals in terms of months and you can set up different schedules for benefits depending on the payment schedules.
Membership plans are set up at the organizational level. After the membership is created, it can be assigned to various centers as required.
Clone a membership
If you want to create a new membership that is similar to an existing membership, you can do this easily by cloning the existing membership. For example, if you have an active membership for which you want to change the price and offer the new price to new customers. You can clone the existing membership and assign it the new price.
The cloned membership will inherit the existing membership type - recurring or non-recurring.
At the organization level, click the Master data icon and navigate to Memberships.
The Manage Memberships page opens.
In the Name column, click the membership name.
The Edit Membership page opens.
Click Clone.
The Clone Membership dialog box appears.
Enter the required information.
Select the configurations to copy from the existing membership.
Some configurations are already selected for you. Clear the ones you don’t want and select the ones you want to keep.
Click OK.
To edit the cloned membership, in the confirmation message, click the link.
After you are done, click Save.
Impacts and considerations
When you clone a membership, the new membership will have the same essential characteristics as the original membership. For example, if you clone a recurring membership, the cloned membership will also be a recurring membership.
You cannot clear the General tab option while cloning a membership.
To avoid confusion, ensure services have distinct names. Similar service names can complicate bookings, memberships, and package redemptions for guests and staff. Ensuring that service names are clear and distinct will help to prevent such issues.
Create a Non-Recurring Membership
Learn how to create a non-recurring membership in Zenoti. Offer prepaid, term-based plans with flexible benefits, service credits, and expiration periods tailored to guest needs.
Overview
Non-recurring memberships are prepaid plans where guests pay upfront and receive benefits over a set duration—such as 3, 6, or 12 months. These term-based plans don’t auto-renew and are ideal for promotions, seasonal packages, or single-use offers.
Prerequisites
Ensure you have administrator access at the organization level.
Steps to create a non-recurring membership
At the organization level, click the Master data icon and navigate to Memberships.
Click Add new and select Non-recurring membership.
Step 2: Enter Basic Membership Information
Enter basic information such as:
Membership Name: A descriptive name for the membership.
Membership Code: This is split into two - Prefix and Seed Value. Together they help uniquely identify each instance of the membership. For instance, if you are running a Summer Special, you might set Prefix to SS and set Seed Value to 001. SS001 will identify the first membership you sell, SS002 will identify the second one, and so forth.
Note
Codes of deleted memberships cannot be used for new memberships.
Membership Identification: This value appears in the POS and lets you easily identify the membership plan.
Description: This is an optional field and lets you describe the plan.
The Active toggle lets you indicate whether the membership is available for sale. To be able to sell a membership at a center, along with the membership being active, on the Center tab, the specific center must be selected. An active membership cannot be sold at a center not chosen on the Center tab.
Note
When a membership is set as inactive, customers who have purchased the membership can continue to use the benefits accrued. However, the membership will not be available for sale on POS.
In the Define section, indicate what fees are applicable to the membership. The options you select here will appear on the Centers tab, where you can specify the actual numbers.
Setup Fee : Indicate whether the membership has associated setup fees.
Freeze Fee : Switch the toggle on to configure a fee associated when this membership is paused. Select the Manual option to specify the fee on the Centers tab. Select the Freeze Fee Reason option to apply freeze based on the applicable member freeze reason. You can also choose to charge a One time freeze fee, or collect a reduced Recurring fee until it is unfrozen.
Annual fee: When enabled, the following options appear for configuring when the annual fee collection begins:
From Sale Date: The annual fee collection starts from the date the membership is sold.
From First Redemption: Starts the annual fee collection from the date the membership is first redeemed.
After [___] Cycles : Starts the annual fee collection after a specified number of cycles. Contains a number input field to enter the count and a drop-down defaulting to Cycles (other option is Days).
Collect on Date __ Month __: Collects the annual fee on a specific calendar date. Contains a drop-down for selecting the date and a drop-down for selecting the month. When you select this option, all members are charged their annual fee on the same calendar date each year, regardless of when they joined. Zenoti automatically sets each member’s first annual fee date based on their join date: if they join before the configured date, it’s charged that year; if after, it’s charged the following year. If the membership is sold on the fixed annual fee date, the initial annual fee will be charged on that same day.
Indicate whether the membership is a one-time offer. You can choose to sell the membership only to new guests or to both new and existing guests. If you do not see this option, option, contact your administrator.
Set up the validity for the membership. Here you can configure when the membership expires.
Set up how the start date of the membership is calculated. You can set it to start from the date when the sale is made or from the date of the first redemption of a credit.
In the Benefits section, you can set up how customers can use the membership benefits.
Configure whether the customer gets credits for specific services (Service Credits), or they can use services up to a certain value (Credit Value), or both. For instance, the membership might give the customer a fixed number of credits that they can redeem for services, or it might allow the customer to avail of services up to a certain value.
Indicate whether the membership has product or service discounts. If you turn off the Service Discounts and Product Discounts toggle switches, the corresponding tabs are hidden. To see these options, turn on the appropriate toggle switches.
You can add additional members on the guest memberships tab. To allow add-on members in this membership, turn on the Addon Members switch.
Specify how many people, including the primary member, you want to allow for this membership in the # of addon members including primary field. The default value is 1.
To have different membership codes for the primary and secondary members, enable the Add different membership code for secondary member setting.
Indicate whether front-desk staff can waive cancellation and no-show fees for classes booked using membership credits.
In the Commission section, you can set up how you pay commissions to employees for the sale of the membership. For instance, you can set it up such that the employee making the sale gets either a fixed amount or a percentage of the sale value.
In the Advanced Properties section, you can set up other options to define how the membership is administered.
Select the business unit where the membership is offered.
Enter the Services Accounting Code (SAC) under which the membership appears.
Select a category to which to assign the membership. This is a required field.
Select the appointment category for the membership.
If you want to limit the sale of the membership to a specific time period, next to Restrict Sale to Specific Time Period, click No restriction, and then select the start date and end date. This lets you set the duration for which the membership is available for sale.
Select how you want to restrict redemptions. For instance, you might want to allow your customers to redeem only one service credit a week.
If you want the membership to be available only to customers who already have an existing membership, set Restrict membership to upgrade/downgrade and renewals to Yes.
If you want to configure a lock-in period during which the membership cannot be canceled, next to Cancellation Restriction Period (Lock-in Period), click No restrictions and enter the number of months.
If you don’t want to let your customers redeem credits after expiry or cancellation of their membership, next to Redemption post expiry or cancellation, click Use default configuration ((Allow)), and select the appropriate option.
To configure how customers can renew their membership, use the Membership Renewal options and Default Membership Renewal option fields.
Note
You can select the current membership in the membership renewal options and default membership renewal options only after it has been created; this selection is available only in edit mode.
Changes made to renewal options do not apply to memberships that have already been sold.
To configure how customers can upgrade or downgrade their membership, use the Membership Upgrade options and Membership Downgrade options fields.
To add Terms and Conditions for the membership, next to Terms & Conditions, click Add. In the text box, enter the terms and conditions.
To add a Terms and Conditions acceptance message, next to Terms & Conditions Acceptance Message, click Add. In the text box, enter the message to display.
To configure tags to identify the membership, next to Tags, click Add. In the text box, enter the tags. If you have multiple tags, separate them using commas.
To go to the next step, click Next.
Note
You can click Finish to save the membership at any step of the wizard. You can later reopen the membership and make changes.
Step 3: Set up Service Credits
Tip
In fitness centers, service credits often apply to group fitness classes or personal training sessions.
Tip
Allow Service Replacement? lets you specify whether credits for a service can be redeemed against other services. For instance, if the membership includes two credits for two 30-minute massages, you might want to allow the customer to redeem them for one 60-minute massage.
To give your members the flexibility to redeem service credits to avail of services not included in their memberships, select the Service Equality Template .
How often credits should be given? Indicates when the membership credits must accrue to the customer. You can set this to happen either when the payment is made or all at once.
In the table, set up how the credits may be used.
To set up how credits are used:
For a service or a group of services, in the Select column, select the checkbox.
In the Service Qty for Each Payment column, enter the number of service credits customers receive with each payment. For instance, if the annual membership gives the customer 12 credits for a service. If the customer is making monthly payments, they will receive one credit with each payment.
Use the Wait Time For Next Redemption column to specify the duration between each redemption of the service credits. For instance, you may want a customer to wait a week before they avail of a specific service again.
In the Expiry (Days) column, indicate after how many days the credits for the service expire.
Click Next.
Step 4: Set up Service Discounts
Tip
For fitness centers, service discounts could apply to training sessions or fitness classes.
Tip
This step is available only if you have set the Service Discounts toggle key to Yes.
On this tab, you can configure the following:
Discount Type lets you specify whether the discount is a percentage of the price of the service or a flat value.
Specify the discounts available to members when they use the available credits and when they don’t have any credits left. For instance, you may give a 10% discount for a massage if the customer uses available credits and an 8% discount if they have no more credits left to use.
Specify discounts for availing services during peak hours and off-peak hours. For instance, you may give the customer a 10% discount if they avail of the service during non-peak hours and not give a discount during peak hours.
Set up the discounts as a percentage of the service fee or a flat amount. For instance, you might want to give the customer a 10% discount on the price of a specific service or simply a $5 discount.
Set up discounts for individual services, groups of services, or all services.
To specify service discounts:
For a service or group of services, in the Select column, select the checkbox.
In the Name column, select the service.
Under Discounts When Using Credits, in the Peak column, enter the discount when the customer uses credits to pay for a service availed during peak hours.
Under Discounts When Using Credits, in the Off Peak column, enter the discount when the customer uses credits to pay for a service availed during non-peak hours.
Under Discounts After Credits Used, in the Peak column, enter the discount when the customer has no more credits and pays for a service availed during peak hours.
Under Discounts After Credits Used, in the Off Peak column, enter the discount when the customer has no more credits and pays for a service availed during non-peak hours.
Note
To apply service discounts when there is no membership credit amount, you should ensure that all the Peak and Off Peak values are set to non-zero values.
Click Save.
Step 5: Set up Product Discounts
This step is available only if you have set the Product Discounts toggle key to Yes.
On this tab, you can:
Specify the discounts available to members when they buy a retail product.
Set up the discounts as a percentage of the product price or as a flat amount.
Set up discounts for individual products, groups of products, or for all services.
To specify product discounts:
In the Set discount for list, select the product category.
In the Category list, select All or a specific category.
If you selected a category, in the Sub Category list, select All or a specific product.
In the Discount box, enter the discount as a percentage of the product price or as a flat amount.
Click Add. The discount definition is added to the table.
Repeat steps 1 to 5 for all the products for which you want to offer on discount as part of the membership.
Click Save.
Step 6: Set up Centers
In this step, you can specify which centers can offer the membership to their customers. For a center to be able to sell the membership, you must select the center on this page. To make a membership available at a center:
In the Center column, select the center.
In the Tax Group column, select a tax group to assign to the membership.’
In the Sale Price column, enter the sale price of the membership at that center. This lets you specify different sale prices for the membership at different centers. Note: This price should be the pre-tax value.
In the Credit Amount column, enter the credit amount you want to allocate for services. You can also allocate credit amount for products, but this feature must be enabled by your administrator. Once enabled, click the Credit Amount value for a center to enter credits for services, products, and the common credit amount.
In the Setup Fee column, enter any enrollment fee that might be applicable for the membership. This column is available only if you set Setup Fee to Yes in the General tab.
Note
If you enter any amount in this Setup Fee field, a separate membership plan is automatically created exclusively for the setup. You need to configure the setup benefits in that plan.
In the Initially Recognized Revenue column, enter the starting value to calculate the revenue generated by the membership. For instance, if you sell a membership for $300 with two sessions each of three different services (S1, S2, and S3). The original price of all services is $100, and the Initial Revenue Recognition (IRR) of the membership is set to 0. When the guest avails each of these services from the membership, $50 is recognized as membership revenue.
In the Monthly Recognized Revenue column, enter the starting value to calculate the monthly revenue generated by the membership.
In the Service Credit Revenue column, enter the starting value to calculate the value of the service credits that are part of the membership.
Learn how to customize a membership plan for a center.
Step 7: Set up Forms
In this step, you can select the available forms and assign them to this membership.
From the Available Forms drop-down list, select the form you want to assign to this membership.
Click Add.
Learn how to create custom forms using Form Builder.
Step 7: Set up Catalog
In this step, you can set up how the membership appears on your Webstore.
Select Show in Catalog.
Enter the required information, such as the display name for the membership, the price of the membership, YouTube video id, meta keywords, description, etc. You can also upload the associated image if you have one.
Tip
For fitness centers, use appealing fitness-focused descriptions—include trainer bios, class themes, and schedule highlights.
Click Save.
You’ve successfully created a non-recurring membership plan that guests can purchase in-center or online.
Create a recurring membership
Open the Create Membership page.
At the organization level, navigate to Master data > Memberships. The Manage Memberships page opens.
Click Add new and select Recurring membership.
Enter general membership information.
In this step, you define the outline of the membership. Based on your choices in is the step, you will be required to provide more information in further steps.
Enter basic membership information.
Field
Description
Membership Name
Enter the name of the membership plan.
Active
Select a Yes if you want to sell this membership from POS. Along with this, the centers where you want to make the memberships available for sale must also be selected in the Centers tab.
When you want to stop selling this membership, select No here.
When you set a membership as inactive, the membership is no longer available for sale to customers. Any benefits and credits that existing customers have accrued still hold good and can be applied to their purchases.
Membership Code
When you sell a membership to a guest, it must have a unique identification code. The system can auto-generate the code as follows:
In the Prefix box, enter a common prefix for all memberships sold under this plan.
In the Seed Value box, enter the first number that must be assigned to the first membership sale. Zenoti automatically increments the number from there for all the following sales. For example, if the seed value of the first sale is 001, the next memberships that are sold automatically have 002, 003, and so on.
Note
Codes of deleted memberships cannot be used for new memberships.
Membership Identification
Type a code for identifying this membership plan in Zenoti. Each membership should have a unique identification code. You can use a combination of words and numbers to create one of your choice.
Description
Enter a description for the membership. When you select this membership for sale in POS, the description shows next to the name. This helps your front desk to check if they are selecting the right membership.
In the Define section, indicate what fees are applicable to the membership. The options you select here will appear on the Centers tab, where you can specify the actual numbers.
Setup Fee : Indicate whether the membership has associated setup fees.
Freeze Fee : Switch the toggle on to configure a fee associated when this membership is paused. Select the Manual option to specify the fee on the Centers tab. Select the Freeze Fee Reason option to apply freeze based on the applicable member freeze reason. You can also choose to charge a One time freeze fee, or collect a reduced Recurring fee until it is unfrozen.
Annual fee: When enabled, the following options appear for configuring when the annual fee collection begins:
From Sale Date: The annual fee collection starts from the date the membership is sold.
From First Redemption: Starts the annual fee collection from the date the membership is first redeemed.
After [___] Cycles : Starts the annual fee collection after a specified number of cycles. Contains a number input field to enter the count and a drop-down defaulting to Cycles (other option is Days).
Collect on Date __ Month __: Collects the annual fee on a specific calendar date. Contains a drop-down for selecting the date and a drop-down for selecting the month. When you select this option, all members are charged their annual fee on the same calendar date each year, regardless of when they joined. Zenoti automatically sets each member’s first annual fee date based on their join date: if they join before the configured date, it’s charged that year; if after, it’s charged the following year. If the membership is sold on the fixed annual fee date, the initial annual fee will be charged on that same day.
Indicate whether the membership is a one-time offer. You can choose to sell the membership only to new guests or to both new and existing guests. If you do not see this option, contact your administrator.
Enter validity information for the membership.
Validity: If the membership expires after a specific period, select Fixed Expiry and enter the Expiry Period (this can be in days or months).
Note
For weekly or biweekly payments, set the Validity to Fixed Expiry and enter multiples of 7 (7, 14, 21, and so on) in the Expiry Period column.
Validity Starts: Choose at what point the validity of the membership starts. This can be either From Sale Date or At First Redemption.
For recurring memberships, you need to set up the membership charges and the payment intervals.
Important
If you make any changes to the payment schedule, they will take effect only for future membership sales. Existing payment schedules will remain unaffected.
Payment Frequency: Select the frequency of regular membership payments in terms of months. For example, if the membership has quarterly payments, then enter 3 in the box, and for half-yearly payments, enter 6. If the membership requires monthly payments, enter 1.
Payment Installments: Alternatively, enter the total number of monthly installments that the client needs to pay for this membership.
To populate a future billing date for the sale of future memberships, enter the number of days in Default offset days for future sale. For example, if you want to schedule the first payment of membership 3 days after the current date, enter 3 in the box.
Note
If you cannot find this field, contact your administrator.
Select how benefits and discounts are applied. Based on the options you select here, Zenoti shows you the options to set up or enable these features.
Configure whether the customer gets credits for specific services (Service Credits), or they can use services up to a certain value (Credit Value), or both. For instance, the membership might give the customer a fixed number of credits that they can redeem for services, or it might allow the customer to avail of services up to a certain value.
Indicate whether the membership has product or service discounts. If you turn off the Service Discounts and Product Discounts toggle switches, the corresponding tabs are hidden. To see these options, turn on the appropriate toggle switches.
You can add additional members on the guest memberships tab. To allow add-on members in this membership, turn on the Addon Members switch.
Specify how many people, including the primary member, you want to allow for this membership in the # of addon members including primary field. The default value is 1.
To have different membership codes for the primary and secondary members, enable the Add different membership code for secondary member setting.
Indicate whether front-desk staff can waive cancellation and no-show fees for classes booked using membership credits.
Select how commissions are calculated.
Commission on Membership Sale: If you pay employees commissions on membership sales, set this to Yes.
Commission Adjustment: You can scale the final commission value to a certain percentage using this field. For example, if you enter 90% here, the employee gets 90% of the commission value that is arrived at based on the commission type (explained above). If you do not want to reduce or increase the percentage of commissions, just leave this field blank.
Commission Type: Select a commission type for the membership from the
following options:
Commissions settings defined in employee or job profiles: Award the commissions based on the settings in the employee or job profiles.
Flat amount: Give a fixed amount on selling this membership. Enter the
amount in the Commission box.
Percentage of discounted price: Give a certain percentage of the cost of the discounted membership service. Enter the percentage value in the Commission box.
Set up Advanced Properties.
Learn how to set up advanced properties for memberships.
Enter service credit information.
In this step, define how service credits are handled. This step appears only if you have set Membership Benefits to Service Credits or to Both.
Learn how to enable transfer of service credits.
Enter service discount information.
In this step, define how service discounts are handled for the membership. This step appears only if you have set Service Discount to Yes.
For a service or group of services, in the Select column, select the checkbox.
Note
Service categories that have services configured are only displayed in the list. If all services configured to a service category are deleted, the respective category is not listed.
In the Name column, select the service.
Under Discounts When Using Credits, in the Peak column, enter the discount when the customer uses credits to pay for a service availed during peak hours.
Under Discounts When Using Credits, in the Off Peak column, enter the discount when the customer uses credits to pay for a service availed during non-peak hours.
Under Discounts After Credits Used, in the Peak column, enter the discount when the customer has no more credits and pays for a service availed during peak hours.
Under Discounts After Credits Used, in the Off Peak column, enter the discount when the customer has no more credits and pays for a service availed during non-peak hours.
Note
To apply service discounts when there is no membership credit amount, you should ensure that all the Peak and Off Peak values are set to non-zero values.
Click Save.
On this tab, you can configure the following:
Discount Type lets you specify whether the discount is a percentage of the price of the service or a flat value.
Specify the discounts available to members for when they use the available credits and for when they don’t have any credits left. For instance, you may choose to give a 10% discount for a massage if the customer uses available credits and an 8% discount if they have no more credits left to use.
Specify discounts for availing services during peak hours and during off-peak hours. For instance, you may choose to give the customer a 10% discount if they avail the service during non-peak hours and not give a discount during peak hours.
Set up the discounts as a percentage of the service fee or as a flat amount. For instance, you might want to give the customer a 10% discount on the price of a specific service or simply a $5 discount.
Set up discounts for individual services, for groups of services, or for all services.
Enter product discount information.
In this step, define how product discounts are handled for the membership. This step appears only if you have set Product Discount to Yes.
To find the appropriate products to apply discounts, in the Set discount for list, select Product Category, Product, or Products with the same Tag.
In the Category list, select All or a specific category.
If you selected a category, in the Sub Category list, select All or a specific product.
In the Discount box, enter the discount as a percentage of the product price or as a flat amount.
If you select a flat amount, choose the level at which you want the discount to be applicable from the Type list:
Per line item: Discount is applicable at the line item level.
Example: Discount on product A is $5. Even if you add product A twice, the discount applicable is $5.
Per item: Discount is applicable at the unit (quantity) level.
Example: Discount on product A is $5. When you add product A twice, the discount of $5 is also applicable twice and the total discount is $10.
Click Add.
The discount definition is added to the table. Repeat steps 1 to 5 for all the products for which you want to offer on discount as part of the membership.
Click Save.
Enter center information.
In this step, customize how centers can offer the membership.
In the Center column, select the center.
In the Tax Group column, select a tax group to assign to the membership.
In the Sale Price column, enter the sale price of the membership at that center. This lets you specify different sale prices for the membership at different centers.: This price should be the pre-tax value.
In the Credit Amount column, enter the credit amount you want to allocate for services. You can also allocate credit amount for products, but this feature must be enabled by your administrator. Once enabled, click the Credit Amount value for a center to enter credits for services, products, and the common credit amount.
In the Setup Fee column, enter any setup fee that might be applicable for the membership. This column is available only if you set Setup Fee to Yes in the General tab.
In the Initially Recognised Revenue (IRR) column, enter how much of the part of the sale price is recognized as revenue at the moment of sale.
In the Monthly Recognised Revenue (MRR) column, enter how much of the part of the sale price is recognized as revenue each month for the duration of the membership. The value is calculated on a daily basis.
So if the MRR is $90, in September $3 is realized each day, while in October $2.9 is realized each day.
In the Service Credit Revenue (SCR) column, enter the part of the sale price that is recognized when the guest uses a service credit.
In the Annual Fee column, enter the annual recurring fee for the membership.
Assign forms.
In this step, select the available forms and assign them to this membership. You can create various memberships forms using Form Builder.
Enter catalog information.
In this step, define how the membership may be offered on the Webstore.
Field
Description
Show in Catalog
Select this checkbox to show membership in the Webstore and the consumer mobile application of the center.
Display Name
Enter a display name for this membership in the catalog.
Display Price
Enter the price of the membership.
Display Order
Enter a display order from the top for this membership in the list of memberships shown in the catalog.
Show Price
If you want to show the price of the membership in the catalog, select this checkbox.
Allow customer to buy this membership
Select this checkbox to allow the visitors to buy the membership online. If you do not select this checkbox, the membership is only shown on the catalog and cannot be bought.
Youtube Video ID
If you want to show a YouTube video of the membership, enter and Video ID of the video. To know the Youtube Video ID, pay the video in Youtube and look at the URL of the page. You can see a combination of numbers and letters after an equal sign (=) at the end of the URL. This is the ID you need to enter in this field Page
Page Title
Enter the page title for this membership in the catalog.
Meta Keywords
Enter the meta keywords for the membership. Meta keywords are a specific type of meta tag that appear in the HTML code of a webpage and help the search engines to understand the topics of the page, and also help it locate the page based on the search keywords.
Meta Description
Enter a meta description for the membership in the catalog. A meta description is an HTML element that helps the search engines understand your page and show the page for relevant searches.
HTML Description
Enter a description for the membership for the consumer mobile app and Webstore. Use HTML for rich descriptions and include images. After you enter the description, click the preview icon next to the box to check how it appears on the app or Webstore.
Create memberships with fixed billing cycles
Managing memberships efficiently is crucial for providing a seamless experience for both businesses and customers. One of the most common billing challenges is determining whether all memberships can be charged on the same day of the month, and how to handle payments when a customer joins mid-cycle.
Zenoti simplifies this process by offering fixed billing dates for membership collections. This feature allows businesses to charge all members on a specific day of the month while automatically calculating prorated charges for new sign-ups. By enabling fixed billing, you can create a predictable payment structure that improves revenue management and enhances customer convenience.
Important
Contact your Zenoti Customer Success Manager to enable fixed billing for your business.
You can configure fixed billing parameters only when creating a new membership. Existing memberships without fixed billing cycles can't be updated with his feature.
On the General tab of the new membership, navigate to the Define section.
For recurring memberships, you need to set up the membership charges and the payment intervals.
Payment Frequency: Select the frequency of regular membership payments in terms of months. For example, if the membership has quarterly payments, then enter 3 in the box, and for half-yearly payments, enter 6. If the membership requires monthly payments, enter 1.
Payment Installments: Alternatively, enter the total number of monthly installments that the client needs to pay for this membership.
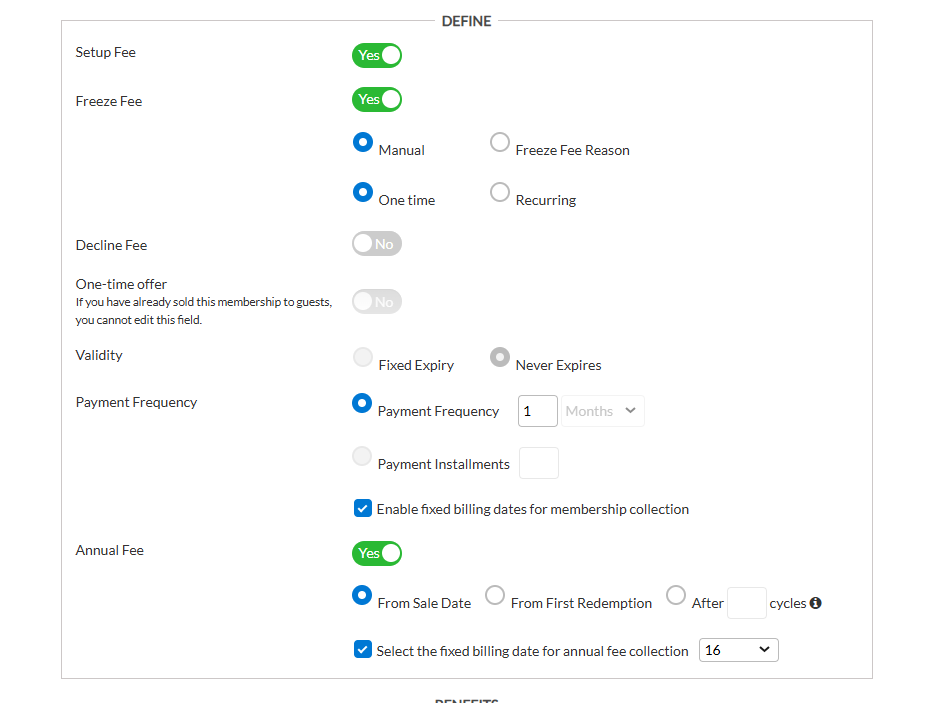
When fixed billing is enabled for your business, the Enable fixed billing dates for membership collection checkbox appears under the Payment Frequency configurations.
Enable this option to ensure all members are charged on a specific day of the month for consistent and predictable revenue management.
Annual fee: Enable this toggle if you want centers to charge annual fees. Based on this, you can choose to start annual fee collection from the sale date of the membership, from the first redemption, or after a number of months.
The annual fee also has a fixed billing component. Enable the Select the fixed billing date for annual fee collection checkbox to ensure that annual membership fees are charged on a specific, pre-defined date each year.
Configure other required settings and click Save.
Impacts and considerations
When the Enable fixed billing dates for membership collection setting is active, the Sale Start Date and Membership Invoice Date fields appear in the Centers tab, with dates automatically assigned during membership creation.
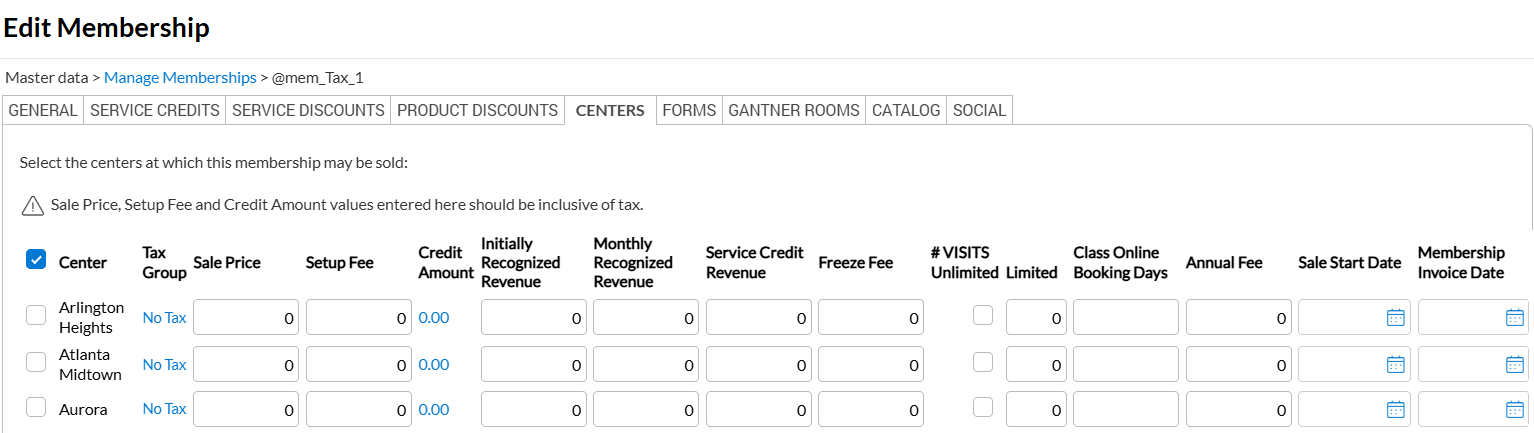
The Sale Start Date is set within the Restrict Sale to Specific Time Period, covering both the start and end dates. The Membership Invoice Date extends from the Sale Start Date through one billing cycle defined in the General tab.
These options are also available on Zenoti Mobile.
Set up payment criteria for a recurring membership
When you are creating a recurring membership, you must set up the membership charges and the payment intervals.
Some memberships have an enrollment fee. In that case, you must enter the details of the setup fee and other relevant details.
Membership pricing may vary across centers. So the payment criteria is split between the General tab and the Centers tab of the Create New Membership window.
Below are the fields related to payment criteria for membership plans:
Fieldname | Description |
|---|---|
Sale price | Enter the recurring membership charges. The amount you enter here is charged to the guest in each installment. |
Setup Fee | Enter the enrollment fee for the membership. It is the one-time fee that will be charged to the clients on selling this membership. If the membership doesn't have a setup fee, leave this field blank. NoteIf you enter any amount in this Setup Fee field, a separate membership plan is automatically created exclusively for the setup. You need to configure the setup benefits in that plan. |
Fieldname | Description |
|---|---|
Start First Collection After | If you are setting up a membership with a setup fee, you can create it in such a way that the first payment date comes a few days after setup fee. Type the number of days by which they must be set apart in this field. Leave it blank to keep the membership billing date on the same date. You can always change the first billing date from POS. |
Start First Collection After | If you are setting up a membership with a setup fee, you can create it in such a way that the first payment date comes a few days after setup fee. Type the number of days by which they must be set apart in this field. Leave it blank to keep the membership billing date on the same date. You can always change the first billing date from POS. |
Expiry Period | Appears only when you select the Expiry option in the Expiration field. Enter a specific number of days or months after which the membership expires. |
Payment Type | You can setup the payment type either in the form of an interval between payments or the total number of monthly installments. Based on your preference, enter the details for one of these options:
|
Lock-in Period | Enter the number of payments that the clients need to complete before they can cancel the membership. |
Set up advanced properties for memberships
You can access these options when creating and editing a membership . The table below contains all the advanced properties that you can configure for new or existing memberships.
Field name | Description |
|---|---|
Business Unit | Select the business unit to which the membership applies. This helps you to track the sales or revenues for that particular business unit. |
SAC | Enter the Service Accounting Code (SAC). |
Membership Category | If your business has membership categories, selecting a category for the plan is mandatory. |
Appointment Category | Select the appointment category to which the membership belongs. |
Restrict Sale to Specific Time Period | If you want to restrict the time period for which the membership is available, enter the start date and end date here. |
Restrict redemption to only selected services | This option appears only if you have set Membership Benefits to Credit Value or Both. When this option is set to Yes, in the Service Discounts tab, you can select the services that form part of this membership. When collecting payment, the membership benefits will only be applied to these services and not to services those are not part of the membership. For example, Joanne has purchased the Annual Hair Care Special membership. It gives her a 10% discount on haircut. In the same appointment, she also opts for hair color. The hair color service is not part of the membership. So when the membership is applied to the invoice, Zenoti informs you that she can only use it to pay for the haircut, but not for hair color. |
Membership expires when credits are consumed | This option is available for non-recurring memberships when you set Membership Benefits to Credit Value or Both. The setting cannot be changed after selling the membership. |
Maximum Credit Redemption Per Invoice | This option is available when you set Membership Benefits to Credit Value or Both. |
Limit redemption based on | This option is available when you set Membership Benefits to Service Credits or Both. Select one of the following:
|
Restrict redemption to | Configure the level where guests can redeem a membership - center, zone, or organization. By default, it is set to organization. Some of the available options are covered below:
NoteThis is available only when the Enable cross center redemption for setting is enabled for memberships. To enforce one-time password authentication for redemptions, select the Need OTP authorization checkbox. If you do not see this option, contact your administrator. |
Restrict membership to upgrade/downgrade and renewals | If this is enabled, the membership will be available only for upgrades, downgrades or renewals. It cannot be sold directly in POS. This option is not available for non-recurring memberships. |
Cancellation Restriction Period (Lock-in Period) | Enter the number of months that the customer must complete before they can cancel the membership. |
Redemption post expiry or cancellation | Select whether a customer can continue to redeem credits after cancellation. |
Membership Renewal options | Select the memberships to appear in the Default Membership Renewal option list. Note
When the front desk wants to change the existing membership set to auto-renew by default for a guest, the memberships you select here are available for selection on the Change Membership Renewal Detail window on the Membership Details page (Guest Profile > Memberships tab > Membership Membership Details page > Membership Renew Options section > Membership Renewal > Change). |
Default Membership Renewal option | Select a membership to auto-renew by default on expiry. The membership appears in the Membership Details page (Guest Profile > Memberships tab > Membership > Membership Details page > Membership Renew Options section > Membership Renewal). Note
|
Membership Upgrade options | Select the options for membership upgrades. This option is not available for non-recurring memberships. |
Membership Downgrade options | Select the options for membership downgrades. This option is not available for non-recurring memberships. |
Terms & Conditions | Enter your membership terms and conditions in the box. These are shown during membership purchases from Webstore on the receipt for in-store purchases. Based on the notification settings, these are also sent to the guest's mobile and email. If you do not see this option, contact your administrator. NoteThese are printed on receipts for non-recurring memberships and when benefits are enabled. If you do not see this option, contact your administrator. |
Terms & Conditions Acceptance Message | If you enable notifications (email/mobile) for membership terms and conditions, a hyperlink is sent to the user to accept the terms and conditions. The text you enter in this box is used as the acceptance message from the user. |
Tags | Tags help you group guests, services, products, employees, packages, or memberships based on specific criteria. If you have created tags for membership, enter the relevant membership tags in this box. Tags help you filter membership sales reports. |
Age Buckets | This field is accessible only when Age Buckets are enabled for your organization. The age buckets are predefined in the current membership settings section based on the organization-level configuration. To allow membership sales for a specific age range, select the checkbox for the corresponding bucket. Membership sale is restricted for the unchecked age bucket. |
Customize a membership plan for a center
After you create either a recurring or a non-recurring membership, the membership needs to be assigned to the relevant centers. The price value, membership credits of the membership can vary between centers. Also, you can choose different models of revenue recognition for each center.
You can access these options when creating a membership and when you edit a membership.
In the Center column, select the center.
In the Tax Group column, select a tax group to assign to the membership.
In the Sale Price column, enter the sale price of the membership at that center. This lets you specify different sale prices for the membership at different centers.: This price should be the pre-tax value.
In the Setup Fee column, enter any setup fee that might be applicable for the membership. This column is available only if you set Setup Fee to Yes in the General tab.
In the Initially Recognised Revenue (IRR) column, enter how much of the part of the sale price is recognized as revenue at the moment of sale.
In the Monthly Recognised Revenue (MRR) column, enter how much of the part of the sale price is recognized as revenue each month for the duration of the membership. The value is calculated on a daily basis.
So if the MRR is $90, in September $3 is realized each day, while in October $2.9 is realized each day.
In the Service Credit Revenue (SCR) column, enter the part of the sale price that is recognized when the guest uses a service credit.
In the Annual Fee column, enter the annual recurring fee for the membership.
Note
IRR, MRR, and SCR are displayed only when the membership liability based on value setting is turned on.
Important
For Credit Value only memberships, do not put any value in the SCR box, because SCR revenue can only be realized when a service credit is used to pay for a service.
The total value of IRR, MRR, and SCR must equal to Sale Price of the membership.
For examples of how to set up IRR, MRR, and SCR, refer to Revenue Recognition Scenarios.
Scenario 1
Cost of membership: $1200
Duration: 12 months
Type: Service Credit or Credit Value
IRR: 10%
MRR: 90%
SCR: 0%
Services included: Hair cut
Listed price of service: $100
Member price of service: $90
If membership is sold on January 1, the amount recognized is $210 (IRR: 120, MRR: 90 (1080/12)). Each subsequent month $90 is recognized as revenue, irrespective of whether the guest uses the credit.
Scenario 2
Cost of membership: $1200
Duration: 12 months
Type: Service Credit
IRR: 10%
MRR: 0%
SCR: 90%
Services included: Hair cut
Listed price of service: $100
Member price of service: $90
If membership is sold on January 1, the amount recognized is $120 (IRR: 120). Every time the member uses a credit, $90 is recognized as revenue.
Scenario 3
Cost of membership: $1200
Duration: 12 months
Type: Service Credit or Credit Value
IRR: 10%
MRR: 10%
SCR: 80%
Services included: Hair cut
Listed price of service: $100
Member price of service: $90
If membership is sold on January 1, amount recognized is $130 (IRR: 120, MRR: 10 (120/12)). Every time the member uses a credit, $80 is recognised as revenue.
Configure employee commissions for membership sales
When you are creating either a recurring or a non-recurring membership, you can define employee commissions for membership sales in the General tab of the Create Membership page. Here, you can also enable commissions for therapists when guest's service credits are used for payment.
The following is the list of fields related to membership commissions, along with their descriptions:
Fieldname | Description |
|---|---|
Commission on Membership Sale | If you want to pay employees a commission on the sale of the membership, set this to Yes. |
Commission Adjustment % | The percentage of the commission that must be paid to the employee. You can scale the final commission value to a certain percentage using this field. For example, if you enter 90% here, the employee gets 90% of the commission value that is arrived at based on the commission type. If you do not want to reduce or increase the percentage of commissions, just leave this field at 100%. |
Commission Type | Select a commission type for the membership from the following options:
|
Commission | The flat value or percentage amount is based on the selection earlier. |
Commission Frequency | This is a non-editable field. It displays whether commissions are calculated for each sale, upgrade or renewal, or only for the first sale. |
Commission on Service Credit Redemption | If turned on, the commission is awarded when the credit amount is used to pay for a service or product. |
Commission on Member Service Discount Amount | If turned on, the commission is awarded even for discounted services or products. |