Configure User Settings
This article explains how to configure notifications, predictive responses, keyword alerts, and voice settings within HyperConnect. These settings help ensure timely responses to guest communications, improve staff efficiency, and streamline operations.
Overview
HyperConnect provides configurable notification and communication tools to help front desk staff stay responsive without the need to constantly monitor the application. From audible alerts and desktop notifications to AI-powered responses and keyword prioritization, these settings ensure a seamless and proactive communication experience.
Key Terms:
Predictive Responses: AI-suggested replies to guest messages.
Keyword Alerts: Highlight and prioritize messages based on user-defined keywords.
Configure Notifications
Staying updated with guest messages is essential to avoid delays and ensure a positive guest experience. HyperConnect allows you to configure notification sounds, desktop notifications, text alerts, and push notifications to streamline communications and keep your front desk staff informed and responsive without constantly switching between applications.
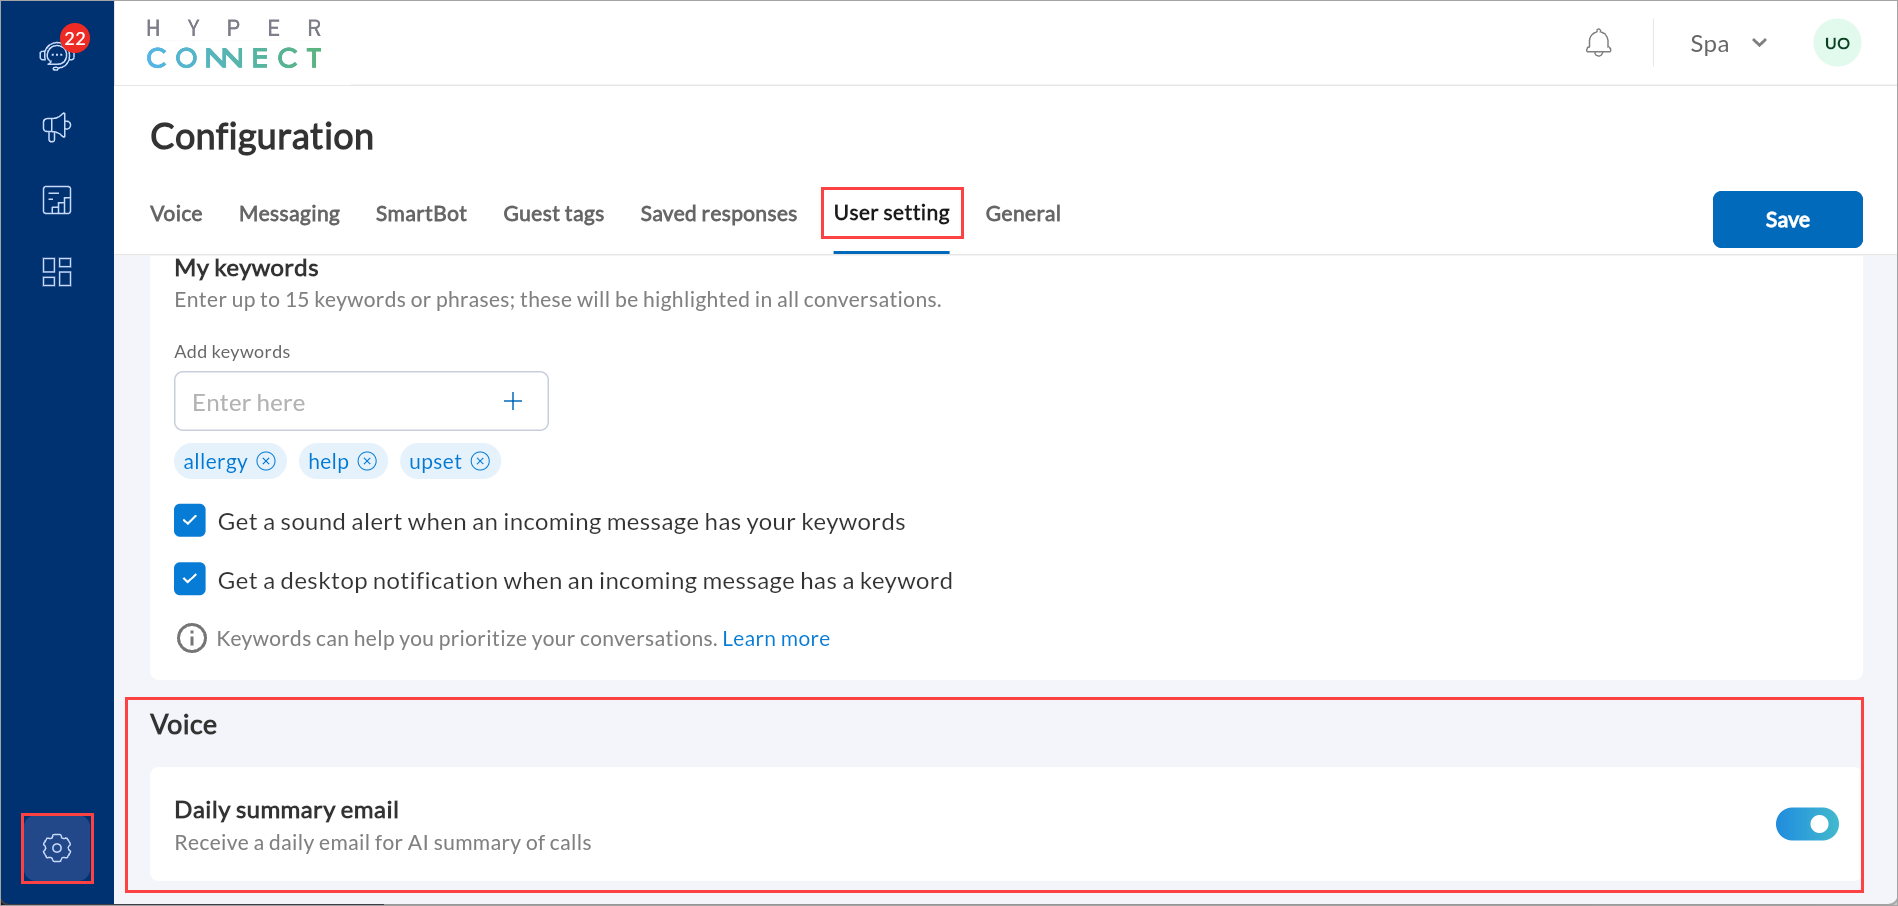
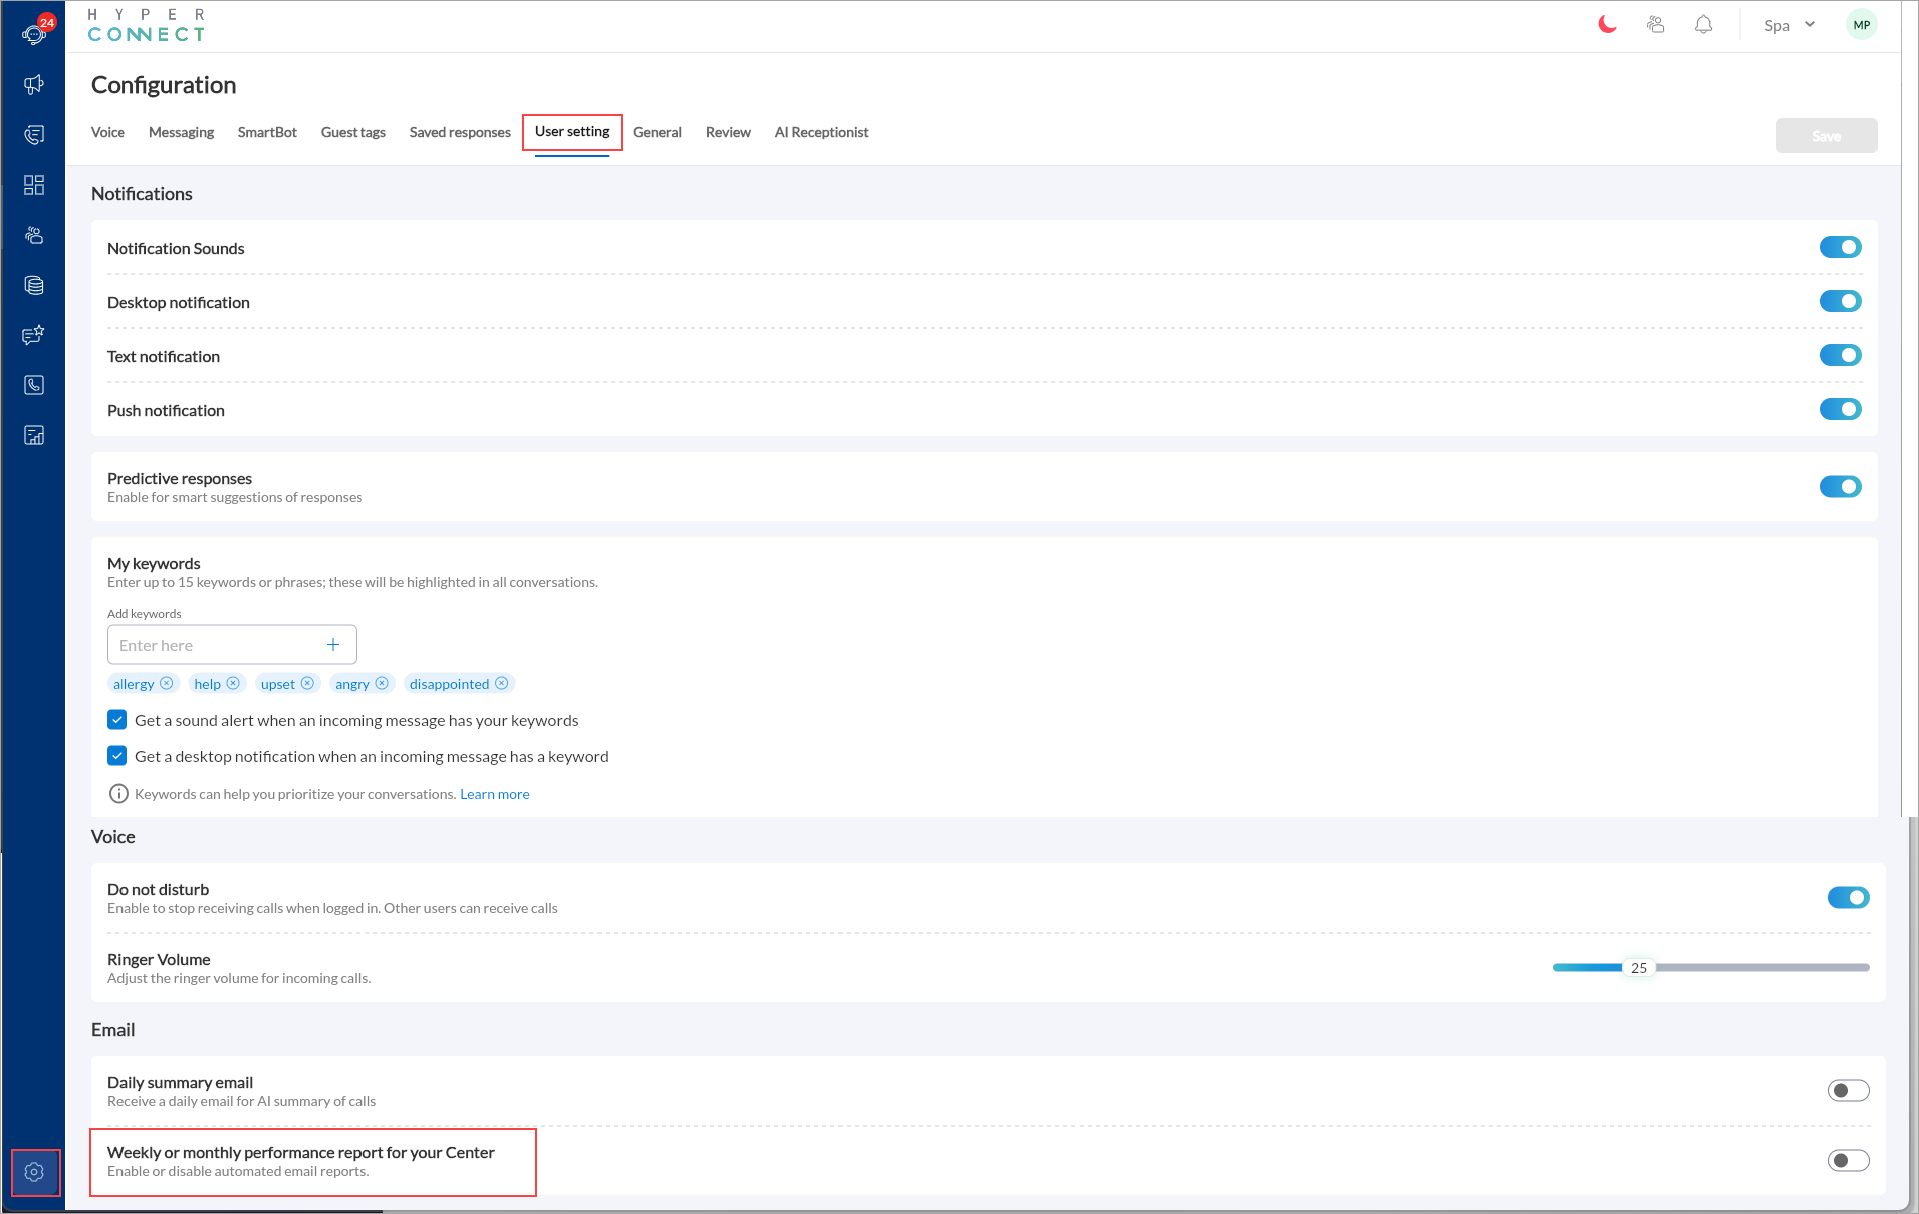
Navigate to HyperConnect > Settings > Configuration > User setting tab to configure notifications as shown in the following image.
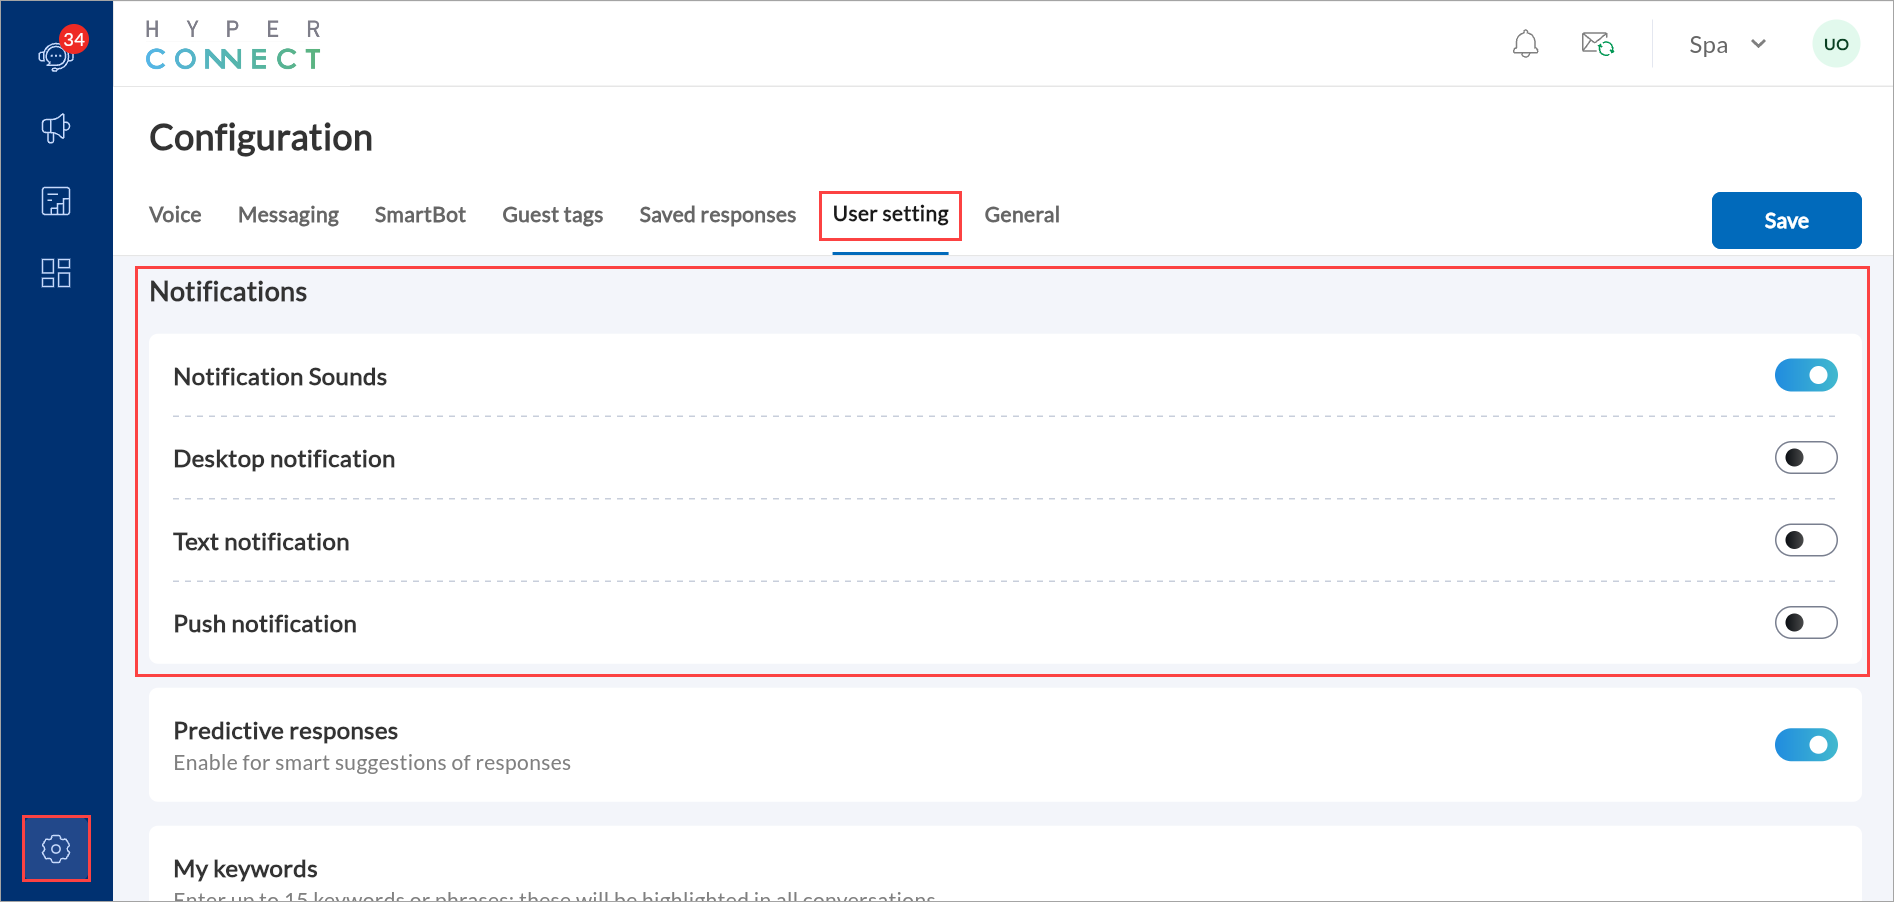
Configure Notification Sounds
Enable notification sounds to receive audible alerts when you get a message or call. This ensures you are always aware of incoming communication without constantly checking the application.
Launch HyperConnect.
Click the Settings icon.
Navigate to the User setting tab.
Under Notifications enable Notification sounds.
Click Save.
Configure Desktop Notification
Desktop notifications allow you to stay updated with new messages even when HyperConnect is minimized or in the background.
Launch HyperConnect.
Click the Settings icon.
Navigate to the User setting tab.
Under Notifications, enable Desktop notification.
Note
Ensure your browser settings allow desktop notifications from HyperConnect.
Click Save.
Configure Text Notification
Text notification enables you to receive important alerts via SMS on your device. When enabled, you will receive updates, alerts, or important messages directly to your device's messaging inbox.
Launch HyperConnect.
Click the Settings icon.
Navigate to the User setting tab.
Under Notifications, enable Text notification.
Click Save.
Configure Push Notification
Push notifications are real-time alerts that appear on your device such as phones or computers, even if you are not actively using the application or device. These are great for quick updates on the go.
Launch HyperConnect.
Click the Settings icon.
Navigate to the User setting tab.
Under Notifications, enable Push notification.
Click Save.
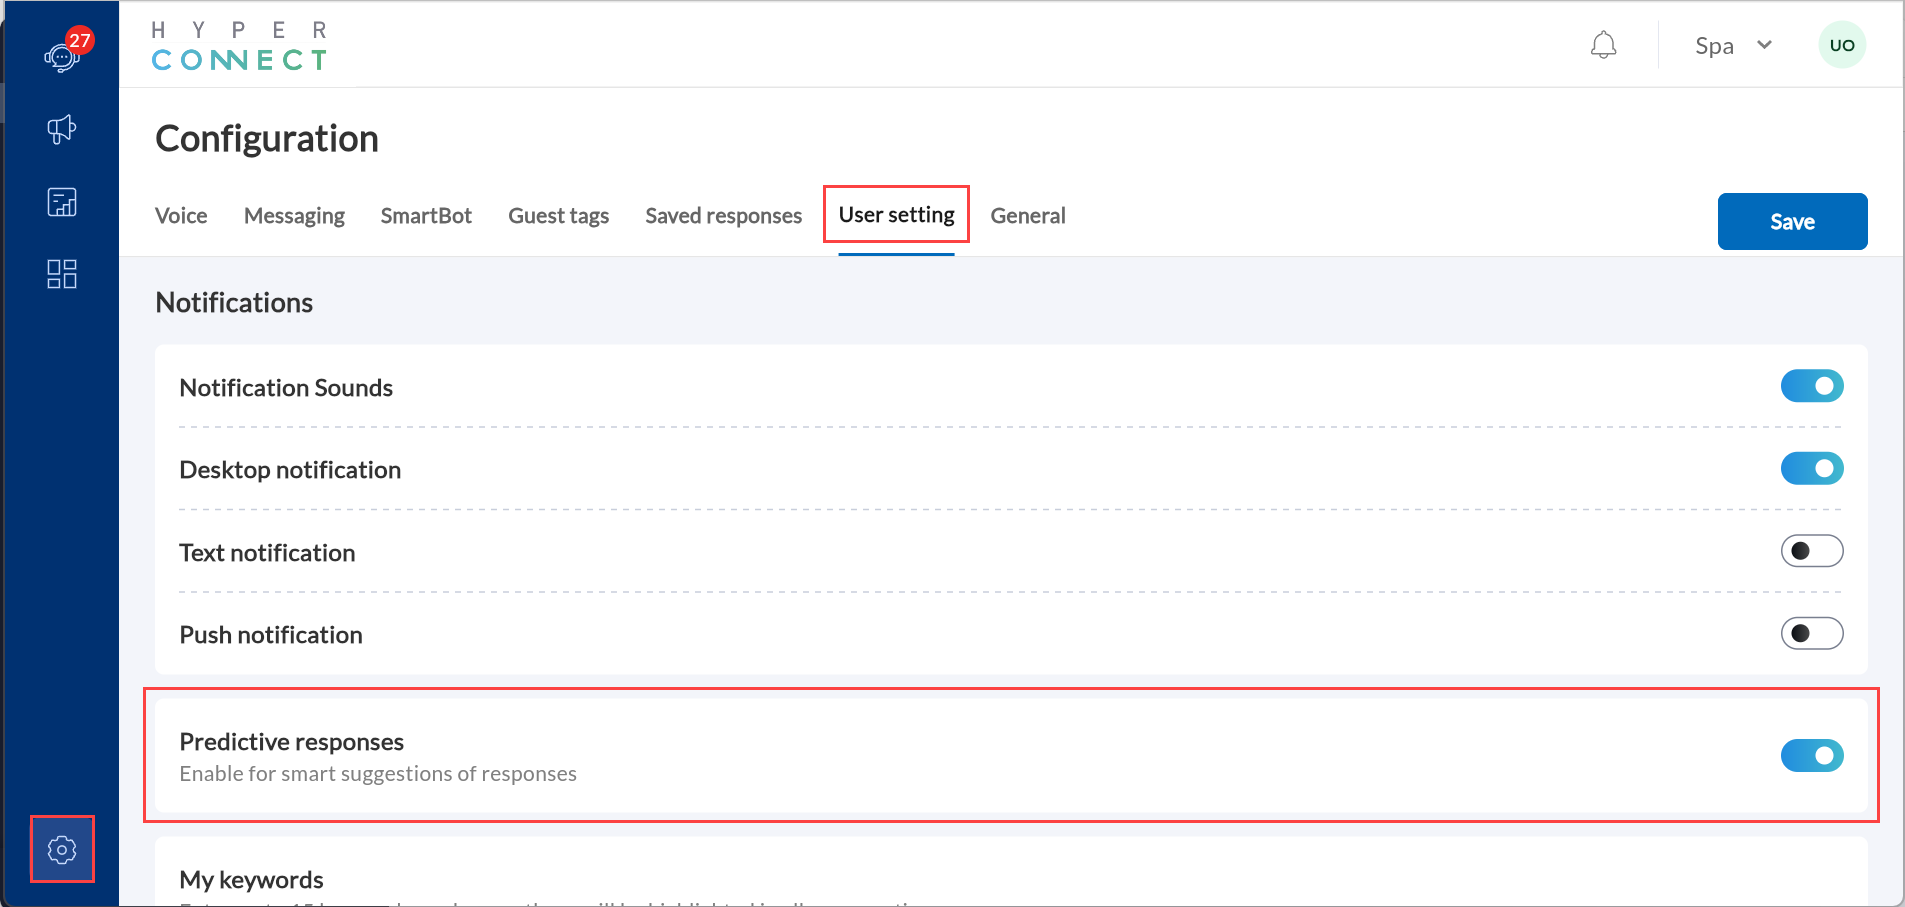
Configure Predictive Responses
Predictive responses use AI to analyze messages and suggest replies, saving time and ensuring consistent communication. This is especially valuable during peak hours or when managing large volumes of messages.
Follow these steps to enable predictive responses in HyperConnect.
Launch HyperConnect.
Click the Settings icon.
Navigate to the User setting tab.
Scroll to the Predictive Responses setting and toggle it to on.
Click Save.
Note
Best Practices
Use predictive responses to reply faster, especially during peak hours when message volume is high.
Regularly review suggested responses to ensure they align with your team's tone and communication goals.
Configure Keywords to Prioritize Conversations
HyperConnect allows you to add keywords to prioritize specific messages. For example, by adding "booking" as a keyword, you will receive alerts for messages containing that term. For easier identification, the keyword in these messages is highlighted in yellow.
Launch HyperConnect.
Click the Settings icon.
Navigate to the User setting tab > My keywords.
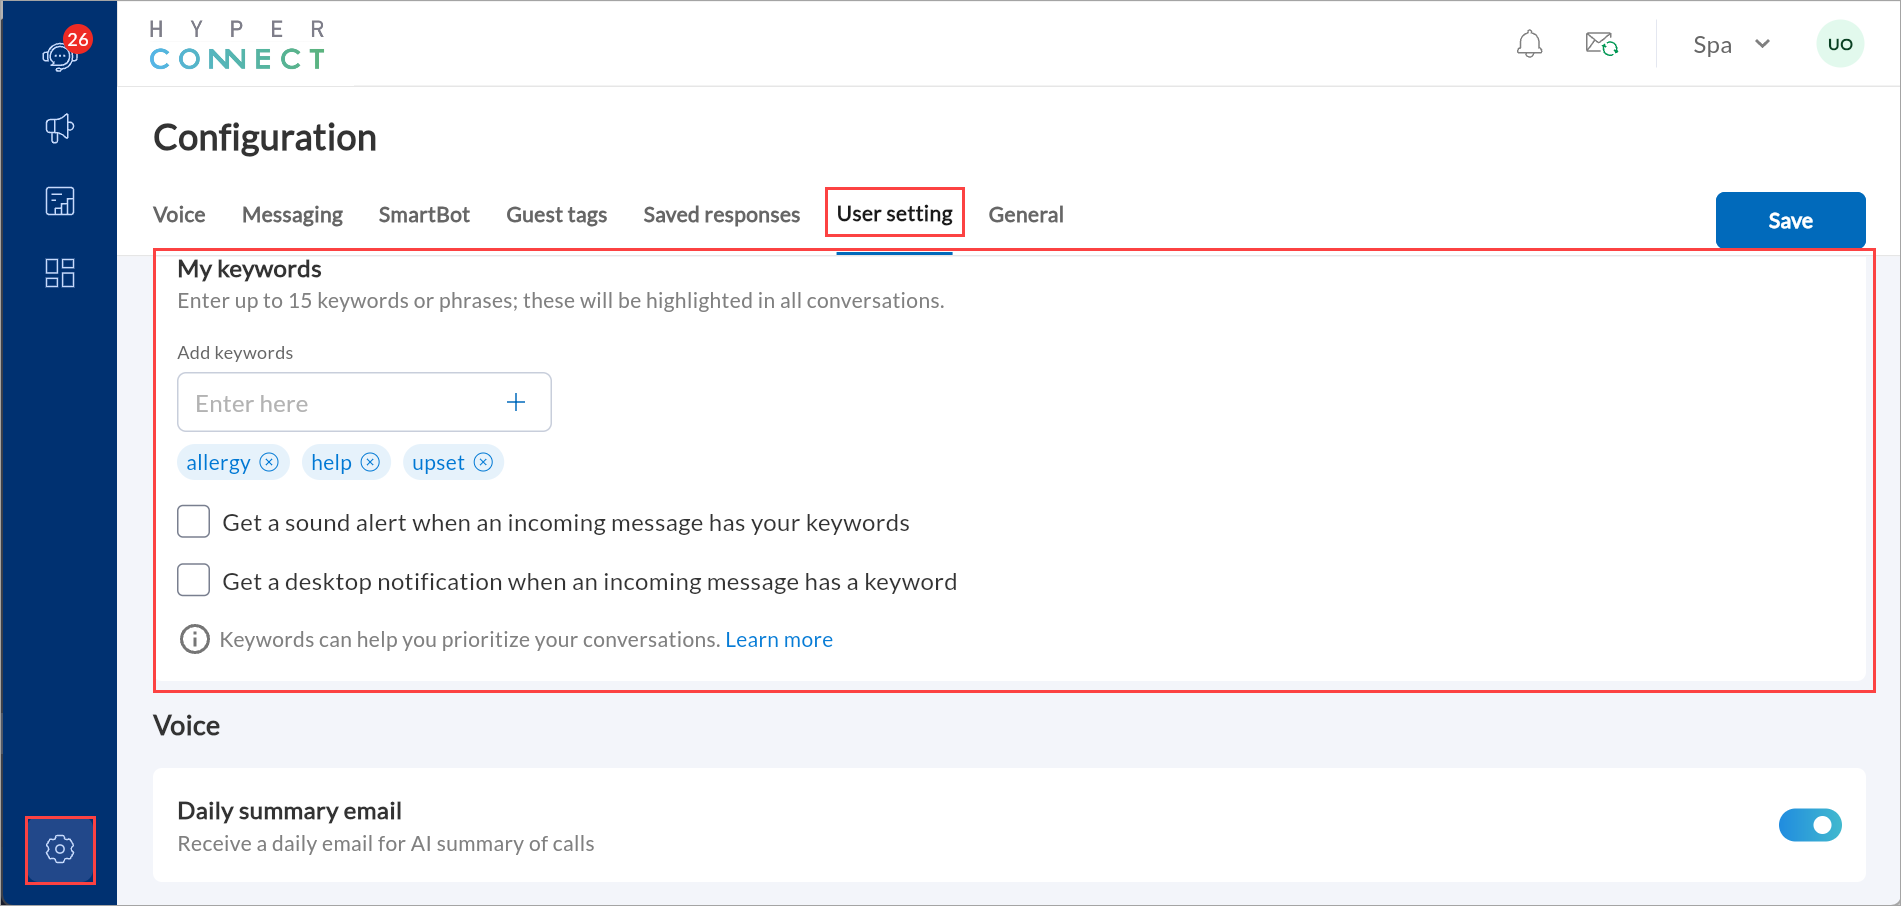
In the Add Keywords box, type the keyword (example, ‘booking’), and click the + icon.
You can add up to 15 keywords or phrases.
To remove the keyword, click the x icon next to the keyword you want to delete.
Optionally, select the checkboxes:
Get a sound alert when an incoming message has your keywords checkbox.
Get a desktop notification when an incoming message has a keyword checkbox.
Note
Your browser should be configured to receive desktop notifications.
Click Save.
The added keywords are highlighted in the left panel as well as in the main message.
Best Practices
Add keywords for common terms used in guest communications to manage high-priority inquiries efficiently. For example: "booking", "cancel", "check-in"
Regularly review and update keywords based on customer trends or recurring topic.
Set Do Not Disturb Mode
To prevent calls and message notifications from coming through while you are logged in, you can set yourself to Do Not Disturb (DND). This setting ensures that you will not receive calls or notifications, but other users will still be able to receive calls.
Launch HyperConnect.
Click the Settings icon.
Navigate to User setting tab > Voice.
Enable the Do not disturb setting.

Click Save.
You can toggle Do Not Disturb mode on or off using the Do not disturb button available at the top of the screen. This allows you to quickly enable or disable DND mode based on your requirements.
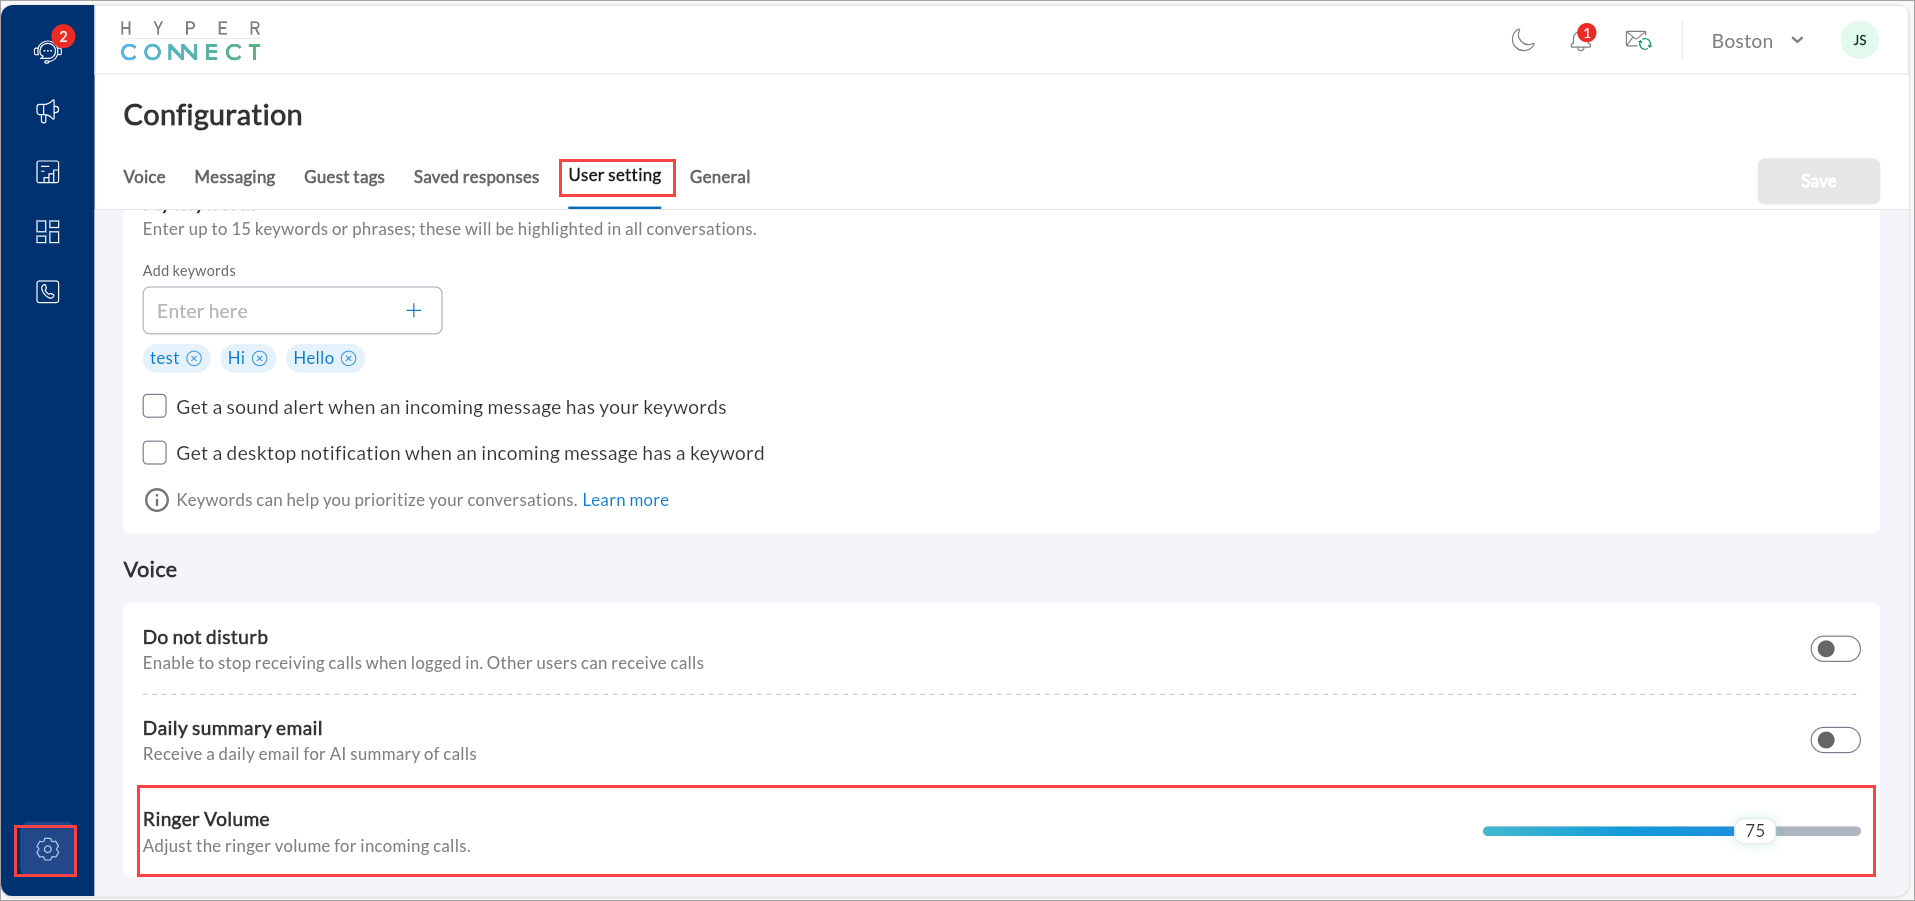
Adjust Ringer Volume for Incoming Calls
You can adjust the ringer volume for incoming calls to ensure notifications are at a level that works best for you. Turn it up to ensure you never miss a call or lower it for a more subtle alert.
Launch HyperConnect.
Click the Settings icon.
Navigate to the User setting > Voice.
Use the slider to adjust the ringer volume. You will hear a sound each time you change the volume level to help you find the right setting.
Click Save.
Receive Daily Summary Email of Calls
HyperConnect’s daily summary email feature provides AI-generated reports of your calls, offering a quick overview of key interactions. This feature helps you stay on top of important conversations and track performance effortlessly.
Launch HyperConnect.
Click the Settings icon.
Navigate to the User setting > Voice.
Enable the Daily summary email setting.
Click Save.
Receive Performance Report for a Center
HyperConnect’s performance report feature automatically delivers weekly or monthly summaries of your center’s performance through email. These AI-generated reports provide insights into overall metrics, trends, and productivity, helping you monitor team performance and make data-driven decisions with ease.
Launch HyperConnect.
Click the Settings icon.
Navigate to User Settings > Voice.
Enable the Weekly or monthly performance report for your center setting.
Click Save to apply changes.