Manager/Admin actions
Upload a Custom Digital Form
Your organization may need your guests to sign certain forms while buying a service, package or membership. Zenoti allows you to build, add, associate, and enable different custom forms such as a service form, guest form, treatment form, and consent form to get required information or consent from a guest.
Using Zenoti, you can manage and use the custom forms to:
Upload or Add an HTML Form (covered in the following section)
Zenoti allows you to upload the following HTML forms:
Service Form: Used to take guest consent or provide your guest with information specific to a service. A service can have either the same form for each visit or one form for the first visit and another for the subsequent visits. Service forms are also known as medical charts, treatment notes, treatment charts, SOAP notes, consent forms, or charts.
Guest Form: Used to take the guest data, such as name, address, phone number, health information, and allergies, when a guest visits your center for the first time.
Tag Form: A service can have a service form and up to ten additional forms. These additional forms are what are called tag forms. When you assign a tag form to a service, the assigned form is applicable each time your guest takes the service. Tag forms also allow you to have a different form for each center for the same service.
Membership Form: Used to capture a guest’s signature either offline or online after you sell a membership to a guest.
Package Form: Used to capture guest data when they purchase packages. You can assign this form to a group of services as part of a package.
Loyalty Form: Used to capture a guest's consent to the terms and conditions when they redeem the accrued loyalty points for the first time. You can only create one loyalty form for your business.
Upload the guest form in HTML format
You can use the guest form to capture information about a guest such as their name, address, contact details, health history, allergies, and lifestyle details when a guest visits you for the first time.
A guest form is also known as the guest intake form, new guest form, or guest consultation form.
Important
There is only one guest form and one loyalty form per organization. If you already have those forms in the Form builder or V1 formats, you cannot upload them again in HTML format.
At the organization level, click the Configuration icon.
Search for Custom forms, and under Forms, select Custom forms.
Under the Name, Code, and Description fields, enter the name, code, and description of the form.
From the Form type list, select Guest.
From the Create form using list, select HTML as you are uploading a custom form.
Select the number of days after which the form outdates. Once the form expires, an 'Outdated' banner is displayed at the top of the form.
Note: The 'outdated' banner is not displayed for HTML forms in ZMA Mobile v1.
To configure additional settings of the form, select applicable checkboxes.
Under Form behavior settings:
Setting name
Description
Show this form on Webstore
When a guest logs into Webstore, they have an option to fill out their guest form. By default, this setting is enabled.
If you do not wish to allow guests to fill out the guest form from Webstore, clear this checkbox.
Make this form read-only for guests (applies to Webstore and CMA)
Makes sure that the guests cannot fill out or edit the form
Copy details from old version of the form to the new version
This setting retains the relevant data from the previous version of the form in the new version
This way, if you update the HTML of the form, a guest or provider will only need to fill in the updated fields when they fill out the form.
Important
To ensure this setting applies after this check box is selected, you must read and agree to the details on the pop-up that appears.
Click Save & Proceed.
To upload your form, in the Edit form area, add your HTML code.
Note
You can use the available macros to add variable values to the body of the form.
To preview the form, click Preview.
Click Save.
Upload a service form in HTML format
Using a service form you can take a guest's consent or provide your guest with information specific to a service. A service can have either the same form for each visit or one form for the first visit and another for the subsequent visits.
Service forms are frequently used as medical charts, treatment notes or charts, SOAP notes, consent forms, or charts.
At the organization level, click the Configuration icon.
Search for Custom forms, and under Forms, select Custom forms.
Under the Name and Code fields, enter the name and code of the form.
From the Form type list, select Service.
From the Create form using list, select HTML as you are uploading a custom form.
Set the form status as Active or Inactive.
From the Form validity list, select your form's validity.
Setting name
Description
No expiry - Applicable for single service
Keeps the form valid for a single service until selected otherwise
The user must fill out the form for every appointment.
No expiry - Common form for all services on the same day
Keeps the form valid until selected otherwise
The user doesn't need to fill out the form for each service on a particular day.
You can use this option to fill common treatment forms and charts for services that are often booked multiple times on a single day for the same guest, such as laser hair removal for different parts of the body.
Expires after
Keeps the form valid for the set number of days after it's first filled
Example: If you have entered 60 in this field and the guest fills the form on August 1st, then the form will be valid until September 29th only.
Expires on
Keeps the form valid until the entered date on which the form expires irrespective of when it was first filled
Example: If you select December 15th as the expiry date and the guest has filled the form on December 14th, then the form is valid only till December 15th. The guest must fill out the form again on the next visit.
When a form reaches its expiry date, the information available in the form is reset and you must fill in the information again. If no expiry date is set, Zenoti continues to display the information for each visit.
To configure additional settings of the form, select the applicable checkboxes:
Under the Form review settings:
Setting name
Description
Require review
Makes sure that a review mandatory for the form
Require review only once within validity period
Notice
This checkbox appears only after the Require review checkbox is selected.
Makes the form available for review only once within the validity period
This way, you can prevent the form review overhead for your employees (such as Medical Directors).
Under the Form behavior settings:
Setting name
Description
Make this form read-only for guests (applies to Webstore and CMA)
Makes sure that the guests cannot fill out or edit the form
Prefill form with data from previous visit
Loads form data from the last time the form was filled
Copy details from old version of the form to the new version
Retains the relevant data from the previous version of the form in the new version
This way, if you update the HTML of the form, a guest or provider will only need to fill in the updated fields when they fill out the form.
Important
To ensure this setting applies after this check box is selected, you must read and agree to the details on the pop-up that appears.
Click Save & Proceed.
To upload your form, in the Edit form area, add your HTML code.
Note
You can use the available macros to add variable values to the body of the form.
To preview the form, click Preview.
Click Save.
You can now associate the uploaded form with services.
Upload additional forms for a service in HTML format
A service can have a service form and up to ten additional forms. These additional forms are called tag forms.
When you assign a tag form to a service, the assigned form is applicable each time your guest takes the service. Tag forms also allow you to have a different form for each center for the same service.
At the organization level, click the Configuration icon.
Search for Custom forms, and under Forms, select Custom forms.
Perform these steps under the General tab
Under the Name and Code fields, enter the name and code of the form.
From the Form type list, select the type of form you want to create. In this case, select Tag.
Notice
The settings after this field may vary depending on the type of form.
From the Create form using list, select HTML as you are uploading a custom form.
Set the form status as Active or Inactive.
Note
By default, the status is set to Active, which means that the form is ready to be associated with services.
From the Form validity list, select your form's validity.
Setting name
Description
No expiry - Applicable for single service
Keeps the form valid for a single service until selected otherwise
The user must fill out the form for every appointment.
No expiry - Common form for all services on the same day
Keeps the form valid until selected otherwise
The user doesn't need to fill out the form for each service on a particular day.
You can use this option to fill common treatment forms and charts for services that are often booked multiple times on a single day for the same guest, such as laser hair removal for different parts of the body.
Note
This option is selected by default.
Expires after
Keeps the form valid for the set number of days after it's first filled
Example: If you have entered 60 in this field and the guest fills the form on August 1st, then the form will be valid till September 29th only.
Expires on
Keeps the form valid till the entered date, on which the form expires, irrespective of when it was first filled
Example: If you select December 15th as the expiry date and the guest has filled the form on December 14th, then the form is valid only till December 15th. The guest must fill out the form again on the next visit.
Note
When a form reaches its expiry date, the information available in the form is reset and you must fill in the information again. If no expiry date is set, Zenoti continues to display the information for each visit.
To configure additional settings of the form, select applicable check boxes.
Under the Form review settings:
Setting name
Description
Require review
Makes sure that a review is mandatory for the form
Require review only once within validity period
Notice
This check box only displays after the Require review check box is selected.
Makes the form available for review only once within the validity period
This way, you can prevent the form review overhead for your employees (such as Medical Directors).
Under the Form behavior settings:
Setting name
Description
Make this form read-only for guests (applies to Webstore and CMA)
Makes sure that the guests cannot fill out or edit the form
Prefill form with data from previous visit
Loads form data from the last time the form was filled
Copy details from old version of the form to the new version
Retains the relevant data from the previous version of the form in the new version
This way, if you update the HTML of the form, a guest or provider will only need to fill in the updated fields when they fill out the form.
Important
To ensure this setting applies after this check box is selected, you must read and agree to the details on the pop-up that appears.
Click Save & Proceed.
Perform these steps under the Design tab
To upload your form, in the Edit form area, add your HTML code.
Note
You can use the available macros to add variable values to the body of the form.
To preview the form, click Preview.
Click Save.
Create a package form
Your business may require guests to sign some forms when they purchase packages. For example, you could have different forms such as agreement forms, terms and conditions forms, and forms outlining terms for freezing a package.
All such forms are called package forms. You can assign a package form to a group of services as part of a package.
At the organization level, click the Configuration icon.
Search for Custom forms, and under Forms, select Custom forms.
Under the Name, Code, and Description fields, enter the name, code, and description of the form.
From the Form type list, select Packages.
By default, the creation mode is set to Form builder and the availability of the form is set to Online.
Note
If you have existing offline package forms, you may continue to use them. Any new creation of package forms will be supported in the online mode with the use of form builder.
To set a specific purpose for the form, under the Purpose list, select one of the following:
Sign-up: The form will be used for signing up a guest for a new package.
Others: The form will be used for package-related activities apart from sign-up. For example, feedback.
Set the form status as Active or Inactive.
Note
By default, the status is set to Active, meaning the form is ready to be associated with packages.
Click Save & Proceed.
From the form list, under the Sample tab, select a sample form, or a blank form.
To use a form that you created recently, from the Recent tab, select a form.
Click Use form.
To add fields to the form, from the Tools list, drag components onto the form.
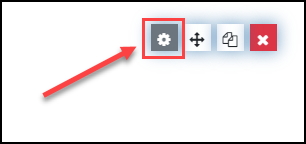
To customize a component, place the mouse pointer on the component and click the Edit button.
Click Save.
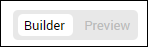
To preview, use the Builder - Preview toggle.
By default, the preview is in desktop mode. However, you can also preview in mobile and tablet modes.
After you build the form, perform one of the following steps:
Save: Saves the form
Save and close: Saves the form and redirects you back to the Manage custom forms page.
Close without saving: Redirects you back to the Manage custom forms page without saving the form.
You can now associate the form with a package.
Overview of Membership Forms
Your organization may need your guests to enter details and sign certain membership forms such as the Membership Agreement form when you sell a membership. Zenoti allows you to create membership forms and have them signed by guests.
This article helps you learn how to:
Create Custom Memberships Form
Ensure your guest fills and submits the Membership form:
Offline form: You need to print the offline form and have the guest fill and sign the form.
Online form: You can capture the guest’s details and signature, and submit the membership form using:
Upload a memberships form in HTML format
To upload a membership form in HTML, you should have already built the HTML form. To learn more, refer to this article.
At the organization level, click the Configuration icon.
Search for Custom forms, and under Forms, select Custom forms.
Click Add.
Under the Name and Code fields, enter the name and code of the form.
From the Form type list, select Memberships.
From the Create form using list, select HTML as you are uploading a custom form.
To make the form available online or offline, under the Mode setting, select Online or Offline.
Online: The form is available only in print format from the web.
Offline: The user’s details and signature are captured using Zenoti Mobile and the web.
To set a specific purpose for the form, under the Purpose list, select one of the following:
Sign-up: The form will be used for signing up a guest for a new membership.
Cancel: The form will be used for canceling the membership for a guest.
Freeze: The form will be used for freezing the membership for a guest.
Others: The form will be used for membership activities apart from sign-up, cancellation, or freeze. For example, feedback.
Upgrade: The form will be used for upgrading the membership of a guest to a higher tier or to a new membership with better benefits.
Downgrade: This form will be used to downgrade a guest’s membership to a lower tier or a plan with fewer benefits.
Transfer: This form will be used to shift a guest’s membership from the current center to a new one.
Set the form status as Active or Inactive.
Click Save & Proceed.
To upload your form, in the Edit form area, add your HTML code.
Note
You can use the available macros to add variable values to the body of the form.
To preview the form, click Preview.
Click Save.
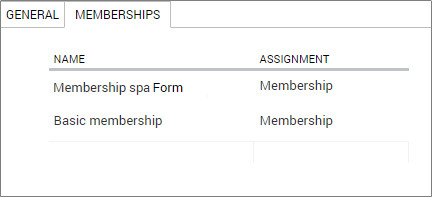
Note
When you create a new custom form, the Memberships tab is empty as there are no memberships associated yet.
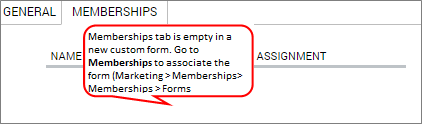 |
When you associate the form with a membership, the Membership tab shows the list of all the memberships associated with the form.
Upload the loyalty form in HTML format
Your organization may require the guests to be aware of the terms and conditions (T&Cs) of the loyalty program before they can redeem their points.
You can create a custom form that details the T&C of their loyalty program and make it a requirement for guests to sign in before they can redeem loyalty points.
Guests can sign the form while they are either at the center or they can sign it online using an email link.
Important
There is only one guest form and one loyalty form per organization. If you already have those forms in the Form builder or V1 formats, you cannot upload them again in HTML format.
At the organization level, click the Configuration icon.
Search for Custom forms, and under Forms, select Custom forms.
Click Add.
Under the Name, Code, and Description fields, enter the name, code, and description of the form.
From the Form type select Loyalty.
From the Create form using list, select HTML as you are uploading a custom form.
Click Save & Proceed.
To upload your form, in the Edit form area, add your HTML code.
Note
You can use the available macros to add variable values to the body of the form.
To preview the form, click Preview.
Click Save.
Build a digital form
In this article, you will learn the essentials required to create a basic HTML form that you can upload to Zenoti, and capture guest health and service data (including provider notes or SOAP Notes). You can also use the form to take a guest's consent and signature.
Important
This article assumes that you have basic understanding of HTML and working with JavaScript.
Log into Zenoti's digital form library to download basic HTML structures of forms.
About the HTML structure
The HTML structure you downloaded contains all the basic scripts including JQuery, JQueryUI, bootstrap, and the Zenoti scripts.
Note
The Zenoti scripts are required for the forms to render when using Zenoti.
You must add your HTML elements to this HTML structure.
Working with the HTML structure
Before you start making changes to the basic structure and adding the HTML elements, you must be aware of the following:
form.js: These scripts are used for saving, validating, and retrieving form data. It is also used for capturing guest signatures and file uploads. You can overwrite any function specified in form.js by replacing JavaScript/Jquery in
< script type = "text/javascript" ></script>tag of HTML.
form.css: Contains the basic and common CSS for all forms. You can add your custom styles within the HTML file by using the following tag:
                  <style type="text/css">
Body {
-------
-------
}
</style>
The
<body>tag should containclass="container". The<form>tag must always be after the<body>tag. The form tag (which must always come after the body tag) must contain anid="form"and optionally anaction="".
Signature: The basic HTML structure includes a code snippet that allows you to collect a guest's signature (useful if you need to capture guest consent).
                   /* Signature Components */
            createSignature("client-signature", { "required": true });
Remove this code if you do not need a signature field.
Reviewer Signature attribute: Sometime, you may need a form to be reviewed and signed by another person (for example, a medical supervisor). In such cases, you can add the
ReviewNeededattribute to your signature component that enables the form to open into the review panel for the reviewer's signature. Example
createSignature("patient-signature", { "required": true, "ReviewNeeded": true});
Webstore Signature attribute: If you have forms that you use for both webstore and appointment book, you may have the following requirements:
- When opened from appointment book - You may need the form signed by
another person (for example, a provider)
- When opened in webstore - As guests usually access the form on webstore, you might not need to collect a signature.
You can implement this behavior by adding the webstore attribute to your signature component.
createSignature("patient-signature", { "required": true, "webstore": true});
A Typical Form
A simple form usually consists of fields that are designed to capture the guest or service details, and usually include the following HTML elements - textarea, number field, date field, radio buttons, checkboxes, drop-down list, and signature field.
The following is an example of a typical form:
Click here to download the HTML of the above form.
Building an HTML Form
The following section contains the guidelines, required libraries, and common controls available for the HTML elements that you can add to your HTML structure.
Guidelines
When you are building a form for Zenoti, you must ensure the following:
Scripts and CSSInclude the following styles and scripts references in your HTML:
Styles
<link rel="stylesheet" href="https://cnt01.zenoti.com/forms/V1/common/css/bootstrap.min.css">
<link rel="stylesheet" href="https://cnt01.zenoti.com/forms/V1/common/css/jquery-ui.min.css">
<link rel="stylesheet" href="https://cnt01.zenoti.com/forms/V1/common/css/signature-pad.css">
<link rel="stylesheet" href="https://cnt01.zenoti.com/forms/V1/common/css/form.css">
<link rel="stylesheet" href="https://cnt01.zenoti.com/forms/V1/common/css/font-awesome.css">
Scripts
<script src="https://{BaseUrl}/jquery1.12.4.min.js"></script>
<script src="https://{BaseUrl}/JQuery.validate1.17.0.js"></script>
<script src="https://{BaseUrl}/jQueryUI.1.12.1.js"></script>
<script src="https://{BaseUrl}/Bootstrapv3.3.7.js"></script>
<script src="https://{BaseUrl}/signature_pad.js"></script>
<script src="https://{BaseUrl}/Form.js"></script>
Form Tags: You must enter the HTML elements within the
<form> </form>tags of your HTML structure.Comments: Zenoti supports only multi-line comments. For more information, see the Multi-line Comments section of this link.
Functions: End all functions with a semicolon.
CSS Classes: Do not use more than one bootstrap class.
Macros: A macro is a placeholder text that gets replaced with specific data when inserted into an input field. Zenoti supports the following Macros only:
Example
Consider the following snippet:
<input type="text" class="form-control" name="patientfirstName" id="patientfirstName" value="[GuestFirstName]" />
This snippet contains the [GuestFirstName] macro. This macro gets replaced with the guest's first name in the form.
Note
If you want to add the Guest's Zip code to the form, use the macro: [ZipCode].
HTML Elements
Textarea
Textarea is a multiple-line text input control that allows a user to enter more than one line of text. Multi-line text input controls are created using a <textarea> tag.
Example
                     <textarea onfocusin = " textAreaAdjust ( this ) " onkeyup = " textAreaAdjust ( this ) "
class = " form-control " rows = " 5 " id = " notes "
name = " Notes " placeholder = " Enter your areas of concern "
label = " Areas of Concern " required ></textarea>
You must be aware of the following for a Textarea:
(Mandatory) Every Textarea must have a
unique class = "" , id = "" , name ="" , and row ="".(Mandatory) Every Textarea must have
class="form-control"attribute. This is a bootstrap class. You can refer to this link for more information.(Mandatory for auto height): To handle auto height, you must add the following functions:
onfocusin = " textAreaAdjust ( this ) " - onkeyup = " textAreaAdjust ( this ) "If you wish to make a Textarea a mandatory field, add
requiredandlabelattributes. The label attribute is used for the error message.Use the placeholder attribute to display helpful text about the Textarea.
Tables
Tables allow you to organize and present data in rows and columns.
An HTML table is defined with the <table> tag.
Important
: Zenoti suggests that you do not use tables unless absolutely necessary as the experience on mobile devices may be compromised. You can use Div elements instead.
Example
                     <table id =" table_name " class = "table_name table table-bordered" >
< thead class= "cf" >
< tr >
< th > Code </ th >
< th > Company </ th >
</ tr >
</ thead >
<tbody>
< tr >
< td > 01 </ td >
< td > Spa Bliss </ td >
</ tr >
< /tbody>
</ table>
You must be aware of the following for a Table:
(Mandatory) Every table must have a unique
class = "" and id = ""attributes.If you want to add borders on all sides of the table and cells, use the
table table-borderedattribute. This is a bootstrap class. You can refer to this link for more information.Each table row is defined with the
<tr>tag.A table header is defined with the
<th>tag.By default, table headings are bold and centered. A table data/cell is defined with the
<td>tag.
Input Field
The <input> tag specifies an input field for the user to enter data. The input field can be used to capture either a number or text.
Example
                     <input class = "form-control" id = "input-padding" type = "text" min = "0"
placeholder = "Enter quantity" name = "Bio Face Wash"
required label =" Enter the quantity you wish to buy "/>
You must be aware of the following for an Input Field:
(Mandatory) Every input field must have an
id = "" , type="" , and name =""attributes. : id and name must be unique.The type attribute can be either
textortel.- Use
textif you want users to enter text, number, special characters, or a combination of all three.- Use
telif you want users to enter only numbers. If you usetel, add the following attributeonkeypress="return (event.charCode >= 48 && event.charCode <=57)"(Mandatory) Every input field must have
class="form-control"attribute. This is a bootstrap class. You can refer to this link for more information.If you wish to make the input field a mandatory field, add
requiredandlabelattributes. the label attribute is used for the error message.Use the placeholder attribute to display helpful text about the input field.
Dropdown list
A dropdown list allows users to select one option from a pull-down list of options.
selectoption tags.
Example
                     < select id = "severity" name = "Severity" class = "form-control" >
< option selected= "selected" value= "1" > Mild </ option >
< option value = "2" > Moderate < / option >
< option value =" 3 "> Severe </ option >
</ select >
You must be aware of the following for a dropdown:
(Mandatory) Every dropdown list must have a
class = "" , id = "" , and name =""attributes. : id and name must be unique.(Mandatory) Every dropdown must have
class="form-control"attribute. This is a bootstrap class. You can refer to this link for more information.The list of options in the dropdown is added using multiple
<option>tags that have a value attribute.To show an option as the default selected value, use the
selected="selected"attribute.If you wish to make the dropdown field, a mandatory field, add
requiredandlabelattributes. the label attribute is used for the error message.
Checkbox
Checkboxes allow the user to select one or more options from a pre-defined set of options. The options can be presented in a list (one below the other), or in a row (one after the other).
It is created using an input element whose type attribute has a value
of checkbox.
Example
Checkboxes in a list
                     <div class="checkbox">
    <label><input type="checkbox" id="Hives" name="Hives" value="Hives">Hives</label>
</div>
<div class="checkbox">
    <label><input type="checkbox" id="Moles" name="Moles" value="Moles">Moles</label>
</div>
<div class="checkbox disabled">
    <label><input type="checkbox" id="Acne" name="Acne" value="Acne">Acne</label>
</div>
The above code is rendered as follows:
Checkboxes in a row
                     <label class="checkbox-inline"><input type="checkbox" id="Hives" name="Hives" value="Hives">Hives</label>
<label class="checkbox-inline"><input type="checkbox" id="Moles" name="Moles" value="Moles">Moles</label>
<label class="checkbox-inline"><input type="checkbox" id="Acne" name="Acne" value="Acne">Acne</label>
The above code is rendered as follows:
You must be aware of the following for a checkbox:
(Mandatory)
type="checkbox"attribute is used to define a checkbox.(Mandatory) Every
<input type = "checkbox">must have a uniquevalue = "" , id = "" , and name ="".If you wish to make the checkbox a mandatory field, add
requiredandlabelattributes. The label attribute is used for the error message.
Radio Button
Radio buttons allow the user to make a selection. It is created using an input element whose type attribute has a value of radio. The options can be presented in a list (one below the other), or in a row (one after the other).
Note
A radio button behaves like a checkbox if it's not a part of a radio button group
Example
Radio buttons in a list
                     <div class="radio">
    <label><input type="radio" name="gender" value="male" checked>Male</label>
 </div>
 <div class="radio">
     <label><input type="radio" name="gender" value="female">Female</label>
 </div>
The above code is rendered as follows:
Radio buttons in a row
                     <label class="radio-inline"><input type="radio" name="gender" value="male">Male</label>
<label class="radio-inline"><input type="radio" name="gender" value="female">Female</label>
The above code is rendered as follows:
You must be aware of the following for a radio button:
(Mandatory)
type="radio"attribute is used to define a radio button.(Mandatory) Every
<input type = "radio">must have a uniquevalue= "" , id = "" , and name ="".If you wish to make the radio button a mandatory field, add
requiredandlabelattributes. The label attribute is used for the error message.
Signature
The Signature element allows you to capture a digital signature.
The script needed to render the signature field in Zenoti is in the HTML Structure you downloaded.
Example <div id= "guest-signature" > </ div >
For the signature field to render, you must ensure that the id in the script and id specified in HTML are the same.
Note
To add multiple signature blocks, add multiple signature scripts with varying ID's and ensure the ID in the script and the corresponding HTML is the same.
Error Validations
For validations to work, add the following code in the Script tag of HTML.
                     /* Required Fields Handling */
$('#form').focusout(function (e) {
    var reqAttr = $(e.target).attr('required');
    errorMessage(e, reqAttr);
});

$('input[name^="date"]').change(function (e) {
    var reqAttr = $(e.target).attr('required');
    errorMessage(e, reqAttr);
});
Annotations
You can reference the sample HTML form with annotation for adding annotations to your form.
To annotate images, you must do the following:
1. In the Script tag of HTML, add the following code:
createAnnotaions('imageAnnotationbefore',[imageURL]);
Note
: The [imageURL] must be present in the Zenoti Image Gallery (at the organization level, Configuration > Marketing > Image gallery)
Example
createAnnotaions('imageAnnotationbefore', ['https://demo.zenoti.com/temp_data/tempassetstore/368f32b9-6902-4fc9-9006-f07e3f583e0b/customassetupload/419b4d70-2e22-4a13-9be3-d611038c1b70.jpg ']);
2. Add the following paths to HTML:
                     <script src="https://{BaseUrl}/Annotation.js"></script>
<link rel="stylesheet" href="https://cnt01.zenoti.com/forms/V1/common/css/annotations.css">
3. Add the following script below the path:
                     <script type="text/javascript">
    window.$Annotation = $;
</script>
4. Add the following to the HTML tag:
                     <div class="clsUploadImage" align="left">
    <label class="clsCaptureLabel">Before</label>
    <input type="file" id="capture" capture="camera" style="visibility: hidden"><br>
    <br>
    <div class="clsAnnotatedImage" id="imageAnnotationbefore"></div>
</div>
Guest Mode
If you send your forms in an email or use guest mode (a mode that allows guests fill up the form on a device), you may want to hide or restrict guests from editing certain fields.
Hide fields
Normal fields: To hide normal fields when the form is sent in an email or viewed in guest mode, add hidefields attribute to your class.
Example
                     <div class="hidefields">
   <input type="text" class="form-control" name="FName" id="FName" />
</div>
Mandatory fields: To hide mandatory fields that are mandatory for your provider, but not your guest, when the form is sent in an email or viewed in guest mode, add viewtype="hidefields" attribute to your element (div). Example
                     <div>
   <input type="text" class="form-control" name="FName" id="FName" required viewtype="hidefields" />
</div>
Restrict fields
Normal fields: To restrict editing of normal fields when the form is sent in an email or viewed in guest mode, add viewfields attribute to your class.
Example
                     <div>
   <input type="text" class="form-control viewfields" name="FName" id="FName" />
</div>
Mandatory fields: To restrict editing of mandatory fields (that are mandatory for your provider, but not your guest), when the form is sent in an email or viewed in guest mode, add viewtype="viewfields" attribute to your element (div). Example
                     <div>
   <input type="text" class="form-control" name="FName" id="FName" required viewtype="viewfields" />
</div>
Validate the HTML Code in Forms
Your organization may need your guests to sign certain forms while buying a service, package, or membership. Zenoti allows you to build, add, associate, and enable different custom forms such as a service form, guest form, treatment form, and consent form to get required information or consent from a guest.
When you add HTML to a form, the chances of errors are high. As HTML is not compiled, everything still works in a way, but it might not be the way that you want the form to work. HTML validator, in-built in Zenoti, is a quick way to check for such errors. The validator works in the following way:
When you add the HTML code and save it, the validator checks for errors in the following areas:
Name element
ID element
Tags
Links to JS files
HTML head and body
If the validation succeeds, the validator saves the HTML code.
If the validation fails, the validator does not allow you to save the HTML code until the errors are resolved.
To validate the HTML you have pasted
At the organization level, click the Configuration icon.
Search for Custom forms, and under Forms, select Custom forms.
Click Add.
Complete the following fields:
Name: Enter a name for the form. Example: Spa Service - Guest Form.
Code: Enter a code for the form. Example: Ann 02
Description: Enter a description. This is an optional field.
Assigned To: Select from Service, Guest, Tag, Memberships, Packages, and Loyalty.
Type: Select V2 Form HTML to upload an HTML form.
Active: This option is selected by default and means that the form can be associated with either services or guest profiles. Clear the checkbox if you do not wish to make the form active.
Similarly, configure the other settings, such as Enable for review and Validity.
Click Next
A text area appears where you can enter your HTML.
You can use the available macros to add variable values to the body of the form.
Add your HTML to the text area.
(Optional) Click Preview to view your form before saving the changes.
This allows you to view your form with multiple fields in one single screen.
Click Save.
The HTML validator validates the HTML code.
If the validation fails, a banner appears on top.
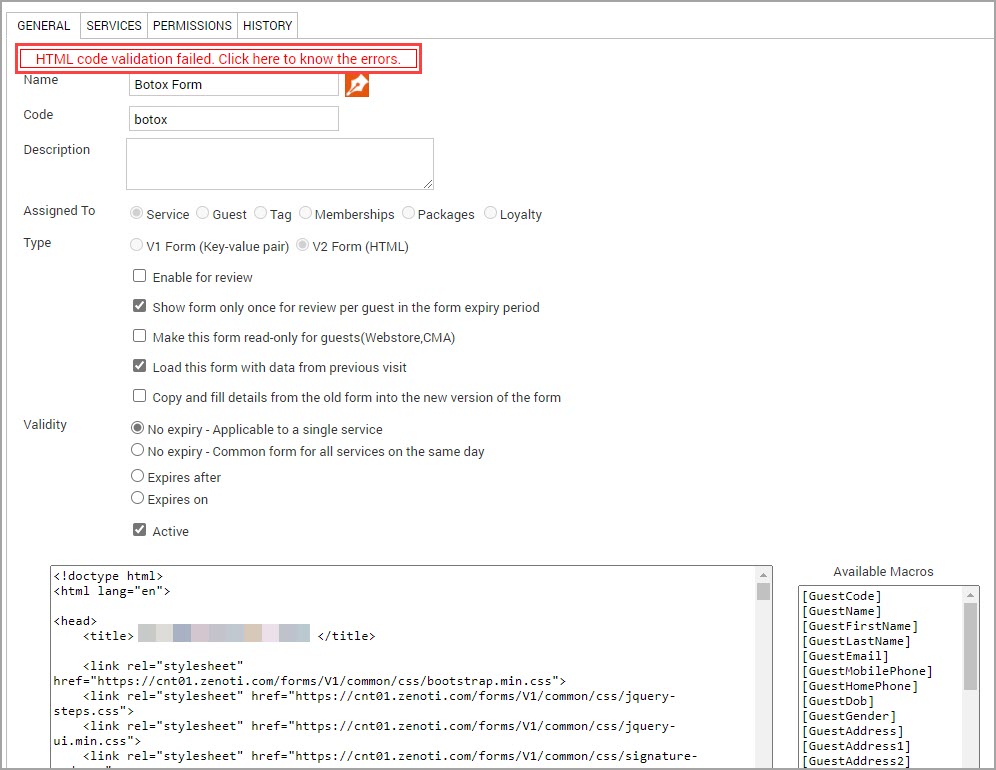
Click the banner.
A pop-up appears, displaying the issues present in the HTML code.
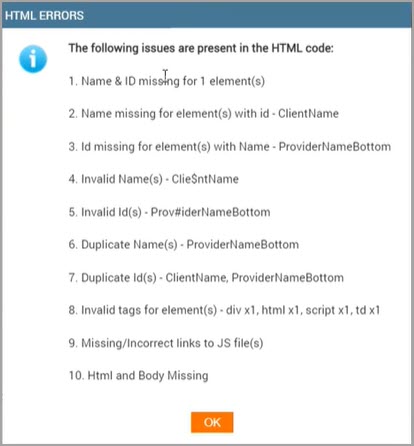
Make the changes accordingly, copy over the corrected HTML to the text area, and then click Save.
You have successfully uploaded your digital form.
View the Version History of a Form
On the custom form setup page, the History tab serves as a reference to review the version history of a form. The page lists:
Which areas within the digital form setup were updated, such as changes to the HTML and changes to the settings
Who made the change
What changed
When those updates were made.
The value before the change and the changed value
For changes to HTML, you can also preview the changes.
Note: The History tab lists the history with the most recent changes first.
To view the version history
At the organization level, click the Configuration icon.
Search for Custom forms, and under Forms, select Custom forms.
Click the relevant form.
Click the History tab.
For HTML related changes, click the hyperlink in the Old value column.
Similarly, to preview the new value, click the hyperlink in the New value column.

Validity of custom forms
Custom forms allow you to capture guest data such as guest details, guest consent, SOAP Notes, and treatment notes. Zenoti supports the following types of custom forms:
Guest Forms: These are the guest intake forms that help you to capture the guest details when they visit your center for the first time. In this form, you can capture guest information such as contact details, birthdays, anniversary dates, and promotions they are interested in.
Service Forms: These are the consent and consultation forms that you can use to take guest consent and fill the SOAP or treatment notes of a service.
Tags: Tags help you in assigning multiple forms to a service. You can also assign the same tag to multiple services. When you assign the same tag to multiple services, the information you collect for a service gets assigned to all the services that use the same tag. Learn More: Assign Tags to Multiple Services: Overview
For each service and tag form you create, you can set the validity. This reduces your effort of collecting the guest information multiple times. With this, you need to fill the form information only when it is expired. Following are the validity options you can configure for a form:
No expiry - Applicable for a single service: This option is selected by default. If left unchanged, the form is valid for a single service and the guest must fill the form for every visit.
No expiry - Common form for all services on the same day: You can use this option to fill common treatment forms and charts for services that are often booked multiple times on a single day for the same guest, such as laser hair removal for different parts of the body.
Example: Let’s say your guest Marie books a Botox Treatment service that has 2 sessions. For both sessions, the provider must capture SOAP or treatment notes. To accommodate this, you create a consultation form and apply the validity for a single visit.
Marie avails her 1st Botox session on November 1st and the provider fills the SOAP notes. Remember that the form is valid for a single visit. When she avails of the 2nd Botox session on November 10th, your provider must fill the SOAP notes again.
Note
With this validity option, a form does not get expired, but you need to capture the information each time. Zenoti stores the form information from both sessions.
Expires after: This option allows you to set the validity for a specified number of days after which the form gets expired. Zenoti calculates the validity of the form from the date when it was first filled.
Example: Let’s say you have entered 365 for this option. Now, if your guest fills the form on August 1st 2018, the form is valid till July 31st 2019. For any service your guest takes after July 31st 2019, they must fill the form again.
Note
If a guest fills the consent form before the actual service date, the form validity begins from the day it was first consented and not the service date. For example, if your guest has booked a service for October 25th, but had consented on October 15th, the validity begins from October 15th.
Expires on: This option allows you to set the validity to expire on a specified date irrespective of when it was first filled.
Example: Let’s say you select the expiry date as December 15th 2018. Now, if a guest fills the form on December 14th, the form is valid only till December 15th. If the guest visits on December 16th, the guest must fill the form again.
Note
When a form reaches its expiry date, the information available in the form is reset and the form must be filled again
If no expiry date is set, Zenoti continues to display the information for each visit.
You can create target segments to extract guest list who have forms that are expired or will soon expire. Learn More: Export Guests List with Expired or Will Expire Forms
Booked a service for the first time: If you book a service for the first time after an expiry date is set, you or your guest must fill the forms available for the service. Validity is calculated from the day the form was first filled.
Booked a service that has a valid form: If a service has a valid form (not expired), Zenoti does not prompt you to fill the form again. Even if the “Enforce entry of mandatory service custom data fields before payment” setting is enabled, you can still continue with the payment since the form was already filled in previous visit and it has not reached its expiry date yet.
However, you can override the information available in the form until the forms gets expired.
To override a valid form, do the following:
Click the appointment block, and select the Enter Service Custom Data option.
The forms page appear with a message on top of the page as “This form isvalid through mm/dd/yyyy. To override this form, click here”.
To override, click “Click here”.
The form gets reset and you can fill it.
Note
When the form is filled again, the validity of the form is reset based on latest date.
Booking a service with expired forms: When you book a service that has one or more service expired forms, Zenoti displays an alert icon on the appointment block.
An appointment that has an expired form is equivalent to booking a service for the first time where you must fill the form.
What happens to the form after it expires?
Even after a form expires, it is stored in the Guest Profile in the Forms Unified View tab. You can access the information in the form but to book another appointment, the form must be filled in again.
Can you delete an appointment after a guest provides consent to a service?
You can delete an appointment after your guest consents to a service. However, if you have applied the same consent to another service for which payment is collected and the invoice is closed, you cannot delete the original appointment (where the consent was provided).
Example: Let’s say your guest avails Botox Treatment for the first time on August 15th and provides consent. The consent will be valid until August 14th 2019.
Let’s say, the same service is rebooked for December 15th at 4:00 PM. In this case, the following are possible:
You can delete the August 15th appointment anytime before your guest avails of the service on December 15th.
You cannot delete the August 15th appointment if your guest avails of the service on December 15 and makes a payment. This is because Zenoti is using the same form for both services.
That is until the consent form from the first Botox service appointment is not applied to any other service (for which invoice is closed), you can delete the appointment.
Associate HTML forms with a service
After you create a custom form and upload it to Zenoti, you can assign the form to the services. When you assign a form to a service, the following takes place:
Guests can fill the form details
Providers can enter the SOAP notes
To assign custom form with a service
At the organization level, click the Master data icon.
Select Services.
Click Add to create a new service or click an existing service from the list to edit its details.
Do one of the following:
If you are adding a new service: Follow the steps in Create a New Service until you reach the Custom section.
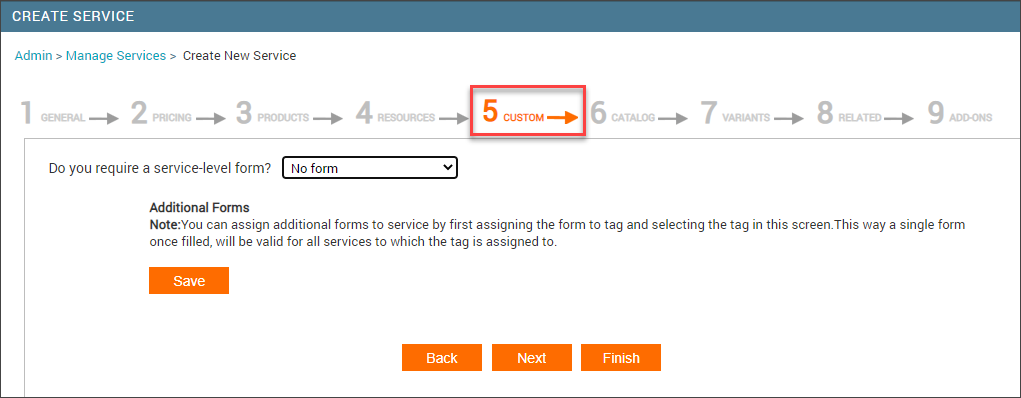
If you are editing an existing service: Click the Custom tab.
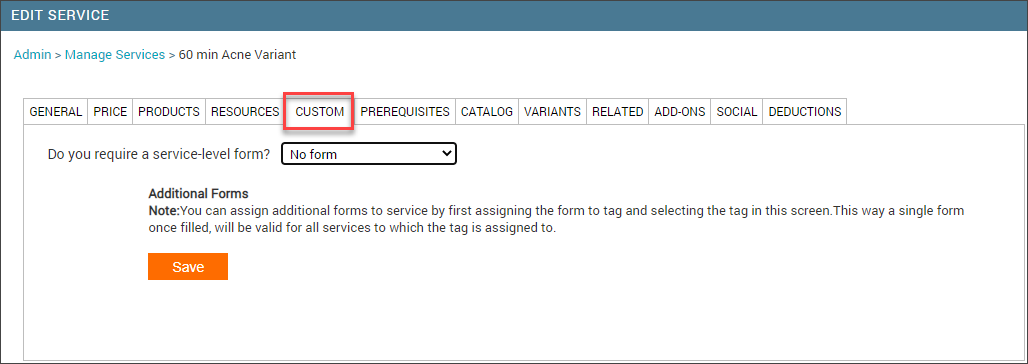
Complete the fields in this tab as follows:
From the Do you require a service-level form? drop-down list, select one of the following options from the list:
Same form for each visit: Select this option if you want your guest to fill the same form every time the guest takes a service.
To know how to associate the same form for each visit, read: Associate Same Form for a Visit
Different forms: Select this option if you want your guest to fill out different forms, one for the first visit and another for subsequent visits. For example, let’s say you have two forms, Botox Custom form , and Botox Follow Up form. You select the Botox Custom form for the first visit and the Botox Follow Up form for subsequent visits. Now, when a guest visits for the first time, Zenoti applies the Botox Custom Form and for subsequent visits, Zenoti applies the Botox Follow Up form.
To know how to associate different forms for a service, read: Associate Different Forms for a Service
No form (default): Select if the service does not require any form.
Click Save.
Zenoti assigns the service forms and the custom forms (that are assigned to the tags) to the service.
To go to the Catalog section and configure the online catalog, click Next.
Associate Same Form for Each Visit
Depending on your business, you can associate a form with a service that the guests must fill each time they visit to take that service.
In addition to associating the service forms, you can also assign tag forms to a service. When you assign a tag to a service, the assigned custom form is applicable each time your guest takes the service.
Note
You can decide how many tag forms can be assigned to a service. When you assign a tag form to a service, the assigned form is applicable each time your guest takes the service. Tag forms also allow you to have a different form for each center for the same service. You can choose to add up to 10 tag forms to a service.
To learn how to assign tags, read: Assign a Tag to Multiple Services: Overview.
At the organization level, click the Master data icon.
Select Services.
Click Add to create a new service or click an existing service from the list to edit its details.
Do one of the following:
If you are adding a new service: Follow the steps in Create a New Service until you reach the Custom section.
If you are editing an existing service, locate the service and click the Custom tab.
From the Do you require a service-level form? drop-down list, select Same form for each visit.
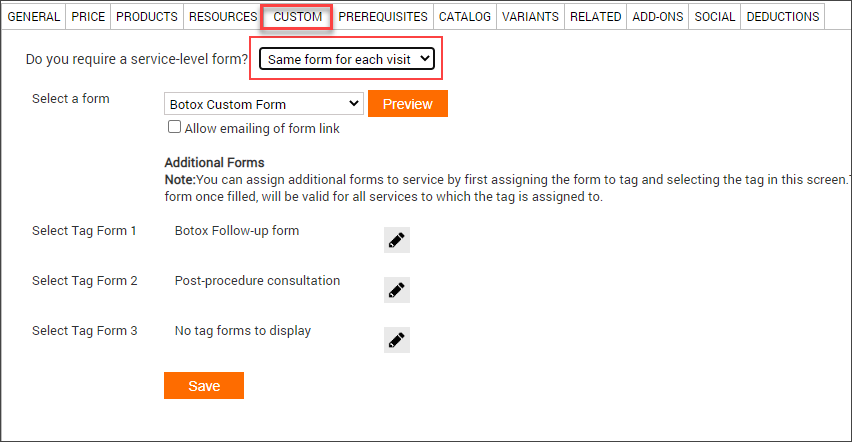
Do the following:
From the Select a form drop-down list, select a custom form.
To include the form link in the email via [ServiceDataLink] macro in the Appointment Confirmation and Appointment Reminder notifications, click the Allow emailing of form link checkbox.
Important
If you do not select the checkbox, the form link is not added to the notifications and your guest won’t be able to access the form from their email.
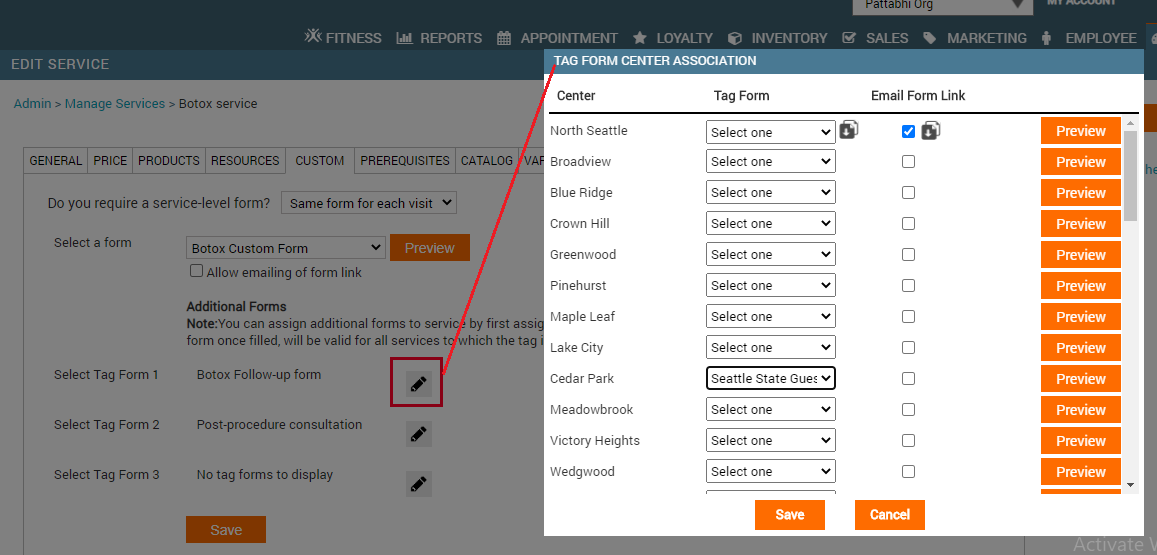
(Optional) To associate a tag form with the service, click the edit icon in Select a Tag Form 1 and perform the following steps in the Tag Form Center Association dialog box.
Click Save.
The tag form is associated.
Note
If you want to add more tag forms, click the edit icon for Select a Tag Form 2 and Select a Tag Form 3, and perform steps a to d.
Click Save.
The form is associated with a service.
Associate Different Forms for a Service
Depending on your business, you can associate multiple forms with a service. The guests must fill these forms each time they visit to take a service.
For example: For a Botox service, let’s say your guests are required to fill two forms; one during their first-time visit to take the service and the other during their subsequent visits. In Zenoti, you can set up different forms and associate these forms with a service.
In addition to associating the service forms, you can also assign tag forms to a service. When you assign a tag to a service, the assigned custom form is applicable each time your guest takes the service.
Note
You can assign up to three tags per service. To learn how to assign tags, read: Assign a Tag to Multiple Services: Overview.
At the organization level, click the Master data icon.
Select Services.
Click Add to create a new service or click an existing service from the list to edit its
details.
Do one of the following:
If you are adding a new service: Follow the steps in Create a New Service until you reach the Custom section.
If you are editing an existing service, locate the service and click the Custom tab.
From the Do you require a service-level form? drop-down list, select Different forms.

Do the following:
From the First visit drop-down list, select a custom form.
This is the first visit form that the guests must fill when they visit for the first time
to take the service.
From the Subsequent visits drop-down list, select a custom form. This form is filled by your guests when they visit again to continue the procedure for the service. These subsequent visits are part of the service and the guests are required to fill necessary information.
For example, you have set up two visits for a Botox service for your business.
The first visit requires the guest to fill health information in the first-visit form. The second visit requires to record any post-procedural observation and consent from the guest.
To include the form link in the email in the Appointment Confirmation and Appointment Reminder notifications
, click the Allow emailing of form link checkbox.
Important
: If you do not select the checkbox, the form link is not added to the notifications and your guest won’t be able to access the form from their email.
Tag Form 1 and perform the following steps in the Tag Form Center Association dialog box.
The tag form is associated with the service
Note
If you want to add more tag forms, click the edit icon for Select a Tag Form 2 and Select a Tag Form 3, and perform steps a to d.
Click Save.
The form is associated with a service.
Note
To view the change history for service form or tag form associations, click the View Service Form Association Change History icon or the View Tag Association Change History icon, respectively.

Assign a Tag to Multiple Services
In businesses, some of the services need to use multiple forms such as a consent form and a consultation form to capture the guest and consultation information. In addition to this, you may need to take your guest’s consent for multiple services. In such situations, you can use tags.
Using tags, you can assign multiple forms to a service. When you assign a tag (that has a custom form assigned to it) to multiple services, the information you collect for one service automatically gets applied to rest of the services that use the same tag. Using tags you can avoid the need to take guest consent for each service.
Example: Let’s say, under Body Treatment you have the following two massages and services:
Deep Tissue Massage
- 30 minutes service
- 60 minutes service
Balinese Massage
- 40 minutes service
- 75 minutes service
Say you must take guest consent and fill SOAP notes for all the services available under Body Treatment. In this case, you must create two service forms, one for guest consent with a validity of 365 days and another for service consultation with a validity of single visit. Now, you must create two tags for each form and assign the tags with each service under Body Treatment. With this, the forms get applied to all the four services.
Now, if your guest avails 30 minutes Deep Tissue Massage service for the first time, the following takes place:
Your guest provides consent for the 30 minutes Deep Tissue Massage service. Since, all the services use same tag, Zenoti applies the consent all the services under Body Treatment.
When your guest comes next time for any other service under Body Treatment, your guest need not provide a consent again.
Your provider fills SOAP notes in the consultation form specific to 30 minutes Deep Tissue Massage service.This consultation is valid only for this visit. If your guest avails any other service next time under Body Treatment, provider must fill the SOAP notes again.
Steps to create a tag and assign it to a service
Step 1: Create a custom form of type Tag.
Step 2: Create a tag of type service and assign the custom form you created in Step-1.
Step 3: Assign the tag you created in Step 2 to the services you wish to group.
After you finish the three steps, the custom form is assigned to all the services that have the same tag.
Example:
Step-1: You create a tag custom form with name Massage Consent Form.
Step-2: You create a tag of type service with name For Massages and assign the Massage Consent Form form to the tag.
Step-3: You assign the tag For Massages to the Detox, Green Tea, and
Fruit Pulp massage services and group them with the tag.
Now, if your guest avails the Detox Massage and fills the consent form, the consent gets applied to Green Tea and Fruit Pulp massages as well.
Configure settings to send submitted forms to guests
For compliance and documentation, you might have to send submitted forms to your guests.
This includes service, guest, and tag forms.
To configure settings to send submitted forms, you must:
Mark a form to be sent to guests via email
Add macros to notifications
At the organization level, click the Configuration icon.
Select Notifications > Templates for email and text.
Scroll down and select any of the following templates.
Appointment completion to guest
Thank You
Click Edit and add the [SubmittedFormCopy] macro to the notification text.
Click Save.
Example:

Prerequisites to send submitted form to guests
The form to be sent must be associated with services in the appointment taken by the guest and in the submitted status.
You must mark the forms to be sent to guests by selecting the Email copy of the form to guest on submission checkbox.
Your organization must use the latest version of Webstore (Webstore v2).
If your organization uses Webstore v1, you won't be able to use this feature.
Retain the Relevant Data from Previous Version of a Form
When you add, update, or delete certain fields of a form (service, tag, or guest), Zenoti creates a new version of the form. You can enable a form-level setting to retain the relevant data from the previous version of the form. This way, when a guest or provider updates the form, they only need to fill the updated fields. If this form-level setting is not enabled, the guest or the provider will have to complete the form from the beginning.
Caution
The old and the new versions of a form may be completely different. Before you save or submit the new version of the form, you must review the details in it for accuracy.
At the organization level, click the Configuration icon.
Search for Custom forms, and under Forms, select Custom forms.
Select the relevant form.
The Manage Form page appears.
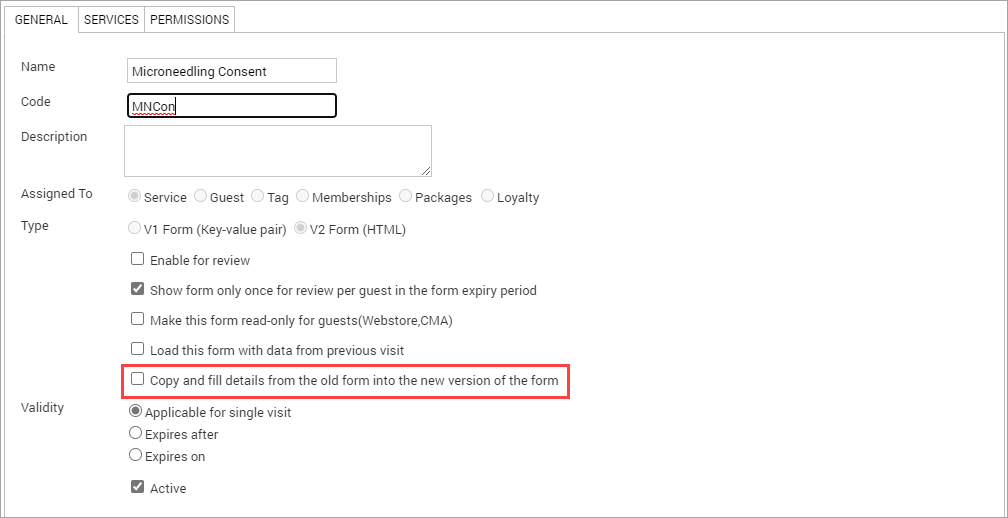
Select the Copy and fill details from the old form into the new version of the form check box.
Note
By default, any image that the guest or the provider adds to the old version of a form is automatically loaded in the new version. Not selecting this check box will not affect the loading of image from the old version to the new version. A caution appears, letting you know that when you select this option, Zenoti will automatically copy and fill details from the old form into the new version of the form.
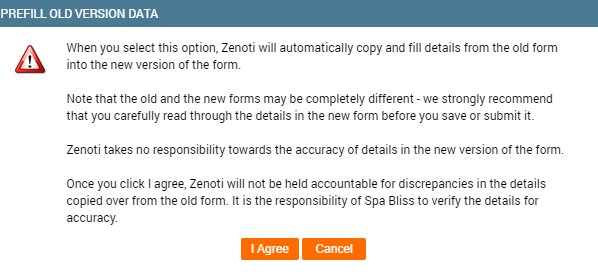
Click I Agree.
Click Save.
Zenoti automatically retains the relevant data from the previous version of the form in the new version
Retain Forms for Deleted, Cancelled, and No-Show Appointments
The Forms Unified View tab in the guest profile lists all the forms related to all the services the guest has booked. This includes forms for deleted, cancelled, and no-show appointments. The forms for such appointments do not get filled and remain blank.
Providers usually check the forms filled for earlier appointments before deciding the treatment specifications for the current appointment. But they get confused when they see the blank forms for no-show, cancelled, void, or deleted appointments.
To avoid this, you can choose to retain or discard blank forms for the void, cancelled, deleted, and no-show appointments.
To retain or discard blank forms for the void, cancelled, deleted, and no-show appointments:
At the organization level, click the Configuration icon.
Search for and select the Retain blank (not filled) forms for setting from the Forms section.
In the Retain blank (not filled) forms for list, select the types of blank forms you wish to retain:
Void
Deleted
No-show
Cancelled
Click Save.
Allow Only Signed in Users to Access Guest Form Online
Permission available to: Administrator and owner roles
Setting available at: Organization level
You can capture essential guest data by sending an email to the guest with a link to the guest form. To maintain the guest’s confidentiality and to prevent unauthorized access to the form, you can enable a setting that requires guests to log in before they can edit or view the form (sent via email or Webstore).
To force guests to access the guest form only after they sign in
At the organization level, click the Configuration icon.
Search and select Enforce guest sign-in for online guest form submission via email links and webstore under Forms.
Enable the Enforce guest sign-in for online guest form submission via email links and webstore setting to prevent guests from viewing the guest form without logging in.
Click Save.
Guests must now log in or sign up to view or enter their details in the guest custom data form that is emailed to their registered email address.
Impact on guest access to the form
With the Enforce guest sign-in for online guest form submission via email links and webstore setting enabled, the following takes place:
Guest receives an email with a link to the guest custom data form.
Note
The link to the form automatically expires after 8 hours.
Guest clicks the link and is directed to log in using the username (unique identifier) and password.
Tip
Based on your organization level settings, the unique identifier may be the guest’s email address or phone number.
Guest enters the username and password or must sign up to create a new account.
Zenoti performs a check and verifies if the logged in user's credentials is the same as that of the intended guest.
If the credentials are valid, then Zenoti allows the guest to proceed to complete the form.
Else, the following error displays:
You are not authorized to access this form. Please login with the correct credentials.
Allow Only Signed In Guests to Access Service and Tag Forms Online
Permission available to: Administrator and owner roles
Setting available at: Organization level
You can capture essential guest data for services by sending an email to the guest with a link to the service form (also known as treatment chart, treatment form, medical notes, medical chart, or SOAP notes) and tag form. To maintain the guest’s confidentiality and to prevent unauthorized access to the form, you can enable a setting that requires guests to log in before they can edit or view the form (sent via email or Webstore).
To force guests to access service and tag forms only after they sign in
At the organization level, click the Configuration icon.
Search and select Enforce guest sign-in for online service & tag form submission via email links and webstore under Forms.
Enable the Enforce guest sign-in for online service & tag form submission via email links and webstore setting to prevent guests from viewing the guest form without logging in.
Click Save.
Guests must now log in or sign up to view or enter their details in the guest custom data form that is emailed to their registered email address.
Impact on guest access to the service and tag forms
If the Enforce guest sign-in for online service & tag form submission via email links and webstore setting is enabled, the following takes place:
Guest receives an email with a link to the service form or tag form.
Note
The link to the form automatically expires after 8 hours.
Guest clicks the link and is directed to log in using the username (unique identifier) and password.
Tip
Based on your organization level settings, the unique identifier may be the guest’s email address or phone number.
Guest enters the username and password or must sign up to create a new account.
Zenoti performs a check and verifies if the logged-in user's credentials are the same as that of the intended guest.
If the credentials are valid, then Zenoti allows the guest to proceed to complete the form. Else, the following error appears:
You are not authorized to access this form. Please login with the correct credentials.
Allow Only Signed in Users to Access Loyalty Form Online
You can capture guest consent on the terms and conditions of a loyalty program before they redeem loyalty points by sending an email to the guest with a link to the loyalty form. To maintain guest’s confidentiality and to prevent unauthorized access to the form, you can enable a setting that requires guests to log in to Webstore before they can edit or view the form (sent via email or Webstore).
To ensure only signed-in users can access the loyalty form
At the organization level, click the Configuration icon.
Search and select Enforce the Guest to Sign-in to Webstore in order to sign the Loyalty Form under Forms.
Enable the Enforce the Guest to Sign-in to Webstore in order to sign the Loyalty Form setting to prevent guests from viewing the guest form without logging in.
Click Save.
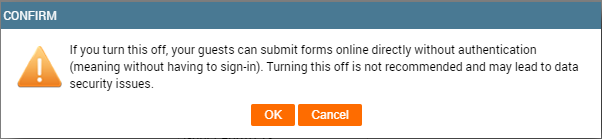
Note
If this setting is disabled, you get an alert message that states the guest will be able to submit loyalty forms without logging in, which may lead to data security issues.
Impact on Guest Access to the Form
With the Enforce the Guest to Sign-in to Webstore in order to sign the Loyalty Form setting enabled, the following takes place:
Guest receives an email with a link to the loyalty form.
Note
The link to the form automatically expires after 8 hours.
Guest clicks the link and is directed to log in using the username (unique identifier) and password.
Tip
Based on your organization level settings, the unique identifier may be the guest’s email address or phone number.
Guest enters the username and password or must sign up to create a new account.
Zenoti performs a check and verifies if the logged in user's credentials is the same as that of the intended guest.
If the credentials are valid, then Zenoti allows the guest to proceed to complete the form.
Else, the following error displays:
You are not authorized to access this form. Please login with the correct credentials.
Edit Forms
Only employees with appropriate role permission can edit forms. In Zenoti, you can view and edit the guest or service forms from the Guest Profile page.
You cannot delete custom forms. However, you can change the status of the form to Inactive.
Required permissions: Appointments > ServiceCustomData > View, Edit, Forms review
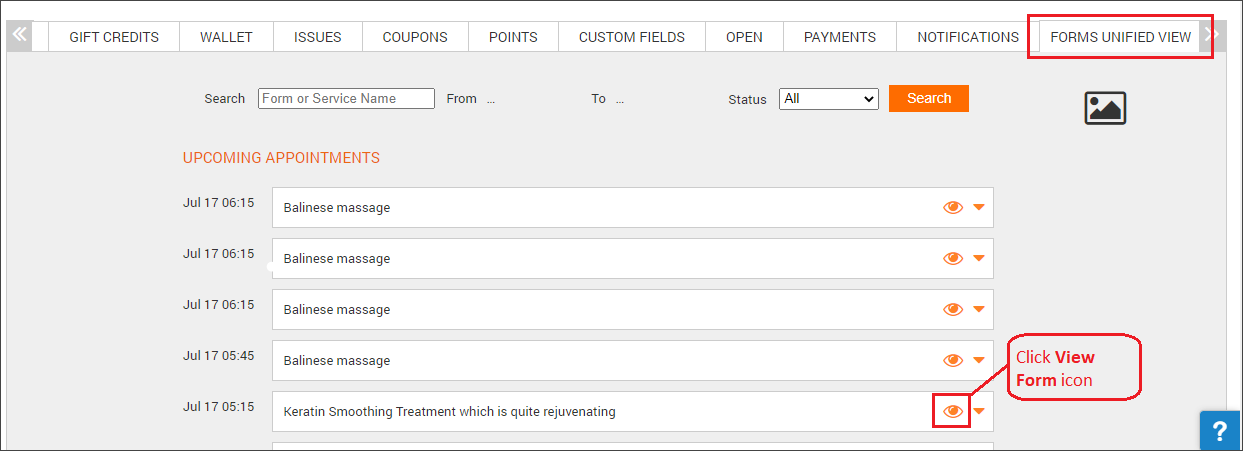
On the Guest Profile page, click the Forms Unified View tab.
Locate the form and click the View Form icon.
Edit the form.
To save the form, click Save.
To submit the form, click Submit and close.
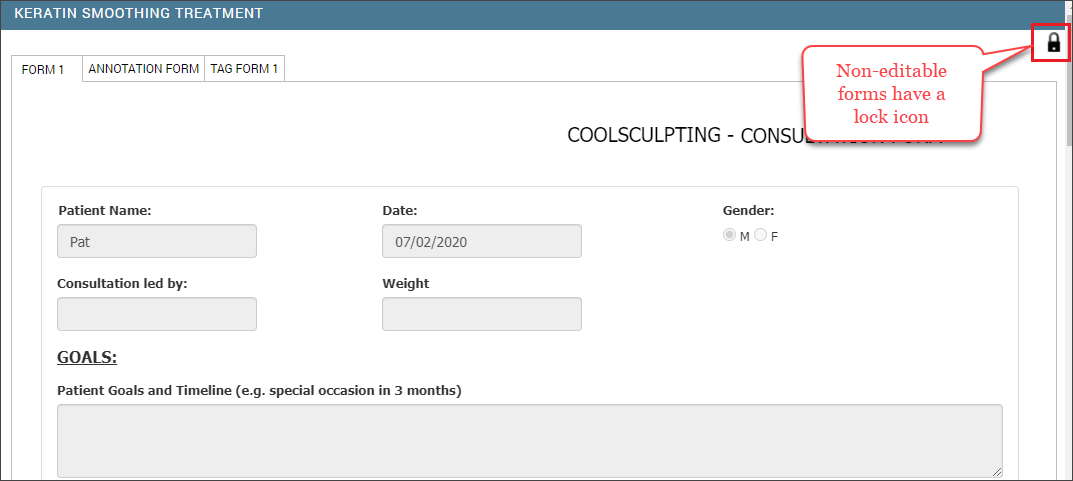
Important
Based on your business setup, you may come across forms that are locked; this is indicated with a lock icon on the top right-hand corner of the form.
To know how to enable appropriate permission to unlock forms, read: Permission to Unlock Forms.
After appropriate permission is enabled you can perform the following steps to unlock forms:
On the Guest Profile page, click the Forms Unified View tab.
Locate the form and click the View Form icon.
Click the lock icon on the top right-hand corner.
The Need authorization to unlock this form dialog box appears.
Enter your credentials and click OK.
The form is unlocked for editing.
Permissions to Lock Form Editing
When collecting guest consent or service information in forms, businesses need to ensure data compliance to avoid legal issues. This includes making sure there is no unwanted data tampering after the form is submitted.
In Zenoti, if you are a business owner you can enable permissions that restrict employees from editing forms after they are submitted.
To enable the Restrict Editing Form permission
At the organization level, click the Configuration icon.
Search for Restrict Editing Form, and under Forms, select Restrict Editing Form.
Under Restrict Editing Form, you can select one of the following:
To restrict employees from editing forms after the invoice is closed, select Restrict editing after closing invoice.
To restrict employees from editing forms after it is submitted, select Restrict editing after form is submitted.
Enabling this setting will also limit the medical directors from reviewing the form.
To restrict employees from editing forms after it is submitted or after the service date has passed, (whichever comes earlier), select Restrict editing after form is submitted or the service date has passed.
To allow employees to edit forms without any restrictions, select No restriction.
Click Save.
The edit restriction for forms is applied.
Note
After you save the changes, it cannot be undone. To undo the changes, reach out to Zenoti Support.
When form editing is restricted, the forms after they are submitted become non-editable. Only authorized employees who have permissions to unlock forms enabled may edit forms in such situations.
To see if form editing is restricted:
On the Guest Profile page, click the Forms Unified View tab.
Locate the form and click the View Form icon.
The form opens.
The lock icon on the top right-hand corner indicates that the form is non-editable.
Related articles
Enable permission to unlock forms
In Zenoti, as a business owner, you can enable permission to unlock forms at each security role level; this ensures that the submitted data is editable only after authentication.
At the organization level, click the Configuration icon.
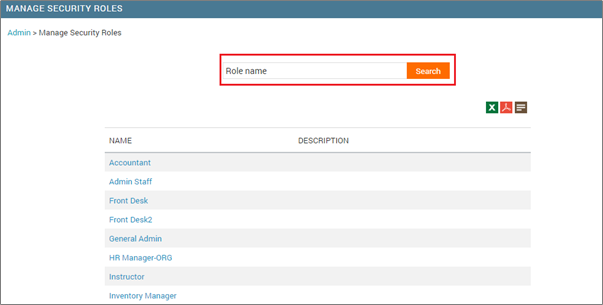
Search for Security roles, and under Security, select Security roles.
Search and select the employee role that you want to edit.
Click the Permissions tab and expand Appointment book.
To allow employees with this role, to unlock forms, for ServiceCustomData, select the Unlock forms check box.

Click Save.
Edit autofilled forms set to expire
If you open an autofilled form that is set to expire, the Save and Submit options will not appear.
To edit, save, or submit the form, click Override in the banner at the top of the page.
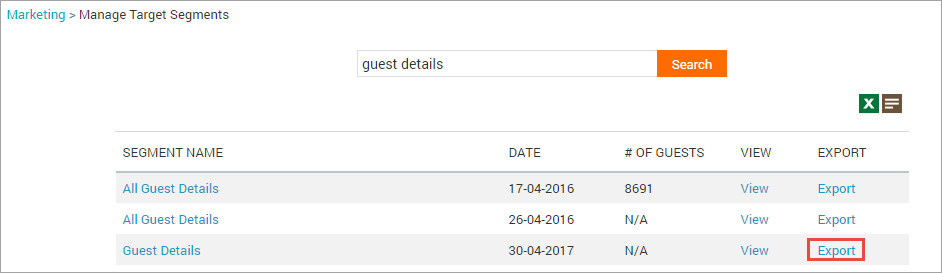
Export Guests List with Expired or Will Expire Forms
Learn how to export the list of guests whose custom forms have expired or will expire soon
On the main menu, click the Marketing tab.
On the Marketing Dashboard, click Segmentation > Target Segments.
On the Manage Target Segments window, click Add to open the Create a New Segment window.
At the bottom of the window, select Create Custom Segment, and then click Create.
Enter a name and description for the custom target segment and then click Create to open the set up page.
Create the rule based on parameters such as Tag Form, Expired, and Less than.
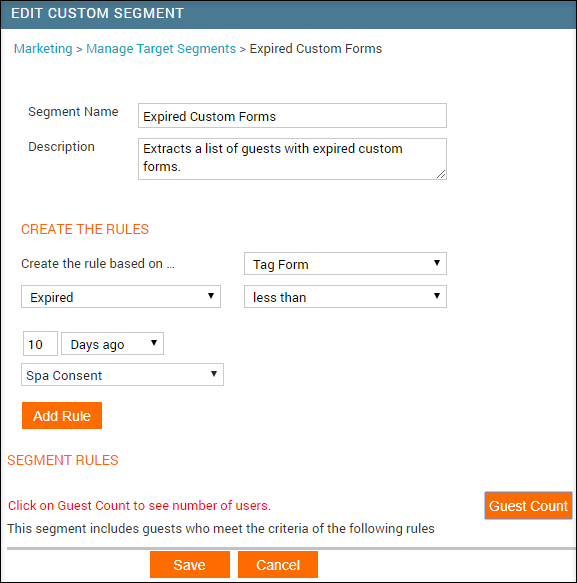
Click Add Rule.
The rule is added.
Click Guest Count.
The number of guests fulfilling the criteria is displayed.
Click Save.
The target segment is saved and you are returned to the Manage Target Segments window.
Click Export next to the required target segment.
The guest details including email addresses and phone numbers are exported.
Associate Custom Form with a Membership
After you create a custom membership form, you need to associate the form with a membership. To learn how to create the custom membership form, read: Membership Forms: An Overview
At the organization level, click the Marketing icon and navigate to Memberships >Memberships.
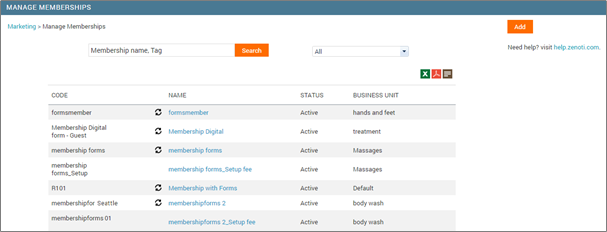
Select the membership with which you want to associate the form.
Go to the Forms tab.
Select the form from the Available Forms drop-down.
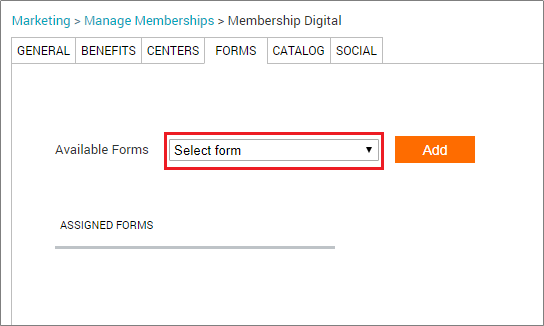
Click Add.
The selected form appears under the Assigned Forms section.
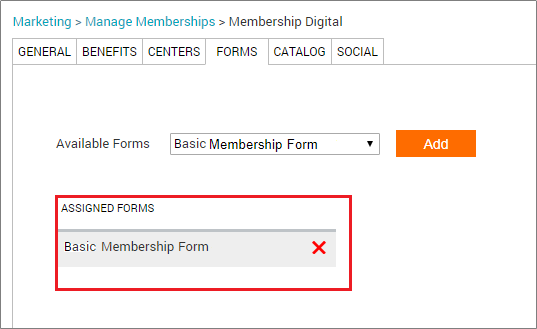
Zenoti associates the custom form with a membership
If you want to associate multiple forms to a membership, repeat steps 3 to 5.
If you want to associate multiple memberships with one form, repeat steps 1 to 5
You can view all of the memberships associated with a custom form in the Memberships tab (Configuration > Forms > Form creation > Custom Forms > (select a form) > Memberships tab).
Previous Step: Create Custom Membership Form
Next Step: Ensure the Guest Submits Membership Forms
Related articles
Ensure the Guest Submits Membership Forms
Learn about the different Membership forms available that you can use to capture the guest's details and signature
After selling a membership, the membership form must be filled and submitted by the guest at the front desk. Depending on the format (online or offline) of the membership form you created, you can capture the guest’s details and signature. To learn how to configure these forms, read: Membership Forms: An Overview
There are two types of membership forms:
Offline form: You need to print the offline form and have the guest fill and sign the form.
Learn how to submit an offline membership form.
Online form: You can capture the guest’s details and signature, and submit the membership form:
Previous step: Associate the custom form with a Membership
Macros to customize forms for memberships
A macro is a placeholder text that gets replaced with specific data when inserted into a form, an automated email, or text message when you create a membership form for your business. It helps a business to customize its communication with the guests and gather necessary information.For example, when you use the [CenterName] macro, the text in the square brackets gets replaced with the actual center’s name. So, the center name where the guest took a membership appears in the membership form.
When creating a membership form, (Configuration > Forms > Form creation > Custom Forms > Add > select membership form from the settings > Edit Custom Form page > General tab) you can make use of the available macros you want to include in the membership form.
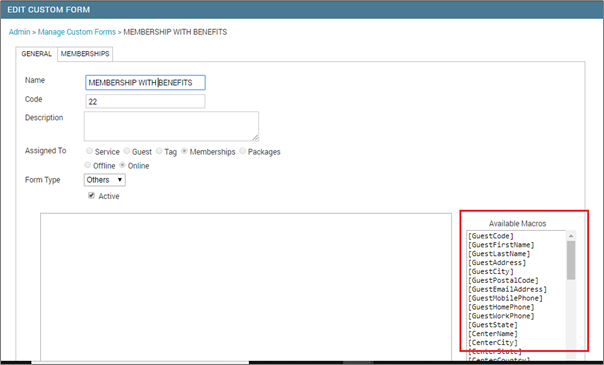
Use the following macros to customize the forms for your membership:
[GuestCode]: Unique identification code assigned to your guests when you enter their details in Zenoti.: Zenoti generates a guest code only if you select Enable auto-generate guest code in center settings at the organization level (Configuration > Guest > Profile > Guest profile rules > Auto-generate guest code). However, if you do not enable the setting, you must manually enter a code when entering the guest’s details in Zenoti.
[GuestFirstName]: First name of the guest.
[GuestLastName]: Last name of the guest.
[GuestAddress]: Complete billing address of the guest registered in the guest's profile.
[GuestCity]: City where the guest resides.
[GuestPostalCode]: Postal code of the guest’s address.
[GuestEmailAddress]: Email address of the guest.
[GuestMobilePhone]: Mobile phone number registered for the guest.
[GuestHomePhone]: Home phone number registered for the guest.
[GuestWorkPhone]: Work phone number registered for the guest.
[GuestState]: State where the guest resides.
[CenterName]: Name of the center where the membership is sold.
[CenterCity]: City where the center is located.
[CenterState]: State where the center is located.
[CenterCountry]: Country where the center is located.
[CenterZip]: Zip code/postal code of the center’s location.
[CenterPhone]: Center’s phone number (corresponds to the Phone field in the center’s settings).
[CenterPhone2]: Secondary phone number provided for the guest's base center (corresponds to the Phone 2 field in the center settings.
[CenterAddlData1]: The custom text entered in the Additional Text field in the Invoice & Receipt section of the center Settings page.
[CenterAddress]: Complete address of the center (corresponds to the Address 1 and Address 2 field in the center settings).
[CenterEmail]: Email address of the center.
[RecMembershipName]: Name of the recurring membership on the invoice.
[MembershipName]: Name of the membership sold at the center.
[MembershipNumber]: Number assigned to the membership sold at the center.
[MembershipInvoiceNo]: Then invoice number in which the membership was sold.
[MembershipType]: The type (recurring or non-recurring) of membership being sold to the guest.
[MembershipDuration]: Duration of the membership.
[MembershipValidFrom]: Date when the membership becomes active.
[MembershipSoldBy]: Name of the person who sold the membership.
[MembershipPrice]: Price at which the membership is sold.
[SetupFee]: Setup fee associated with the membership.
[RecurringFee]: Recurring fee charged towards membership.
[Mem#OfCollections]: Total number of collections made towards the membership.
[MemPaymentMethod]: Type of payment method used towards membership fees.
[MemFirstCollectionDate]: Date when the first membership fee is collected.
[MemNextCollectionDate]: Date when the next fee is collected towards the membership fee.
[MembershipExpiry]: Date at which the membership is set to expire (in the membership settings).
[MemExpiryDate]: Membership expiry date.
[TodaysDate]: Current date when the membership form is accessed.
[MembershipLockin]: Lockin period defined for membership.
[MemBalance]: Total credit balance available in membership.
[MemRenewalPrice]: Membership renewal price for a recurring membership.
[RecMemAnnualFee]: Annual fee of the recurring membership. This is set at the creation of the membership.
[RecMemAnnualFeeDiscount]: Discount given on the annual fee of the recurring membership on the invoice at the time of sale (on the POS screen).
[RecMemSaleDiscount]: Discount to be applied on the membership sale price.
[RecMemFinalSalePrice]: Final sale price after discount (if any) for the recurring membership on the invoice.
[RecMemAnnualFeeFinalSalePrice]: Final annual fee for the recurring membership on the invoice at the time of sale.
[RecMemSetupFeeDiscount]: Discount given on the setup fee on the POS screen at the time of sale of a recurring membership.
[RecMemSetupFeeFinalPrice]: Final setup fee (calculated after discount and taxes) for the recurring membership on the POS screen at the time of sale.
[RecMembershipSaleDate]: Date on which the recurring membership was sold.
[RecMemSetupFeeCollectionDate]: Date on which set up fee collection invoice is generated for a recurring membership.
[RecurringMemFeeDueDate]: Date on which the recurring fee for a recurring membership is scheduled to be collected.
[RecMemAnnualFeeDueDate]: Date on which the annual fee collection invoice is generated for a recurring membership.
[RecurringMemFeeSecondDueDate]: Date on which the next recurring fee is scheduled to be collected It is the date of the second payment from the current cycle in the payment frequency setting taken from the membership settings. For example, if a recurring membership is set to take payments every month and it is bought in March, this macro gives details of the payment that is due in May (second cycle of payment).
[MembershipFeeDiscountPeriod]: Duration for which the discount on the membership fee is applicable.
[RecMemAnnualFeeDiscountPeriod]: The number of installments for which the discount on the annual fee of a recurring membership has been applied applicable.
[DefaultPaymentDetails]: Default (primary) payment entered on the POS screen at the time of sale.
[DDPaymentDetails]: Details of direct debit for the purchase of the membership.
[GuestAge]: Guest's age is calculated based on the guest's date of birth registered in the profile.
[Minor]: Whether the guest is a minor. The value of this macro will be either Yes or No. Determined based on the guest's date of birth registered in the profile.
[BackupPaymentDetails]: Secondary payment entered on the POS screen at the time of sale.
[DeclineFee]: Fee charged for a failed transaction.
[RecMemSalePrice]: Prorated fees before discount.
[RecMemListPrice]: Fee listed in the membership settings before tax and discount.
[RecMemFinalListFee]: Fee listed in the membership settings after addition of tax and applying discount (if any).
[CustomMacro1 to CustomMacro10]: Optional fields that appear as CustomMacro1 to CustomMacro10, can be used to add messages in the membership form to communicate information to guests.
Related articles
Associate forms to a custom package template
Your business may require guests to sign some forms when they purchase packages. For example, you could have different forms such as agreement forms, terms and conditions forms, and forms that outline terms for freezing a package.
To associate forms to the custom package template
At the organization level, click the Master data icon.
Select Packages.
Click Add.
Enter General information for the custom package template.
Enter Service details for the custom package template.
Enter Product details for the custom package template.
Add Discounts for services not part of the custom package template.
Specify Centers where you want the custom package template to be available.
Select the appropriate form from the drop-down list in the Forms tab.
Important
Administrators first need to create these forms from the organization level.
Click Add.
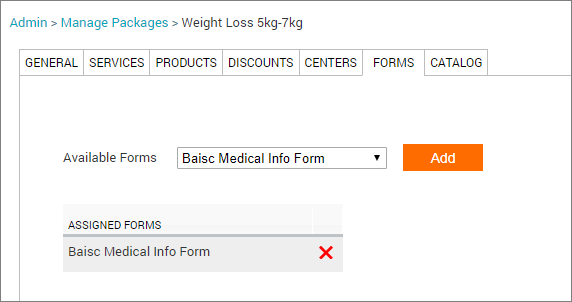
Note
Once you associate forms to the custom package template, when the front desk creates custom packages for guests, they can view the forms from:
The Point of Sale (POS) during the sale of the package.
The Appointment book in the bottom panel from the Packages window once the guest is selected.
The Guest profile under the Packages tab.
Important
If you have an existing offline package form, you may continue to use it. Otherwise, you can create a new online package form and then associate it with the custom package of your choice.
Next step: Upload details to the catalog
Limit guest data access to specific employees
To ensure that your guests' medical data is only accessible to authorized doctors, you can configure the following settings for your business. The settings limit unauthorized employees' access to forms and waiting rooms of guests, following the HIPAA compliance guidelines.
At the organization level, click the Configuration icon.
Search for Allow only supervising employees to view data of their employee's guest(s), and under Employee, select Allow only supervising employees to view data of their employee's guest(s).
Enable the Allow only supervising employees to view data of their employee's guest(s) setting.
Click Save.
At the center level, click the Employee icon.
Select an employee and scroll down to the Job info section.
From the Supervising employee field, type and select the employee (doctor) who will be assigned as the supervisor.
You can assign more than one supervisor to an employee.
Click Save.
Example
Configuring the settings ensures that only supervising employees have access to the (subordinate) employees' guest data.
For instance, Tony, Lilly, and Frank are service providers, and Janet and Rob are doctors. The assignment of supervising employees is as in the table below.
Service provider (subordinate employee) | Assigned Supervising employee |
|---|---|
Tony | Janet |
Lilly | - |
Frank | Rob |
Janet can only view forms associated with guests whose service providers are Tony or Lilly.
Similarly, Rob can only add admit those guests from the waiting room whose service providers are Frank or Lilly.
This is because a supervisor can only access guest data of their (subordinate) employees or employees with no assigned supervisors.