Troubleshooting Guide for HyperConnect
Why is a user unable to make or receive calls in HyperConnect?
If a user is experiencing issues making or receiving calls, the issue is most likely related to role permissions or device configuration. Follow the steps below to diagnose and resolve the problem
Verify User Role and Permissions
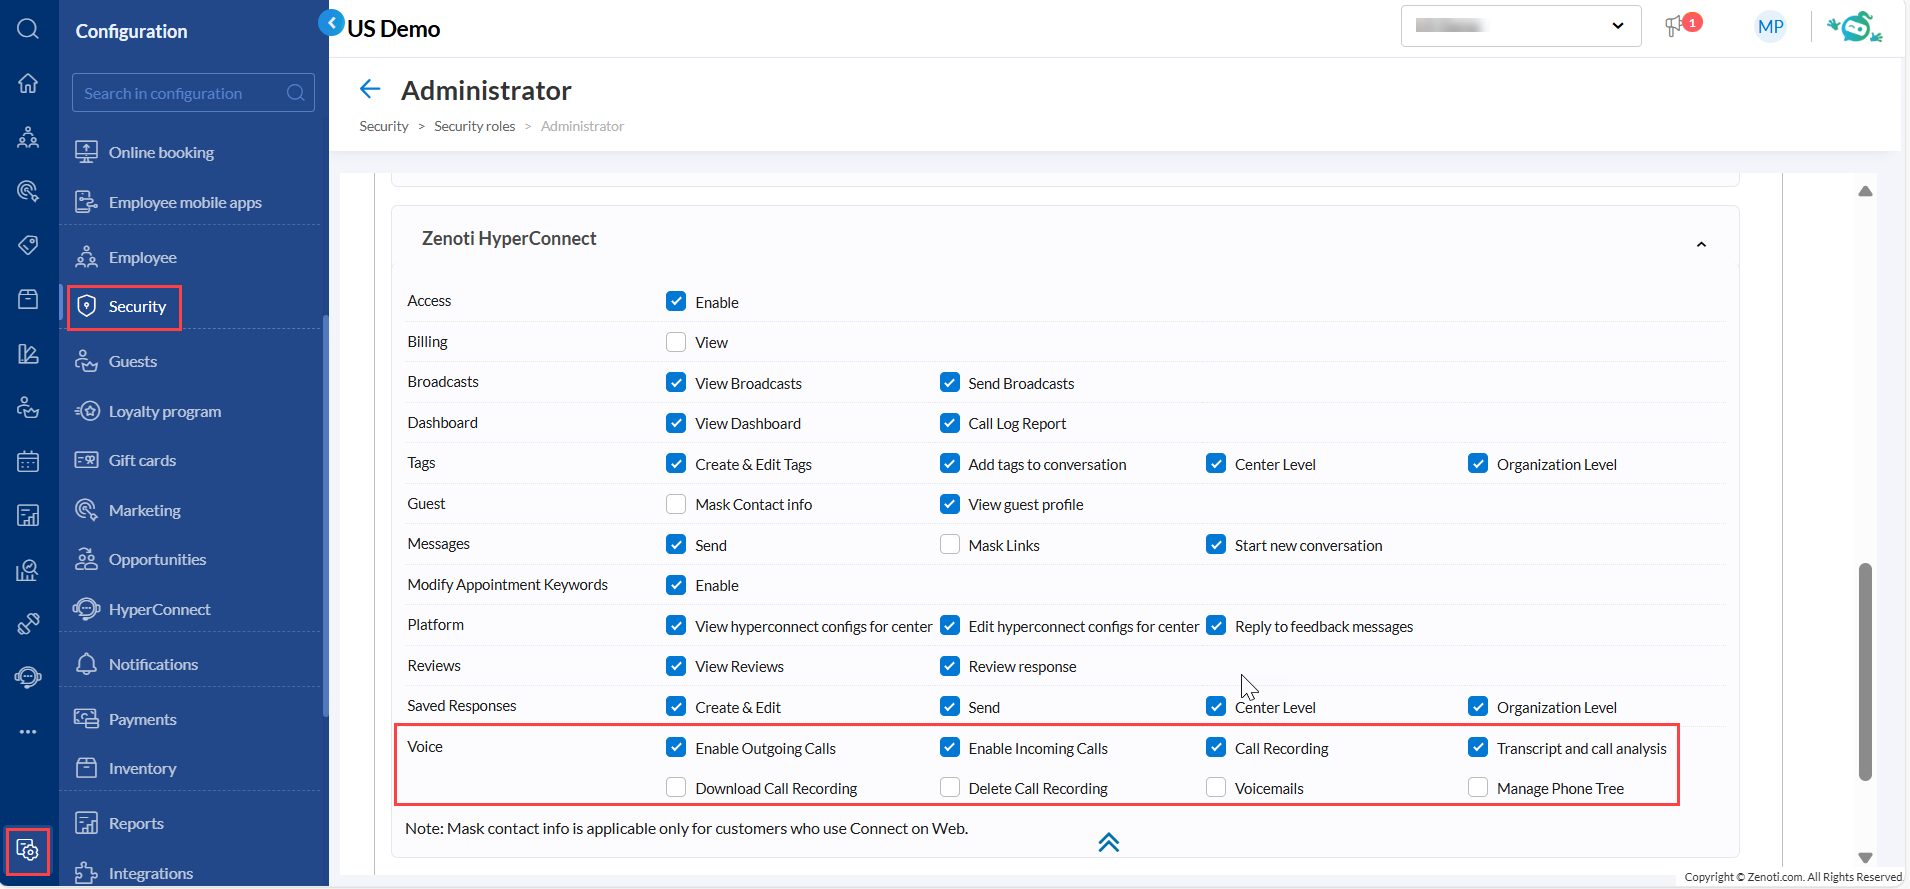
At the organization level, navigate to Configuration > Security > Security Roles.
Select the role assigned to the user.
Go to the Permissions tab.
Expand Zenoti HyperConnect > Voice.
Ensure these are enabled:
Enable Outgoing Calls- To allow the user to make outgoing calls.
Enable Incoming Calls- To allow the user to receive incoming calls.
Click Save to apply changes.
Reset Device
If the role permissions are already correctly set and the issue persists:
Ask the user to delete and re-add their device.
Perform a device reset to re-sync and refresh connectivity.
Learn more: For more information, refer to the Enable Permissions for HyperConnect article.
The user says the call keeps dropping. What could be causing this?
Calls may drop in two common scenarios:
The call disconnects after ringing a few times.
The call drops during an ongoing conversation with the guest.
In both cases, there are typically two possible causes:
Network connectivity issues on the customer’s end.
The customer may have intentionally ended the call.
If the call was not intentionally ended by the guest or the business, request the customer to check with their network service provider to identify any possible issues on their end.
How to turn on or turn off the automatic recording for inbound and outbound calls?
To enable or disable call recording for inbound or outbound calls, follow the steps below:
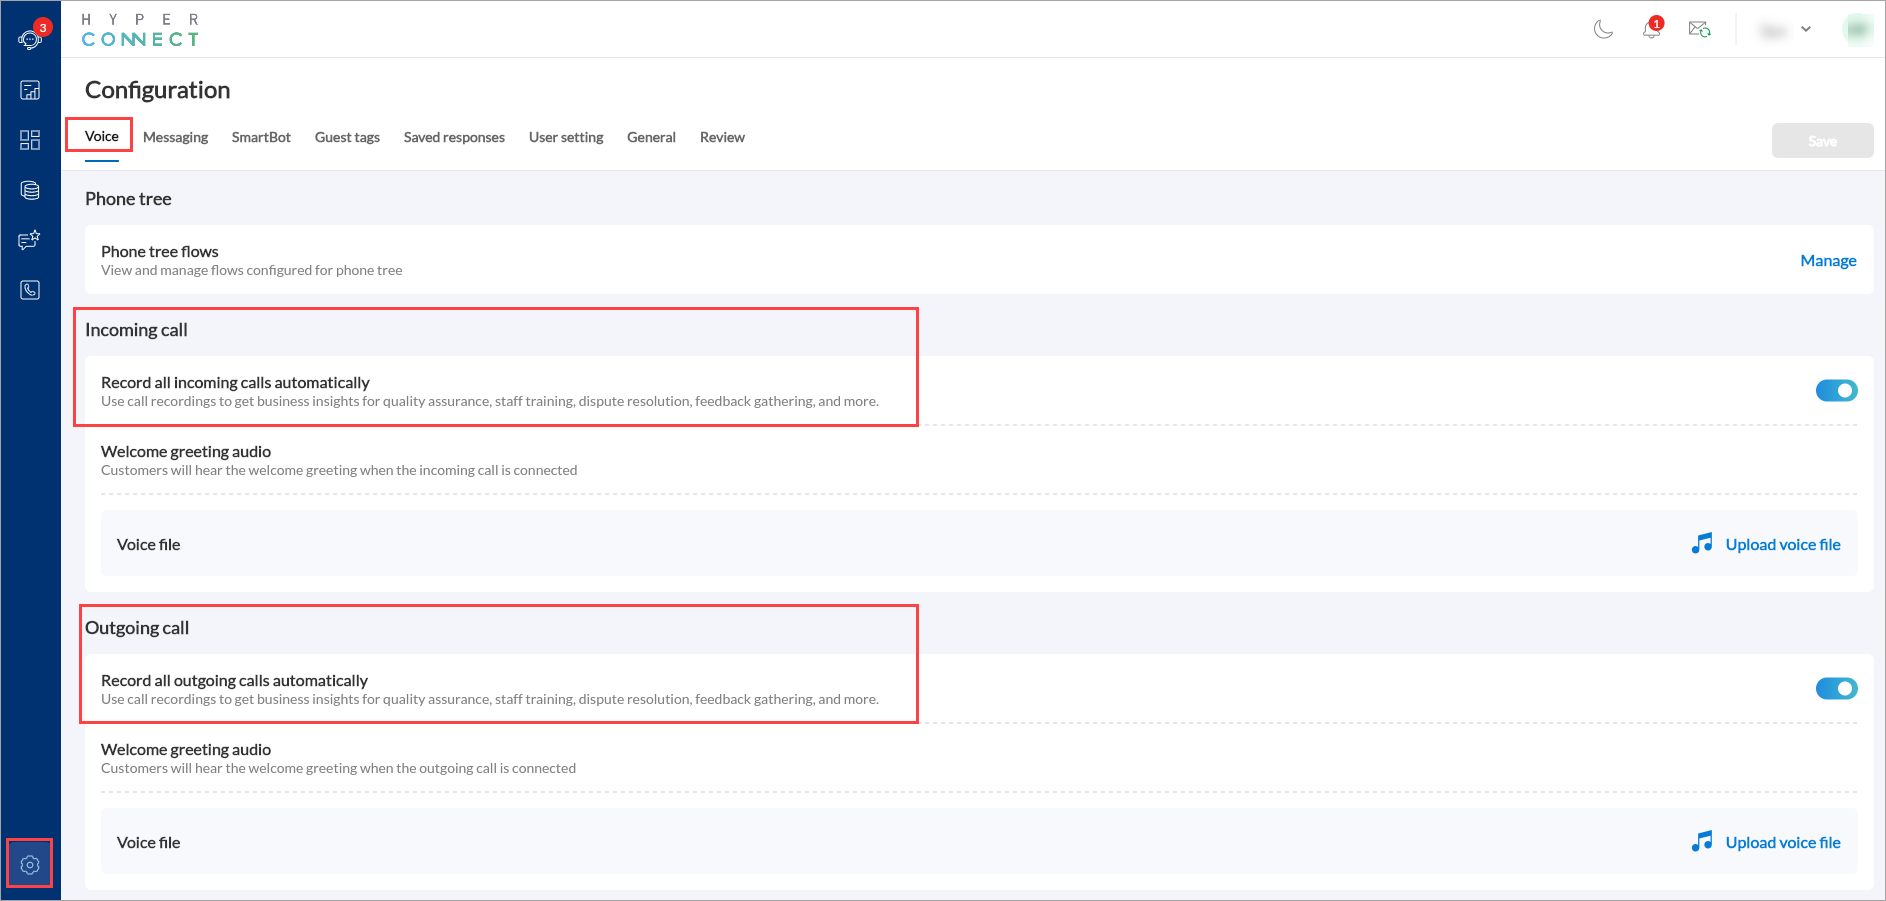
Navigate to HyperConnect > Settings > Voice.
Scroll to the Incoming call or Outgoing call section.
Enable or disable these options based on the user's preference:
Record all incoming calls automatically
Record all outgoing calls automatically
Click Save to apply changes.
The changes will take effect immediately and apply to all future calls.
Learn more: For more information, refer to Automatically Record Calls in HyperConnect.
Welcome or Hold greeting calls not playing the greeting messages however the voice file is uploaded
If a user reports that greetings or any recorded messages such as welcome messages, hold messages, or voicemail prompts are not playing in HyperConnect, follow the steps below to identify and resolve the issue.
Verify audio file upload
Navigate to HyperConnect > Settings > Voice.
Check the relevant sections where the audio files are configured:
Business Hours Configuration to allow guest to leave a voicemail
Post Business Hours Configuration to allow guest to leave a voicemail
Ensure that an audio file is uploaded in each section where a greeting is expected.
Confirm audio file format
Verify that the uploaded audio files are in MP3 format. HyperConnect supports audio files in MP3 format with a maximum file size of 5MB.
Uploading files in other formats such as WAV, M4A may not result in playback, even if the upload is successful.
If the current file is not in MP3 format, convert it to MP3 using audio editing software.
Re-upload the audio file
After ensuring the audio file is in MP3 format:
Select the section for which you want play the audio such as hold greeting.
Click Replace.
Select the correct MP3 file from your computer.
Click Save to apply the changes.
Test the greeting playback
Place a test call to verify that the greeting or recorded message plays as expected.
If the issue persists, consider the following:
Clear browser cache and cookies, then retry.
Try accessing HyperConnect from a different browser or device.
Ensure that the device's audio output is functioning correctly.
For more information. refer to
Why does a call connect but have no audio in Zenoti, and how can I fix it?
If a call connects but you cannot hear any audio, the issue may be caused by one of the following:
Potential Spam Call
The system may have identified the incoming call as spam or flagged it.
Check if similar calls have previously been marked as spam or blocked.
Faulty Receiver
The physical handset or receiver might be damaged or malfunctioning.
Test the device using a different handset (if available) to confirm if the problem is hardware-related.
Bluetooth Receiver Issues
Ensure the Bluetooth device is properly paired and connected to the phone or calling system.
Verify that the Bluetooth receiver is charged and turned on.
If the problem continues, try using a different Bluetooth device to determine if the original one is faulty.
Why is the user experiencing poor call quality (echo, jitter, or robotic voice) and how can I troubleshoot it?
Poor call quality on Zenoti calls can occur for several reasons. Follow the appropriate checklist based on whether the user is using a physical phone or a soft phone/screen.
For Physical Phone Users
Check Network Availability
Confirm that the user has a strong and stable network connection at their location.
Check Physical Connections
Ensure that the handset (receiver) and the base phone are properly connected.
Verify that the wire is securely plugged in and not loose.
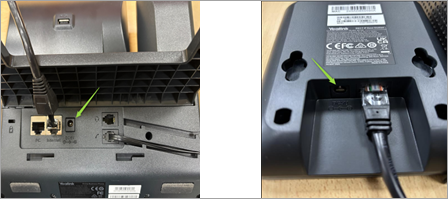
Check Power and Ethernet Connection on Yealink Phone
Inspect the back of the Yealink phone.
If connected only via a D-Link Ethernet cable, also connect the power adapter.
A proper power supply is essential for optimal performance and call clarity.
For Soft Phone / Screen Users
For Soft Phone / Screen Users
Confirm that the Bluetooth headset is correctly paired with the computer.
If issues persist, try re-pairing or using a different headset to rule out hardware faults.
Why is the caller ID showing incorrectly or as Unknown in HyperConnect?
When a call displays as “Unknown” or “Private” in HyperConnect, it is usually because the caller is intentionally hiding their number or due to other related factors. Follow these steps to investigate and address the issue:
Check if the Call is from a Hidden Number
Intentional Number Blocking: Callers can deliberately hide their caller ID by dialing *67 before the recipient’s number. This action prevents the number from appearing, causing the call to show as “Private” or “Unknown.”
Assess the Nature of the Call
If the call was unsolicited and the caller’s identity is hidden, it could be a spam or robocall.
Recommended Actions
If Suspected Spam:
Advise the user not to answer calls from unknown or private numbers.
Suggest reporting the number to the relevant authorities or enabling call-blocking features if available.
Escalate if Needed
If the problem persists or raises security concerns, escalate the matter to the engineering or security team for further investigation.
Why is voicemail not working or not being received in HyperConnect?
If voicemails are not being received or the voicemail feature is not functioning, follow these steps to check and resolve the issue:
Launch HyperConnect.
Navigate to Settings > Voice.
Scroll down to the Missed Calls Forward To section.
Check if Forward to Voicemail is enabled.
If not enabled, select the checkbox to activate it.
Click Save.
Once updated, test the voicemail functionality by placing a test call and verifying that the voicemailis working as expected.
Why are calls going straight to voicemail in HyperConnect?
If calls are being sent directly to voicemail without ringing, it may be due to the incoming call ring duration setting. Follow these steps to check and fix the issue:
Launch HyperConnect.
Navigate to Settings > Voice.
Scroll down to the Missed Calls Forward To section.
Locate the After option and specify the duration for which an incoming call should ring before being forwarded to voicemail.
Ensure the Seconds field is set to greater than 10 seconds. If it is set to 0, calls will skip ringing and go directly to voicemail.
Click Save to apply changes.
Why cannot the user transfer calls to an extension in HyperConnect?
If a user is unable to transfer calls to another extension, the cause may be related to system issues or configuration settings. Follow these steps to investigate and resolve the problem:
Identify the Nature of the Issue
Transfer Option Visible but Not Working:
If the transfer button appears but the call cannot be transferred, this may be a system-level issue. Reach out to the engineering team for further investigation.
Transfer Option Missing (Soft Phone):
If the transfer option is not visible, the problem is likely due to configuration settings. Proceed to verify extension and device setup.
Verify Extension Configuration
In the left panel, click Call Extensions.
Confirm the user’s extension number is listed and correctly configured. If missing:
Click + Associate Extension.
In Select Employee, choose the correct employee.
Enter a unique 4-digit extension number (for example: 9999).
Click Add to save.
Ensure Device–User Association
Navigate to HyperConnect > Settings > Voice.
In the Phone Device section, verify the physical phone is associated with the correct user.
If not associated:
Click Add your first phone.
Select the phone’s manufacturer (For example: Yealink).
Enter the model, MAC address, and machine ID from the phone.
Assign a friendly name for identification.
Select the employee responsible for the device.
Click Save.
Verify the Recipient’s Setup
Ensure the person receiving the transferred call has:
A properly configured extension in HyperConnect.
A physical phone correctly associated with their user profile.
Why is the HyperConnect desktop or mobile app not working?
If HyperConnect is not functioning on a tablet, mobile device, or desktop, follow these steps to identify and resolve the issue:
HyperConnect Not Working on Tablet or Mobile
Check if the Zenoti mobile application on the tablet or mobile device is updated to the latest version.
If the issue persists even after updating, reach out to the engineering team for further investigation.
HyperConnect Not Working on Desktop
If users encounter issues with HyperConnect on desktop systems, refer to question number 12.
How can I check if there’s a system-wide outage or service degradation in HyperConnect?
In the event of a system-wide outage affecting HyperConnect, you may observe one or more of the following scenarios. These symptoms indicate a broader issue rather than an isolated user problem
HyperConnect Window Not Launching from Zenoti
If the HyperConnect interface fails to open when accessed from within Zenoti, it can be a strong indicator of a broader outage.
Incoming Calls Not Reaching Any Devices
If inbound calls do not appear on both physical phones and the HyperConnect interface, it suggests a disruption in call routing across the system.
Outbound Calls Failing
If you receive an error message when attempting to place an outbound call and the call does not connect, it is likely part of a system-wide issue.
Next Steps
Confirm with multiple users to verify whether the problem is widespread.
Notify affected users and provide updates as more information becomes available.
Why are calls showing in HyperConnect but not on the physical device?
If calls are visible in the HyperConnect app but do not appear on the physical phone, the device may not be properly associated with the user.
Follow the steps below to verify and resolve the issue:
Check Device Association
Navigate to HyperConnect > Settings > Voice.
Scroll to the Phone Device section.
Check if a wired or wireless phone is listed and associated with the correct user.
Add a Phone Device (If Not Associated)
Click Add Phone.
Enter the required details:
Manufacturer: Yealink
Model: As printed on the back of the physical phone
MAC Address: Found via Menu > Status > MAC on the phone
Machine ID: Found via Menu > Status > Machine ID on the phone
Friendly Name: A user-friendly name (appears on the phone screen)
Employee: Select the employee who will use the device
Click Save.
Sync the Device
Reset the physical phone:
Click Reset base in case of wireless phone
Click Reset config in case of wired devices
Wait for 15 to 20 seconds to allow the device to sync with HyperConnect.
After syncing, the device should be properly associated with the user and ready for use.