Accounting integration: Troubleshooting
The following is a list of error messages along with the corresponding steps to effectively resolve each issue:
This error is caused if a payment method or account is not mapped to the chart of accounts in Zenoti.
Note
The resolution steps mentioned below can also be used to resolve the following errors:
Please add credit or debit account.
Please map chart of accounts for given payments.
Navigate to organization or center level where you have set up accounting integrations and click the Configuration icon.
Search for and select Accounting from the Integrations section.
Expand Payments Mapping. For each payment method in Zenoti, an account name must be mapped in the accounting platform.
Select the payment method from the error message that was not mapped, from the Payment Header drop-down list.
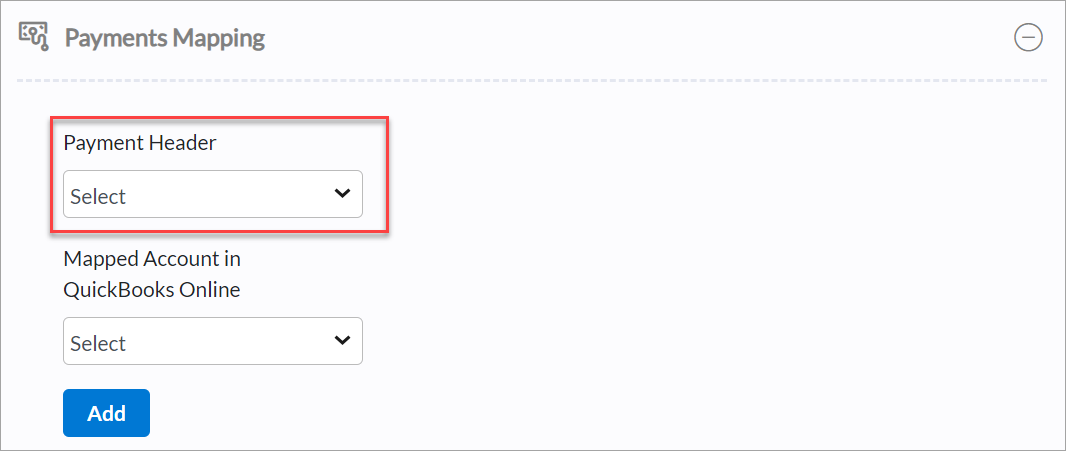
Select account or payment method from the Payment Account drop-down list.
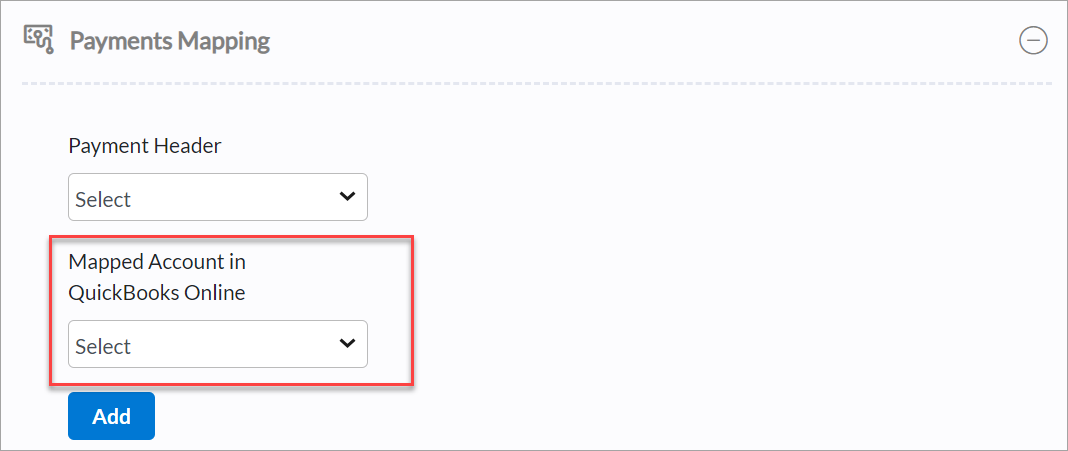
Click Save.
If you see POSAccount Mapping, then click Setup Customer Account.
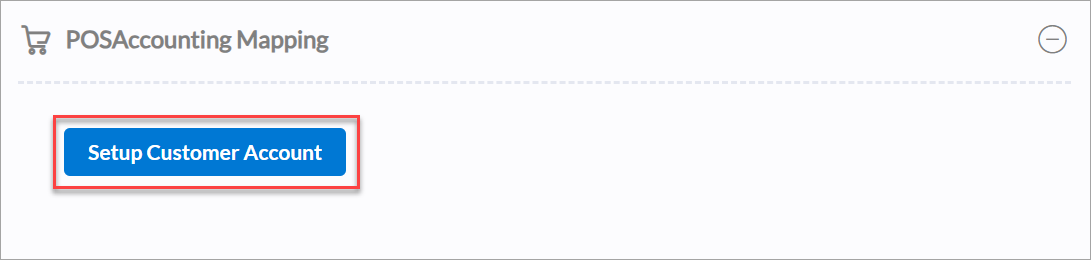
Click Next.
Navigate to the Add Payment tab.
Under Payment ID, enter the mapped account or payment method from step 5.
Enter the chart of account under Payment Account. This can be same as payment ID for all the providers except for QuickBooks Online and QuickBooks Desktop. After saving, the system syncs the invoices automatically as per schedule.
This error is caused when an item is either not created or not synced.
Navigate to Reports > Integrations > Financial Integrations Sync Details report.
Select Items from the filter.
Click Refresh.
Search for the missing items. If you find the item, check the response message and the item type. If the item is present with no error messages, validate the Item Type from the Mapped Item Type from Configuration > Integrations > Accounting. Update the item type in the accounting application.
If the desired item is not found, proceed to create a new item in the accounting platform. If you see Item Type Mapping, then create the item with the same as Mapped Item Type from Configuration > Integrations > Accounting.
From Manual Sync, click Get to ensure synchronization with the system after the item is created.
This error occurs because the as-of-date for the product in QuickBooks is greater than the sale date of the invoice.
Login to QuickBooks.
Click Sales > Products & Services.
From the Actions column, click Edit.

Click Starting value under Quantity on hand.
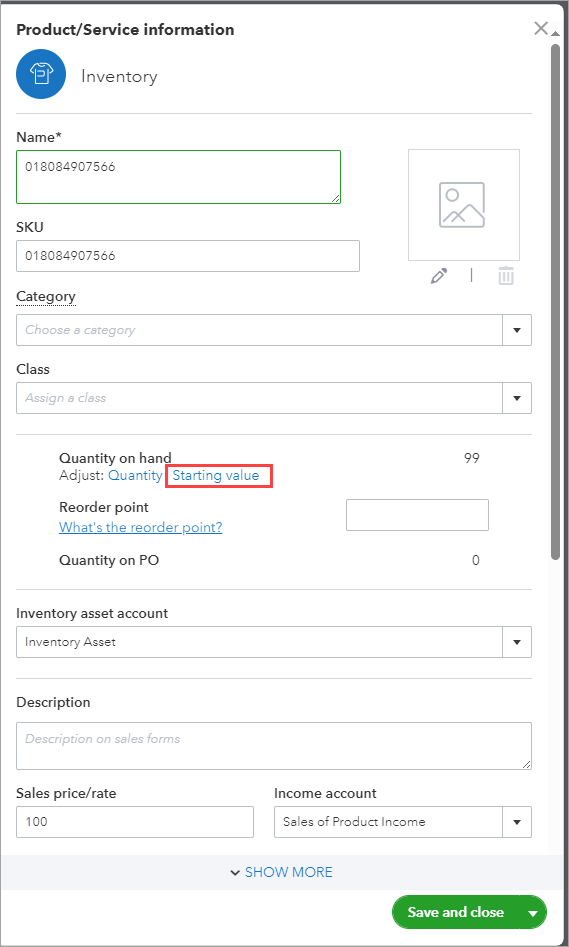
Change the As of date prior to the invoice sale date.
Click Add.
Click Save.
This error occurs because items are not mapped to the chart of accounts in Zenoti.
Navigate to where you have setup accounting integrations and click the Configuration icon.
Search for and select Accounting from the Integrations section.
Expand Items Mapping. For each item in Zenoti, an account name must be mapped in the accounting platform.
From the Item Type drop-down list, select the item from the error message that was not mapped.
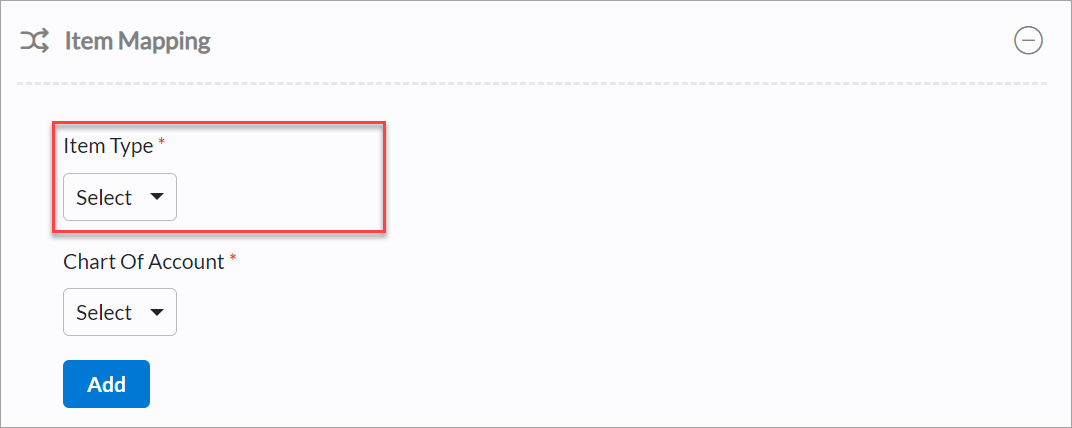
From the Chart of Account drop-down list, select the account.
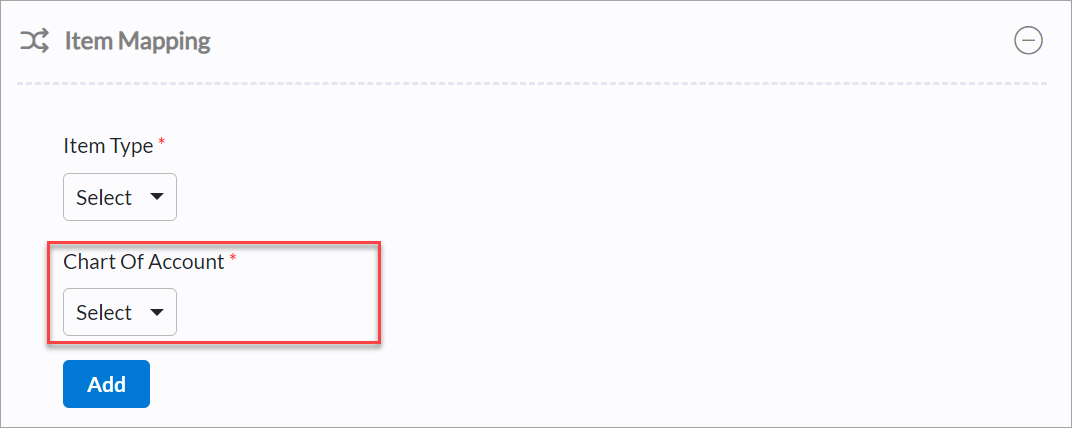
Click Add.
Click Save.
This error occurs because the mapping for the miscellaneous journal entries is missing.
Navigate to the Financial Integration Sync Details report.
Filter the report with Sales Order Summaries, Journal Entry, and time frame.
Check the details under the Response Message column and identify the account.
Now, navigate to where you have setup accounting integrations and click the Configuration icon.
Search for and select Accounting from the Integrations section.
Expand Journal Mapping.
Select journal type, credit account, and debit account.
Click Add.
Click Save.
This error occurs because taxes are not mapped to the chart of accounts in Zenoti.
Navigate to where you have setup accounting integrations and click the Configuration icon.
Search for and select Accounting from the Integrations section.
Expand Tax Rates Mapping.
Select the tax rates from the error message that was not mapped, from the Tax Rates drop-down list.
Select the Tax Group.
Click Add.
Click Save.
This error occurs if multiple items have the same item code in the accounting platform.
Navigate to the accounting application.
Validate items master for duplicate codes.
Navigate to Reports.
Search for and open the Financial Integration Sync Details report.
From the filters, select Sale Order Summaries and click Refresh.
From the Details column, click View Details.
In the Payments section, check for the payment methods under Deposit To Account.
Now, navigate to POSAccount Mapping, then click Setup Customer Account.
Click Next.
Navigate to the Add Payment tab.
Validate the payment mapping for all transactions in the payload. Ensure that each payment corresponds accurately with the POSA payment mapping.
Navigate to Reports.
Search for and open the Financial Integration Sync Details report.
From the filters, select Sale Order Summaries and click Refresh.
From the Details column, click View Details.
Validate all the accounts that are mapped for items and payments.
Validate if you can create journal entries for accounts in accounting software.
If you cannot, then you must update the item or payment mappings.
Navigate to Reports.
Search for and open the Financial Integration Sync Details report.
From the filters, select Sale Order Summaries and click Refresh.
From the Details column, click View Details.
Navigate to Payments and identify the payment that failed.
Change the mapping as required or change the account type in the accounting application.
From the Actions column in the report, click Resync.
This error occurs when a new item is added to Xero.
Log in to Xero and search for the item you have added.
Click Edit and add a sales account.
Add the tax rate that you have applied to the product. For example, 'Standard 20%'.
From the Actions column in the report, click Resync once all the items have a sales account and tax rate in Xero.
Base Invoice Not Synced
Discrepancies between sales and payment summaries can cause errors such as Base Invoice Not Synced or The Sale Summary has not been generated. These issues may arise due to financial lock settings, delayed sale summary generation, or multiple payment payloads. Use the sale summary number in the Response Message column to identify the corresponding sale summary. This helps you troubleshoot and resolve errors.
Navigate to the Financial Integration Sync Details report.
Apply filters for Sales Order Summaries.
Specify the time frame for the transactions you want to review.
Analyze the response messages:
Scenario 1: Base invoice not synced, and sale summary not generated
If the financial lock is off and the sale summary is not generated, but a payment summary exists, the Response Message column will display The Sale Summary Has Not Been Generated message. To resolve this issue, you must investigate why the sale summary was not generated and manually sync the data for the correct date.
Scenario 2: Sale summary not generated due to financial lock changes
If the sale summary is missing due to financial lock changes, but the payment summary was generated after the lock was restored, the Response Message will display The Sale Summary Has Not Been Generated message. To resolve this issue, ensure the financial lock is properly configured and manually sync the missing sale summary.
Scenario 3: Payment summary with multiple payloads
When a payment summary contains multiple payloads, response messages may vary by line item. The main response message updates only during the next job run, while individual payment line items update immediately. To resolve this issue, identify why the sale summary is missing and manually sync the data for the relevant date.
Impacts and considerations
The Financial Integration Sync Details report shows the sales summary linked to a specific payment. If the sale summary invoice number is missing the sale summary has not been generated.
Verify whether the financial lock is active and if it has impacted sale summary generation.
Check the Reference Summary Invoice Number column to see if there is a sale summary linked.
Manually sync data for missing sale summaries to align payment transactions with sales.
This applies only to sales or cash accounting when a due amount exists.
Business Validation Error: You need to activate this item before updating the quantity
Navigate to Reports.
Search for and open the Financial Integration Sync Details report.
From the filters, select Sale Order Summaries and click Refresh.
From the Details column, click View Details.
From the Name column, verify if all the records are also present in the accounting software.
If not, activate the item in the accounting software.
From the Actions column in the report, click Resync.
Errors from the middleware
Zenoti will automatically initiate a retry process to push the data for the following error messages that occurred in the last 30 days from your financial lock.
Accounting platform | Error |
|---|---|
All | Order Number# [order number] already exists |
All | Blank message |
All | The operation has timed out |
All | Invalid response \"An unexpected error occurred. Error ID: lfnicdu7n4ymvuhyrqpt\" |
All | The underlying connection was closed |
All | Fatal error: Allowed memory size of 1073741824 bytes exhausted (tried to allocate 4294967296 bytes) in /home/wmsgxi91iyt8/public_html/AccountingAPI/src/EntityRepository/MappingRepository.php on line [line number] |
All | Failed to set memory limit |
All | Notice: Constant true already defined in /home/wmsgxi91iyt8/public_html/AccountingAPI/src/constants.php on line [line number] |
All | cURL error during making API call. cURL Error Number:[28] with error:[Operation timed out after 15000 milliseconds with 0 bytes received |
All | Null |
All | Stale Object Error |
All | Company [company id] has reached the daily rate limit cap |
All | A connection attempt failed because the connected party did not properly respond after a period of time, or established connection failed because connected host has failed to respond. |
All | Unexpected Error Occurred, Administrator has been informed. |
All | The API returned a non-successful status code that is not recognised. |
All | Error calling GET Organisation |
All | Unable to open file |
All | "Invalid response \"An unexpected error occurred. Error ID: lfnicdu7n4ymvuhyrqpt\ |
All | Unexpected Error Occurred, the Administrator has been informed. |
All | The underlying connection was closed |
All | Fatal error: Allowed memory size of 1073741824 bytes exhausted (tried to allocate 4294967296 bytes) in /home/wmsgxi91iyt8/public_html/AccountingAPI/src/EntityRepository/MappingRepository.php on line [line number] |
All | Constant true already defined in /home/wmsgxi91iyt8/public_html/AccountingAPI/src/constants.php on line [line number] |
All | Something went wrong |
Xero | Connection reset by peer in connection to api.xero.com:443 |
Xero | Error calling GET Invoices/fdd9a183-d0eb-4549-81d9-a856897d75e2 |
Xero | A validation exception occurred: An error occurred in Xero. Check the API Status page |
Xero | Error calling PUT Payments |
QBO | Failed to create journalEntries for companyId: [company id] in Codat, but the push to the platform succeeded. |
All | Invalid response/could not connect to host. |
Troubleshooting financial data sync issues
If your financial data is not synced and you cannot see it in the Financial Integration Sync Details report, follow these steps to troubleshoot the issue.
Note
If your issue is resolved in step 1, then you need not proceed further. However, if your issue persists beyond step 1, please follow steps 2, 3, and 4. If your issue remains unresolved after these steps, you will need to reach out to a person from Zenoti.
Step 1: Verify if data is displayed
Navigate to Reports and search for and open the Financial Integration Sync Details report.
From the filters, select sale order summaries and the date for which the data is missing.
If data is present, check the response message column against it and resolve the issue accordingly. More information.
Step 2: Verify if the configuration is enabled
If data is not present, navigate to the organization or center level based on where the configuration is set.
Click Configuration icon.
Search for and select Accounting from the Integrations section.
From Configuration, switch on the Enable option.
Step 3: Verify if location is active
If data is not present, navigate to the organization or center level based on where the configuration is set.
Click Configuration icon.
Search for and select Accounting from the Integrations section.
Click Locations.
Switch on the Active toggle.

Step 4: Verify if jobs are active
If data is not present, navigate to the organization or center level based on where the configuration is set.
Click Configuration icon.
Search for and select Accounting from the Integrations section.
Click Sync Schedule.
Ensure the four highlighted jobs are active.
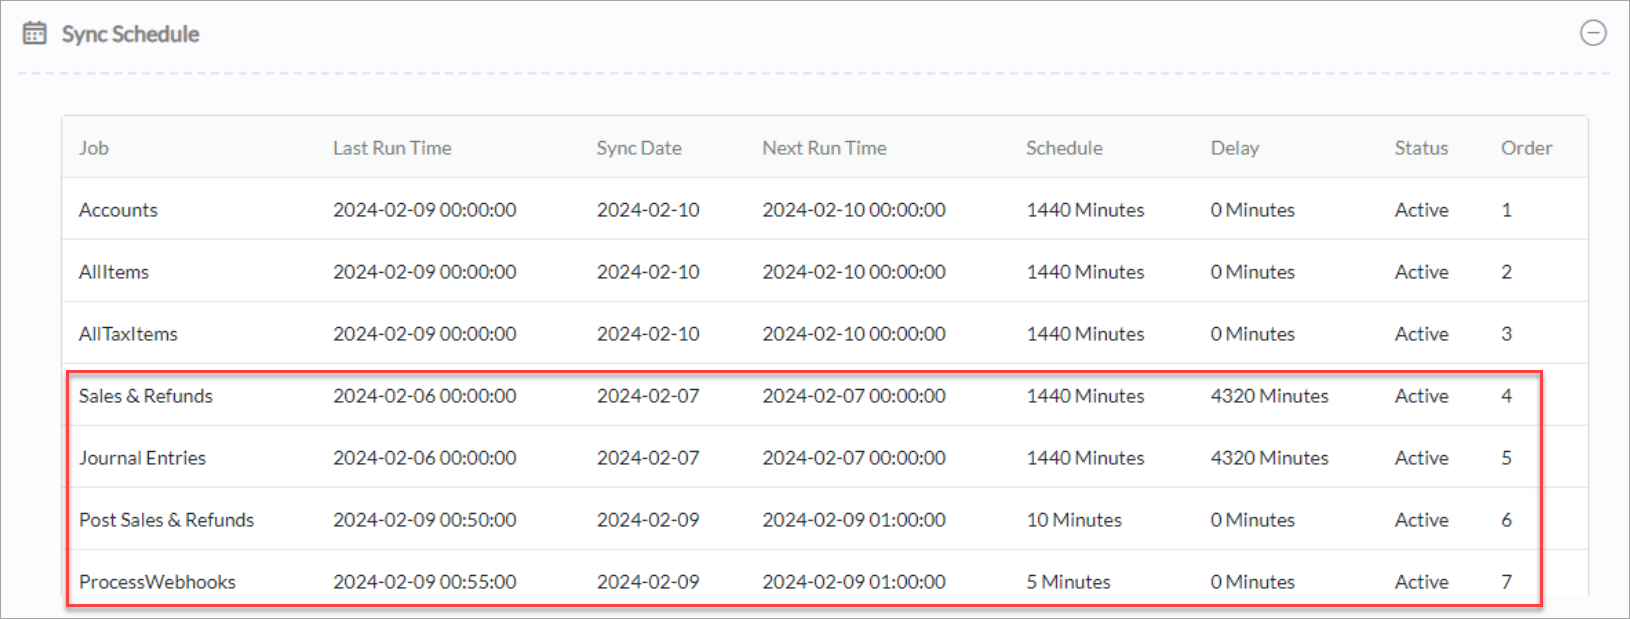
Note
If jobs are inactive at the organization level, check their status at the center level. If they are inactive at both levels and no jobs are found, contact a person from Zenoti.
If the configuration is done at the center level, check if the schedule and delay for sales and refunds, and journal entries is equal to the financial lock.
If your delay is less than your financial lock or if you receive the, "Data was not processed due to changes to Financial Lock" error, then you need to adjust your financial lock to match your delay. To adjust your delay to the financial lock, reach out to a person from Zenoti.
From Manual Sync, select the date for which you want to post the data and click Post.
Note
Verify the financial lock at the center level. If it is not set up there, proceed to check at the organization level. If your data was not processed due to changes to the financial lock, it will sync automatically when financial lock is set correctly.
You can add jobs at both the organization and center levels regardless of configuration. However, if you are configuring jobs at the organization level, ensure you double-check at the center level so that those same jobs are not already listed there.
Sync Date = Current Date - 5.