Opera cloud integration
Integrate Zenoti with Opera cloud
This article explains how to integrate Zenoti with Oracle Opera Cloud PMS. The integration enables seamless guest management and payment processing for properties using Opera Cloud, helping front-desk staff streamline operations. You'll also learn how to set up required configurations in both systems to ensure successful communication.
Caution
Some links and procedures in this article pertain to the configuration of third-party products; Zenoti bears no responsibility for the accuracy, legality, or content of the external sites listed in these articles or of subsequent links.
Zenoti’s integration with Oracle Opera Cloud PMS enables seamless communication between the two systems, allowing properties to automate and streamline guest management processes. Front-desk staff can enter the room number the guest is checked into in Opera when creating an appointment through the bottom panel. Zenoti then pulls the latest guest check-in details from Opera, and the guest profile is automatically created. This allows staff to quickly identify guests and manage check-ins more efficiently. This only works if the PMS integration is enabled.
This integration also supports synchronized billing and custom payment processing directly through Opera Cloud. By mapping Zenoti transactions with Opera’s financial systems, businesses can maintain accurate records and reduce manual entry errors.
PMS integration can be controlled at both the organization and center levels. By default, centers inherit theorganization-level setting. However, center administrators can override this setting (if permitted) to enable or disable PMS integration for a specific center.
Opera Cloud: Oracle's property management system for hotels.
PMS: Property Management System used to manage guest bookings and payments.
Cashier ID: Identifier for the cashier profile used during transactions.
Client ID, Client Secret, AppKey: Credentials provided by Zenoti to establish integration.
Transaction Code: Code that defines the type of financial transaction in Opera Cloud.
EFT Interface: Electronic Funds Transfer system used for processing card payments.
Before you begin the integration process, ensure you:
Log in to the Oracle Hospitality Developer Portal.
Make a note of the following details:
Host Name
Hotel ID (Located on the Manage Profile page in Opera)
Cashier ID (Found under Financials > Cashiering > Open Cashiers)
Configure Custom Payment Methods in Opera:
Navigate to Administration > Financial > Transaction Management > Payment Methods.
Click New and complete the following:
Confirm or select the Property
Enter a Code (shown to agents during reservations/check-in)
Enter the Payment Method (For example, credit card name)
Select a Transaction Code (must belong to a group configured for payment)
For credit card payments, select the card type for validation
Contact Zenoti support to receive:
Client ID
Client Secret
AppKey
Provide your Tenant ID to Zenoti.
Zenoti will initiate partner registration on Oracle's Identity Self-Service Portal.
Approve the registration request on Opera Identity Management.
Navigate to Administration > Financial > Transaction Management > Payment Methods.
Click New and enter required payment codes and descriptions.
Assign the appropriate Transaction Code.
For credit card methods, select the card type for validation.
Contact Zenoti Support to receive your Client ID, Client Secret, and AppKey.
Share your Tenant ID with Zenoti.
Zenoti submits a partner registration request using Oracle’s Identity Self-Service portal.
You must approve the request in Opera Identity Management.
PMS integration must be enabled at the organization level. If a center overrides the setting and disables PMS integration, Opera-related workflows (room charge, posting, cross-center posting) will not function for that center.
Integration is only available for Opera Cloud properties.
There are separate environments: Production and Non-Production
URLs containing “UAT” refer to Non-Production
To access Production, remove “UAT-” from the URL
Refer to the Oracle help article Obtaining details from the hotel for more information.
Note
The payments for group bookings are posted to the respective PM/PI rooms ensuring seamless reconciliation and accounting.
At the center level, click the Configuration icon.
Search for and select Settings from under Payments.
Expand PMS and select the Enable PMS integration checkbox.
Select Use organization default to inherit the organization-level setting.
Select Override at center level, and then select the Enable PMS integration checkbox to enable PMS for this center. Clear the checkbox to disable PMS for this center.
To charge walk-in customers through Opera PMS, select the Post Non Room Charge to PMS checkbox
If you want only to charge the stay-in guests to their rooms, you can leave this checkbox unselected.
To combine the tax and actual cost into a single line item for posting to Opera, turn on the Enable single line posting setting.
To allow front desk staff to post spa charges across different hotels within the same location, turn on the Enable cross-center posting setting.
For example, if Alice is staying at Property A but uses the spa at Property B, the front desk at Property A can book her appointment and post the charges to her room at Property A. At check-out, charges are settled at Property A with the same payment method.
To include room number, check number, and guest last name in the reference field of Opera Cloud postings, turn on the Use enhanced OHIP posting reference setting. When enabled, the reference field contains all three identifiers separated by slashes — for example, 501 / 111059 / SMITH — and the supplement field is left blank. When disabled, the reference field contains only the check number, and detailed line items are sent to the supplement field.
Note
This setting is off by default.
To send the invoice number to Opera Cloud instead of the transaction number during the posting process, enable the Post invoice number for room charge setting.
For group invoices, the host's invoice number is sent, or if the host is unavailable, the first invoice number in the group is used.
By default, this setting is turned off.
Under the Provider list, select Opera cloud (beta).
If PMS integration is disabled at the center level (either directly or via organization settings), Opera Cloud configuration options will not be available. Under the Provider list, select Opera cloud (beta).
Complete the following fields:
Setting
Description
Agent name
Select the custom payment you created to charge to a guest's room.
From our example, Charge Room is the Agent Name (for stay-in guests). You can charge walk-in guests using the standard payment methods (Cash, Card, and Check).
Username & Password
The username and password of your Opera cloud account.
Client ID
This is a public identifier for the application or client that is requesting access to resources.
Talk to a person at Zenoti to update the information in this field.
Client secret
This is a confidential piece of information known only to the application and the authorization server.
Talk to a person at Zenoti to update the information in this field.
AppKey
Obtain your application key from the Oracle Hospitality Developer Portal, and enter the key in this field.
Talk to a person at Zenoti to update the information in this field.
HostName
HostName is the API gateway URL that you can find on the Oracle Hospitality Developer Portal, under the Environments tab.
HotelId
The Hotel ID is the business against which you want to perform actions like obtaining reservation data.
CashierId
A cashier ID is used to track each posting made to a reservation or AR account.
Custom payment method
Custom Payment Methods allow you to define the payment methods accepted at your business and are referenced in reservations and routing payment instructions.
Custom payment method needs to be configured in Opera and then you must enter it in Zenoti.
BinMode
Configure these settings for both, walk-in and stay-in guests
By default, Category is selected. You can alternatively select BU.
When you select Category, the item codes you set in the subsequent steps get applied on the category level of your offerings (Example service category, membership category etc.). Similarly, when you select BU, the item codes you set in the subsequent steps get applied on the business unit level (Business units are the operational units set up at the organization level).
After you select one of the abve optuions from the list, you must:
Click Configure transcode mappings.
From the Select the item type list, select each of your offerings and enter item codes in each field.
Click Configure tax transcode mappings.
From the Select the item type list, select each of your offerings and enter item codes in each field.
To apply the same mappings to all the centers in your business, select the Use the same mappings for all centers checkbox.
Payment mapping
Configure this setting for walk-in guests.
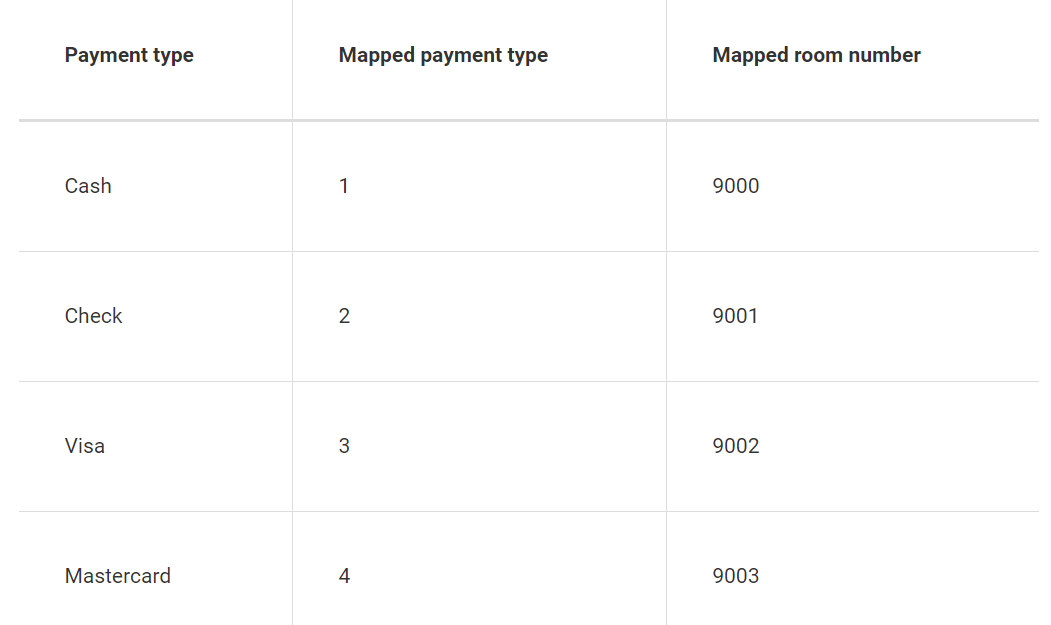
Map payment types to room numbers and click Add.
The configured room numbers act as placeholders for that payment type.
If Opera does not already have room numbers mapped to different payment types, you can do the mapping based on the following example (see the columns below).
Payment method
Cash
Cheque
Visa
Master card
Payment type
1
2
3
4
Mapped room number
9001
9002
9003
9004
Click Save.
Impacts and considerations
If the Enable single line posting setting is turned on, items assigned the same transcode will be grouped together. The combined total will reflect the sum of the individual components.
For example:
If transcode 9000 is set for sale, service charge, and other fees and transcode 8000 is set for tax then two line items are posted. One line item for transcode 9000 displays the total of the sale, service charge, and fees. Another line item for transcode 8000 shows the total tax.
If different transcodes are assigned to different items but the Enable single line posting setting is not enabled, the items will not be posted as a single line.
The supplement text will include the names of configured tax components. For example, if GST is configured as a tax component, the configured name should be sent to Opera.
Charge to a room with Opera
After you integrate Zenoti with Opera, for the services a guest avails, you can submit the charges of the guest as charge to the guest's room.
In the Appointment Book, click on the appointment block of the guestwhose charges you wish to charge to the room and click Take Payment.
The POS opens.
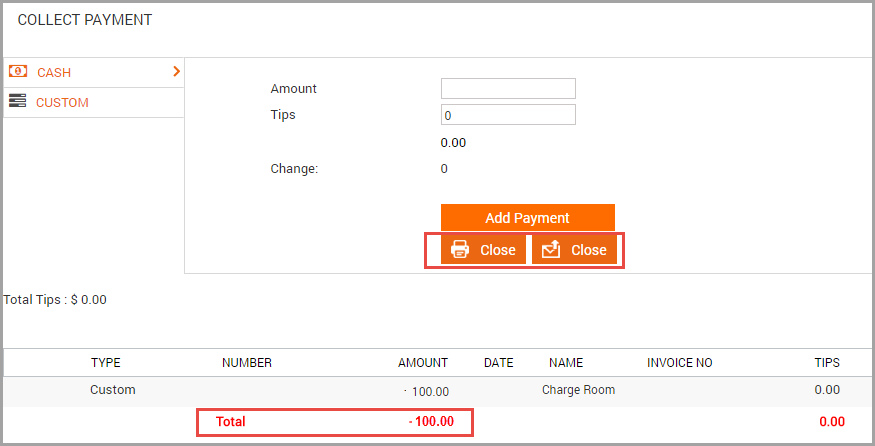
In the Collect Payment section, click the Custom tab.
The Custom Payment screen opens.
From the drop-down of the Payment Data field, select the custom payment you created for charging to a guest's room (this is the custom payment name you specified for Opera in the Agent Name field).
The Center Name, Room Number, Name, and Additional Data fields appear.
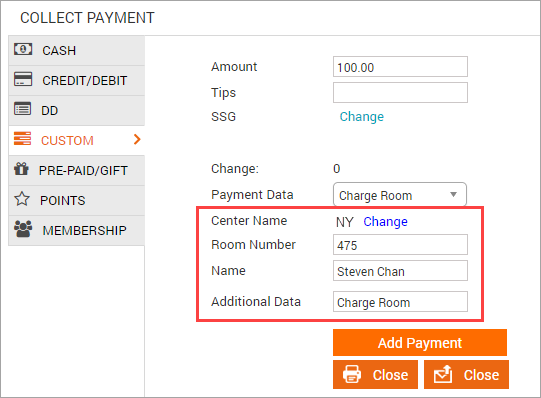
If the guest belongs to a different center, click Change and select the desired center.
Front desk staff can post spa charges across different hotels within the same location, if the Enable cross-center posting setting is turned on in the PMS configuration.
Note
Only the centers that have the same Group Code appear in the list.
Search for the guest's room and name using one of the following methods:
Enter the guest's room number in the Room Number field and press Enter. The guest's name associated with the room appears.
Enter the guest's name in the Name field and press Enter. The room number associated with the guest appears.
In the Additional Data field, enter your comments, if any.
Click Add Payment.
The amount is charged to the guest's room.
Close the invoice using one of the Close buttons (Print or Email).
Edit a charge to a room
If you have added a charge to a room and have not closed the invoice yet, you might encounter scenarios where you might have to edit the payment (enter a different amount or a different room). In this article you will learn how to edit such payment entries.
In the open invoice, under the Collect Payment section,
against the payment you wish to edit, click the delete icon.
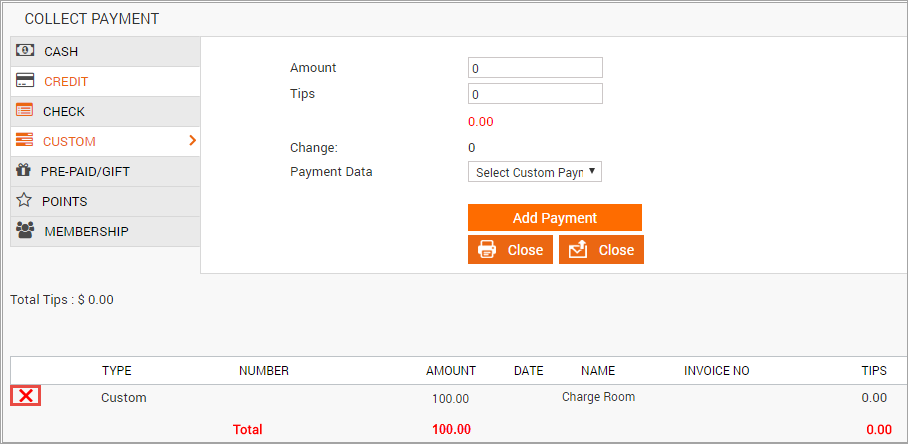
The Remove the select Payment? message appears.
Click OK.
The charge to the room is removed.
Start the charge to a room process again with the desired changes.
Refund a charge to a room
If you have charged to a guest's room and you need to refund the charge, you can easily do it from the Appointment Book.
At the center level, click the Appointment icon.
Navigate to the Refund invoice window using one of the following ways:
If you know the invoice number: Click in the Appointment Book, search for the invoice number, view the invoice, click I want to and then click Refund Invoice.
If you do not know the invoice or receipt number: Open the guest's profile, select the Appointments tab, locate the invoice you wish to refund, and click the Refund icon.
In the Refund Invoice window, select the item you want to refund,enter the refund amount and click Select Refund Mode.
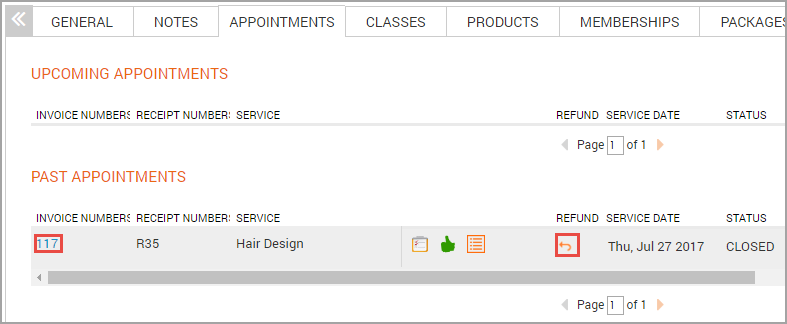
The Payment Methods tab opens.
To refund a charge to a room, enter the amount to refund in the Custom section and click Refund.
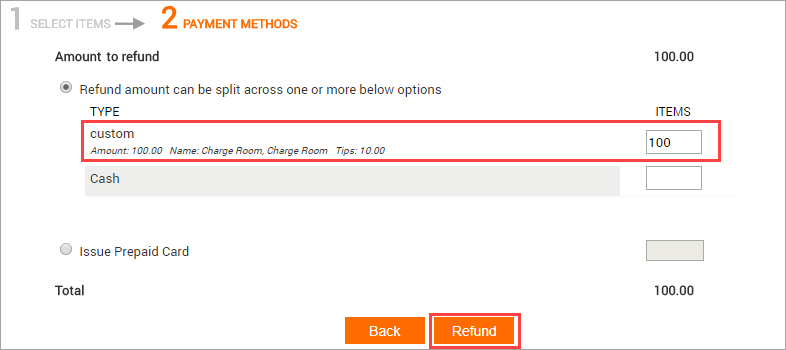
An invoice showing the refund amount in negative appears.
Click Close (Print or Email) to close the invoice.
The Invoice refund accepted message appears.
This indicates that the charge to the room is refunded.
Sale and redemption in Opera
When selling packages, gift cards and memberships, the sale and redemption is posted to different Payment Method (PM) rooms depending on the payment type that was used to make the sale for automatic reconciliation of financial transactions within the system.
The amount is posted to the PM room as per configuration and payment type selected for the walk-in guest.
The amount is posted to the guest room, in case, the guest staying at the property.
Before you make a sale, you must configure PM rooms and enable auto balancing in Opera. The room needs to be configured in Zenoti based on name, payment type and mapped room number.