Accounting integrations
Accounting integration syncs Zenoti sales transactions with an accounting application, automating the creation of financial statements and payment reconciliation. The real-time sales data in the accounting application provides accurate insights into revenue, liabilities, cash flow, and business performance from any location. The benefits of accounting integration are:
Optimizes your financial management with a diverse array of customizable options. You can post sales to the accounting application either as invoices or as journal entries. Tailor your preferences by opting to post based on individual invoice details or by providing a daily summary of total sales.
Syncs Zenoti sales data daily, facilitating seamless financial statement generation, including comprehensive profit and loss and cash flow statements.
Minimizes manual data entry and gain visibility over Zenoti sales and payments. Syncs data, saving numerous professional hours and associated costs.
Matches bank statements with synced payments for easy reconciliation.
Accrual Accounting
In accrual accounting, transactions are recorded based on the day they occur. For example, sales and collections indicate the day on which the business earned revenue by selling products or providing services, or the day on which the business received payment to reconcile the amount received with the money in the bank. This approach simplifies the process of reconciling accounts with sales and facilitates bank reconciliation with collections.
Cash Accounting
In cash accounting, transactions are posted based on the day the payments are received, denoting the day the business has earned revenue based on the received payment. This is commonly used by small businesses to simplify their accounting processes and manage financial liabilities.
Cash basis accounting is primarily used by small businesses that need to constantly monitor their cash flow. It is generally easier to manage as there is less to track. Many small businesses use this method due to its simplicity. Cash basis accounting recognizes all revenue as it is received and all expenses when the money is spent. Hence, whenever you check your bank balance, you know precisely what resources are available to you. Additionally, this method implies that your revenue will generally not be subject to tax until the cash is in the bank.
Switch to a new accounting platform in one click
Zenoti can enable the Reset Configuration button on the configuration page, where the integration is configured (at center level or at the organization level).
 |
When a business resets the integration, Zenoti does the following:
Removes current configuration and provider mappings.
Disables the sync jobs for items, guests, and locations
Disables data sync to the accounting platform of all pending syncs
Disables reports and marks past data (synced or pending) as Archived in reports
Click Reset Configuration.
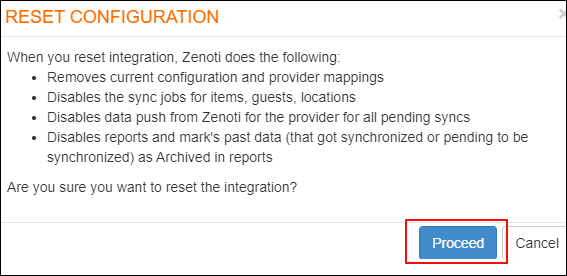 |
Click Proceed to continue to reset the configuration.
Simplified configuration for accounting integration
Generally, not all businesses need a multiple set of configurations to set up accounting integration in Zenoti.
To help such businesses easily set up the integration, we've simplified the configuration page.
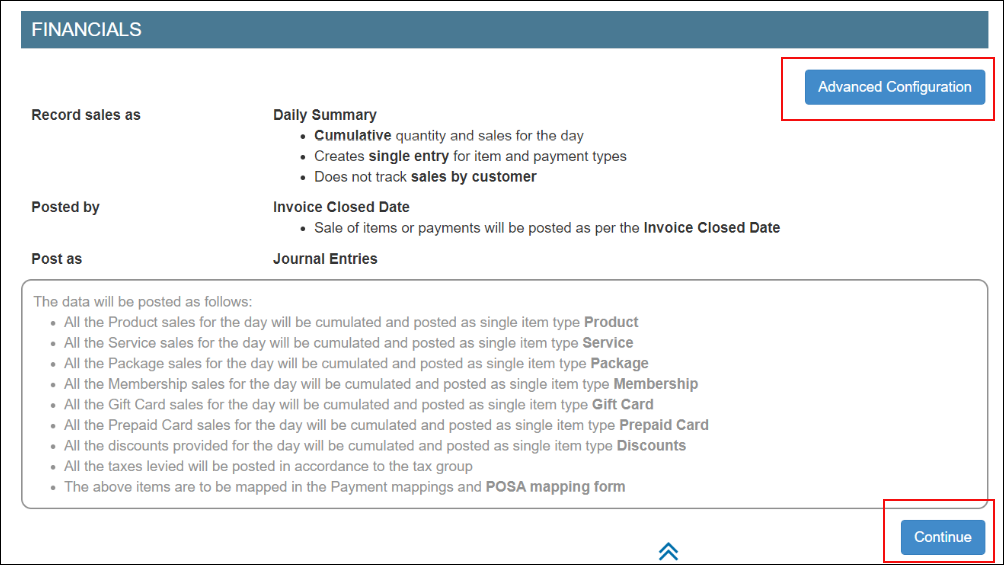 |
By default, Zenoti considers the following configurations:
Record sales as Daily Summary:
Cumulative quantity and sales for the day are considered
Single entry is created for items and payment types
Note
This configuration does not track sales by customers.
Post sale of items (for services the date when the services are performed) or payments based on Invoice Closed Date.
Post items as journal entries.
Default Value for Customer - Guest
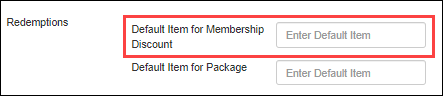
Default Item for Membership Discount - Membership Discounts
Default Item for Package Discount - Package Discounts
Click Continue to accept the default configurations. To edit these configurations, click Advanced Configuration.
Accounting integration in Zenoti
Running a smooth and profitable business is always challenging. Accounting activities such as tracking sales, managing expenses, filing taxes, measuring liabilities, and reconciling cash-flows, are the most crucial and complex activity for any business.
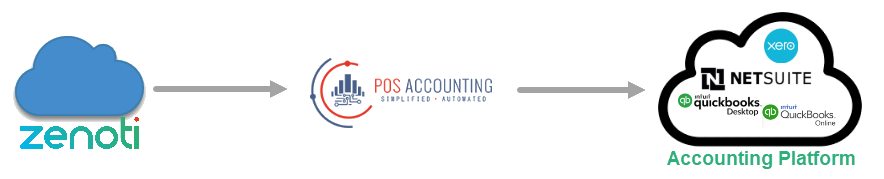
With Zenoti, you can integrate with a third-party accounting platform that can help you track these complex activities and in turn, helps you to prepare the following book of accounts for your business:
Profit and loss accounts
Cash-flow statements
Balance sheets
Expenses
Zenoti partners with POSAccounting and supports integration with the following accounting platforms:
Xero
QuickBooks Desktop
QuickBooks Online
NetSuite
Businesses can choose to set up the integration at the organization level or at each center.
Based on where you want to set up the integration,
Navigate to organization or center, click Configuration icon > Integrations tab.
Set up and authorize the accounting platform.
Expand the Provider section and select the accounting platform.
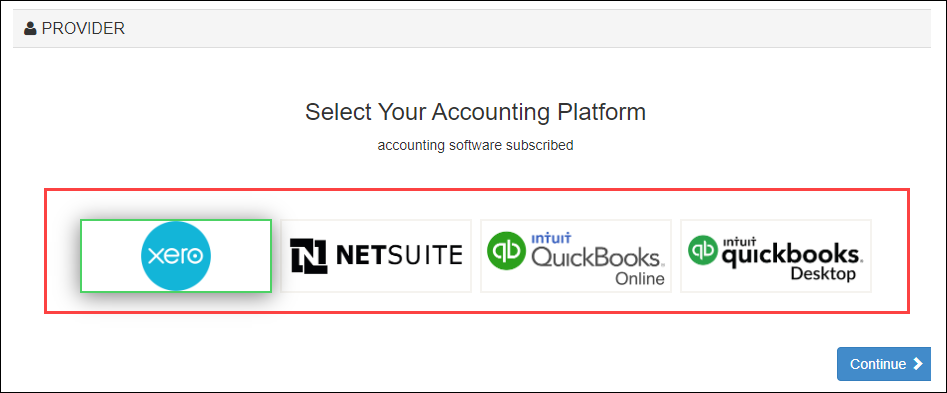
Click Continue to move to the next step.
The Configuration section appears. The fields in this section vary based on the accounting platform that you’ve selected.
Enter the details of the account that you have on the accounting platform.
Note
When a user authorizes or re-authorizes a third-party provider, whether a POSA or Codat integration, including middleware, the user account performing the action must have Administrator permissions. If the account lacks these permissions, the authorization may appear successful, but the data flow will fail to function correctly.
Locations
In this step, you can choose to send data with or without locations.
If you want to enable the integration with locations, select the Multi-Location switch.

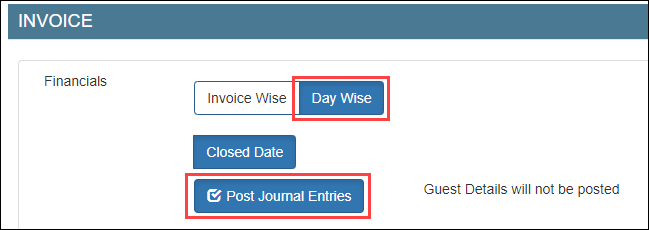
Sync Type
Select the way you want to sync the data.
Important
Ensure that you’ve enabled Closed Date. This is important as Zenoti syncs data based on the day when the invoice is closed.
You can choose to sync data in one of the following ways:
Invoice-wise
For each invoice in Zenoti, a corresponding invoice is created in the accounting platform.
Invoice-wise as Journal entries
For each invoice in Zenoti, a corresponding invoice is posted as a journal entry in the accounting platform.
Day-wise
For all the invoices in Zenoti on a day, a corresponding summarized invoice is created in the accounting platform.
Day-wise as Journal entries
For all the invoices in Zenoti on a day, a corresponding summarized invoice is posted as a journal entry in the accounting platform.
Configure
Based on the sync type that you’ve selected in step-3, you can choose how to post your data from Zenoti to the accounting platform.
You can do the configuration either by:
Map
After you’ve completed configuring how data in Zenoti can be pushed to the accounting platform, you are ready to map data in Zenoti to data in the accounting platform.
If you’ve configured data by invoice, you have to map the following:
If you’ve configured data by journal entries, you have to map the following:
Sync
After you’ve mapped the data, you can sync data using one of the following ways:
Scheduled sync
To auto-sync data on a timely basis, reach out to Zenoti Support to set up scheduled sync for your business.
Reconcile
The last step is to reconcile data that you’ve synced from Zenoti to the accounting platform using the following Zenoti Reports:
Items
Customers
Sales Orders Summary
Inventory Orders
Sale Order Summary Details
Note
Zenoti has separate reports for each accounting platform: Xero Reports and QuickBooks Reports.
Reauthorizing Integrations
This article explains how reauthorization works for integrations when the connection is broken, and what users can expect during the reauthorization process.
Overview
Zenoti accounting integrations rely on an active authorization link to securely sync data. If this link is broken, for example, due to expired credentials or revoked permissions, the integration must be reauthorized to resume data sync.
When the authorization link is broken:
The Status of the integration is displayed as Deauthorized.
The Reauthorize button is shown for the affected integration.
The standard Authorize option is replaced with Reauthorize to indicate an existing but inactive connection.
To reauthorize integration, follow these steps:
Navigate to the organization or center level based on where the integration is set up.
Click Configurations > Integrations > Integration Settings.
Expand the Accounting section.
Locate the integration showing Status as Deauthorized.
Click Reauthorize. A new browser tab opens with the provider’s authorization page.
Sign in and grant the required permissions. Once completed successfully, return to Zenoti.
The integration status updates to Authorized, and data sync resumes.
Note
Users can complete reauthorization on their own, without contacting Zenoti Support.
Reauthorization does not require reconfiguration of previously saved settings.
Existing integration mappings remain unchanged unless modified during the provider’s flow.
Set up and authorize Xero accounting integration
Xero is an online accounting software that allows you to track financials.
Zenoti's integration with Xero enables you to sync the financial data from Zenoti to your Xero account.
Important
Before you begin to set up and authorize Xero, ensure that you already have an account created on Xero.
To set up your Xero account details in Zenoti
If you are not on the integration page, based on where you want to set up the integration, click on the Configurations icon.
Click the Integrations tab.
Select Accounting.
Under the Configuration tab, expand the Account section.
You can see the fields relevant to Xero integration.
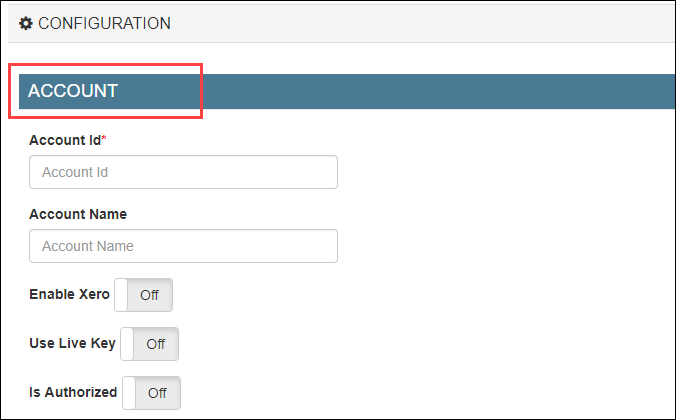
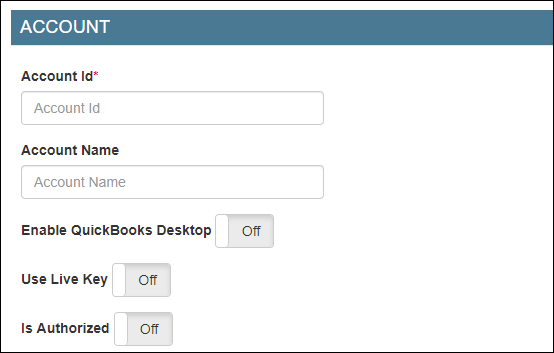
Enter the following details:
Account Id: Enter an identifier for your business. This can be any random combination of numbers. Zenoti will use this id while creating a company for your business in POSAccounting (a third-party connector for accounting integrations in Zenoti).
For example, 34567821.
Account Name: Enter the company name of your business. You may use the same name that you’ve provided in Xero.
For example, Spa Bliss.
Enable Xero: Select this switch to enable integration.
If you want to pause the sync, you can turn off this switch.
Use Live Key: If you want to test the integration, turn off this switch. After you are ready to integrate data, you must turn on this switch.
To authorize Zenoti to access your Xero account
Caution
This tab will be visible only after you configure the invoice and sync settings in the Configuration tab.
Expand the Authorize tab.
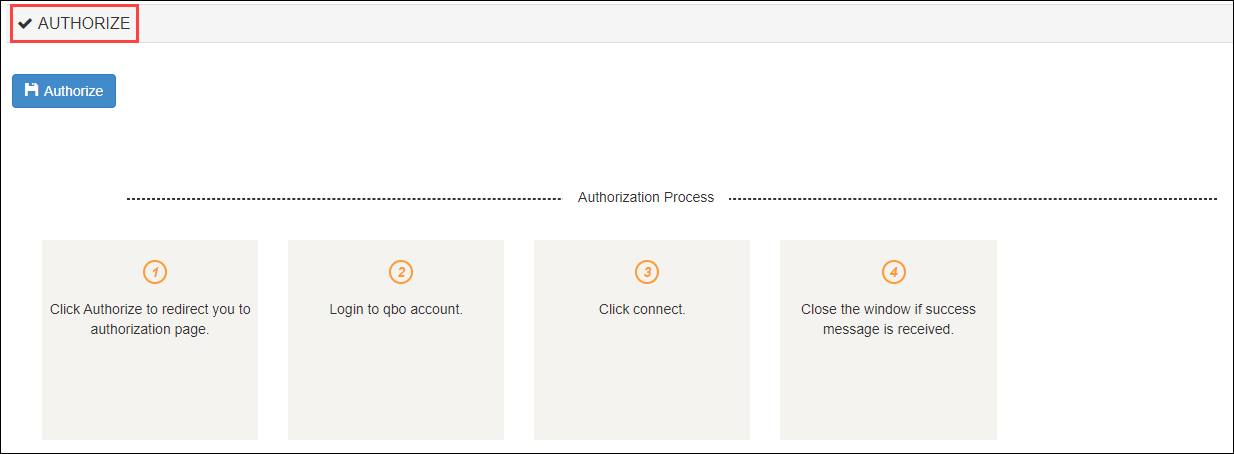
Click the Authorize button.
A new tab opens that will ask you for access to your Xero account to Zenoti.
Important
For some technical reasons, if the new tab does not open, you can see the authorization link in the Authorize section.
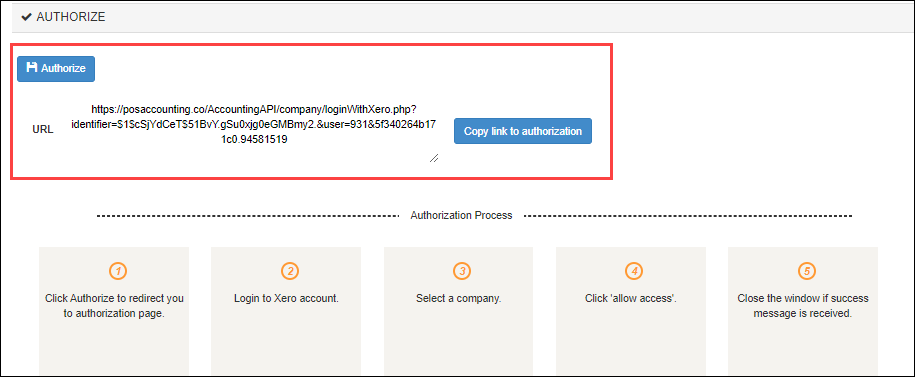
Copy and paste the authorization link in a new tab and press Enter.
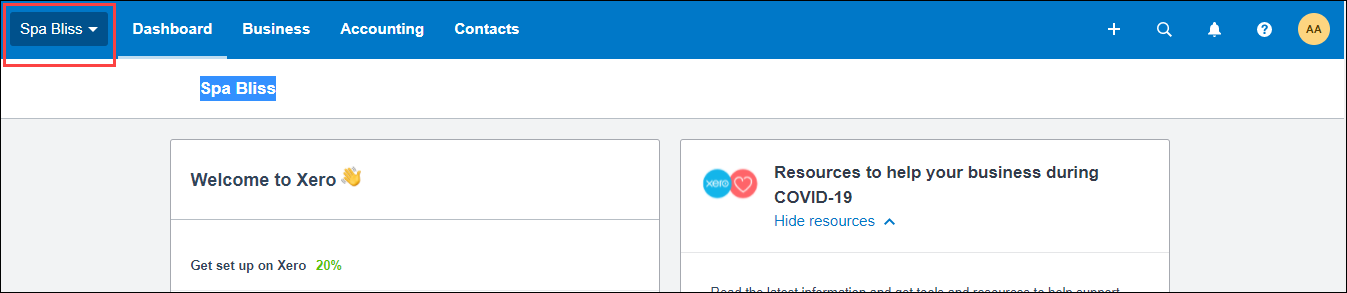
If you have a single organization created for your business on Xero, you will see the following window:

However, if you have multiple organizations created for your business on Xero, you will see the following window:
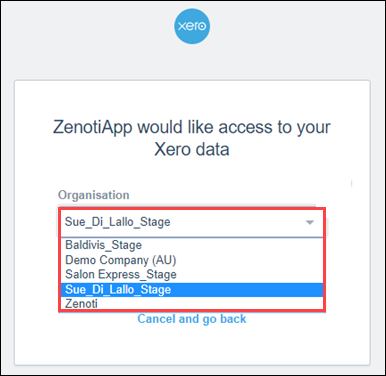
Select the organization to which you want to give access to Zenoti.
Click Allow access.
Zenoti now has access to your Xero account and you will see the following message.

To close the window, click Click here to close this window.
Turn on the Is Authorized switch.
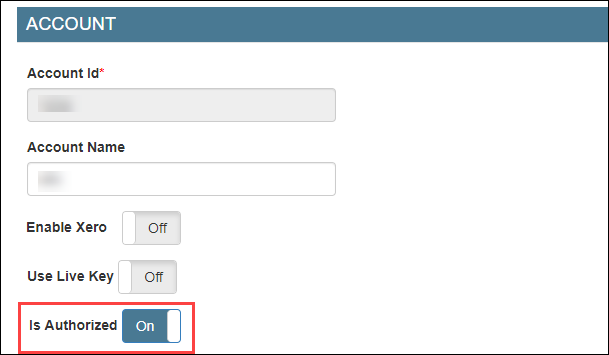
Click Save.
You’ve completed the authorization process for Xero.
Next step
If you've created locations in Xero, you must configure the location details. However, if you have not created locations in Xero, you must follow these steps (configure without location details).
Set up and authorize QuickBooks Desktop accounting
QuickBooks Desktop (QBDT) is an on-premise accounting software that allows you to track financials.
Zenoti's integration with QBDT enables you to sync the financial data from Zenoti to your QBDT account.
Before you begin to set up and authorize QBDT, ensure that you have an account already created on QBDT and you’ve installed the QuickBooks Web Connector for Zenoti.
To set up your QuickBooks Desktop account details in Zenoti
At the organization level, click the Configurations icon.
Click the Integrations tab and expand Accounting.
Under the Configuration tab, expand the Provider section.
Select quickbooks Desktop as the accounting platform.
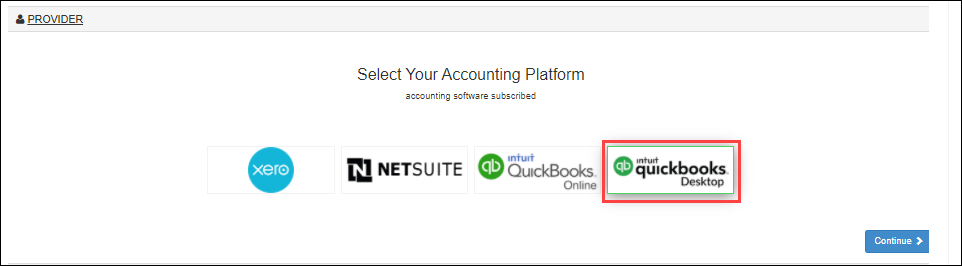
Click Continue.
The Configurations tab expands and you can see the fields relevant to QuickBooks Desktop integration.
Enter the following details:
Account Id: Enter an identifier for your business. This can be any random combination of numbers. Zenoti will use this id while creating a company for your business in POSAccounting (a third-party connector for accounting integrations in Zenoti).
For example, 34567821.
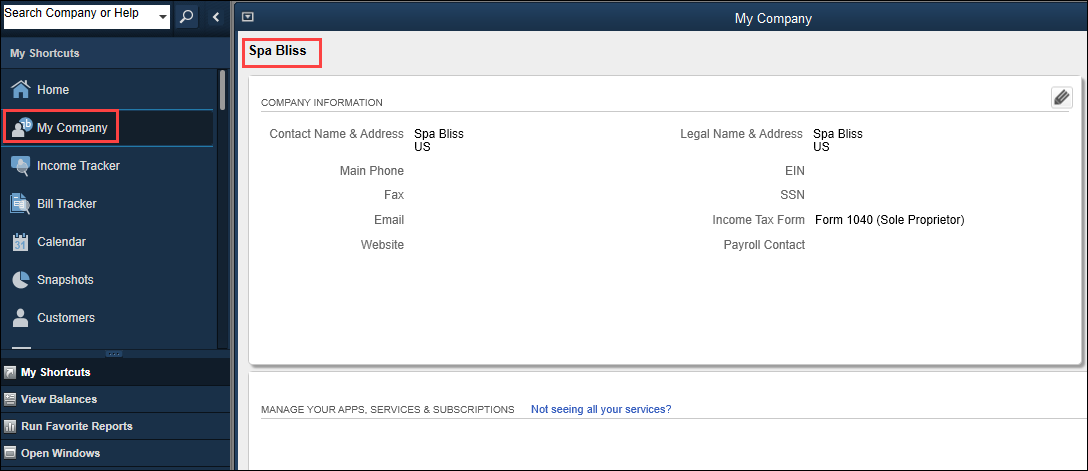
Account Name: Enter the company name of your business. You may use the same name that you’ve provided in QuickBooks.
For example, Spa Bliss.
Enable QuickBooks Desktop: Select this switch to enable the integration for the desktop version of the accounting platform.
If you want to pause the sync, you can turn off this switch.
Use Live Key: If you want to test the integration, turn off this switch. After you are ready to integrate data, you must turn on this switch.
To authorize Zenoti to access your QuickBooks Desktop account
Disclaimer
This tab will be visible only after you configure the invoice and sync settings in the Configuration tab.
Expand the Authorize tab.
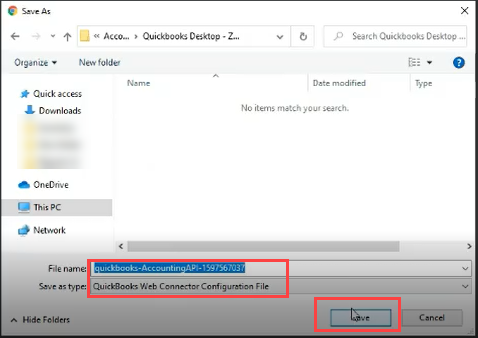
Click the Authorize button.
The quickbooks-AccountingAPI file downloads on your local machine.
Select the location where you want to download the file and click Save.
Navigate back to the Zenoti integrations page and you can see the API password.
This is an auto-generated password. Keep this password handy as you will need in (Step: 13) while authorizing the API in Quickbooks web services.
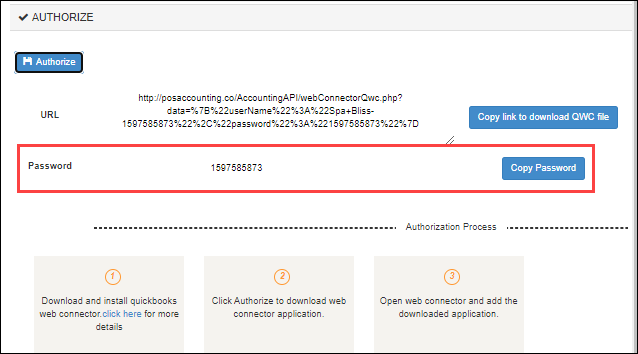
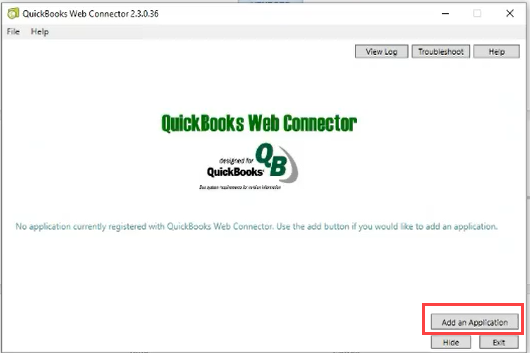
Open the QuickBooks Web Connector application from your local machine.
If you are a new user, you will see the following screen:
If you are an existing user, you will see the following screen:
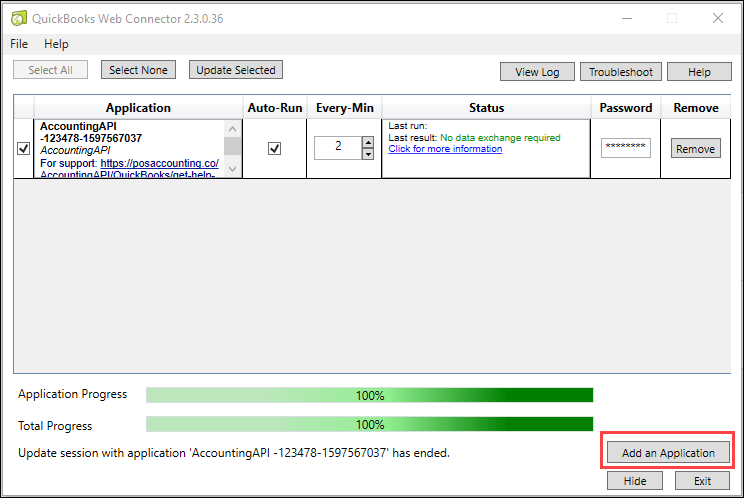
Click Add an Application.
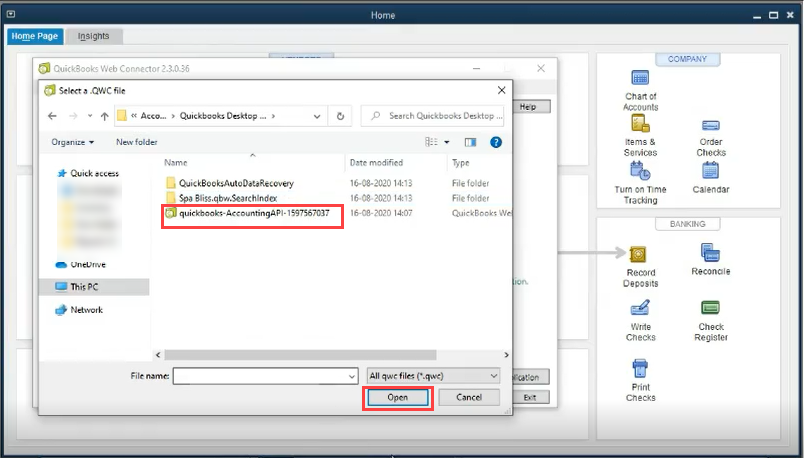
Open the quickbooks-AccountingAPI file that you’ve saved in step 3.
Click Ok to authorize the QuickBooks web service.
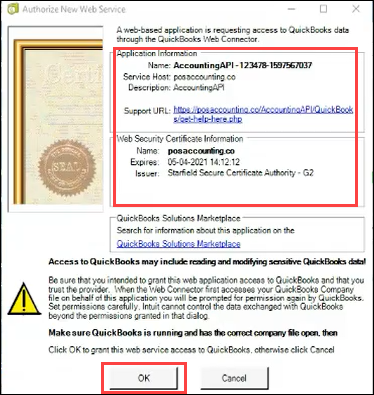
The QuickBooks - Application Certificate dialog box appears.
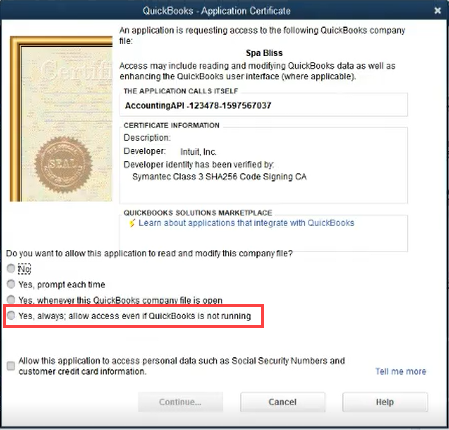
Select the Yes, always; allow access even if QuickBooks is not running option.
A confirmation dialog box appears.
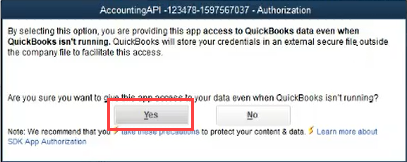
Click Yes.
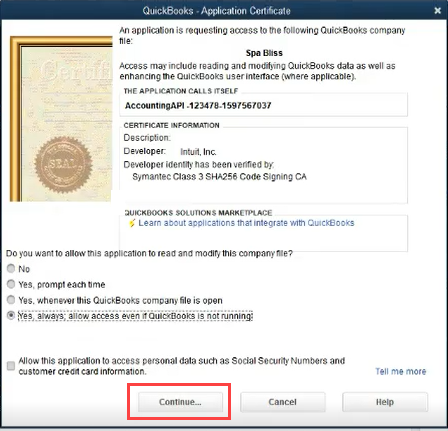
Click Continue.
Click Done.
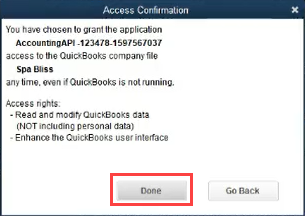
You’ve allowed access to the QuickBooks web service.
On the QuickBooks: Web Connector window, click the Application checkbox and enter the password that you copied from the Zenoti integration page (Step: 4).
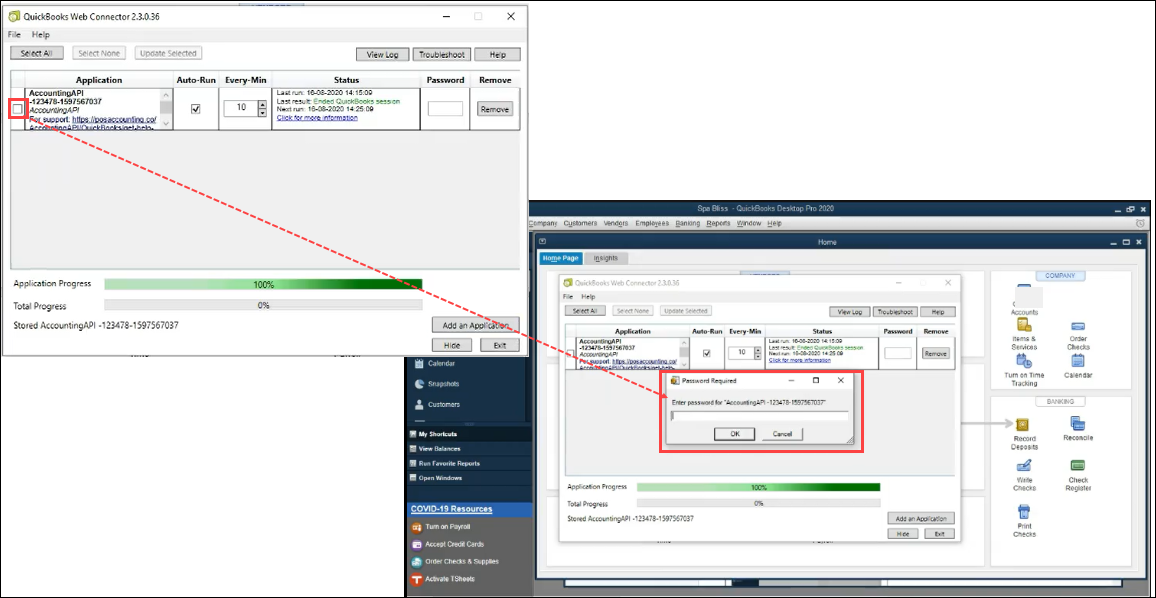
Click Ok.
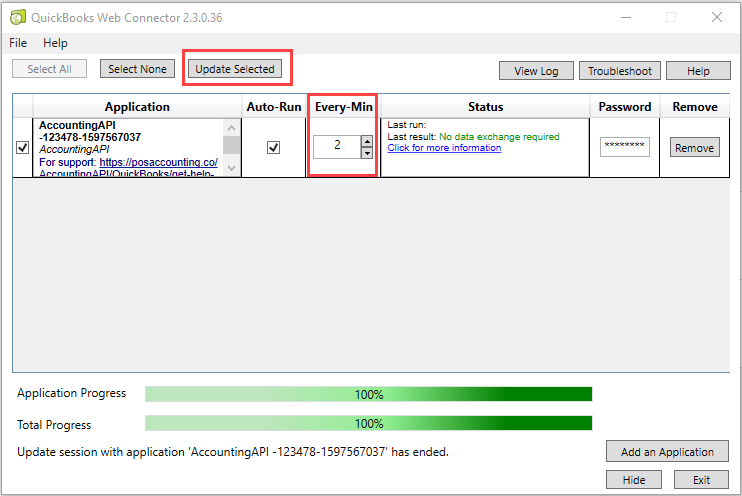
Click Update Selected to test the connection between QuickBooks web-services and POSAccointing API (Zenoti).
(Optional) By default the auto-sync is set to 10 minutes. You can update this duration in the Every-Min box.
Navigate back to the Zenoti integration page and turn on the Is Authorized switch.
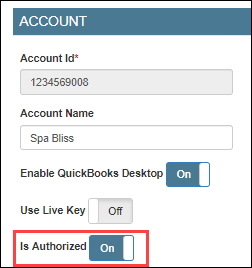
Click Save.
You’ve completed the authorization process for QuickBooks Desktop.
Next step
If you've created locations in QuickBooks Desktop, you must configure the location details. However, if you have not created locations in QuickBooks Desktop, you must follow these steps (configure without location details).
Configure QuickBooks Desktop accounting with location details
Important
Ensure that you’ve created locations (classes) in QuickBooks Desktop.
To create tracking categories in QuickBooks Desktop
Login to your QuickBooks Desktop account.
Click Edit.
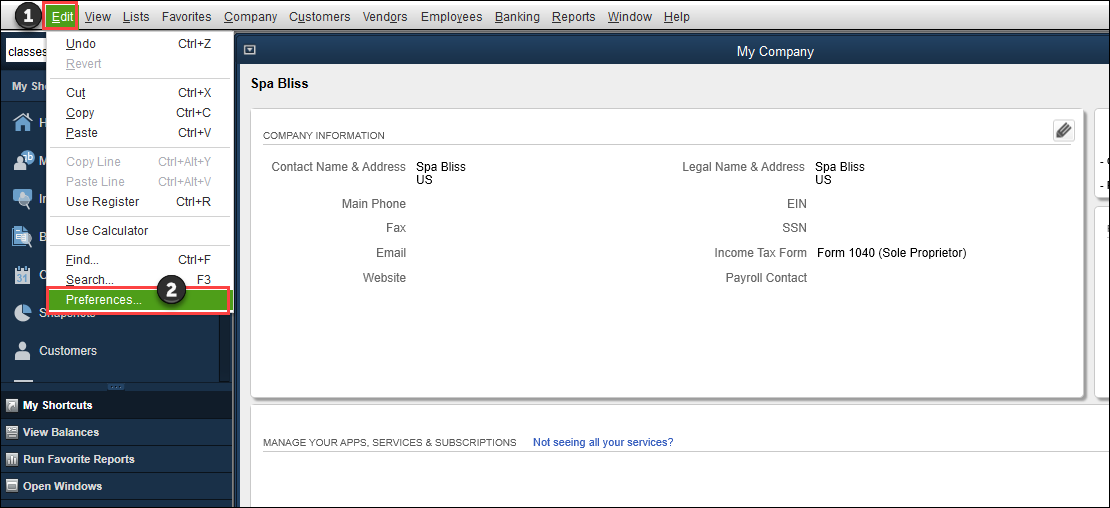
Click Preferences.
Click Accounting > Company Preferences.
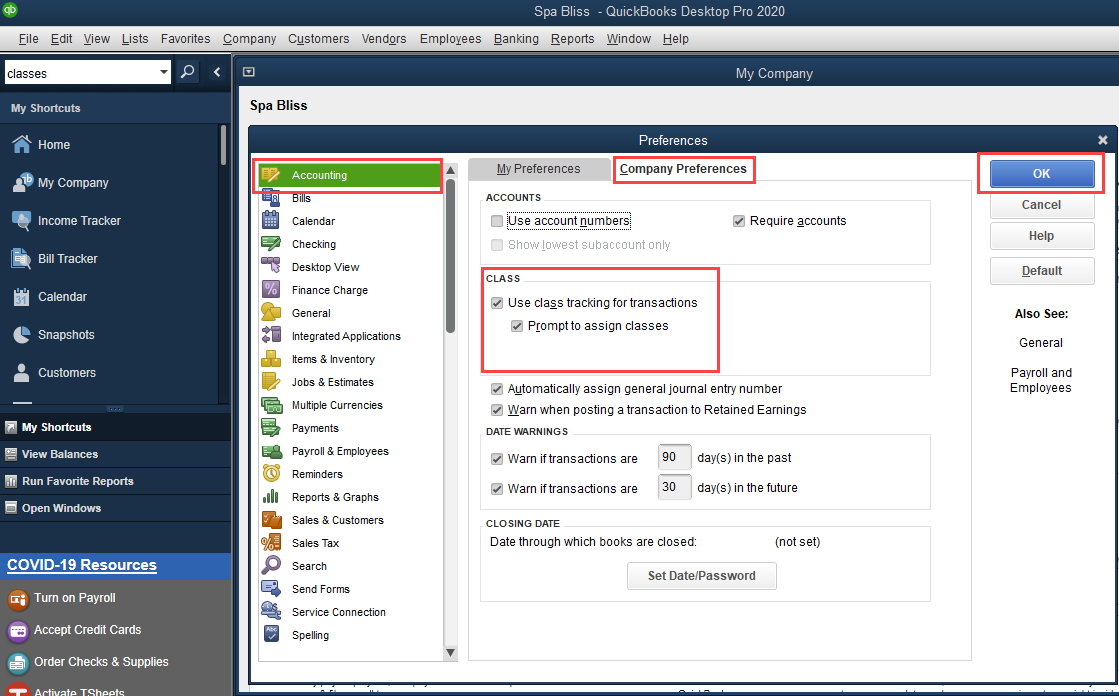
Under the Class section, select the Use class tracking for transactions and Prompt to assign classes.
Click Ok.
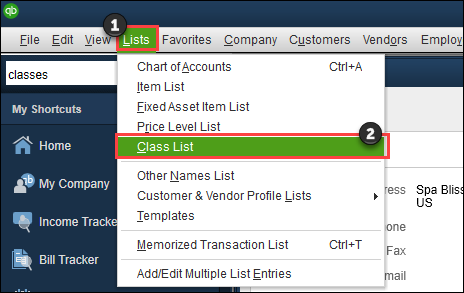
Navigate to Lists and click Class List.
To add a new class, from the Class menu, select New.
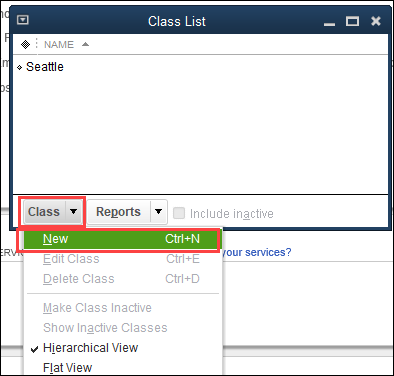
In the Class Name box, enter the name of the class. Keep this information handy to map the category options as location names in Zenoti.
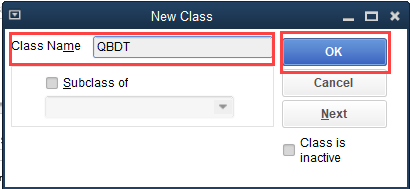
Click Ok.
The class is created.
To configure location details in Zenoti
Navigate to the Integrations page.
Organization level:
Click the Configurations icon.
Click Integrations.
Center level:
Click the Configurations icon.
Click Integrations.
Select Accounting.
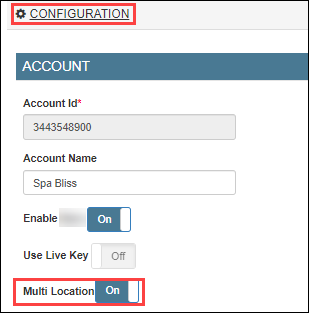
Expand the Configuration tab and navigate to the Account section.
Turn on the Multi-Location switch.
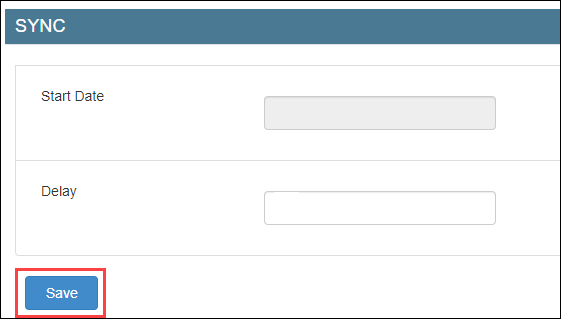
Navigate to the Sync section and click Save.
Expand the Locations tab.
In the Mapped Location box, enter the category option that you’ve entered in QuickBooks Desktop (Step 9 of location creation in QuickBooks Desktop).

Click Save.
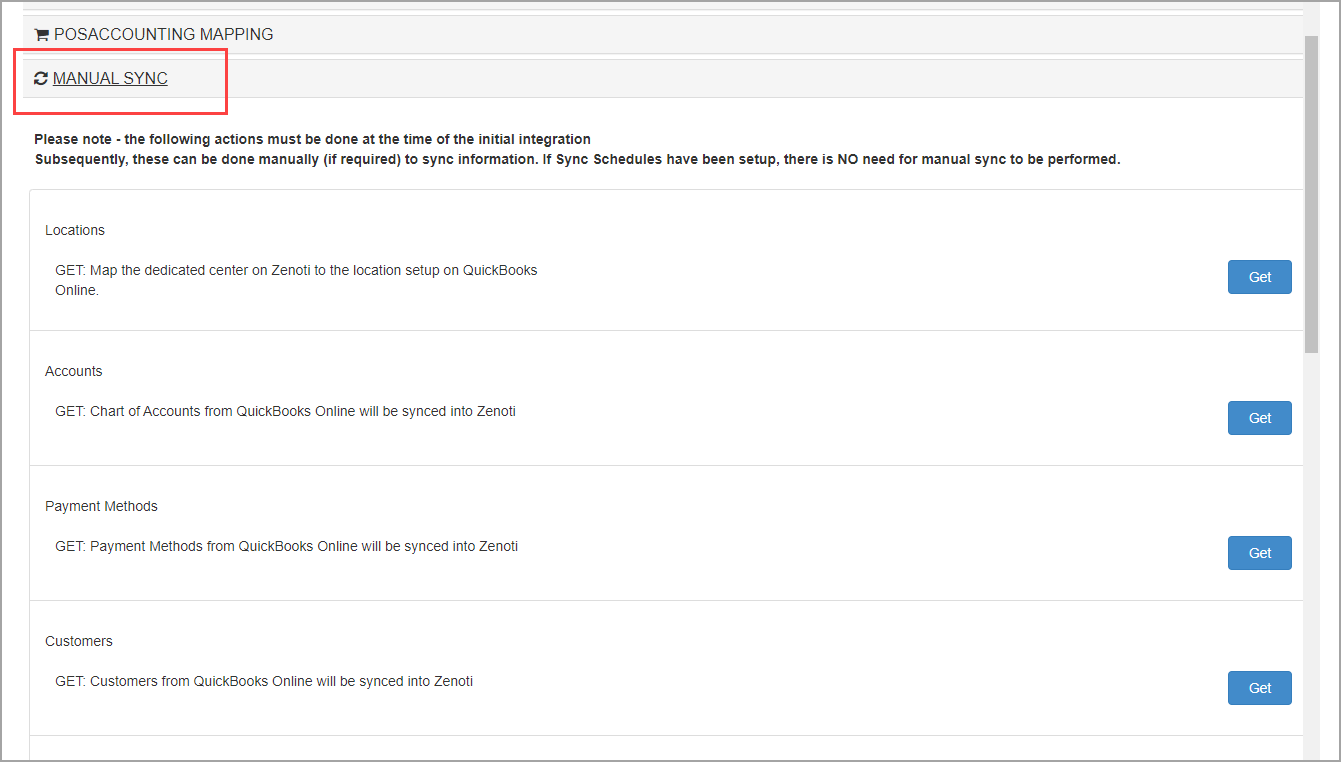
Expand the Manual Sync tab.
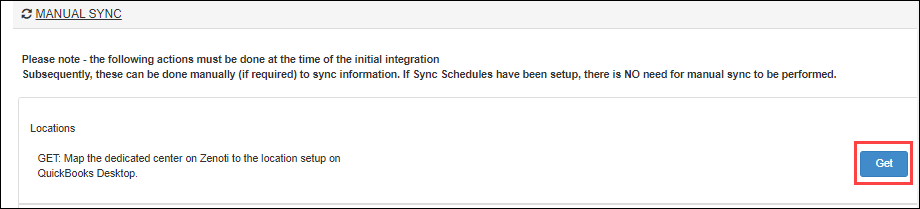
Click Get to sync the locations.
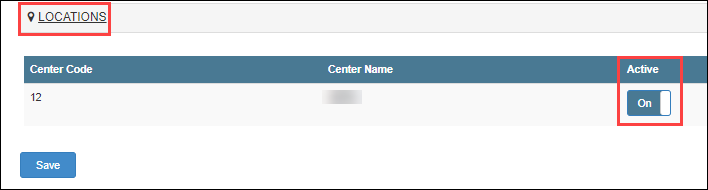
Expand the Locations tab.
Verify that the POSAccounting Location is updated and the Active switch is enabled.

You’ve completed locations mapping for QuickBooks Desktop.
To add locations in POSAccounting
Note
Ensure that you’ve completed mapping in the POSAccounting application.
Navigate and expand the POSAccounting Mapping tab.
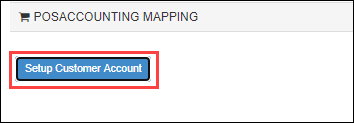
Click Setup Customer Account.
The POSAccounting page opens.
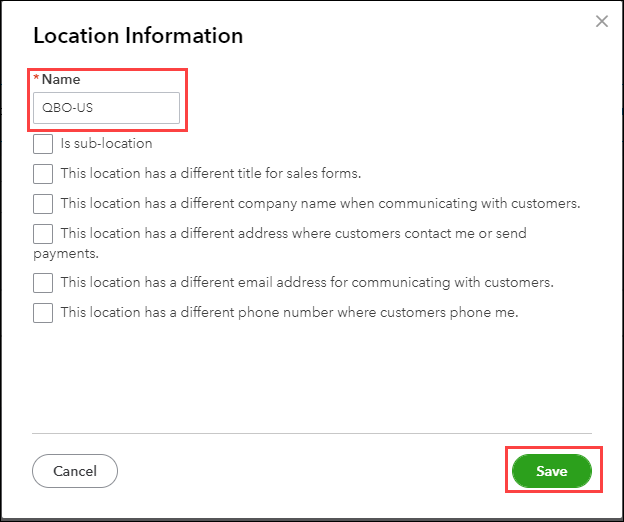
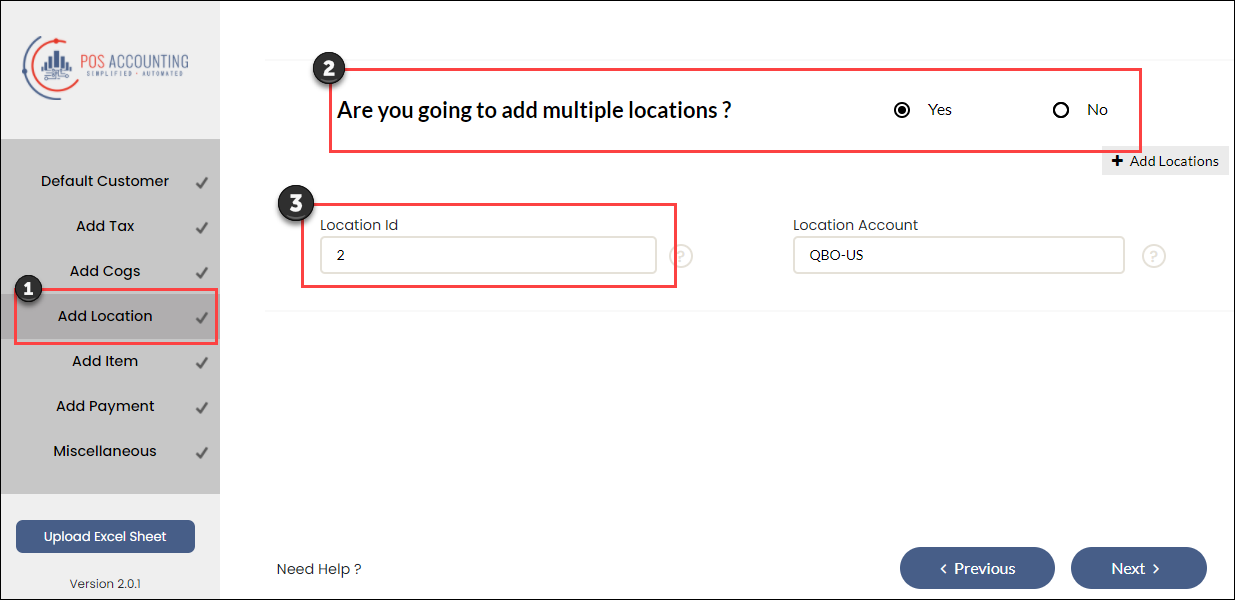
Navigate to Add Location.
Select Yes for multiple locations.
Enter the POSAccounting Location (Step 11 while configuring locations in Zenoti) as the Location id in POSAccounting.
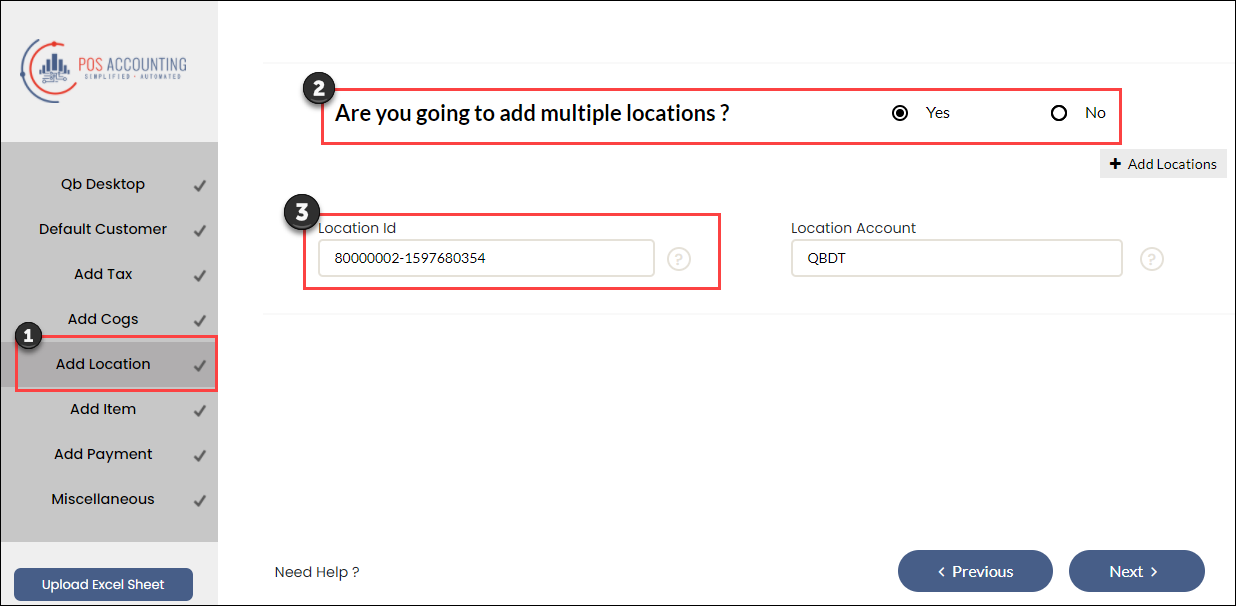
Enter the class (in QuickBooks Desktop) as Location Account in POSAccounting.
Next step
Set up and authorize QuickBooks Online accounting
QuickBooks Online (QBO) is an online accounting software that allows you to track financials.
Zenoti's integration with QBO enables you to sync the financial data from Zenoti to your QBO account.
Before you begin to set up and authorize QBO, ensure that you have an account already created on QBO.
To set up your QuickBooks Online account details in Zenoti
At the organization level:
Click the Configurations icon.
Expand the Integrations tab.
At the center level:
Click the Configurations icon.
Expand the Integrations tab.
Select Accounting.
Under the Configuration tab, expand the Provider section.
Select QuickBooks Online as the accounting platform.
Click Continue.
The Configurations tab expands and you can see the fields relevant to QuickBooks Online.
Enter the following details:
Account Id: Enter an identifier for your business. This can be any random combination of numbers. Zenoti will use this id while creating a company for your business in POSAccounting (a third-party connector for accounting integrations in Zenoti).
For example, 1234.
Account Name: Enter the company name of your business. You may use the same name that you’ve provided in QuickBooks.
For example, Spa Bliss.
Enable QuickBooks Online: Select this switch to enable the integration for the online version of the accounting platform.
If you want to pause the sync, you can turn off this switch.
Use Live Key: If you want to test the integration, turn off this switch. After you are ready to integrate data, you must turn on this switch.
Note
Zenoti calculates tax amounts accurately and consistently. These values match exactly with QuickBooks Online, eliminating discrepancies during reconciliation. For example, if an invoice shows $1,190.65 in tax in Zenoti, the same amount will appear in QBO.
Zenoti records delayed refunds as separate transactions to ensure accurate syncing with accounting systems. This avoids data mismatches, reduces manual adjustments, and maintains clear audit trails.
To authorize Zenoti to access your QuickBooks Online account
Disclaimer
This tab will be visible only after you configure the invoice and sync settings in the Configuration tab.
Expand the Authorize tab.
Click the Authorize button.
A new tab opens that will ask you to give access to your QuickBooks account to Zenoti.
Important
For some technical reasons, if the new tab does not open, you can see the authorization link in the Authorize section.
Copy and paste the authorization link in a new tab and press Enter.
If you have a single organization created for your business on QuickBooks, you will see the following window:
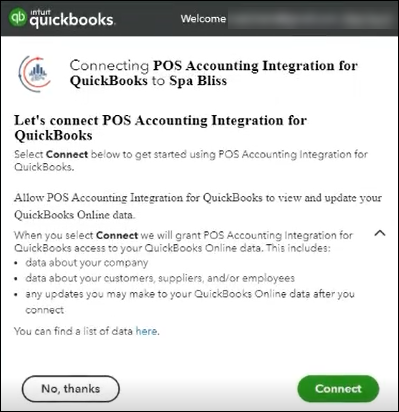
Click Connect.
Zenoti now has access to your QuickBooks account and you will see the following message.
To close the window, click Click here to close this window.
Turn on the Is Authorized switch.
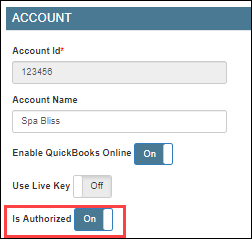
Click Save.
Next step
If you've created locations in QuickBooks Online, you must configure the location details. However, if you have not created locations in QuickBooks Online, you must follow these steps (configure without location details).
Configure QuickBooks Online accounting with location details
Before you begin, ensure that you’ve created locations (tracking categories) in QuickBooks Online.
To create tracking categories in QuickBooks Online
Login to your QuickBooks Online account.
Click the settings icon.
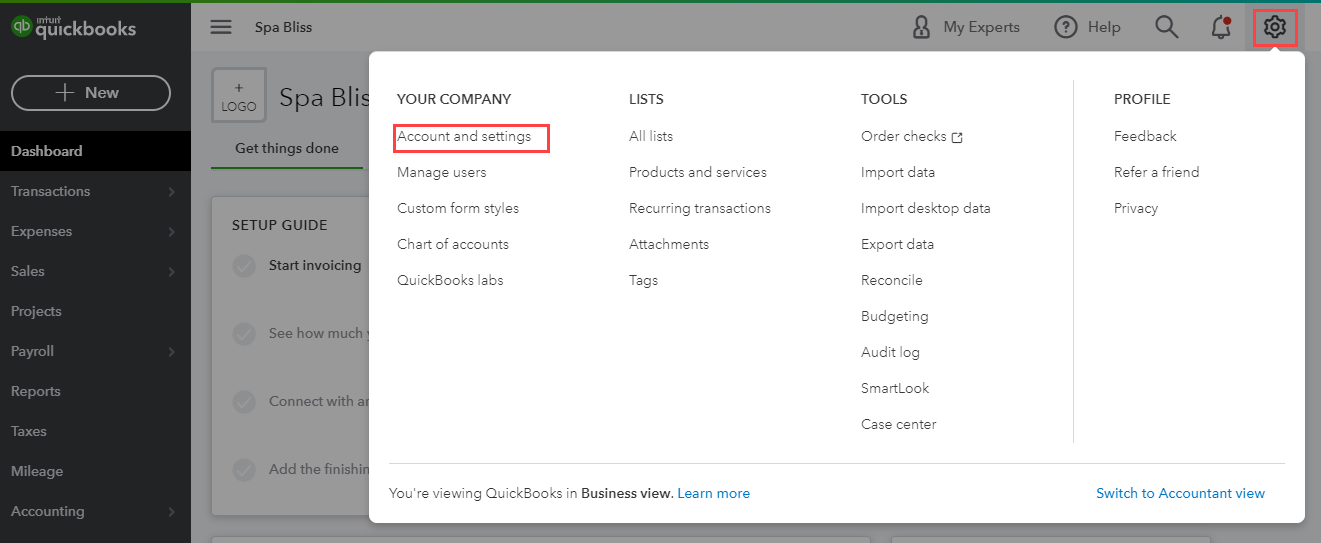
Click Account and settings.
Click Advanced.
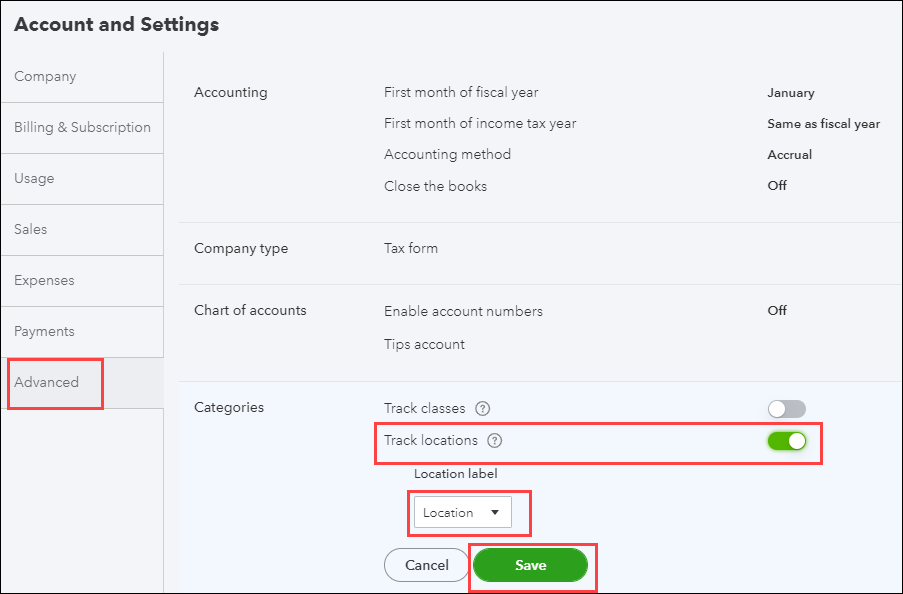
Turn on the Track locations switch.
From the Location label drop-down list, select Location as only this location label is supported by Zenoti.
Click Save.
Click the settings button on the upper-right corner of the screen.
Click All Lists.
You can see that the Locations section is enabled.
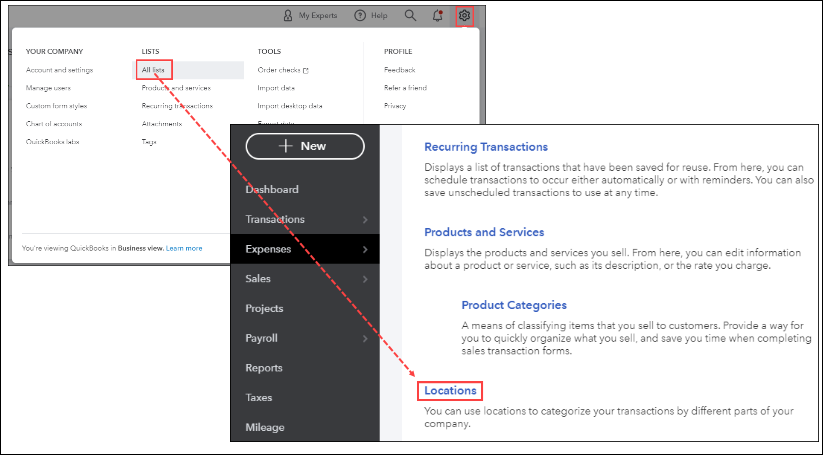
Click Locations.
The list of locations page appears where you can see existing locations, if any.
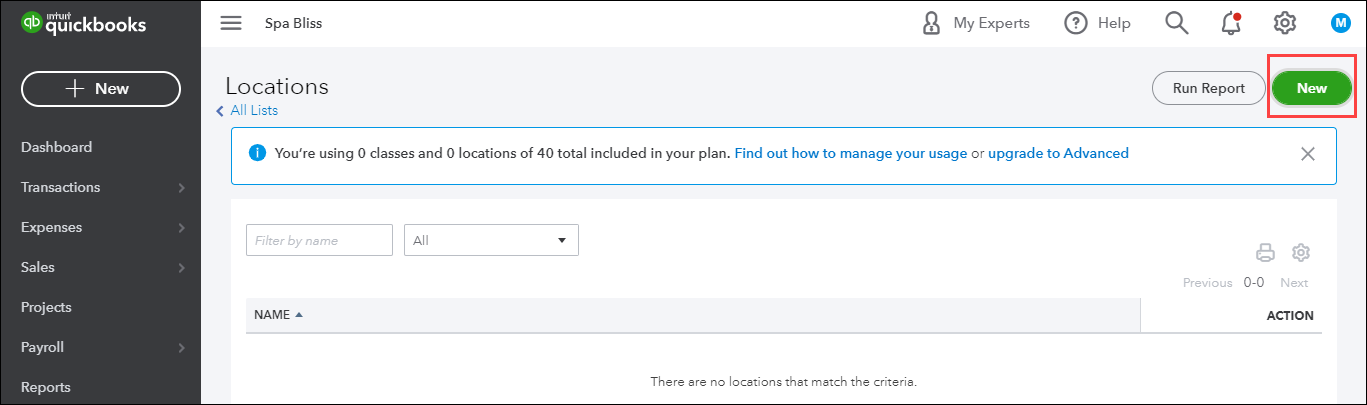
To add a new location, click New.
Enter the location name.
Click Save.
The location is created in your QuickBooks Online account.
To configure location details in Zenoti
At the organization level, click the Configuration icon.
At the center level, click the Configuration icon.
Navigate to Integrations tab.
Select Accounting.
Expand the Configuration tab and navigate to the Account section.
Turn on the Multi-Location switch.
Navigate to the Sync section and click Save.
Expand the Locations tab.
In the Mapped Location box, enter the category option that you’ve entered in QuickBooks Online (Step 12 of location creation in QuickBooks Online).

Click Save.
Expand the Manual Sync tab.

Click Get to sync the locations.
Expand the Locations tab.
Verify that the POSAccounting Location is updated and the Active switch is enabled.

You’ve completed mapping locations for QuickBooks Online.
To add locations in POSAccounting
Note
Before you add locations in POSAccountnig, ensure that you’ve completed mappings in the POSAccounting application.
Navigate and expand the POSAccounting Mapping tab.
Click Setup Customer Account.
The POSAccounting page opens.
Navigate to Add Location.
Select Yes for multiple locations.
Enter the center code (in Zenoti) as the Location id in POSAccounting.
Enter the category option (in QuickBooks Online) as Location Account in POSAccounting.
Configure accounting integration without location details
Note
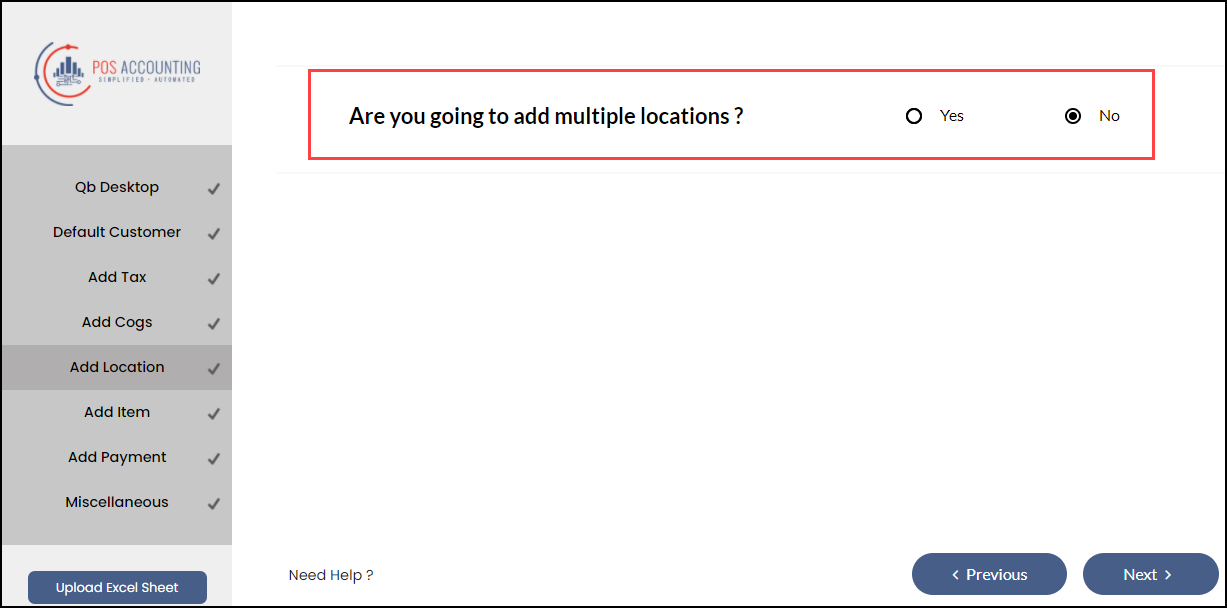
Follow these steps if you’ve not created locations in your accounting platform.
Navigate to the Integrations tab.
Organization level:
Click the Configuration icon.
Click the Integrations tab.
Center level:
Click the Configuration icon.
Click the Integrations tab.
Select Accounting.
Expand the Configuration tab and navigate to the Account section.
Turn off the Multi-Location switch.
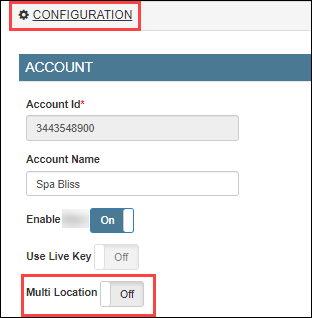
5. Navigate to the Sync section Click Save.
6. While setting up the POSAccounting mapping, you must select No for multi- locations.
Important
Under the Locations tab, ensure that the Active switch is turned on for the required center (for center level) or centers (if you are at the organization level).
This is to let Zenoti know that data has to be synced for the selected centers.
You’ve completed the configuration.
Next step
Manual sync for accounting integration
After you’ve completed mapping, you can start syncing the data from Zenoti to the accounting platform.
Navigate to the Integrations page.
At the organization level:
Click the Configuration icon.
Go to the Integrations tab.
At the center level:
Click the Configuration icon.
Go to the Integrations tab.
Select Accounting.
Expand the Manul Sync tab.
Sync items
Click the respective Get button to sync the following items from the accounting platform to Zenoti:
Locations: Locations in the accounting platform is synced with locations in Zenoti.
Note
If you’ve not enabled the Multi-Location switch, you can skip this step.
Accounts: Chart of accounts in the accounting platform is synced for the -------- mapping in Zenoti.
Payment Methods: Payment methods in the accounting platform is synced with payment types in Zenoti.
Note
This is required only for QuickBooks(Online and Desktop).
Customers: Customer details in the accounting platform is synced with configured customer details in Zenoti.
Taxes: Tax codes in the accounting platform is synced with tax groups in Zenoti.
Note
If you are posting tax as a separate item, you can skip this step.
Products: Inventory item codes in the accounting platform are synced with items mapped as Inventory item type in Zenoti.
When you are syncing products for the first time, select the Sync Type as All Products.

After the first sync, if you update any products in the accounting platform, select the Products Modified On or After option and the select date to sync the changes.

Services: Service codes in the accounting platform is synced with items mapped as Service item type in Zenoti.
When you are syncing services for the first time, select the Sync Type as All Services.

After the first sync, if you update any services in the accounting platform, select the Services Modified On or After option and the select date to sync the changes.

Non-Inventory Items: Non-Inventory item codes in the accounting platform is synced with items mapped as Non-Inventory Item type in Zenoti.
Other charge Items: Other charges in the accounting platform is synced with items mapped as Other Charge item type in Zenoti.
Bundle Items: Bundle items in the accounting platform is synced with items mapped as Bundle Items in Zenoti.
You can verify the sync, by using the Items report for the respective accounting platform. You can navigate to this report from Reports > Accounting Platform.
Sync transactions
Click the respective Get or Post buttons for the following transactions, to sync data from the accounting platform to Zenoti or vice-versa:
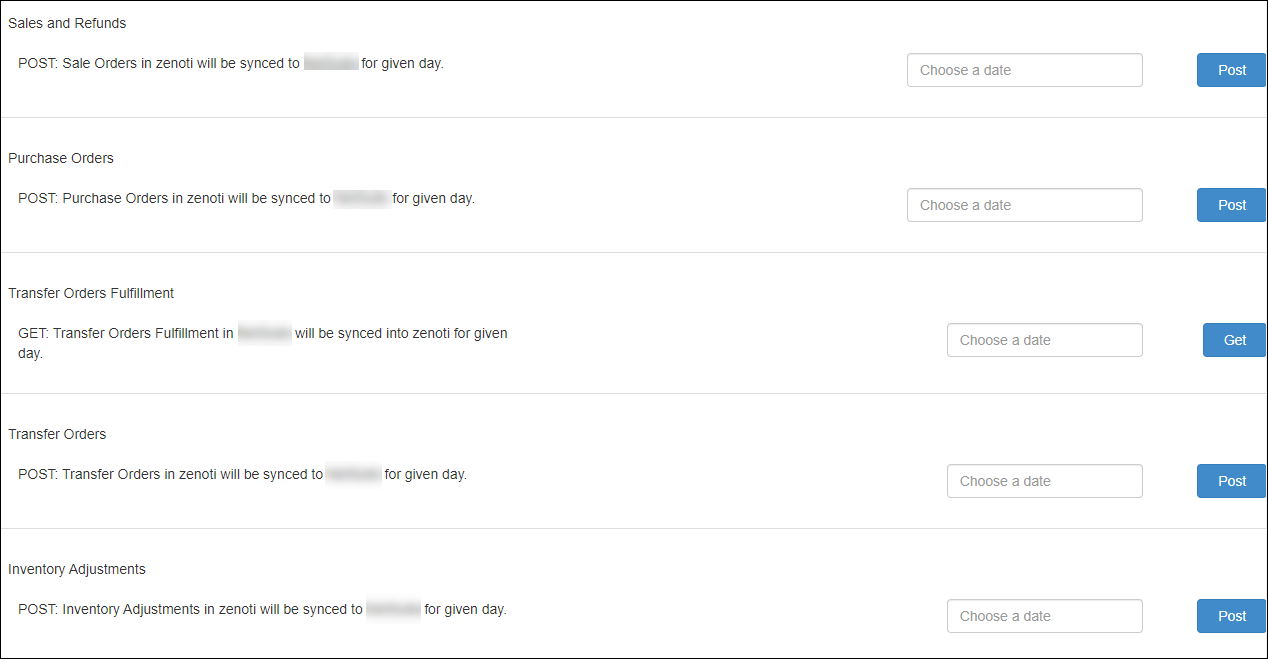
Sales and Refunds: Post the sales invoices generated in Zenoti to the accounting platform.
Purchase Orders: Post the purchase orders created in Zenoti to the accounting platform.
Note
You must specify the date for which you want to post the sale invoices or purchase orders to the accounting platform.
For NetSuite, you can see three more transactions that you can sync:
Transfer Orders: Post the transfer orders created in Zenoti to the accounting platform.
Inventory Adjustments: Post the inventory adjustments made in Zenoti to the accounting platform.
Transfer Orders Fulfillment: Get the delivered transfer orders in the accounting platform to Zenoti.
Note
You must specify the date for which you want to post the transfer orders and inventory adjustments to the accounting platform. For transfer orders fulfillment, specify the date for which you want to get the transfer orders fulfillment from the accounting platform.
Next step
The last step is to reconcile data that you’ve synced from Zenoti to the accounting platform using the following Zenoti Reports:
Items
Customers
Sales Orders Summary
Inventory Orders
Sale Order Summary Details
Note
Zenoti has separate reports for each accounting platform: Xero Reports, QuickBooks Reports, and NetSuite Reports.
Post cross-center redemptions of loyalty points as journal entries
Disclaimer
This enhancement is done only for businesses where the value-based model is enabled.
Generally, businesses with multiple centers allow guests to redeem loyalty points across centers. For cross-center settlement, they need the amount to appear as payable for the center where the points are accrued, and as receivable for the center where the points are redeemed.
Moreover, a business can choose to post the value of the points for cross-center redemption.
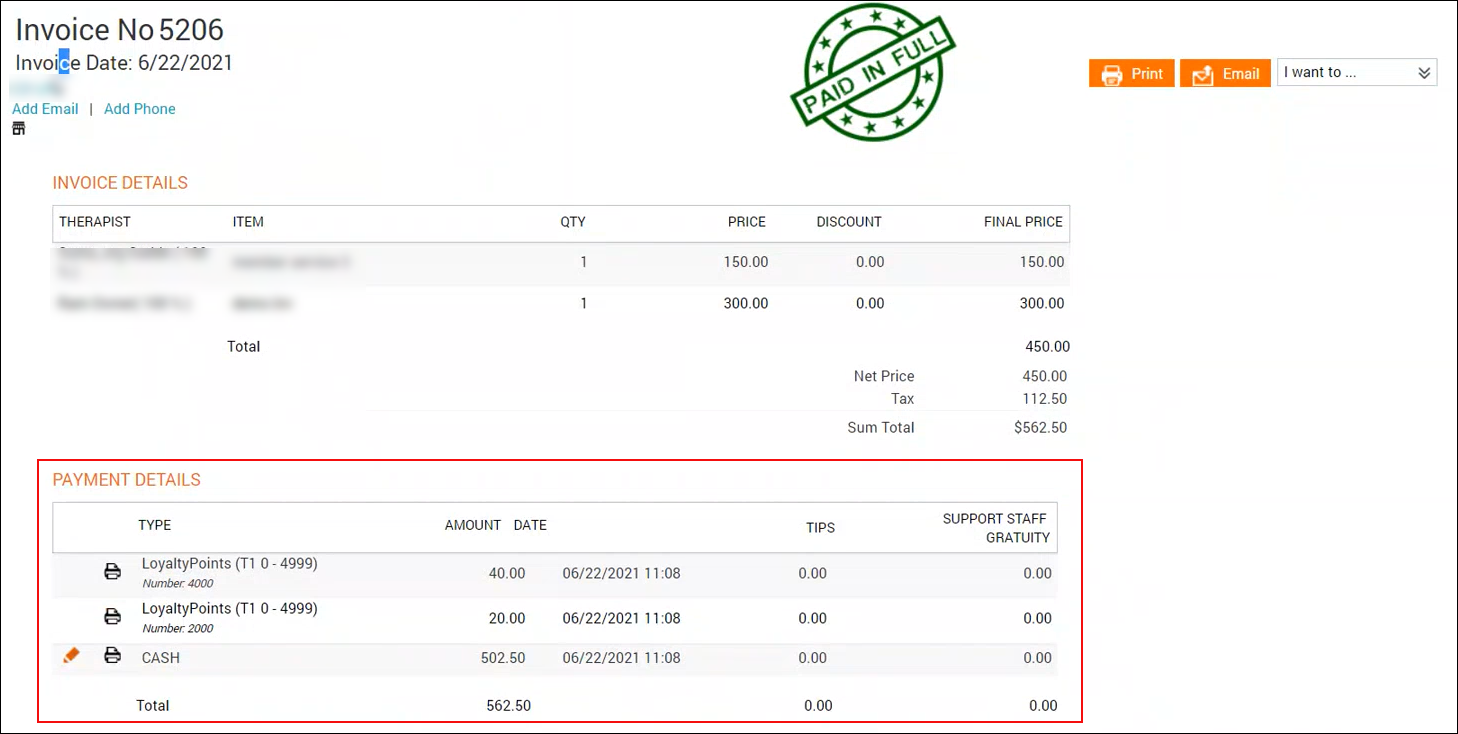
Example
A guest buys a package from the Los Angeles center for $500 and earns loyalty points worth $100. The guest took a service worth $100 in the California center and paid using loyalty points.
Based on the value model, when Zenoti syncs this redemption to the accounting platform, the value of the service $100 is posted as payable to the Los Angeles center and as receivable to the California center.
To configure posting of loyalty points redemption based on value
At the organization level, click the Configurations icon.
Click the Integrations tab and expand Accounting.
Expand the Configuration tab and navigate to the Invoice section.
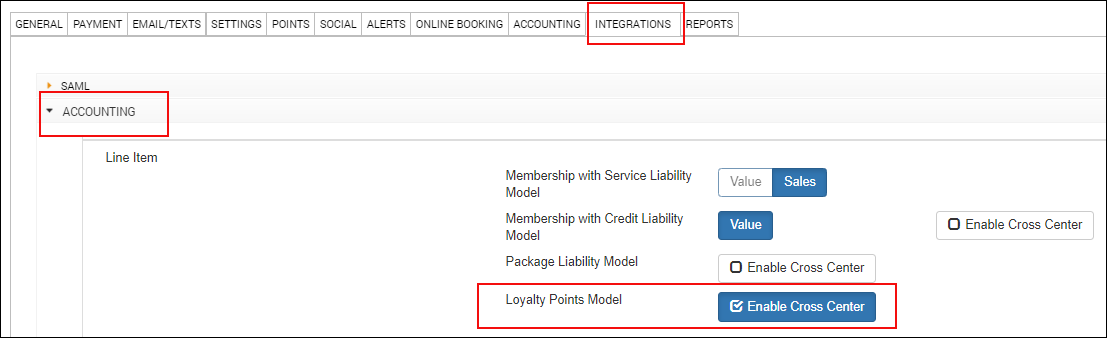
For Loyalty Points Model, select the Enable Cross Center check box.
The following fields appear.
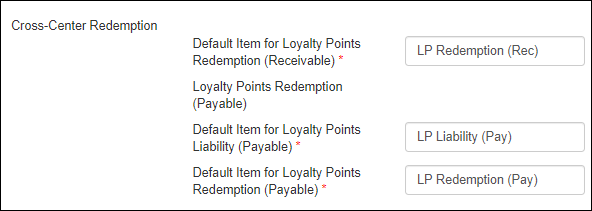
Default Item for Loyalty Points Redemption (Receivable): Enter the item to be used to post the redemption as receivable for the center where the points are accrued (where there’s no redemption invoice – the redemption invoice is only in the center where the redemption is made).
Note
You can post this as an item or as a payment type.
Default Item for Loyalty Points (Payable)
Default Item for Loyalty Points Redemption (Payable): Enter the item to be used to post the redemption as payable for the center where the points are redeemed (where there’s no redemption invoice – the redemption invoice is only in the center where the redemption is made).
Note
You can post this as only an item.
Under the Sync section, click Save.
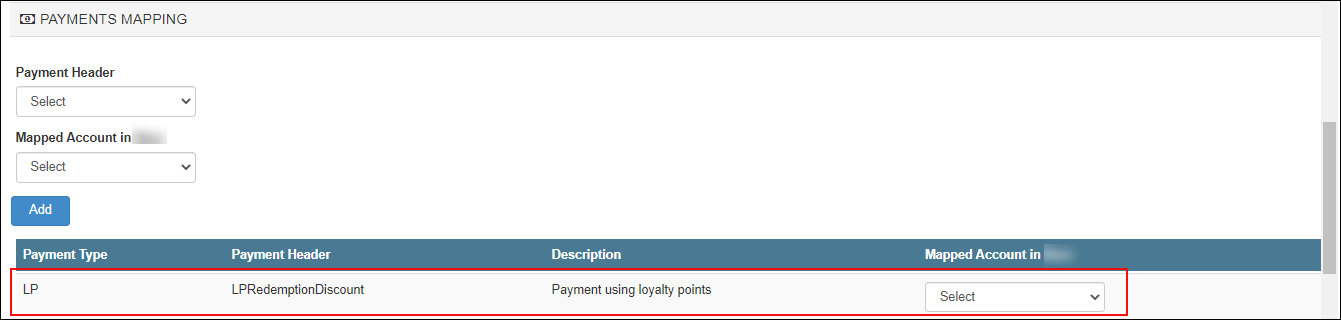
You can post the receivable amount as either an item or as payment. However, you can post the payable amount as only journal entries.
To post redemption amount as journal entries, expand the Payments Mapping tab and add and map the chart of accounts for receivable and payable.
To post redemptions as invoices, expand the Item Type Mapping tab and add and map the chart of accounts for receivable.
Click Save.
The integration is configured to post cross-center redemptions for loyalty points based on value.
Sample transaction
Reports
Admin Sync – Sale Order Summaries report
You can verify the posting of cross-center redemptions for loyalty points in this report.


Cross Center Redemptions report

Configure Xero accounting with location details
Important
Ensure that you’ve created locations (tracking categories) in Xero.
To create tracking categories in Xero
Login to your Xero account.
Click your company name.
For example, Spa Bliss.
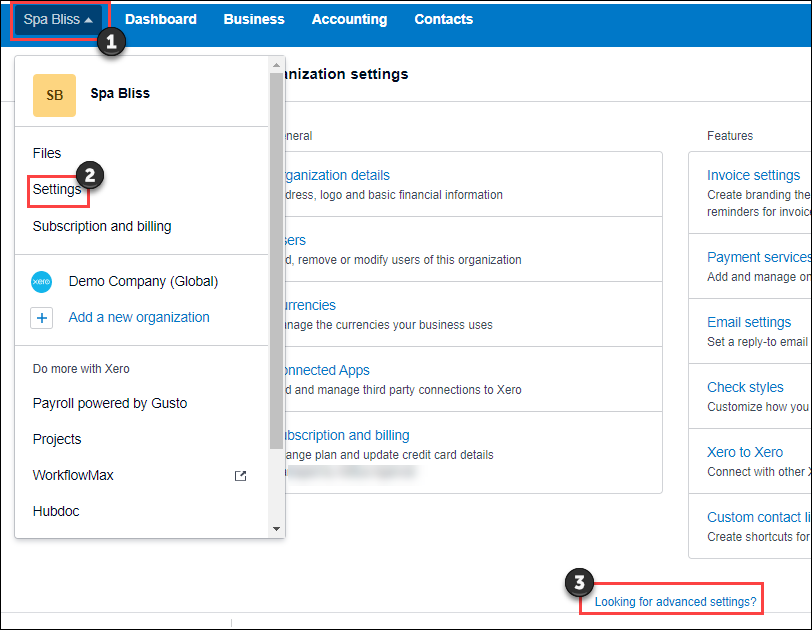
Click Settings and then click Looking for advanced settings?
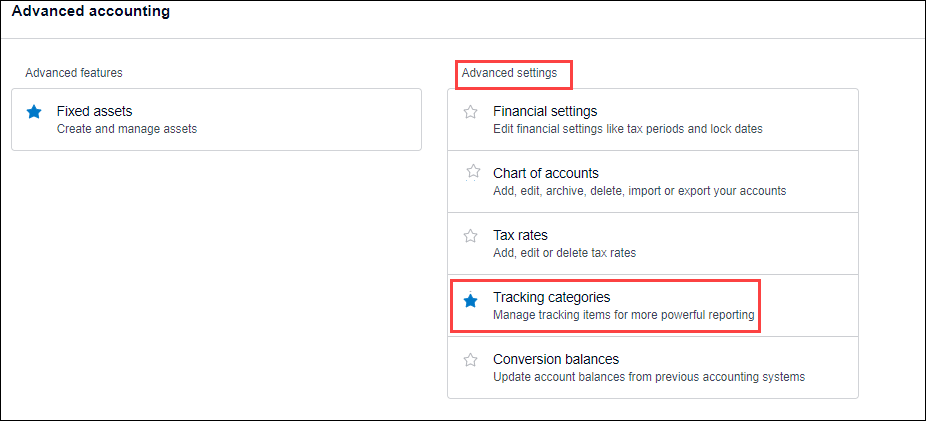
Click Tracking categories.
Click Add Tracking Category.
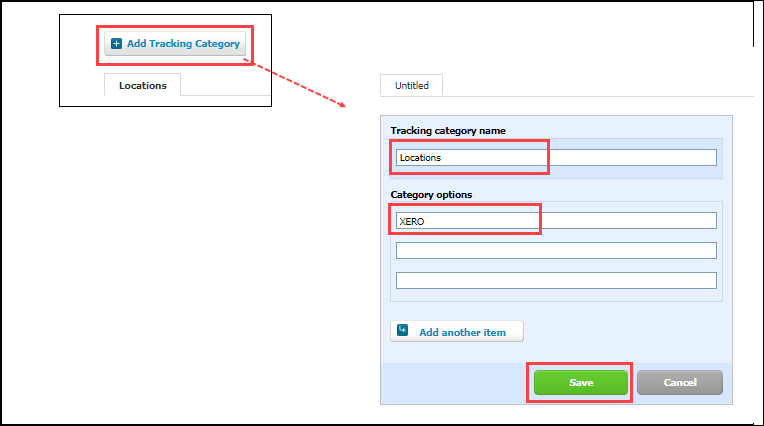
In the Tracking category name box, enter Locations.
In the Category options box, enter the center names.
Keep this information handy to map the category options as location names in Zenoti.
Click Save.
The tracking category is created.
To configure Xero with location details in Zenoti
Navigate to the Integrations page.
Organization level:
Click the Configurations icon.
Click Integrations.
Center level:
Click the Configurations icon.
Click Integrations.
Select Accounting.
Expand the Configuration tab and navigate to the Account section.
Turn on the Multi-Location switch.
Navigate to the Sync section and click Save.
Expand the Locations tab.
In the Mapped Location box, enter the category option that you’ve entered in Xero (step 8 of location creation in Xero).

Click Save.
Expand the Manual Sync tab.
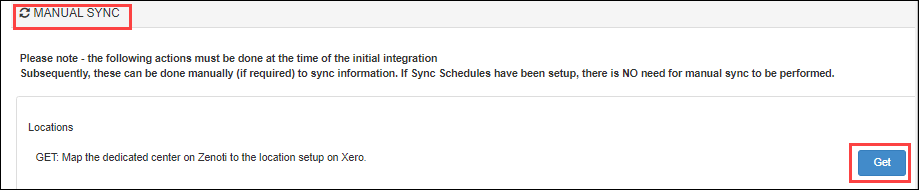
Click Get to sync the locations.
Expand the Locations tab.
Verify that the POSAccounting Location is updated and the Active switch is enabled.
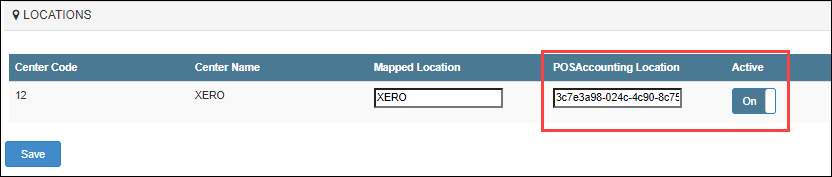
You’ve completed locations mapping for Xero.
Keep POSAccounting Location handy as you will need this while adding locations in POSAccounting.
To add locations in POSAccounting
Note
Ensure that you’ve completed mapping in the ----POSAccounting---- application.
Expand the POSAccounting Mapping tab.
Click Setup Customer Account.
The POSAccounting page opens.
Navigate to Add Location.
Select Yes for multiple locations.
Enter the POSAccounting Location (Step 11 while configuring locations in Zenoti) as the Location id in POSAccounting.

Enter the category option (in Xero) as Location Account in POSAccounting.
Next step
Configure cross-center redemptions for accounting integration
In Zenoti businesses are allowed to redeem liabilities at any center - irrespective of where the liabilities are purchased.
Using cross-center redemptions, businesses can reconcile the amount that a center should collect or pay to other centers as a result of the redemption of liabilities: packages, prepaid cards, and gift cards.
Example: A guest purchased a $200 gift card from the Los Angeles center and redeems it on a service worth $100 at the San Antonio center, then the Los Angeles center needs to pay $100 to the San Antonio center.
Receivables (Amount to collect): The total amount a center should collect from other centers.
Example: A guest purchased a $500 gift card from the San Antonio center and redeemed it on a service worth $200 at the Los Angeles center, then the Los Angeles center needs to collect $200 from the San Antonio center.
Payables (Amount to pay): The total amount a center should pay to other centers.
Configure Cross-Center Redemption for Packages
You can configure to post redemptions as an item or as a payment.
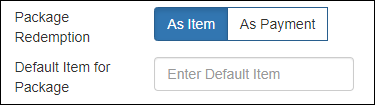
As Item
Select this option to post redemption based on the benefit actual price.
Example: If a liability (package or membership) was sold at $100 (with one benefit of $150), the redemption value that gets posted is $150.
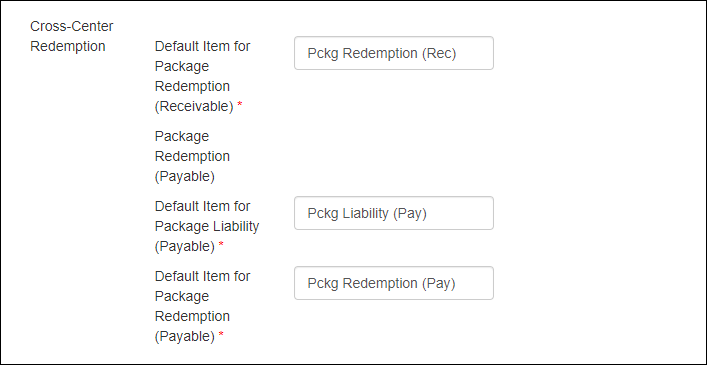
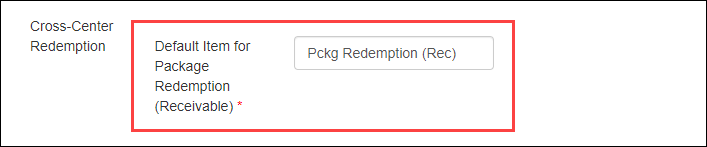
Configuration for Receivables
Enter the default item name for redemptions through packages that are sold at other centers and redeemed at this center.
Configuration for Payables
Enter the default item names for redemptions through packages that are sold at this center and redeemed at other centers.
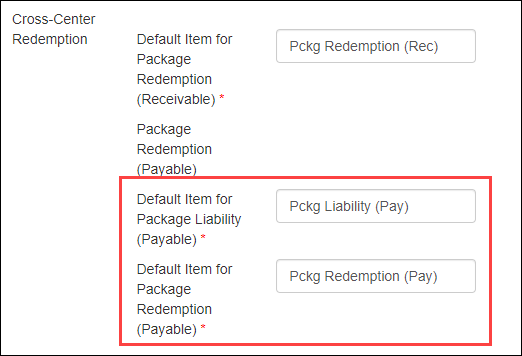
Default item for Package Liability (Payable): Configure this to post a debit entry to the package liability account.
Default item for Package Redemption (Payable): Configure this to post a credit entry to the payables account.
As Payment
Select this option to post redemption based on the liability price.
Example: If a liability (package or membership) was sold at $100 (with one benefit of $150), the redemption value that gets posted is $100 and the redemption discount that gets posted is $50.

Configuration for Receivables
Map the payment type to the payment account or payment method for redemptions through packages that are sold at other centers and redeemed at this center.
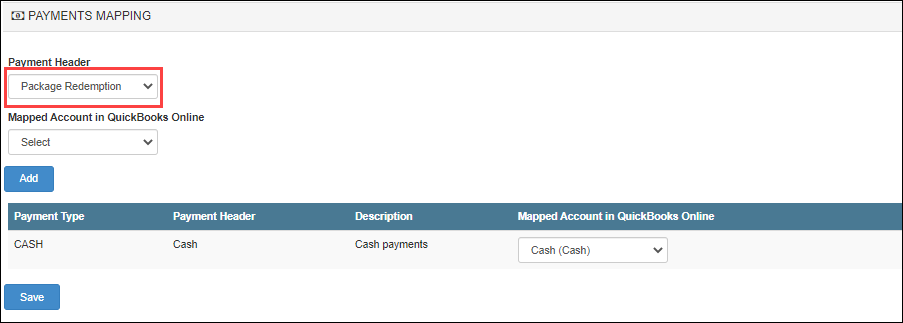
To configure this, expand the Payments Mapping tab.
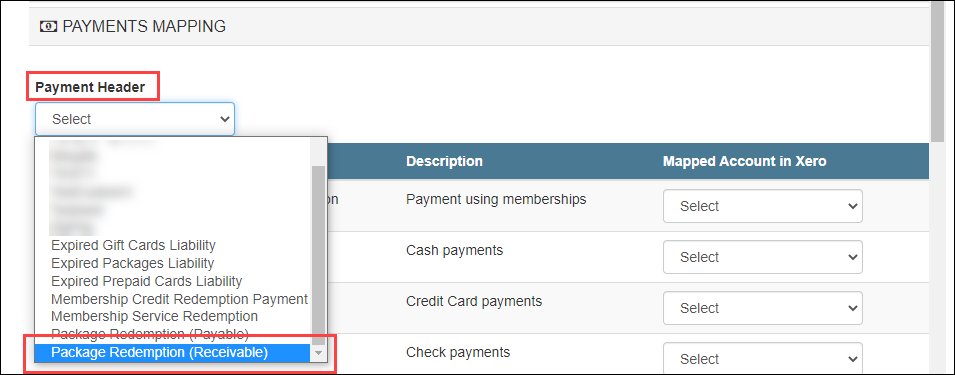
From the Payment Header drop-down, select Package Redemption (Receivable).
From the Mapped Account drop-down, select the corresponding payment account or payment method.
Click Add.
Configuration for Payables
Enter the default item names for redemptions through packages that are sold at this center and redeemed at other centers.
Default item for Package Liability (Payable): Configure this to post the redemption as a debit entry to the package liability account.
Default item for Package Redemption Discount (Payable): Configure this to post the redemption discount as a credit entry to the liability account.
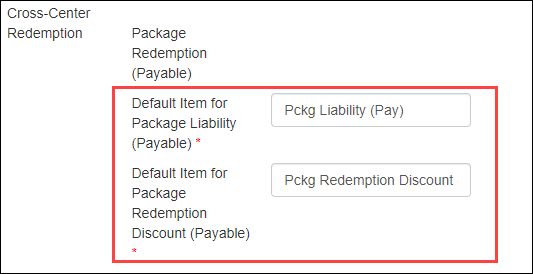
Default item for Package Redemption (Payable): Configure this to post the redemption as a credit entry to the payable account.
To configure this, expand the Payments Mapping tab.
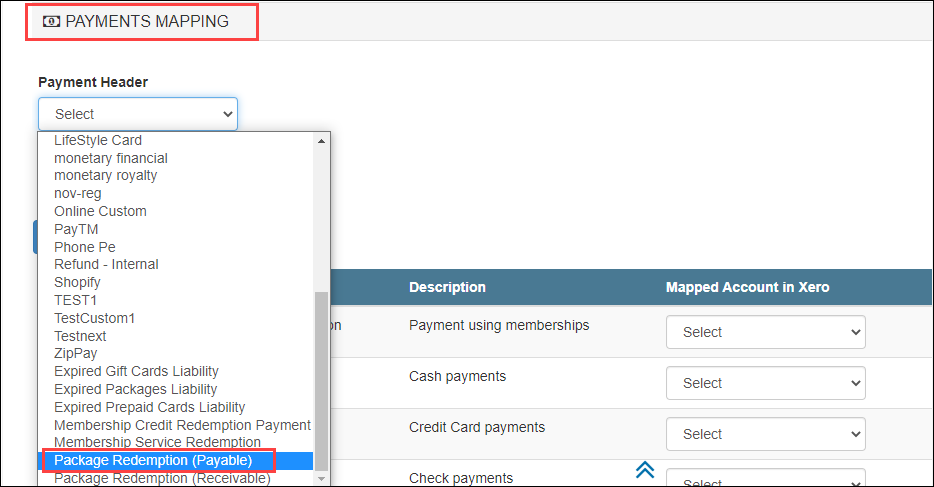
From the Payment Header drop-down, select Package Redemption (Payable).
From the Mapped Account drop-down, select the corresponding payment account or payment method.
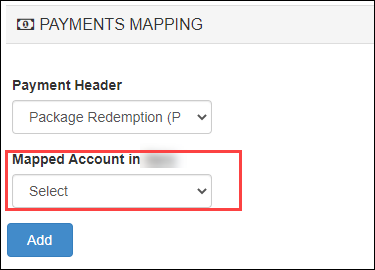
Click Add.
Configure accounting integration by invoice
Based on the sync type you’ve selected; you can choose how to present your data from Zenoti to the accounting platform.
If you are not on the integration page, based on where you want to set up the integration, click the Configuration icon > Integrations tab.
Select Accounting.
Expand the Configuration tab and navigate to the Invoice section.
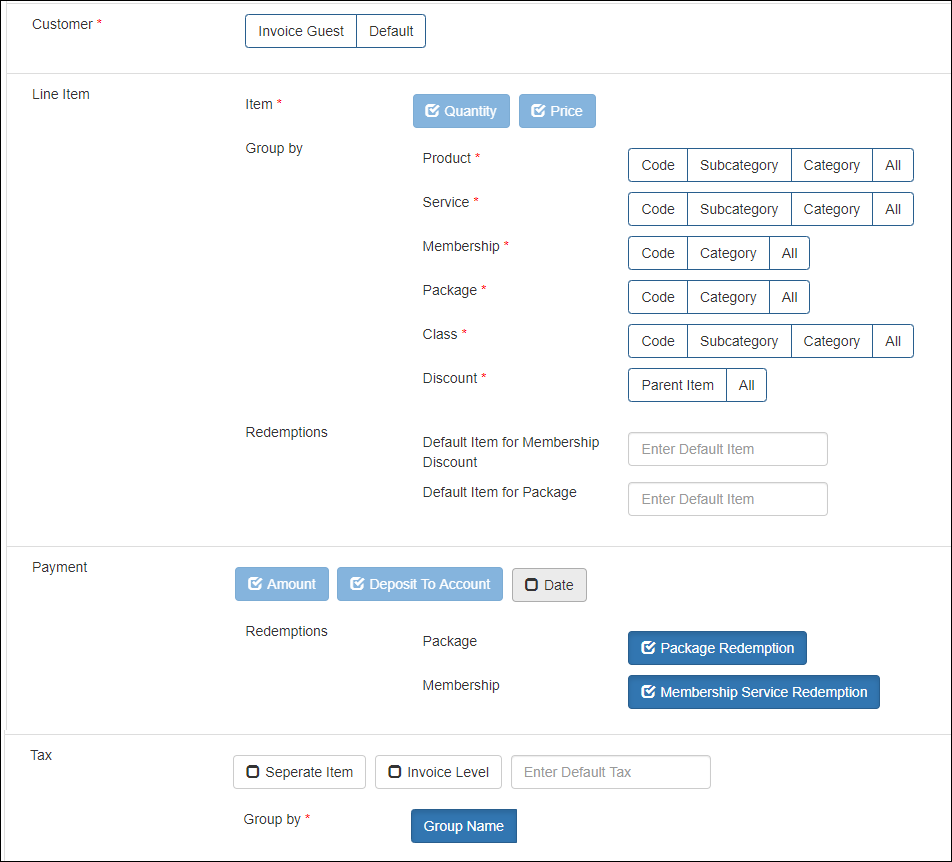
Customer: The name of the guest that you want to post for each invoice.
Select any one of the following options:
Invoice Guest: Select this option if you want to sync the guest name on the Zenoti invoice to the accounting platform.
Note
This is applicable only for the Invoice-Wise sync type.

Default: Select this option to post a default guest name for all invoices. Then, enter the default guest name in the box.

Line Item: In this section, you can configure how you want to post items to your accounting platform.
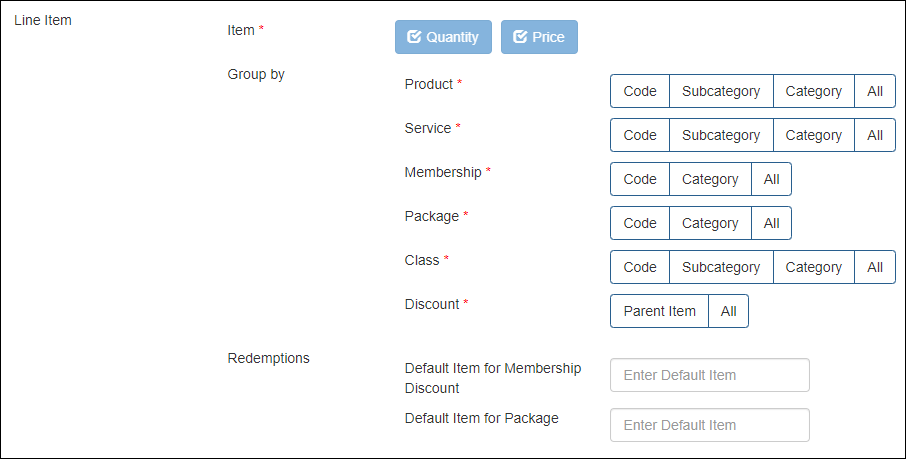
Item: Zenoti posts each item with Quantity and Price. These options are selected by default.
You can Group each item as follows:
Product
Code
Select this option to map each product in Zenoti to the respective item in the accounting platform
Important
Before you select this option, you must ensure that each product in Zenoti has a corresponding item with the same code in the accounting platform.
Subcategory
Select this option to map each product subcategory in Zenoti to the respective item in the accounting platform.
Important
Before you select this option, you must ensure that each product subcategory and subcategory code in Zenoti has a corresponding item with the same code in the accounting platform.
Category
Select this option to map each product category in Zenoti to the respective item in the accounting platform.
Important
Before you select this option, you must ensure that each product category and category code in Zenoti has a corresponding item with the same code in the accounting platform.
Default Item
Select this option to map all the products to the single item with item code as Product in the accounting platform.
Service
Code
Select this option to map each service in Zenoti to the respective item in the accounting platform.
Important
Before you select this option, you must ensure that each service in Zenoti has a corresponding item with the same code in the accounting platform.
Subcategory
Select this option to map each service subcategory in Zenoti to the respective item in the accounting platform.
Important
Before you select this option, you must ensure that each service subcategory and subcategory code in Zenoti has a corresponding item with the same code in the accounting platform.
Category
Select this option to map each service category in Zenoti to the respective item in the accounting platform.
Important
Before you select this option, you must ensure that each service category and category code in Zenoti has a corresponding item with the same code in the accounting platform.
Default Item
Select this option to sync all the services to the single item with item code as Service in the accounting platform.
Membership
Code
Select this option to map each membership in Zenoti to the respective item in the accounting platform.
Important
Before you select this option, you must ensure that each membership in Zenoti has a corresponding item with the same code in the accounting platform.
Category
Select this option to map each membership category in Zenoti to the respective item in the accounting platform.
Important
Before you select this option, you must ensure the following:
The Membership Category is Mandatory setting is enabled at the organization level.
Each membership has a category assigned in Zenoti.
Each membership category and category code in Zenoti has a corresponding item with the same code in the accounting platform.
Default Item
Select this option to map all memberships to the single item with item code as Membership in the accounting platform.
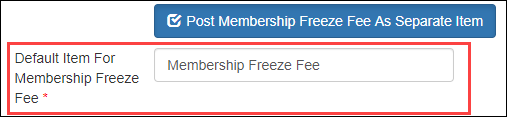
Post Membership Freeze Fee As Separate Item
Select this option to map membership freeze fee to a single item in the accounting platform. You can enter this item code (that you’ve in the accounting platform) in the Default Item For Membership Freeze Fee box.
Package
Code
Select this option to map each package in Zenoti to the respective item in the accounting platform.
Important
Before you select this option, you must ensure that each package in Zenoti has a corresponding item with the same code in the accounting platform.
Category
Select this option to map each package category in Zenoti to the respective item in the accounting platform.
Important
Before you select this option, you must ensure the following:
The Package Category is Mandatory setting is enabled at the organization level.
Each package has a category assigned in Zenoti.
Each package category and category code in Zenoti has a corresponding item with the same code in the accounting platform.
Default Item
Select this option to map all packages to the single item with item code as Package in the accounting platform.
Gift Cards
Zenoti maps all the gift cards to a single item GiftCard with the item code as in the accounting platform.
Prepaid Cards
Zenoti maps all the prepaid cards to a single item PrepaidCard with the item code as in the accounting platform.
Class
Note
You will see this section only if Classes/Fitness is enabled for your business.
Code
Select this option to map each class in Zenoti to the respective item in the accounting platform.
Important
: Before you select this option, you must ensure that each class in Zenoti has a corresponding item with the same code in the accounting platform.
Subcategory
Select this option to map each class subcategory in Zenoti to the respective item in the accounting platform.
Important
: Before you select this option, you must ensure that each class subcategory and subcategory code in Zenoti has a corresponding item with the same code in the accounting platform.
Category
Select this option to map each class category in Zenoti to the respective item in the accounting platform.
Important
: Before you select this option, you must ensure that each class category and category code in Zenoti has a corresponding item with the same code in the accounting platform.
Default Item
Select this option to map all the classes to the single item with item code as Class in the accounting platform.
Discount
Discounts in Zenoti are of three types:
Campaign-based discounts
Membership discounts
Package discounts
Parent Item
Select this option to map each discount type in Zenoti to the respective item in the accounting platform.
In Zenoti, a discount can be one of the following types:
Campaign-based discounts - Map each campaign code to an item in the accounting platform.
Membership discounts - These discounts get posted against the membership item that you’ve configured in the Line Item section for memberships.
Package discounts - These discounts get posted against the membership item that you’ve configured in the Line Item section for packages.
Manual discounts - Map all manual discounts to a single item Manual Discount in the accounting platform.
Price adjustments - Map all price adjusted amounts to a single item Price Adjustment in the accounting platform.
Important
Before you select this option, you must ensure that each discount type and its code in Zenoti has a corresponding item with the same code in the accounting platform.
For example, if there’s a campaign-based discount in Zenoti Thanksgiving Offer 10% with campaign code as TH10OFF, the item in the accounting platform must have the code as TH10OFF.
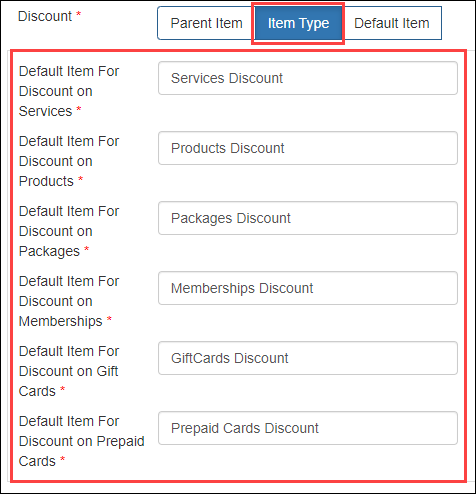
Item Type: Select this option to map discounts applied to an item type in Zenoti to the respective discount item in the accounting platform. You can enter the code of this discount item in the respective default item discount box for each item type.
For example, if you want to account all the service discounts under one item, let’s say Service Discount in the accounting platform with code as SD, enter SD in the Default Item for Discount on Services box.
Note
This configuration INCLUDES package redemption discounts and membership redemption discounts under the respective item type on which these redemptions are applied. For example, if a package is redeemed on a service, the redemption discount will be accounted under services discount.
- Default Item: Select this option to map all the discount types to a single item in the accounting platform. You can enter this item code (that you’ve in the accounting platform) in the Discount box.
Note
This configuration DOES NOT include package redemption discounts and membership redemption discounts - you need to configure these discounts separately.
Redemption
You can post the value of a redemption in any one of the following ways:
Based on the benefit actual price
If a liability (package or membership) was sold at $100 (with one benefit of $150), the redemption value that gets posted is $150.
To configure this for packagesDo not select the Package Redemption checkbox.

Enter the default item name for the package redemption.

To configure this for memberships (with service benefits)Do not select the Membership Service Redemption checkbox.

Enter the default item name for the membership redemption.

Based on the liability price
If a liability (package or membership) was sold at $100 (with one benefit of $150), the redemption value that gets posted is $100 and the redemption discount that gets posted is $50.
To configure this for packagesSelect the Package Redemption checkbox.

Enter the default item name for the package redemption discount.
Configure the package redemption as a payment in the Payment Mapping tab.
To configure this for memberships (with service benefits)Select the Membership Service Redemption checkbox.

Enter the default item name for the membership redemption.
Configure the membership service redemption as a payment in the Payment Mapping tab.
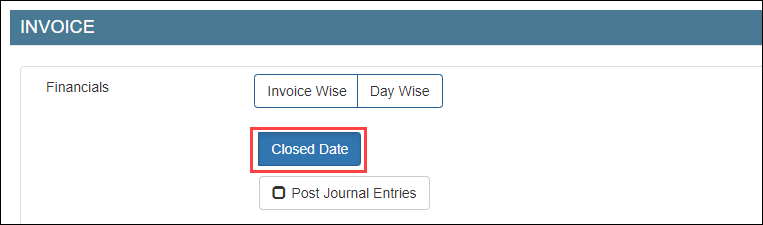
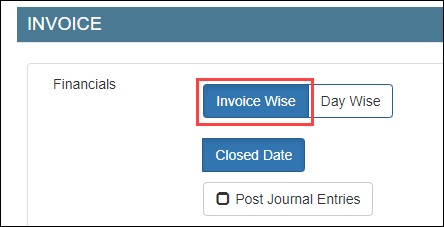
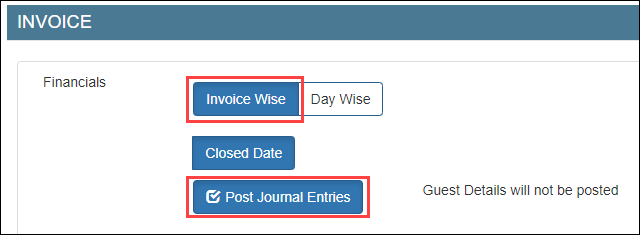
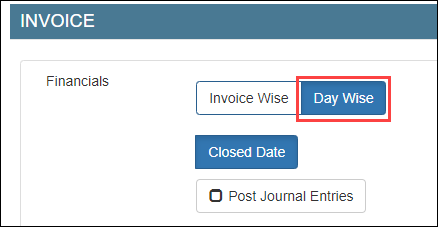
Financials
Accrual Accounting: Sales are posted based on the invoice sale date.
Cash Accounting: Sales are posted on the date payment is collected.
Departments: Post departments to track revenues, expenses, and operational performance at a departmental level. This is only applicable for NetSuite and Sage Intacct.
Classes: Post classes to analyze profitability and performance across product lines, services, or customer segments. This is only applicable for NetSuite and Sage Intacct.
Payment
To configure payments, ensure that each payment type in Zenoti has a corresponding payment type in the accounting platform.
Amount: The payment transaction amount. This option is selected by default.
Deposit to Account: The chart of account to which the payment is mapped in the accounting platform. This option is selected by default.
Date: By default the payments are posted based on the closed date. However, to post payments based on the payment date, select the Date checkbox.
Note
If you’ve selected QuickBooks Desktop as the accounting platform, you will not see the Date checkbox.
Credit Card
Card Logo: Post payments individually for each card logo.
Default Card Type: Post a single entry for the total credit card payment.
Tax
You can post taxes in four different ways:
Item-level: By default, the tax amount is posted for each item in the accounting platform.
Important
Ensure that each tax group in Zenoti has a corresponding tax with the same code in the accounting platform.

Tax as a separate item (as tax group): The total tax amount is posted by the tax group name.
Important
Ensure that each tax group in Zenoti has a corresponding item with the same code in the accounting platform.

Tax as a separate item (as tax component): The tax amount is posted by the individual tax components (by names).
Important
Ensure that each tax group component in Zenoti has a corresponding item with the same name in the accounting platform.

Invoice Level: The total tax amount for an invoice is posted in the accounting platform.
Important
Ensure that each tax group in Zenoti has a corresponding tax with the same code in the accounting platform.
Irrespective of whether you post taxes based on item-level, as a separate item, or based on invoice level, you must enter the default tax group name in the Enter Default Tax box.

Automated Sales Tax: For Quickbooks US, select Tax from the drop-down list and then select Automated Sales Tax. Enter None in Automated sales tax ID. For other QBO versions, do not select anything.
Expenses: Select this option to post retail cost of goods to the accounting platform.
Important
You can use this option only if your business tracks inventory in Zenoti.
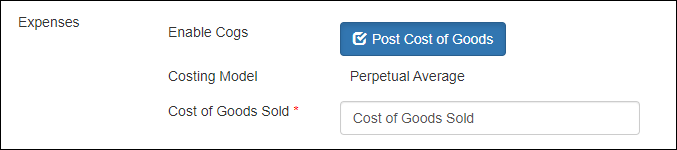
By default, Cost of Goods Sold is the name of the default item for cost of goods of retail products sold in Zenoti, which you must map to the corresponding chart of accounts in the POSAccounting Mapping form.
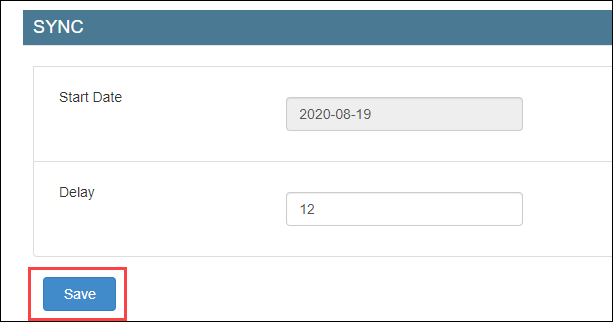
Navigate to the Sync section under the Configuration tab.
Start Date: Select the date from when you want to start posting your data to the accounting platform.
Delay: Specify the gap between each data posting.
Important
After you’ve set these two fields, reach out to Zenoti Support to enable auto-sync.
Click Save.
Impacts and considerations
You must enable multi-location functionality to post invoices in NetSuite. When setting up location mapping, select only locations. Do not include departments or classes in the mapping.
When multi-location functionality is enabled, payments posted to NetSuite also carry the location information from the Zenoti center. This uses the same location mapping configuration that is used for invoices and journal entries. No additional location setup is required for payments — if your locations are already mapped, payments automatically include the correct location. This allows you to reconcile bank deposits per location with the corresponding payments posted to NetSuite.
Next step
Configure accounting integration by journal entries
Based on the sync type you’ve selected, you must do two things:
Configure how you want to present data from Zenoti.
Map the data in Zenoti to the respective chart of accounts in POSAccounting mapping.
Access Integrations tab.
Organization level:
Click the Configurations icon.
Go to the Integrations tab.
Center level:
Click the Configurations icon.
Go to the Integrations tab.
Select Accounting.
Expand the Configuration tab and navigate to the Invoice section.
Customer: The name of the guest. This is not required for journal entries.
Line Item: In this section, you can configure how you want to post items to your accounting platform.
Item: Zenoti posts each item with Price. This option is selected by default.
You can Group each item as follows:
Product
Code
Select this option to map each product in Zenoti to the respective chart of accounts in the accounting platform.
Important
You must map each product code to the corresponding chart of accounts in the POSAccounting Mapping form.
Subcategory
Select this option to map each product subcategory in Zenoti to the respective chart of accounts in the accounting platform.
Important
You must map each product subcategory code to the corresponding chart of accounts in the POSAccounting Mapping form.
Category
Select this option to map each product category in Zenoti to the respective chart of accounts in the accounting platform.
Important
You must map each product category code to the corresponding chart of accounts in the POSAccounting Mapping form.
Default Item
Select this option to map all products to a single item Product, which you can use to map to the corresponding chart of account in the accounting platform.
Service
Code
Select this option to map each service in Zenoti to the respective chart of accounts in the accounting platform.
Important
You must map each service code to the corresponding chart of accounts in the POSAccounting Mapping form.
Subcategory
Select this option to map each service subcategory in Zenoti to the respective chart of accounts in the accounting platform.
Important
You must map each service subcategory code to the corresponding chart of accounts in the POSAccounting Mapping form.
Category
Select this option to map each service category in Zenoti to the respective chart of accounts in the accounting platform.
Important
You must map each service category code to the corresponding chart of accounts in the POSAccounting Mapping form.
Default Item
Select this option to map all services to a single item Service, which you can use to map to the corresponding chart of account in the accounting platform.
Membership
Code
Select this option to map each membership in Zenoti to the respective chart of accounts in the accounting platform.
Important
You must map each membership code to the corresponding chart of accounts in the POSAccounting Mapping form.
Category
Select this option to map each membership category in Zenoti to the respective chart of accounts in the accounting platform.
Important
Before you select this option, you must ensure the following:
The Membership Category is Mandatory setting is enabled at the organization level.
Each membership has a category assigned in Zenoti.
Map each membership category code to the corresponding chart of accounts in the POSAccounting Mapping form.
Default Item
Select this option to map all memberships to a single item Membership, which you can use to map to the corresponding chart of account in the accounting platform.
Post Membership Freeze Fee As Separate Item
Select this option to map membership freeze fee to the chart of accounts for freeze fee in the accounting platform. By default, Membership Freeze Fee is the name of the default item for membership freeze fee in Zenoti, which you must map to the corresponding chart of accounts in the POSAccounting Mapping form.
Package
Code
Select this option to map each package in Zenoti to the respective chart of accounts in the accounting platform.
Important
You must map each package code to the corresponding chart of accounts in the POSAccounting Mapping form.
Category
Select this option to map each package category in Zenoti to the respective chart of accounts in the accounting platform.
Important
Before you select this option, you must ensure the following:
The Package Category is Mandatory setting is enabled at the organization level.
Each package has a category assigned in Zenoti.
Map each package category code to the corresponding chart of accounts in the POSAccounting Mapping form.
Default Item
Select this option to map all packages to a single item Package, which you can use to map to the corresponding chart of account in the accounting platform. You can also configure and post day packages as a separate item. If the posting is for JE-wise entries or for the Xero provider, it will automatically default to day packages.
Post Expired Amount
Select this option to map the expired amount from packages in Zenoti to the chart of accounts for package liabilities in the accounting platform. By default, Expired Packages Revenue is the name of the default item for expired amount from packages in Zenoti, which you must map to the corresponding chart of accounts in the POSAccounting Mapping form.
Gift Cards
Zenoti maps all the gift cards to a single item GiftCard, which you can use to map to the corresponding chart of account in the accounting platform.
Post Expired Amount: Select this option to map the expired amount from gift cards in Zenoti to the chart of accounts for gift card liabilities in the accounting platform. By default, Expired Gift Cards Revenue is the name of the default item for expired amount from gift cards in Zenoti, which you must map to the corresponding chart of accounts in the POSAccounting Mapping form.
Prepaid Cards
Zenoti maps all the gift cards to a single item PrepaidCard, which you can use to map to the corresponding chart of account in the accounting platform.
Post Expired Amount: Select this option to map the expired amount from prepaid cards in Zenoti to the chart of accounts for prepaid card liabilities in the accounting platform. By default, Expired Prepaid Cards Revenue is the name of the default item for expired amount from prepaid cards in Zenoti, which you must map to the corresponding chart of accounts in the POSAccounting Mapping form.
Class
Note
You will see this section only if Classes/Fitness is enabled for your business.
Code
Select this option to map each class in Zenoti to the respective chart of accounts in the accounting platform.
Important
You must map each class code to the corresponding chart of accounts in the POSAccounting Mapping form.
Subcategory
Select this option to map each class subcategory in Zenoti to the respective chart of accounts in the accounting platform.
Important
You must map each class subcategory code to the corresponding chart of accounts in the POSAccounting Mapping form.
Category
Select this option to map each class category in Zenoti to the respective chart of accounts in the accounting platform.
Important
You must map each class category code to the corresponding chart of accounts in the POSAccounting Mapping form.
Default Item
Select this option to map all classes to a single item Class, which you can use to map to the corresponding chart of account in the accounting platform.
Discount
Parent Item: Select this option to map each discount type in Zenoti to the respective chart of accounts in the accounting platform.
In Zenoti, a discount can be one of the following types:
Campaign-based discounts - Map each campaign code to the corresponding chart of accounts in the accounting platform.
Membership discounts - These discounts get posted against the membership chart of account that you’ve configured in the Line Item section for memberships.
Package discounts - These discounts get posted against the package chart of account that you’ve configured in the Line Item section for packages.
Manual discounts - Map all manual discounts to the corresponding chart of accounts in the accounting platform.
Price adjustments - Map all price adjusted amounts to the corresponding chart of accounts in the accounting platform.
Important
You must map each discount type to the corresponding chart of accounts in the POSAccounting Mapping form.
For example, if there’s a campaign-based discount in Zenoti Thanksgiving Offer 10% with campaign code as TH10OFF, use TH10OFF in the accounting platform to map the discount to the corresponding chart of account.
Item Type: Select this option to map discounts applied to an item type in Zenoti to the respective chart of accounts in the accounting platform. By default, for each item type in Zenoti a corresponding default item name is created.
Important
You must map the item type discount to the corresponding chart of accounts in the POSAccounting Mapping form.
For example, all discounts applied on services will be accounted under Service Discounts.
Note
This configuration INCLUDES package redemption discounts and membership redemption discounts under the respective item type on which these redemptions are applied. For example, if a package is redeemed on a service, the redemption discount will be accounted under services discount.
Default Item: Select this option to map all the discount types to a single chart of accounts for discounts in the accounting platform. By default, Discount is the name of the default item for discounts in Zenoti, which you must map to the corresponding chart of accounts in the POSAccounting Mapping form.

Note
This configuration DOES NOT include package redemption discounts and membership redemption discounts - you need to configure these discounts separately.
Redemption
You can post the value of a redemption in any one of the following ways:
Based on the benefit actual price
If a liability (package or membership) was sold at $100 (with one benefit of $150), the redemption value that gets posted is $150.
To configure this for packagesDo not select the Package Redemption checkbox.
Enter the default item name for the package redemption.
Use the default name in the accounting platform to map to the corresponding chart of accounts.
To configure this for memberships (with service benefits)Do not select the Membership Service Redemption checkbox.
Enter the default item name for the membership redemption.
Use the default name in the accounting platform to map to the corresponding chart of accounts.
Based on the liability price
If a liability (package or membership) was sold at $100 (with one benefit of $150), the redemption value that gets posted is $100 and the redemption discount that gets posted is $50.
To configure this for packagesSelect the Package Redemption checkbox.
Enter the default item name for the package redemption discount.
Use the default name in the accounting platform to map to the corresponding chart of accounts.
Configure the package redemption as a payment in the Payment Mapping tab.
To configure this for memberships (with service benefits)Select the Membership Service Redemption checkbox.
- Enter the default item name for the membership redemption.
Use the default name in the accounting platform to map to the corresponding chart of accounts.
Configure the membership service redemption as a payment in the Payment Mapping tab.
Payment
To configure payments, ensure that each payment type in Zenoti has a corresponding chart of accounts in the accounting platform.

Amount: The payment transaction amount. This option is selected by default.
Deposit to Account: The chart of account to which the payment is mapped in the accounting platform. This option is selected by default.
Date: By default the payments are posted based on the closed date. However, to post payments based on the payment date, select the Date checkbox.
Note
If you’ve selected QuickBooks Desktop as the accounting platform, you will not see the Date checkbox.
Tax
You can post taxes in four different ways:
Item-level: Not supported for journal entries - you must select either the Separate Item option of the Invoice Level option.
Tax as a separate item (as tax component): The tax amount is posted by the individual tax components (by names).
Important
Ensure that each tax group in Zenoti is mapped to the corresponding chart of accounts in the POSAccounting Mapping form.
Tax as a separate item (as tax group): The total tax amount is posted by the tax group name.
Important
Ensure that each tax group in Zenoti is mapped to the corresponding chart of accounts in the POSAccounting Mapping form.
Invoice Level: The total tax amount for an invoice is posted in the accounting platform.
Important
Ensure that each tax group in Zenoti is mapped to the corresponding chart of accounts in the POSAccounting Mapping form.
Irrespective of whether you post taxes based on item-level, as a separate item, or based on invoice level, you must enter the default tax group name in the Enter Default Tax box.
Expenses: Select this option to post retail cost of goods to the accounting platform.
Important
You can use this option only if your business tracks inventory in Zenoti.
By default, Cost of Goods Sold is the name of the default item for cost of goods of retail products sold in Zenoti, which you must map to the corresponding chart of accounts in the POSAccounting Mapping form.
Navigate to the Sync section under the Configuration tab.
Start Date: Select the date from when you want to start posting your data to the accounting platform.
Delay: Specify the gap between each data posting.
Important
After you’ve set these two fields, reach out to Zenoti Support to enable auto-sync.
Click Save.
Next step
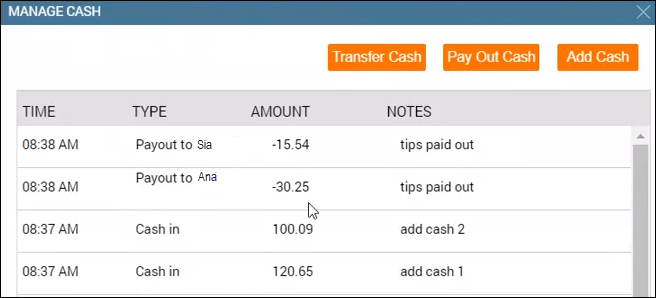
Post bank deposits and cash pay-ins to the accounting platform as journal entries
Generally, businesses use some amount of cash for pay-outs and petty expenses. As these transactions are not tracked, businesses cannot reconcile the cash deposits, cash added to the register, cash pay-outs and petty expenses with their bank statement.
For example, if the center manager of the LA center collected $500 on a day as cash, but deposited only $450 to the bank, the difference of $50 was not tracked anywhere.
Important
For cash-related transactions, a subsidiary is a cash register for a location or center.
Before you begin
On the Configurations page, ensure that the following organization-level settings are enabled for Invoice & Receipt:
Enable multiple cash registers: To post cash deposits, cash pay-outs, cash added, and petty expenses done from each register (subsidiary) as a separate entry. If you enable this setting, you will see the Post by Subsidiary options. However, if you do not enable this setting, all these transactions will be posted from the default register.
Maintain separate product sales: To view the product sales register as a subsidiary in mapping.
To configure posting of cash deposits, cash added, cash pay-outs, petty cash expenses, transfer cash, check deposits as journal entries
At the organization level, click the Configurations icon.
Navigate to Integrations tab.
At the center level, click the Configurations icon.
Navigate to Integrations tab.
Select Accounting.
Expand the Configuration tab.
Navigate to the Invoice section and locate Miscellaneous Journal Entries.
Select the following checkboxes based on requirement:
Post Cash Deposit
You will see the Post by Subsidiary option if you've enabled the Enable multiple cash registers setting at the organization level.
Post Cash Pay-In
You will see the Post by Subsidiary option if you've enabled the Enable multiple cash registers setting at the organization level.
Post Cash Payout
You will see the Post by Subsidiary option if you've enabled the Enable multiple cash registers setting at the organization level.
Post Petty Cash
You can post petty cash as either Petty Cash Expenses based on petty cash categories, or Petty Cash Receipts that is business cash and other receipts.
Post Transfer Cash
You can post transfer cash if you have enabled multiple cash registers at the organization level.
Post Check Deposit
You will see the Post by Subsidiary option if you've enabled the Enable multiple cash registers setting at the organization level.
Note
The payment type as check must be enabled from Organization > Configuration > Payments > Payments setting > Payment Type.
Post Custom Payment Deposit
You will see the Post by Subsidiary option if you've enabled the Enable multiple cash registers setting at the organization level.
Post Card Deposit
You can post cash deposits for both online and offline card payments. Additionally, you have the option to assign card logos to different accounts.
Click Save.
Expand the Miscellaneous Journal Type Mapping section.
For each cash journal entry type, map the following details and click Add:
Journal Type: Select the entry - Cash Deposit, Cash Pay-In, or Cash Payout.
Location: Center for which you want to post the entry.
Subisdiary: Register for each location.
If you've selected the Post by Subsidiary option for the journal entry in the Configuration tab, you can see all the registers that are available for the selected locations.
If you've not selected the Post by Subsidiary option for the journal entry in the Configuration tab, you can see only the default register.
Important
If you've enabled the Maintain separate product sales organization-level setting, you will also see the product sales register as another default register.
Credit Account: Chart of accounts in the accounting platform for credit entry.
Debit Account: Chart of accounts in the accounting platform for debit entry.
Note
If the journal entry has a negative amount, the entries are reversed - the mapped Debit Account is credited and the mapped Credit Account is debited.
To manually sync data, expand the Manual Sync section and locate Miscellaneous Journal Entries.
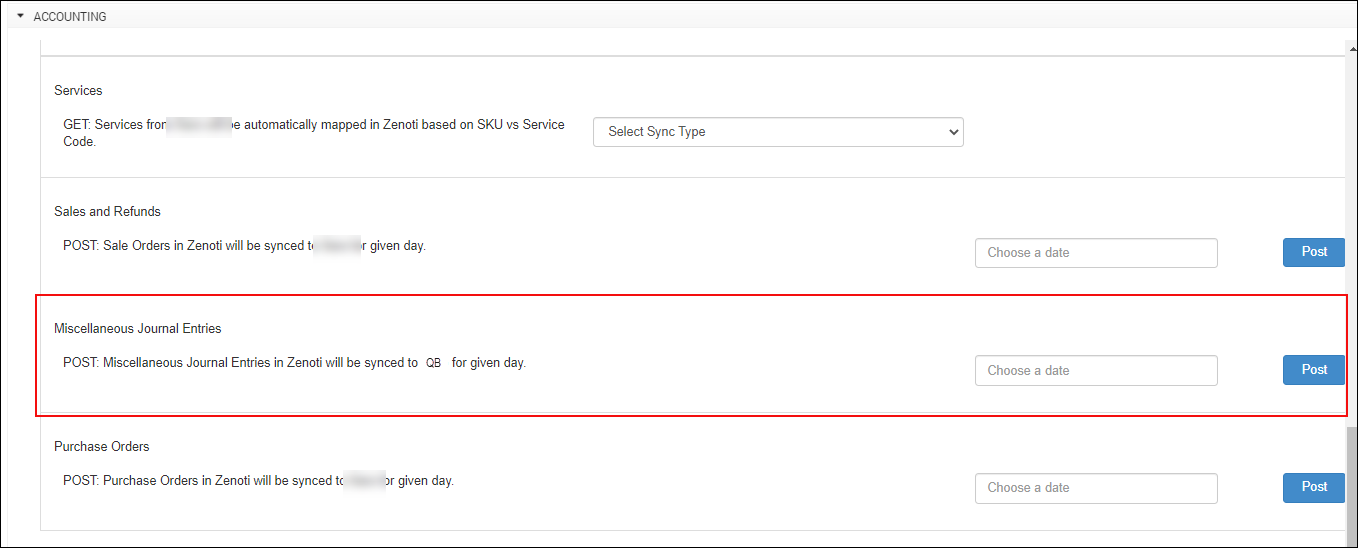
Select the date for which you want to post data.
Click Post.
Note
To add auto-sync schedules, reach out to Zenoti.
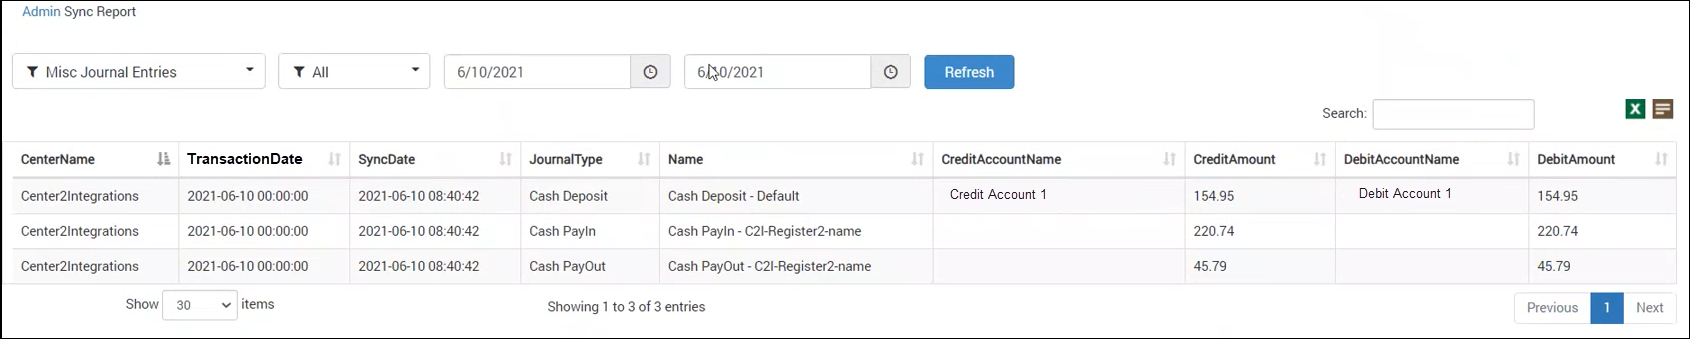
Sample transactions
Admin Sync report - Misc Journal Entries
Admin Sync report - Sale Order Summaries

POSAccounting mapping by invoices for accounting integration
After you’ve completed configuring how data in Zenoti can be pushed to the accounting platform, you are ready to map data in Zenoti to data in the accounting platform.
Zenoti partners with POSAccounting to push data from Zenoti to the accounting platform.
Based on where you want to set up the integration, Click the Configurations icon.
Click Integrations.
Select Accounting.
Expand the POSAccounting Mapping tab.
Click Setup Customer Account.
The POSAccounting window opens.
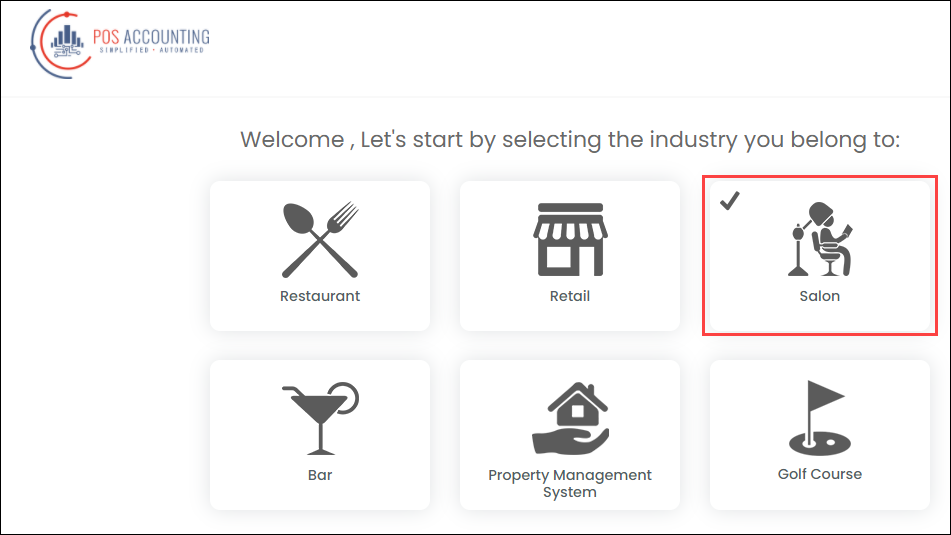
Select the business type as Salon.
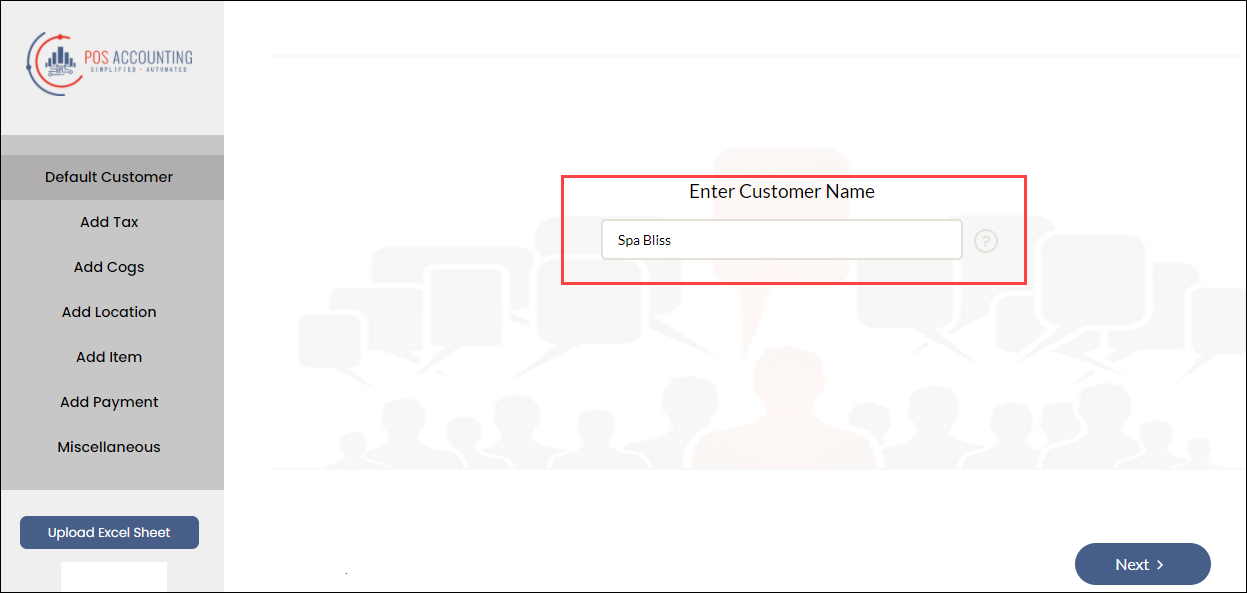
Enter the default customer name and click Next.
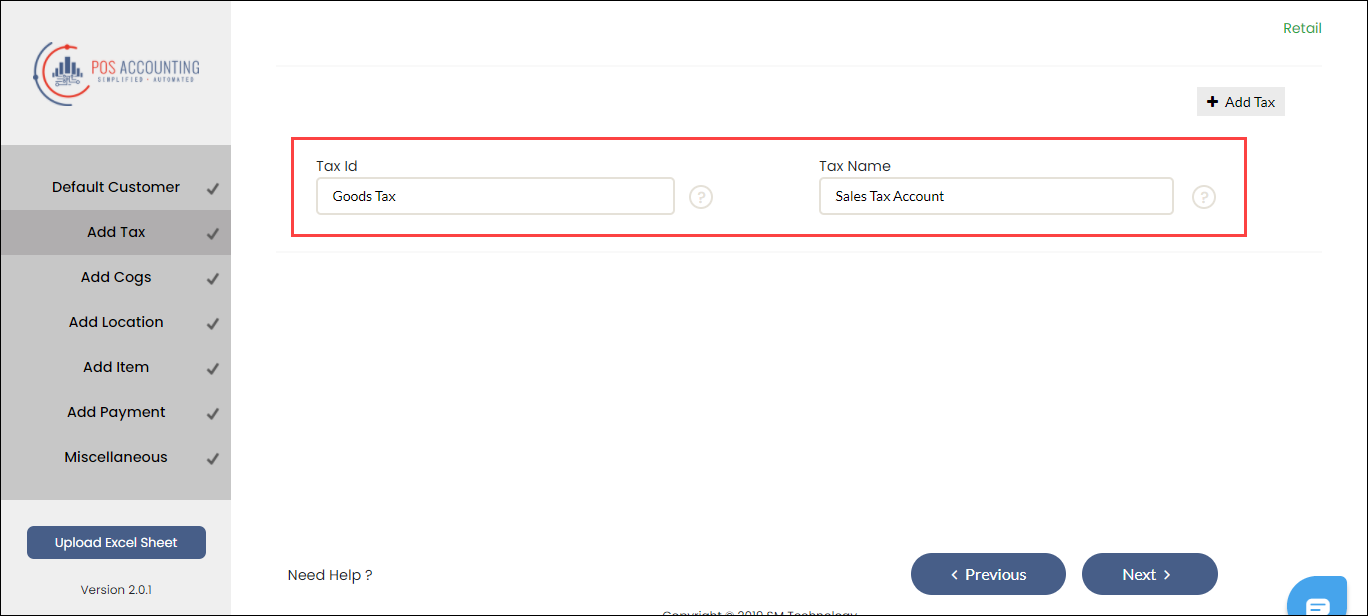
Add the tax details.

If you’ve configured to push tax by group name, enter the tax group code in Tax id and click Next.
However, if you’ve configured to push tax by components, enter the tax component name in Tax id and click Next.
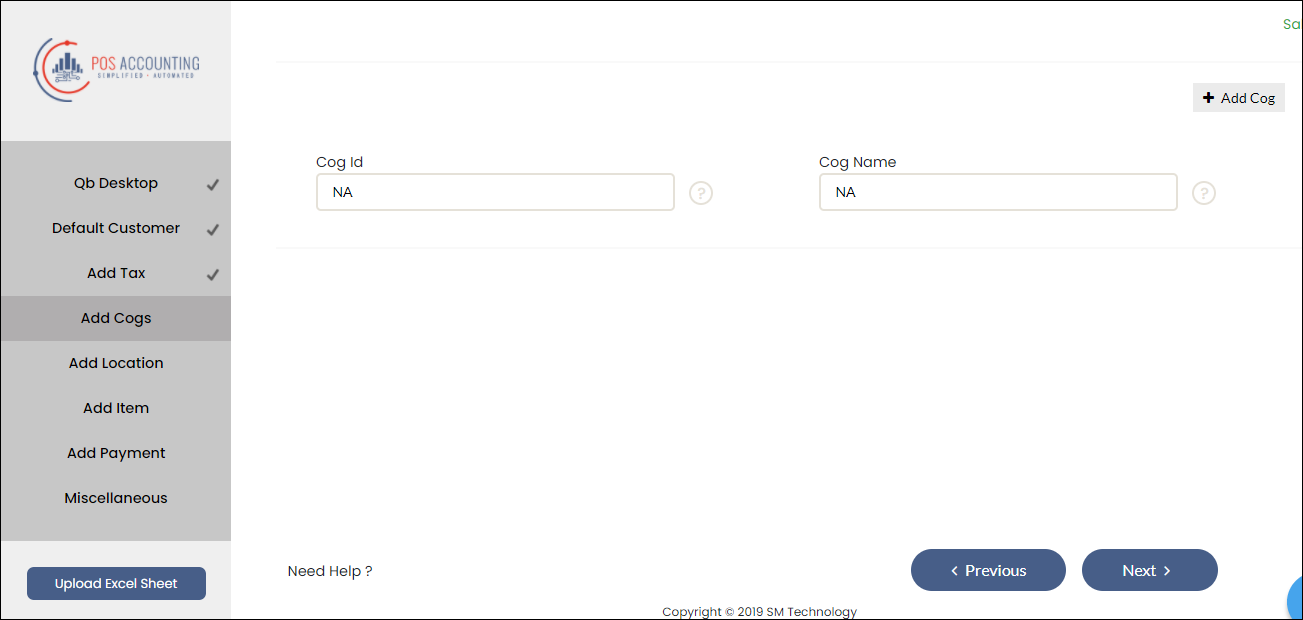
Currently, Zenoti does not post COGS data. You can ignore the Add Cogs section and enter any random values to continue.
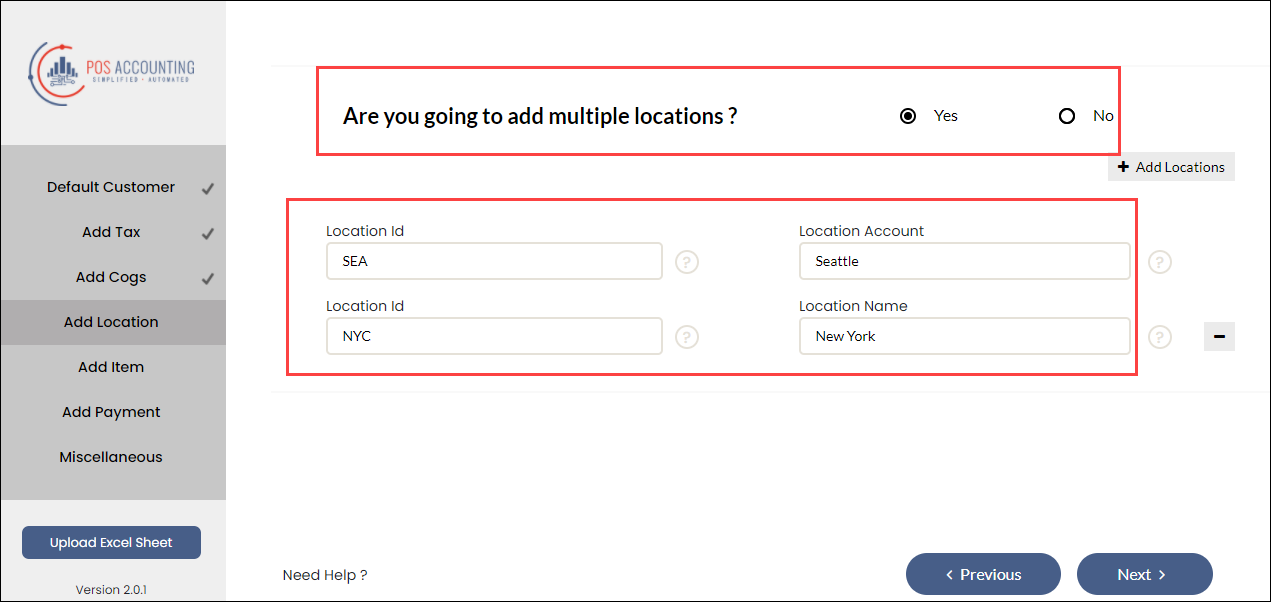
To enable locations for your accounting platform, select locations, and enter the location details.
Read our help article on location mapping for Xero, QuickBooks Online, and QuickBooks Desktop.
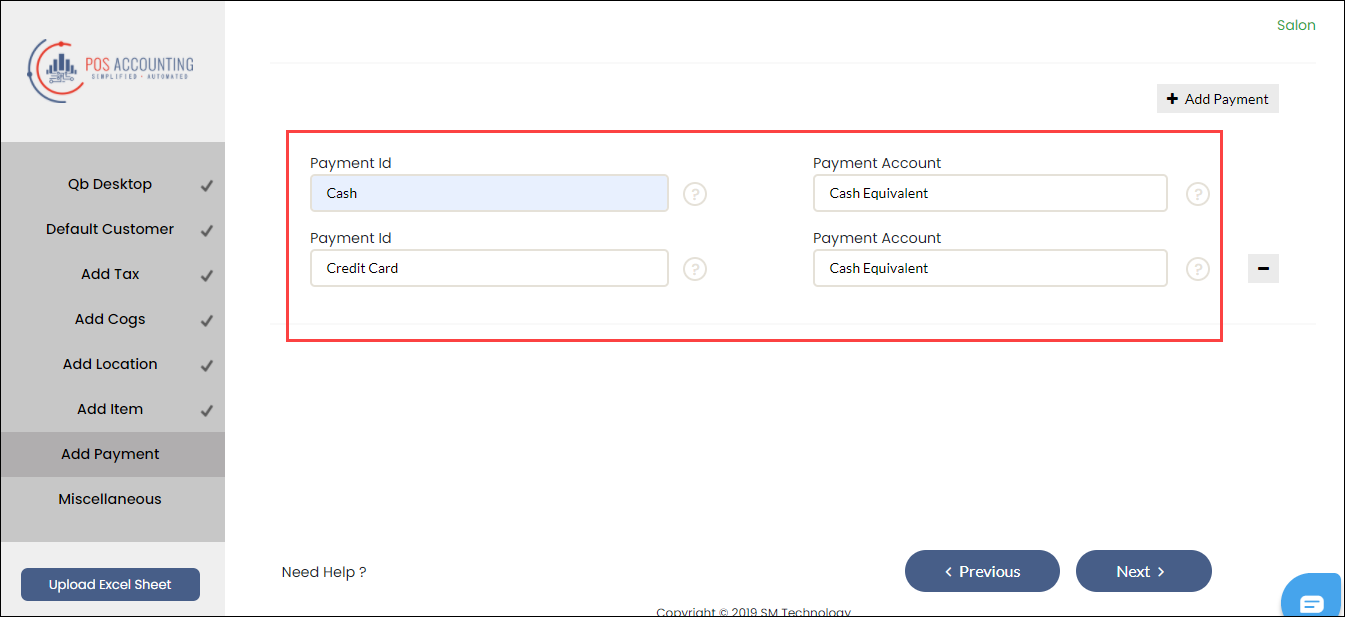
Enter the default sales account for Service and Inventory item types.
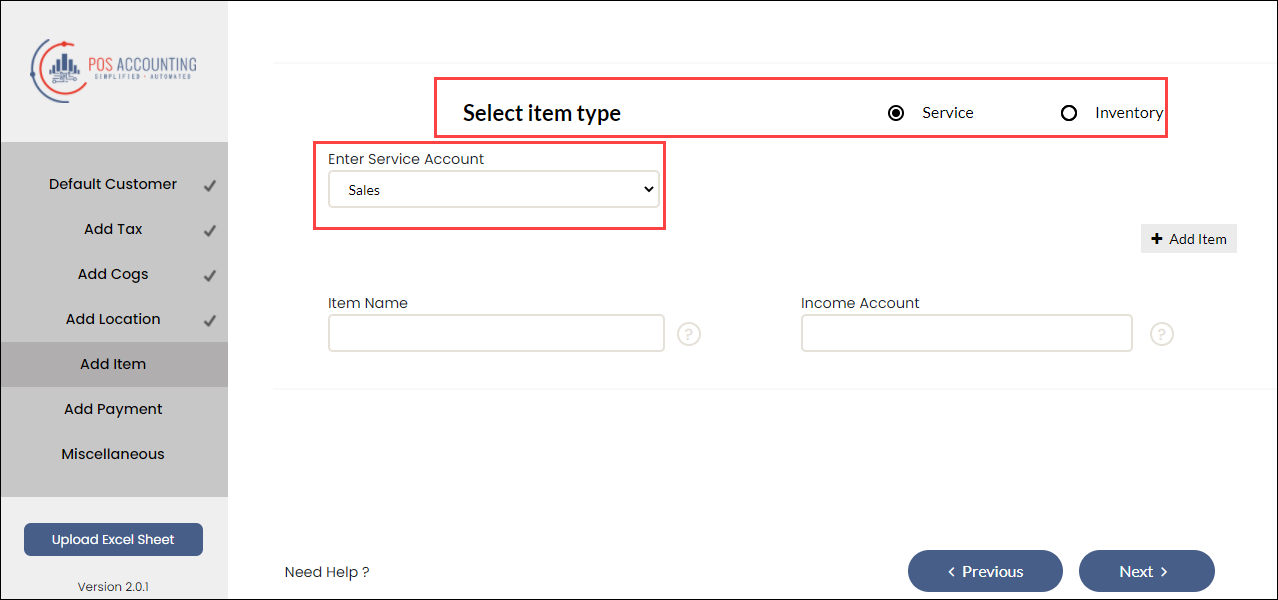
Enter the Zenoti payment type in the Payment Id box and the corresponding payment account (for Xero and NetSuite) or payment method (for Quickbooks Online and Quickbooks Desktop) in the Payment Account box.
If you want to configure refunds, from the Miscellaneous tab, select Yes for refunds.
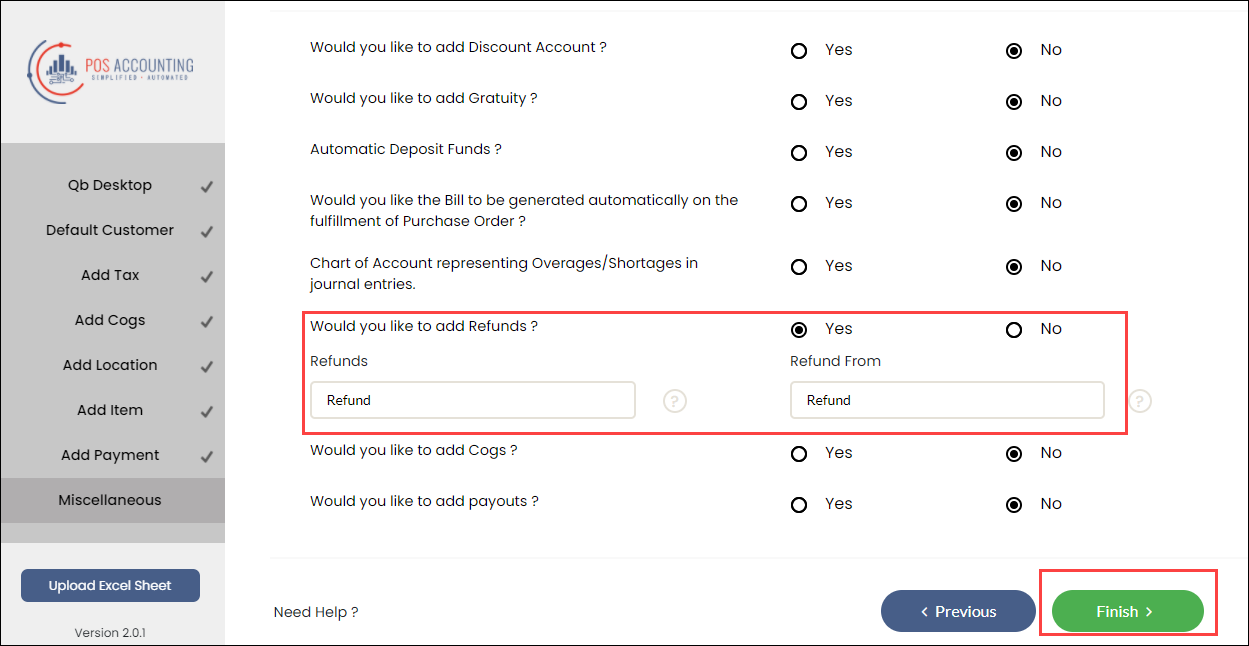
Click Finish.
You’ve mapped data as journal entries.
Next step
POSAccounting mapping by journal entries for accounting integration
After you’ve configured how data in Zenoti is pushed to the accounting platform, you are ready to map data in Zenoti to data in the accounting platform.
Zenoti partners with POSAccounting to push data from Zenoti to the accounting platform.
If you are not on the integration page, based on where you want to set up the integration, click Configuration > Integration.
Select Accounting.
Expand the POSAccounting Mapping tab.
Click Setup Customer Account.
The POSAccounting window opens.
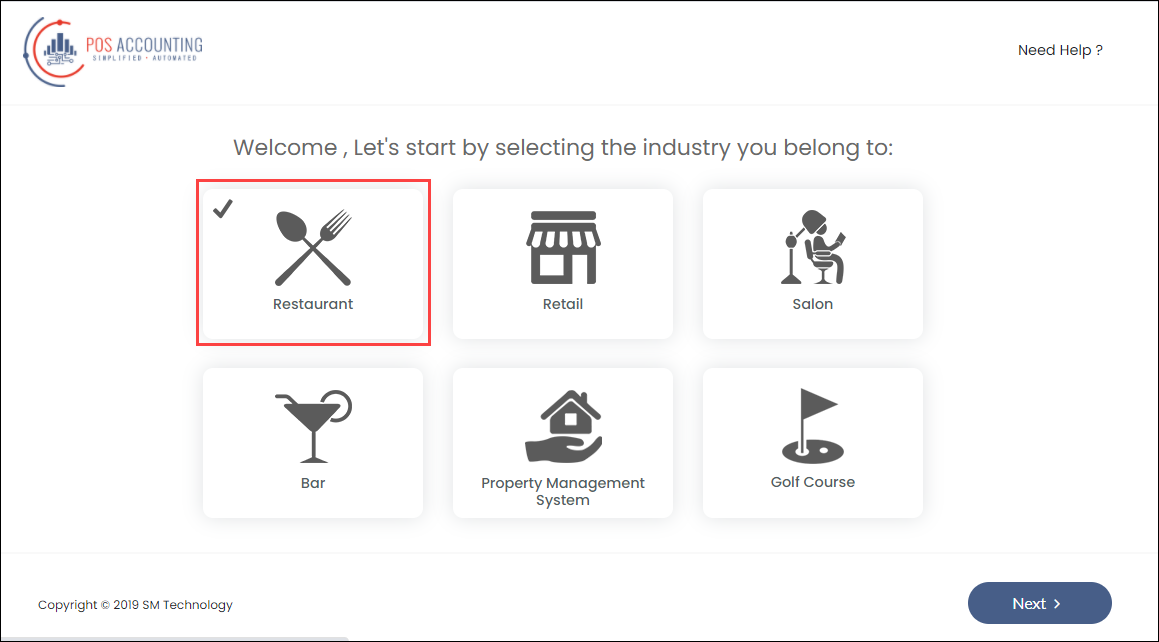
Select the business type as Restaurant.
Enter the default customer name and click Next.
Add the tax details.
There are four ways you can push tax details to the accounting platform:
Tax at item-level: Not supported for journal entries.
Tax at invoice-level: Enter the tax group code (from Zenoti) in Tax id and map each Tax Id to the respective Tax Name (tax account in the accounting platform).
Tax as a separate item (as tax group): You can map tax as a separate item to the respective tax account in the Add Item section (step-7 in this article) within the POSAccounting form.
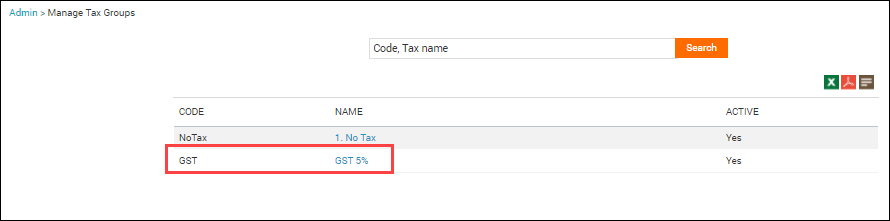
You can get the tax group code in Zenoti from the Business details > Business setup > Financials > Taxes > Tax groups at the organization level.
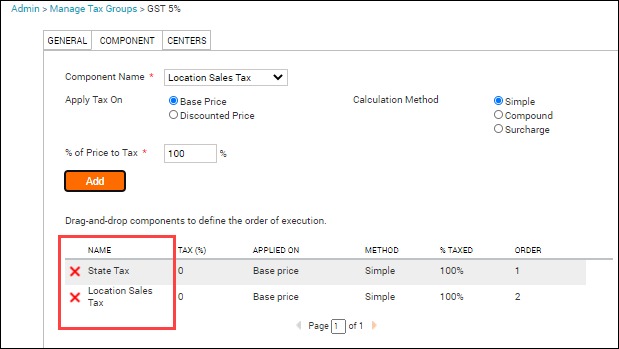
Tax as a separate item (as tax component): You can map tax as a separate item to the respective tax account in the Add Item section (step-7 in this article) within the POSAccounting form.
You can get the tax component name in Zenoti from the Configurations > Set Up > Tax Groups > Manage Tax Groups page at the organization level.
After you choose how you want to push tax details, click Next.
Currently, Zenoti does not post COGS data. You can ignore the Add Cogs section and enter random values to continue.
To enable locations for your accounting platform, click Add Locations, select the desired location, and enter the location detail. Repeat this process for all locations that you want to map.
Read our help article on location mapping.
Enter the default sales account for the Service item type and map each item name (based on the configuration) with the respective account name. For example, if you’ve configured to post products based on category, you must enter the product category code from Zenoti in Item Name and map Item Name to the respective income account in the accounting platform.
Note
Do not select the Inventory item type as Zenoti does not support posting of data to COGS and asset accounts.
Enter the Zenoti payment type in the Payment Id box and the corresponding payment account (for Xero and NetSuite) or payment method (for Quickbooks Online and Quickbooks Desktop) in the Payment Account box.
If you want to configure refunds, from the Miscellaneous tab, select Yes for refunds.
Click Finish.
You’ve mapped data as journal entries.
Next step
Payment Mapping
Post cross-center redemption of gift cards as journal entries to the accounting platform
Notice
This enhancement is for businesses with the sale model or value model.
Generally, businesses with multiple centers allow guests to redeem gift cards across centers. For cross-center settlement, businesses need the amount to appear as payable for the center where the gift card is sold, and as receivable for the center where the gift card is redeemed.
Example: A guest purchased a $100 gift card from the Los Angeles center and redeemed it on a service worth $100 at the San Jose center. Based on the value model, when Zenoti syncs this redemption to the accounting platform, the value of the service $100 is posted as payable to the Los Angeles center and as receivable to the San Jose center.
To configure posting of gift card redemption based on value
At the organization or center level, click the Configuration icon
Click the Integrations tab and expand Accounting.
Expand the Configuration tab and navigate to the Invoice section.
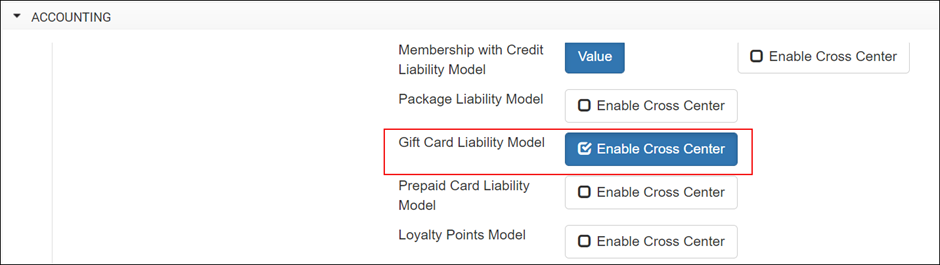
For Gift Card Liability Model, select the Enable Cross Center check box. The following fields appear.
Default Item for Gift Card
Note: If you select posting by Payment Type, you will not see this field for configuration.
Default Item for Gift Card Redemption (Receivable)Note: If you select posting by Payment Type, you will not see this field for configuration.
Default Item for Gift Card Liability (Payable)
Note: If you select posting by Payment Type, you will not see this field for configuration.
Default Item for Gift Card Redemption (Payable)
Under the Sync section, click Save. You can post the receivable amount as either an item or as payment. However, you can post the payable amount as only journal entries.
To post redemption amount as journal entries, expand the Payments Mapping tab and add and map the chart of accounts for receivable and payable.
To post redemptions as invoices, expand the Item Type Mapping tab and add and map the chart of accounts for receivable.
Click Save. The integration is configured to post cross-center redemptions for gift cards based on value.
Payment mapping for accounting integration
After you’ve completed configuring (by invoice) how you want to push data from Zenoti to the accounting platform, you must map each payment type in Zenoti with the corresponding payment account (for Xero and NetSuite) or payment methods (for Quickbooks) in the accounting platform.
For example, if the payment type Cash in Zenoti is configured as the Cash payment account in the accounting platform, you must map these two payment types.
Important
Before you start mapping the payment types, you must sync the accounts in the Manual Sync tab.
At the organization level, click the Configurations icon.
Click the Integrations tab and expand Accounting.
Locate and expand the Payments Mapping tab.
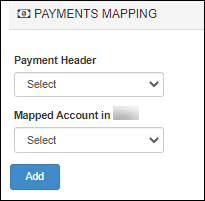
For each payment type in Zenoti, do the following:
From the Payment Header drop-down, select the payment type in Zenoti
From the Mapped Account drop-down, select the corresponding payment account or payment method in the accounting platform.
Click Add.
An entry is added for the payment type.

Click Save.
The payment types are mapped.
Payment method mapping for NetSuite
When you use NetSuite (Codat) as your accounting platform, you can map each Zenoti payment method to a corresponding payment method in NetSuite. This ensures that payments posted to NetSuite carry the correct payment method (for example, Cash, Credit Card, Gift Card, or UPI), allowing you to classify payments accurately without creating separate GL accounts for each payment type.
Note
You do not need to create separate GL accounts in NetSuite for each payment type. Payment method mapping posts payments to the standard Payment Method field in NetSuite.
Before you begin, ensure the following:
The provider is set to Codat_Netsuite.
The Enable Payment Methods toggle is turned on in the Configuration section under Payments.
Your SuiteTalk Authentication credentials (Account ID, Consumer Key/Client ID, Consumer Secret/Client Secret, Token ID, Token Secret) are configured and the connection is verified.
Fetch payment methods from NetSuite
Before you can map payment methods, you must fetch them from NetSuite:
At the organization or center level, click the Configuration icon.
Search for and select Integrations.
Click Integration Settings.
In the SuiteTalk Authentication section, next to Fetch payment methods from NetSuite, click Get.
Wait for the sync to complete. The fetched payment methods are now available for mapping.
Map payment methods
In the same Integration Settings page, expand the Payment Method Mapping section.
You will find a grid listing each Zenoti payment method. For each payment method, from the drop-down, select the corresponding NetSuite payment method.
From the Payments Chart of Account drop-down, select the chart of account to which payments should be posted.
Click Save.
You have successfully mapped payment methods for NetSuite.
Note
If a Zenoti payment method is not mapped to a NetSuite payment method, the system uses the default fallback behaviour. To prevent posting errors for unmapped payment methods, ensure all active payment methods in Zenoti are mapped before enabling the sync.
Next step
Item type mapping for accounting integration
After you’ve completed configuring (by invoice) how you want to push data from Zenoti to the accounting platform, you must map each item type in Zenoti with the corresponding item type in the accounting platform.
For example, if the item type Products in Zenoti is configured as the Inventory item type in the accounting platform, you must map these two item types.
To map item types
Navigate to the Integrations tab either at the center level or at the organization level.
Expand Accounting.
Locate and expand the Item Mapping tab.

For each item type in Zenoti (Item Type), select the corresponding item type (Mapped Item Type) that you’ve defined in the accounting platform.
Item Type
Xero
QBO
QBDT
Services
Yes
Yes
Yes
Inventory
Yes
Yes
Yes
Non-Inventory
-
Yes
Yes
Other Charges
-
-
Yes
Tax
Yes
-
Yes
Click Save.
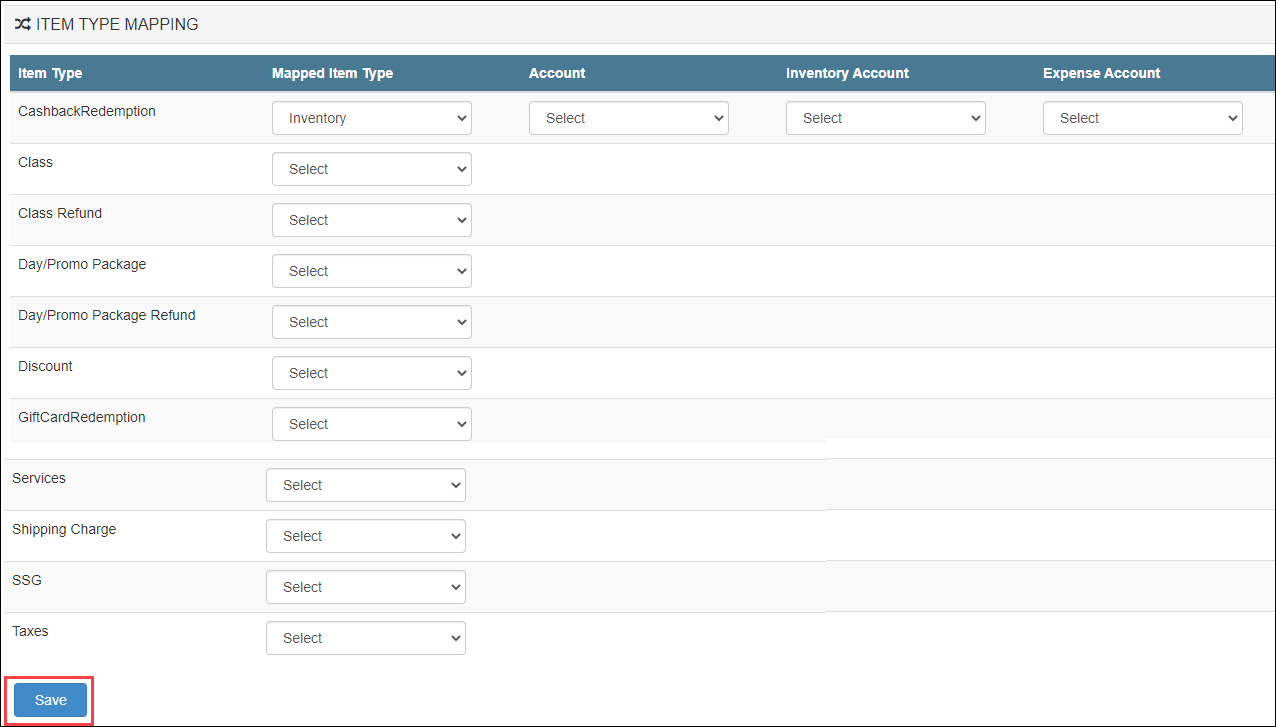
You’ve saved the item type mapping.
To map the chart of accounts
In this tab, for each item type, you can also map the respective chart of accounts in the accounting platform. Before you start mapping the accounts, you must sync the accounts in the Manual Sync tab.
For each item type, select the following chart of accounts:
Account: The sales chart of the account.
Inventory Account: The inventory asset chart of accounts.
Note
You can select this account type only if the item type is Inventory.
Expense Account: The inventory expense chart of accounts.
Note
You can select this account type only if the item type is Inventory.
Click Save.
Next step
Transfer orders for Sage Intacct
Businesses use an accounting platform to sync financial and inventory data. For inventory, they raise an order in the vendor system, and the order details are updated in their accounting platform. You can configure Zenoti to sync the complete transfer order flow (raise, dispatch, and receive a delivery) between Zenoti and Sage Intacct.
Workflow
Ensure that the inventory is synced between Zenoti and Sage Intacct.
Select the Get option for Transfer Orders – Dispatch (Integration > Accounting > Configuration > Inventory) to get the dispatched date and dispatched quantity of the transfer order from Sage Intacct to Zenoti and update them on the Transfer Order page.
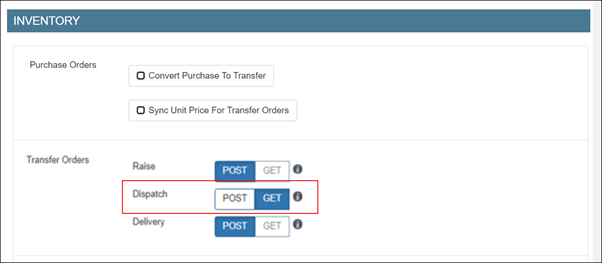
Navigate to Inventory > Procurement > Orders.
The Manage Purchase Orders & Transfers page appears.
From the I want to… drop-down list, select the Add Transfer option.
The Create a Transfer Order page appears.
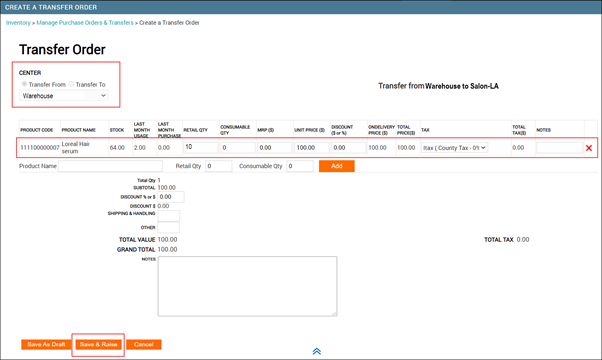
Select one of the following options:
Transfer From to receive products at your center from the selected center. So, your center becomes the destination center.
Transfer To to transfer products from your center to the selected center. So, your center becomes the source center.
Add the products.
Click Save & Raise.
The order is raised in Zenoti.
Important
The raised transfer order is synced to the accounting platform at the end of the day. If you wish to sync the order instantly, do a manual sync.
To sync the order manually, based on where you have to set up the integration, click on the Configurations icon > Integrations tab.
Select Accounting.
Expand the Manual Sync section.
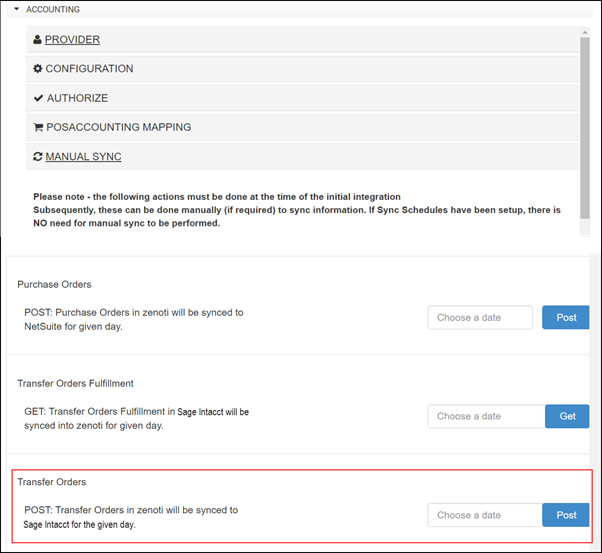
For Transfer Orders, select the raised order date and click Post to post the raised transfer order to Sage.
After you receive the delivery at your center, in Sage Intacct, change the STO Status to Fulfilled and update the Qty Shipped.
Important
This can be done only once for each transfer order as Zenoti can get only one fulfillment status from Sage Intacct, not multiple in case of partial deliveries.
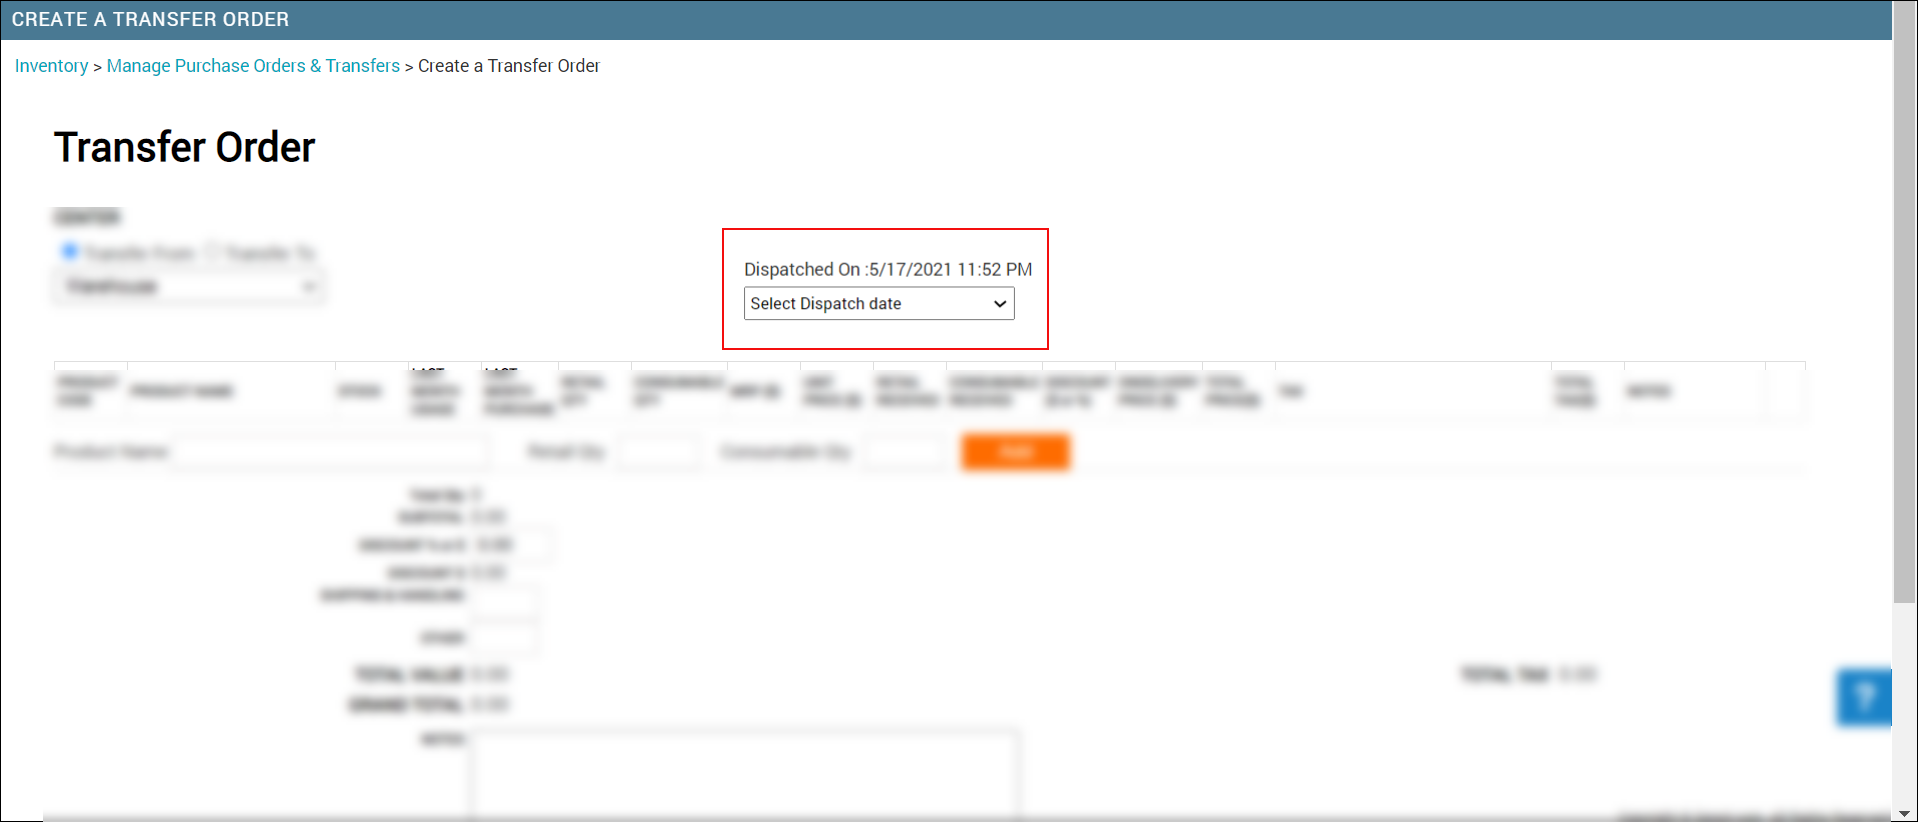
On the Transfer Order page, select the dispatched date (this date appears automatically). You can see the quantity is automatically updated from Sage Intacct.
Click Full Delivery.
The transfer order is delivered and closed and the stock is updated.
Important
Do not click Partial Delivery even if you must receive more quantity from the warehouse. To receive the remaining quantity, you must raise another order.
Navigate to Accounting Integration and expand the Manual Sync tab.
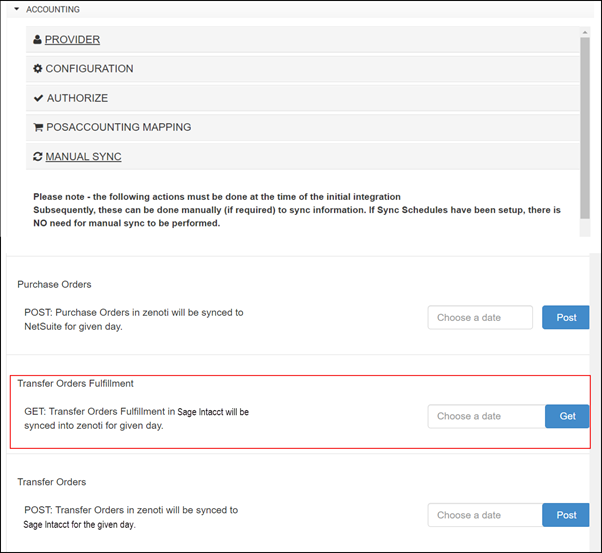
For Transfer Orders Fulfillment, select the date and click Get to get the fulfilled transfer order details from Sage to Zenoti.
QuickBooks Admin Sync report
Admin sync report shows the status of sync to QuickBooks.
Items Sync report
To view the Items Sync report
At the organization level, navigate to Reports > Financial > QuickBooks (Depending on the application you have subscribed to, you see QuickBooks Online or QuickBooks desktop). The Admin Sync Report page appears.
Note
Select ‘Items’ to view the sync details of services, products, non-inventory, and taxes. If you are using QuickBooks Desktop, you see additional item called ‘Other charge’. Two additional filters appear when you select ‘Items’ option: a. Filter Category: All, Services, Products, Non-inventory, and Other Charge. b. Status: All, Pending, Synced, and Failed.

Column descriptions
Column | Description |
Name | Shows the SKU of the service, or product (if you have selected Group Services/Products by Product Code) added in QuickBooks. Shows SKU or Name associated with the non-inventory items you added in QuickBooks (Packages, Memberships, Gift cards, Prepaid cards, Gratuity, Rounded-off amount, tips, manual discounts, No-show/cancellation fee, Service sub-category, and Product sub-category). |
Display Name | Shows the name you gave for these items (Services, Products, Packages, Memberships, Gift cards, Prepaid cards, Gratuity, Rounded-off amount, Support Staff Gratuity (SSG), manual discounts, No-show/cancellation fee, Service sub-category, or Product sub-category) in QuickBooks. |
Cost | Shows the cost of the items as per QuickBooks. |
Inactive | In QuickBooks, you have an option to mark items as Active or Inactive. If you have marked an item as inactive in QuickBooks, the status here shows ‘True’ |
Sync Status | Shows three statuses: Pending, Synced, and Failed. |
Item | If the item is a product or service, this column shows the respective item code as per Zenoti. Click the code to see the details of the item in Zenoti. |
Response Message | Depending on the status of the sync, two types of response messages appear: Success and Failure. |
Customers Sync report
At the organization level, navigate to Reports > Financial > QuickBooks (Depending on the application you have subscribed to, you see QuickBooks Online or QuickBooks desktop). The Admin Sync Report page appears.
Select Customers and click Refresh.

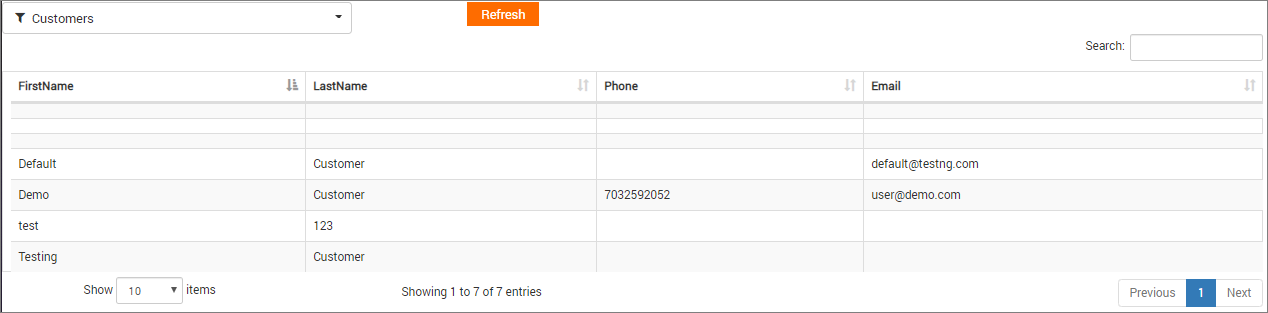
Column descriptions
Column | Description |
First Name | Shows first name of the guest. |
Last Name | Shows last name of the guest. |
Phone | Shows the phone number of the guest (if provided in QuickBooks). |
Shows the email address of the guest (if provided in QuickBooks). |
Xero Admin Sync report
Admin sync report shows the status of sync to Xero.
XeroPOSA Items Sync report
You can view the items that have synced from Zenoti to Xero through this report. For this, the item must be added both in Zenoti and Xero. To view the Items Sync Report
At the organization level, navigate to Reports > Financial > XeroPOSA. The Admin Sync Report page appears.
Select ‘Items’ to view the sync details of services, products, and taxes.
Select the Status: All, Pending, Synced, and Failed.
Click Refresh.
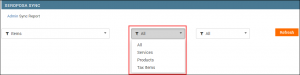
The selected item sync report appears.
Column Descriptions
Column | Description |
Name | Shows the SKU of the service, or product (if you have selected Group Services/Products by Product Code) added in Xero. Shows SKU or Name associated with the non-inventory items you added in Xero (Packages, Memberships, Gift cards, Prepaid cards, Gratuity, Rounded-off amount, tips, manual discounts, No-show/cancellation fee, Service category, and Product category). |
DisplayName | Shows the name you gave for these items in Xero. |
UPCCode | Shows the Zenoti item code. |
Cost | Shows the cost of the items as per Xero. |
Active | In Xero, you have an option to mark items as Active or Inactive. If you have marked an item as active in Xero, the status here shows ‘True’. |
SyncStatus | Shows three statuses: Pending, Synced, and Failed. |
Item | If the item is a product or service, this column shows the respective item code as per Zenoti. Click the code to see the details of the item in Zenoti. |
ResponseMessage | Depending on the status of the sync, one of the response messages appear: Success or Failure. |
XeroPOSA Customers Sync report
You can view the customer details that have synced from Zenoti to Xero.
At the organization level, navigate to Reports > Financial > XeroPOSA. The Admin Sync Report page appears.
Select Customers and click Refresh.
Column descriptions
Column | Description |
First Name | Shows first name of the guest. |
Last Name | Shows last name of the guest. |
Phone | Shows the phone number of the guest (if provided in Xero). |
Shows the email address of the guest (if provided in Xero). |
XeroPOSA Sales Orders Summary Sync report
While setting up Xero, if you chose Invoice Format as ‘Invoice Summary’, all the sales invoices of a particular center, belonging to a particular day, are summarized and synced into a single sales invoice. Similarly, all the refund invoices of a particular center, belonging to a particular day, are summarized and synced into a single refund invoice.
To view Sales Orders Summary report
At the organization level, navigate to Reports > Financial > XeroPOSA. The Admin Sync Report page appears.
Select ‘Sales Orders Summary’. Three additional filters appear: Status, From date, To date.
Select a Status, select From and To dates, and click Refresh to view the report.
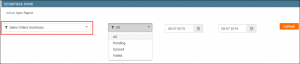
Column | Description |
Center | Shows the name of the center to which the invoice belongs. |
Summary Invoice No. | Shows the number of the Invoice Summary that is generated from all the closed invoices of a business day in Zenoti. |
Sale Date | The closed invoices that are condensed into Invoice Summary belong to the date on which the sale was made. This column shows such sale date. |
Sync Date | If you have requested a delay in Sync while setting up automated daily syncs, the sync date can be different from the sale date. This column shows the date on which the auto-sync of the invoice summary was performed. |
Status | Shows any of the three statuses: Synced, Pending, or Failed |
Transaction Reference | Shows the reference number internally generated in Xero. A reference number is generated every time a sync is performed. |
Invoice Reference | Same as the Invoice Summary Number. |
Response Message | Depending on the status of the sync, two types of response messages appear: Success and Failure. |
Resync | If the sync failed, this column shows two options: Resync and Delete. Resync: If sync fails due to an issue with Xero, select Resync. After that, perform the manual sync of the invoices as well. : If the issue with the invoice in Zenoti, Resync doesn’t work. You need to manually sync the invoices. Delete: If during the sync, you have modified an invoice in Zenoti and the sync failed, click Delete. Perform manual sync, after deleting. |
Order Type | Shows: Sale or Refund.
|
XeroPOSA Inventory Orders Sync report
Important
You can view the purchase order sync status, using this report. : Zenoti does not support partially delivered purchase orders.
To view Inventory Orders Sync report
At the organization level, navigate to Reports > Financial > XeroPOSA. The Admin Sync Report page appears.
Select ‘Inventory Orders’. Three additional filters for Orders, Status and Dates appear.
Select the order type, a Status, select a From and To date, and click Refresh to view the report.

Column descriptions
Column | Description |
Order Number | Shows the purchase order number in Zenoti. Click the link to view the purchase order details. |
Center | Shows the name of the center to which the purchase order belongs. |
Memo | Shows the Corresponding order number generated in the Xero software. |
SyncDate | Shows the date on which sync was performed. |
Status | Shows the status of the purchase order: Delivered or Raised (Raised purchase orders show up as fulfilled). |
TransactionRef | Shows the transaction reference number generated internally for the sync. |
OrderType | The type of order. It is 'Purchase Order' for inventory. |
ResponseMessage | Depending on the status of the sync, two types of response messages appear: Success and Failure. |
ReSync | If the sync failed, this column shows two options: Resync and Delete. Resync: If sync fails due to an issue with Xero, select Resync. After that, perform the manual sync of the invoices as well. : If the issue with the invoice in Zenoti, Resync doesn’t work. You need to manually sync the invoices. Delete: If during the sync, you have modified the purchase order in Zenoti and the sync failed, click Delete. Perform manual sync, after deleting. |
XeroPOSA Sale Order Summary report
If you want to see sync details of each invoice summary separately, use the Sale Order Summary report.
To view Inventory Orders Sync report
At the organization level, navigate to Reports > Financial > XeroPOSA. The Admin Sync Report page appears.
Select ‘Sale Order Summary’.
Additional filter: Summary No. appears.
Enter an Invoice Summary number and click Refresh.
Column descriptions: Summary
Column | Description |
Center Name | Shows the name of the center to which the invoice belongs. |
Type | Shows whether the invoice summary is from sales or from refunds. |
Memo | Shows the Corresponding invoice number generated for the invoice summary in Xero. |
Date | The closed invoices that are condensed into Invoice Summary belong to the date on which the sale was made. This column shows such sale date. |
Sync Date | If you have requested a delay in Sync while setting up automated daily syncs, the sync date can be different from the sale date. This column shows the date on which the auto-sync of the invoice summary was performed. |
Transaction Reference | Shows the reference number, internally generated in the POSAccounting software. A reference number is generated every time a sync is performed. |
Status | Shows any of the three statuses: Synced, Pending, or Failed |
Response Message | Depending on the status of the sync, two types of response messages appear: Success and Failure. |
Column descriptions: Totals
Column | Description |
Services | Shows the total amount from closed invoices obtained from sale of services. |
Product | Shows the total amount from closed invoices obtained from sale of products. |
Membership | Shows the total amount from closed invoices obtained from sale of memberships. |
Package | Shows the total amount from closed invoices obtained from sale of packages. |
Gift Card | Shows the total amount from closed invoices obtained from sale of gift cards. |
Gratuity | Shows the total amount paid as tips, accounted in the closed invoices. |
Discount | Shows the total discount given on all the closed invoices from sales. |
Tax | Shows total tax of all the invoices in that invoice summary. |
Package Redemption | Shows the total amount redeemed from packages. |
Column descriptions: Items
Column | Description |
Type | Shows the Item Type: Products, Services, memberships, packages, gift cards, or prepaid cards. |
Name | Shows the code of the item. For example, if you sold about 15 ‘Look-Great’ hair shampoos to various guests in a day and closed the invoices generated from the sale, the Type column shows Product and the Name column shows the name of the product as per Zenoti, which is ‘LookGreat’. |
Display Name | Shows the name of the item as per Xero. |
Price | Shows the total amount earned on that item’s sale. |
Quantity | Shows the number of units of the item sold. |
Department | While creating the item in Xero, you would have given a Department name. That name appears in this column. |
Class | While creating the item in Xero, you would have given a Class name. That name appears in this column. |
Column descriptions: Payments
Column | Description |
Payment Method | Shows the mode of payment made by guests to buy the item. |
Deposit to Account | Shows the payment method you synced to the accounts during the initial setup of Xero in Zenoti. |
Amount | Shows the total of invoice amount + Tax + any rounding off value on the invoice amount. |
Create items for the accounting platform in Zenoti
When you sync from Zenoti to the accounting platform, the sync is successful if each item in Zenoti has a mapped item in the accounting platform. However, if there is no mapped item, the sync fails. You can view the Admin Sync report of the respective accounting platform to know the items that did not sync.
For a missing item in the accounting platform, you can either create it in the accounting platform or create it in Zenoti and resync the item.
At the center level, click the Configuration icon and navigate to Reports > Accounting Platform.
From the report type drop-down list, select Sale Order Summaries.
Using the date pickers, select the date range during which you have performed the sync.
Click Refresh.
The report is generated for the date range.
Click the View Details link.
The Sale Order Report page appears.
QuickBooks
Click View Details for the desired item.
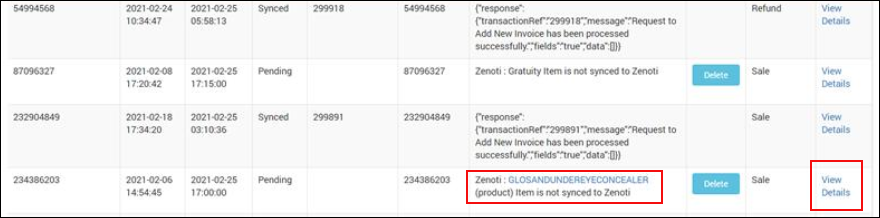
Another window appears.
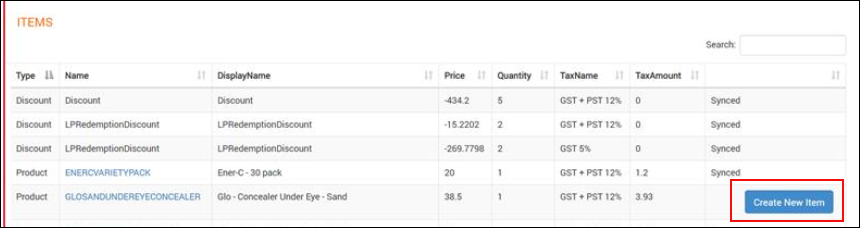
Xero
You can see the Create New Item button for items that are not in Xero.
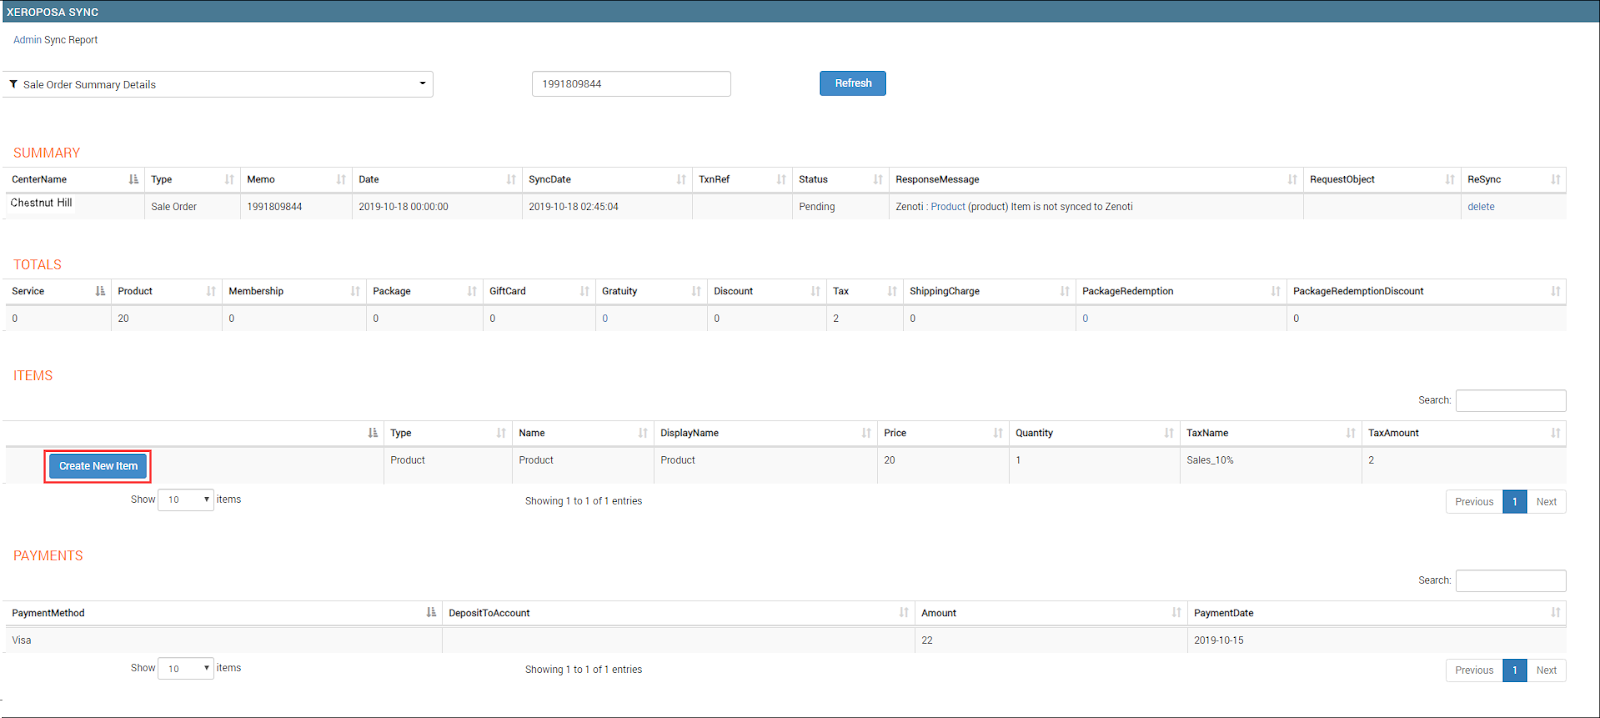
Click Create New Item.
The Add Item dialog box appears. The fields in this dialog box vary based on the accounting platform:
QuickBooks

Xero
You can see that the Item Code and Item Name boxes are filled automatically.
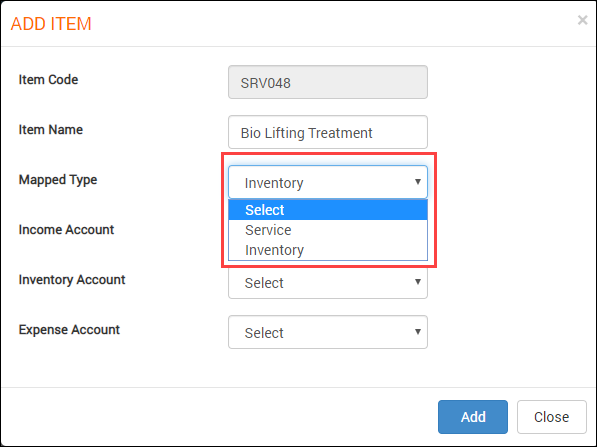
Select the mapping type from the Mapped Type drop-down list.
Service for service
Inventory for product
Select the chart of accounts to which the item must be mapped in the accounting platform:
For QuickBooks - Sales Account
For Xero - Income Account, Inventory Account, and Expense Account
Click Add.
The item is created in Zenoti.
Next steps
Delete the item record in the Sales Order Summaries report.

Resync the items first and then the sale orders.
Post membership sales based on value
Businesses can calculate sales based on either the sale price of an item or the value of an item.
In the value model, Zenoti posts membership sales and redemption based on the value of the membership, and not the sale price.
For example, if a guest purchased a $100 non-recurring membership with a service value of $150, in the sale model, Zenoti posts $100 to the accounting platform. While in the value model, Zenoti posts $150 to the accounting platform.
Important
Reach out to Zenoti Support to enable the value model for your business.
At the organization level, click the Configuration icon.
Navigate to Integrations.
Select Accounting.
Expand the Configuration tab and navigate to the Invoice section.
For the Membership Liability Model, the Value option is selected by default.
You can see the Default Item for Membership Liability Discount box is enabled for the Membership item. This item is to post the difference between the Value and Sale Price of the membership.
In the Default Item for Membership Liability Discount box, enter the name of the default item that you want to post for membership liability discount.
Under the Sync section, click Save.
Membership sales will be posted based on value.
Example
Service | Sale Price | Membership Service | Credits |
Hair Cut | $110 | $100 | 3 |
Hair Color | $215 | $200 | 4 |
Hair Wash | $120 | $100 | 5 |
Let’s say that a guest purchased a non-recurring membership for $1200 with a value of $1600.
Default Item for Membership Liability Discount = 1600- 1200 = $400
Reports
Admin Sync Report - Sale Order Summaries
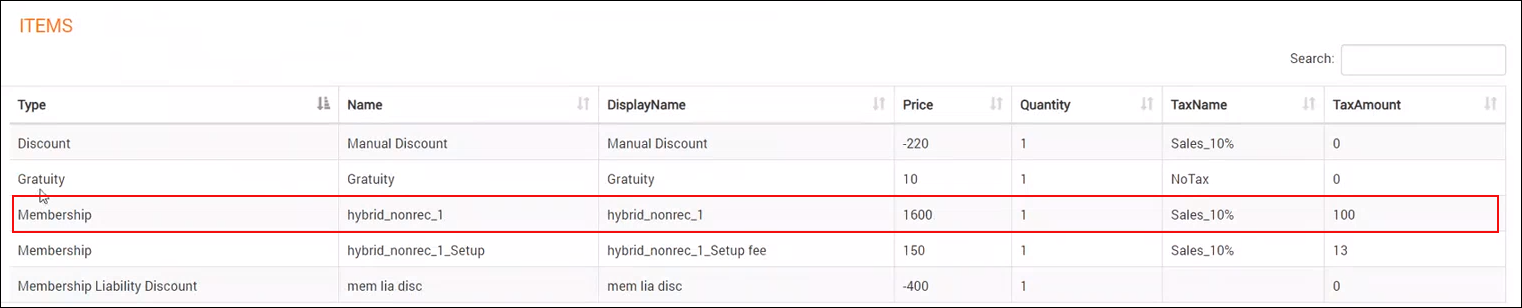
You can see Membership as $1600 for Price and any discounts under the Discount item.
Under the Payment section, You can see the actual payment made by the guest.
Post cross-center redemption of memberships credits as journal entries to the accounting Platform
Disclaimer
This enhancement is for businesses with the sale model or value model.
Generally, businesses with multiple centers allow guests to redeem memberships with credits across centers. For cross-center settlement, they need the amount to appear as payable for the center where the membership is sold, and as receivable for the center where the membership is redeemed.
Example
A guest purchased a $100 membership worth $200 credits from the Los Angeles center and redeemed it on a service worth $200 at the California center.
Based on the value model, when Zenoti syncs this redemption to the accounting platform, the value of the service $200 is posted as payable to the Los Angeles center and as receivable to the California center.
The difference between the sale and the redemption is the discount amount. In our example, the discount is $250 - $200 = $50.
To configure posting of membership with credits redemption based on value
At the organization or center level, click the Configuration icon.
Click Integrations.
Select Accounting.
Expand the Configuration tab and navigate to the Invoice section.

For Membership with Credit Liability Model, select the Enable Cross Center check box.
The following fields appear.
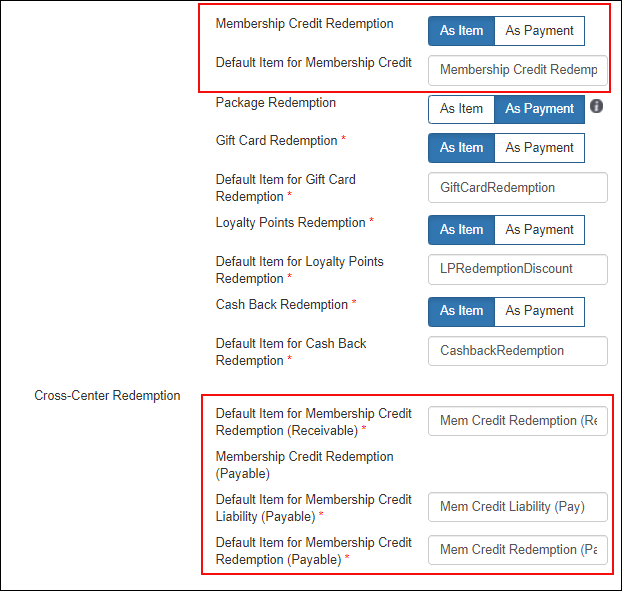
Default Item for Membership Credit
Note
If you select posting by Payment Type, you will not see this field for configuration.
Default Item for Membership Credit Redemption (Receivable)
Note
If you select posting by Payment Type, you will not see this field for configuration.
Default Item for Membership Credit Liability (Payable)
Default Item for Membership Credit Redemption (Payable)
Note
If you select posting by Payment Type, you will not see this field for configuration.
Under the Sync section, click Save.
You can post the receivable amount as either an item or as payment. However, you can post the payable amount as only journal entries.
To post redemption amount as journal entries, expand the Payments Mapping tab and add and map the chart of accounts for receivable and payable.
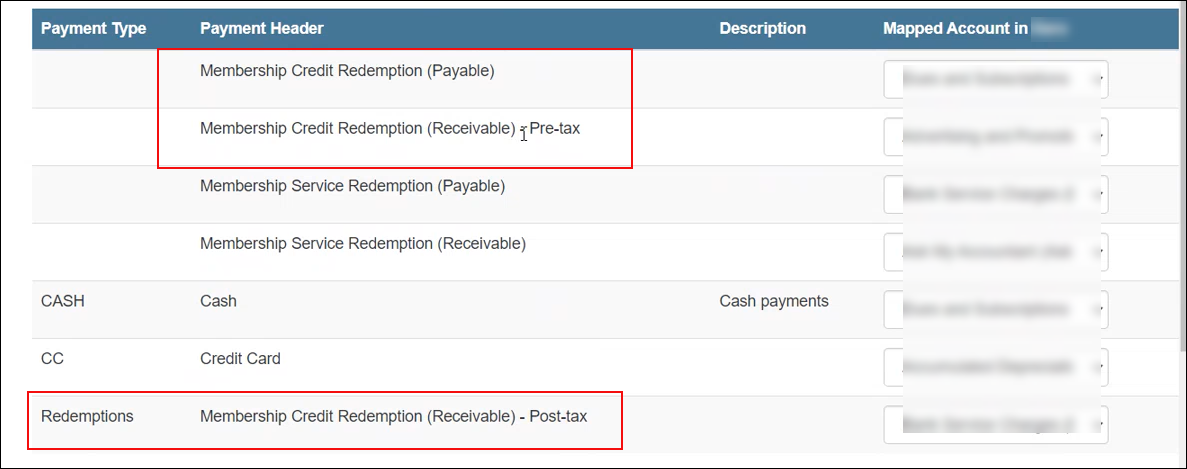
To post redemptions as invoices, expand the Item Type Mapping tab and add and map the chart of accounts for receivable.
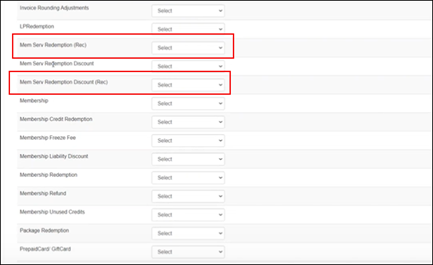
Click Save .
The integration is configured to post cross-center redemptions for memberships based on value.
Reports
Admin Sync – Sale Order Summaries report
You can verify the posting of cross-center redemptions for membership credits in this report.
Redemption Center

Sale Center
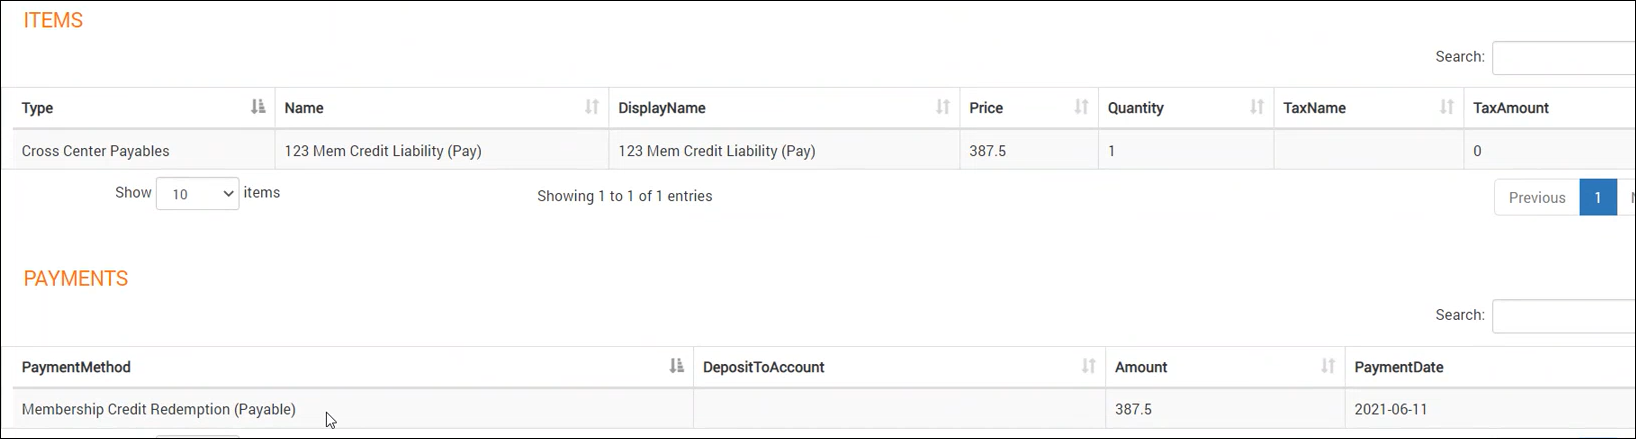
Post expired or reversed loyalty points as revenue
Disclaimer
This enhancement applies to businesses where the value model is enabled and sync is configured at the journal entries level.
When loyalty points expire, your business can configure to post the expired amount as revenue to the business.
Note
Currently, loyalty points reversals are not supported in the integration.
For the value of expired loyalty points, Zenoti considers the redemption ratio (the value for each point) at the time of posting the journal entry.
To configure posting of expired loyalty points as revenue
At the organization level, click the Configurations icon.
Click Integrations.
Select Accounting.
Expand the Configuration tab and navigate to the Invoice section.
Under Financials, select the Post Journal Entries check box.
5. Select the Post Expired Amount check box.
The Default Item for Loyalty Points Expired Amount box appears. This is the item used to post the revenue from the expired loyalty points for a day.
Note
: Under the Payments Mapping tab, you can also see a payment type added to post expired amount as revenue.
6. Under the Sync section, click Save.
7. Expand the Payments Mapping tab.
8. From the Payment Header list, select Expired Loyalty Points Liability.
9. From the Mapped Account list, select the corresponding chart of accounts in the accounting platform.
10. Click Add.
The payment header is added.
11. Click Save.
The payment mapping is saved.
Reports
Admin Sync – Sale Order Summaries report
Other reports
Loyalty Points - Expiration Report
Use this report to check the expired loyalty points.
Other helpful articles
Accounting integration: Post membership cross-center redemption
Disclaimer
This enhancement is done only for businesses where the value-based model is enabled.
Generally, businesses with multiple centers allow guests to redeem memberships across centers. For cross-center settlement, they need the amount to appear as payable for the center where the membership is sold, and as receivable for the center where the membership is redeemed.
Moreover, a business can choose to post the value of the membership for cross-center redemption.
Example
A guest purchased a $250 non-recurring membership from the LA center and redeemed it on a service worth $200 at the California center.
Based on the value model, when Zenoti syncs this redemption to the accounting platform, the value of the service $200 is posted as payable to the LA center and as receivable to the California center.
The difference between the sale and the redemption is the discount amount. In our example, the discount is $250 - $200 = $50.
At the organization level or center level, click the Configurations icon.
Navigate to Integrations tab.
Select Accounting.
Expand the Configuration tab and navigate to the Invoice section.
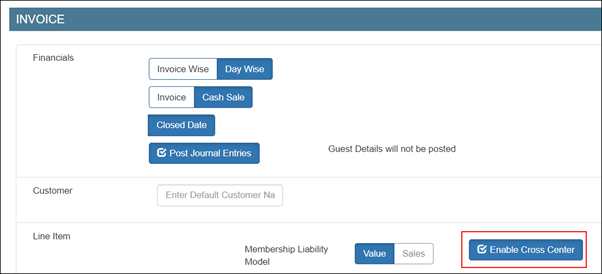
Select the Enable Cross Center check box.
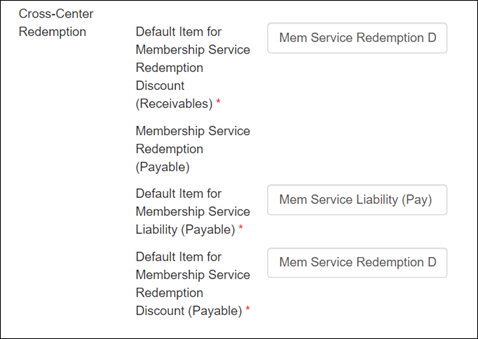
Default Item for Membership Service Liability (Payable): Enter the item to be used to post the redemption as payable for the sale center where there’s no redemption invoice – the redemption invoice is only in the center where the redemption was made.
Default Item for Membership Service Redemption Discount (Receivables): Enter the item to be used to post the difference in the sale and the redemption amount as a receivable discount for the center where redemption was made. This is to ensure if the centers want to receive the full amount or just the value amount (without discount).
Default Item for Membership Service Redemption Discount (Payable): Enter the item to be used to post the difference in the sale and the redemption amount as a payable discount for the center where the membership was sold.
Under the Sync section, click Save.
You can post the receivable amount as either an item or as a payment. However, you can post the payable amount as only journal entries.
To post redemption amount as journal entries, expand the Payments Mapping tab and add and map the chart of accounts for receivable and payable.
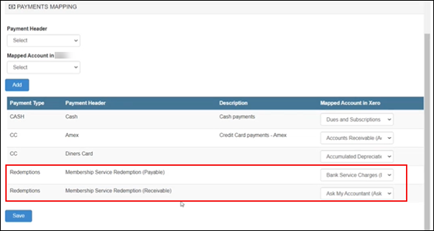
To post redemptions as invoices, expand the Item Type Mapping tab and add and map the chart of accounts for receivable.

Click Save .
The integration is configured to post cross-center redemptions for memberships based on value.
Reports
Admin Sync – Sale Order Summaries report
You can verify the posting of cross-center redemptions for membership in this report.
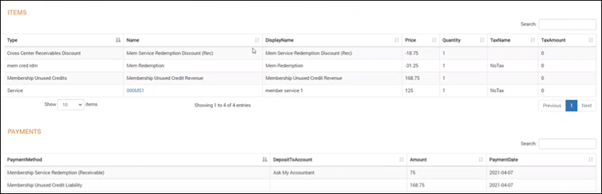
Sales Invoices Report

Accounting integration: Post expired membership amount as revenue
Disclaimer
This enhancement applies to businesses where the value-based model is enabled and sync is configured at the journal entries level.
When a membership expires, your business can configure to post the expired amount as a revenue to the business. Your business must select Redemption post expiry or cancellation at the membership level. When this is enabled, Zenoti posts expired credits based on the expiry date of the service or the expiry date of the membership, whichever is earliest.

Let’s consider a non-recurring membership with 3 services, that expired on April 15th with a grace period of 1 day. So, the actual expiry date for this membership is April 16th.
Service | Sale Price | Membership Price | Credits | Expiry Date |
Hair Cut | $110 | $100 | 3 | April 14th |
Hair Color | $215 | $200 | 1 | April 17th |
Hair Wash | $120 | $100 | 1 | April 18th |
When Zenoti syncs data on April 14th, only the Hair Cut service expired credit amount is posted to the accounting platform. When Zenoti again syncs on April 16th, the earliest of April 16th and April 17th (expiry of Hair Color service) is April 16th, so Zenoti will post the expired amount from the Hair Color service on April 16th.
At the organization level, click the Configurations icon.
Click the Integrations tab and expand Accounting.
Expand the Configuration tab and navigate to the Invoice section.
Under Financials, select the Post Journal Entries check box.
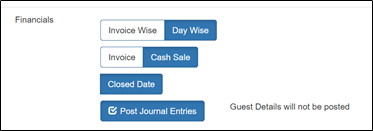
For Membership Liability Model, you can see that the Value is selected by default.
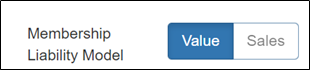
Select the Post Expired Amount check box.
The Default Item for Membership Expired Amount box appears. This is the item used to post the revenue from the expired memberships for a day.
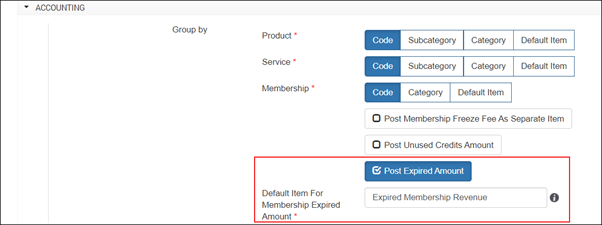
Note
Under the Payments Mapping tab, you can also see a payment type added to post expired amount as revenue.
Under the Sync section, click Save.
Expand the Payments Mapping tab.
From the Payment Header list, select Expired Membership Liability.
From the Mapped Account list, select the corresponding chart of accounts in the accounting platform.
Click Add.
The payment header is added.
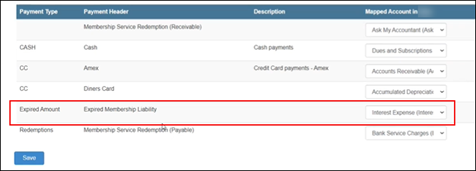
Click Save.
The payment mapping is saved.
Example
Service | Sale Price | Membership Price | Credits |
Hair Cut | $110 | $100 | 3 |
Hair Color | $215 | $200 | 1 |
Hair Wash | $120 | $100 | 1 |
Let’s say that a guest purchased a non-recurring membership with the following services:
If the guest has used only 2 credits from the Hair Cut service, and the remaining services are unused, and the membership has expired, then the total expired amount from this membership is calculated as follows:
Total expired amount = 1x100 +1x200 + 1x100 =$400
When the daily sync happens, Zenoti adds all such membership expired amounts and posts it as a single item – the Default Item for Membership Expired Amount.
Reports
Admin Sync – Sale Order Summaries report
You can verify the posting of the expired membership amount in this report.
To see the total expired amount posted for the day, click View Details.
Other reports
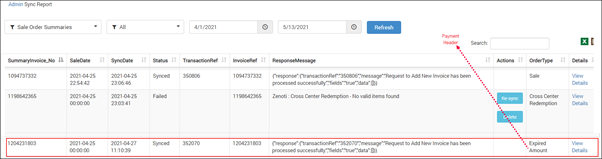
Membership Expired Revenue is displayed as an item with the total expired amount.
Expired Membership Liability is displayed as a payment with the total expired amount.
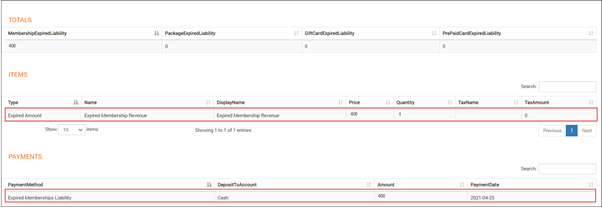
Post digital payment fee as journal entry to the accounting platform
Digital payment fee is the percentage of the fee charged by the payment provider on each payment.
In Zenoti, you can configure to post the digital payment fee as journal entries into the accounting platform (such as QuickBooks) to improve tracking and transparency of the accounting process.
Important
A subsidiary is a payment provider for a location or center.
To configure posting of digital payment fee to the accounting platform
At the organization level, click the Configuration icon.
Click the Integrations tab and expand Accounting.
Expand the Configuration tab.
Navigate to the Invoice section and locate Miscellaneous Journal Entries.
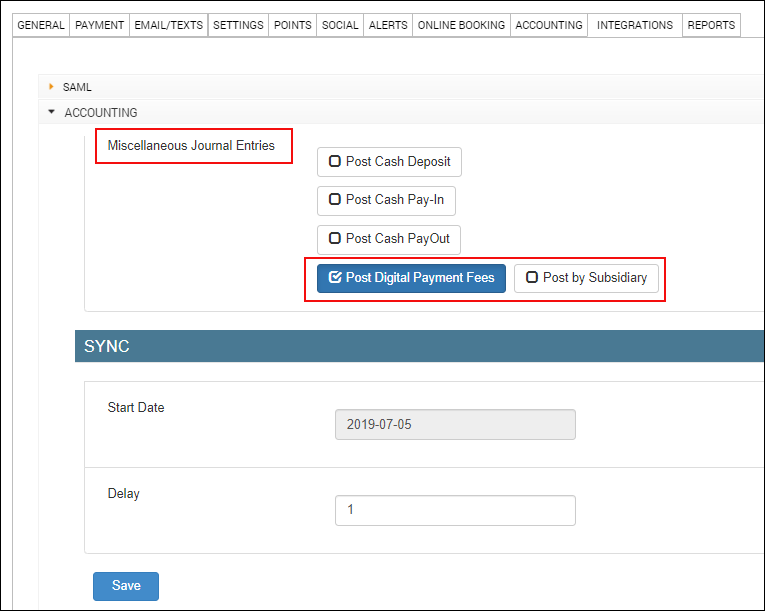
Select the Post Digital Payment Fees checkbox.
The Post by Subsidiary checkbox is enabled.
Select the Post by Subsidiary checkbox to post digital payment fee by each provider per location (center).
Click Save.
Expand the Miscellaneous Journal Type Mapping section.
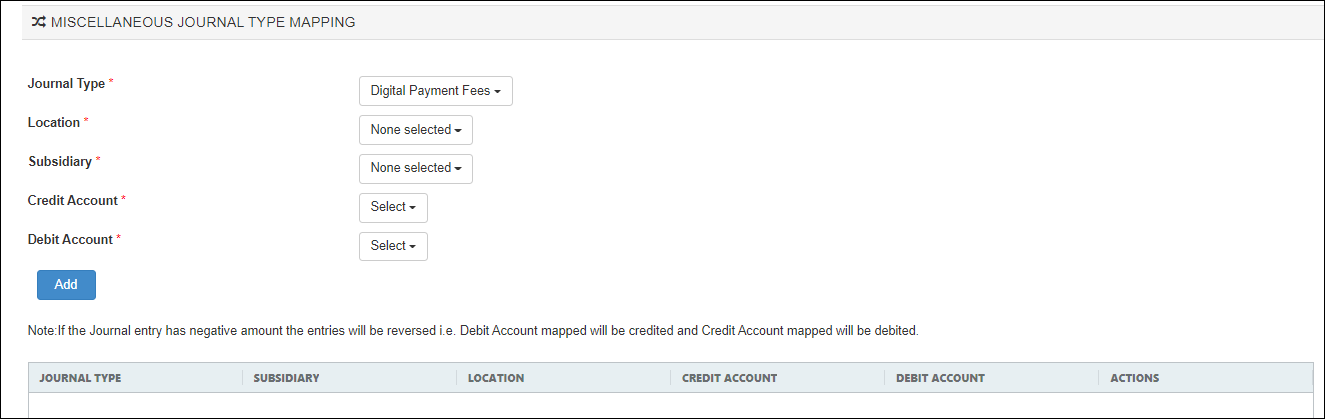
For each cash transaction, map the following details and click Add:
Journal Type: Select Digital Payment Fees.
Location: Center for which the journal entry has to be posted.
Subsidiary: Payment provider for each location.
If you've selected the Post by Subsidiary option for the journal entry in the Configuration tab, you can see all the payment providers for the selected locations.
If you've not selected the Post by Subsidiary option for the journal entry in the Configuration tab, you can see the All Provider option (the default payment provider).
Credit Account: Chart of accounts in the accounting platform for credit entry.
Debit Account: Chart of accounts in the accounting platform for debit entry.
Important
If the journal entry has a negative amount, the entries are reversed - the mapped Debit Account is credited and the mapped Credit Account is debited.
To manually sync data, expand the Manual Sync section and locate Miscellaneous Journal Entries.
Select the date for which you want to post data.
Click Post.
Note
To add auto-sync schedules, reach out to Zenoti.
Admin Sync reports
Sale Order Summaries

Miscellaneous Journal Entries
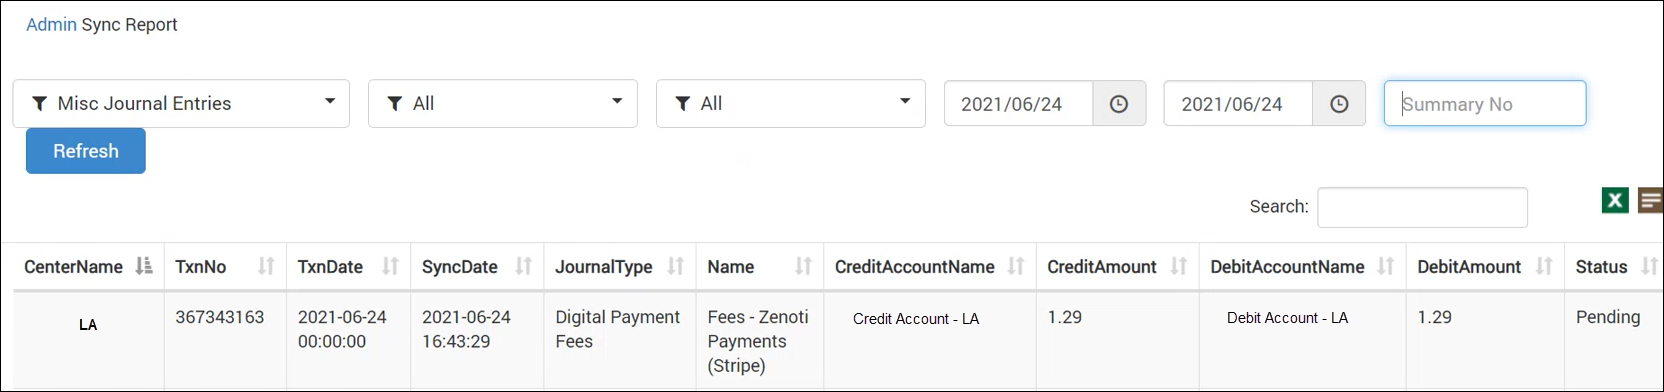
Reconciliation post accounting integration
After you sync data, you need to understand if the data is correct.
Currently, we have the following easy-and-quick articles that you can refer to reconcile data between and your accounting integration platform:
Accounting Integration: Reconcile Sales and Refunds
Reconcile sales and refunds post accounting integration
Important
Before you begin, ensure that you sync data by manual sync or scheduled sync.
Note
For scheduled sync, reach out to Zenoti.
Click the Reports icon.
Search for the Invoices report.
The Sales report page appears.
From the Report Name filter, select the Invoices report.
From the Invoice Status filter, select Closed.
From the Date Type filter, select Closed Date.
From the Closed Date filter, select the duration for which you want to reconcile.
Click Refresh.
The report is generated.
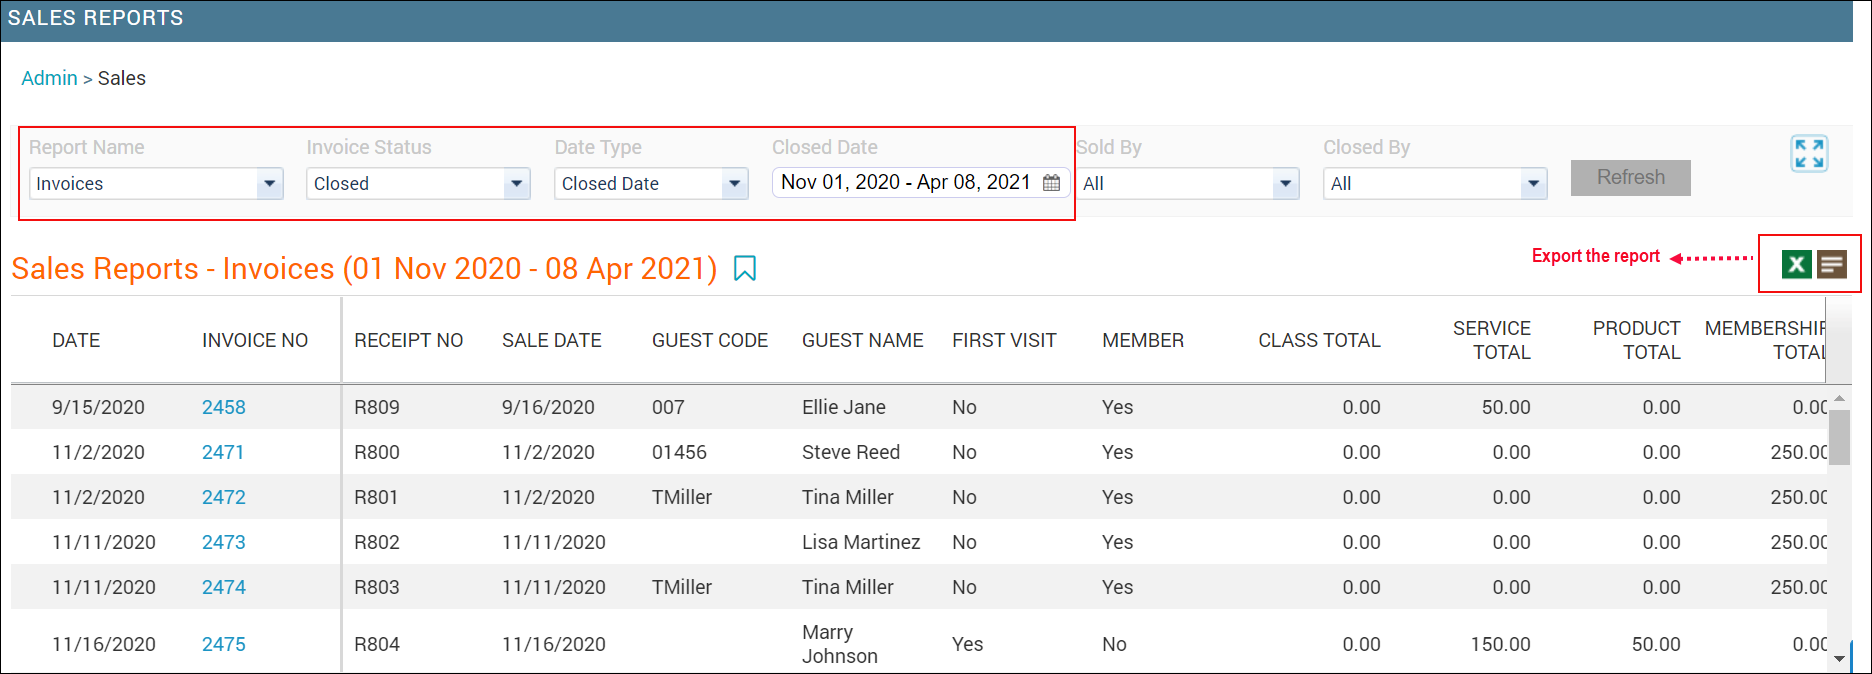
Export the report and sort the Sale Date column in ascending order.
Note the earliest and latest sale date.
In the exported file, identify and highlight the list of closed invoices during the earliest and latest sale date.
Open the Sales Accrual report (from the new Reports dashboard).
From the Sale Date filter, select the earliest and latest sale date (step 9) as the sale date range.
From the Centers filter, select the desired centers.
To generate the report for all items, select All.
From the Item Type filter, select the desired items.
To generate the report for all items, select All.
Important
To reconcile both sales and refunds, ensure that All is selected from the Sale Type filter. To reconcile only refunds, select Refund from the Sale Type filter.
Click Refresh.
Create a summary on the Invoice Closed Date and Item Type columns.
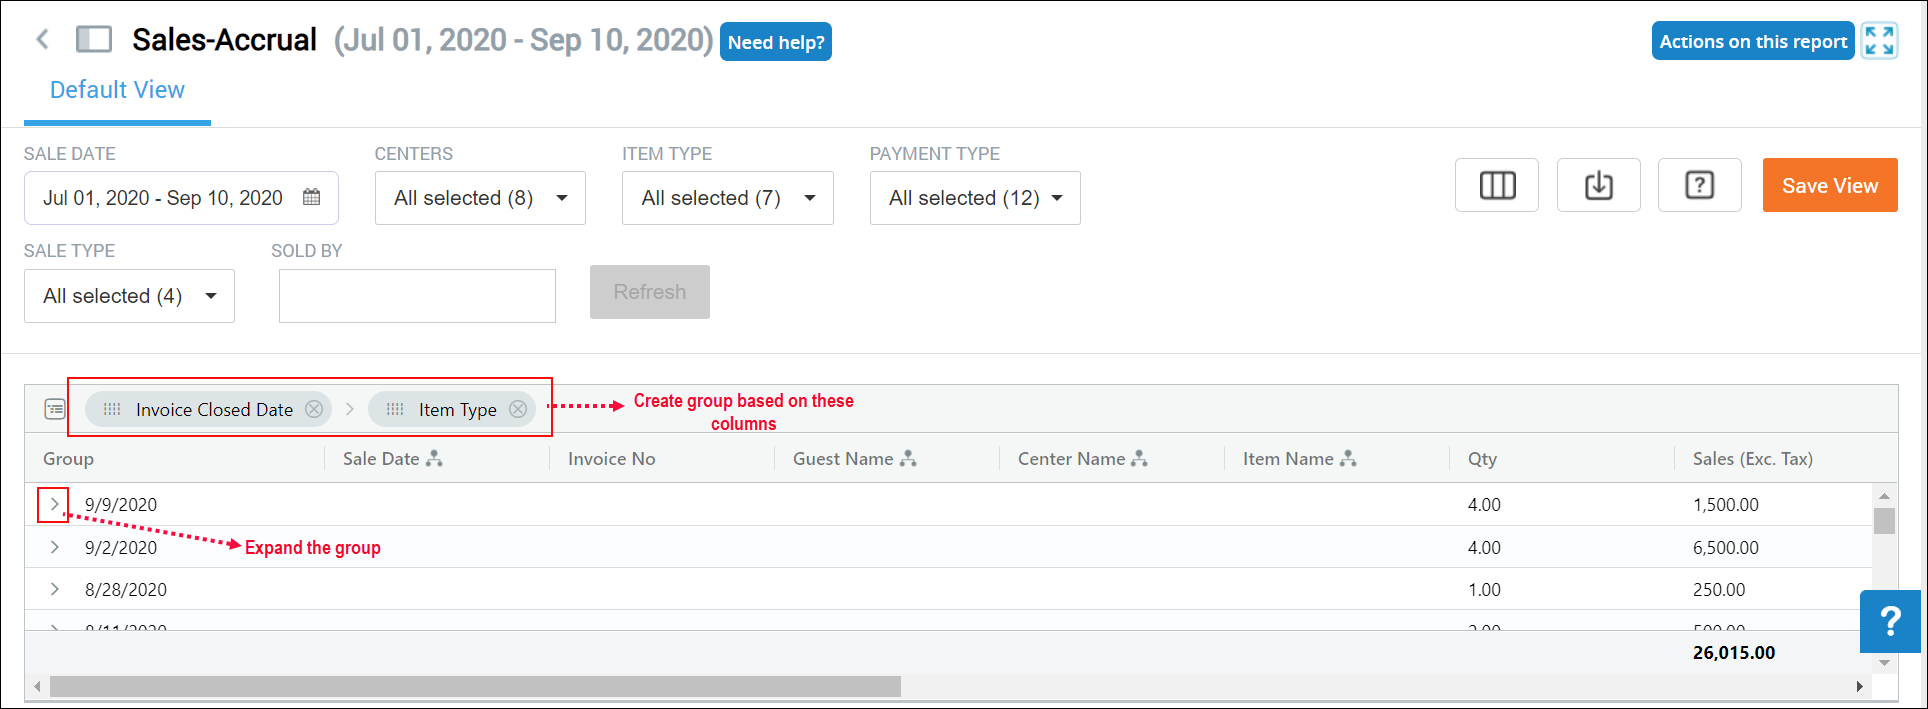
For each invoice, verify the following amounts in the accounting integration platform:
Gross Sales - Refer to the Price column
Net Sales - Refer to the Sales(Exc.Tax) column
Reconcile tax post accounting integration
Important
Before you begin, ensure that you sync data by manual sync or scheduled sync.
Note
For scheduled sync, reach out to Zenoti.
Click the Reports icon.
Search for the Invoices report.
The Sales report page appears.
From the Report Name filter, select the Invoices report.
From the Invoice Status filter, select Closed.
From the Date Type filter, select Closed Date.
From the Closed Date filter, select the duration for which you want to reconcile.
Click Refresh.
The report is generated.
Export the report and sort the Sale Date column in ascending order.
Note the earliest and latest sale date.
In the exported file, identify and highlight the list of closed invoices during the earliest and latest sale date.
Open the Sales Accrual report (from the new Reports dashboard).
From the Sale Date filter, select the earliest and latest sale date (step 9) as the sale date range.
From the Centers filter, select the desired centers.
To generate the report for all items, select All.
From the Item Type filter, select the desired items.
To generate the report for all items, select All.
Click Refresh.
Create a summary on the Invoice Closed Date column and Item Type columns.
For each invoice, verify the tax amount in the Tax column with the amount in the accounting platform.
Reconcile discounts post accounting integration
Important
Before you begin, ensure that you sync data by manual sync or scheduled sync.
Note
For scheduled sync, reach out to Zenoti.
Click the Reports icon.
Search for the Invoices report.
The Sales report page appears.
From the Report Name filter, select the Invoices report.
From the Invoice Status filter, select Closed.
From the Date Type filter, select Closed Date.
From the Closed Date filter, select the duration for which you want to reconcile.
Click Refresh.
The report is generated.
Export the report and sort the Sale Date column in ascending order.
Note the earliest and latest sale date.
In the exported file, identify and highlight the list of closed invoices during the earliest and latest sale date.
Open the Sales Accrual report (from the new Reports dashboard).
From the Sale Date filter, select the earliest and latest sale date (step 9) as the sale date range.
From the Centers filter, select the desired centers.
To generate the report for all items, select All.
From the Item Type filter, select the desired items.
To generate the report for all items, select All.
Click Refresh.
Create a summary on the Invoice Closed Date column and Item Type columns.
For each invoice, verify the discount amount in the Discount column with the amount in the accounting platform.
FAQs on accounting integration
Why is inventory items' sync status showing pending?
If your business has configured to sync items not based on product code, the sync status will be pending.
How to sync pending invoices?
For each pending invoice, click Post.
Statuses in Sales Order Summaries Sync report
At the organization level, click the Configurations icon.
Navigate to Reports > Financial > QuickBooks.
The Admin Sync Report page appears.
Form the report name filter, select the Sales Orders Summary.
One additional filter appears for sync status.
Select a status, select a date range, and click Refresh.
To view more details of a sale order (invoice), click View Details.
Status
Description
Action to be taken
Synced
The sync is successful.
Pending
The sync is pending as there are items that are not synced to Zenoti from the accounting integration and you are trying to sync an invoice summary for the same.
For these error messages, refer our help article: Troubleshooting Invoice Failures and Sync Failures.
Failed
The sync failed due to an unexpected technical error.
All these errors are listed in the following table along with the action to be taken.
For the Failed sync status, here is the list of possible error messages, their meaning, and the solution to the problem:
Sync Type
Message
Description
Action to be taken
Journal Entry
{"response":{"code":"451","message":"Name 'MICD' didn't match with mapped value.","fields":"journalItemAccounts","data":[]}}
The chart of account for the item’s Code, Category, or Sub-Category is not defined in the POSA Item Mapping form.
In this error message, MICD is the Service Category code that is missing in POSA Item Mapping form.
1. Add the relevant item along with chart of account under Add Item in POSAccounting.
2. Sync the transaction for the sale date manually.
3. In the Admin Sync report, click Delete and then click Resync.
Journal Entry
{"response":{"code":"451","message":"Name 'MasterCard' didn't match with mapped value.","fields":"journalPaymentAccounts","data":[]}}
The chart of account for the payment method is not defined in the accounting platform POSAccounting Payment Mapping form.
In this error message, chart of accounts for Payment method MasterCard, is missing in the POSAccounting Payment Mapping form.
1. Add the relevant payment method along with chart of account under Add Payment in POSAccounting.
2. Sync the transaction for the sale date manually.
3. In the Admin Sync report, click Delete and then click Resync.
Journal Entry
{"response":{"code":"451","message":"Name 'STA' didn't match with mapped value.","fields":"journalTaxAccounts","data":[]}}
The chart of account for tax is not defined in the POSAccounting tax mapping form.
In this case, chart of accounts for Tax with the code STA in Zenoti, is not mapped in POSAccounting under the Add Tax section.
1. Add the relevant tax along with chart of account under Add Tax in POSAccounting.
For QuickBooks Desktop, the format in which you must add the tax is,
Sales tax chart of account code <#10042018#>Tax Agency Name
Example: 350.00<#10042018#>VA State Tax.
2. Sync the transaction for the sale date manually.
3. In the Admin Sync report, click Delete and then click Resync.
Journal Entry
{"response":{"code":455,"message":"A validation exception occurred (Account code or ID must be specified)\nValidation errors:\nThe TaxType field is mandatory","fields":"false","data":[]}}
The sales account for the product is not selected.
Mark the product as retail and select the account.
Invoice/Invoice Summary
{"response":{"code":455,"message":{"0":"Invalid account type used"},"fields":"false","data":[]}}
The payment type is of liability account, which is not allowed in QuickBooks Online or Xero.
Change the account type from liability to any other current asset in QuickBooks Online or Xero.
Invoice/Invoice Summary
Zenoti: GiftCardRedemption Item is not synced to Zenoti.
The item is not created in QuickBooks.
In this error message, GiftCardRedemp is not created in QuickBooks.
1. Click View details in the admin sync report for which the invoice summary is failed and click Create Item.
2. Choose the relevant Item Type and Chart of Account.
This creates the Item in the accounting platform.
3. Delete the failed summary from the Admin Sync report.
4. At center level, navigate to Configurations > Integrations.
5. Expand the Manual Sync section.
6. Select the item type that was created (Service/Non-Inventory/Product/OtherCharge).
7. Click Get to sync the created item.
8. After the item is synced, expand the Manual Sync section.
9. Under Sales and Refunds, select the date for which the invoice summary failed and click Post to manually sync the invoice summary.
If you see an error message that’s not listed here, reach out to Zenoti Support.
Accounting integration: How to add a new payment method or chart of accounts?
Get payment methods (for QuickBooks) or chart of accounts (for Xero) from the accounting platform
Notes:
If you add a new payment type in QuickBooks, you MUST do a manual sync of payment methods in Zenoti.
If you want to assign a new chart of accounts in Xero to a payment type in Zenoti, you MUST do a manual sync of accounts.
At the organization level or center level, click the Configuration icon.
Navigate to Integrations > Accounting.
Expand the Manual Sync tab.
Sync payment methods (from Quickbooks) or chart of accounts (from Xero).
For QuickBooks, to sync payment methods manually, click Get for Payment Methods.
All the payment types are synced from QuickBooks to Zenoti.
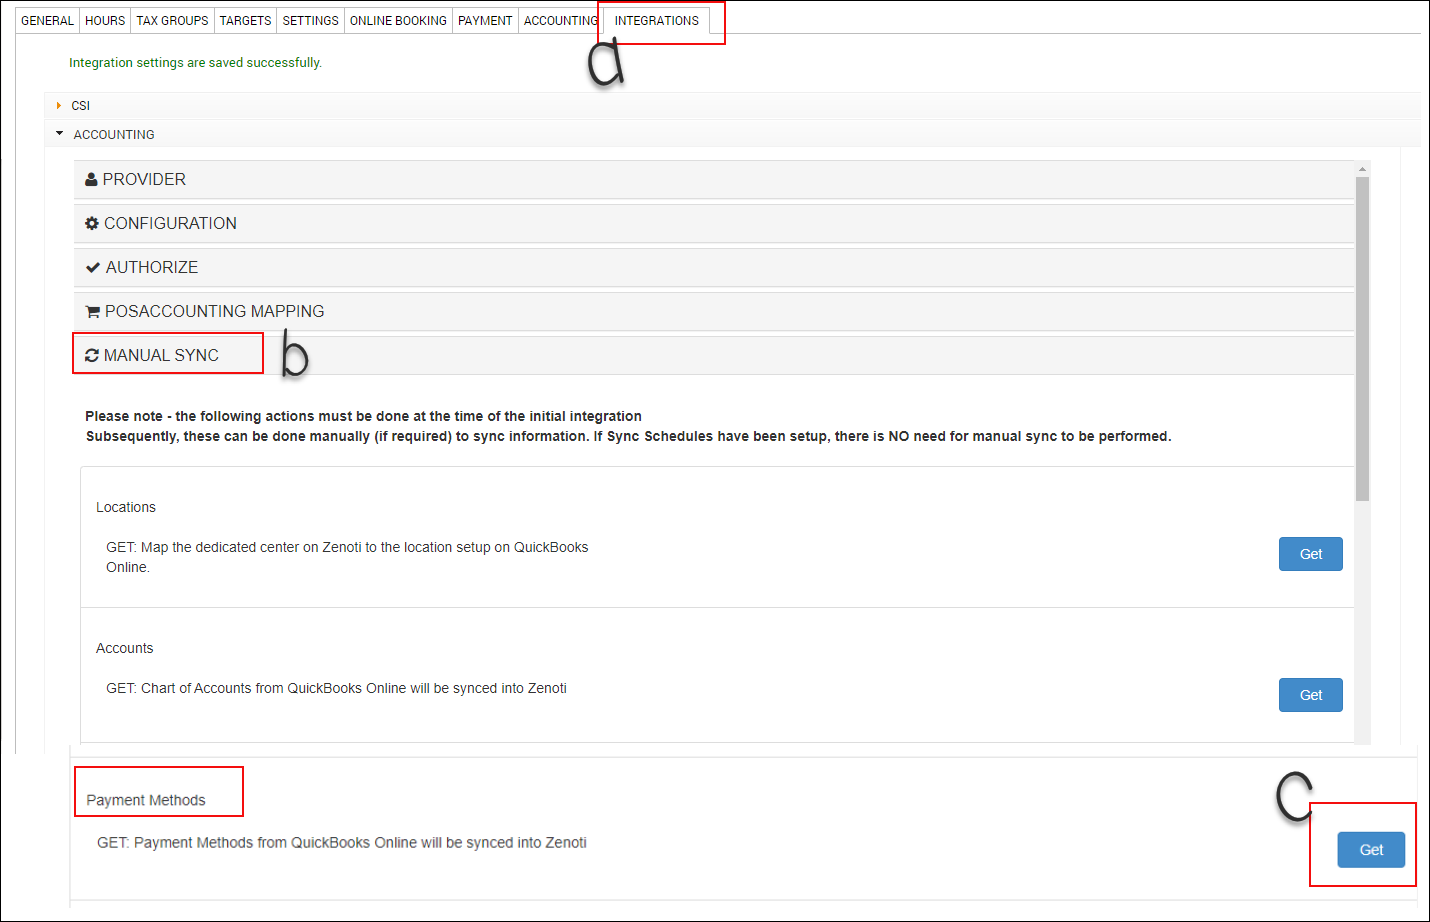
For Xero, to sync the chart of accounts manually, click Get for Accounts.
All the charts of accounts are synced from Xero to Zenoti.
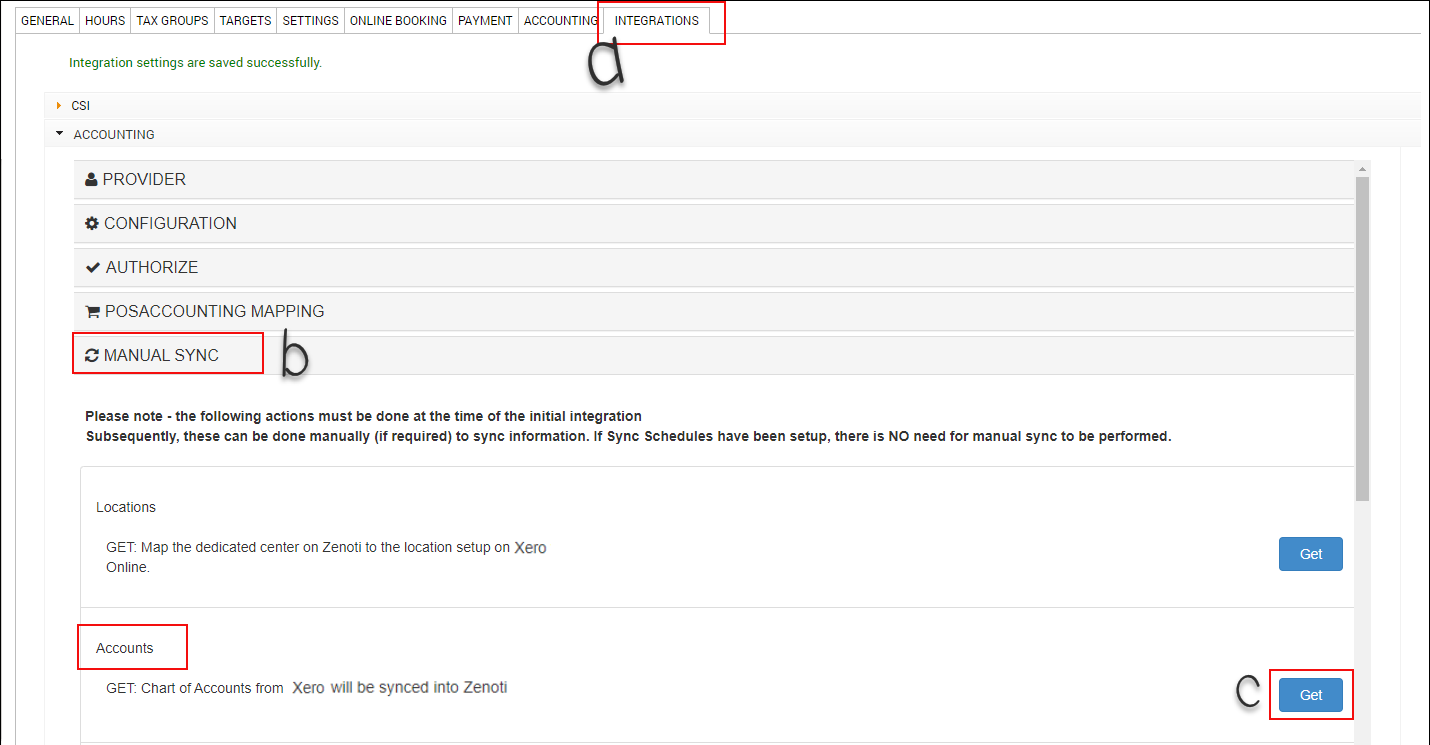
Map the payment types in Zenoti
Expand the Payments Mapping section.
For Payment Header, select the payment type in Zenoti.
For QuickBooks, from the Mapped Account in QuickBooks, select the corresponding payment type in QuickBooks.
For Xero, from the Mapped Account in Xero, select the corresponding chart of account in Xero.
Click Add.
Click Save.
For Quickbooks
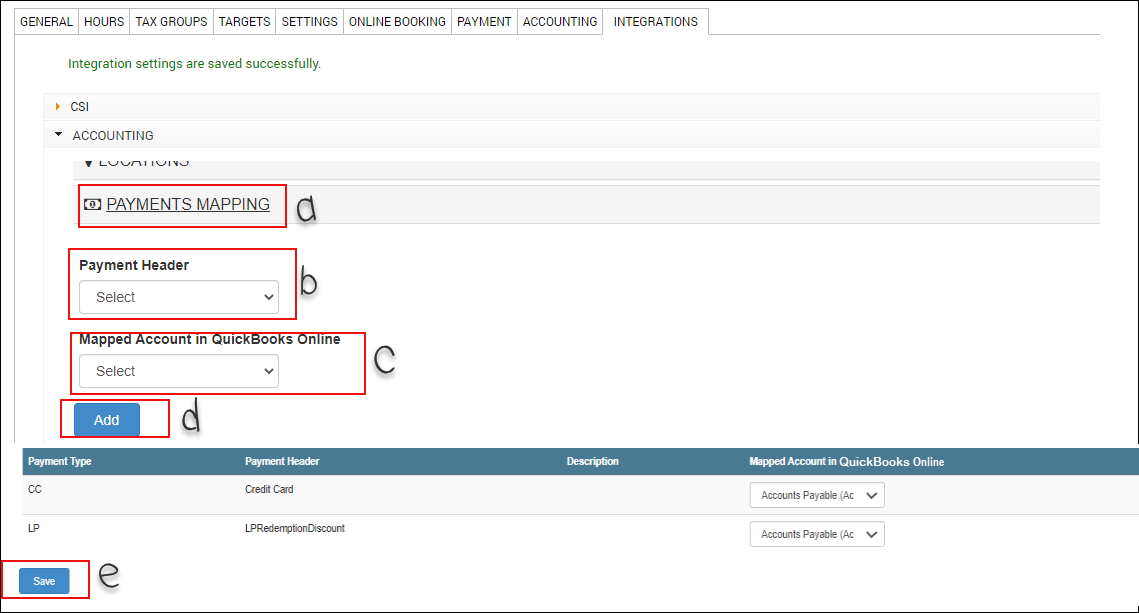
For Xero
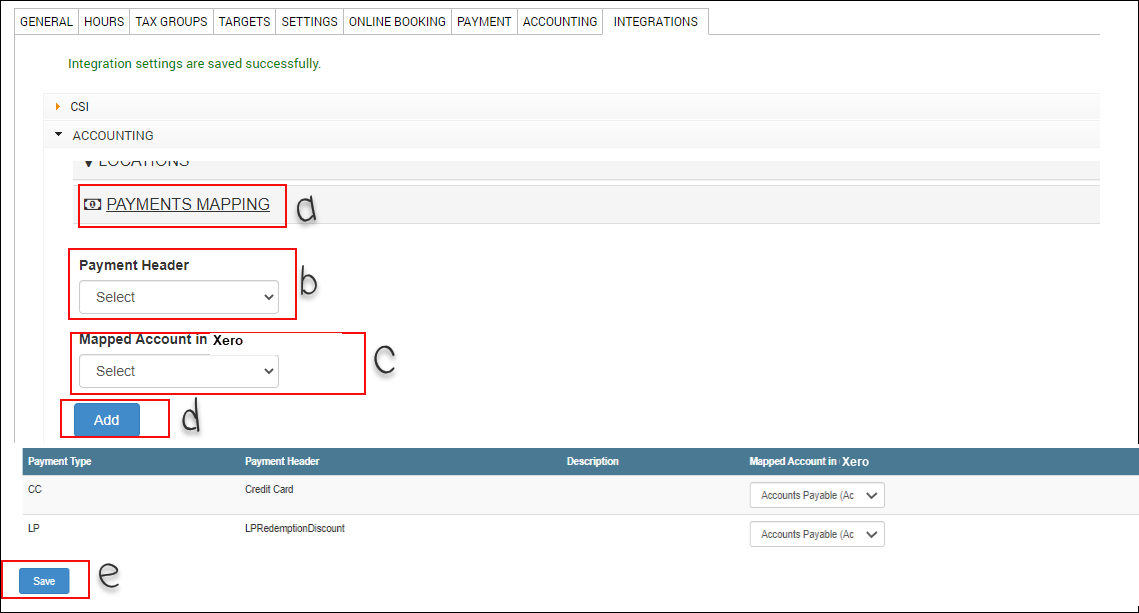
Add payments in POSAccounting
Expand the POSAccounting Mapping section.
Click Setup Customer Account.
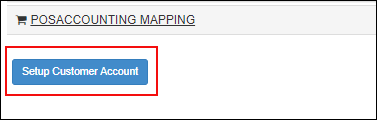
Read our detailed help article on the setup process on POSAccounting.
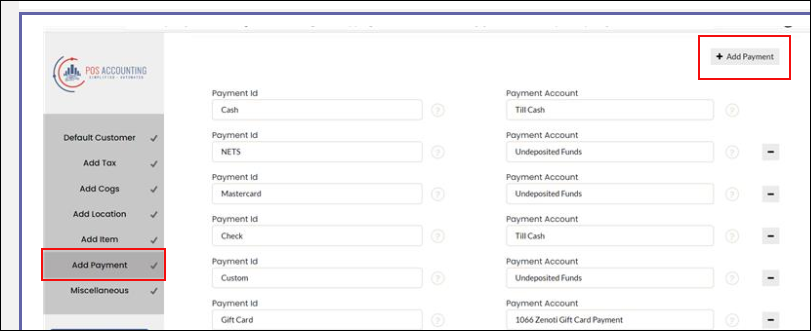
Click the Add Payment section.
Click +Add Payment.
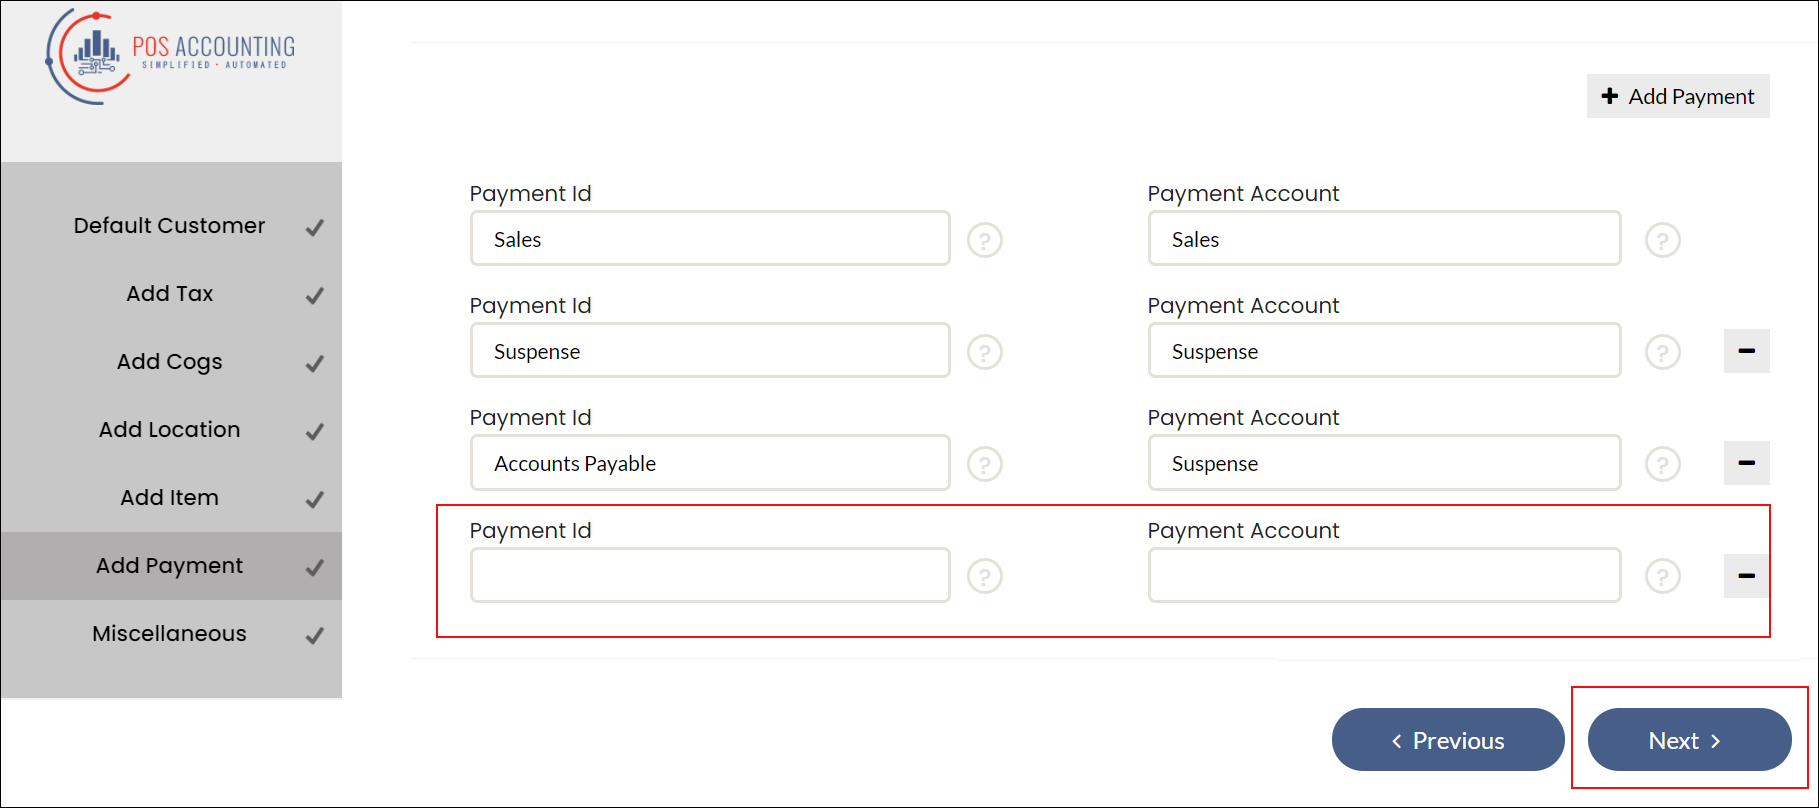
Enter details in the Payment Id and Payment Account boxes.
Note
For Xero, Payment Id and Payment Account must be the Mapped Account in Xero that you’ve selected in Zenoti (in Step 2: Map the Payment Types in Zenoti) .
Click Next.
The payment type is added in POSAccounting.
Accounting integration: How to edit an existing payment method?
Navigate to the Integrations tab.
Organization level:
Click the Configurations icon.
Click the Integrations tab.
Center level:
Click the Configurations icon.
Click the Integrations tab.
Expand the Accounting section.
Expand the Payments Mapping section.
For QuickBooks, for the payment method that you want to edit, select the corresponding QuickBooks payment type from the Mapped Account in QuickBooks list.
For Xero, select the corresponding Xero chart of accounts from the Mapped Account in Xero list.
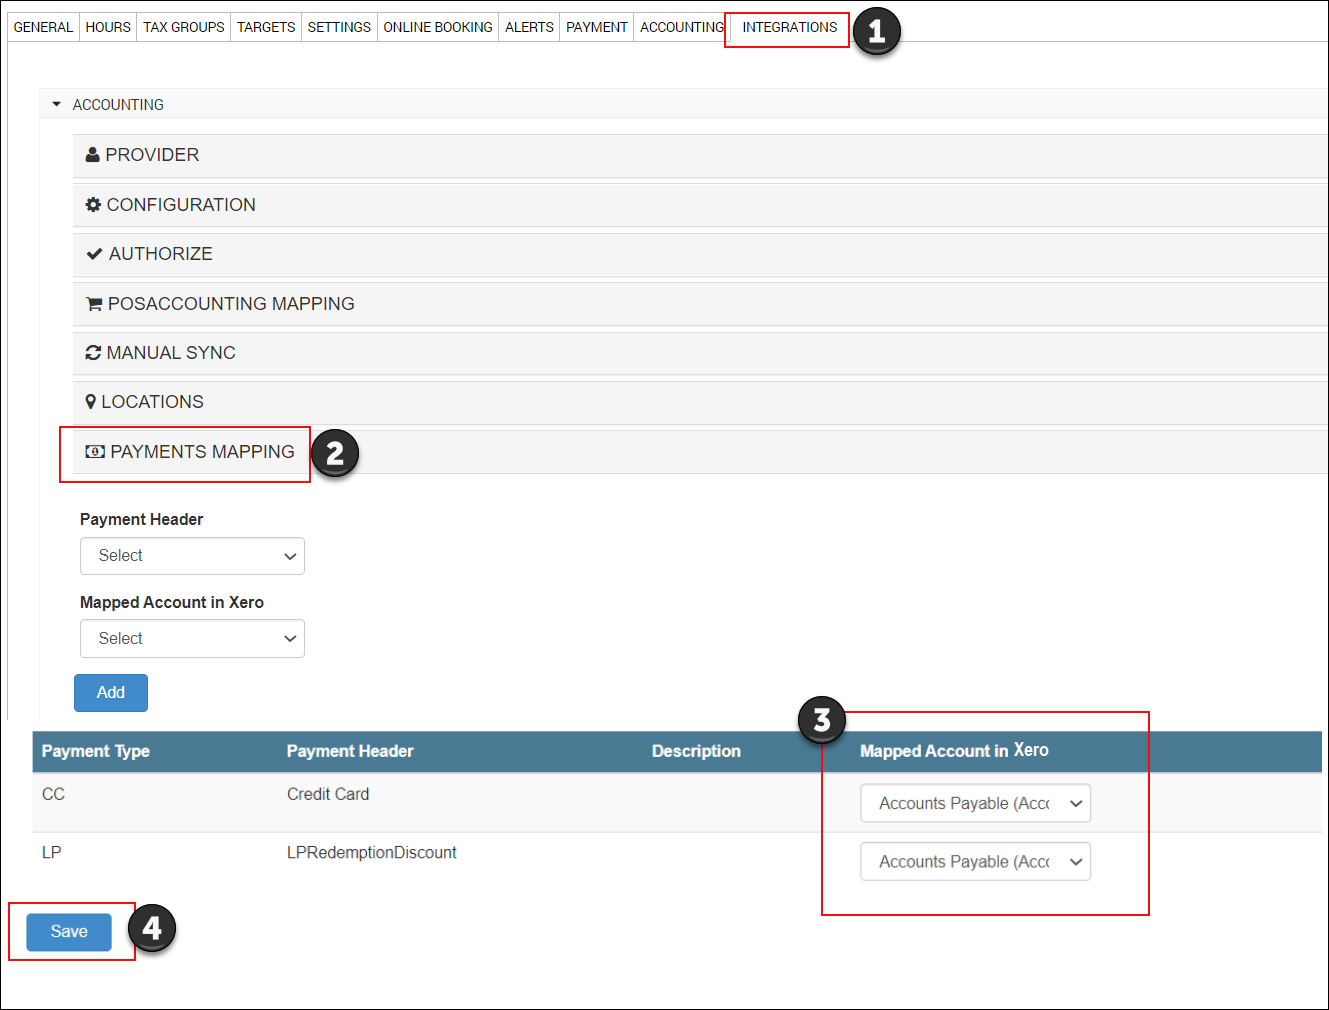
Click Save.
Open POSAccounting and ensure that the mapped account for the payment type is correct. Otherwise, change the mapped account in POSAccounting.
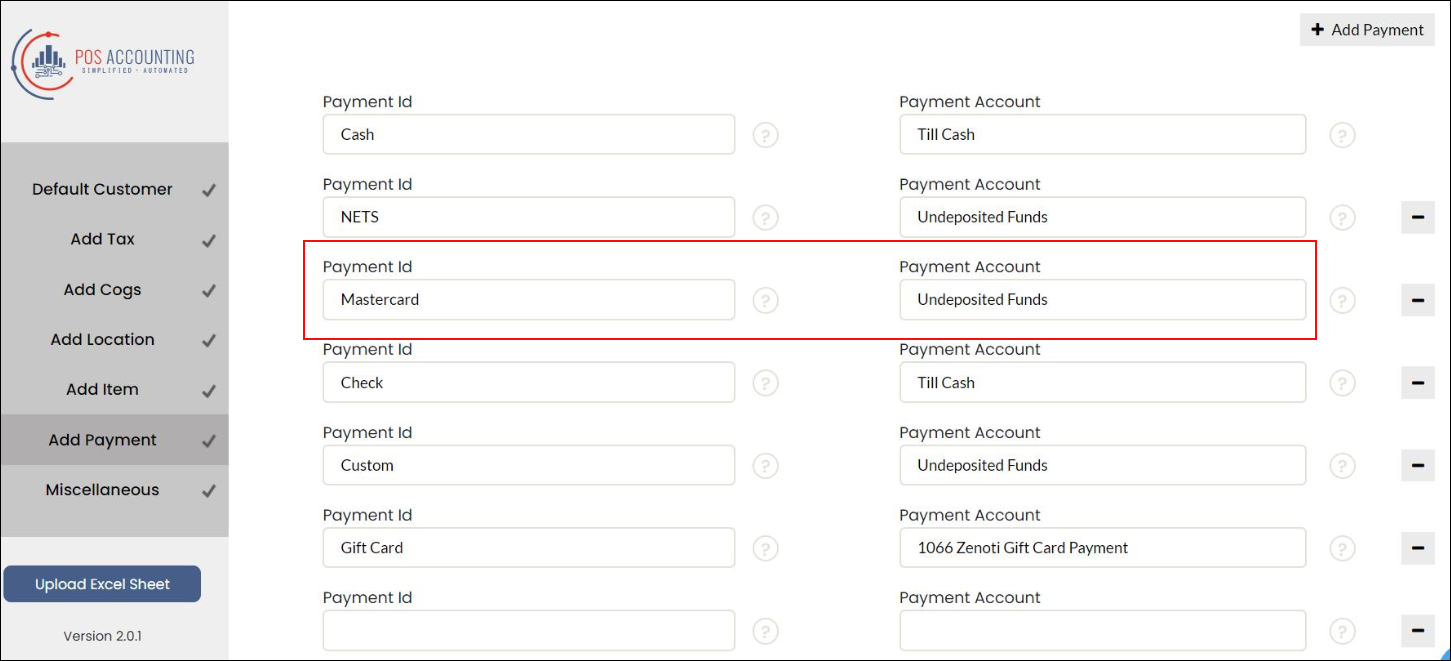
Note
For Xero, Payment Id and Payment Account must be the Mapped Account in Xero that you’ve selected in Zenoti (in Step 3) .
Accounting integration: How to sync a new item instantly?
When you add a new service or product based on grouping in Zenoti, it is recommended to add the same item in the accounting platform with the relevant item type (Service, Inventory, Non-Inventory, and Other Charge).
For the accounting platform, you can create the new items even from the Sale Orders Summary report.
To check the item type that you’ve selected in Zenoti
At the organization level, click the Configurations icon.
Important
You can see the Item Type Mapping section only if you’ve selected the Invoice-wise option under the Configuration section.
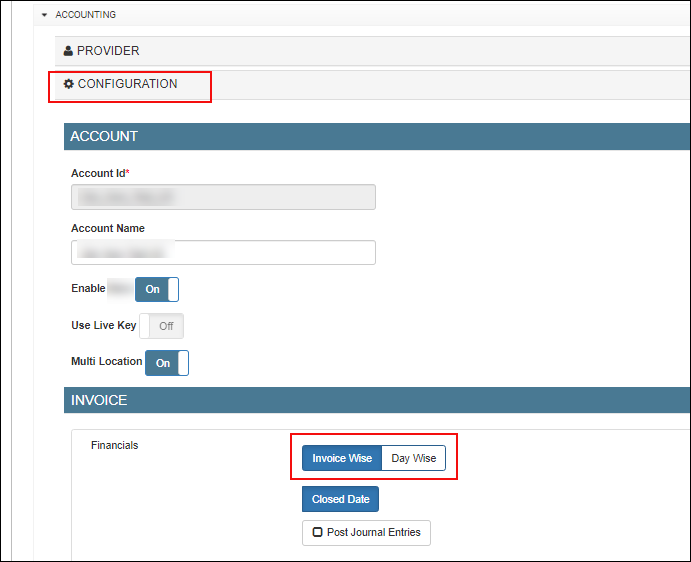
Go to the Integrations tab.
Expand the Accounting section.
Under Invoice, select Invoice Wise.
Expand the Item Type Mapping section and check the Mapped Item Type that is selected for the new item that you want to create in the accounting platform.
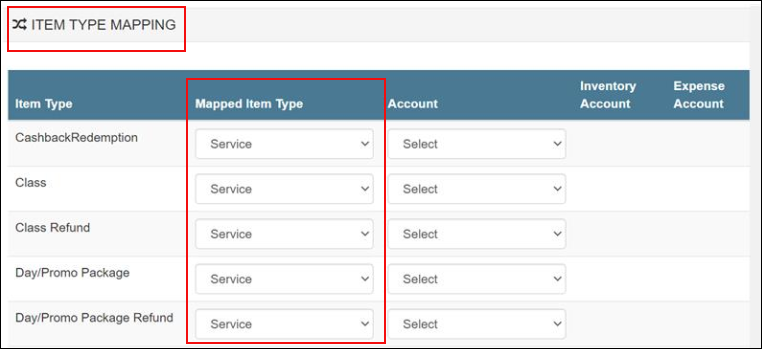
Note the mapped item type and select the same item type in the accounting platform.
After you add the item (product or service) in the accounting platform and map it to the correct item type, the item is automatically synced after the duration specified for Schedule under the Sync Schedule section.
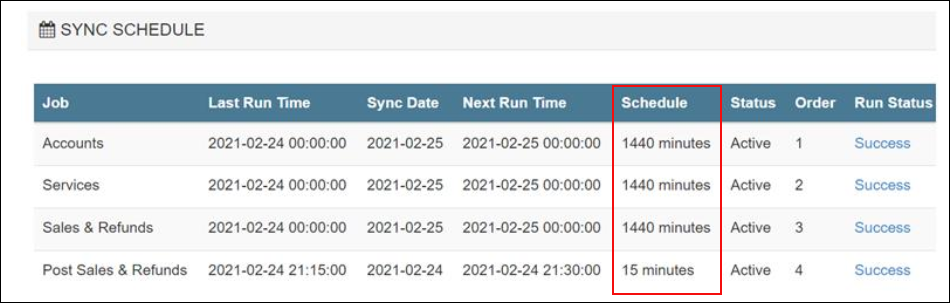
Access Integrations tab.
Organization level:
Click the Configurations icon.
Go to the Integrations tab.
Expand the Accounting section.
Center level:
Click the Configurations icon.
Go to the Integrations tab.
Expand the Accounting section.
Expand the Manual Sync section.
Under Products, select one of the following options:
Products Modified On or After
Select this option if you want to sync products that are added or modified on a particular date or after a particular date. When you select this option, you are required to select the date as well.
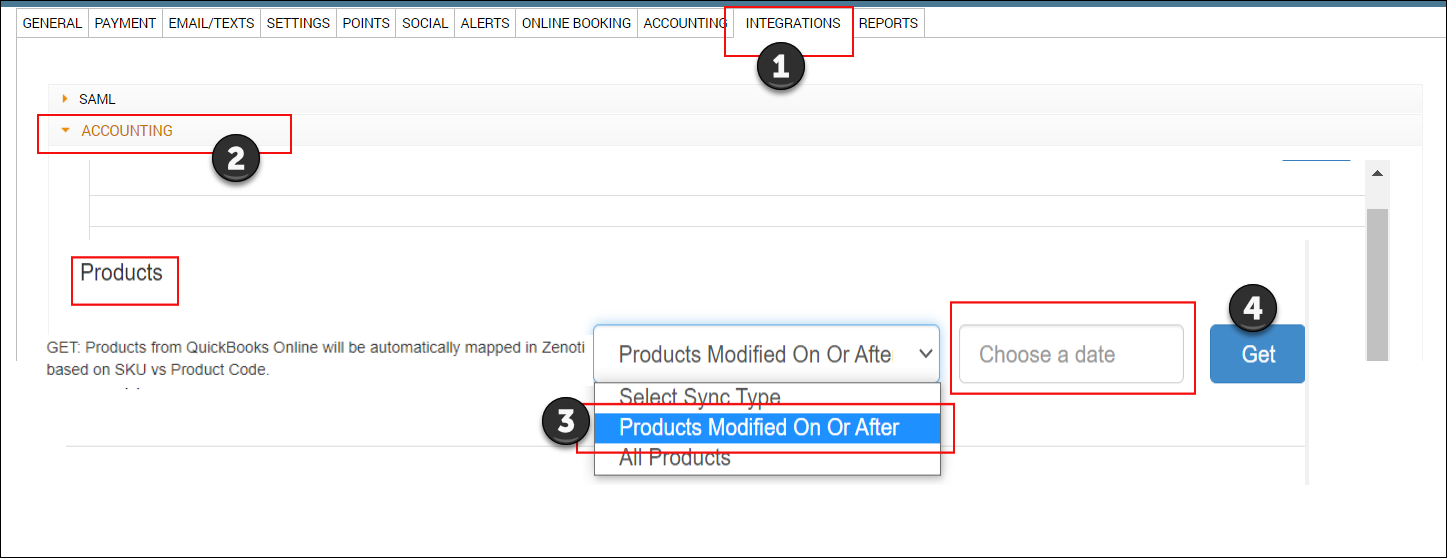
All Products
Select this option if you want to sync products that are added or modified till the current date.
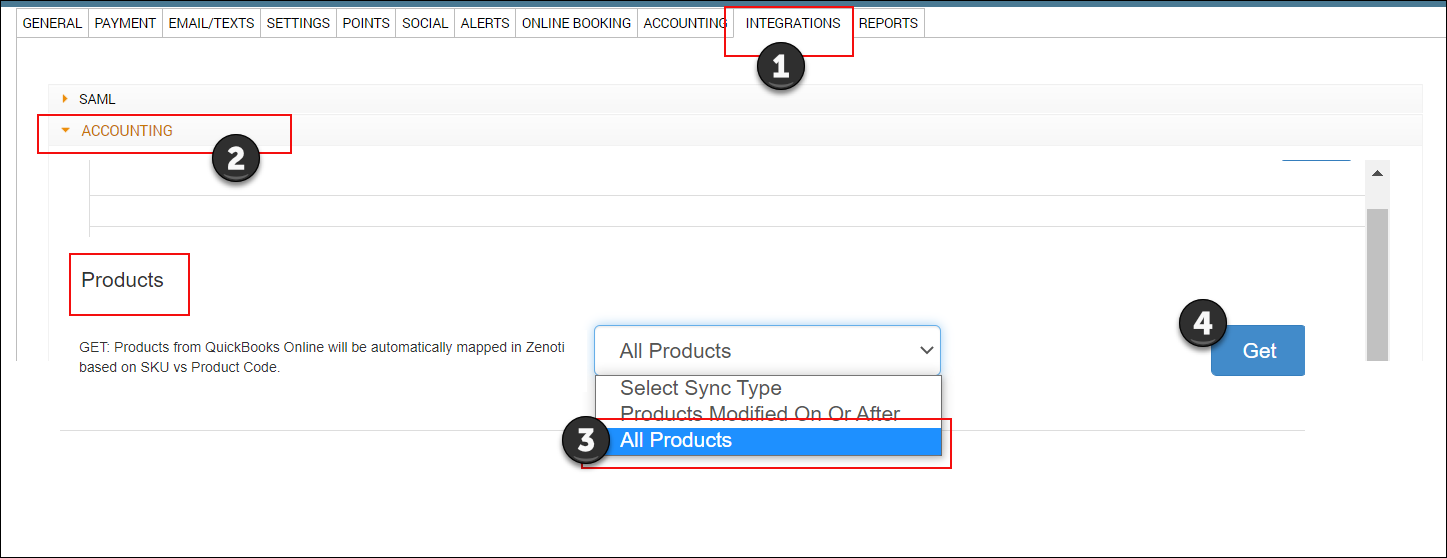
Click Get.
Important
Ensure that the product code in Zenoti has a matching SKU in the accounting platform.
Ensure you are at the center level or organization level and navigate to Configuration icon > Integrations > Accounting.
Organization level:
Click the Configurations icon.
Go to the Integrations tab.
Expand the Accounting section.
Center level:
Click the Configurations icon.
Go to the Integrations tab.
Expand the Accounting section.
Expand the Manual Sync section.
Under Services, select one of the following options:
Services Modified On or After
Select this option if you want to sync services that are added or modified on a particular date or after a particular date. When you select this option, you are required to select the date as well

All Services
Select this option if you want to sync services that are added or modified till the current date
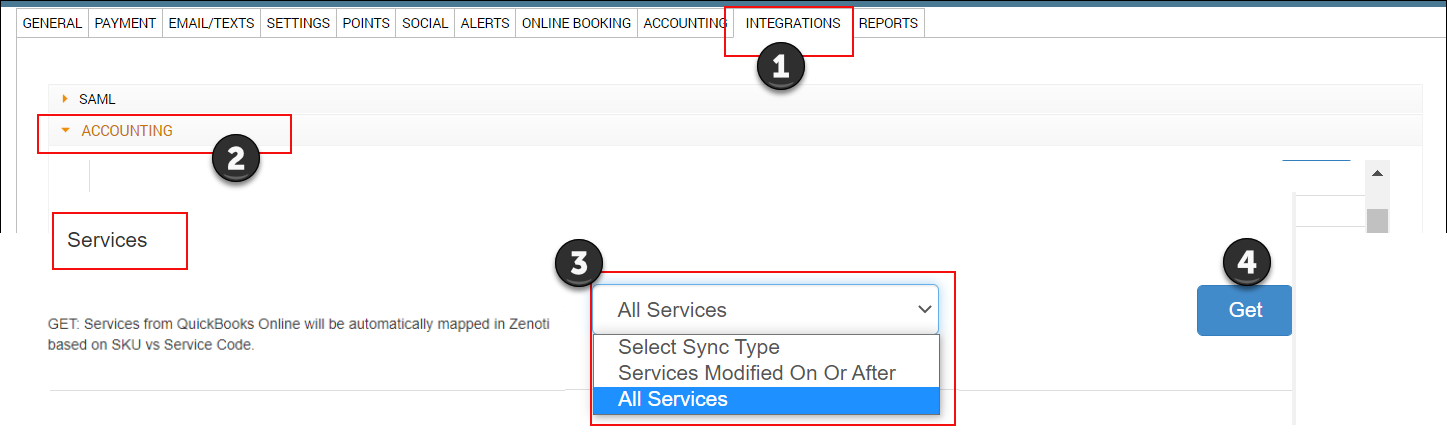
Click Get.
Important
Ensure that the service code in Zenoti has a matching SKU in the accounting platform.
Accounting integration: How to sync sale orders manually?
At the center level, click the Configurations icon.
Navigate to Organizations > Centers.
Select the center for editing.
Click the Integrations tab.
Under Accounting, expand the Manual Sync section.
For Sales and Refunds, select a date for which you want to sync the sale orders.
Click Post.
The sale orders are synced to the accounting platform for the selected date.
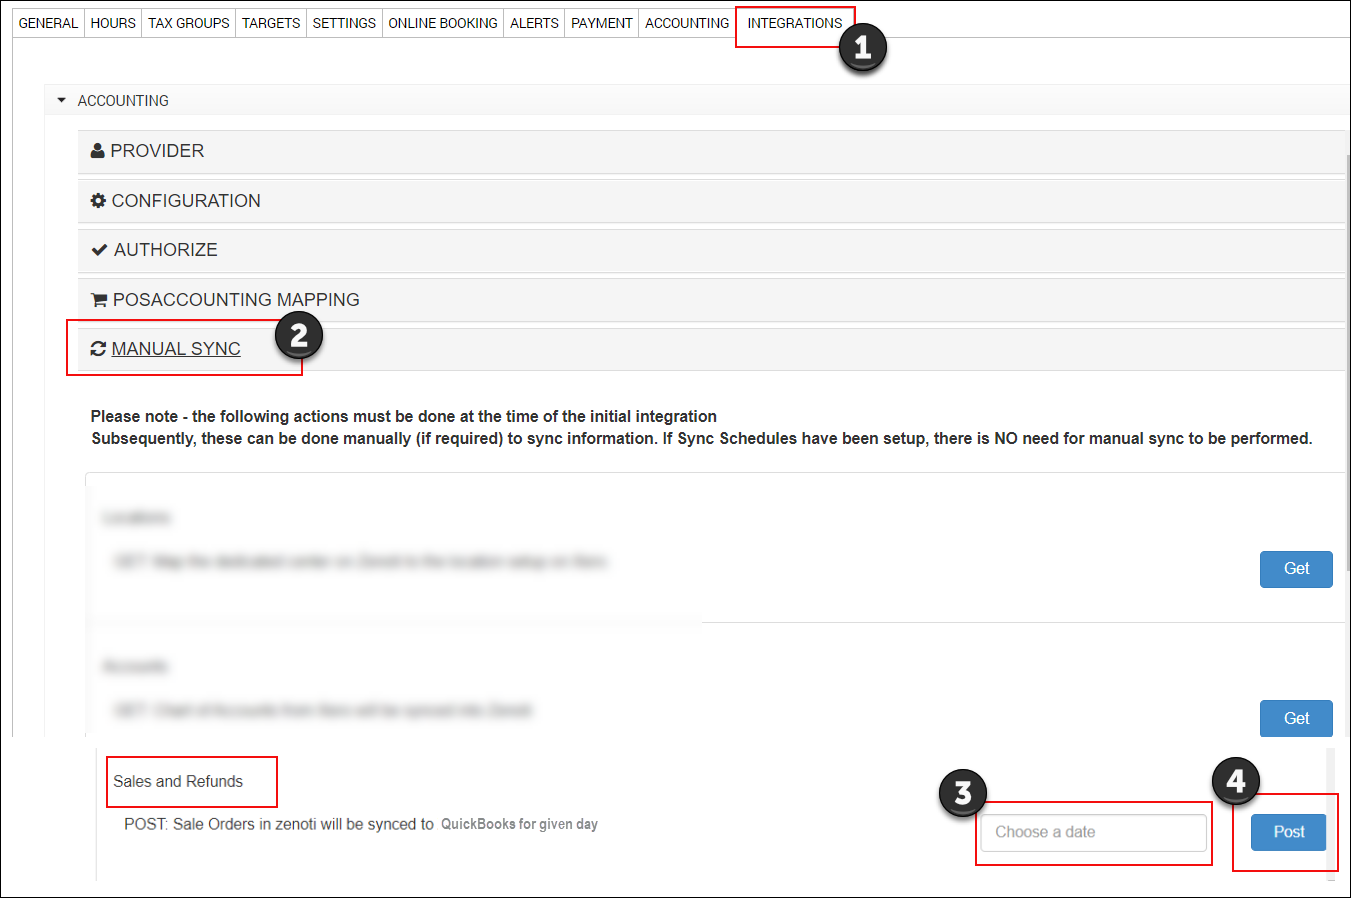
To verify the sync, open the Sales Orders Summary report for the accounting platform.
Accounting integration: Troubleshooting invoice failures and sync failures
Invoice failures occur when the scheduler is unable to retrieve the data for the jobs scheduled. The failure can be caused due to a mismatch of data between Zenoti, POSAccounting, and the accounting integration.
In the Sales Order Summary report, a few terms in the response message indicate the source of the failure. The following table lists these terms:
Response Message Contains | Description | Action |
Response | This is due to incorrect data in POSAccounting mapping form or in the accounting integration. | Ensure that there are no spelling mistakes, there are correct chart of account selected for the item, or the item is added correctly in POSAccounting or the accounting integration accordingly. |
Zenoti | This is due to incorrect data mapping in Zenoti. | Ensure that the items are synced or the payment method is added correctly. |
If you are still unable to troubleshoot the failure, reach out to Zenoti Support.
Sales Orders Summary Sync report
While setting up QuickBooks, if you chose Invoice Format as ‘Invoice Summary’, all the sales invoices of a particular center, belonging to a particular day, are summarized and synced into a single sales invoice. Similarly, all the refund invoices of a particular center, belonging to a particular day, are summarized and synced into a single refund invoice.
To view Sales Orders Summary report
At the organization level, navigate to Reports > Financial > QuickBooks (Depending on the application you have subscribed to, you see QuickBooks Online or QuickBooks desktop). The Admin Sync Report page appears.
Select ‘Sales Orders Summary’. Two additional filters appear: Status and ‘From and To’ Dates.
Select a Status, select From and To dates, and click Refresh to view the report.
 |
Column descriptions
Column | Description |
Center | Shows the name of the center to which the invoice belongs. |
Summary Invoice No. | Shows the number of the Invoice Summary that is generated from all the closed invoices of a business day in Zenoti. |
Sale Date | The closed invoices that are condensed into Invoice Summary belong to the date on which the sale was made. This column shows such sale date. |
Sync Date | If you have requested a delay in Sync while setting up automated daily syncs, the sync date can be different from the sale date. This column shows the date on which the auto-sync of the invoice summary was performed. |
Status | Shows any of the three statuses: Synced, Pending, or Failed |
Transaction Reference | Shows the reference number internally generated in QuickBooks. A reference number is generated every time a sync is performed. |
Invoice Reference | Same as the Invoice Summary Number. |
Response Message | Depending on the status of the sync, two types of response messages appear: Success and Failure. |
Resync | If the sync failed, this column shows two options: Resync and Delete. Resync: If sync fails due to an issue with QuickBooks, select Resync. After that, perform the manual sync of the invoices as well. If the issue with the invoice in Zenoti, Resync doesn’t work. You need to manually sync the invoices. Delete: If during the sync, you have modified an invoice in Zenoti and the sync failed, click Delete. Perform manual sync, after deleting. |
Order Type | Shows: Sale or Refund.
|
Accounting integration export data
The data export option allows only posting of day-wise journal entries for both accrual and cash accounting. You can export the data only in Excel and CSV formats.
At the center level, click the Configuration icon.
Search for and select Accounting from the Integrations section.
Select Export icon and click Continue. You can edit the configuration if required.
Navigate to Manual Sync and select the time period.
Note
You can choose a time period of up to one month only.
From Locations, select the center and click Save.
From Fields, select and enter the data as required.
From Payments Mapping, select the Payment Header and enter the Chart of Account.
Enter the custom fields as required.
Click Add.
From Journal Mapping, you can select the Transaction Type as either sales, refunds, or payments (if accrual accounting is selected).
Enter the Journal Custom Field if required.
Click Add.
From Item Mapping, you can select the Item Type and enter the Chart of Account.
Enter the custom fields as required.
Click Add.
From Miscellaneous Journal Entries, select the Journal Type and enter the Journal Name.
Enter the custom fields as required.
Select the Location.
Select the Subsidiary from the drop-down list corresponding to the selected Journal Type.
Enter the credit and debit account.
Click Add.
From Manual Sync, click Export.
The file will be exported as [SAGE ID]_[Location name]_[EXPORT NB]_[Start Date]_[End Date].csv.
Note
Sage ID is the organization name defined during configuration and location name is the center.
Export Data in QuickBooks Desktop Format
The data export option allows you to extract your financials from Zenoti and format them for easy import into QuickBooks Desktop.
At the organization or center level, click Configuration.
Navigate to Accounting > Integrations.
Select Export icon and click Continue.
From Configuration, select Export Format as QuickBooks Desktop.
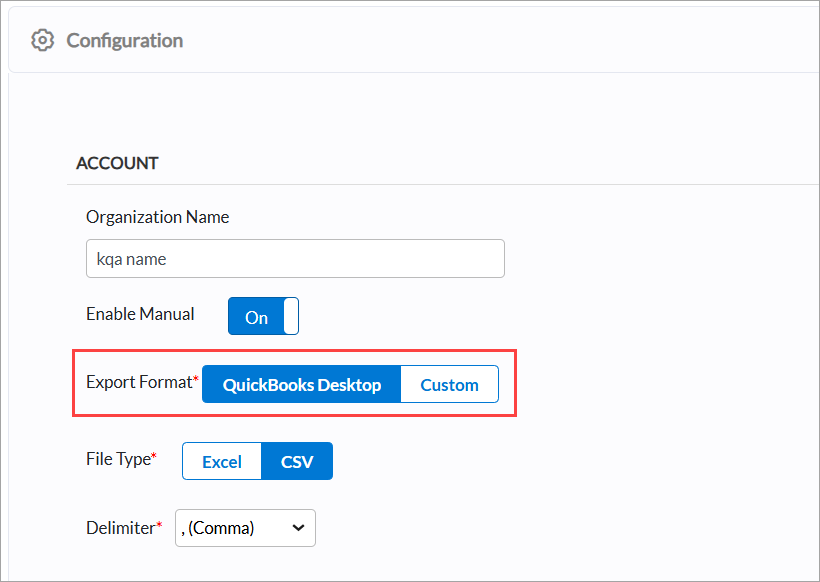
Note
The data can be exported only in CSV format.
Edit the other details as per your requirements.
Navigate to Manual Sync and select the time period.
You can choose a time period of up to one month only.
From Locations, select the center and click Save.
From Fields, select and enter the data as required.
Journal Number: Journal Number for each transaction
Date: Date of Transaction
Account name: Chart of Accounts
Debit Amount: Amount
Credit Amount: Amount
Item Name/ Payment Header: Description of item/payment type
Custom field 1: Name of the guest
Custom field 2: Currency of the Transaction
Custom field 3: Class in which the transaction must be posted
Location: Location of the transaction
Note
You can use the Sort Order column to determine the sequence in which the fields are arranged when exported or displayed. It allows you to prioritize or reorder fields based on importance or preference.
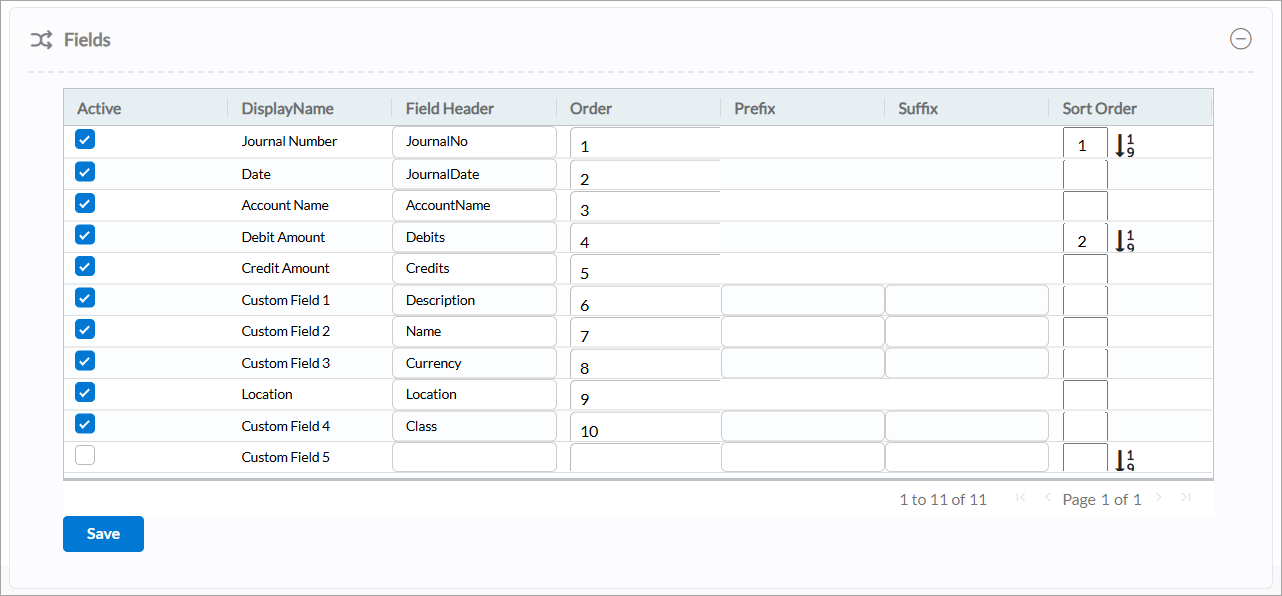
From Payments Mapping, select the Payment Header and enter the Chart of Account.
Enter the custom fields as required.
Click Add.
Enter the Journal Custom Field if required.
Click Add.
From Item Mapping, you can select the Item Type and enter the Chart of Account.
Enter the custom fields as required.
Click Add.
From Miscellaneous Journal Entries, select the Journal Type and enter the Journal Name.
Enter the custom fields as required.
Select the Location.
Select the Subsidiary from the drop-down list corresponding to the selected Journal Type.
Enter the credit and debit account.
Click Add.
From Manual Sync, click Export.
Note
In the Integration Data Export report, if a record's status is Success but no link is generated, it likely indicates that the financial lock is not set, or the required data is unavailable.
Set up NetSuite
This article explains how to set up NetSuite for integration with Zenoti. It covers installing the required NetSuite bundle, enabling SuiteCloud features, configuring NetSuite account details in Zenoti, authorizing access, and leveraging the Codat integration to create purchase orders (POs) directly in NetSuite.
Overview
Integrating NetSuite with Zenoti helps automate your accounting processes by syncing your financial data securely and in real time. With this integration, Zenoti can send mapped data, including purchase orders, directly to NetSuite, ensuring consistency with your validation rules and configuration.
Prerequisites
Ensure you meet the following requirements before beginning:
Administrator privileges in your NetSuite account.
Access to the Integrations section in Zenoti.
An active NetSuite account prepared for bundle installation and configuration.
To set up NetSuite, you must:
Install NetSuite Bundle
Enable SuiteCloud features
Install NetSuite Bundle
You must have Administrator privileges in your NetSuite account to install bundles and link your account. To install the following bundle for Zenoti to access your accounting data, follow these steps:
Log in to your NetSuite account.
Navigate to Customizations > Suite Bundler > Search and Install Bundles.
Search for AppLink and the ID: 391485
Click Install.
Enable SuiteCloud Features
To enable the SuiteCloud features and ensure the linking process does not fail, follow these steps:
Log in to your NetSuite account.
Navigate to the SuiteCloud tab and enable the following features and agree to the terms and conditions:
SuiteScript
Client SuiteScript
Server SuiteScript
SuiteTalk (Web Services)
Rest Web Services
Manage Authentication
Token-based Authentication
Set up your NetSuite account details in Zenoti
If you are not on the integration page, based on where you want to set up the integration, click the Configuration icon.
Navigate to Integrations and click Accounting.
Under the Configuration tab, expand the Account section. You can view the fields relevant to NetSuite integration.
To enable integration, toggle the Enable NetSuite button. If you want to pause the sync, you can turn off the switch.
The following details are autogenerated:
Account ID: An identifier for your business. This is an auto-generated random combination of numbers. Zenoti creates a company for your business in POSAccounting (a third-party connector for accounting integrations).
Account Name: The company name of your business that is auto generated by Zenoti.
Use Live Key: It is enabled by default.
Authorize Zenoti to access your NetSuite account
Expand the Authorize tab.
Click Authorize.
If the new tab does not open automatically, you can find the authorization link in the Authorize section. Copy and paste this link into a new tab and press Enter.
If you have a single organization created for your business on NetSuite, you will see a window with ZenotiApp asking to access your organization's data. If you have multiple organizations created for your business on NetSuite, the window displays a drop-down list of all the organizations. Select the organization to which you want to give access to Zenoti.
Click Allow. Zenoti now has access to your NetSuite account and you will see a message stating that you have completed your first step for integration.
To close the tab and finish the mapping of chart of accounts setup, click Click here to close this window.
Turn on the Is Authorized switch.
Click Save.
Integration with Codat for Purchase Orders
If your organization uses the Codat integration for NetSuite, Zenoti can directly create purchase orders (POs) within your NetSuite system. This integration allows Zenoti to send mapped data in real time, ensuring that the POs comply with your configuration and validation rules.
Supported Capabilities:
Single-line and multi-line purchase orders (with headers and line-item details)
Accurate and duplicate-free PO creation
Field alignment with NetSuite's mapping and validation configurations
Payment method mapping from Zenoti to NetSuite for accurate payment classification
Location-level payment posting using the existing location sync configuration
Key Terms
SuiteCloud: A NetSuite development platform that allows customizations and integrations using SuiteScript and web services.
SuiteBundler: A NetSuite tool used to package and install custom solutions or bundles.
Token-based Authentication: A secure method of linking Zenoti with NetSuite to authorize API access.
Payment Method Mapping: A configuration that links each Zenoti payment method (such as Cash, Credit Card, or Gift Card) to a corresponding payment method in NetSuite, so that payments carry the correct classification without requiring separate GL accounts.
Enable Payment Methods: A toggle in the accounting integration configuration that activates payment method mapping for NetSuite. This setting is visible only when the provider is Codat_Netsuite.