Payment settings
Required roles: Owner
This article explains how to configure payment settings in Zenoti, including payment types, check payment prerequisites, Zip Pay setup, gift card reader rules, and Denmark-specific saved-card restrictions. It guides owners and administrators through each configuration to ensure accurate, compliant, and seamless payment processing.
Overview
Payment settings define how your business accepts and processes payments across POS, Webstore, and related workflows. These settings help you control available payment modes, enable or restrict specific transaction types, support third-party payment providers, and manage device-level behavior such as gift card readers or saved-card usage. Use this section to ensure your payment workflows match your business requirements and regional compliance needs without duplicating configuration in multiple places.
Configure payment types
The payment type determines the payment or transaction modes the guests can use to avail services or purchase products from your business.
At the organization level, click the Configurations icon.
Search for and select Payment settings from the Payments section.
On the Payment settings page, select the Payment Types option.
To enable the various payment modes for your business, select the available options in the Payment Types section.
Multiple icons represent various payment modes such as cash, check (cheque), custom payment, prepaid card, loyalty card, and membership card. Select the options you require to enable for your business.
To enable the cards that can be used for guest payments, select the available options in the CARD TYPES section.
Set the Default Payment Option in Point-of-Sale and Default Card Type in Point-of-Sale from the respective dropdown lists.
To set compulsory fields when a guest makes an offline payment, enable the options under the MANDATORY FIELDS FOR OFFLINE CHECK PAYMENT section.
The available options are Check Number, Bank Name, and Check Date. The front desk staff must enter these details while accepting an offline payment.
Click Save.
Enable check payments for a center
Required roles: Center Managers, Administrators
Required permissions: Appointment > PaymentTypeChange, Close Payments
To enable check or cheque payments in the Collect Payments section of POS, the following prerequisites must be completed.
Enable check payment type at the organization level. For more information refer to configure payment types.
Disable DD/ACH at the center level. Refer to the steps below to update the DD/ACH transaction type.
Update DD/ACH transaction type
At the center level, click the Configurations icon.
Search for and select Payment processor onboarding from the Payments section.
On the Payment processor onboarding page, select the Transaction Types tab.
To enable check payments, locate and click Change next to the DD/ACH option.
Select the No Payment Processor option from the list to change the DD/ACH setting.
To confirm your selection, on the popup, click Yes.
After updating the DD/ACH settings, refresh your browser. Open the appointment book and navigate to the POS. The check option should now appear as one of the modes of payment. For more details on guest payments, refer to take payments.
Configure Zip pay
At the organization level, click the Configurations icon.
Search for and select Payment settings from the Payments section.
On the Payment settings page, select the Zip option in the Additional Payment Options section.
To enable the zip pay, select the Enable zip option.
In the Agent Name field, select a custom payment provider from the available options.
In the Merchant Api Key field, enter the agent's or provider's endpoint details.
Enter the Store Location ID.
Click Save.
Enable gift card reader
At the organization level, click the Configurations icon.
Search for and select Payment settings from the Payments section.
On the Payment settings page, select the Gift Card Reader option in the Additional Payment Options section.
To enable the gift card reader, select the Enable gift card reader option.
Select a card reader from the available options.
To set a rule or format that the gift card reader must validate, enter the RegEx format.
A regex (regular expression) for a gift card reader depends on the specific format of the gift card numbers you are trying to validate. You can set the required format as per your business requirements.
For example, ^[0-9a-zA-Z]*$
^ denotes that the gift card number or code must start here.
[0-9a-zA-Z] denotes any number (0-9) or letter (a-z, A-Z).
* means zero or more of the previous part (so it can be empty, or have many characters).
$ means the gift card number or code must end here.
Together, it means the gift card number or code can only have numbers and letters, and it can be empty or be as long as needed. No spaces, punctuation, or other special characters are allowed.
Click Save.
Restrict Saved Card Charges by Front Desk (Denmark Only)
This article explains how Zenoti helps businesses in Denmark comply with regional regulations by allowing them to restrict front desk staff from charging saved cards. It outlines the configuration setup, user impact, and system behavior when the feature is enabled.
Overview
Saved card functionality in Zenoti allows businesses to simplify recurring and membership payments. In Denmark, businesses are expected to handle saved cards with extra care, especially when it comes to front desk access.
To support this, Zenoti now restricts the use of saved cards in POS workflows. Front desk staff can no longer charge or edit saved cards—ensuring compliance, reducing risk, and protecting the business from potential penalties related to unauthorized card use.
Prerequisites
The business must be configured and based in Denmark.
Admin access is required to update payment settings.
Configure Restriction on Saved Card Charges
This setting appears only for businesses in Denmark.
How to enable:
Navigate to Configuration > Payments > Settings.
Click the down arrow next to the configured payment provider.
Select the Don’t allow saved card charge in POS check box under Payment options.
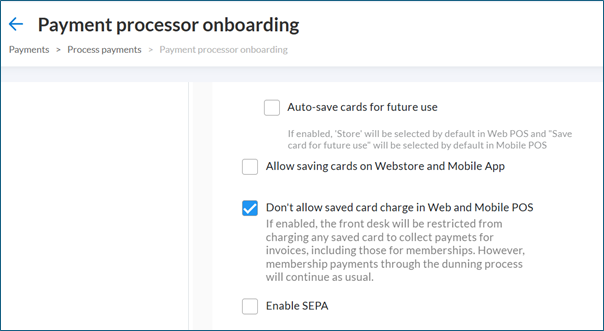
Front desk operators cannot charge saved cards through POS or related touchpoints.
Front desk operators cannot edit saved card details (primary or backup) for guest's membership.
Front desk operators retain view-only access to saved cards under the guest profile.
Bulk tools like the Membership Suspended Report and Membership Payment Report are also restricted.
Guest Access via Webstore
Guests retain full control over their saved cards when this setting is enabled. They can:
Add new cards
Update existing cards
Link a card to a membership or series
They need to navigate to Webstore > Guest Profile > Memberships.
User impact
User | Action | Result |
|---|---|---|
Center Manager | Enables the POS restriction setting | Ensures compliance with local consent laws |
Front Desk Operator | Attempts to charge or edit saved cards | Restricted access—can only view card details |
Guest | Manages cards through Webstore | Full access to update or replace cards |
This setting is only available for Denmark-based businesses.
WebPOS
Guest Profile
Membership Reports
Webstore
Admin Settings (Payment Configuration)
Key terms
Term | Description |
|---|---|
Payment Types | Modes guests can use to pay at POS, such as cash, checks, prepaid cards, loyalty cards, and membership cards. |
Card Types | Card brands or categories enabled for accepting guest payments at POS. |
Default Payment Option | The pre-selected payment mode shown in POS for faster checkout. |
Mandatory Fields for Offline Check Payment | Required details—Check Number, Bank Name, Check Date, that front desk staff must record when accepting offline check payments. |
DD or ACH Transaction Type | Direct Debit/Automated Clearing House configuration that must be disabled to enable check payments at the center level. |
Zip Pay | A custom-payment setup where an external provider processes payments using an agent name, API key, and store location ID. |
Gift Card Reader RegEx | A rule that validates gift card numbers using a regular expression format. |
Saved Card POS Restriction (Denmark Only) | A compliance setting that prevents front desk staff from charging or editing saved cards. |
View-Only Saved Cards | Access level where front desk staff can only view saved card details without performing actions. |
Bulk Membership Tools Restriction | Denmark-specific limitation that disables saved-card–dependent membership actions in reports and bulk tools. |