Guest tasks for booking appointments in Webstore
Book an appointment
The Webstore V2 provides a convenient interface from where your guests can book appointments online. The guests can check different services, specify a provider of their preference, and select an add-on.
In this article, you will see the steps taken by your guests to book an appointment on the Webstore.
Book an appointment using the service-based booking flow
To use this feature, ensure that you have the Enable service-based booking setting turned on.
To book an appointment on the Webstore V2 using the service-based booking flow, your guest takes the following actions
Navigate to the Webstore V2 either from your website or by the URL. For example, the Webstore URL can be www.<orgname>.zenoti.com/webstoreNew.
Log in to the Webstore V2 using the username and password.
Note
It is necessary for the guest to log in to the Webstore V2 to book an appointment and also to check the membership benefits. The Webstore home page reloads after you sign in.
Click Change Location to select the center of your choice.

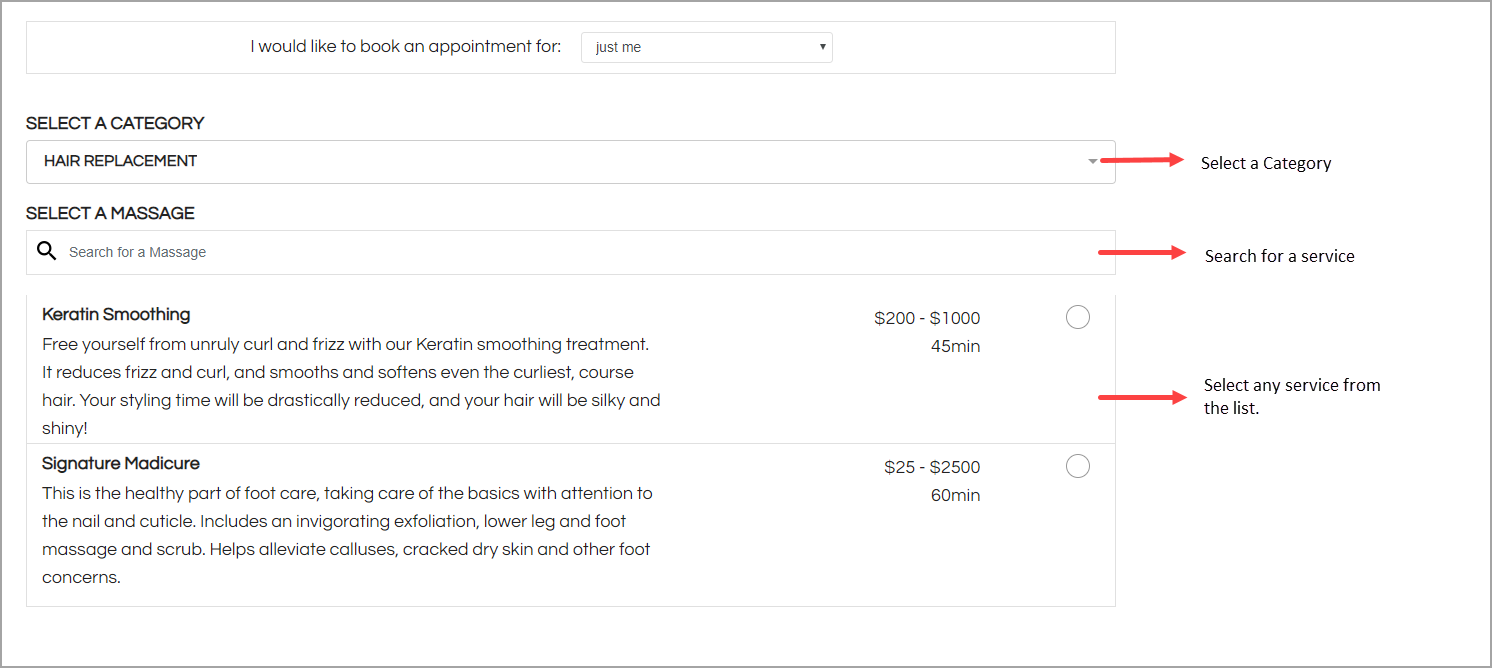
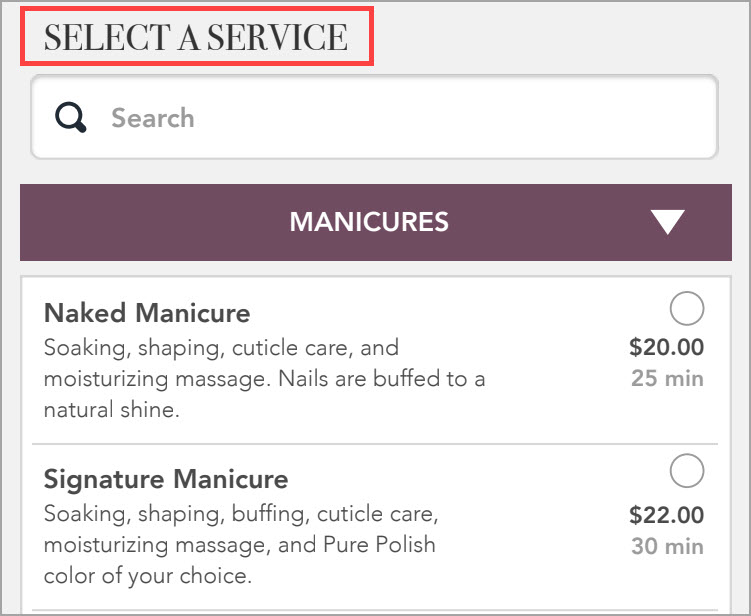
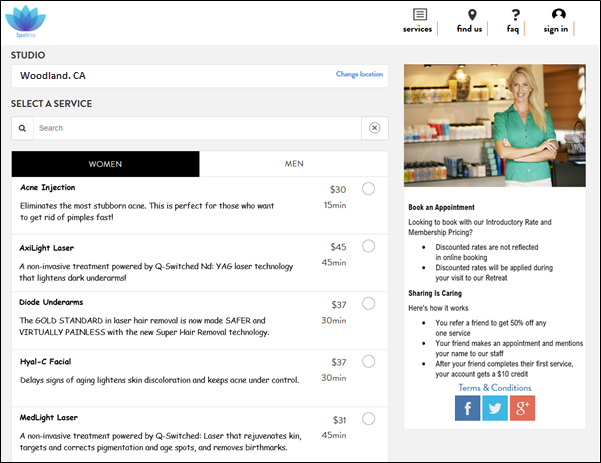
Select a service, day package, or bundle.
You can take any of the following actions to select a service:
Search for the service from the search bar.
Select a category from the Category drop-down list and view all the services for the selected category.
Select any of the services listed on the home page.
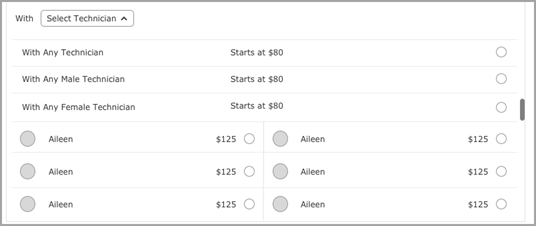
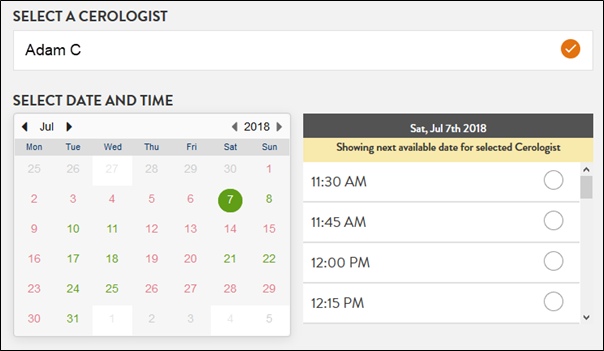
Select a provider.
If a guest sees the message "No provider available for your current selection," it usually means the "Available Online" setting is not turned on. Check that each provider has Available Online enabled, and make sure the selected employees and services are set up for online booking.
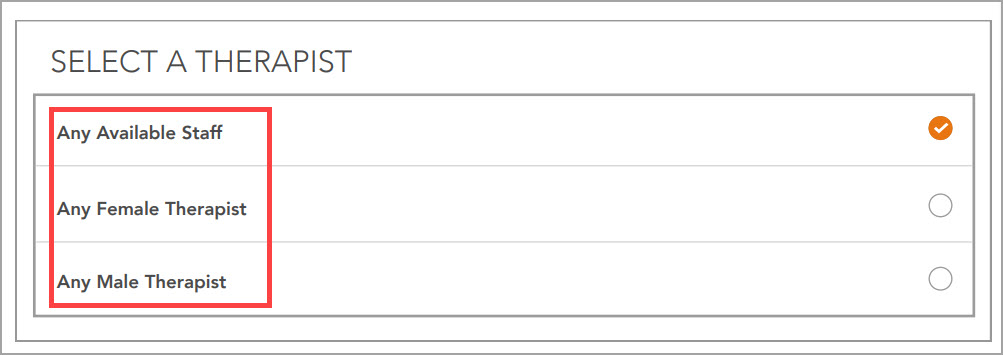
After you select a service, you must specify your provider preference. You can choose any of the following:
Any Provider
Any Male Provider
Any Female Provider
Specific Provider
Note
If level-based provider selection is enabled, you can choose from three options:
By Level: Browse providers grouped by employee level.
Each level shows the level name (for example, Junior Stylist, Senior Stylist, Master Stylist) and the price range for your selected service. The price range is calculated from the minimum and maximum prices across all providers at that level.
Select a level to see available time slots pooled from all providers assigned to that level. At booking confirmation, the system automatically assigns an available provider from your selected level.
Any Provider: View available slots from all providers.
The system auto-assigns a provider when you confirm the booking.
Specific Provider: Browse and select an individual provider by name.
When you book by level, the exact price is determined by the provider auto-assigned to your booking, which you can see on the booking confirmation screen.
Note
If your business calls your employees Providers or Technicians, you can configure the labels for employees. Learn how
This way, when guests book appointments, they will see the label you have configured for your business, such as say Provider.
Note
If the guest selects Specific provider and the therapist has the Allow bookings for only repeat guests setting enabled, the following scenarios apply for the guest:
Guest is logged in and has been served by the specific provider in the past: The guest can proceed with the booking with the specific provider.
Guest is logged in and has not been served by the specific provider in the past: The guest is not shown the specific service provider for any service.
Guest is not logged in and has been served by the specific provider in the past: The guest is asked to log in and if they have been served by the therapist in the past, they can proceed with the booking.
Guest is not logged in and has not been served by the specific provider in the past: The guest is prompted to log in first. Once logged in, they encounter an error message indicating the provider is unavailable, prompting them to select another provider.
If the provider has the Restrict some providers from providing some services setting enabled, the therapist's name will not appear in the available list of therapists for those services.
Note
If the therapist has Provider-specific durations enabled, the duration of the service or add-on can vary depending on the employee’s specific configuration. For example:
The Add More Services button and the Select Date and Time (calendar) appear.
When you add multiple services to your cart, Zenoti applies the visit frequency rules for each service individually.
If any service in your cart has Visit frequency applies to set to All services, booking any other service within its restricted interval also triggers an alert.
If no single time slot satisfies all frequency rules for all services in your cart on the same day, the calendar moves to the earliest day where a compliant combination is available.
Select an available date and then select the time for which you want to book an appointment.
If a visit frequency rule applies: After you select a time, the system checks your booking history against the visit frequency rules configured for the service. If your selected time falls within the restricted interval:
The calendar automatically refreshes to show only dates and times that comply with the visit frequency rule. Unavailable dates are greyed out.
If the originally selected day has no valid slots, the calendar moves to the earliest day with availability.
Select a new date and time from the refreshed calendar.
Click Book Reservation or Book Now.
Note
You can configure the text label for this button. Navigate to organization level > Configuration > Online Booking > Webstore V2 template > Labels section.
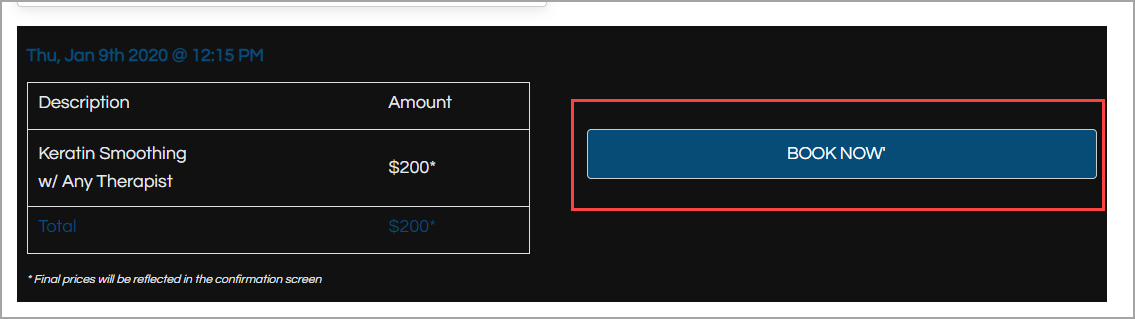
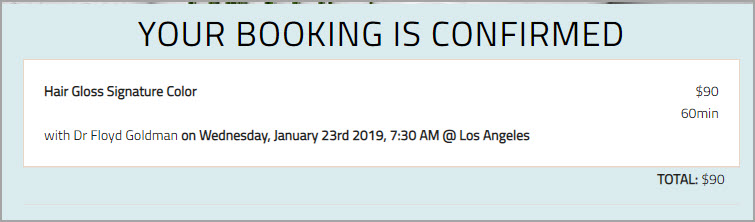
The confirm booking page appears.
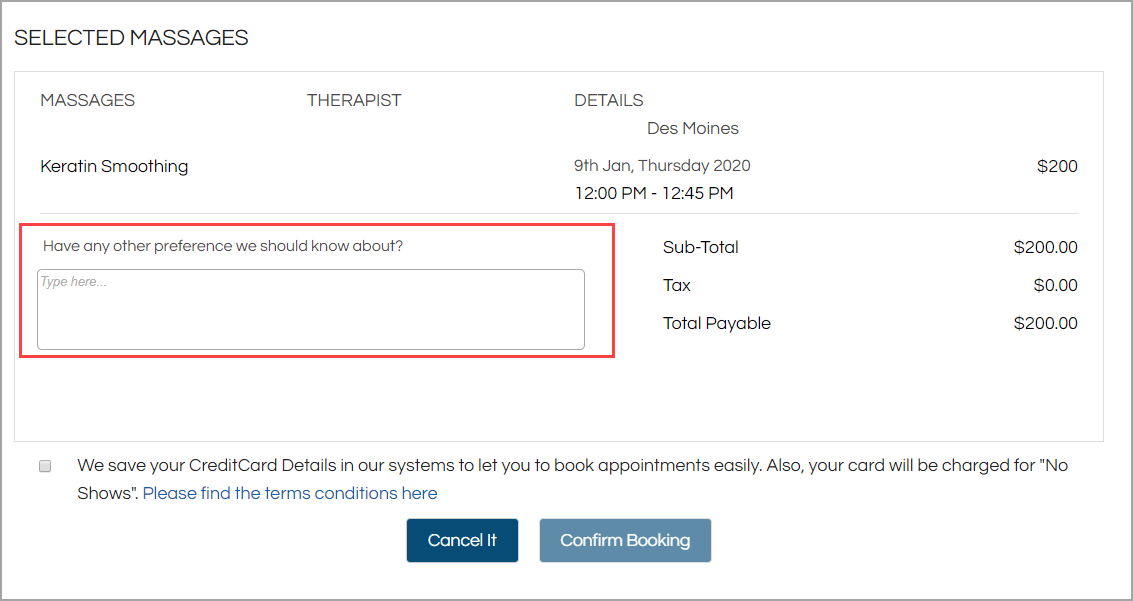
You can review the booking dates and price and click Confirm Booking.
Note
You can also add a note to the providers to inform them about your preferences regarding certain products or services. For example, you can specify a type of hair shampoo to be used or specify hot water or cold water to be used during the hair wash.
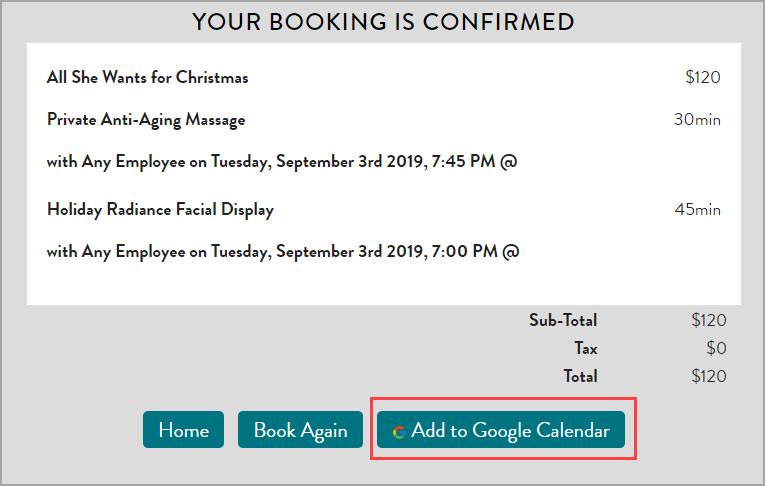
The booking confirmation page appears.
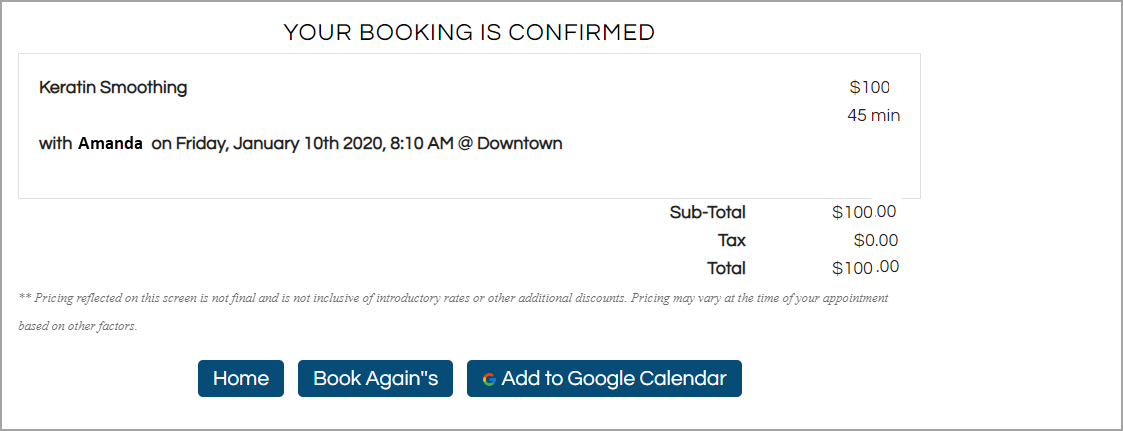
You can take the following actions:
Home: Navigate to the home page of the Webstore V2.
Book Again: Navigate to the Services page to book another service.
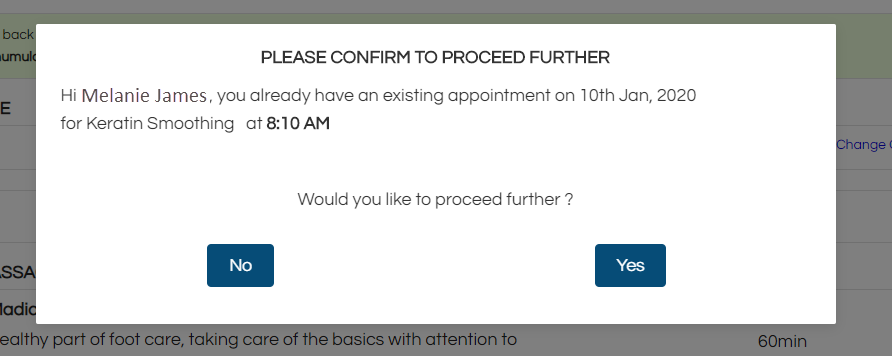
Note
When you already have an existing appointment and if you book another appointment on the same day, the Webstore V2 will display a prompt informing you that you already have an existing appointment and if you want to proceed further.
Add to Google Calendar: Add the booked appointment to your personal Google calendar. Learn how you can add the appointment to your Google calendar.
Book an appointment using the provider-based booking flow
This article explains how guests can book appointments using the provider-based booking flow on Webstore V2. This allows guests to begin their booking by selecting a provider instead of a service. It is ideal for businesses that focus on guest-provider relationships or want to promote key team members.
Guests often return not just for services, but for the trusted providers behind them—be it a favorite stylist or a long-time massage therapist. For salons, spas, and wellness centers that prioritize guest-provider loyalty, the provider-based booking flow enables guests to start by selecting a provider rather than a service. This personalized flow helps highlight top talent, increase rebooking rates, and improve overall guest satisfaction. After choosing a provider, guests see only the services that provider offers, making the experience more tailored and efficient.
Key Benefits
For Businesses:
Highlight key team members with deep links that lead to the webstore with the provider’s services displayed, can be inserted into the customer’s website. Providers can also share these links with guests on social media through messages in their introductions.
Increase rebooking and guest loyalty by surfacing familiar faces
For Guests:
Find your favorite stylist or therapist quickly
Search for providers by name
Discover new providers that fit your preferences
The Enable provider-based booking setting must be turned on.
Providers should have services assigned and active schedules.
Deputed employees will only appear under their mapped centers if they have an active schedule.
If a provider has service restrictions or specific visibility rules, they may not appear for certain services.
To book an appointment on the Webstore V2 using the provider-based booking flow, your guest takes the following actions
As a guest, log in to Webstore using the username and password or using a verification code.
You can also click Change Location to select the center of your choice.
Note
It is necessary for the guest to log in to Webstore to book an appointment and also to check the membership benefits.
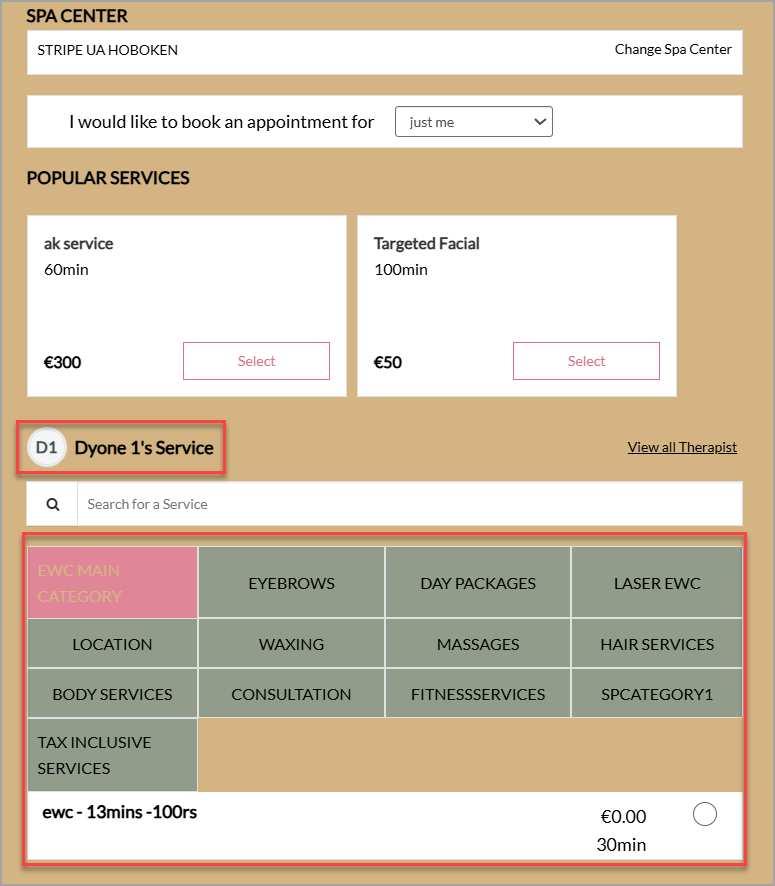
From the Select a Service section, click Select Now to choose a therapist first.
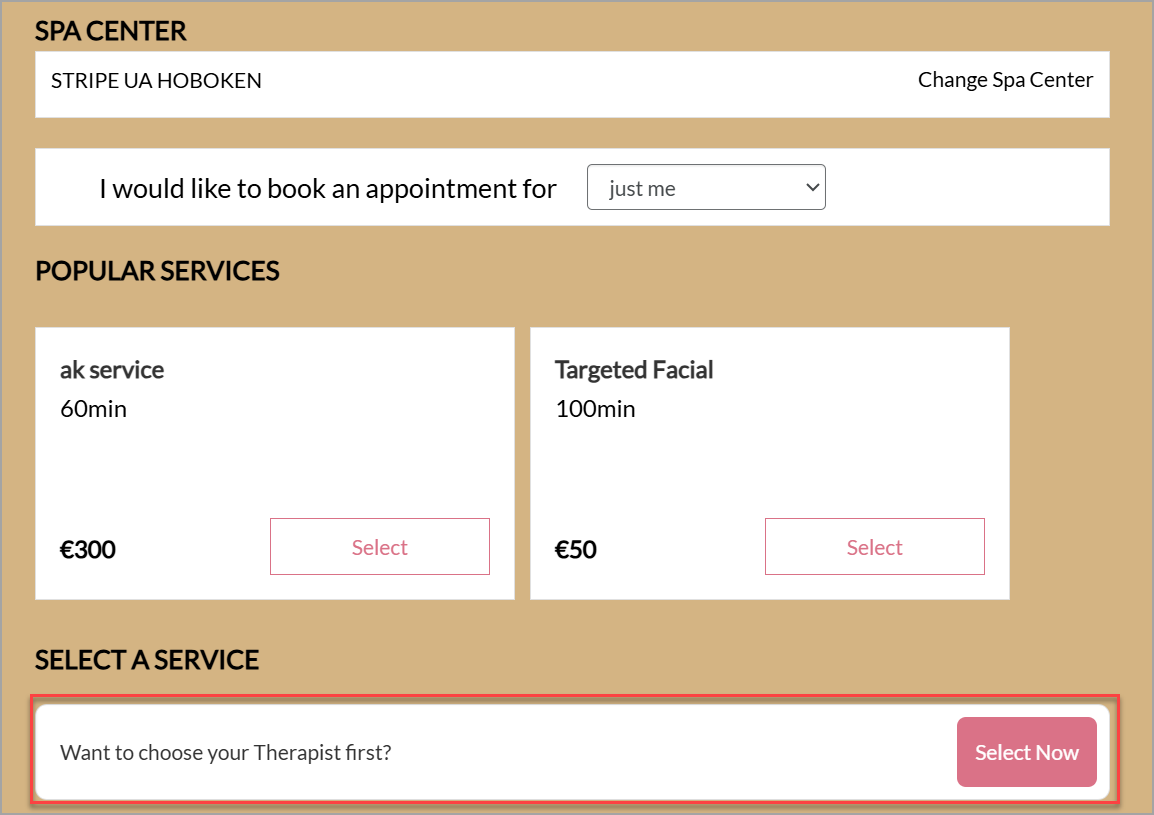
A list of available providers appears with name, designation, profile image, and pronouns, if they are configured. You can also choose to search for a specific provider.
Select the stylist.
After a provider is selected, only services offered by that provider will appear.
Note
If level-based provider selection is enabled, you can choose from three options:
By Level: Browse providers grouped by employee level.
Each level shows the level name (for example, Junior Stylist, Senior Stylist, Master Stylist) and the price range for your selected service. The price range is calculated from the minimum and maximum prices across all providers at that level.
Select a level to see available time slots pooled from all providers assigned to that level. At booking confirmation, the system automatically assigns an available provider from your selected level.
Any Provider: View available slots from all providers. The system auto-assigns a provider when you confirm the booking.
Specific Provider: Browse and select an individual provider by name.
When you book by level, the exact price is determined by the provider auto-assigned to your booking, which you can see on the booking confirmation screen.
Note
If your business calls your employees Providers or Technicians, you can configure the labels for employees. Learn how.
This way, when guests book appointments, they will see the label you have configured for your business, such as say Provider.
Note
If the guest selects Specific provider and the therapist has the Allow bookings for only repeat guests setting enabled, the following scenarios apply for the guest:
Guest is logged in and has been served by the specific provider in the past: The guest can proceed with the booking with the specific provider.
Guest is logged in and has not been served by the specific provider in the past: The guest is not shown the specific service provider for any service.
Guest is not logged in and has been served by the specific provider in the past: The guest is asked to log in and if they have been served by the therapist in the past, they can proceed with the booking.
Guest is not logged in and has not been served by the specific provider in the past: The guest is prompted to log in first. Once logged in, they encounter an error message indicating the provider is unavailable, prompting them to select another provider.
If the provider has the Restrict some providers from providing some services setting enabled, the therapist's name will not appear in the available list of therapists for those services.
Note
If the therapist has Provider-specific durations enabled, the duration of the service or add-on can vary depending on the employee’s specific configuration. For example:
You can:
Add multiple services with the same provider
Mix and match services across different providers in the same booking
Select the preferred date and time for the appointment.
Select the preferred date and time for the appointment. Click Book.
Review the appointment date, selected services, final pricing, and click Confirm Booking.
Note
You can also add a note to the providers to inform them about your preferences regarding certain products or services. For example, you can specify a type of hair shampoo to be used or specify hot water or cold water to be used during the hair wash.
Book appointments for services with add-ons
Add-ons are booked with another service, package, or membership; these are not offered as standalone services. If the guest books a service that has an add-on associated with it, you can choose to show the add-on as a prompt or as a suggested add-on to your guest. After booking, the duration of the add-on is added to the duration of the main service.
Note
To display add-ons on your Webstore V2, you must ensure configure the catalog for add-ons.
Open your Webstore URL.
Your Webstore URL will be www.<business name>/zenoti.com/webstoreNew .
The Webstore V2 homepage appears.
[Optional] Select a location.
Enter the number of guests.
Normally, if the guest is looking to book a service for herself, the number of guests will be one.
Select a Service.
Either select a service or search for a service in the Search bar.
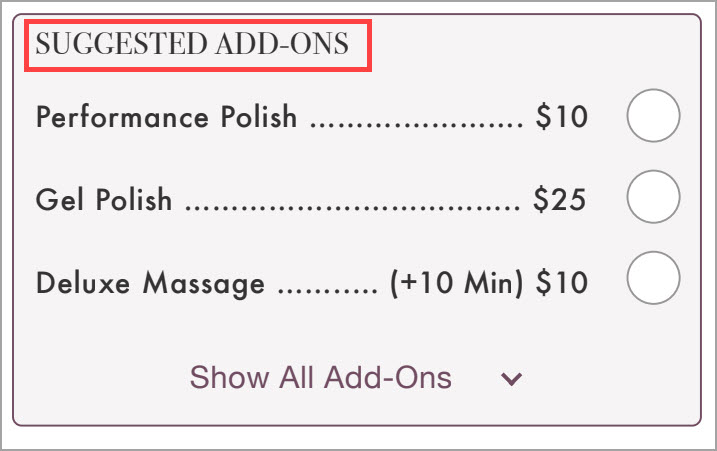
The Suggested Add-Ons screen appears.
Select an Add-on.
Your guest can select an add-on either from the Suggested Add-ons or from the add-on prompt (If Display in Mandatory Selection Prompt for the add-on is enabled in the Catalog). The duration of the add-on (if configured), also appears when you select the add-on from the Suggested Add-ons screen.
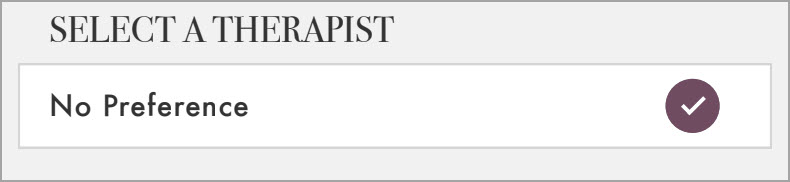
The Select a Provider screen appears.
Select a Provider from the drop-down list.
The guest can select a provider preference from Any, Any Female Provider, Any Male Provider, No Preference or even a Specific Provider.
The Select Date and Time screen appears.
Select a Date and Time.
The Summary screen appears with duration of the main service and, the duration for the add-ons (If the duration for the add-on is set up).
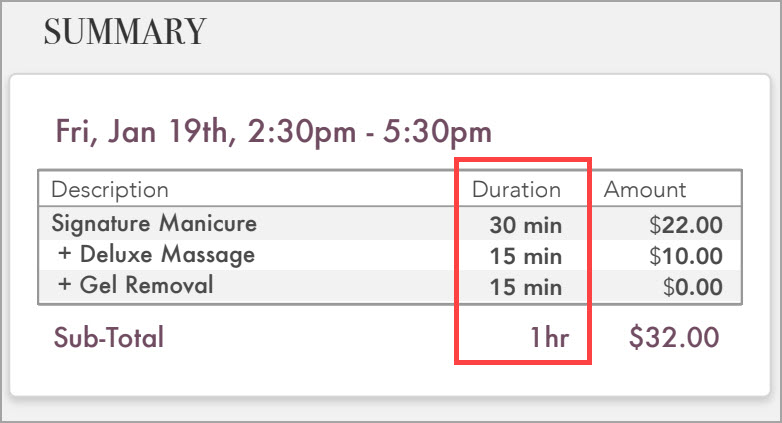
Note
The duration for the add-on is based on the Additional Service Time setting of the General settings tab while creating an add-on in the Zenoti Web.

Click Book.
The booking confirmation screen appears.
Check the Booking Summary and click Confirm.
The Confirmation Screen appears.
Your guest can book more services by clicking Book Again. Your guest may choose to return to the home screen or close the page.
Add your appointments to Google Calendar
After booking an appointment on Webstore V2, guests can add it to their Google Calendar directly from the confirmation page. The calendar event reflects the actual service duration, recovery time used for room cleanup or provider preparation is not included, so the event matches the time the guest needs to be present. Google Calendar sends timely reminders, helping guests arrive on time. For group appointments, guests can also share the event to ensure everyone is present at the center.
How to add an appointment to Google Calendar
Open the Webstore URL or navigate to the Webstore from the salon website.
The Webstore opens and the Location pop-up appears.
Select the appropriate location.
Select a service.
Select a provider.
Select a date and time for the appointment.
Click Book.
The Payment screen appears.
Enter the payment details or use a saved card.
Click Confirm Booking.
The booking confirmation screen appears.
Click Add to Google Calendar on the booking confirmation screen.
Google prompts you to log in to the Google Account.
Log in with your credentials.
The calendar summary appears.
Refer to the following image:
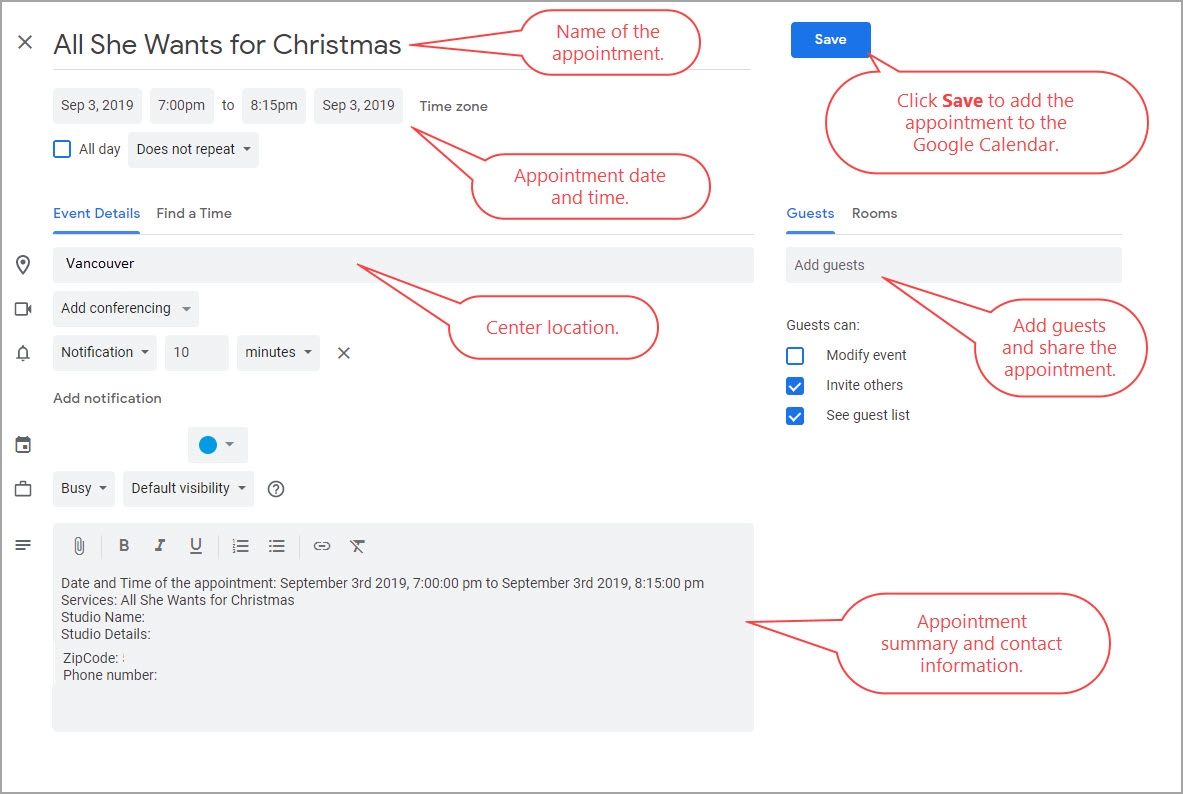
Click Save.
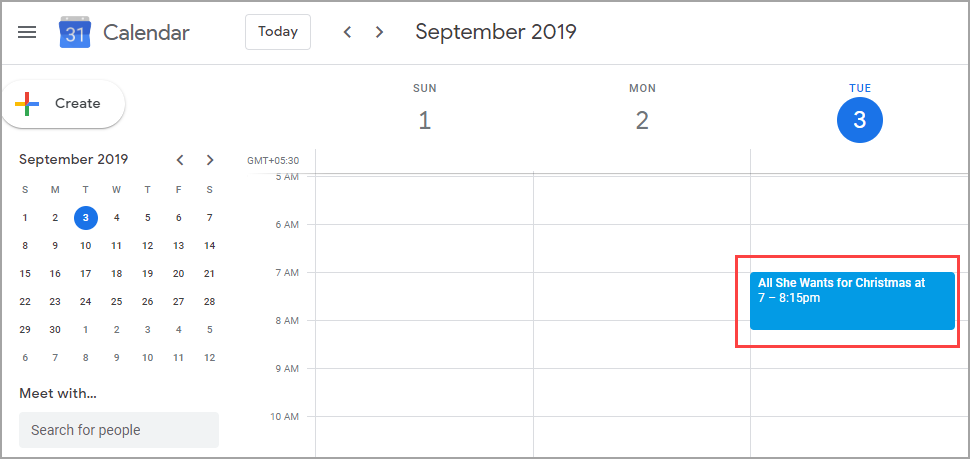
The appointment is added to your Google Calendar.
Reschedule an appointment
There may be cases when a guest, after booking the appointment, might want to reschedule the appointment due to various reasons. To accommodate this, Zenoti allows your guests to reschedule appointments, including those with services and day packages, to a new time.
Things to remember
Guests cannot reschedule their appointments if they are within the cancelation window. For example, if Jennifer has an appointment at 8:00 PM, and you have configured the cancelation window to be active three hours before the appointment, she cannot reschedule the appointment after 5:00 PM on the day of the appointment. She can only cancel the appointment. In such cases, the Reschedule button will be greyed out.
Guests cannot add new services or change their provider when they reschedule an appointment.
Group bookings and group appointments cannot be rescheduled.
Guests cannot reschedule to a different center.
To reschedule an appointment
Open Webstore by navigating to the URL.
From the main menu, click Sign In or Log In. The Webstore prompts you to enter your Username and Password.
Enter the credentials to log in.
Take either of the following actions:
On the home page, in the Upcoming Appointments section, from the list of all the upcoming appointments, click Reschedule next to the relevant appointment.
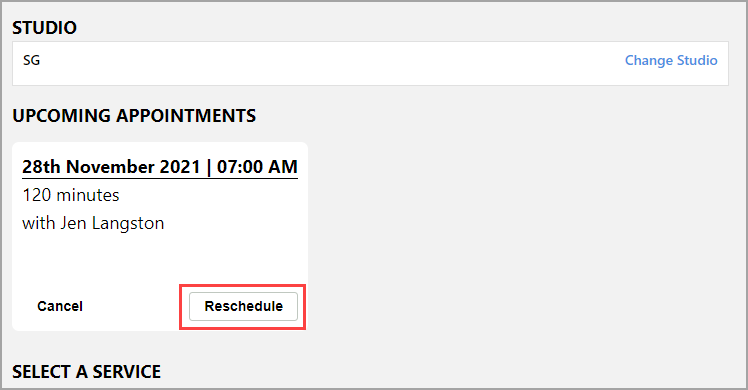
Select the appointment that you want to reschedule.
Click Reschedule.
The Select Date and Time screen appears.
Navigate to Guest Profile >Appointments section. The Upcoming Appointments tab opens and shows a list of all the upcoming appointments.
Select the appointment that you want to reschedule.
Click Reschedule.
The Select Date and Time screen appears.
Select a new date and time.
The service summary appears.
Click Book Now.
The appointment confirmation screen appears.
Click Confirm Booking.
The booking is confirmed and you have successfully rescheduled an appointment.
Book appointments for a group
In your business, you will also have guests, who would want to take a service along with their friends or family. Such bookings are called group bookings, where a guest is often accompanied by other guests.
Webstore V2 allows your guests to book the services for a group. A group booking can accommodate a maximum of 6 guests.
Important
The Enable Group Booking setting of the Webstore V2 General Settings should be enabled at the organization level. For a group booking, the guest can select multiple services for all co-guests. The guest who books the service is designated as the host for the entire group.
Note
If the host cancels a single appointment from the group booking, only the host’s appointment gets canceled. The host can cancel a single appointment in the group.
Open your Webstore V2 URL.
The URL will be www.<businessname>/zenoti.com/webstoreNew.
The Webstore V2 homepage appears.
[Optional] Select a location.
Enter the number of co-guests (minimum 2 to a maximum of 6).
Note
Group booking is initiated automatically when the number of guests, is more than one. If the number of guests remains one, the group booking is not initiated.

Select a Service.
Either select a service or search for a service in the Search bar.
To add a finishing service included in the selected service, click Add a finishing service.
Note
The host can select multiple services, without any add-ons for the entire group.
Select a Provider.
Note
The guest can select a provider preference from Any, Any Female Provider, and Any Male Provider. The guest can select a specific provider when booking for a group, but will not be able to select the same therapist for two different guests.
The Select An Available Date and Time (calendar) appears.
To add a finishing service included in the selected service, click Add a finishing service.
The same therapist who is conducting the main service will be automatically assigned to perform the finishing service.
Select a Date and Time.
The selection of date and time depends upon the availability of providers and resources required to tend to a group. In case the providers or resources are not available, the guest must select a new date, to view the available slots and continue with the booking.
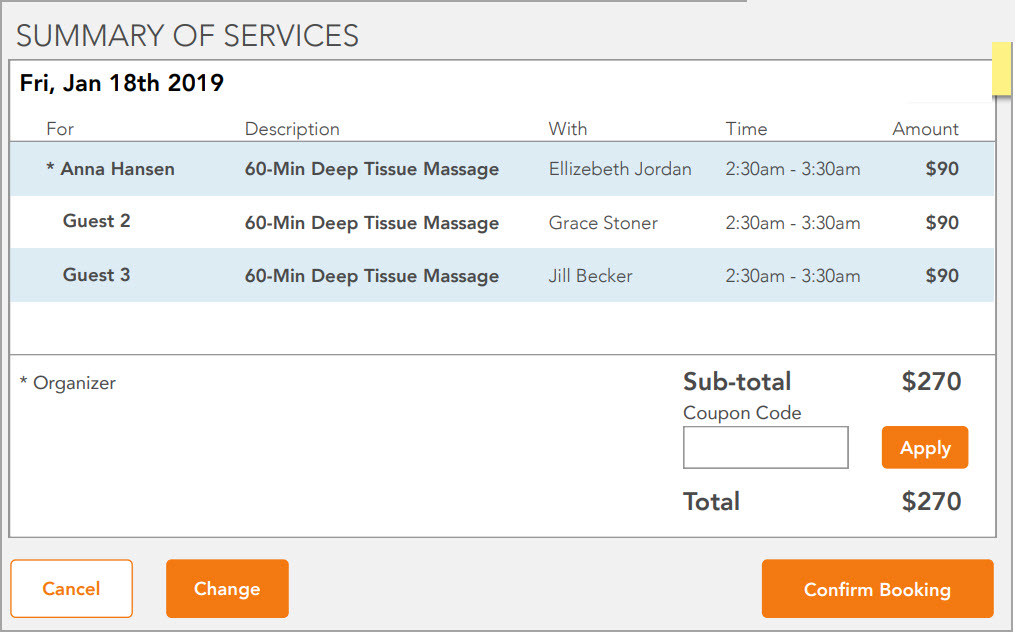
The Summary page appears.
Check the Summary.
The guests and the selected services appear as line items in the Summary, along with time and price. The host can also edit the names of the co-guests.
Click Continue.
The Sign In page appears.
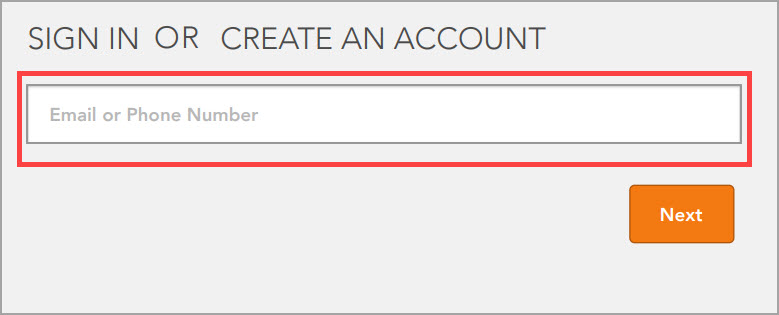
Sign in to the Webstore either with Email or Phone number.
The Summary of Services page appears.
Click Confirm Booking.
The Booking Confirmation page appears.
Note
The following settings will automatically be disabled when your guest initiates a group booking.
Enable Membership Pricing
Is Therapist Selection Required
Enable Multiple Therapists Selection
Enable Therapist Pricing
Coupon Code
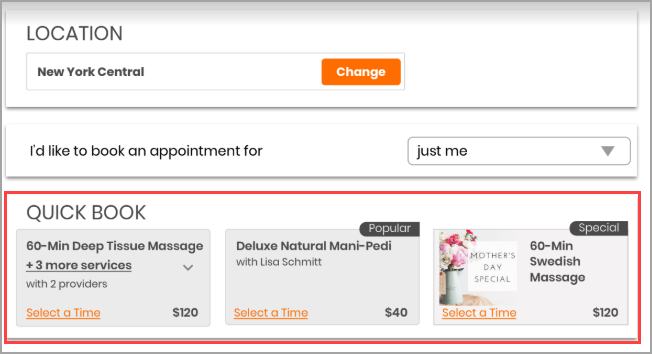
Quickly book appointments
Quick Book on your Webstore allows the guests to book any of the three distinct appointments taken earlier without the need to follow the entire booking process.
The guests must select any one of the three appointments taken earlier, select an available date and time slot and book the appointment.
Things to remember
You can book services and bundles from the Quickbook section.
All the services and bundles in the appointment, add-ons (if any), and providers are automatically added based on the earlier appointment.
If the earlier appointment included three services, then all the three services are booked again. You cannot book a single service from the earlier appointment.
If the earlier appointment included a mandatory add-on, then the Webstore will display the mandatory add-on prompt. The guest can choose if the add-on is required or not.
If the guest chose a specific provider in the earlier appointment, and if that specific provider is not currently available, then the Webstore will prompt the guest to select a provider.
Quick book is enabled for all organizations by default.
You cannot Quick book if you are:
Booking a group appointment.
Booking appointment through a smart marketing or deals.
A new guest who has an intro pricing campaign code.
A guest who has upcoming appointments with Show Upcoming Appointments setting enabled.
To quickly book an appointment
Navigate to the Webstore either from your organization’s website or by opening the Webstore URL.
The Webstore opens and the Location pop-up appears.
Select a Location.
The Webstore home page appears along with the Quick Book panel.
Note
The Quick Book panel consists of three distinct appointments taken by your guest earlier. If the guest is new and does not have any past appointments, then the Quick Book panel does not appear.
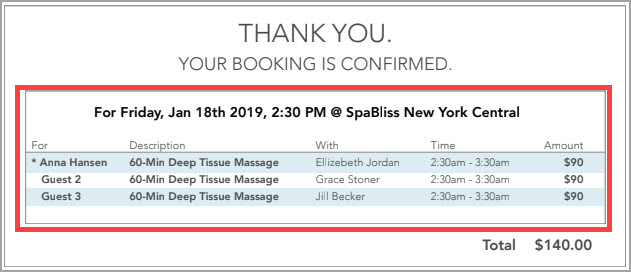
Example: Teresa is an existing guest. She wants to book a Deep Tissue Massage for tomorrow. She opens the Webstore and logs in.
During the last month, she has booked 3 Manicure and Pedicure Combos, 2 Swedish Massages, and 1 Deep Tissue Massage. After logging in, she will see one distinct appointment for each of the three appointments that she booked earlier.
Refer to the following image:
Note
Guests cannot book group appointments using the Quick Book panel.
Click Select a Time for the desired service.
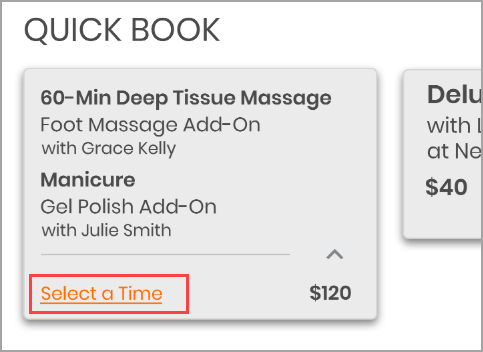
The Date and Time selector appears.
Note
If the earlier appointment included a mandatory add-on, then the Webstore will display the mandatory add-on prompt. The guest can choose if the add-on is required or not.

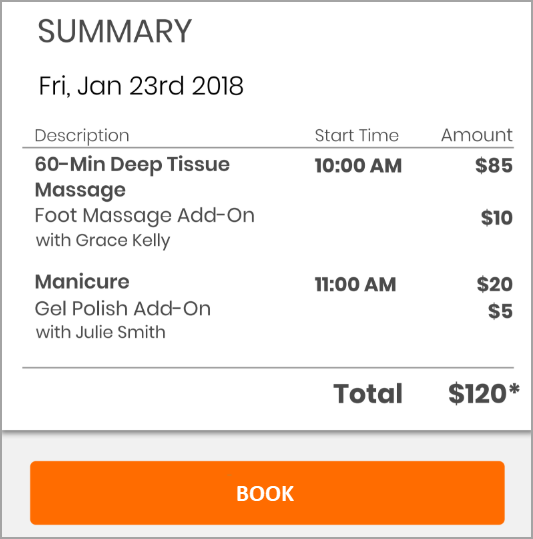
Select an available date and time for the service.
A summary of the services appears.
Click Book.
The Make Payment page appears.
Make Payment.
The Thank You page appears and the appointment is booked.
Rebook an appointment
Guests usually tend to repeat the services they have taken in the past.
Webstore allows your guests to book the services taken earlier, by rebooking the services from the Appointments tab in their profile.
Important
Your guests can rebook only individual appointments, but not group appointments.
To rebook an appointment
Navigate to the Webstore either from your organization website or by opening the Webstore URL.
The Webstore opens and the Location pop-up appears.
Select a Location.
Click Sign-in.
The Sign-in page opens.
Enter the Username and Password to log in.
The Webstore home page reloads.
Click the name of the guest in the top right corner.

The guest profile opens.
Click the Appointments tab.
The Upcoming Appointments tab opens.
Click Past Appointments tab.
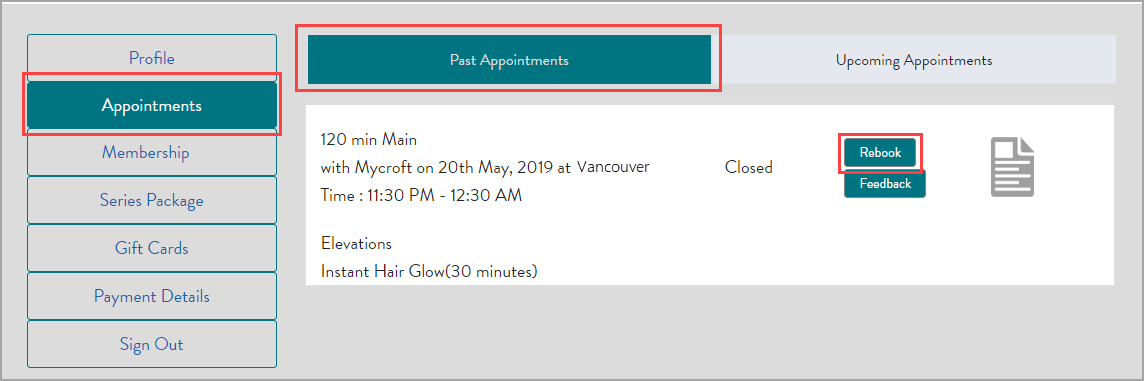
A list of all the past appointments appears with two buttons - Rebook and Feedback.
Click the Rebook button.
The service page appears.
The services, add-ons (if any) and the therapist are auto-populated based on the past appointment.
Note
If the guest had selected a specific therapist earlier and if that specific therapist is not available currently, the guest must select a different therapist to proceed further.
If the past appointment included a mandatory add-on, the Webstore displays the mandatory prompt to the guest. The guest can choose to select the add-on or skip the add-on.
Select an available time slot.
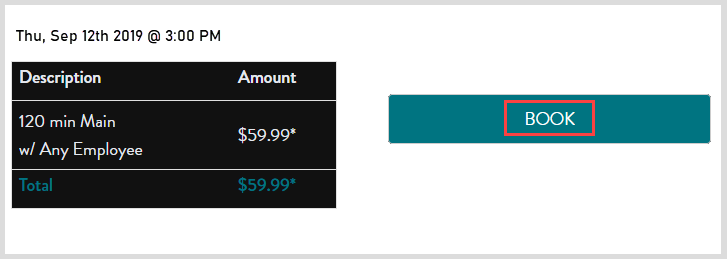
Click Book.
The Confirm Booking screen opens.
Make the payment and rebook the appointment.
The appointment is booked and the guest can verify the same in the Upcoming Appointments tab of the guest profile.
After the appointment is booked, the guest can do any of the following:
Home: Click this button to proceed to the homepage of the Webstore.
Book Again: Click this button to book another service.
Add to Google Calendar: Click this button to add the booked appointment to the guest's Google Calendar.
Note
When booking or rebooking an appointment, prerequisite conditions are checked before the appointment can proceed.
For example, if a guest books the Tattoo Removal service, the required Tattoo Removal Consultation must have been completed within 180 days; otherwise, the guest will be prompted to book or complete it first.
View next availability for a provider
Important
You must enable the catalog for providers so that they are available for booking on the Webstore V2.
If a service provider is on holiday or has appointments for the entire day, the Webstore V2 will not show any availability for that day. However, the Webstore V2 displays the next available dates in the calendar for the rest of the month.
This allows you to view the next available dates of the service provider while booking an appointment. Guests can book appointments by looking for:
Available time slots based on services and service providers.
Available service providers based on services.
Change the location where you want to book an appointment, if required.
A list of services available at that center appears.
From the list, select a service.
Alternatively, enter the service name in the Search field and select the service.
The list of service providers appears.
Select a service provider.
The Select Date and Time (calendar) appears.
Note
The next available dates (or slots) of the provider appear in green. Guests can book an appointment based on these slots.
Book a prerequisite service
Before you begin
Ensure you enable the catalog for the main service and the prerequisite service.
At the organization level, click the Master Data icon.
Navigate to Services > <Service Name> > Centers.
To make the service available on the webstore, select the Online Booking checkbox.
The service will be available online for the selected centers.
Scenario
Mary (guest) wants to book an Anti-dandruff treatment for herself. The service Anti-dandruff treatment requires a consultation that evaluates the dryness of the scalp, type of scalp, and type of hair. So, in order to book the main service, Mary also needs to book the consultation service.
Let us take a look at the steps involved in booking the Anti-dandruff treatment and its Consultation service.
Mary opens the Webstore by navigating to www.<orgname>.zenoti.com/webstoreNew.
On the search bar, she enters “anti dandruff”.
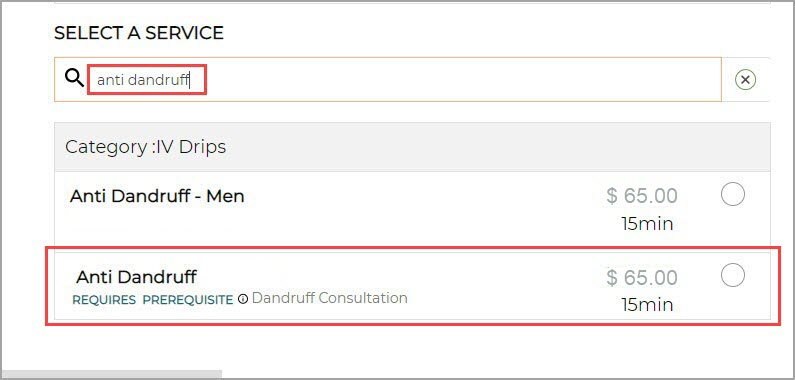
Mary selects Anti dandruff with the Dandruff.
The Webstore prompts Mary to log in - if she has not logged in yet.
After the login, Webstore prompts Mary whether she wants to book the consultation along with the main service.
Note
This is based on the setting Allow Prerequisites to be Booked with the Service.
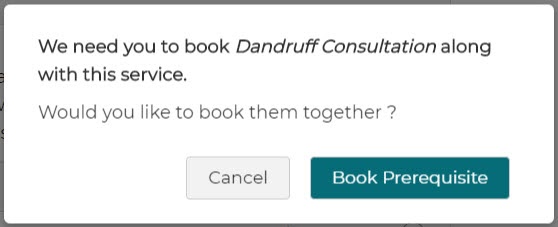
Mary clicks Book prerequisite.
Mary selects a convenient date and time slot.
Mary clicks Book now.

The booking is confirmed and the booking confirmation screen appears.
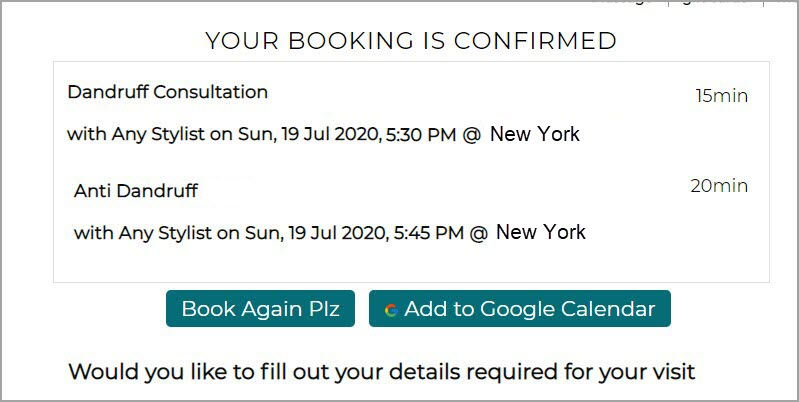
Mary has successfully booked the Anti-Dandruff service along with its prerequisite service “Dandruff Consultation”.
Book parallel services
Parallel services allow you to book two services with two different providers at the same time. This way, your guests can save time.
Webstore V2 provides a convenient interface from where your guests can combine services so that they can be done parallelly.
Consider this example. Gina, a guest, wants to book manicure and pedicure from your Webstore. These services can be combined and done simultaneously if they are performed by different therapists, resulting in more sales for the business and an optimized booking schedule.
To book a parallel appointment on Webstore V2
Tip
Access Webstore V2 by signing in with your username and password.
Click Change Location to select the center of your choice.
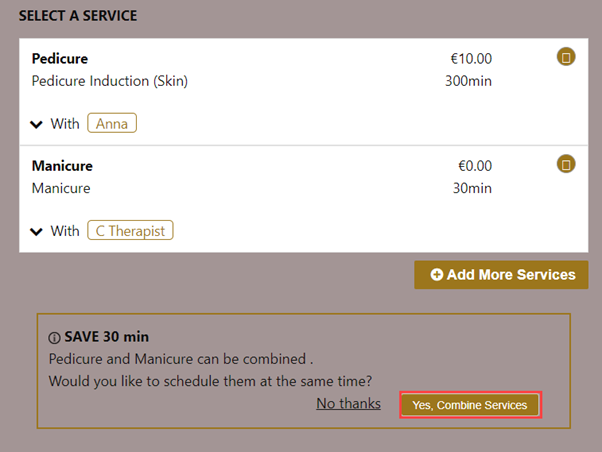
Select the first service. For example, select Manicure.
Select a provider.
The Add More Services button and the Select Date and Time (calendar) appear.
Click the Add More Services button to select the second service. For example, Pedicure.
Select a different provider.
After you select a provider, you get an alert saying that you can save time if you combine the two services.
Note
To combine services so that they can be performed parallelly, two different providers need to be selected. If you book the services with the same provider or if no provider is selected, you cannot make the services parallel. If for the second service, i.e. Pedicure, you select the same Provider as that of the first service, i.e., Manicure, you are alerted that you can change the therapist so that you can save time.
Click Yes, Combine Services.
The available date and time refreshes to show only those slots where the room for the parallel group is available.
Select an available date and then select the time for which you want to book the appointment for parallel services.
Click Book Reservation.
The confirm booking page appears.
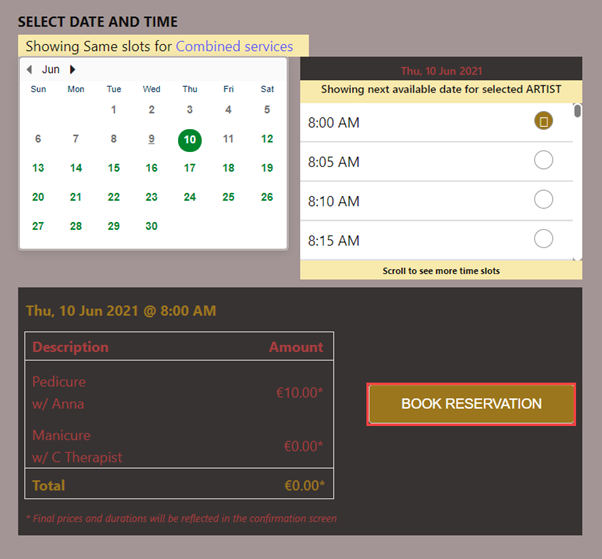
Review the booking dates and price and click Confirm Booking.
The booking confirmation page appears.
The appointment is confirmed with the two services (manicure and pedicure) as parallel services.
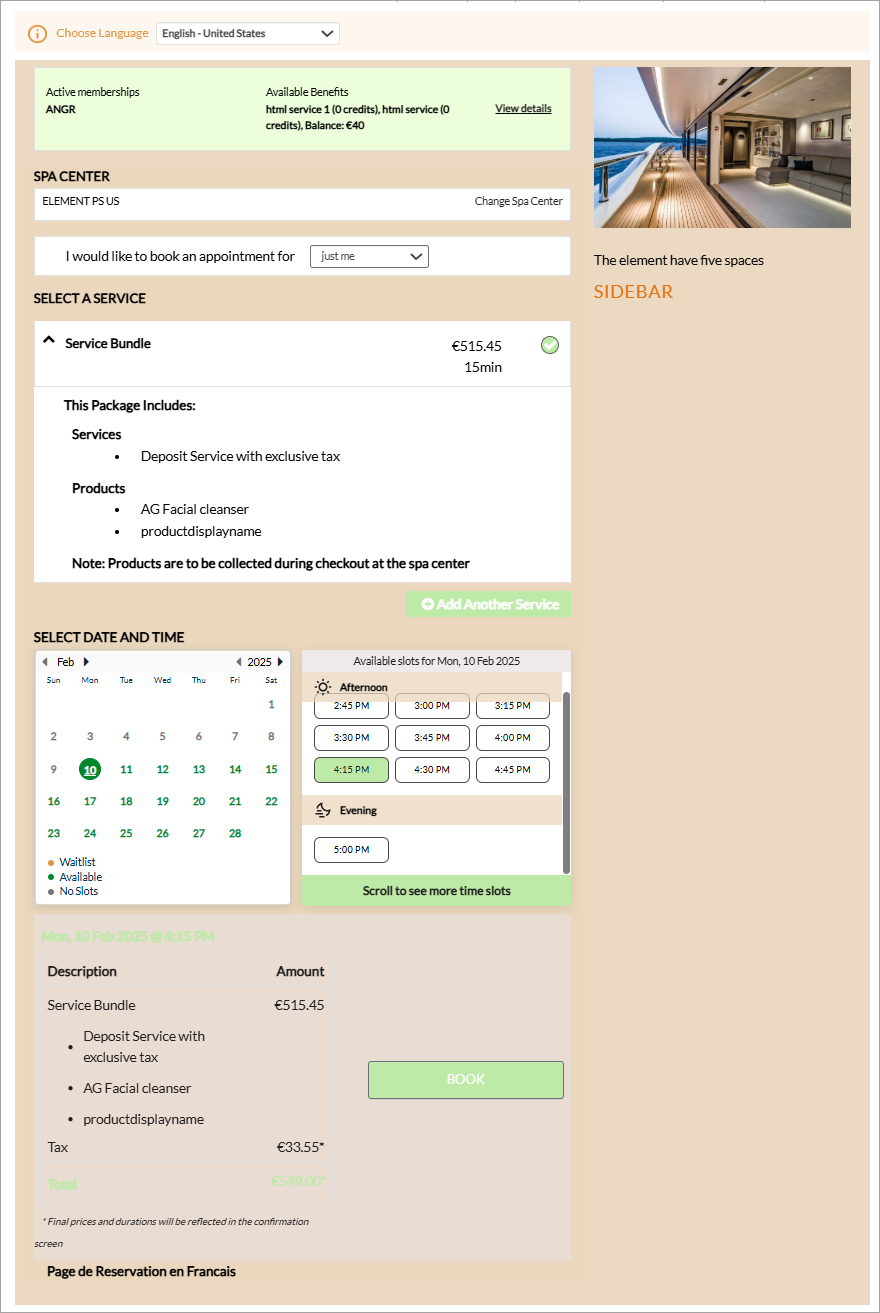
Book a bundle online
A bundle is a collection of services and products that provides guests with the convenience of booking and enjoying everything in a single visit. Products added to the bundle configuration, are listed in the bundle description. The total cost of the bundle is the sum of the individual services and products, plus any discounts configured in the bundles master.
Bundle Configuration: If a Category, Tag, or service/product is added to the bundle during creation in the Bundles Master, the Webstore will display the default service/product from that category/tag. During checkout, the front-desk staff can change it to another service/product within the same category/tag.
Visibility on Webstore: Bundles are only visible on the Webstore if they are configured for display during setup.
Catalog-enabled Services: Ensure all services in the bundle are catalog-enabled. If any service inside the bundle is not enabled for catalog display (Online display) the entire bundle will not be displayed to the users. If a bundle is enabled for display but contains services that cannot be booked online, it will not appear in the Webstore or CMA.
If the bundle contains a default service in a Category or Tag that is unavailable for online booking, the bundle will still appear. However, Zenoti will automatically display the first available service alphabetically from that category/tag.
Steps to book a bundle online:
Navigate to your Webstore URL and log in to your account.
Optionally, you can select your preferred center by clicking Change Location.
Browse the list of available bundles and choose the one that best fits your needs. Bundles will be listed in the category Packages or inside the Service categories (if the setting to display packages inside Service categories is enabled).
The bundle description will show the included services and any associated products.
Select an available date and then choose a time slot for your appointment.
Before you proceed, verify the services and products included in your selected bundle, pricing, applicable taxes, and total cost.
Accept the terms by selecting the user consent checkbox.
Complete the payment using a saved card or by entering new payment details.
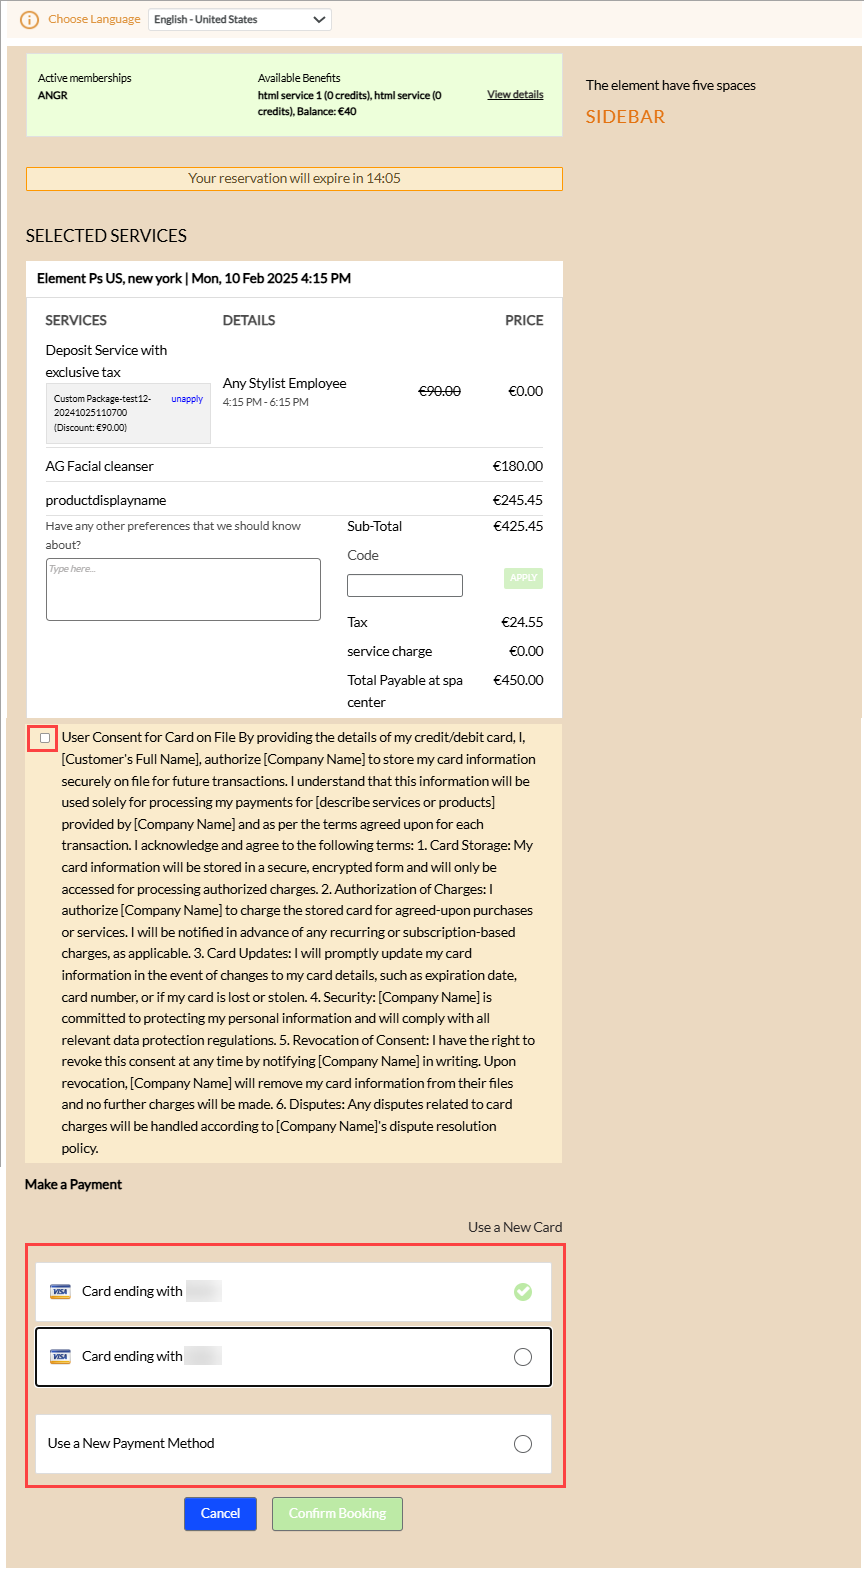
Click Confirm booking.
Once the payment is processed successfully, you will receive confirmation of your booking.
Cancel an appointment in Webstore
When guests schedule an appointment on the Consumer Mobile App, there may be instances when they need to cancel for various reasons such as sudden commitments, unexpected events, or changes in plans.
Note
To allow guest to cancel their appointments, the Enable appointment cancelation setting must be enabled.
Cancel appointments from the Appointments screen
To cancel an appointment from the Appointment screen, you must follow these steps as a guest:
Log in to Webstore.
If the guest is returning, then the home page appears as soon as the guest launches the app. The center is also pre-selected.
Click Account and navigate to Appointments.
To view the list of appointments, navigate to the Upcoming section.
Tap the More Info icon (indicated by 3 vertical dots).
To cancel the appointment, click Cancel appointment on the Modify appointment screen.
Note
When a guest clicks Cancel appointment and a cancelation fee is applicable, the following takes place:
Service credit check: If the redemption of service credit against the cancelation fee is enabled and the user has enough credits, the credits are deducted, the appointment is canceled, and the invoice is closed.
Packages credit Check: If the redemption of service credit from packages for cancellation is enabled, then the credits are deducted against the cancelled appointment for the services and the appointment is cancelled.
Insufficient credits or redemption of service credit against cancelation fee is not enabled: If there are not enough credits or redemption is disabled, Zenoti checks for saved cards.
No saved cards: A pop-up alerts the user of the fee, and the appointment is canceled with the front-desk staff collecting the fee manually.
Saved cards: If the guest has multiple cards, the most recent card is used to attempt payment. If successful, the appointment is canceled, and the invoice is closed. If the payment fails the front-desk staff must collect the fee manually.
Payment handling: If the payment is successful, Zenoti either confirms the cancelation, tracks pending payments, or alerts the user of payment failure. This means that the front-desk staff has to collect the fee manually.
To confirm cancelation, click OK on the pop-up screen.
You will be prompted to enter a cancelation reason.
To provide a reason for cancelation, choose any of the pre-configured reasons or select Others.
To specify the reason for cancelation if you selected Others, provide a reason in the cancelation reason textbox.
Click Submit.
Limit appointment cancelation within the specified period
Within the specified timeframe for appointment cancellations in the cancellation window, businesses have the flexibility to decide between two options: enabling guests to self-cancel appointments or limiting this feature by hiding the Cancel button. The latter encourages users to contact the center ensuring personalized communication and allowing staff to inform guests about possible late cancellation charges.
To hide the cancel button during the cancellation period, enable the Hide cancel button during the cancellation window
Note
To set up a timeframe for user cancellations with associated charges, the Enable cancellation fee setting must be enabled.