FAQ and Troubleshooting
Zenoti Hardware Requirements - FAQs
Review the Zenoti hardware and software requirements and ensure the PC and Internet meet the required specifications for your salon operations to run smoothly:
What should I do if my PC does not meet the required CPU Mark score of 7500?
If your PC does not meet the CPU Mark score of 7500, it means that your daily Zenoti operations may run slower. This can affect the efficiency of your daily operations.
Solution: Zenoti recommends you upgrade your CPU to meet the required score.
What should I do if my internet speed does not meet the minimum or recommended requirements?
If your internet speed is not at the required pace, you may experience session timeouts, unresponsive payments, or slow performance of Zenoti.
Solution: Ensure your internet connection meets the following requirements:
Minimum: Download - 5 MBPS. Upload - 1 MBPS
Recommended: Download - 10-20 MBPS. Upload - 4-8 MBPS.
What should I do if my RAM does not meet the minimum requirement of 4GB?
RAM allows your PC to function properly and manages multi-tasking. Lower RAM will result in slower performance.
Solution: Zenoti recommends: 6 GB RAM (for centers managing 100 - 200 appointments per day) or 8-16 GB RAM (for centers managing 200+ appointments per day) for optimal performance.
Which OS version should I use for optimal performance?
PC: Windows 10 or above
Mac: Mac OS 10.14 or above.
Which printer or cash drawer should I use?
Zenoti has a list of recommended printers. You can use any one of the recommended printers.
Things to remember
Bluetooth printers are required for Zenoti Mobile only.
Use the wired printers for Zenoti Web.
If a printer is not available, you can use a digital receipt.
Zenoti does not require a specific cash drawer. It is compatible with most of the cash drawers that are available in the market.
FAQ: Center has an email credit balance but the employee is unable to email reports. Why?
If you are unable to email reports of a center that has enough email credits, please follow these steps:
Check if your base center has enough email credits. Zenoti does not use the viewing center's credits when emailing reports.
If your base center does not have enough credits, check your organization's balance.
If your organization also does not have enough credits, you have to buy them.
Digital forms FAQ
How do I add an image for annotation?
For an HTML form, you can add images for the annotation pad from the Zenoti image gallery.
For a form built using form builder, you must first add an annotation pad to a form and then upload its image.
How do I hide a section of the form such that only my employees can view that section?
How do I ensure that only therapists can fill out a form?
You can mark the form as read-only on the guest's end in the form behavior settings. This will make the form available only for therapists and reviewers.
How do I check if a guest has filled in all the required forms for a service?
How do I create a tag form and what is it for?
You can create a tag form in two ways:
What are the different ways the guests can fill out the forms?
How do I ensure all of my services are mapped to appropriate forms?
At the organization level, click the Configuration icon.
Search for Custom forms, and under Forms, select Custom forms.
Select the relevant service form.
Click the Services tab.
The Services tab lists all the services with which this form is associated. If you see any service that is missing from this list, associate that service with this form.
By repeating this process for all forms, you can ensure that all of your services are mapped to the appropriate forms.
How do I enable the guest intake and service forms on the relevant channels, such as CMA?
At the organization level, click the Configuration icon.
Search for Online booking settings, and under Online booking, select Online booking settings.
Select the CX v3 template, and click the General tab
Expand the Appointments section.
Enable the Enable guest custom form setting.
How do I educate the salon and spa staff on using Zenoti Mobile to check customer guest form/service form status?
In the Zenoti University course Zenoti mobile: Introduction to digital forms you will learn how to start using digital forms, and learn about information such as the status of the guest form or service form.
You can access Zenoti University from appointment book, other Zenoti modules, and a mobile device.
How do I utilize digital forms data to build and drive target segments/marketing efforts?
How do I mask the guest’s contact details from the therapist and service providers?
You need to write custom JavaScript logic to mask guest contact details. Please contact your Zenoti representative to assist you with this.
Why do you charge for making changes in Forms or CMA when we already pay a monthly subscription fee?
When you need to make a change to CMA and forms, it requires a significant development effort from Zenoti, such as the charges for consulting.
We charge you for this development effort. These charges for change requests in CMA and forms are different from the monthly subscription fee that you pay for using the product.
Note
The Digital forms template library contains predefined forms which you can host for free (without any additional charges).
However, any change requests to modify these free forms also attract additional development and validation charges.
Can I delete forms?
You cannot delete a form. However, you can mark the forms you don't require as Inactive from the form settings.
Mark a form as InactiveAt the organization level, click the Configuration icon.
Search for Custom forms, and under Forms, select Custom forms.
Search for and open the form you want.
Under the General tab, in the Status field, set the status of the form to Inactive.
What are the different types of forms in Zenoti, and how do they differ?
Zenoti supports the following main form types:
Guest Intake Forms
Service Forms
Tag Forms
Each form type serves a specific purpose and applies to different workflows.
What is a Guest Intake Form?
A Guest Intake Form (also called a consultation form) links directly to a guest’s profile and does not depend on an appointment or service.
Use this form to:
Collect general guest information
Store long-term data such as medical history or preferences
Access guest data even when no appointment exists
What is a Service Form?
A Service Form links to a specific service or appointment. Zenoti displays this form only when the guest books the associated service.
Use this form to:
Capture treatment-specific information
Enforce prerequisites such as waivers or consent forms
Meet compliance requirements for individual services
What is a Tag Form?
A Tag Form applies to multiple services through service tags instead of a single service.
Key benefits:
Reuse one form across related services
Reduce duplicate configurations
Maintain consistency for similar treatments
What is the difference between Guest Forms and Service Forms?
Guest Forms store general information tied to the guest profile and remain available long term.
Service Forms apply only to specific services or appointments.
What is the difference between Service Forms and Tag Forms?
Service Forms apply to one specific service.
Tag Forms apply to multiple services through shared tags.
How do I manage and customize service forms in Zenoti?
Service forms in Zenoti offer various settings and configurations to meet specific operational needs. This FAQ addresses common questions related to form customization, prefilled data, signature management, and troubleshooting.
Signature Fields in Forms
Can form information, including signatures, prefill from previous visits?
The Massage Intake and SOAP Notes forms can prefill information from previous visits if this feature is enabled. However, signatures cannot be prefilled. Clients must manually provide a signature for each visit to ensure compliance and accuracy.
How do I configure forms to avoid requiring a new signature for every visit?
To allow service providers to reference forms without requiring repeated signatures, set a validity period for the form:
Navigate to the form settings.
Configure the validity period (for example, 730 days for 2 years).
This ensures that the form, along with the client's signature, remains valid and accessible for the specified period.
Prefilled Data in Forms
How do I disable data from previous visits prefilling into forms?
To prevent a form from auto-loading data from previous visits:
At the organization level, navigate to Configuration > Forms > Custom Forms.
Locate the form you want to modify.
Turn off the Prefill form with data from previous visit option.
This ensures a fresh form is presented for each client interaction.
Custom Form Creation and Editing
Why doesn't information transfer from the client intake form to the General tab?
Client intake forms created in HTML format do not support two-way macros. Two-way macros enable data to update both in the form and on the guest profile.
To resolve this:
Create a new form using Form Builder and select Tag form as the form type.
Submit a request to the database team to convert this form into the client intake form.
Once converted, the form supports two-way macros and allows seamless data transfer.
How do I Add an Image for Annotation to a Digital Form?
Follow these steps to upload an image to Zenoti Image Gallery and use it in a digital form to annotate an image.
At the Organizational level, click the Configuration icon.
Search for Image gallery, and under Marketing, select Image gallery.
Click Add.
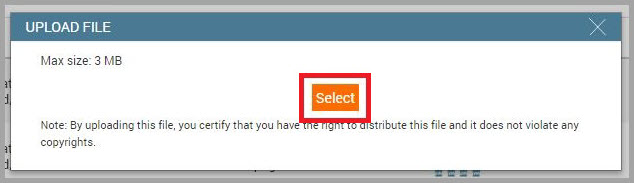
The Upload File pop-up opens.
Click Select.
A new window to select a file opens.
Navigate to the location of your image on your computer.
For example, if you have it saved in "My Documents," then navigate to that location.
Select the image which you want to add/upload.
Note
The size of the image can be up to 3 MB.
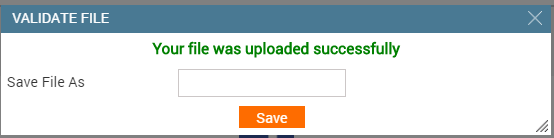
The Validate File window appears.
(Optional) Enter the image name in Save File As text box.
Note
If you do not name the image, Zenoti generates a random name for your image. It is recommended that you name the image to locate it easily.

Click Save.
A URL is generated and the image is added to the Zenoti Image Gallery.
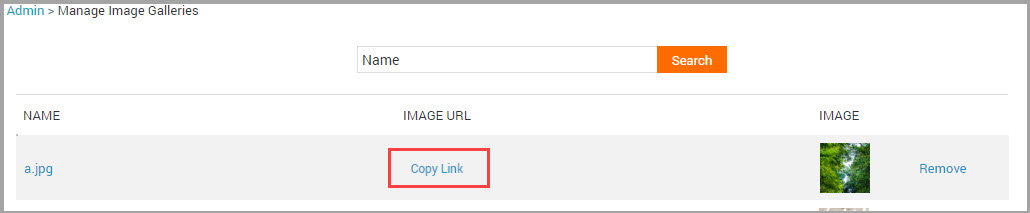
Locate your image in the Zenoti Image Gallery.
Click Copy Link.

A message stating that the link is copied to clipboard appears.
Step 2 A: In the digital form HTML, replace the placeholder image URL with the new image URL
Open the digital form in a source code editor, such as Notepad.
Search for “create annotations”.
Select the placeholder image URL and delete it.
Paste the copied image URL from Step 1.
Save the HTML form.
Copy the HTML code.
Close the source code editor.
Step 2 B: In the HTML text area in Zenoti, replace the placeholder image URL with the new image URL
At the organization level, click the Configuration icon.
Search for Custom forms, and under Forms, select Custom forms.
Click the relevant custom form hyperlink
Scroll down to the HTML section. The text area appears where you can edit your HTML.
Search for “create annotations”.
Select the placeholder image URL and delete it.
Paste the copied image URL from Step 1.
Click Save.
You have successfully edited your custom form.
Step 3: In Zenoti, Upload the Service, Guest, or Tag Custom HTML Form with the updated image for annotation.
How do I add a signature to the HTML form?
Watch this video to learn about the signature component and how to add a code snippet for a signature block in an HTML form.
Follow these steps to add a code snippet for a signature block in an HTML form.
Step 1: Download the applicable template
Navigate to the Zenoti Digital Forms Library.
Search for the form.
Click the View icon to preview the HTML.
Click the Download icon.
Step 2 A: To make any edits, open it in a source code editor, such as Notepad.
In the
<head>tag of the digital form, enter the applicable JavaScript for the signature.The head tag of the digital form contains a code snippet that allows you to collect a guest's signature (useful if you need to capture guest consent).
Example:
createSignature("client-signature", { "required": true });If you need the form to be reviewed and signed by another person (for example, a medical director), you can add the
“Review Needed”attribute to your signature component. Once this attribute is added, it opens up these signatures only in Zenoti's review workflow.Example:
createSignature("patient-signature", { "required": true, "ReviewNeeded": true});
In the
<body>tag of the digital form, enter the applicable HTML code for the signatureExample:
<div id="patient-signature" ztype="signature" > </div>
Step 2 B: In the HTML text area in Zenoti, make any edits to the HTML
At the organization level, click the Configuration icon.
Search for Custom forms, and under Forms, select Custom forms.
Select the relevant custom form.
Scroll down to the HTML section. The text area appears where you can edit your HTML.
In the HTML text area, In the
<head>tag of the digital form, enter the applicable JavaScript for the signature.The head tag of the digital form contains a code snippet that allows you to collect a guest's signature (useful if you need to capture guest consent).
Example:
createSignature("client-signature", { "required": true });If you need the form to be reviewed and signed by another person (for example, a medical director), you can add the
“Review Needed”attribute to your signature component. Once this attribute is added, it opens up these signatures only in Zenoti's review workflow.Example:
createSignature("patient-signature", { "required": true, "ReviewNeeded":true});In the
<body>tag of the digital form, enter the applicable HTML code for the signatureExample:
<div id="patient-signature" ztype="signature" > </div>.Click Save.
You have successfully edited your custom form.
Step 3: In Zenoti, Upload the Service, Guest, or Tag Custom HTML Form with the signature block.
Important
The signature field is used to take a guest's consent before a procedure, after completion, and to review forms by the doctor.
While reviewing forms, the doctors or the reviewers can add their signature to multiple forms at once. So, you may not want to create a doctor's signature field when you create a form.
How do I add my business logo to an HTML form?
Follow these steps to add your business logo to an HTML form:
Step 1: Upload the image to Zenoti Image Gallery
At the organizational level, click the Configuration icon.
Search for Image gallery, and under Marketing, select Image gallery.
Click Add.
The Upload File pop-up opens.
Click Select.
A new window to select a file opens.
Navigate to the location of your image on your computer.
For example, if you have it saved in "My Documents," then navigate to that location.
Select the image which you want to add/upload.
Note: The size of the image can be up to 3 MB.
The Validate File window appears.
(Optional) Enter the image name in Save File As text box.
Note: If you do not name the image, Zenoti generates a random name for your image. It is recommended that you name the image to locate it easily.
Click Save.
A URL is generated and the image is added to the Zenoti Image Gallery.
Locate your image in the Zenoti Image Gallery.
Click Copy Link.
A message stating that the link is copied to clipboard appears.
Step 2 A: In the digital form HTML, replace the placeholder image URL with the new image URL
Open the digital form in a source code editor, such as Notepad.
Search for “
img src”.Select the placeholder image URL and delete it.
Paste the copied image URL from Step 1.
Save the HTML form.
Copy the HTML code.
Close the source code editor.
Step 2 B: In the HTML text area in Zenoti, replace the placeholder image URL with the new image URL
At the organization level, click the Configuration icon.
Search for Custom forms, and under Forms, select Custom forms.
Select the relevant custom form
Scroll down to the HTML section. The text area appears where you can edit your HTML.
Search for “
img src”.Select the placeholder image URL and delete it.
Paste the copied image URL from Step 1.
Click Save.
You have successfully edited your custom form.
Step 3: In Zenoti, Upload the Service, Guest, or Tag Custom HTML Form with the updated business logo
How do I hide a section of a digital form?
If you send your forms in an email or use guest mode, you may want to hide or restrict guests from editing certain fields when they fill out the form.
To hide a section of the form:
In the <div> element, add "hidefields" as the value to your class attribute.
Example:
To hide the first name text box (name="Fname", id="Fname") from your guest, in the <div> element of the text box, add class="hidefields".
                  <div class="hidefields">
       <input type="text" class="form-control" name="FName" id="FName" />
</div>
To make a field mandatory in HTML:
If you wish to make a textarea, textbox, or any other field a mandatory field, add required and label attributes. The required attribute will make the field mandatory and the label attribute will be used to inform the user that the field is not filled, in the form of an error message.
Example
                  <textarea onfocusin = " textAreaAdjust ( this ) " onkeyup = " textAreaAdjust ( this ) "
class = " form-control " rows = " 5 " id = " notes "
name = " Notes " placeholder = " Enter your areas of concern "
label = " Areas of Concern " required ></textarea>
How do I ensure that only therapists can fill out a form?
To ensure that only therapists can fill out a form and that the form remains read-only for your guests in Webstore and CMA:
At the organization level, click the Configuration icon.
Search for Custom forms, and under Forms, select Custom forms.
Select the applicable custom form or click Add.
Select the Make this form read-only for guests (Webstore, CMA) checkbox.
The form becomes read-only for guests and now only therapists can fill out the form.
Note
At the organization level, navigate to Master data > Services > select a service, in the Custom tab, the Allow emailing of form link checkbox includes the form link in the email via [ServiceDataLink] macro in the Appointment Confirmation and Appointment Reminder notifications. If you do not select the checkbox, the form link is not added to the notifications and your guest won’t be able to access the form from their email.
How do I check if a guest has filled in all the required forms for a service?
To check if a particular guest has filled a form:
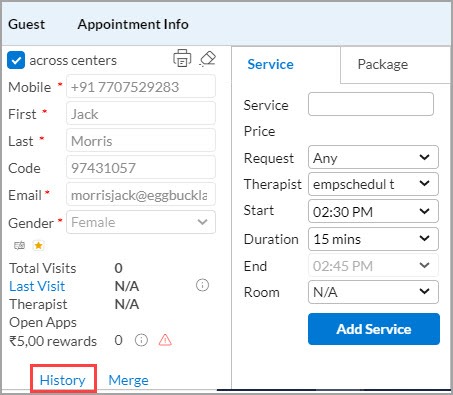
Access the Guest Details, Guest Profile, or Guest History page from the Appointment Book using any of the following methods:
From the search box
From an existing appointment block
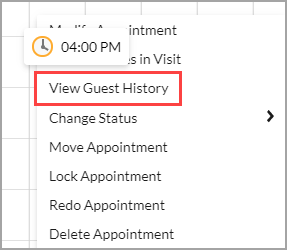
From the Booking panel or the Appointment Info panel
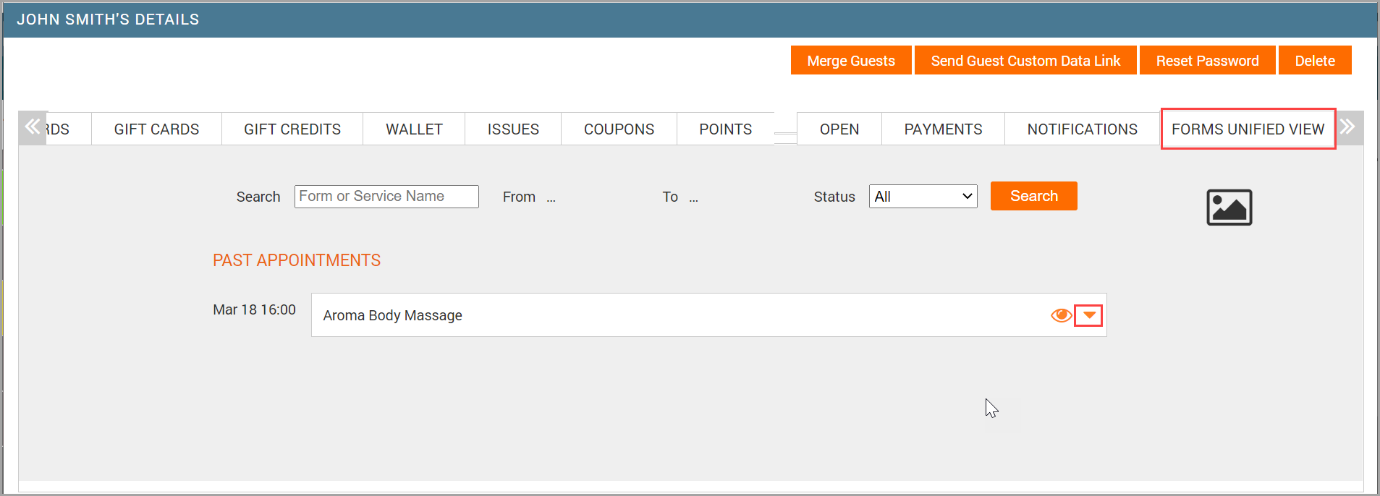
On the Guest Details page, click the Forms Unified View tab.
Locate the form and click the Expand to view forms icon of the relevant appointment.
Notice the status of the form next to the appointment date, and then take one of the following actions:
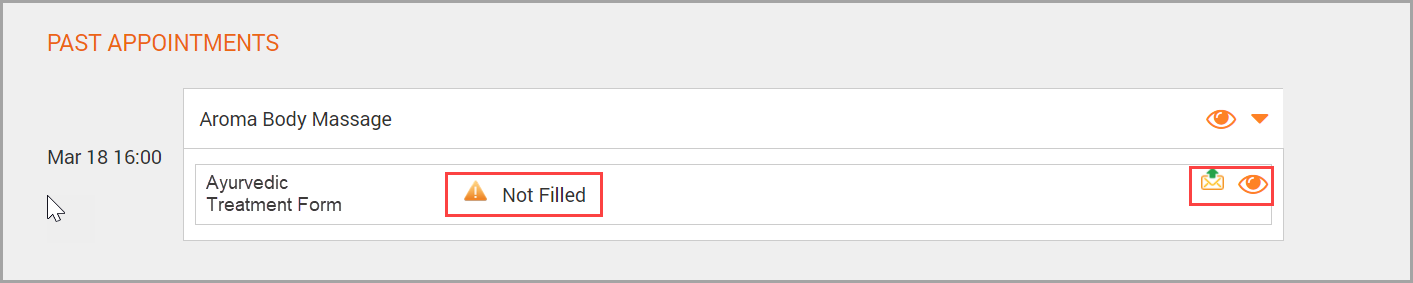
View the form - Click the View Form icon to view the details entered by the guest.
Email the form link to the guest - If the guest has not completed the form, email the link to the form to the guest, reminding them to complete it.
Fill the form, if the guest has reached your center but has still not filled the form.
Click the View Form icon to open the form.
Enter the details provided by your guest.
Use the following options to complete the form:
Save: This allows you to save the information which you have filled. You can revisit the form and complete the details at a later point of time.
Submit and fill next: This appears only if you see multiple tabs in the forms.
This allows you to fill the data in the forms and move to the next form.
Submit and Close: This allows you to submit the data and close the form.
How do I utilize digital forms data to build and drive target segments/marketing effort?
To build target segments using the data available in digital forms, you can:
Create target segments based on responses to specific fields within custom guest forms.
For example, create a target segment of the guests who have responded ‘yes’ to a particular question and send out a targeted campaign that is relevant to the people who have responded this way.
Note
To ensure that a target segment based on digital form data work correctly, you need to add a custom z type attribute in the form. Please contact your Zenoti representative to set it up correctly.
Create target segments based on q
For example, target a group of guests whose service forms expire in the selected time period.
From where can guests access and fill forms?
Guests can fill guest and service forms in the following ways:
If your location center has a kiosk, guests can also fill it from the kiosk
Membership forms can be filled out from the Zenoti Mobile app and the web application.
Email link
If the front-desk staff has booked an appointment for you over the phone or if you have booked an appointment through the Webstore, you will receive an email with a link that will take you to all the required forms for the appointment. You can click the link to the form and then sign in with your credentials to access the guest intake form and the required service forms for the appointment.
Webstore
If you booked your appointment through Webstore, you can fill forms from:
Booking confirmation page
Email link
Webstore profile
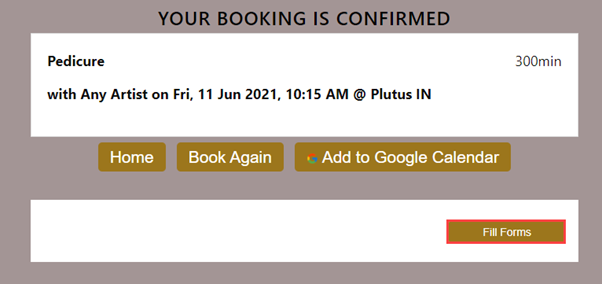
Booking confirmation page
In Webstore, after you confirm the booking, you are redirected to the booking confirmation page. On this page, you can click the Fill Forms button to complete the forms that are required for all the services in your appointment.
Email link
You will also receive an appointment confirmation email with a link that will take you to the forms for the appointment.
Webstore profile
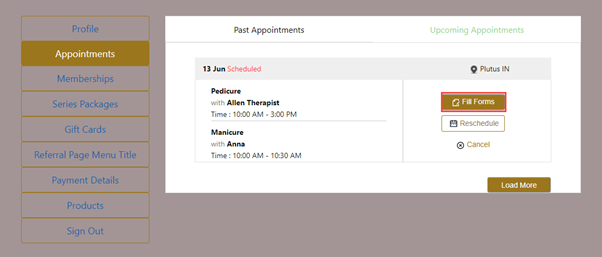
To fill forms in Webstore for an upcoming appointment, log in, and then :
Click Appointments.
Click Upcoming Appointments.
Next to the appointment, click Fill Forms.
The Fill Forms page opens with the following details:
Appointment date and time
All the relevant forms are in a pane on the left.
The status of each form under the form title
Services associated with the form below the status.
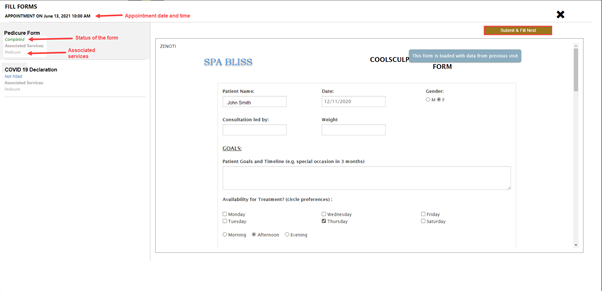
After completing each form, click Submit and Fill Next.
After you complete all the forms, click Submit.
Consumer Mobile App
To fill the guest intake and service forms in CMA, log in to the Consumer Mobile App.
Tap the hamburger icon on the top left to open the menu.
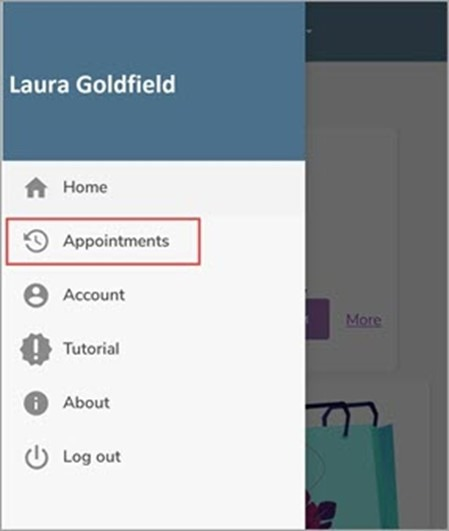
Tap Appointments.
The Upcoming and Past appointment tabs appear.
The Upcoming appointments tab displays a list of all the upcoming appointments. In the upcoming appointments, below the center location, all the forms that are to be filled for the particular appointment will be listed.
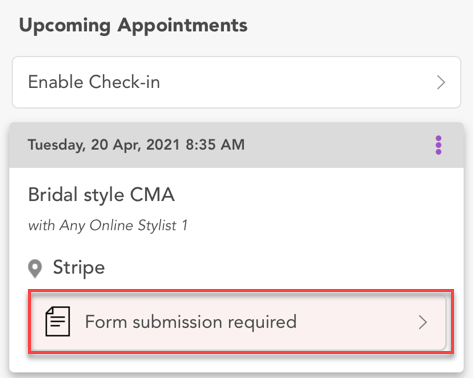
Tap Form submission required
The Forms page appears. Complete all the forms listed on this page.
Zenoti Mobile App
To fill the guest form for a service in ZMA:
Log in to Zenoti Mobile.
Tap Appointments from the Zenoti Mobile menu.
Select a service.
The Appointment details screen shows the guest form with an orange triangle with a Not filled status indicating that the form is incomplete for a service.
Tap the guest form.
The form opens with two tabs. The Guest Details and the name of a guest form (such as the Guest Intake or the service-related form).
Tap the ‘Lock’ icon on the top right corner of the screen.
The Guest mode is turned on.
Note
Enable this lock before handing over the device to the guest so that they can fill the form. This lock ensures that guests cannot access anything apart from the intake form in the app.
Expand each form.
Ensure the guest fills the details in the form as per requirement.
Tap Submit.
A submit message appears on the Appointment details screen.
Note
If you minimize or toggle the screen, an alert message appears prompting you to submit or save the changes to avoid loss of data.
The submitted form displays the date of submission.
Kiosk
To fill the guest intake and service forms at a kiosk:
Open the Kiosk home page.
Note
You can open the Kiosk home page by navigating to the URL or tapping Kiosk in the settings of Zenoti Mobile (iOS).
Kiosk home page opens and shows a list of all the guests and their position in the queue.
Click the name of the guest.
The phone number confirmation pop-up appears.
Enter the last 4 digits of your phone number to check-in.
Click Submit.
The forms page opens.
Note
The forms page appears only if the selected service has a form associated and requires consent from the guest. Otherwise, the guest will continue the booking process without seeing this page.
Select the form or forms and fill them accordingly.
Click Check-in.
You are Checked-In pop-up message appears.
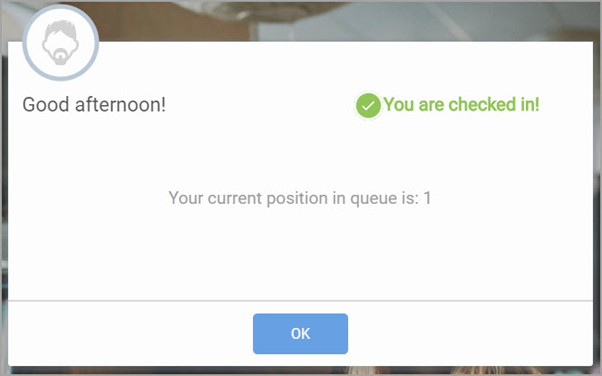
Click OK.
The Kiosk home page appears again, indicating your position in the queue.
Tag forms FAQs
This article addresses some of the questions you may come across while using custom forms or tagging custom forms.
Can I assign a tag form directly to a group of services?
Yes. You can assign a tag form to a group of services.
Can I assign multiple forms to a service?
Yes. You can also assign multiple forms to a service. This is because a tag has a custom form assigned to it. Which means, when you assign a tag to multiple services, the information you collect for one service is automatically applied to the rest of the services in the same tag.
Example: Lets say you have created 'Weight Loss treatment' tag and assigned a consent form to the tag. If you assign the 'Weight Loss treatment' tag to 'Tummy Tuck' and 'Skin Tightening' services, both these services will have the same consent form which the guest must fill.
When will a form expire?
A form expires based on the validity configured while creating the form in Zenoti.
If you have configured that the form should expire at a certain duration, then the form expires on that configured date.
For example, let’s say on August 15th 2018 your guest has filled the consent form, that expires after one year, for a Botox service.
If your guest comes back to avail the Botox service on September 16th 2019, your guest must fill the consent form again. For more information, see Custom Forms Validity: Overview.
What will happen to the custom data if the tag is unassigned with a service or if a tag is deleted after the guest has filled the form?
When you unassign a tag from the service or delete a tag, you won’t have the form assigned to the service. So, if you book a service for a guest, there is no form associated to the service and the guest need not fill the form.
Can I update an unexpired form?
Yes. You can update a form that has not reached an expiry date yet. Use the Enter Service Custom Data option from the context menu of Appointment Book to update.
What happens to the data which the guest has filled for a service in case the form is removed or if a new form is associated (after removing the old form) for the service?
The data is lost when you remove a form or associate a new form for a service. This means, the guest needs to fill the data again when a new form is associated to the service.
How do I translate custom form names and descriptions to a supported language?
Ensure that your organization has added the preferred language as a supported language.
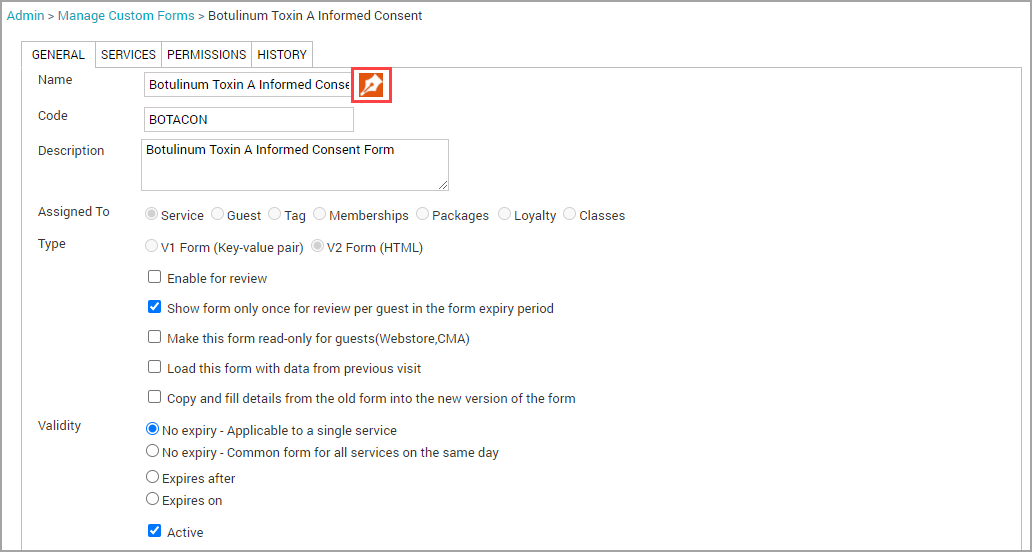
Create or edit a custom form
On the General tab, navigate to the Name field.
Click the pen icon.
Expand the appropriate section of the language of your preference.
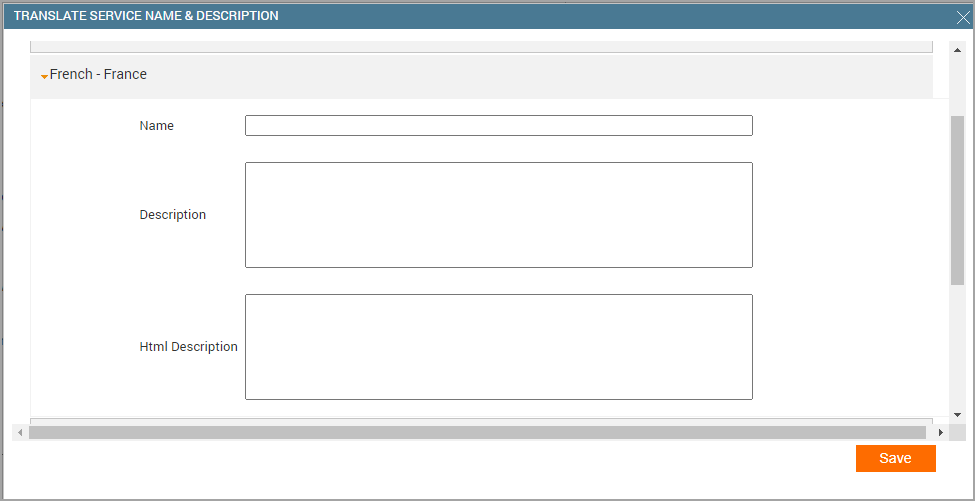
Enter the Name and Description in the supported language.
Enter the HTML content of the form in the supported language in the HTML Description field.
Click Save.
You have successfully translated the form details to a supported language.
Your employees with the preferred language can understand the form details better and your guests can fill the form as it is in their preferred language.
How do auto-cached forms work in Zenoti?
If a form is closed unexpectedly before saving, Zenoti temporarily saves (caches) the form with the entered information. When you reopen the form, a banner appears with options to Recover or Discard the cached data.
Recover: Restores the form with your previously entered details so you can continue where you left off.
Discard: Deletes the cached data and opens a blank form.
The banner also displays the exact date and time when Zenoti last saved your changes.
Note:
Auto-caching is available only on forms created using the Form Builder.
This feature is supported on Zenoti Web, ZMA for tablet, and Zenoti Mobile v2.