Redesigned Appointment Book for enhanced scheduling
Audience: This update impacts front desk operators, managers, and administrators involved in scheduling and managing appointments.
Pain points in the current experience:
Navigating between dates required taking multiple steps.
Accessing guest search was not intuitive enough.
Discovering filters and sorting options was not easy.
Understanding icons was difficult due to lack of descriptive labels.
Customizing appointment blocks and viewing detailed information was limited.
Moving appointments with payments or redemptions was restricted.
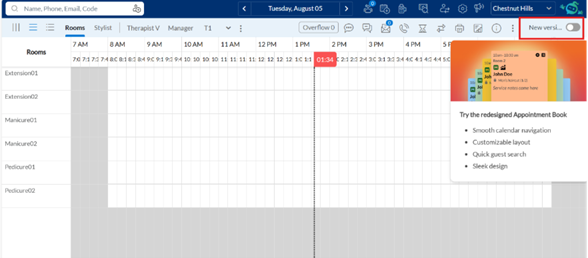
Try out the redesigned Appointment Book
You can preview the redesigned Appointment Book without waiting for your center to complete onboarding. This gives you the flexibility to explore the new layout and features before your center officially switches to it.
To access the redesigned Appointment Book, follow these steps:
Note
If your organization has enabled the redesigned Appointment Book and your center has not yet switched to it, you will see a New version toggle on the top-right corner of the calendar.
Turn the New version toggle on to try out the redesigned Appointment Book.
Note
The redesigned view applies only to your current login session, on the same browser and device.
The redesigned view follows the default setup for appointment block text, icons, and theme.
New Interface Summary: The redesigned Appointment Book offers a modernized layout with improved navigation and customizable features, enhancing usability and operational efficiency.
Existing experience vs. new experience
Existing Experience
The existing Appointment Book has limited navigation, a guest search that is not prominently placed, outdated filters and sort options, and appointment blocks where information is presented without hierarchy, making it difficult to quickly identify what’s most relevant.
New Experience
The redesigned Appointment Book introduces the following improvements.
Enhanced Navigation
Introduced a Today button for quick access to the current date.
Enabled skipping ahead by 2, 3, or 4 weeks.
Improved Guest Search
Placed the search bar prominently.
Displayed recent guest searches for quick reference.
Filters and Sorting
Made filters easily accessible, including a new provider filter.
Enabled sorting and reordering of providers in vertical view.
Appointment Blocks
Made guest names more visible
Enabled display of up to eight configurable icons (four appointment and four guest).
Added options to indicate appointment status or category.
Separated guest-related and appointment-related icons.
Additional Functionalities
Enabled moving of appointments regardless of associated payments or redemptions.
Introduced Focus Mode to highlight all services for a guest on hover.
Introduced the ability to edit views, set a recommended view, and define a default layout, along with improved zoom controls for better visibility.
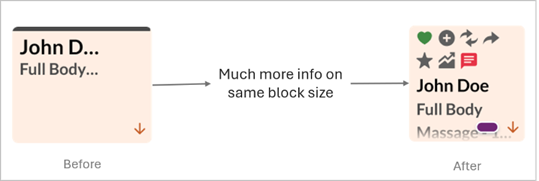
Redesigned appointment blocks
The redesigned Appointment Book includes updated appointment block templates that support a cleaner, more structured layout for displaying to display appointment details. These templates accommodate more information while maintaining readability and consistency across different screen sizes and calendar views.
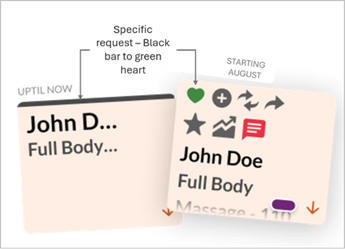
New icon for guest’s preferred provider
The black bar at the top of appointment blocks is being replaced with a heart icon to make provider requests more visible.
Green heart – Guest requested a specific provider
Blue heart – Guest requested any male provider
Pink heart – Guest requested any female provider
Action required if you have four appointment icons enabled:
At the center level, navigate to Configuration.
Search for 'redesign' and select Customize block for redesigned Appointment Book.
Disable one least-used appointment icon.
Click Save.
No action is needed if you have three or fewer appointment icons enabled — the heart icon will appear automatically after the update.
All the details of the redesigned appointment block are given below:
Guest icons appear in a row at the top of the appointment block.
Appointment icons are placed in the same row as the guest icons and are aligned to the right.
Room information, if applicable, is displayed just above the guest’s name to provide additional context without clutter.
Appointment notes are presented in an italicized or visually distinct format to differentiate them from other appointment information.
A notes icon appears on the appointment block if a note has been added to the appointment. This icon ensures that a note is visibly indicated, even when the appointment block is small.
Note
The notes icon is part of the standard onboarding configuration. When enabled, it displays automatically for all appointments that include a note.
The heart icon, in the top-right corner of the appointment block, replaces colored bars to clearly show provider requests. A green heart indicates a specific provider request, blue indicates any male provider, and pink indicates any female provider. In narrow layouts, the icon may adjust its placement but remains visible and functional.
Existing Appointment Book | Redesigned Appointment Book |
|---|---|
 |  |
 |  |
 |  |
 |  |
 |  |
  |  |
 |  |
Key functional changes
Why this change?
To address user feedback regarding navigation inefficiencies and limited customization, enhancing the overall scheduling experience.
How it helps?
The redesigned Appointment Book helps reduce time spent on scheduling appointments, enhances the clarity of appointment information, and provides flexibility in viewing and organizing provider schedules.
Usability improvements
Intuitive interface with minimal training required.
Clear labeling of icons and toolbar options.
Visual indicators enhanced for appointment statuses and categories.
FAQs
Is the redesigned Appointment Book automatically enabled?
For businesses going live on Zenoti on or after April 29, 2025, the redesigned Appointment Book is enabled by default. For existing organizations, owners and managers can enable this at the organization level. Once enabled, it becomes available at all center levels within that organization. You must enable the center level setting as well to use the redesigned appointment book.
Can I switch back to the previous version of Appointment Book?
Yes, you can switch back to the previous version.
Can I choose to see all guest or appointment details directly on the block?
No. Details such as guest phone number, provider name, and check-in time are accessible via tooltip or context menu but not displayed on the block itself.
How many icons can I show on each appointment block?
You can configure up to four appointment icons and four guest icons per appointment block.