Manage visits on Queue
Manage guest visits effectively to keep your queue running smoothly. Handle service starts, no-shows, and visit notes efficiently for a better guest experience and optimized operations.
Note
The Guests Waiting queue is sorted based on each guest’s promised start time. If multiple guests have the same ETA, the guest who checks in earlier is listed first.
The Queue view displays check-in alerts for scheduled appointments, consistent with the Appointment Book. For walk-in appointments booked and checked in at a kiosk, the check-in alert will not appear in the Queue view. This is because the alert is only displayed when the front desk explicitly checks in a guest.
Start a Service
Navigate to the Guests Waiting section.
Click Start on the guest’s queue card.
After the service starts, the guest moves to the Guests Being Serviced section.
When a service is started:
The guest is automatically checked in (if not already).
The actual start time is recorded in the Appointment Book.
When the Automatically move appointments in the Appointment Book based on start and complete actions setting is enabled, the appointment block automatically adjusts to reflect the actual start time if it differs from the scheduled time.
Undo a Service Start
Navigate to the Guests Being Serviced section.
Click Undo Start on the guest’s queue card.
Note
Based on your organization’s settings, you can start a service regardless of the queue position.
When the Automatically move appointments in the Appointment Book based on start and complete actions setting is enabled, undoing the start action does not reset the appointment to its originally scheduled start time.
When this setting is enabled, if the appointment was in a processing queue, it returns to its previous queue position.
Mark a Guest as a No-Show
Locate their queue card in the Guests Waiting section.
Click No Show.
Note
Based on your organization's setting, the No Show button may appear with a different label, such as Left or Unavailable.
Select a reason from the Reason List and provide additional details in the Comments box if needed.
Click Submit to confirm the no-show status.
Complete a Service
Navigate to the Guests Being Serviced section.
Click Mark Complete to end the service.
When completing a service:
If the invoice is closed for a started appointment, the appointment is automatically marked as Completed and the actual end time is recorded.
If the invoice is closed for an appointment that has not been started, the appointment must be manually marked as Completed.
If the Automatically move appointments in the Appointment Book based on start and complete actions setting is enabled, the appointment block automatically resizes to reflect the actual service duration, including non-bookable slots.
When enabled, staff can also start and complete multiple appointments as a group from the Queue. These may appear as double-booked in the Appointment Book, but Zenoti accurately records each appointment’s actual timings.
Note
If the service is prepaid or the payment was made in advance, mark it as complete after rendering the service and closing the invoice from the Point of Sale (POS).
Key visibility in the Appointment Book and reports
The Appointment Book shows the exact start and end times.
Managers can use this data for accurate reports and performance tracking.
Manage Appointment Visit Notes
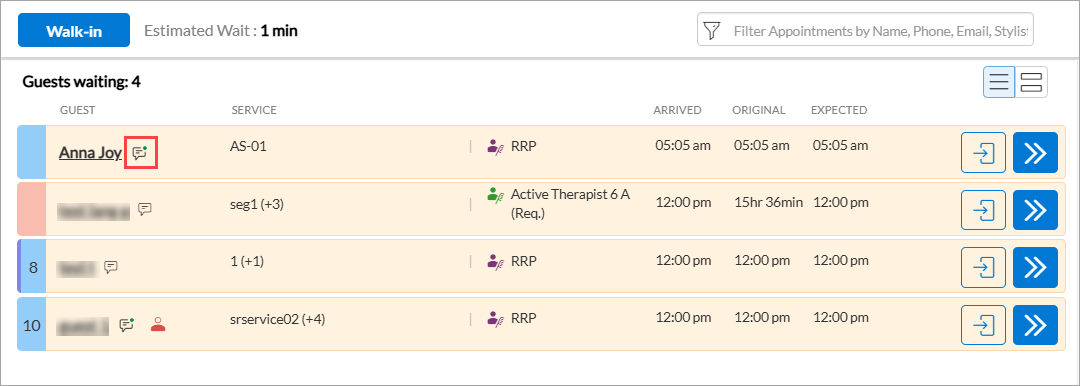
Open the guest’s queue card in the Guests Waiting section.
Click the appointment notes icon to open the notes dialog.
Choose Add to enter new notes or Edit to update existing ones.
Click Save.
Manage Guest Notes
Open the guest’s queue card in the Guests Waiting or Guests Being Serviced section.
Click the notes icon against the guests’ name.
To add a new note, click Add New.
The Add a new note window appears.
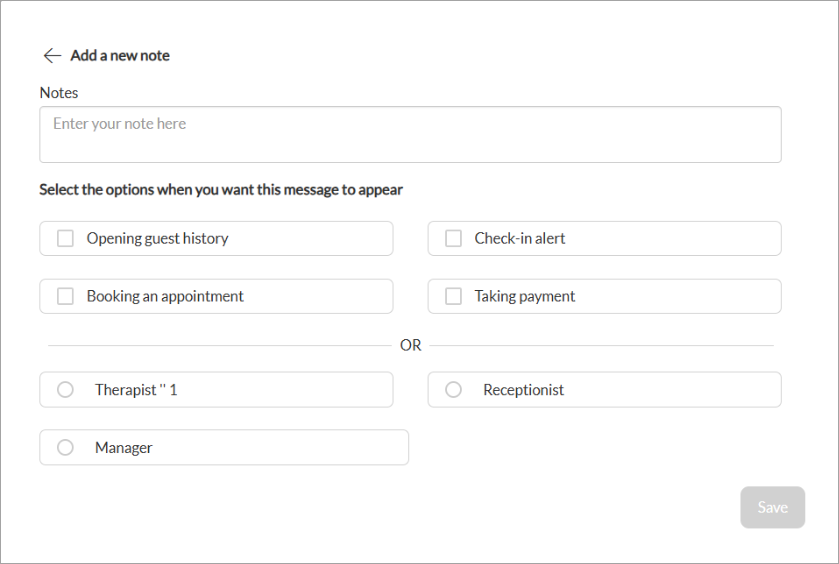
Add the required details.
Click Save.
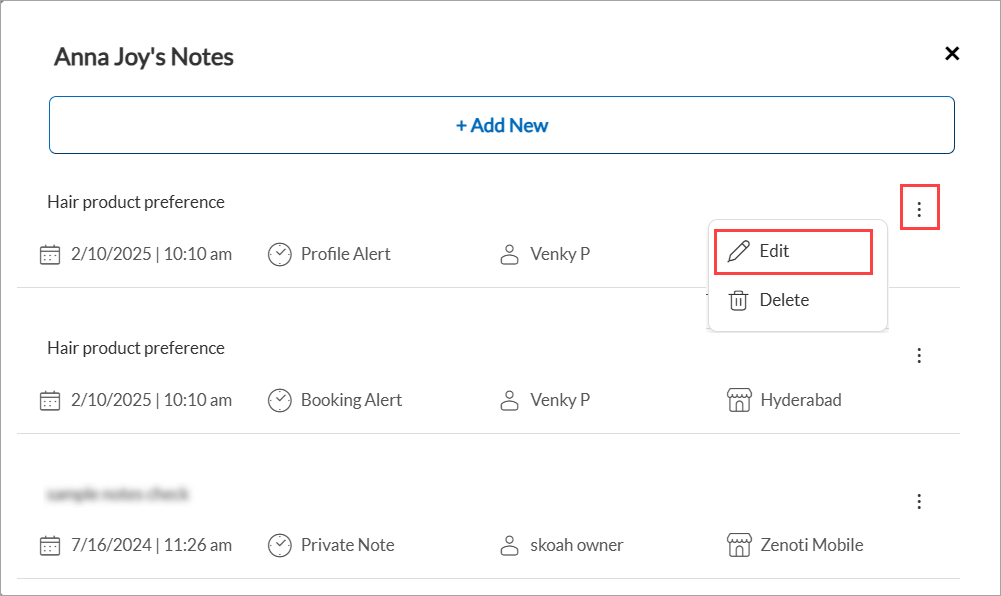
To edit a guest note, click the more options icon.
Click Edit.
The Edit note window appears.
Update the required details and click Save.
To delete a note, click the more options icon.
Click Delete.