New Employee Scheduling Experience
This article explains how to use the new Schedule page in Zenoti, which now offers a more intuitive layout, smart filters, and flexible calendar views to help front-desk teams manage employee schedules more efficiently. You'll learn how to enable the new experience, apply filters to quickly find relevant schedules, switch between different calendar views, and navigate the updated interface with ease.
Overview
The new Schedule page improves how staff members manage shifts, availability, and appointments. With collapsible panels, enhanced filtering options, and support for collaborative scheduling, the new view simplifies day-to-day scheduling activities while improving visibility and control.
The enhanced features empower administrators to:
Consistent day, week, and month views, with unified interaction logic
Smart filters with cascading dependencies for faster employee selection
Drag-and-drop schedule creation and editing
Cross-center scheduling awareness with conflict alerts
Built-in support for dual shifts, room assignments, and schedule notes
Draft scheduling workflows for internal collaboration or employee feedback
Keyboard shortcuts and smart time entry (e.g., type “800” for 8:00 AM)
Improved performance that supports up to 2,000 employees per center
Prerequisites
To use collaborative scheduling or non-working hour tracking, the corresponding toggles must be enabled.
Ensure room assignments are configured if you plan to use them in scheduling.
Considerations
Editing and time restrictions
Once an employee has checked in, you cannot delete the schedule or change its status.
Other hours (Vacation, Holiday) cannot be edited once added — you must delete and re-add the block.
You cannot convert an Other Hours block into Leave — instead, delete it and create a new Leave entry.
Draft scheduling constraints
Draft schedules are excluded from Copy Forward. Only published schedules are included.
You cannot print draft schedules. Only published schedules appear in print views.
Employees cannot check in to draft schedules. Schedules must be published first.
View specific constraints
In the month view drag-and-drop and bulk printing are not supported. Only one employee can be printed at a time.
In the week view, bulk status update is not available. Time edits via drag-and-drop are not allowed.
In the day view, Copy Forward is restricted to 730 days.
Copy forward limitations
Day View: Up to 730 days
Week View: Up to 104 weeks
Month View: Up to 24 months
Enable the new schedule experience
To switch to the new scheduling experience:
At the center level, navigate to Configuration > Employee > Schedule.
Turn on the Switch to the new scheduling experience toggle.
Turn on the Turn on collaborative scheduling with employee approvals toggle to let managers share draft schedules with employees for review before publishing.
Select the default view for your schedule page, by day, week, or month.
Turn on the Track non-working hours toggle to add vacation, holiday, and additional non-working hours directly on the schedule page.
Turn on the Enable copying across employees toggle to allow copying schedule entries from one employee to another for easier schedule setup.
Click Save.
Navigate the calendar on the new schedule page
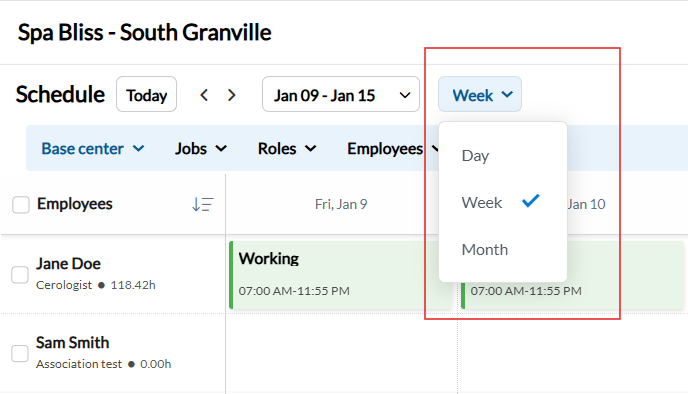
The top navigation bar allows you to move easily between dates and switch between Day, Week, or Month views.
To switch calendar views:
Click the view dropdown.
Choose from:
Day: Displays one day at a time.
Week: Shows the full week.
Month: Displays the entire month in a calendar layout.
To move between dates:
Click the left (←) or right (→) arrows to go back or forward by:
One day (in Day view)
One week (in Week view)
One month (in Month view)
To return to today's date:
Click Today. The calendar will jump back to the current date, regardless of the view.
To choose a specific date:
Click the date selector.
Use the calendar popup to pick to pick the desired date. The calendar view will update to display the selected date.
Note
The schedule page respects the center's Week Starts On configuration and displays the selected day as the first day of the week in all calendar views.
View-specific features
Use this view for detailed schedule creation, editing, room assignment, or shift changes. Day View supports the highest level of interactivity, including drag-and-drop, time adjustments, and smart copying. It shows schedules for multiple employees on a single day. Each row represents an employee. The columns represent time slots. It includes visual indicators for:
Working
Leave
Special Leave
Weekly Off
Other hours (Vacation/holiday)
Cross-center conflicts
Draft statuses
Drag and drop: Create or adjust schedules by dragging blocks across the timeline
Time entry (Smart Input): Typing “8” fills 8:00 AM; “2350” fills 11:50 PM (rounded to nearest 5-min)
Right-click scheduling: Right-click to Add Schedule, Leave, Other Hours, or Edit options
Room assignment: Assign a room to the schedule; searchable if ≥5 rooms
Legend and status colors: Full visibility of status indicators, icons, and block colors
Schedule notes: Add/view notes using icons on blocks
Copy forward: Copy schedules up to 730 days into the future
Bulk status update: Select multiple employees → update schedule status (e.g., Leave)
Cross-center awareness: Yellow indicator for shifts at other centers; hover for details
Dual shift support (Shift 2): Allows split shifts for an employee; each displayed as a separate block
Other Hours support: Add vacation/holiday/non-working hours directly from the side panel
Copy and paste across employees: Copy a block and Paste to another employee using right-click options
Sort Employees A–Z / Z–A: Organize the employee list based on name
Print Schedules: Day-level print option for selected employees
Note
You cannot modify a schedule once the employee has checked in.
Only published schedules (not drafts) can be copied forward
Use this view to compare schedules over an entire week, manage recurring patterns, or make week-level edits. It shows a weekly grid view per employee, showing shifts across 7 days. Each row is an emplouee and each column represents the day of the week. Schedule blocks appear in colored rectangles with status indicators.
View shift status for each day: See one or two shift blocks per day with visual color/status indicators
Hover to view details: Hover over a block to view status, time, notes, room, and center assignment
Copy forward (Weekly): Copy forward schedules by number of weeks (up to 104 weeks)
Alternate week copying: Option to copy schedules every other week
Smart filters: Searchable and cascading filters for Jobs, Roles, Employees
Right-click scheduling: Right-click to edit, delete, cut, copy, paste, or change status
Cross-center awareness: Shows schedule blocks at other centers
Dual shift visualization: Hover shows Shift 1 and Shift 2 separately; blocks are labeled visually
Room color display: If room colors are assigned, they’re displayed on blocks
Notes support: Notes icon appears on schedule blocks
Schedule sorting and freezing: Freeze top filter bar while scrolling; sort employees alphabetically
Print weekly view: Can print for selected employees for the week
Note
Bulk status updates are not supported in Week view.
Time cannot be changed via drag and drop; you must use the edit panel.
Use this view for long-term staff planning, viewing leave patterns, and printing individual monthly schedules. It shows a monthly calendar grid for each employee. Schedule blocks are shown as colored tiles per day.
Schedule blocks with status letters: Each block shows the first letter of the schedule status (e.g., W, L)
Hover to view details: Hover shows full time, room, notes, and status
Cross-center indicators: Yellow-colored block shows schedule at another center
Room color display: Room colors (if assigned) shown in background of the block
Notes and MyZen notes: Icons displayed for quick access
Copy forward (Monthly): Copy schedule up to 24 months into the future
Right-click options: Copy, Paste, Cut, Delete, Add Schedule, Add Leave
Print monthly schedule: Right-click on an employee to print full month schedule
Dual shift support: Hover over the day to see both shifts with full details
Sort employees: A–Z, Z–A sorting available
Sticky filters: Top filters stay fixed during scroll
Note
Drag and drop of schedules is not supported in month view.
Bulk status updates is not supported.
Printing for all employees at once is not available. Schedules of individual employees can be printed from the employee card’s three dot menu.
Use smart filters
The new Schedule page introduces a powerful set of filters, allowing you to narrow down employee schedules based on various parameters. The filters are fully searchable, and supports multi-selection.
All (Base + Shared): Shows all employees scheduled to work in this center, regardless of their base center. Includes employees whose base center is this location and those from other centers through assigned roles.
Base Center: Shows only employees whose base center is this location. Use this to focus on employees permanently assigned to this center.
Shared Centers: Shows only employees who are shared from other centers to work at this location. Use this to monitor or schedule temporary or visiting staff.
Jobs: Filter employees by their assigned job roles (e.g., Beautician, Receptionist).
Roles: Select specific role types like:
Administrator
Accountant
Therapist
Receptionist
This helps in identifying relevant personnel for schedule adjustments.
Employees: Choose individual employees to display on the calendar. Use the search bar or Select All to control visibility.
Status: Use this filter to identify staff by their working status:
Working
Leave
Sick
Weekly off
Custom statuses
Note
The status filter is available only in the Day view.
The filters at the top of the Schedule page help you refine your view based on specific criteria. These filters are arranged from left to right in increasing order of specialization, allowing you to progressively narrow down the results.
Once a center is selected, use the Jobs filter to choose specific job roles within that center. The Roles filter then dynamically updates to show only the roles applicable to the selected jobs, giving you a more relevant list to choose from. Next, the Employees filter becomes available, displaying only those employees who match the selected jobs and roles.
This cascading structure ensures that each subsequent filter is context-aware and only shows options relevant to the previous selections. This hierarchical filtering system helps reduce clutter, improves focus, and makes it easier to find the exact employee schedules you need to view or manage. You can sort employees A–Z or Z–A directly from the filter bar.
These tools are especially useful when the Enable copying across employees setting is turned on, allowing quick replication of schedules between staff members and saving time during bulk scheduling.
Understanding schedule indicators (Legend)
The Legend on the new Schedule page helps you interpret the various colors, icons, and labels used across the calendar.
These labels reflect the current state of the employee’s schedule:
Green (Working): Employee is scheduled to work.
Green Dotted (Working draft): Draft schedule not yet published.
Red (Leave): Employee is on approved leave.
Pink (Special leave): Special types of leave (e.g., training, family).
Gray (Weekly off): Regular weekly off days.
Red Dotted (Leave draft): Draft leave not yet finalized.
Pink Dotted (Special leave draft): Draft for special leave.
Gray Dotted (Weekly off draft): Tentative weekly off day.
Yellow (Schedule in other centers): Employee is scheduled at another center.
Striped (Inactive / Deputation): Employee is inactive or deputed temporarily.
Holiday (Blue label): Center is closed for a holiday.
Closed (Red Label): Center is officially closed.
Blue bar: Indicates a color-coded room for appointments.
No color bar: Room is not color-coded.
Overlap icon: The employee has overlapping schedules across centers.
Note icon: There is a general note linked to this schedule.
MyZen note icon: Notes from the employee’s MyZen profile are present.
Clock icon (Other hours): Indicates additional/non-standard working hours.
View | Legend |
|---|---|
Day view | Full support: All icons, colors, status |
Week view | Full support: Icons, draft status, room color |
Month view | Shows colored blocks plus first letter of status |
Create or edit a schedule
You can quickly create a new schedule entry for an employee directly from the calendar in Day, Week and Month views using three methods:
At the center level, navigate to Employee > Schedule.
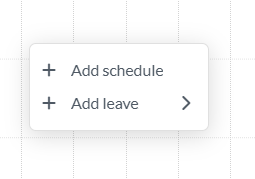
In any view, double-click on an empty time slot next to the desired employee's name. Alternatively, right click an empty slot and select Add schedule.
The new schedule panel will open on the right side of the screen.
In the panel, confirm the Date and Employee name (auto-filled).
Select the Status.
Edit the Start and end times. Alternatively, change the start and end times by dragging the schedule block to the left or right.
Optionally, select a Room from the dropdown.
Add any relevant Notes.
Use Shift 2 if the employee has a split shift.
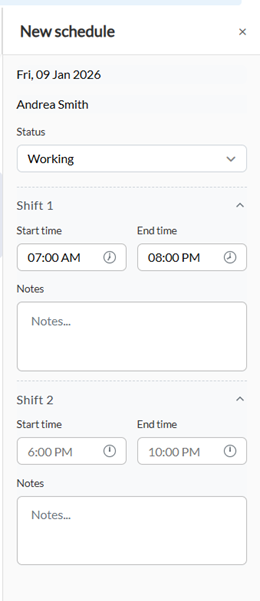
Click Create.
This action creates a draft schedule, which is visually marked as “Draft” on the calendar. From here, you can either:
Click Share Draft to allow employees to review the schedule before finalizing.
Click Publish.
Note
When the Turn on collaborative scheduling with employee approvals toggle is off, schedules are published directly without the creation of a draft.
Hover your mouse over the employee row in an empty time slot.
Click and drag across the time grid to select a time block.
Release the mouse to open the side panel.
In the panel, confirm the Date and Employee name.
Select the Status.
Adjust the Start and End times.
Use keyboard (e.g., type 800 for 8:00 AM)
Time rounds to nearest 5-minute intervals
Assign a Room. This field is searchable if more than 5 rooms exist.
Add Notes.
Add Shift 2 if a dual shift is needed.
Click Create.
Schedules stay in draft mode until published. Drafts can be:
Reviewed internally by managers.
Shared with employees for feedback (via MyZen, if enabled).
Edited, deleted, or copied.
From Zenoti web:
Click Share Draft to send to employees via MyZen.
Employees can view and manage drafts in MyZen by:
Navigate to My Schedule > Review drafts.
Click Approve.
To publish:
Click Publish in the top bar.
All visible drafts will be finalized. Employees will see the schedule as official. They will receive a notification, if enabled.
On the calendar, click an existing schedule block.
The Edit Schedule panel opens on the right side of the screen.
From the panel, review or change the Status.
Adjust the Start time and End time for Shift 1.
Select a Room, if applicable.
Add or edit Notes.
Modify or add Shift 2, if the employee works a split shift.
Click Save to apply the changes or Cancel to discard them.
Any updates made will immediately reflect on the calendar. If the schedule is still in draft state, you'll need to Publish it for it to go live.
Alternatively, edits can be made to schedules tagged as working by right clicking the event.
Right-click the green Working shift block.
A context menu appears with the following options:
Set as leave
Delete
Cut
Copy
Hover over Set as Leave.
A submenu appears with available leave types.
Click on the desired leave type.
Zenoti replaces the working shift with the selected leave.
Click Delete from the context menu to delete the schedule.
Select Cut if you plan to move the shift to another date or employee.
Select Copy to duplicate the same shift elsewhere.
Right-click on an empty cell and select Paste.
Drag an existing schedule block from one time to another to change start/end times.
Drag the block to another employee's row to move the schedule.
Note
A schedule cannot be modified once the employee has checked in.
Notes are not transferred when you move a schedule. Only time, room, and status are preserved.
Time fields support shorthand typing for rapid input:
8 → 08:00 AM
800 → 08:00 AM
2300 → 11:00 PM
239 → 02:39 (rounded to nearest 5-min slot)
Up/Down Arrow keys allow precise time adjustments in 5-minute increments or decrements.
24-hour format is fully supported avoiding the need to type AM or PM
No colon required in shorthand (for example, 815 = 08:15)
Right click an empty slot.
Click Add leave to select a leave type.
This action creates a draft schedule marked as leave. It can be edited, shared as draft, and published.
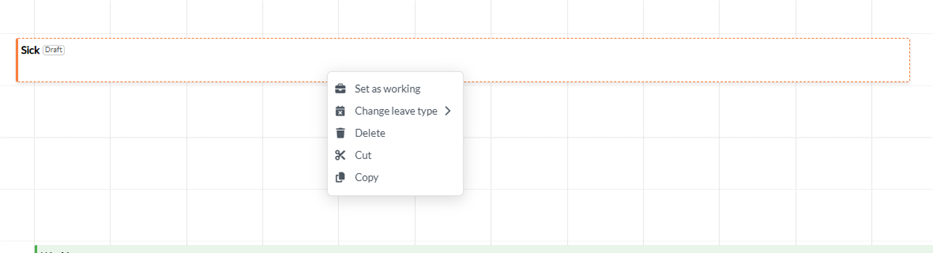
Right click the event to perform the following actions:
Change the leave status to working
Change the type of leave
Delete the entry
Cut the entry to remove it and paste it on another employee’s slot
Copy the entry to paste it on another employee's slot
Track non-working hours
This feature allows you to record vacation, holiday, or additional paid hours separate from regular working hours. It replaces the older method of manually adding this data in the Check-In screen.
Note
This feature is only available when the Track non-working hours toggle is on.
If collaborative schedule is on:
Right-click on a time slot or double click to create a new entry.
On the right panel, scroll down to the Other hours section.
Enter the relevant hours in any of the following fields:
Holiday hours
Vacation hours
Additional hours
Click +Notes next to each field to add context and comments.
Click Create.
If collaborative schedule is off,
Click on a time slot to create an entry.
Click the created entry to open the edit schedule panel.
Scroll down to the Other hours section.
Enter values in any of the following fields:
Holiday hours
Vacation hours
Additional hours
Click +Notes next to each field to add context.
Click Create.
Note
Other hours once entered cannot be edited. Delete the entry and re-enter the Other hours.
Update the status by bulk
Use the checkboxes to select the employees whose status you want to update.
Use the Select All checkbox at the top to select all employees listed.
Once employees are selected, click Update status in the action bar that appears.
In the Update Status popup, choose the new status from the dropdown menu.
Click Update to apply the status change to all selected employees.
Copy forward employee schedules
Navigate to the Schedule page.
Select the employees whose schedules you want to copy using the checkboxes.
Use the Select All checkbox if needed.
Click Copy forward in the action bar.
In the Copy forward dialog, enter the number of days to copy forward.
Alternatively, set the Until end date. The number of days field will automatically update to reflect the duration, and vice versa.
Enable Include notes if you want schedule notes to be copied.
Enable Include other hours to copy non-working hours.
Use the Status to preserve dropdown to maintain existing statuses during copy.
Click Copy.
Note
Draft schedules will not be copied. Schedules can be copied forward for a maximum of four years.
View | Copy range | Limit | Extras |
|---|---|---|---|
Day view | Copy by number of days | Up to 730 days | Copy notes, room, other hours |
Week view | Copy by number of weeks | Up to 104 weeks | Option to copy alternate weeks |
Month view | Copy by number of months | Up to 24 months | Copy forward to specific end date |
The Copy Forward feature in Week View offers two options:
By Weeks: Automatically copies the current week’s schedule to a set number of future weeks.
By Date: Lets you choose specific calendar weeks to copy the schedule into.
Both options include the ability to carry over:
Notes attached to shifts
Other hours (holiday, vacation, and additional hours)
To copy forward by weeks in the Week view,
Select the employees for whom schedules must be copied forward.
In the Copy forward popup, select the Weeks tab.
Enter the number of future weeks you want to copy the schedule into.
Check or uncheck Include notes and Include other hours.
Select schedule Status if you only want to preserve schedules with a specific status.
Click Copy.
To copy forward by date,
Select the employees for whom schedules must be copied forward.
In the Copy forward popup, select the Date tab.
Choose one or more weekly date ranges to copy the schedule to.
Click Show more to see additional weeks.
Use Alternate weeks if applicable.
Ensure the checkboxes for Include notes and Include other hours are selected as needed.
Choose a specific Status to preserve.
Click Copy.
Update your user preferences
On the top-right of the Schedule page, click the Settings icon.
In the User Preferences panel that appears:
Default view: Select your preferred view for the Schedule page.
Default employee list: Choose the default list of employees to display.
Click Save to apply your preferences.
These settings will be retained the next time you access the Schedule page.
Click Reset to revert to the original system defaults.
Handle alerts and validations
The new schedule page introduces inline alerts that provide real-time feedback to reduce errors and ensure compliance. Unlike the older version, alerts are now employee-specific, clearly explained, and appear only when editing a schedule, not while browsing.
Key alerts:
Max Hours Exceeded: Shows who exceeded and by how much.
Special Leave Not Allowed: Warns on restricted days but allows saving with alert.
Weekly Off Not Allowed: Surfaces conflicts with org rules; allows override if configured.
Weekly Off Limit Exceeded: Alerts when offs exceed allowed count per week.
Center Closed / Holiday: Red (closed) or blue (holiday) label on calendar; shows inline alert on conflict.
Scheduled at Another Center: Yellow block shows details of overlapping shifts at other centers.
These alerts are available across Day, Week, and Month views, appear inline, and don’t require dismissal, making it easier to spot and resolve issues during scheduling.
Print the schedule
Navigate to the Schedule page.
Switch to either Day or Week view using the view selector at the top-right.
Select specific employees using the checkboxes on the left.
Click the Print icon from the action bar.
A new browser window/tab opens with a print-ready version of the schedule. It displays the selected date(s), center, employee names, job roles, working hours, and status.
To print schedules in the month view:
Locate the employee row for whom you want to print the schedule.
Click the three-dot menu beside the employee name.
Select Print from the dropdown options.
A monthly schedule preview for that employee will open in a pop-up window.
Review the schedule.
Click Print in the popup to send the schedule to your connected printer.
Frequently asked questions
Why can’t I copy a draft schedule forward?
Only published schedules can be copied forward. Draft schedules are designed for temporary review and do not carry full data integrity needed for replication.
Can I use draft scheduling without involving employees?
Yes. Drafts are visible only to managers unless the center-level toggle for collaborative scheduling with employee approvals is turned ON. This allows manager-to-manager review before publishing.
Will employees get notified about drafts or published schedules?
Only if your organization enables Employee Notifications in Organization > Notifications > Employee. Even if notifications are disabled, employees can still view shared drafts via myZen, provided the feature is enabled.
What happens to my preferences when I log out?
Your selected view, employee list, and other settings are stored as User Preferences. These persist across sessions and devices.
Why was the copy-forward limit reduced from the old scheduling page?
In the old system: Day View supported up to 999 days Week View allowed 99 weeks Month View allowed 99 months These limits led to unreliable or partial schedule creation. To ensure accurate, dependable replication, the new design standardizes copy-forward limits: 730 days 104 weeks 24 months If you need to plan beyond 2 years, simply repeat the copy-forward action at the future target date.
Can I track Other (non-working) hours for payroll?
Yes. When Track non-working hours is enabled, you can record hours such as vacation, holiday, and Other hours. These are visible in Manage Check-In page. They reflect in payroll reports for accurate compensation
What if I schedule someone who is already working at another center?
The new page shows a yellow-colored block for any overlapping schedule at another center. Hover over it to see: Which center Schedule details Time conflict information Unlike the previous version, this provides complete visibility for cross-center scheduling.
Does the new schedule support dual shifts?
Yes. Add Shift 2 from the side panel while creating/editing a schedule. Visualize each shift as separate blocks. Edit or remove shifts independently. This works across Day, Week, and Month views.
What happens if I assign weekly off more than allowed by my organization?
The system triggers a clear alert if the weekly off count exceeds the configured limit. It helps maintain compliance with HR policies.
How does the redesign help large teams?
The new page supports up to 2,000 employees in one view. It loads faster with scroll optimization and offers multi-employee tools like Bulk Status Update, Copy Forward, and Print. It enables easier coordination with draft workflows and filters