Add a new guest
Maintaining a guest profile is crucial for your business as it records transactions, booking history, and general guest details. However, first-time or new guests don't have existing profiles in your organization. When a booking is made on the Appointment Book or Queue view, Zenoti generates a new guest profile for first-time visitors with basic guest details such as name, email address, and contact number. Additionally, you can manually create a new guest profile from the booking panel or Booking Wizard.
To create a guest profile without scheduling an appointment, use the Guests section to create a new guest record.
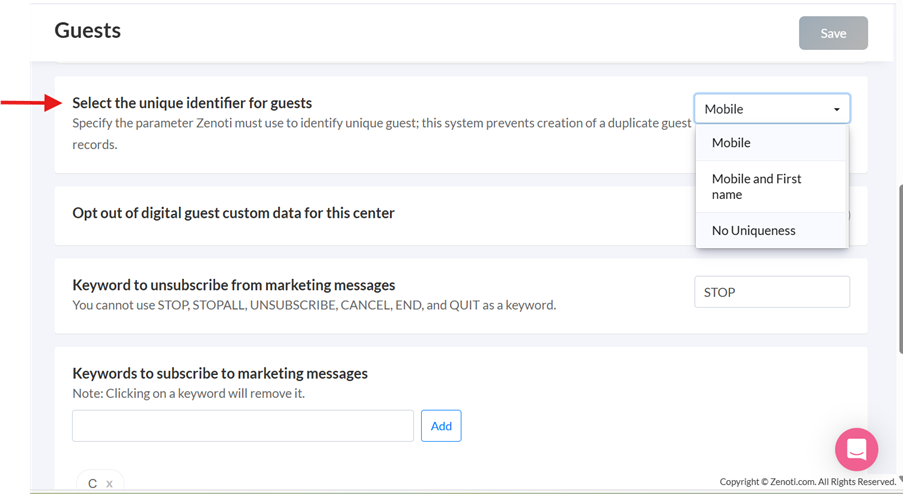
When you create a guest, Zenoti checks for duplicates based on your center’s uniqueness settings. Depending on how these are configured, the system checks across your center, zone, or entire organization. You can go to the Guests section in Configuration and set the unique identifier for guests.
Note
This setting is not available by default. If you want to enable this, contact your Zenoti representative.
Behavior varies by uniqueness type:
Center Uniqueness | Org (Can share mobile) | Zone Level Enabled | Alert/Warning | Result |
|---|---|---|---|---|
Mobile | No | Yes | Alert: If a guest is found in the zone with the same number | Guest creation blocked |
Mobile | No | No | Alert: If a guest is found in the org with the same number | Guest creation blocked |
Mobile | Yes | Yes | Warning: If a guest is found in the zone with the same number | Can ignore warning |
Mobile | Yes | No | Warning: If a guest is found in the org with the same number | Can ignore warning |
Mobile + First Name | N/A | Yes | Alert: If a guest is found in the zone with the same number + First name | Guest creation blocked |
Mobile + First Name | N/A | No | Alert: If a guest is found in the center with the same number + First name | Guest creation blocked |
Create a new guest profile without booking
At the center level, search and select the Manage Guests option under the Guests section.
On the Manage Guests page, click Add guest.
On the Create New Guest window, complete the fields in the Personal Info, Login Info, Address, and Preferences sections.
Click Save.
The guest record is created in Zenoti.
You can now search for the guest in the Appointment Book, Queue View, or from the Manage Guests screen in the Guests section.
Customer ID: Specify a unique customer identifier.
You can choose to auto-generate the customer identifier by navigating at the Organization level to Configuration > Guests and selecting Enable auto-generate guest code in Center settings.
First Name (Mandatory): Enter the first name of the guest.
Middle Name: Enter the middle name of the guest.
Last Name: Enter the last name of the guest.
Email (Mandatory): Enter the email address of the guest.
Email addresses (guest and employee) can have special characters like ÀÂÄÆÇÈÉÊËÎÏÔŒÙÛÜàâäæçèéêëîïôœùûü.
Mobile phone: Select the country. The country code will be automatically displayed. Enter the guest's mobile number. If the phone number length is invalid, an error message will show the valid range accepted in that country.
Home phone: Select the country code and enter the home phone number of the guest.
Work phone: Select the country code and enter the work phone number of the guest.
Primary employee: Enter the name of the employee who will be the primary service provider for the guest.
You can choose to make Primary Employee a mandatory field when creating a guest profile.
Gender (Mandatory): Select the gender of the guest.
This Guest is a minor: Enable this checkbox to indicate that the guest is a minor.
The field This guest is a minor is visible when you edit a guest profile.
Preferred pronoun: Select the gender pronoun by which the guest prefers to be addressed. This is displayed against the guests' name on the Guest Profile, Booking Panel, and Booking Wizard.
Birthday (Mandatory): Enter the date of birth of the guest. This enables personalized marketing for guests' birthdays and ensures age verification for services.
Anniversary: Enter the wedding/marriage anniversary date of the guest.
Referral (Mandatory): Specify the referral source. Learn how to create referral sources.
Referral code: Enter the coupon code that can be used by the referred guest to avail the referral reward.
Block guest from editing custom data: Enable this checkbox to prevent the guest from changing any forms data. Only Front-desk operators (FDO) can modify this data.
Username: Enter a unique username for the guest, that can be used to log in to the Webstore or Customer Mobile Application (CMA)
Tags: Add labels to categorize the guest for easy search and tracking.
Address 1: Enter the primary address of the guest.
Address 2: Enter the secondary address of the guest.
City: Enter the name of the city.
Nationality: Select the nationality of the guest.
Country: Select the country.
State: Select the state.
Zip code: Enter the pin code.
To make the Zip Code field mandatory, ensure that you are at the organization level. Go to Configuration > Guests > and select Zip Code under the Show alert if the required fields are missing when creating the guest profile field.
Language: Select your preferred language from the list.
Center: Select the location or branch where the guest profile was first created. This is used to send targeted email campaigns to guests. For example, if an email campaign is being sent from the James Street center, selecting Send to base center guests will ensure that the campaign reaches all guests who have James Street set as their center in their profile, regardless of their visit history to that specific center.
Transactional Messages: By default, for every transaction made by a guest, the guest receives a transaction text message and email. To disable transactional notifications, clear the Email or SMS checkbox based on the guest's preference.
Marketing Messages: Receive Marketing Emails and SMS (if enabled at the organization level at Settings > Guest).
To send marketing messages to guests, select the Email checkbox to send marketing emails and the SMS checkbox for text messages.
Important
If TCPA is enabled for your organization, the option to receive marketing emails and texts will not be selected by default. You must take consent from the guest before sending any text campaigns to the guest. For EU countries, only the guest can accept these conditions to receive marketing emails and texts. Find out more about TCPA Compliance at Zenoti.
Receive loyalty point statement: To notify guests of transactions related to loyalty points, select the Receive loyalty point statement as a text message (SMS) and an email checkbox.
Opt into loyalty programs: To enroll the guest for loyalty programs select the Check this box if your customer wishes to benefit from the exclusive advantages of the loyalty program checkbox.
Impacts and considerations
You can create new guest records at the center level by navigating to Guests > Manage Guests.
Zenoti sets the correct range and format for the phone number based on the selected country or region code. If a phone number begins with 0, Zenoti excludes the 0 from the digit count. For example, if a phone number requires 10 digits and the user enters 09876543211, then Zenoti automatically removes the leading 0 from the phone number.
Create a new guest from the booking view
If guests don't have guest profiles in your organization, they are considered new guests. You can create new guests directly from the Appointment Book or Queue view.
To create a new guest, on the right side of the Search bar, click the New Guest icon.
In the New Guest window, enter the required details.
Select the referral source by selecting an option from the list.
If the guest is below a certain age limit set by your organization, select the Guest is a minor option.
Click Create.
Create a new guest from the Booking Wizard
To access the booking wizard, on the Appointment Book or Queue view, click the Booking Wizard icon.
Click the search bar.
To create a new guest record or profile, click + New Guest.
On the Create Guest window, enter the required guest details.
Select the referral source by selecting an option from the list.
If the guest is below a certain age limit set by your organization, select the Guest is a minor option.
Select the guest preferences for email and text notifications.
Click Create.
Impacts and considerations
To add a visit to Queue directly from Booking Wizard, click the Booking Wizard icon and follow these steps.
Webcam support for Zenoti Web
Zenoti Web supports webcams for capturing member profile pictures directly from the desktop. This enhancement helps locations that do not use the Zenoti Mobile App (ZMA) to take and update guest profile pictures efficiently.
Some gyms prefer desktop systems over tablets for added security. With webcam support, front desk staff can easily capture member profile pictures without relying on mobile devices.
Prerequisites
Access the guest or member profile.
To add or update a profile picture
Navigate to Guest Profile:
If no profile picture exists, click the "Add" button.
If a picture exists, click the "Edit" button.
Capture the Picture:
The webcam activates, displaying a live feed.
Click “Take Picture” to capture the image.
Choose to Save, Retake, or Cancel the capture.
Adjust and Save:
Adjust the image within the provided circular frame.
Save the picture to update the guest profile.
To delete a profile picture
Click the “Edit” button on the guest profile picture.
Select “Delete”, and confirm the action.
Add a new picture if needed.
Impacts and considerations
Ensure the webcam is properly connected before launching the capture process.
Position the guest in a well-lit area for the best image quality.
Review the captured image before saving.
FAQs
Q: What happens if the webcam is not detected?
A: Check your device settings to ensure the webcam is connected and enabled.
Q: Can I retake a picture if I’m not satisfied with it?
A: Yes, after capturing, you can retake or cancel the process.
Q: Will the previous picture be overwritten?
A: Yes, when you save a new picture, it will replace the existing one