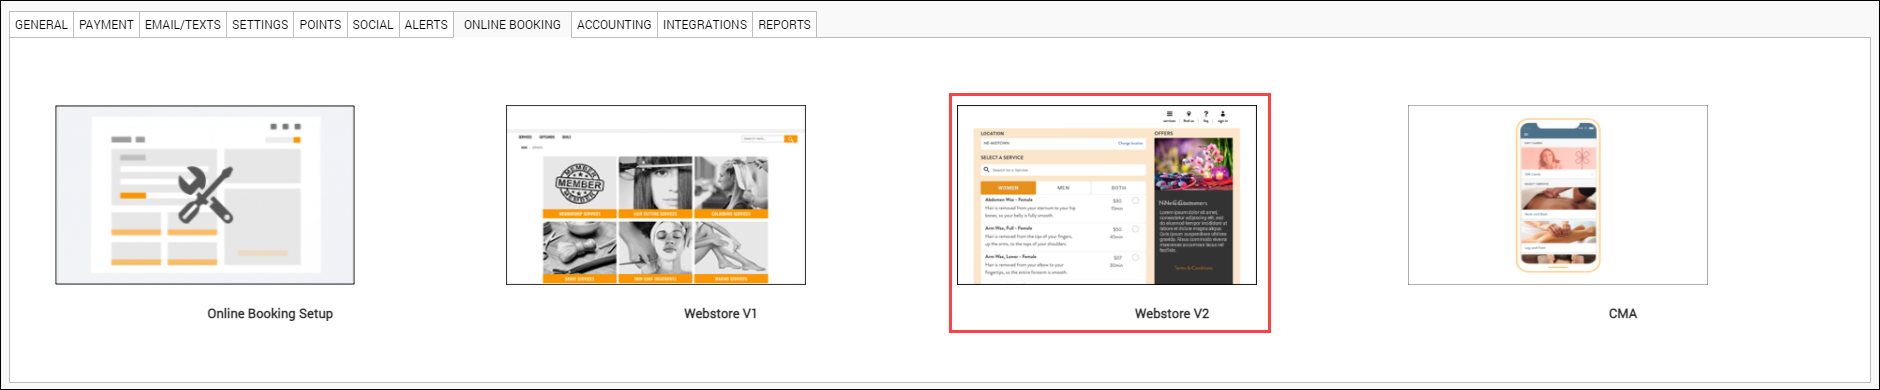
Configure the Webstore v2 template
After you set up the required configurations in Zenoti and configure the CX V3 template, you can proceed to set up the Webstore V2 template.
The Webstore V2 template consists of multiple settings and these settings are divided into various categories.
At the organization level, click the Configuration icon. Navigate to Online Booking > Online booking settings > Webstore V2 .
Configure the relevant settings:
The following categories of settings are available in the Webstore V2 template:Branding Look and Feel: This section allows you to select colors for primary and secondary buttons, containers, and text items. You can also specify the fonts to use and specify details for background containers of your Webstore.
Styling and Custom CSS: This section allows you to customize the look of banners and headers. You can also add your company logo to the header in this section.
Labels and Text Configuration: This section allows you to personalize text labels such as Center, Employee, Booking Button Label that you will use in your Webstore.
Guest Login and Sign up: This section allows you to set up guest login and sign up settings.
Display Settings: This section allows you to customize the display of services that you want to offer on your Webstore. You can enable sales of memberships, packages, gift cards, and services.
Guest Profile: This section allows you to configure the Guest Profile and its different sections. You can enable your guest to see the appointment history, membership history, and others using this setting.
Appointment Booking Flow: This section allows you to set up appointment booking flow settings.
Calendar Settings: This section allows you to configure the calendar settings
Therapist Settings: This section allows you to set up therapist settings.
UI Settings: This section allows you to configure UI Settings.
Group Booking: This section allows you to enable or disable Group Booking on your Webstore. You can also specify the maximum number of guests you can accommodate in a group booking (Up to six guests).
Enable the sale of memberships: This section allows you to enable or disable the sales of Memberships on your Webstore. You can also customize the text of the membership icon and the sales label.
Series Packages: This section allows you to enable or disable the sale of Series Packages.
Configure gift cards: This section allows you to enable the sale of Amount, Service, and Package Gift Cards. You can also configure the validity and maximum price of Gift Cards.
Loyalty Points: This section allows you to set up loyalty points.
Learn how to set up loyalty points.
Deals: This section allows you to set up time based discounts.
Day Packages: This section allows you to enable or disable the sale of Day Packages.
Referral Program: This section allows you to set up referral program for your Webstore.
Analytics: This section allows you to integrate your Webstore with Google Tag Manager and track your user behavior.
Integrations: This section allows you to set up Shopify integration.
Deep Links: This section allows you to set up deep linking.
After you configure the above settings, to publish all the settings and make them live, click Publish.
Customize branding look and feel
Learn how to give your unique brand identity to your Webstore
Zenoti provides various settings that you can use to tailor the look and feel of your brand on the Webstore. The Branding Look and Feel is the first section of customizing your Webstore.
For instance, you can decide the color scheme, fonts, and highlighters for various elements on the interface so that the Webstore appears like your own website.
To customize the Webstore to suit your brand identity:
At the organization level, click the Configuration icon.
Note
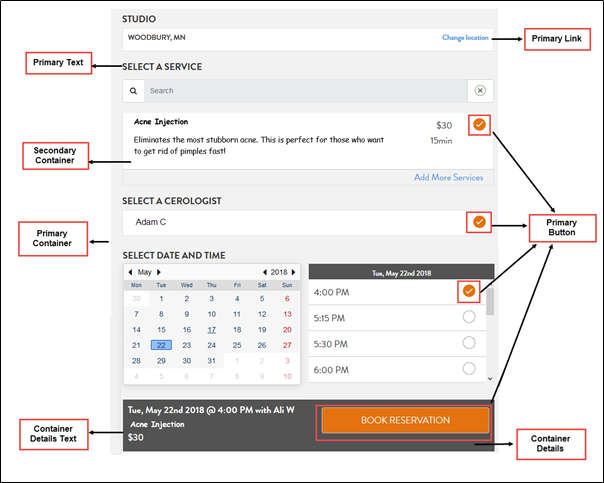
Refer to the image at the end of this article - it shows how your Webstore
will look like after you apply customizations.
Navigate to Online Booking > Online booking settings .
Select the Webstore V2 template.
Expand the Branding Look and Feel section.
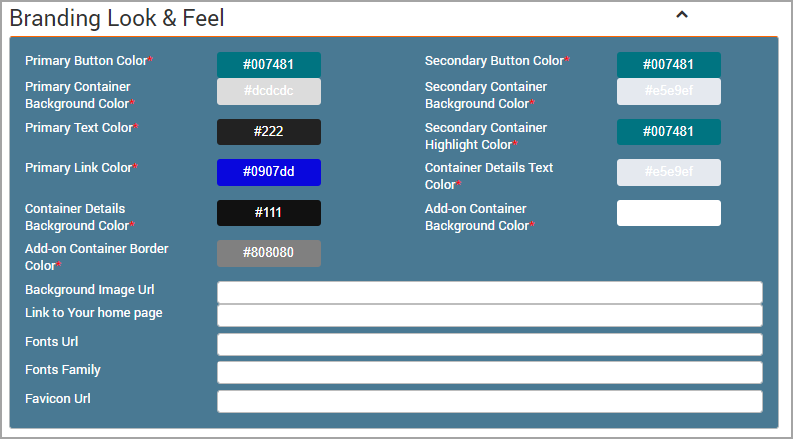
Under the Branding Look and Feeling section, do the following:
In the Primary Button Color and Secondary Button Color fields, enter the HEX codes of the color or select colors using the Color Picker to change the button colors.
In the Primary Container Background Color and Secondary Container Background Color fields, enter the HEX codes of the color or select color using the Color Picker to change the background color.
In the Primary Text Color field, enter the HEX codes of the color or select color using the Color Picker to change text color.
In the Secondary Container Highlight Color field, enter the HEX codes of the color or select color using the Color Picker to change the highlight color of secondary container.
In the Primary Link Color field, enter the HEX codes of the color or select color using the Color Picker to change the highlight color of secondary container.
In the Container Details Text Color field, enter the HEX codes of the color or select color using the Color Picker to change the text color of details container.
In the Container Details Background Color field, enter the HEX codes of the color or select color using the Color Picker to change the background color of details container.
In the Add-on Container Background Color field, the HEX codes of the color or select color using the Color Picker.
In the Background Image URL field, enter the location URL of the background image you want to upload.
In the Fonts URL field, enter the font URL path of the font file. This allows you to change the font on the entire Webstore. You can navigate to third-party sites such as Google Fonts and paste the font URL of your choice. The fonts URL will look like the example below:
In the Font Family field, enter the font family available in the Fonts URL location. The font family acts a backup font if the system does not support the main font. You can enter multiple values in this field, which are mainly the font names.
Example: 'Open Sans', sans-serif
Note
You must copy and paste the font names along with the (') single quotes and the (,) commas, as this specifies the primary font and the backup font.
In the Favicon URL field, enter the location URL of the favicon image you want to upload.
Note
Favicon is a small logo found in front of the visited URL, it can be seen in Address Bar, and is used to promote a company. The resolution of the favicon image should be 32px X 32px.
Click Publish to publish your Webstore.
Your Webstore is now live.
Tip
Click Publish only if you are satisfied with the look and feel of the Webstore in preview.
After customizations, your Webstore will appear as follows:
Next step: Proceed to Customize Labels.
Configure styling and custom CSS settings
Learn how you can configure the Styling and Custom CSS settings for Webstore V2
The Styling and Custom CSS settings of Webstore V2 allow you to add images to the header, customize the link of your Thank You page, and create a custom header. This will allow you to customize the look and feel of the Webstore as per your business requirements.
At the organization level, click the Configuration icon.
Navigate to Online Booking > Online booking settings .
Select the Webstore V2 template.
Expand the Styling and Custom CSS settings.
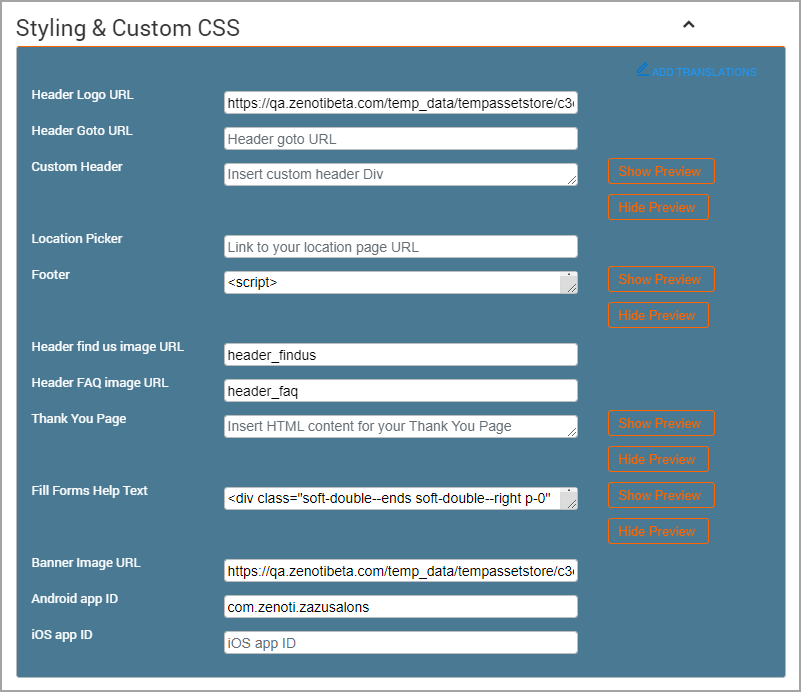
Configure the following settings:
Header Logo URL: Give the image URL of the header logo that will appear on every page of the Webstore. The resolution of the header logo image should be 40px X 275px.
Header Goto URL: Give the URL of your salon website or the home page. This logo appears in the header section of the Webstore.
Custom Header: Paste a customized HTML code to show your custom header.
Note
If you use this option, the Header Logo URL and the Header Go to URL are ignored.
Location Picker: Enables your guests to change locations as per their requirements
Note
This is based on your organization-level settings.
Footer: Paste a customized HTML code to show your guests a customized footer.
Note
If you leave this field blank, guests do not see any footer.
Header Find Us Image URL: Paste the Find Us page URL here. The URL will take your guests to the page with all your location details.
Header FAQ Image URL: Paste the FAQ page URL here. The link will take your guests to your FAQ page.
Thank You Page URL: You can create a customized Thank You page by inserting the HTML code in the Thank you Page field.
Fill Forms Help Text: Enter the text indicating guests to fill forms. For example: Fill Health Details.
Banner Image URL: Add an Image URL for your banner that will appear on the Webstore. As Webstore is dynamic, the banner image does not have required specifications.
Android App ID: Enter the id of your salon’s Android app. Android App ID is a unique application ID that identifies your app on the device and in Google Play Store. For example, com.example.myapp
iOS App ID: Enter the id of your salon’s iOS app. An App ID represents one or more applications in Apple's system. It consists of two components, a Team ID and a bundle ID search string. For example: more applications in Apple's system. It consists of two components, a Team ID and a bundle ID search string. For example:
ABCDE12345.com.exampledomain.applicationname
In this example, ABCDE12345 is the Team ID and com.exampledomain.applicationname is the bundle ID search string. The Team ID and the bundle ID search string are separated by a period.
After you configure the above settings, click Publish to publish all the configured settings.
Customize labels and text configuration
Change the names of common terms such as ‘center’ or ‘employee’ to suit your business needs
In your business, you may refer to your center as a ‘Studio’ or you may refer to an employee or provider as ‘Wellness Executive’. You can use Zenoti’s Webstore settings to customize the names of labels for all such common terms so as to retain your own branding identity with your guests. The Labels is the second section of customizing your Webstore.
At the organization level, click the Configuration icon. Navigate to Online Booking > Online booking settings > Webstore V2 > Labels and Text Configuration section.
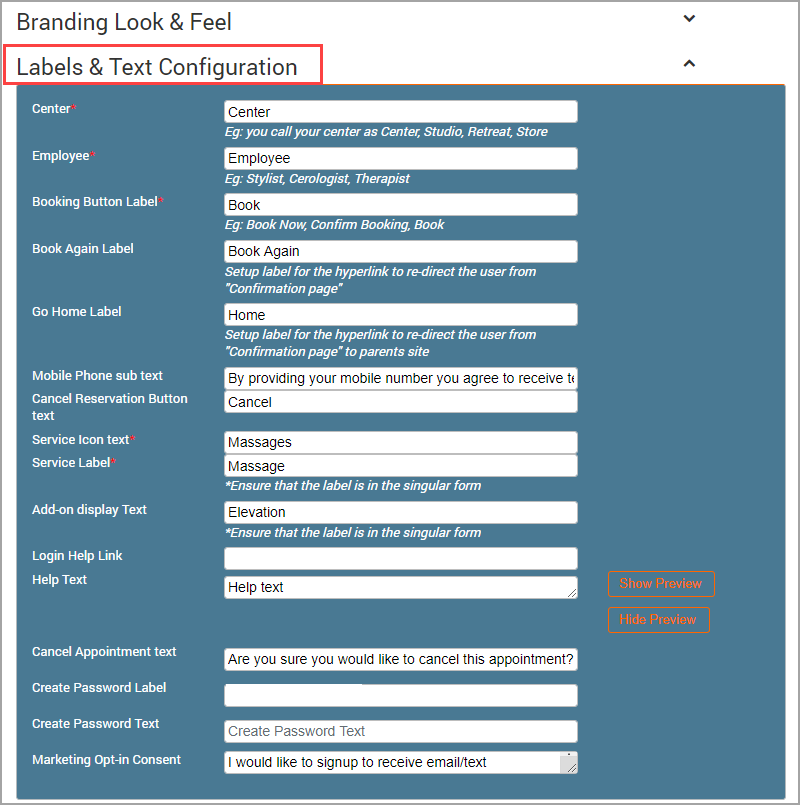
You will find the following settings in the Labels section:
Center: If you call your center as a Studio, then enter Studio in the given field. On the Webstore, this will change all the words that are Center to Studio.
Employee: If you call your employees as Providers or Stylists, then enter the same in the given field. The employees will be shown as Providers when a guest makes a booking.
Booking Button Label: Change the name of the booking button with this label setting.
Example: Book Now, Book Here.
Reschedule Button Label: Change the name of the reschedule button with this label setting.
Example: Book Again
Go Home Label: Use this label to take your guests to the homepage once they are done with the booking.
Example: Book Again.
Mobile Phone Sub Text: Enter a disclaimer text that you will display to your guests when they enter their mobile number while creating a guest profile on the Webstore.
Example: “By providing your mobile number you agree to receive transactional messages when you book a service with us.”
Cancel Reservation Button Text: Enter the text that appears on the Cancel Reservation button.
Example: You can enter the text Cancel or Cancel Reservation, or Cancel Booking.
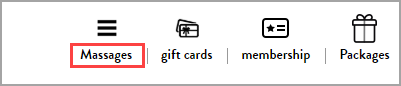
Service Icon Text: Enter the text that appears below the Services icon on the Webstore homepage.
Example: If you call your services as Treatments, enter the text in this field.
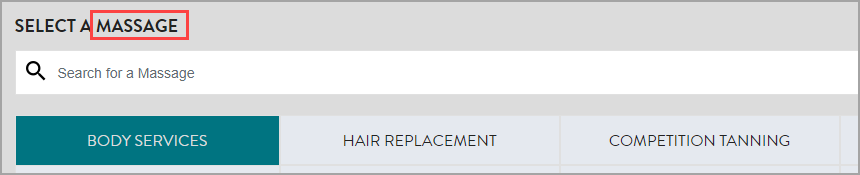
Service Label: Enter the text for the label that appears when your guest is selecting the services.
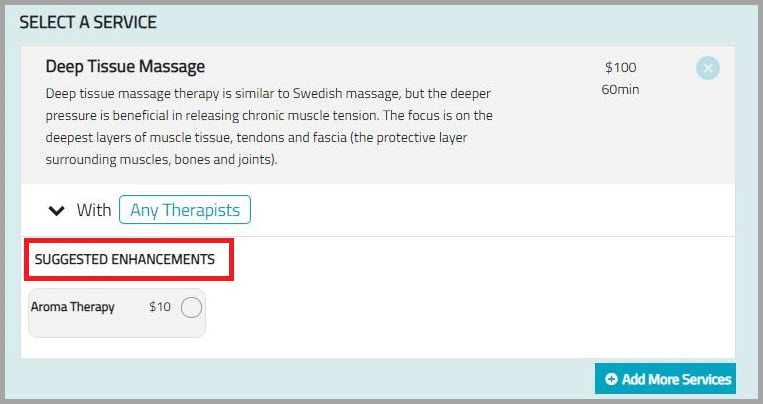
Add-on Display Text: You can change the text label of Add-ons as per your business language or business requirements. You may call your add-ons as enhancements or elevations. Enter the desired name of the add-ons in this field.
Note
Zenoti displays the add-on text label in the plural form. So, when you key in the text label, make sure that it is in the singular form.
Example: If you type Enhancement in the Add-on Display Text, then you will see the display as Enhancements
Login Help Link: Provide the link for the log in help.
Help Text: You can change the text for help as per your business language.
Cancel appointment text: You can change the text for cancelling an appointment based on your business language.
Create Password Label: Enter the text for the label that appears when your guest is creating a password.
Create Password Text: You can change the text for creating a password based on your business language.
Marketing Opt-in Consent: Telecom Consumer Protection Act (TCPA) regulates telemarketing calls, auto-dialed calls, pre-recorded calls or messages, text messages, and unsolicited faxes to consumers in the United States. Enter the text for market opt-in consent.
When guests sign up to create a profile on the Webstore, they will see the consent message as follows.
After you configure the above settings, click Publish to publish all the configured settings.
Next step: Proceed to Configure guest creation settings.
Configure guest login and sign-up settings
At the organization level, click the Configuration icon.
Navigate to Online Booking > Online booking settings .
Select the Webstore V2 template.
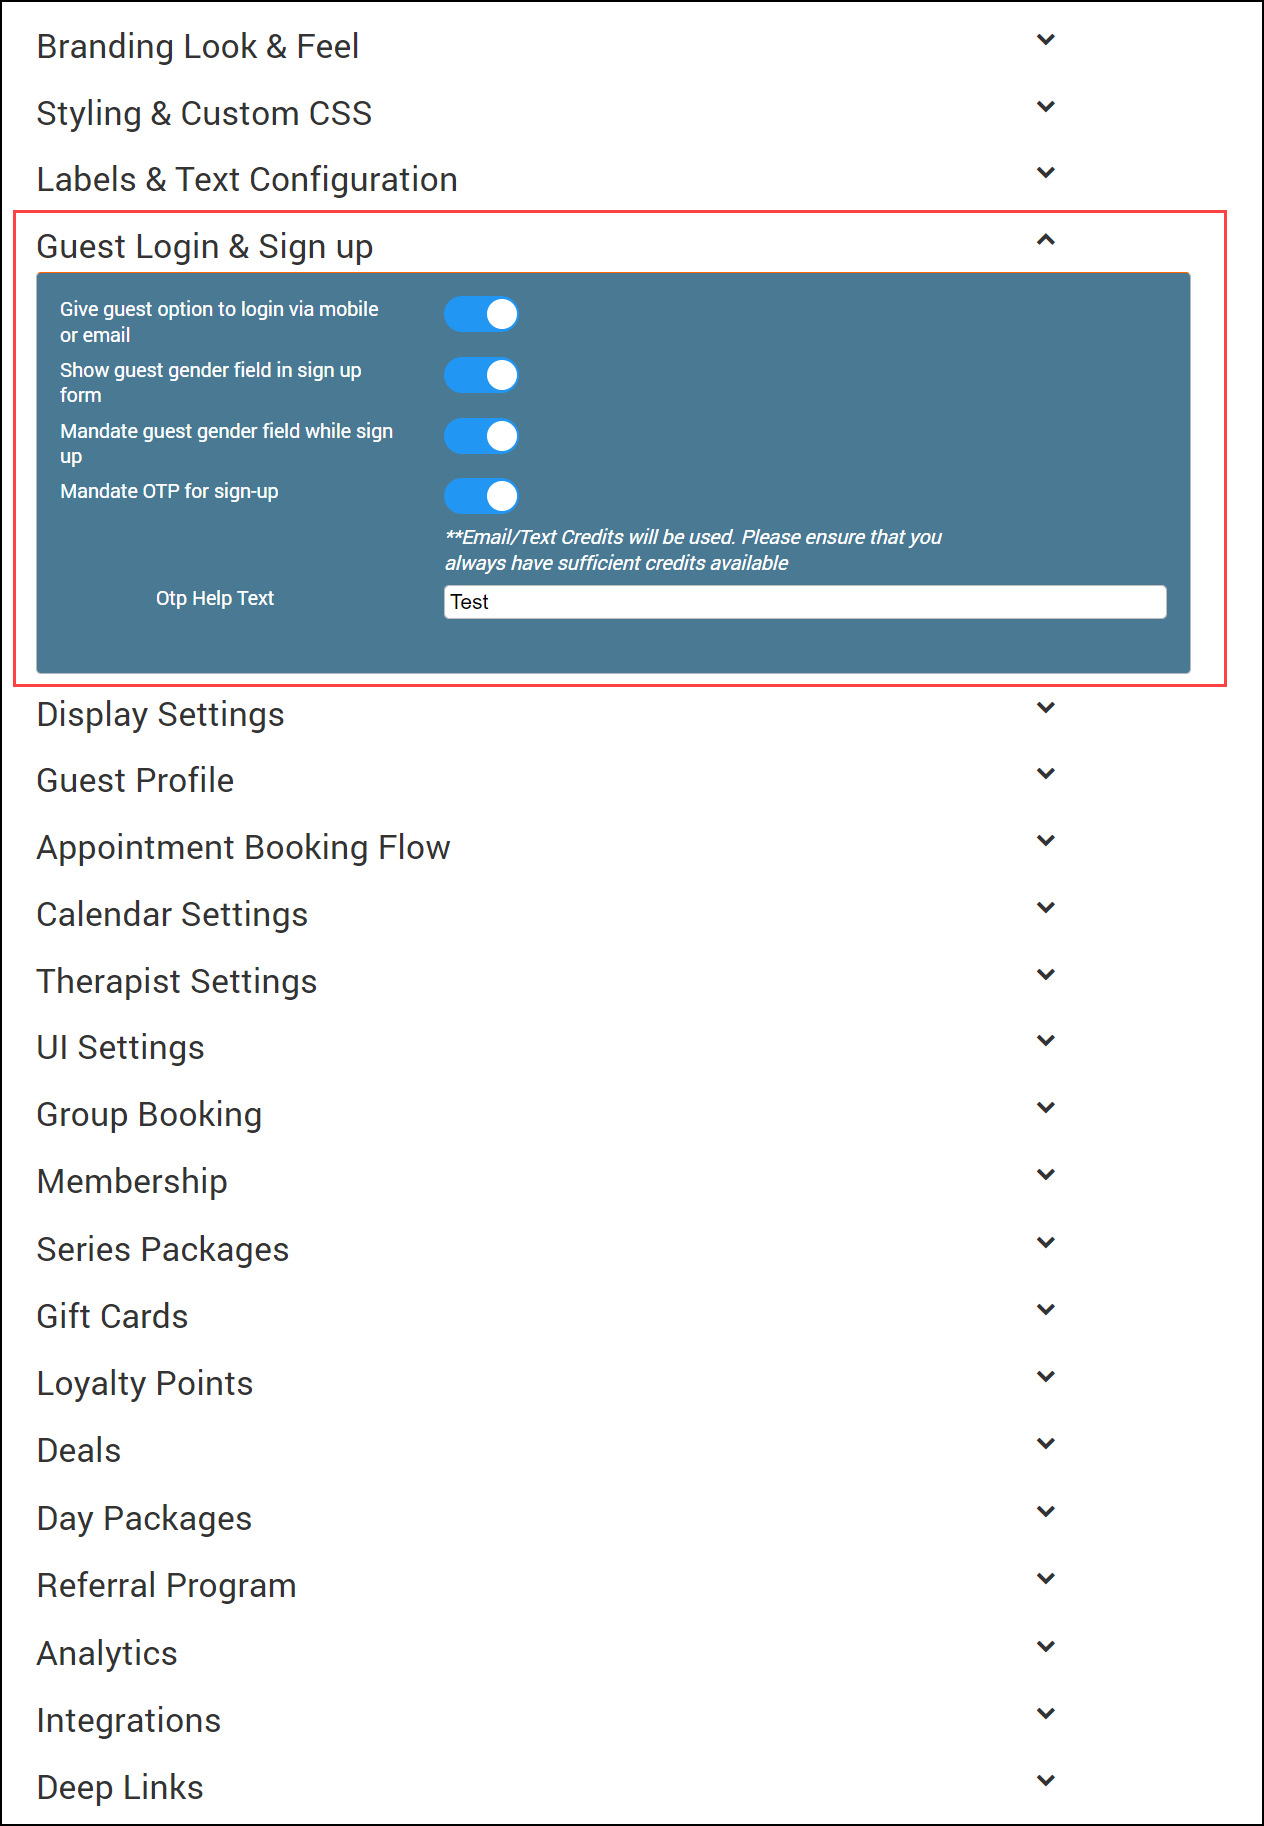
Expand Guest login & sign up and configure the settings described below.
Click Publish.
Setting name | Description |
|---|---|
Guest option to login via mobile or email | To let guests log into Webstore with an email id or a mobile phone number, enable this setting. |
Show guest gender field in sign up form | To display the gender field in the guest's sign-up form, enable this setting. |
Mandate guest gender field while sign up | To make gender selection mandatory for your guests while signing up, enable this setting. |
Mandate OTP for sign-up | To send a one-time password to the guests when they sign up on your Webstore, enable this setting. Important
|
Customize the display settings
Learn how you can access the Display Settings of the Webstore V2 and customize it
If you are a new center and do not want your guests to book the services on your Webstore, then you can configure the Display Settings and enable only the applicable offerings. The Display Settings of the Webstore allow you to enable Services, Gift Cards, Memberships, or Packages individually.
At the organization level, click the Configuration icon.
Navigate to Online Booking > Online booking settings > Webstore v2 .
Expand Display settings.
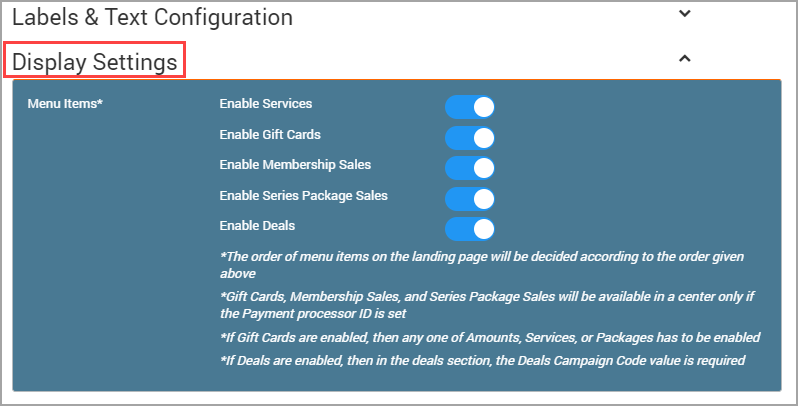
Configure the following settings:
Enable services: Turn on this setting if you want your guests to view all your services and book an appointment.
Enable gift cards: Turn on this setting if you want your guests to purchase Gift Cards on your Webstore.
Enable memberships sales: Turn on this setting, if you want your guests to purchase Memberships on your Webstore.
Enable series packages: Turn on this setting, if you want your guests to purchase Series Packages on your Webstore.
Enable queue: Enable this setting if you want to enable queue-based booking on Webstore.
Enable deals: Turn on this setting, if you want your guests to utilize the time-based discounts on your Webstore.
After you configure the above settings, click Publish to publish all the configured settings.
Things to remember
The items on the Webstore page are displayed in the following order:
Services
Gift cards
Memberships
Series packages
You must set up a payment processor when you enable gift cards, memberships, and series packages.
At least one of the following gift card types should be configured if you are enabling the gift card feature:
Amounts
Services
Packages
Configure the display of sections for the guest profile
Learn how you can customize the display of sections for your guests’ online profiles
When a guest signs up on your Webstore V2, a guest profile is created with the following sections:
Profile
Appointments
Memberships
Series Packages
Gift Cards
Payment Details
Products
Sign Out
Learn more about the sections of the guest profile.
If you are a business that does not deal with Memberships, Series Packages, or Products, it does not help to display all the sections in the guest profile. It may lead to unnecessary guest queries related to the purchase of memberships and packages.
Zenoti allows you to configure the display of the sections in the guests’ profiles so that you display only the relevant sections.
At the organization level, click the Configuration icon.
Navigate to Online Booking > Online booking settings > Webstore V2.
Expand Guest Profile and switch on the desired settings to display them in a guest profile.
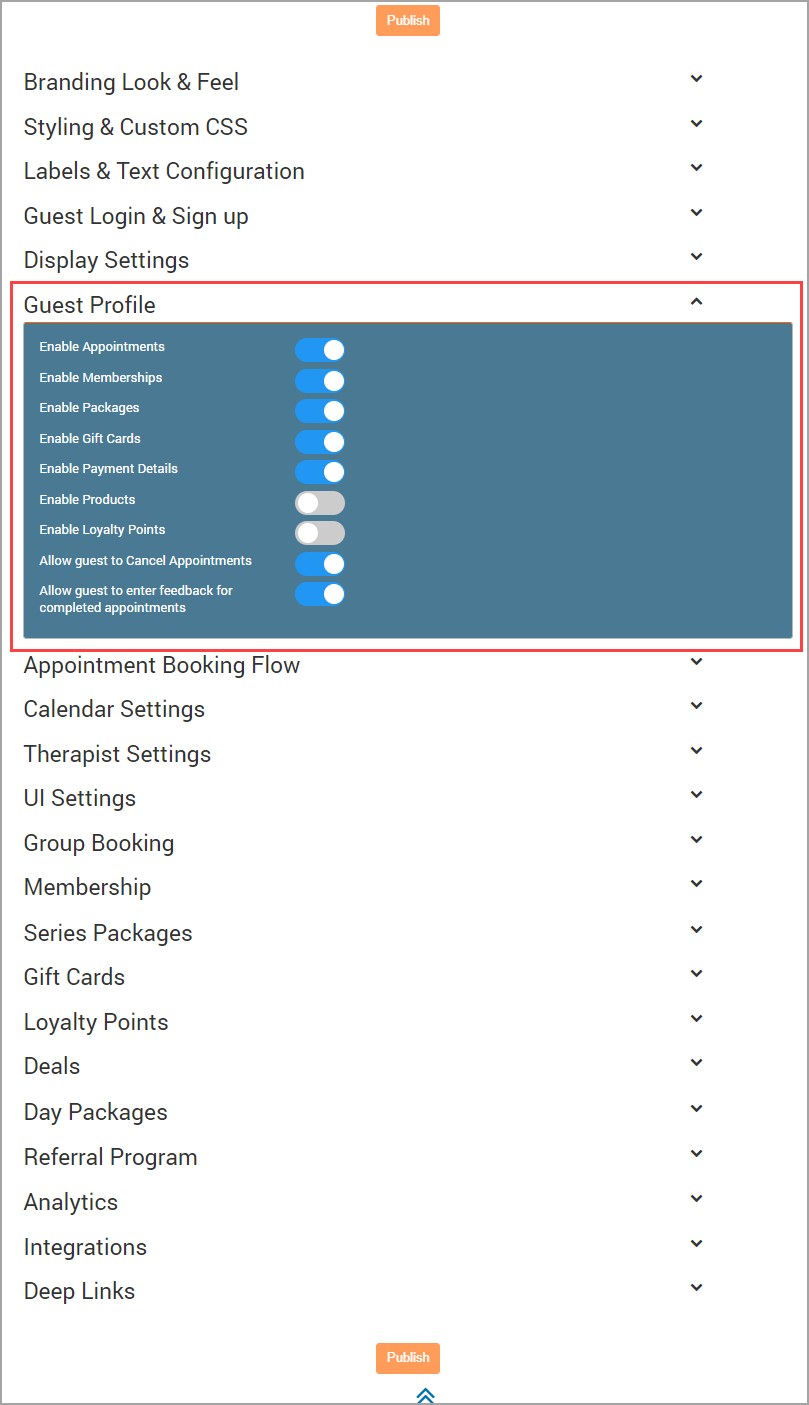
Enable the desired sections to display them in the guests’ profiles.
Click Publish .
Set up appointment booking flow settings
Zenoti allows you to configure the appointment booking flow for Webstore.
At the organization level, click the Configuration icon.
Naviate to Online booking > Online booking settings > Webstore v2.
Expand Appointment booking flow and configure the appointment booking flow setting described below.
Click Publish.
Setting name | Description |
|---|---|
Allow same day bookings only | Select whether you want to allow guests to book appointments only for the current date. Note
|
Allow guest to add multiple services in one appointment | Select whether you want to allow guests to add multiple services in one appointment. |
Allow guest to enter discount code in invoice | To allow guests to enter a discount code in the invoice, enable this setting. |
Allow service process segments to be booked in non-bookable block out times | Select whether you want to allow guests to book service process segments in time slots that may be blocked out and the therapist is unavailable. |
Allow guest to add notes in appointments | To allow guests to add notes in appointments, enable this setting. |
Allow guest to reschedule appointments | Enable this setting to allow guests to reschedule appointments from Webstore |
Block appointment booking if a guest mandatory fields are missing | To block appointment booking when the guest doesn't have mandatory fields filled in the sign-up form, enable this setting. TipIf the logged-in guest doesn't have all mandatory fields filled in the sign-up form, make sure they fill in those details before they complete the booking. |
Intro pricing for first time guests | To give introductory pricing on services to new guests, enable this setting. Example: If Balinese Massage is usually priced at $80.00, you can display $39.99 as an intro price for new guests. |
Campaign code | Enter the intro campaign code that you created. |
Custom banner for intro pricing | Enter the HTML code for your intro pricing banner. You can use this to display text with formatting, links or image files. NoteThis banner appears for users before they sign in. This banner can have information about the prices for a first-time user (intro prices), or a list of benefits offered by the center. After the guests sign in, they will see their respective banners such as their Membership banner or an existing guest banner. |
Allow center override | If you want the introductory pricing feature to be enabled for specific centers instead of the entire organization, enable this setting. Note: When you enable center-level override, you must also configure the introductory pricing from the center-level catalog. Navigate to center-level > Configuration > Online Booking > Online booking settings > Webstore V2. NoteIntroductory pricing is not applicable for group/couple booking |
Warn users while booking appointment on the same day | To warn the guests who book multiple appointments on the same day, enable this setting. This way, you can let you guests know that they must be available for the entire duration of the services. Example: Tabitha already booked a Balinese Massage on 10th January. She logs in to the Webstore and books Keratin Treatment for the same day. In that case, Webstore displays an alert stating that she already has a booking for a Balinese Massage on the same day, with an option to proceed with the booking. |
Enable appointment slots for nearby centers | To allow your guests to check the availability of appointments in the nearby centers, enable this setting. On busy days like weekends when the footfall is high, guests may not be able to find a suitable appointment time slot in your center. In such cases, the guest has to either choose a time slot that might not be convenient or skip booking the appointment entirely. To avoid such situations, you can allow your guests to check the availability of appointments in the nearby centers for service bookings. Specify the distance to be measured either in Kilometers or in Miles. |
Set the maximum radius to show centers | Enter the distance within which the nearby centers are located. The Webstore will display all the centers within the radius of the distance specified. Example: Center 1 is in Brownsville and Center 2 is in Crown Heights. Both centers are located in Brooklyn, New York City. The distance between both centers is 3.5 kilometers or 2.2 miles. In such a case, you will select the Zones radio button, select the Distance to be measured in as either Kilometers or Miles, and specify the distance as either 3.5 or 2.2. |
View more slots button Label | Enter the label text for viewing more slots. |
View availability at nearby locations | To allow guests to view availability at nearby centers, enable this setting. |
Enable prerequisites | To make it mandatory for guests to book a prerequisite service while booking the main service, select this checkbox. |
Label for prerequisite | Enter the label text for prerequisites. |
Enable finishing service | To make it mandatory for your guests to select finishing services when they book an appointment, enable this setting. |
Label for finishing service | Enter the label to represent your finishing service in the box. Finishing services are services that are performed after the main service to complement the main service and complete the entire styling. For example, services like haircut and hair color need hair to be washed post-service. Here, hair wash is the finishing service to the main service of hair cut or hair color. |
Enable deposits | To collect deposits on service booking, enable this setting. Collecting service deposits also ensures guests turn up for their appointments since partial payment for the services is already done. This is more apt for online bookings. |
Charge deposit for | Select any one of the following:
|
Configure calendar settings
Zenoti allows you to configure the calendar settings that you can display in Webstore.
At the organization level, click the Configuration icon.
Navigate to Online Booking > Online booking settings > Webstore V2.
Expand the Calendar Settings drop-down list.
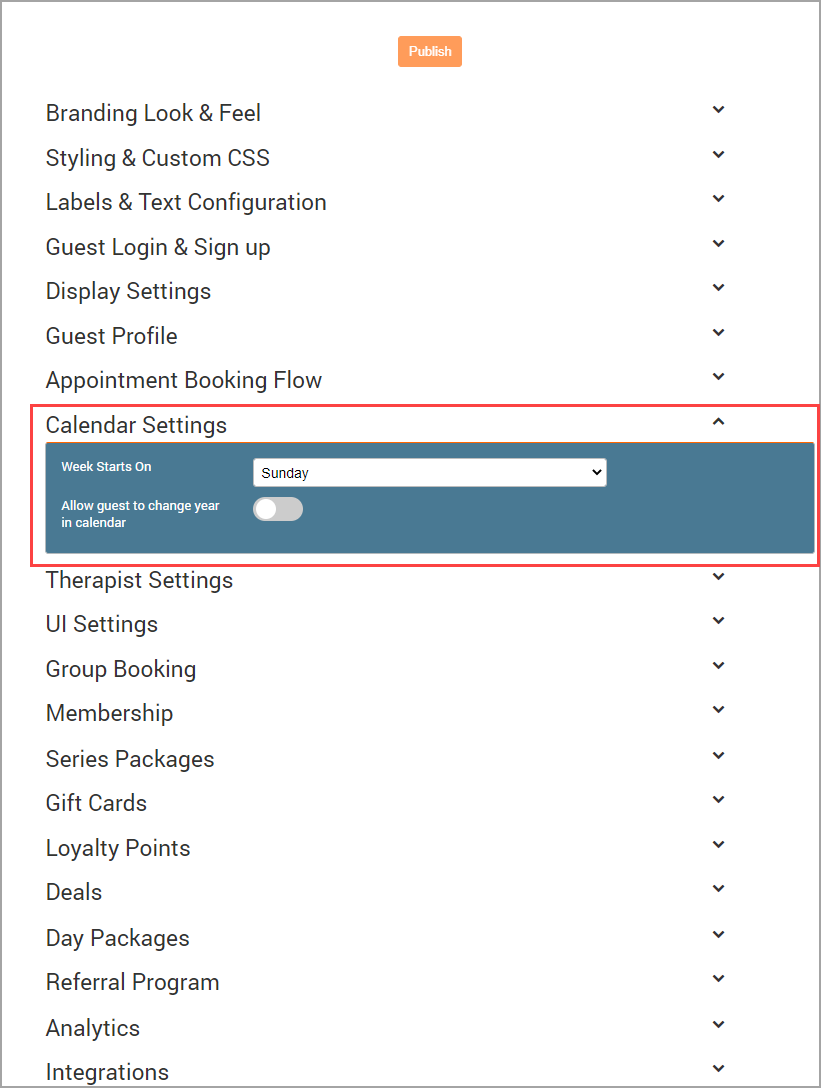
The Therapist Settings open.
Configure the following settings:
Week Starts On: Select the day on which the week starts.
Allow guest to change year in calendar: Enable this setting to allow the guest to change year in the calendar.
After you configure the above settings, click Publish to publish all the configured settings.
Configure therapist settings
At the organization level, click the Configuration icon.
Go to the Online booking > Online booking settings > Webstore v2.
Expand Therapist settings and configure the settings in the table below.
Enable the desired settings to display them in the therapists’ profiles.
Click Publish.
Therapist settings for Webstore
Setting | Description |
|---|---|
Display therapist photo | Control whether you want the therapists' pictures displayed on Webstore. Enable this setting to display a photo of the therapist online. |
Display therapist description | Enable this setting to display service provider-related details to guests while booking an appointment. The therapist or employee details and description is configured in the Catalog tab of an Employee profile. For more information, refer to create a new employee in Zenoti. |
Display therapist name in confirmation screen | Enable this setting to display the therapist's name in the confirmation screen. |
Allow guest to select gender specific therapists | This option allows your guests to select the providers categorized based on gender. Your guests can select any male provider or any female provider. |
Mandate therapist selection per appointment | This option makes it mandatory for your guests to select a provider for an appointment to continue the booking process. If you do not enable this option, the booking process continues even if the guest does not select a provider. Zenoti assigns a provider automatically in such cases. |
Mandate therapist selection per service
| This option makes it mandatory for your guests to select a provider for each service to continue the booking process. For the parallel booking feature to work, enable the Mandate therapist selection per service option. If you do not enable this option, the booking process continues even if the guest does not select a provider. Zenoti assigns a provider automatically in such cases. |
Honor therapist preferred booking interval | Normally, the booking intervals as based on the Appointment Time Slots setting in the Webstore v1 template. Enable this setting to honor the booking intervals based on the therapist's preference. |
Enable therapist pricing for webstore
Therapist pricing in Zenoti is a feature that allows businesses to set different prices for the same service based on the therapist or provider performing the service. This feature is useful in salons, spas, and wellness centers where service costs can vary depending on the experience, seniority, and skill level of the providers. By enabling therapist pricing, businesses can offer a transparent pricing structure that reflects these differences, ensuring that guests are aware of and can choose between various pricing options when booking services.
Prerequisites
Enable the Enable Multiple Therapists Selection setting, for detailed instructions, refer to configure CMA settings.
At the organization level, enable Employee Price Scaling setting. For more information about price scaling, refer to:
Enable therapist pricing
At the organization level, click the Configuration icon.
Navigate to the Online booking > Online booking settings.
Select the Webstore v2 option and expand Therapist settings.
Search and enable the Enable therapist pricing setting.
Click Publish.
Price Scaling functionality
If price scaling is set up (where services cost more when performed by senior providers), enabling therapist pricing will show these variations.
For instance, a haircut by Jim (a senior provider) may cost $50.00, while the same haircut by Tim (a junior provider) may cost $30.00. These prices will be visible to guests during booking, allowing them to make informed choices.
Impacts and considerations
The Enable Therapist Pricing setting allows guests to see different therapist-specific prices for the service based on the provider's seniority and experience.
When Enable Therapist Pricing is enabled, Membership Pricing will not apply as therapist pricing takes precedence over membership discounts.
Service prices appear on the booking forms only when the Enable Therapist Pricing setting is enabled for your webstore.
The service prices are listed on the form based on the Price scaling factor defined in the employee profiles. For more information, refer to understanding price scaling.
Customize UI settings
Zenoti understands that you want to show multiple options to your guests when they are booking an appointment. Zenoti Webstore helps you achieve this, through the configuration of its UI Settings. This makes the process simple and caters to your business needs.
At the organization level, click the Configuration icon.
Navigate to Online booking > Online booking settings > Webstore v2 template.
Expand UI settings and configure the settings described in the table below.
Click Publish.
Setting name | Description |
|---|---|
Service search box | Enable this setting if you want to display a search box. This option allows guests to search for a specific service or a category of services. |
Show categories | Enable this setting if you want to show service categories when the guest books an appointment online. |
Prompt guest to login | Enable this setting to display prompt asking guests to log in. |
Text for login prompt | Enter the text for prompting guests to log in. For example, Hi! Sign in to access your membership benefits. |
Show upcoming appointments | Enable this setting to display upcoming appointments on the home page. |
Display category as | Select whether you want to display a service category as a tab or a drop down. |
Display service duration | Enable this setting to display the duration of the service. |
Display service price upon selection | Enable this setting to display the service price only when a guest selects the service. |
Display service price in summary | Enable this setting to display the service price on the summary page. |
Alert user of price change in confirm booking screen | Enable this setting to inform guests whenever there is a price change between the booking start screen and the booking confirmation (Booking Summary) screen. |
Display mandatory add on selection prompt | Enable this setting to display a prompt informing the guest that they must select an add-on. |
Display discounts upfront in smart marketing pages | Enable this setting to display discounts on the first page (or landing page) of your webstore. |
Display description for service add on | Select whether you want to display text descriptions for suggested add-on services. |
Mandate guest to select a location | Enable this setting to display a prompt informing the guest that they must select a location. |
Text for employee selection | Enter a text here to display it on the therapist selection screen. TipYou can use this field to inform the guests that they have to select a therapist in that step or to convey information about any price scaling. |
Enable group booking
At times, guests may want to take services with their friends or family. Such bookings are called group bookings, where a guest is accompanied by others (up to 6 guests). Group bookings may also include services for couples.
At the organization level, click the Configuration icon.
Navigate to Online booking > Online booking settings > Webstore V2.
Expand Group booking and configure the settings described in the table below.
Click Publish.
Setting name | Description |
|---|---|
Enable group booking | To enable your guests to book a group appointment, enable the setting. Group booking is a booking where 2 to 6 people can book services under the same appointment. |
Manage guest fields | To make each guest field mandatory or optional, from the list, select Mandatory, Optional, or Hide for respective fields. |
Guest label | To name the group of guests, excluding the host, enter a label in this field. NoteA group booking has a host (the one who books the services) and other guests (who make up the rest of the group). The Guest Label field allows you to name the group of guests, excluding the host. For example, you can call them Guests, Co-Guests, or Group Guests. |
Enable couples booking | To enable couples booking, enable this setting. Couple services are services that a couple can take at the same time in the same room. If you want to allow your guests to book couple services through the webstore, enable this setting. |
Group booking guest booking label | To display a text for group booking, enter a label in this field. ImportantThe group booking label lets your guests know that they can book services for themselves, a couple, a group, or someone else. The text you enter here appears beside the guest selection drop-down list. For example, “I’d like to book an appointment for,” or “This booking is for." 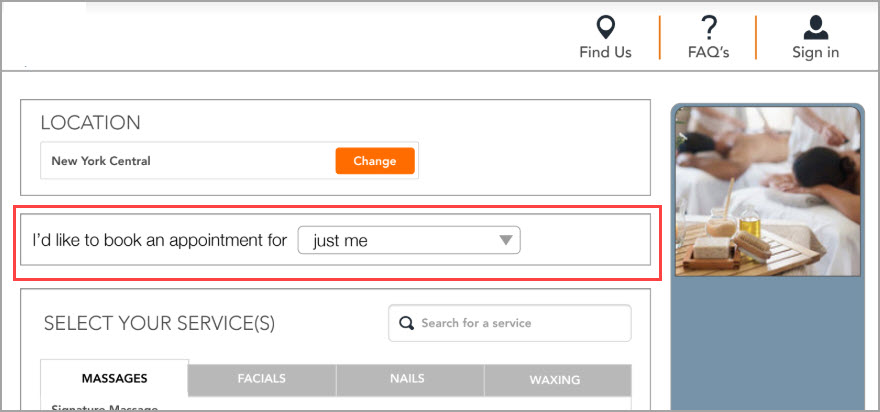 |
Group booking guest limit | To set the maximum number of guests you want to allow in a group booking, enter a number between 2 to 6 in this field. However, some businesses might be unable to accommodate six guests at a time. In such cases, businesses can limit the maximum number of guests. For example, enter 4 in this field to set a guest limit for group bookings. |
Enable the sale of memberships
Membership plans allow you to attract more guests by offering multiple services at member-specific prices and also offer credits, which you can redeem in exchange for various services. Memberships can be for fixed terms or they can be recurring. Your guests can use the Webstore V2 to look at all the different memberships and buy a suitable one.
Prerequisites
Catalog tab of the memberships should be enabled and configured.
Appropriate centers should be assigned while creating the memberships.
Note
You can assign a center to a membership by enabling Different Center for Memberships checkbox. Select an appropriate center in the Membership Center drop down in Webstore V1 settings.
Restrictions
The Start Date of the membership should be the current date and not a future date.
Multiple memberships cannot be sold to your guests.
Gift Cards cannot be used for the purchase of memberships.
Note
For memberships with a setup fee, the setup fee will show only on the checkout page, and not on the Memberships landing page.
At the organization level, click the Configuration icon.
Go to Online Booking > Online booking settings > Webstore V2 .
Locate the Membership section.
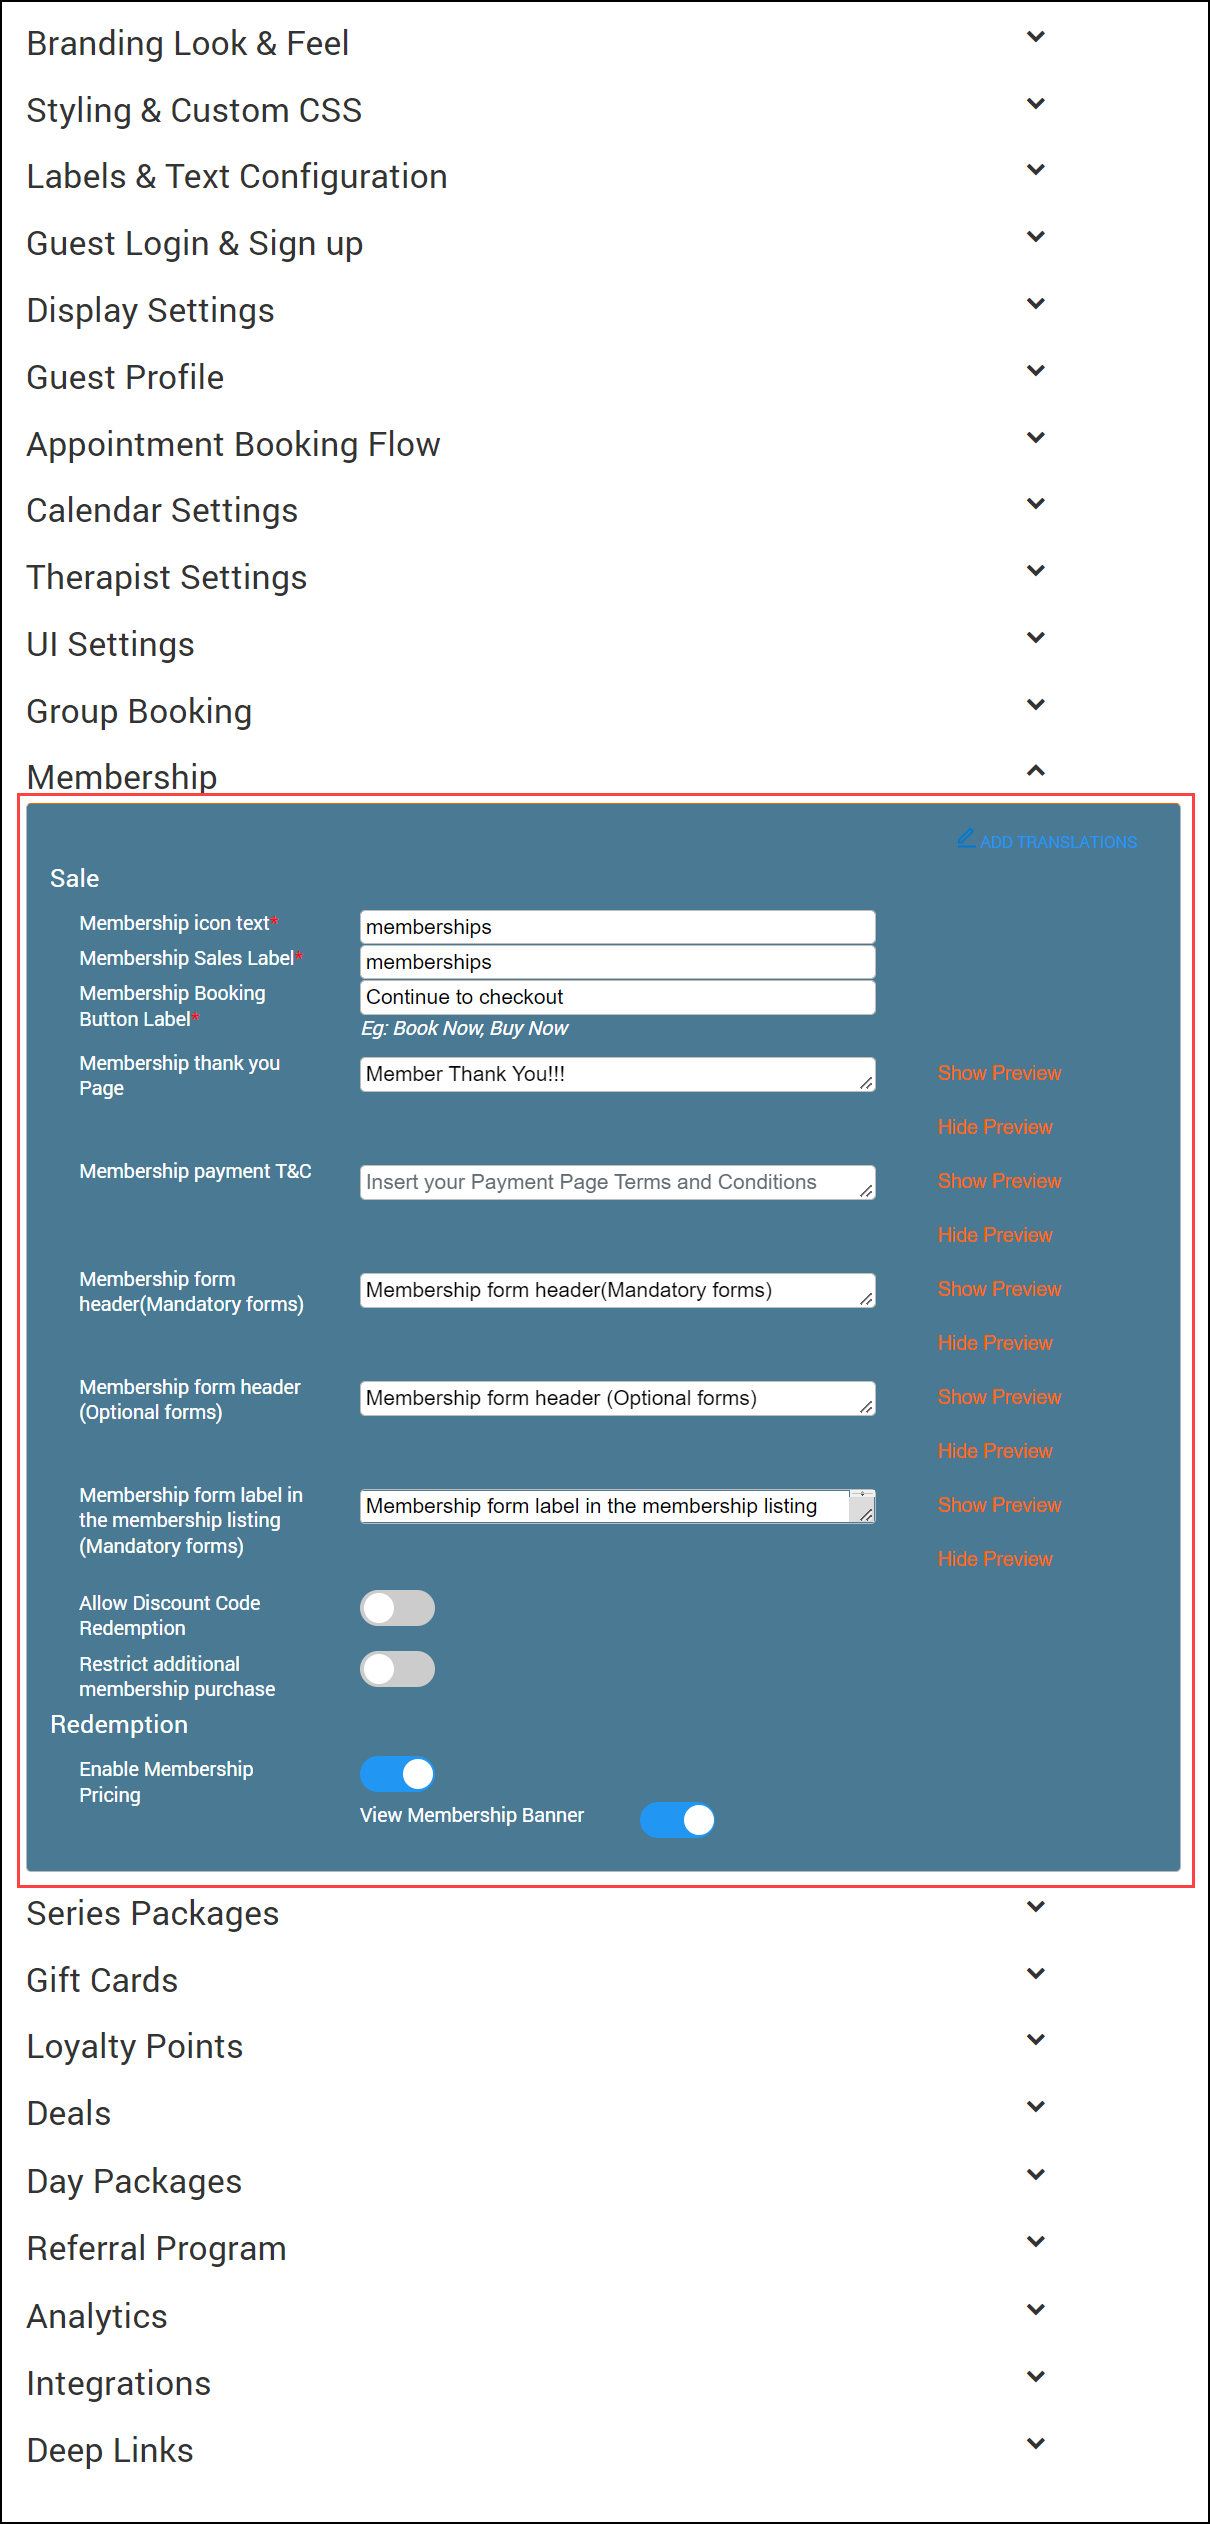
Configure the following in the Membership section:
Membership Icon Text: Type in the text that will appear below the Membership Icon on the main menu.

Memberships Sales Label: On the Memberships page, membership sales label appears above a list of all the membership plans.
This text will tell your guest to select a plan from the list. You need to enter the text that appears after Select A. Enter the text as per your business requirements.
Example 1: Type Membership Plan and the text appears as Select A Membership Plan.

Example 2: Type Membership Pack and the text appears as Select A Membership Pack.

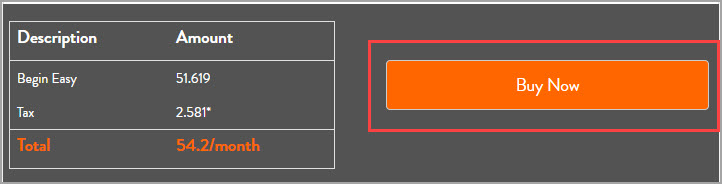
Membership Booking Button Label: After the selection of a membership plan, the guest will see a summary of the charges, along with a button. This setting allows you to configure the text label for the button.
Example: Buy Now, Buy.
Membership Thank You Page: Insert the HTML for the Thank You page that your guests will see after they buy the Membership plan.
Note
This page is different from the Thank You page that appears after your guests book the services.
Membership Payment T&C's: Enter the terms and conditions text message that is displayed to your guests when they make the payment for membership purchase.
Membership form header(Mandatory forms): Enter the header that will instruct the guests to fill mandatory forms.
Membership form header (Optional forms): Enter the header that will request the guests to fill optional forms.
Membership form label in the membership listing (Mandatory forms): Enter the label for mandatory forms that will appear in the membership listing.
Allow Discount Code Redemption: Enable to allow guests to redeem discount code.
Restrict Additional membership purchase: Enable to limit selling one membership per guest on Webstore.
Enable Membership Pricing: This option lets your members to take the membership benefits and pricing. Learn more about memberships.
Note
Therapist Pricing will not be applied if you select this option.
View Membership Banner: This option displays a banner, with membership name and details, on the screen when a guest who has an active membership logs into your webstore.
Click Publish.
Enable the sale of series packages
Series Packages are long-term packages that allow guests to take multiple services or products. For example, a weight loss package may require the guest to come in for three sessions per week for say, eight months. You can allow your guests to book such packages from your Webstore V2.
Prerequisites
You must set up the following on Zenoti Web before you can sell the series packages from your Webstore V2:
Enable the Catalog tab of the series packages. Ensure you configure Show in Webstore and Mobile App, Display Price, Display Name, Display Order, and Allow Customer to Book this Package.
Assign the appropriate centers when you create the packages.
At the Organization Level click on the Configuration icon. Navigate to Online Booking > Online booking settings > CX V3 > Online Booking > Package Sales and select the Different center for package sales check box.
Select the appropriate center from the drop-down.

Restrictions
The following are the restrictions regarding the sale of series packages.
Guests cannot use the gift cards to purchase the series packages.
Guests cannot book a service and purchase a series package in the same invoice.
Guests cannot book a custom series package or an offer series package.
Guests cannot redeem services using a series package on the Webstore.
To enable the sale of series packages
At the organization level, click the Configuration icon.
Navigate to Online Booking > Online booking settings >Webstore V2.
Scroll down to locate Series Packages and expand it.
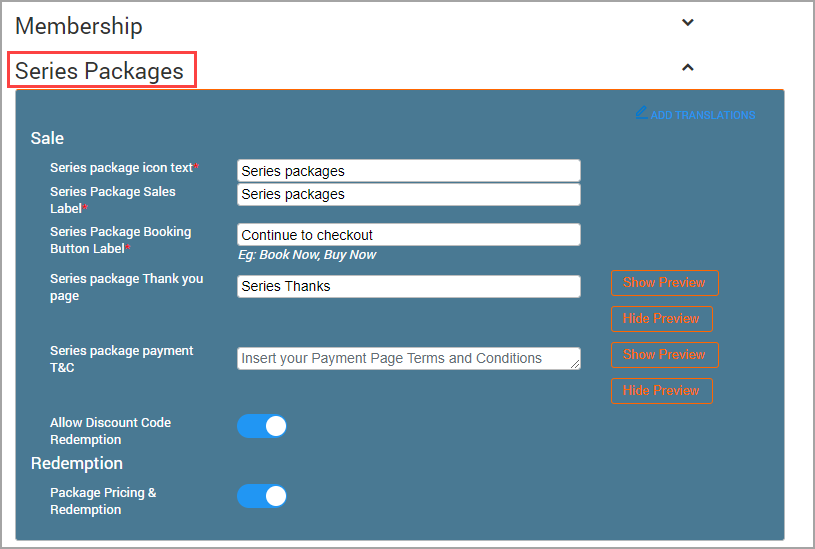
Configure the following in the Series Package Sales section:
Sale
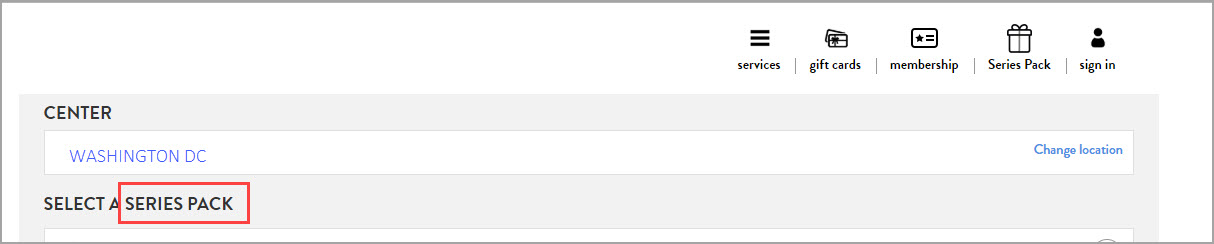
Series Package Icon Text: Enter the text that will appear below the series package icon on the home page of the Webstore. For example, Series Pack.

Series Package Sales Label: Enter the label that will appear on the series package page. The text that you enter here appears after “Select A…”. For example, if you enter Series Package, then the text will appear as Select A Series Package. If you enter Series Pack, then the text will appear as Select a Series Pack.
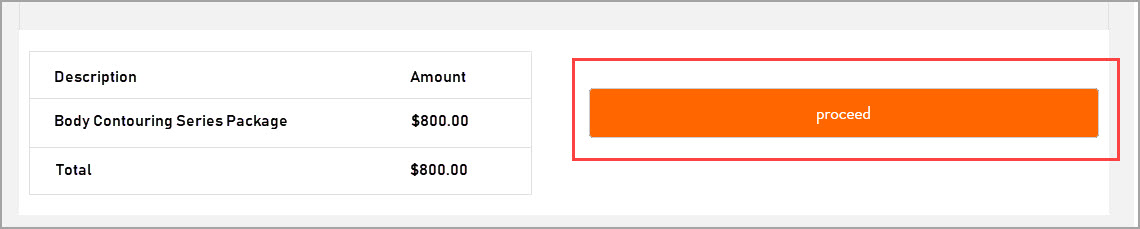
Series Package Booking Button Label: Enter a label for the button that will appear after your guests select a series package. For example, Proceed.
Series Package Thank You Page: Enter the HTML code of the Thank You page that will appear after your guests purchase the series package.
Series Package Payment T&Cs: Enter the terms and conditions regarding the payment or redemption of services for the series package.
Allow Coupon Code Redemption: Switch this toggle ON, if you want to give the option of redeeming a coupon code while purchasing a series package to your guests.
Redemption
Package Pricing and Redemption: Switch this toggle ON, if you want your guests to redeem their benefits when they book an appointment online. This will also enable them to see the package pricing for each service.
After you configure the settings click Publish to publish all the configured settings, and your guests can see the option of purchasing a Series Package.
Enable sale of day packages on Webstore v2
Learn how you can enable the sale of day packages on your Webstore v2
A day package is a combination of services that guests can book at a discounted price, thus encouraging higher average invoice prices. The services included in the day package are usually rendered on the same day.
Prerequisites
Catalog tab of the package should be enabled. Make sure to configure Show in Webstore and Mobile App, Display Price, Display Name, Display Order, and Allow Customer to Book this Package.
Appropriate centers should be assigned while creating the packages.
To enable the sale of day packages
At the organization level, click the Configuration icon.
Navigate to Online booking > Online booking settings > Webstore V2.
Scroll down to locate Day Packages.
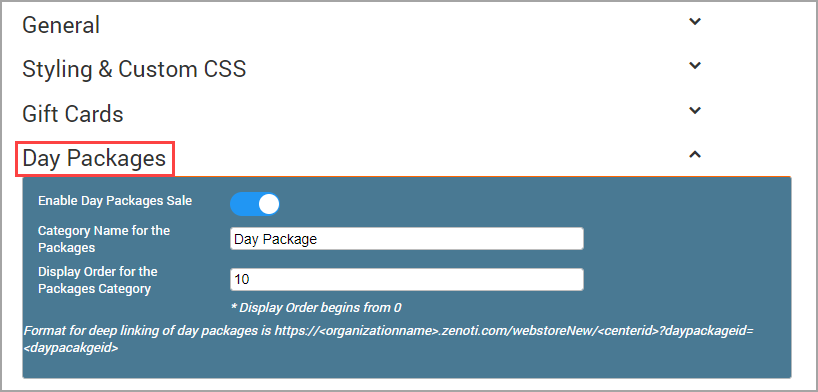
You can configure the following in the Day Packages setting:
Enable Day Packages Sale: Enable this toggle switch to allow the sale of Day Packages on your Webstore.
Category Name for the Packages: Enter the name of the category in which the different day packages appear.
Example: If you give the name of the category as Packages, all the Day Packages will appear in the category named Packages.

Display Order for the Packages Category: Enter a number for the packages category to appear.
Example: If you give the display order number as “0”, then Packages category will appear in the first position. If you give the display order number as 1, then the category will appear in the second position.
After you configure the Packages settings, click Publish to publish all the configured settings.
Set up loyalty points
At the organization level, click the Configuration icon.
Navigate to Online booking > Online bookings settings > Webstore V2.
Expand Loyalty Points.
The Loyalty Points settings appear.
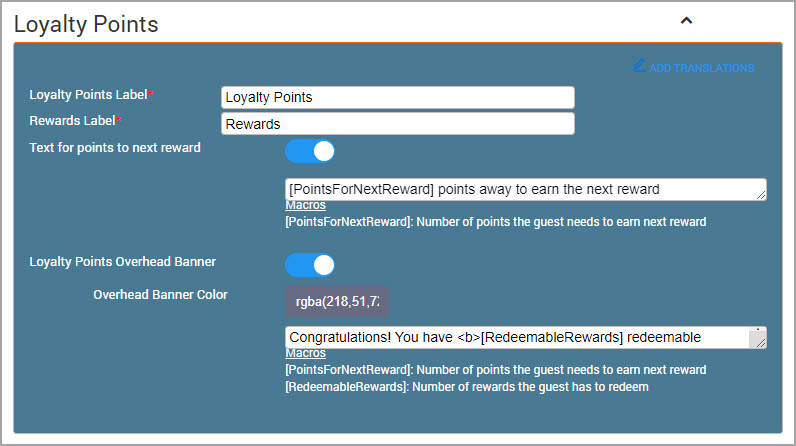
You can customize the following information for loyalty points :
Loyalty Points Label: The name of the loyalty points program.
Example: Bliss Bucks
Rewards Label: The name of the rewards .
Example: Bliss Rewards
Text for points to next reward: The text for the number of points the guest needs to earn for the next reward.
Note
Use the macro [PointsForNextReward] for the Number of points the guest needs to earn next reward.
Example: You are [PointsForNextReward] Bliss Bucks away to earn your next Bliss Rewards!
Loyalty Points Overhead Banner: Turn on this switch to activate the loyalty points overhead banner.
Overhead Banner Color: The color for the overhead banner . To add a color,
click inside the Overhead Banner Color box and pick a color
Overhead Banner Text: The text that for the overhead banner.
Example: Congratulations! You have <b>[RedeemableRewards</b>] Bliss Rewards!</b><br>Loyalty Points needed to collect next reward: <b>[PointsForNextReward] Bliss Bucks</b> 🙌
Macros
Use the following macros to customize the banner: .
[PointsForNextReward]: Number of points the guest needs to earn for the next reward.
[RedeemableRewards]: Number of rewards the guest can redeem.
Click Publish.
Your changes get saved and published.
Enable referral program
Learn how you can enable the referral program for guests who book online
Disclaimer
From October 8th 2020, this feature is generally available (GA) for all businesses.
With the referral marketing feature of Zenoti, you can allow your guests to refer their friends or family to any of the services that you provide. This is a faster way to acquire new customers and you can capitalize on positive feedback from your existing guests.
After you configure the Referral Program for your organization, you must also configure it to be available for your guests who book online. This allows your guests to directly refer their friends and family by sharing a Promo Code and an Invitation Link.
Before you begin
You must enable Referral Marketing for your business and configure the discounts and the rewards.
You must select the Enable Referrals for Webstore checkbox at the organization level by navigating to Configuration > Online Booking > Online Booking settings > CX V3.
At the organization level, click the Configuration icon.
Navigate to Online Booking > Online booking settings > Webstore V2.
Expand Referral Program.
You must configure the following sections:
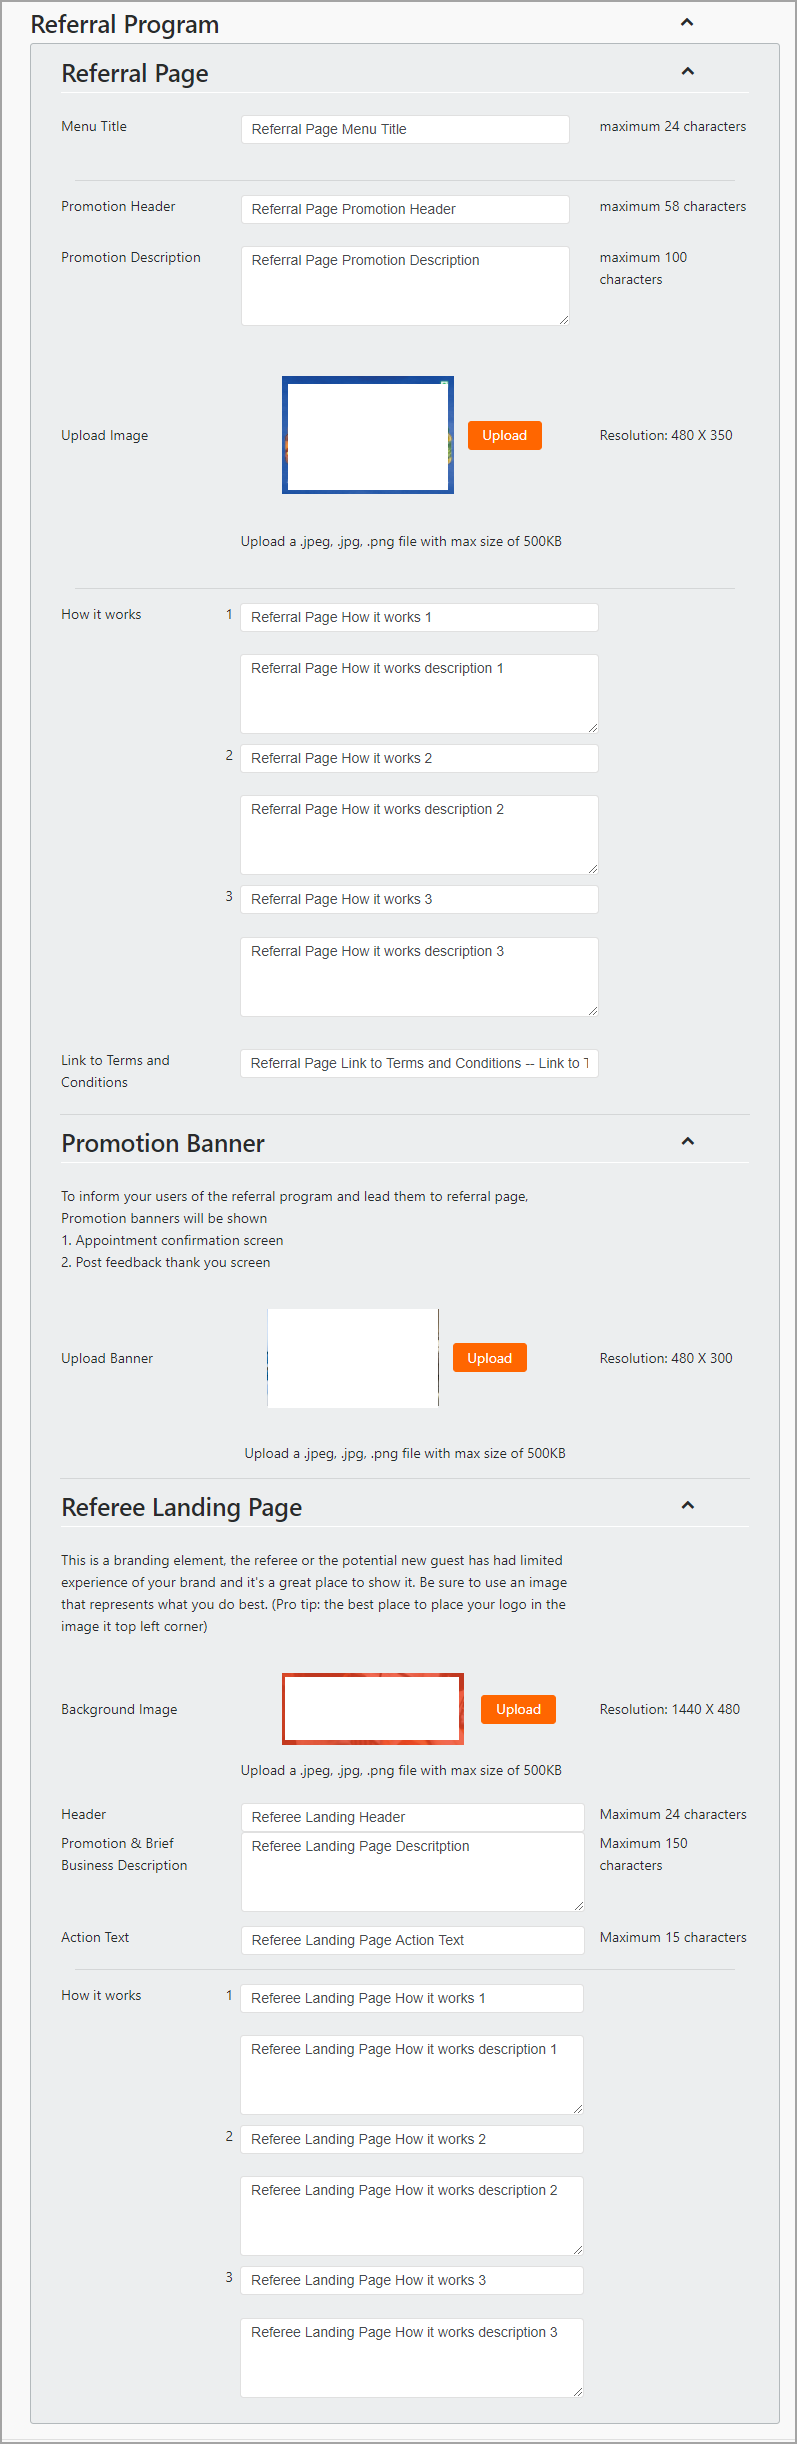
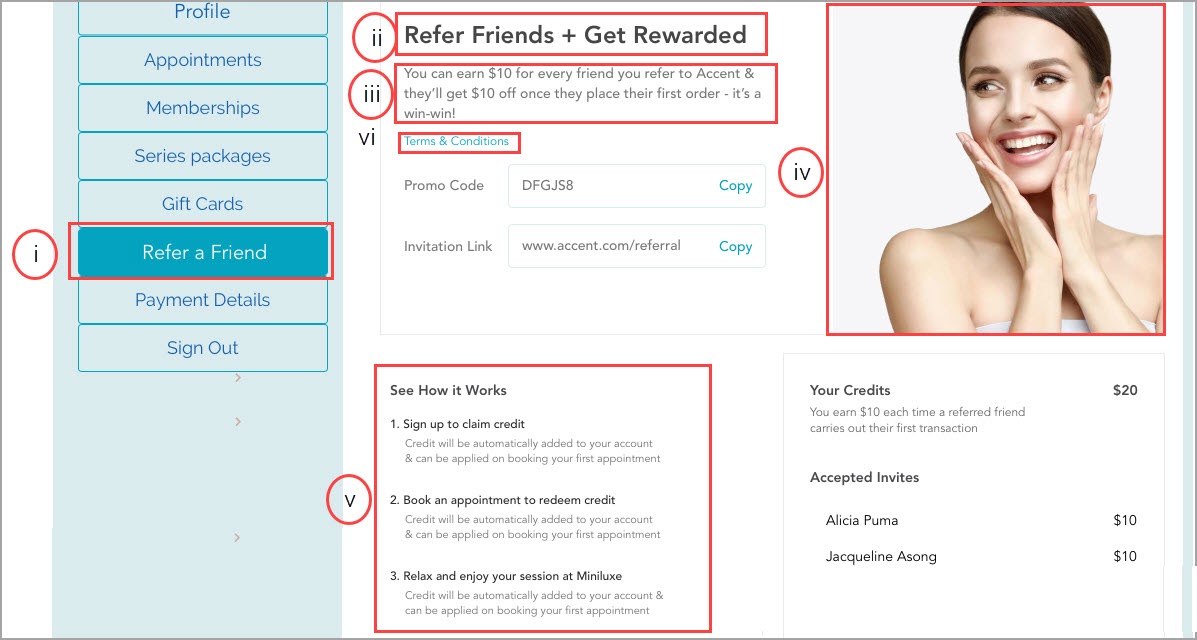
Referral Page:
Menu Title: Enter the text for the title of the Referral Page. This title will appear as a section on the guest profile.
Promotion Header: Enter a text that will appear on the header of the Referral Program page of the guest profile.
Promotion Description: Enter a brief description of the Referral Program. This description will appear below the Promotion Header text.
Referral Page Image: Upload an image that will appear on the Referral Program page of the guest profile. The resolution of the image should be 480 x 350 pixels and should be less than 500 KB in size.
“How it Works” - Steps and Description: Enter three steps on how your guests can send a promo code and how they receive the credits for successful referrals.
You must write the step title and its description.
Terms and Conditions Link: If you have an existing Terms and Conditions URL, enter the URL here.
Check the following image for a quick reference:
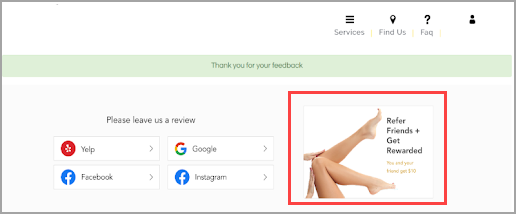
Promotion Banner:
Banner Image: Upload a banner image that will appear on the home page, on the Appointment Confirmation page, and on the Feedback Confirmation page of the Webstore. The image should be of 480 X 300 pixels and should be less than 500 KB.
Note
The idea of this banner is to catch the attention of your guests and encourage them to refer their friends and family to your services. In light of this, it is recommended to make the banner attractive by combining text and images.
A sample promotion banner image:
Note
When the Webstore is opened in a mobile device, as the screen space is restricted, the user might not be able to see the Promotional Banner. In such instances, they must tap Show More to view the Promotional Banner.
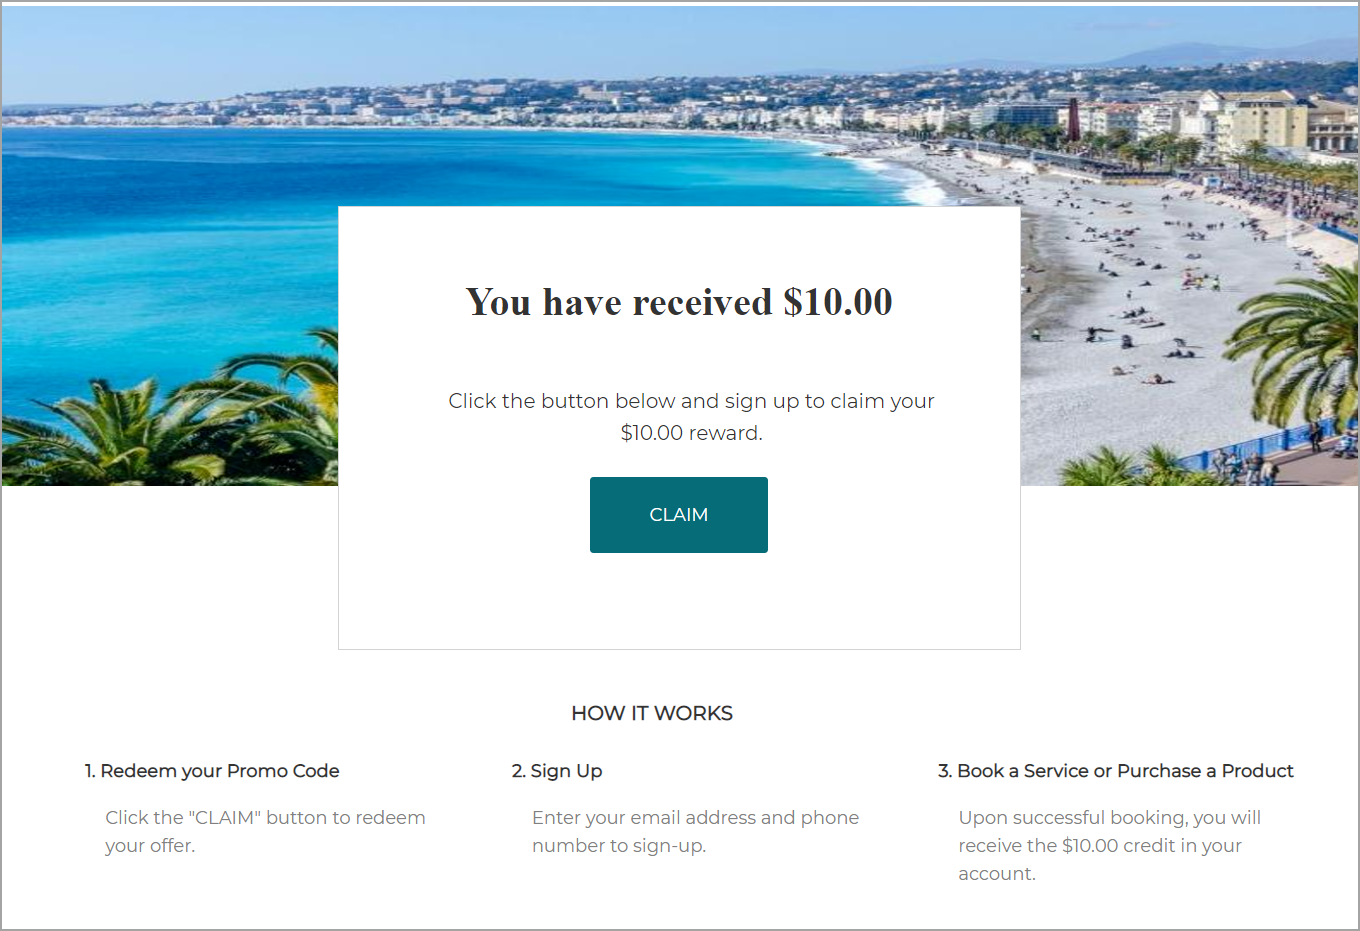
Landing Page:
Note
The configuration of this landing page is critical as new guests form their first impression through this page. Ensure that this page captures the attention of the new guests.
Background Image: Upload an image for the background of the landing page.
Landing Page Header: Enter a header title for the landing page. The resolution of the image should be 1440 X 480 and should be less than 500 KB.
Brief Description: Enter a brief description of what the guest needs to do on this page.
Button Text/Action Text: Enter a label for the button present on this page.
“How it Works” - Steps and Description: Enter the three steps on how your new guests claim their rewards.
A sample Referral Program landing page:
Click Publish.
The changes you make are saved and are live on your Webstore.
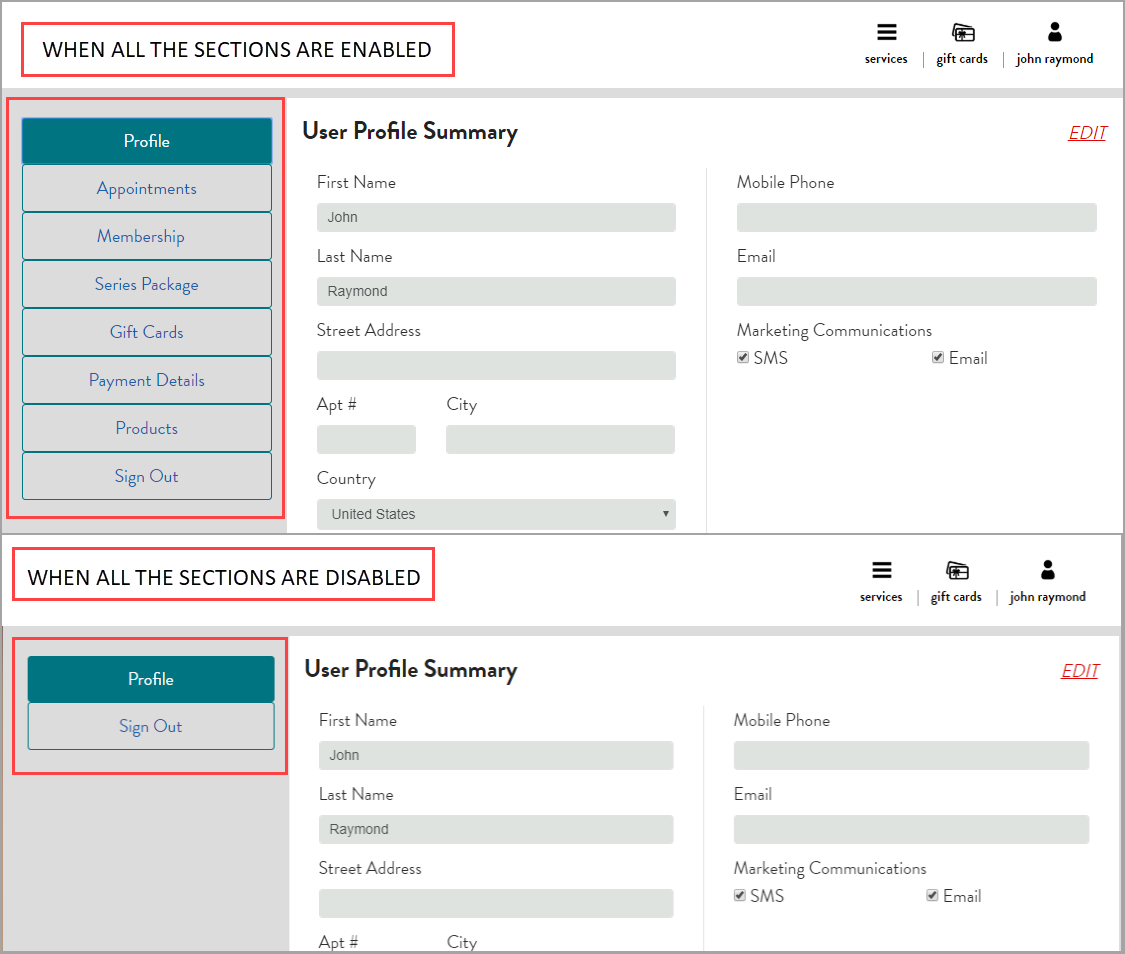
Configure the user profile page for Webstore v2
You can use the User Profile Page section to configure allowing guests to cancel appointments and to gather feedback.
At the Organization level, click the Configuration icon.
Navigate to Online Booking > Online booking settings > Webstore V2.
Expand the User Profile Page section.
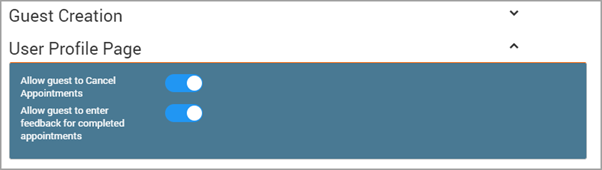
Enable the desired sections to display the option in the users’ profiles:
Allow guest to Cancel Appointments: Enable this setting to allow guest to cancel appointments online.
Allow guest to enter feedback for completed appointments: Enable this setting to allow guest to enter feedback for their appointments.
After you configure the above settings, click Publish to publish all the configured settings.
Display time-based discounts
Time-based discounts allow you to display discounts to your guests on the Webstore as per the time of the booking of an appointment.
You can offer discounts when booking an appointment closer to an available time slot. For example, if a booking slot is available at 5:00 PM, you can configure the discount as:
1 hour before 5:00 PM - 30% Discount
3 hours before 5:00 PM - 15% Discount
You can then display these discounts on the Webstore and allow your guests to book the appointment and avail discounts.
Before you begin
You must configure Time-based discounts in Zenoti and specify the discount for the services.
You must enable deals in the display settings section of webstore V2.
At the organization level, click the Configuration icon.
Navigate to Online booking > Online booking settings > Webstore v2.
Locate and expand Deals.
Configure the following settings:
Deals campaign code: Enter the campaign code of the deals campaign that you create.
Note
Only media campaigns are supported.
Allow center override: Turn ON this setting if you want to offer deals at the center level.
Note
After you enable this setting, you must configure deals for each center where you want to display deals.
If you enable center override and don't configure deals for the centers individually, webstore will not display any deals for that center.
Deals icon text: Enter the text that appears below the deals icon on the Webstore home page.

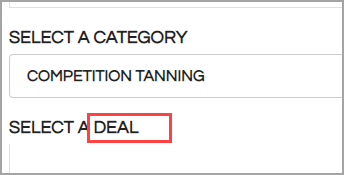
Deals label: Enter the text label that appears on the deals page. The text label will have a prefix of Select the. If you enter the text Deal in this field, it will appear on the Webstore as Select the deal.
Deals booking button label: Enter the text label for the deal booking button.
Deals thank you page: You can create a customized Thank You page by inserting the HTML code of the page.
Deals payment terms and conditions: Enter the text for the payment terms and conditions that will appear on the appointment confirmation page.
After you configure the above settings click Publish.
Integrate Zenoti Webstore with Shopify
Shopify provides a best-in-class eCommerce platform for selling retail products. With Zenoti integrated with Shopify, your guests can visit and purchase products from your Zenoti Webstore, facilitated with the tools and sales channels of Shopify. Guests can simply log in to the Webstore with their email address and when they go shopping, they will land on the Shopify platform with the same credentials.
The purchase details of every product that a guest buys from your center, will be tracked in Zenoti as well as Shopify.
Prerequisites
Before you commence your Shopify integration, you must:
Have a Shopify Basic account.
Set up a dedicated center in Zenoti for Shopify (All the Shopify orders are tracked under this center).
Ensure that the center for Shopify and the store use the same currency:
For example, if your center uses Australian dollars then you must select the same currency for your Shopify.
Ensure the product code in Zenoti and the Shopify product SKU are the same. Integration of products is based on product code (Zenoti) and product SKU (Shopify). Products that are not integrated will not be able to sync.
Ensure that the sale price of the products is the same in Zenoti and Shopify.
Impacts and considerations
Guests can log in and purchase on Shopify (via Webstore), only with their registered email address.
Login with a mobile number is not supported.
Login of guests with multiple profiles in Zenoti with the same email address in their profiles is not supported.
Guests cannot use Zenoti’s offers or benefits such as coupons, discounts, vouchers, memberships, and gift cards to purchase retail on Shopify.
Zenoti cannot process refunds of Shopify invoices.
The following 4 reports: Today’s Sales, Sales Invoice, Product Sales, and Invoice Number are updated with the purchases made on Shopify.
New custom menus on your Webstore appear when you set up products and related details on Shopify. For more information, refer to add products to your Shopify store.
The new Products menu becomes visible on the Webstore after the integration.
To integrate Shopify with Zenoti Webstore
At the organization level, click on the Configuration icon.
Search for and select E-commerce from the Integrations section.
Select Shopify.
Center: Select the center you set up for Shopify. All the Shopify orders are tracked under this center.
Shop Name: Enter the center’s shop name.
Click Save.
The configuration settings are saved.
Click Connect.
The Shopify login page appears.
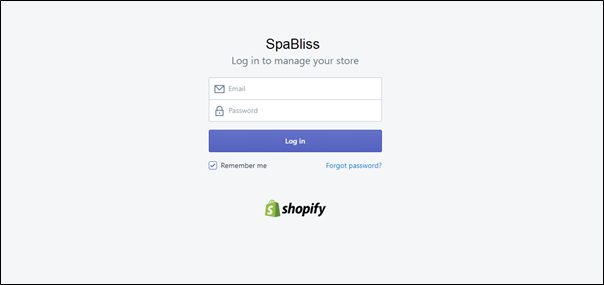
Enter your Shopify login details and click Log in.
The Shopify page appears and gives you an option to install the ZenotiSynch app.
Zenoti Synch is an integration app (not listed on the Shopify site). The app helps you integrate your Shopify account with Zenoti.
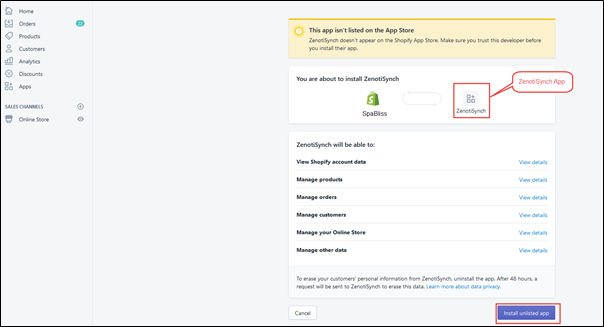
Click Install Unlisted App.
The ZenotiSynch App installation completes and Zenoti’s Organization Level Dashboard opens.
For more information regarding configurations for Shopify, refer to Shpofy integration with Zenoti.
To enable Shopify in Webstore settings
At the organization level, click the Configuration icon.
Navigate to Online Booking > Online booking settings > Webstore V2.
Expand the Integration drop-down list.
On the Enable Shopify setting page, enable the setting.
After you configure the above settings, to publish all the configured settings, click Publish.
After successful integration, you can publish and sell your products on your online store.