FAQ and troubleshooting
What best practices can I adopt to improve visits to my Webstore?
How do I remove mandatory login from my Webstore?
You cannot remove mandatory login from Webstore. It is necessary for the guest to log in to Webstore V2 to book an appointment and also to check the membership benefits. If you wish, you can use social logins, if you do not want the regular login. Learn more
How do I create a target segment using Webstore users?
You cannot create a target segment based on Webstore users.
How do I enable a therapist on Webstore?
If you want your therapists to appear on Webstore V2, you must configure the following settings in Zenoti:
Employee Schedule: You must set up employee schedules for your service therapists as Zenoti uses this information to show their availability in the Appointment Book and in the Webstore.
Employee Catalog: Employee catalog allows you to display the available therapists in the Webstore.
Ensure that the therapist is checked in: Webstore shows only those therapists who have checked in for the day.
How can I update the sidebar of the webstore to display my monthly promotions and offers at my store?
There is no setting to configure sidebar display. Instead, you can use the Announcement Banner to display the monthly promotions and offers at your store. Learn how.
Why is there an "Online Booking In Progress" block on my schedule, and do I need to remove it?
When a guest starts an online booking, Zenoti temporarily reserves the slot to prevent double-bookings while the guest completes checkout. This creates an Online Booking In Progress block on the Appointment Book.
The hold typically lasts 10 minutes. If the guest does not confirm within that time, the block clears automatically. No action is required from staff in most cases.
If the block does not disappear after the hold period, you can remove it manually by clicking on the entry and selecting Cancel under Service Details.
What is a "grey status" appointment?
Grey status appointments are unfinished online bookings that are still within their auto-clear window. The system will remove them automatically once the configured hold period elapses.
A grey status appointment appears when a guest starts but does not complete an online booking. It is the same as an Online Booking In Progress block. The system will remove them automatically once the configured hold period elapses.
What to do: Wait for the hold period to elapse, the appointment will clear automatically.
If the grey appointment remains after the hold period has passed, manual cancellation may be needed — click the appointment and select Cancel to clear it from the schedule.
What are "ghost appointments" and why do they happen?
Ghost appointments are typically caused by online bookings timing out before the guest can complete payment, this is especially common when deposits are enabled and the hold duration is too short, for example: 5 minutes.
To increase the appointment hold time, follow these steps:
At the organization level, click Configuration.
Navigate to Online booking > Online booking settings > CX V3.
Search for the Online Appointment Hold setting.
Enter the value for the appointment hold time in minutes.
For example: If you configure the hold time as five minutes, the Webstore will hold the appointment for five minutes after the guest selects the service, provider, date, and time. The guest must confirm the appointment within five minutes. After the stipulated time, the booking is void and the guest must start the booking process again.
Save your changes and monitor subsequent bookings.
Increasing the hold time gives guests enough time to complete payment, preventing incomplete bookings and ghost slots.
How can we prevent online booking issues from disrupting our schedule?
To prevent online booking issues, follow these best practices:
Set hold duration to 15+ minutes, especially if deposits are required.
Regularly review your Webstore settings to ensure configurations are up to date.
Train staff to identify and handle grey or in-progress booking statuses quickly.
Communicate with guests to encourage prompt booking confirmation after initiating a reservation.
Why do customers see "No provider available for your current selection" when trying to book online?
This message appears when no providers assigned to the selected service are enabled for online booking.
To resolve this issue, follow these steps:
Navigate to Employee > Employee name > Services.
Select the Available Online checkbox for relevant services.
This setting is enabled by default for all services but can be disabled for those services where therapists should not be available for online booking.
Save your changes.
Verify that the relevant services are also configured to appear in online booking.
Why is a specific service not showing up for online booking?
A service may not appear online for one of the following reasons:
The service is not marked as available for online booking.
None of the assigned providers have “Available Online” enabled for that service.
The service is inactive or archived.
Why does the online booking page show the schedule as fully booked when there are open slots?
If the online booking page shows no availability despite open time slots in the schedule, it is usually due to one of the following reasons:
Blocked Dates: Online bookings may be restricted for specific dates.
Mandatory room selection enabled: If the setting Make it mandatory to select a room for all bookings is enabled, bookings may be restricted when rooms are limited, even if providers are available.
Why can’t guests book online, and why does the system show “No appointment time available” even during business hours?
If guests are unable to book online and see a message regarding unavailability of time while trying to book, the booking hours may not be configured correctly.
At the center level, click Configuration.
Navigate to Business Details > Center settings >Essentials > Business Hours.
Set the correct Booking Hours.
Click Save.
How to Update and Troubleshoot the Phone Number on Your Zenoti Webstore
Phone numbers on the Zenoti webstore can come from multiple configuration sources. If the number displayed is incorrect or not updating, follow these steps to identify the source and fix it.
The phone number displayed on your webstore can originate from these:
Center contact details — the primary phone number configured in your center profile
Online Booking sidebar settings — a phone number entered directly in the sidebar's Tel field
Hardcoded HTML — a number embedded directly in the sidebar's HTML content
Third-party scripts — call-tracking or analytics scripts (e.g., GA4) that dynamically replace the displayed number
Note: If multiple sources are configured, scripts and hardcoded HTML typically override the center contact details.
Before You Begin:
Confirm whether you are updating the phone number at the center level or organization level.
Check whether your center uses custom scripts for call tracking or analytics (such as Google Analytics 4).
How to Update the Phone Number?
Update via Sidebar Settings
Navigate to Configurations > Online Booking > Online Booking Settings > Online Booking Setup > Side Bar.
Locate the Phone number field.
Enter your phone number in the format: Phone: [YOUR_PHONE_NUMBER].
Click Save.
Update via Center Contact Details
At the center level, navigate to Configurations > Contact Details.
Update the phone number field.
Click Save.
Note: The number saved in Center Contact Details also appears alongside error messages on the webstore.
Fix a Hardcoded Phone Number in the Sidebar HTML
Use this option if the displayed number does not match either of the configurations above.
Navigate to Configurations > Online Booking > Online Booking Settings > Online Booking Setup.
Open the sidebar content area.
Copy the HTML content and paste it into a text editor.
Use Ctrl+F to search for the incorrect phone number and replace it with the correct one.
Paste the updated HTML back into the sidebar field.
Click Save.
I updated the phone number in the sidebar, but the webstore still shows the old number. Why?
A custom call-tracking or analytics script is likely overwriting the display. Coordinate with your ads or analytics team to update the script so it reflects the new number.
Where does the phone number next to webstore error messages come from?
That number is pulled from your center's configured phone number under Configurations > Contact Details.
Do I need to update the phone number in multiple places?
Yes, if your center uses both the sidebar "Phone number" field and Center Contact Details, update both to ensure consistency across all webstore touchpoints.
Can I disable online booking for one service without affecting others?
Yes. Navigate to the service's settings under Admin > Master Data > Services and disable the online/web booking option for that specific service only.
If I turn off "Allow Appointment Booking," does the center still appear in the location selector?
Only if Show In Location Selector remains enabled. To remove the center entirely from the webstore, uncheck both options.
What is the difference between disabling online booking at the center level vs. the service level?
Disabling at the center level removes all online booking for that center. Disabling at the service level removes only that service from online booking while all other services remain bookable online.
I disabled cancellation fees, but they are still being charged on old appointments. Why?
Cancellation fee changes apply only to appointments booked after the setting is updated. Appointments created before the change retain the original fee configuration.
Why is my center-level cancellation fee setting being ignored?
If cancellation fees are disabled at the organization level, they override all center and service configurations. To use center-level fees, navigate to the org-level settings and select Override at Center Level.
Can guests see the cancellation policy before they book online?
Yes, if you configure the policy text under Online Booking Setup > Cancellation Policy for Webstore V2 and CX V3. The policy displays during the booking process.
If I update the cancellation policy text on the webstore, does it also change the fee amount?
No. The policy text field controls only what guests read on the webstore. Fee amounts are configured separately in the cancellation settings at the org, center, or service level.
Can guests cancel their memberships online?
Yes, if the Cancel Option is enabled under the Membership tab in Webstore V2 settings, guests can cancel through their profile on Webstore V2.
Where are all my uploaded images stored?
All images are stored in the Image Gallery. You can access it during the image upload process. Use the Copy Link option to reuse an image across multiple sections without re-uploading.
I updated the banner image but I don't see the change on the Webstore. What should I do?
After saving, perform a hard refresh on your Webstore page (Ctrl+Shift+R on Windows, Cmd+Shift+R on Mac) to clear the browser cache and display the latest version.
Can I use the same image for both the referral program banner and the online booking sidebar?
Yes. Upload the image once to the Image Gallery, copy its link, and paste it into both sections.
What best practices can I use to improve visits to my Webstore?
Your online store or Webstore is one way to reach more prospective customers. Through your online stores, your guests can book services, schedule appointments, purchase gift cards for their loved ones, and even purchase products online. You can also use your online store to inform your customers about new services, deals, and discounts.
Register your custom domain: You can improve user behavior tracking by using a custom domain. Tracking a user's behavior is challenging if they jump from one domain to another. Using the Custom Domain setup in Zenoti, you can customize the URL of your Webstore to be a subdomain of your website domain; this makes tracking easier since it is on a single domain.
For example:
The existing Zenoti online booking URL for SpaBliss is as follows: spabliss.zenoti.com/webstoreNew
SpaBliss owns the following domain: spabliss.com
The domain name can be masked, as the subdomain of the domain SpaBliss owns, to the following URL: booking.spabliss.com/webstoreNew
The masked URL internally redirects to the Zenoti booking URL
In-store Promotions: The best place for you to promote your Webstore is inside your premises. Use signages that list the different ways your Webstore will make booking easy for your customer. Use spaces like the reception, in service areas, and behind the doors to display the signages. Add the online store links to your invoices and receipts.
Automated Voice Message: When a guest calls you to book an appointment or for any inquiry, you can use a voice message instead of the dial tone.
For example, Thank you for calling <Business name>. You can now book your appointment anywhere, anytime on our Webstore. Just go to www.spabliss.com/webstoreNew and book within seconds. Try it today!
Search Engine Optimization (SEO): Using SEO strategies, you can ensure that your online store ranks high in the search results. The following are some of the SEO strategies:
Keyword optimization: Conduct keyword research and find out the most searched term for each service that you offer. Ensure that these keywords are included in your service name or description. You can also look at the terms used by similar businesses that always rank on top of the search results.
Meta information: For each of your services, products, memberships, and packages, configure the catalog and ensure you add the following information.
Page Title: Enter the page title that will be used when displaying the item in the catalog.
Page titles are seen on Search Engine Results Pages (SERPs) as a snippet describing the content on a particular page, and they are considered for SEO ranking and sharing on social media.
Meta Keywords: Enter any meta keywords that are relevant for the particular item.
Meta keywords are also known as meta tags and are highlighted on Search Engine Results Pages (SERPs) when people use them in search strings. They are used when search engines rank pages to identify the specific content included on a page.
Meta Description: Enter the meta description for the item.
Meta descriptions are displayed on Search Engine Results Pages (SERPs) and help people understand the item listed on a page. Therefore, meta descriptions act as ads and encourage people to click on links.
Promotions on the website:
Smart Banner: Your website is an important medium to promote your online store. Configure smart banners on the home screen of your website for mobile browsers to inform guests about your online store.
Embed Webstore URL links: Always embed your online store URL in website promos, emails, SMS, and social posts. Whenever an email is sent to a guest, include links to your online store.
Digital Campaigns: Create campaigns on your brand’s touchless and safe online experience. Digital campaigns can be very helpful to drive app downloads if the targeting is right.
Referral Program: Zenoti has a referral program. If you have enabled the referral program, you can encourage guests to refer their friends to sign up and visit the online store. Learn more
FAQs on Social Logins
Can an existing guest also use social logins?
Yes, existing guests can use their Facebook and Google credentials to log in to your Webstore. However, a new guest account is created if the email address used by the social networking site is different from the one used to login to Zenoti.
I make use of the OTPs to validate new guest sign-ups. Do I still need to validate through the OTPs after I enable social logins?
No, social logins validate the guest’s email ids automatically and you will no longer be required to validate using an OTP.
How can I add or edit the cancellation policy for online booking (Webstore & CMA)?
If your business allows cancellation of appointments on the Webstore and Consumer Mobile App (CMA), you can display a disclaimer text to your guests stating the terms and conditions for the appointment cancellation.
At the center level, click the Configuration icon.
Select the Online booking > Online booking settings > Online booking setup .
Under Combined settings for Webstore v2 and CX v3, in the Cancellation policy field, add a new cancellation policy or edit if you already have a policy.
Click Save.
How do I enable or disable the display of price for services on the Webstore V2?
At the organization level, click the Configuration icon.
Navigate to Online Booking > Online booking settings.
Select the Webstore V2 > UI settings.
Configure the setting.
Click Publish to make all the changes live.
Note
Pricing for services cannot be disabled if the membership pricing setting is disabled.
Can a guest use gift cards in Webstore?
Yes. A guest can use gift cards in the Webstore for the following scenarios.
Pay for a service or a day package
A guest can copy the gift card number from their profile and use it to pay for services or day packages. At the time of payment, the guest can select to pay with a card on file or a gift card. They can paste the gift card number in the Gift Card field and proceed with the payment. They can also redeem their gift card by typing the correct gift card number in the Gift Card field. The gift card need not be associated with the profile.
A business can enable this feature if they:
Enable Gift cards without tax.
Allow guests to use gift cards to pay for services.
A business that has enabled deposits can turn this setting on only if they allow guests to use gift cards to pay for prepaid card purchases.
Businesses that have enabled the Auto generate gift card number setting at the organization level cannot allow guests to use gift cards in Webstore.
When you have enabled Allow guest to redeem services/packages gift card on all services at the organization level, the guest can redeem all gift cards for any service or package.
When a guest redeems a gift card in Webstore, the redemption is added to the gift card directly. The invoice is not closed.
If there is a deposit, the gift card can be used to purchase a prepaid card.
If there is a partial deposit, the gift card can be used to purchase a prepaid card for the deposit amount. The remaining amount is added to the invoice.
When a guest cancels an appointment:
The gift card payment is removed from the invoice.
If the Enable Deposits setting is enabled at the organization level, the guest cannot cancel an appointment from Webstore.
If the deposit is paid using the gift card, they will lose the prepaid card used as the deposit amount.
Add the gift cards gifted to them to their Webstore profile
A guest can add the gift cards gifted to them by another guest. When a card is gifted, the guest receives an email with the gift card link.
To add this gift card to their profile, they need to:
Click the [claimlink] link and log in to Webstore.
Click Yes.
You should add the [claimlink] macro to the Webstore Gift Card Online template.
If the gift card is already claimed, the guest will see an alert.
Claiming a gift card using [claimlink] will not work if the Auto generate gift card number setting is enabled.
How do I translate labels and descriptions in Webstore to a supported language?
Ensure that your organization has added the preferred language as a supported language.
From the organization level, navigate to Configuration > Online Booking > Online booking settings > Webstore V2.
Expand the following sections:
Styling and Custom CSS
Labels and Text Configuration
Appointment Booking Flow
Therapist Settings
UI Settings
Group Booking
Membership
Series Packages
Gift Cards
Loyalty Points
Deals
Day Packages
Referral Program
Analytics
Note
Note: You will only be able to enter translations for customizable labels and descriptions.
Next to each of these sections, click Add Translations.
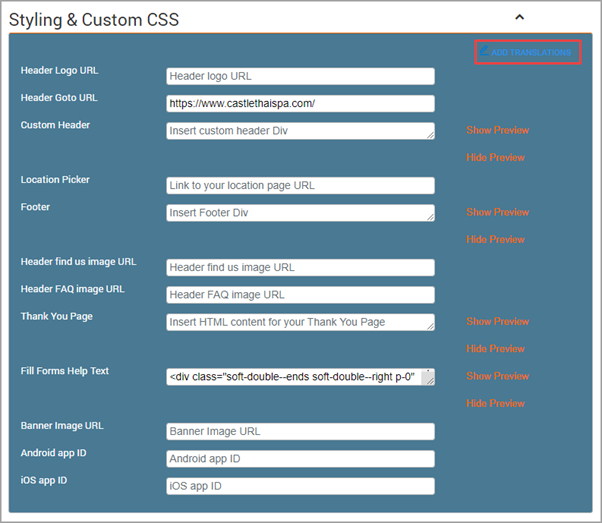
Expand the preferred language and enter the text to the labels and descriptions in the preferred language.
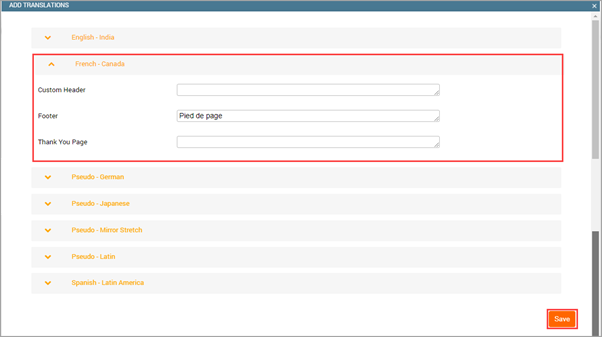
Click Save.
You have successfully translated the details to a supported language. Your guests can now access your Webstore in the selected language.
Why are providers or services not showing up in Zenoti's online booking system?
Visibility issues in online booking are usually caused by incomplete provider setup, missing service-room associations, or bookings that weren't completed properly. Work through the checks below.
Provider not visible online
Go to the provider's profile > Catalog tab and enable Show in Webstore and Mobile App. Also confirm that:
The services they perform are assigned to their profile under Employee > Employees > [Provider Name] > Services.
They have bookable shifts for the relevant date under Employee > Schedule.
Services or time slots not appearing
If your business uses rooms, services must be linked to a room before they appear online. Go to Business Details > Business Setup > Rooms, edit the relevant room, associate it with the applicable service category, and enable the room for the webstore in the Catalog tab.
How can I show a custom message for certain service times? Can I customize an Online booking notification for a specific hour?
Zenoti currently does not support time-specific automatic notifications during appointment booking. However, there are two available workarounds to communicate time-based service policies or restrictions to guests.
Option 1: Use the Announcement Banner on the Webstore
You can use the Announcement Banner to display a custom message at the top of your Webstore. This is useful for organization-wide notices, such as informing clients that certain offerings are unavailable after a specific time. This banner appears across the Webstore, making it a good solution for center-wide visibility. For more information about Announcement Banners, please refer to the following articles:
Option 2: Add timing information in the Service Description
You can include a note directly in the service description to inform guests about any time-based guidelines. Service descriptions are shared across all centers in your organization. So, if you add a note like "Last availability at 7:30 PM", it will be visible to clients of all centers, which may not be desirable if the restriction is center-specific. Service descriptions are added while creating or editing services. Refer to the Edit services article for more details.