Ezypay
Ezypay integration
Note
Zenoti will discontinue support for the Ezypay payment processor effecting September 30, 2025. To ensure uninterrupted payment processing, please switch to a supported payment processor before this date.
You can integrate Ezypay with Zenoti to collect direct debit payments from your guests.
You can choose to configure Ezypay for your entire organization or for specific centers. Please note that if you configure Ezypay at the center level, the center settings override the organization settings.
Important
Zenoti supports Ezypay integration only in Australia and New Zealand.
To complete Ezypay integration with Zenoti, you will need an Ezypay account. If you do not have one, contact Ezypay.
Configure Ezypay in Zenoti
If you are configuring Ezypay at the organization level, click the Configuration icon. Navigate to Payments > Settings.
If you are configuring Ezypay at the center level, click the Configuration icon. Navigate to Payments > Settings.
The New Payment Setup screen opens.
Recommended processors for your location appear.
For Ezypay, click Setup.
The Ezypay configuration screen opens.
Enter your API Token, Account Reference, Organization Code, and API URL.
Note
If you do not have these details, contact Ezypay.
Click Continue to Configuration to proceed with setting up payment options, transaction types, and terminals. If you wish to configure thesesettings later, click Finish Setup.
Configure payment options
If you proceed with Continue to Configuration, you must first set up your payment options. Configure the following settings:
DD/ACH: Select this checkbox to use the ACH (Automated Clearing House) feature of Ezypay.
Configure transaction types
Configure the following settings:
DD/ACH: Select this checkbox to allow ACH transactions for the payment processor.
Note
Ignore the Terminals section for this payment processor.
You have successfully integrated Ezypay with Zenoti.
You can now collect card and direct debit payments from the desktop POS.
Collect card and direct debit payments using Zenoti
After you integrate Ezypay with Zenoti, you can collect direct debit payments as follows:
On the appointment book, click the appointment for which you want to process payment.
Click Take Payment.
On the right-hand side of the POS, under the Collect Payment section, click Check.
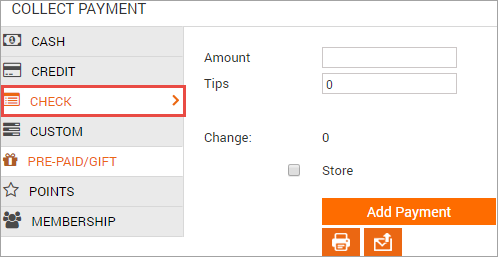
Enter the amount you wish to collect via direct debit and click Add Payment.
A customer information window appears.
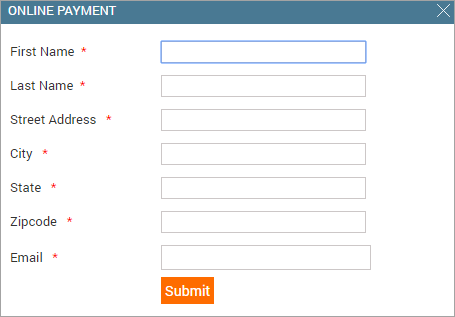
Enter the customer details and click Submit.
The bank account details window appears.
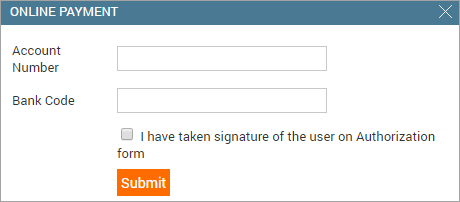
Enter the guest's bank Account Number and Bank Code.
The first direct debit transaction of the guest via Zenoti, requires you to collect an authorization signature from the guest.
You must print an Authorization form and request the guest to sign it.
After the guest signs the Authorization form, select the checkbox, I have taken signature of the user on Authorization form .
Note
After the guest's first direct debit transaction, the bank account details are stored in Zenoti. On subsequent payments using direct debit, you can use the stored bank account information to collect payments. You will not have to take the signature on the Authorization form again.
Click Submit.
The direct debit payment is processed.