Sell memberships
Sell a recurring membership – charged on the same day
When you sell a membership from the current date, the membership billing cycle begins the same day. Also, the payment mode that you use for the first membership charge, like cash or credit card, is used for all the remaining membership drafts. However, if you pay the first charge using prepaid or gift cards, the default payment mode for the next drafts becomes cash.
You can change the payment mode after you sell the membership.
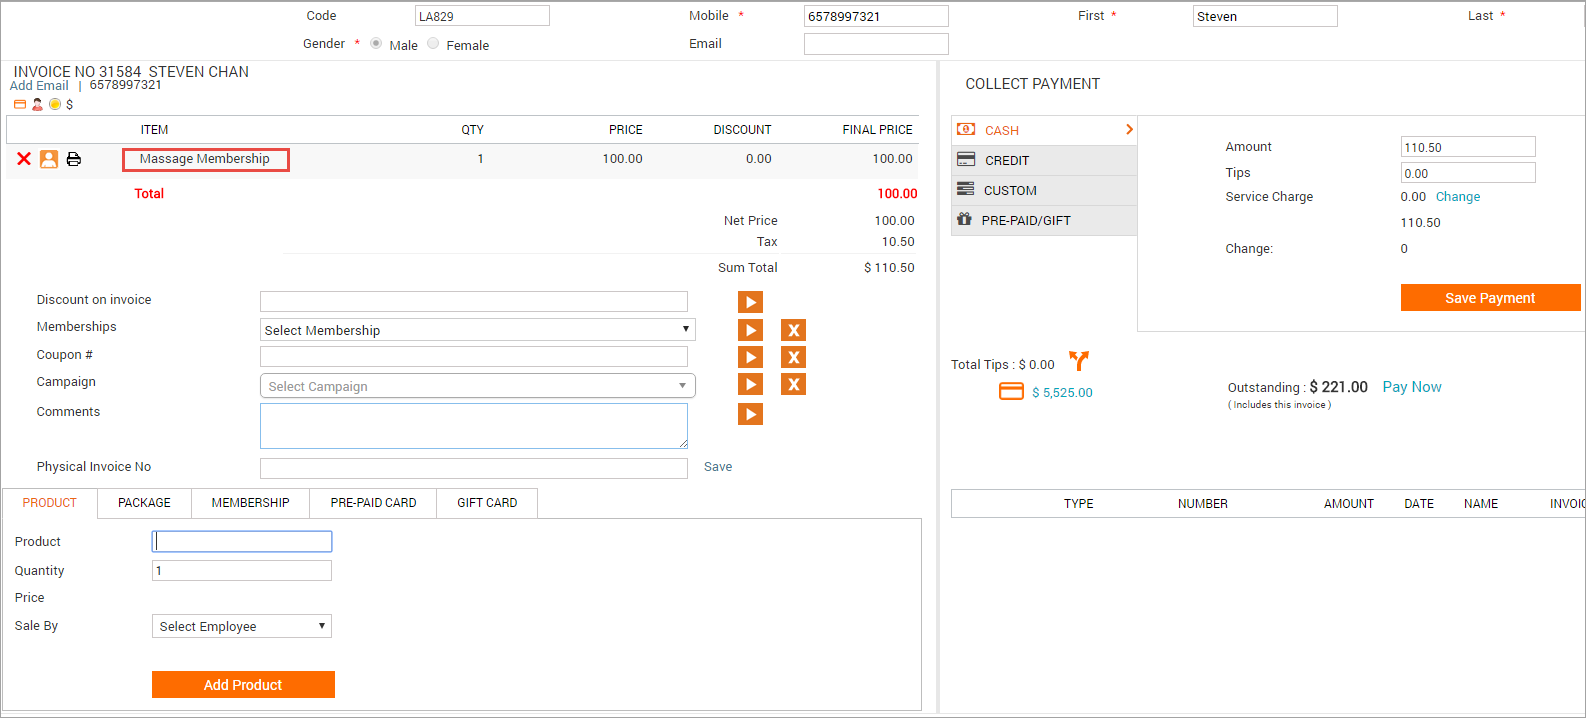
Open POS and enter the necessary guest details.
In the lower left-hand pane of the window, click the Membership tab.
From the Membership drop-down list, select the recurring membership that the guest wants to sign up for.
Note
Zenoti auto-fills the membership price and if there is a description, shows it next to the Membership field. Check the details to see if you selected the right membership.
In the Sale By list, select the name of the employee who sold the membership.
In the Bill Date field, the current date is selected by default. You can schedule the billing date for the future, in which case this invoice remains open until the future date.
Click Add Membership.
Use the Collect Payment section to take payment for the membership.
Note
Payments added to a membership invoice cannot be deleted if the membership's benefits are already used in other invoices.
The membership is added for the guest. You can see the following on the invoice page:
A message appears in the Multiple Commission window that displays the provider who would receive commissions for every future recurring payment.
A new information icon appears next to the discount amount under the Discount column in the invoice. When the front-desk staff hovers over it, a message appears informing if any discount awarded towards the recurring membership is applicable on all future recurring payments.
On the right-hand side, you can see payment-related information like payment amount, default payment type used for collecting recurring payments, and the scheduled date for next payment. There is also a link to view the membership details.
Impacts and considerations
You can optionally do the following while selling the membership:
To apply any discount, enter the amount in the Discount on Invoice box and click the arrow next to it.
If the customer has a cashback or a custom coupon that is redeemable on the membership, enter the coupon number in the Coupon # field and click the arrow button next to it to apply it.
If there is any active marketing campaign going on for the membership, click Campaign list and select the campaign.
Depending on how you have set up Zenoti, any discount you offer on the first purchase of a recurring membership to a guest may be offered on all subsequent invoices of that membership, or the discount may apply to only the first invoice of the membership. For example, if a recurring membership requires a monthly payment of $100 on which you give a discount of $10, then the guest has to pay $90. You can set up Zenoti such that the $10 discount is applied to every monthly invoice or it is applied only to the first invoice. In the first case, the guest pays $90 every month. In the second case, the guest pays $90 for the first month and $100 for subsequent months.
For memberships with an associated setup fee, you see an alert informing you that separate invoices will be created for the setup and membership fees. The payment method used in the invoice that is created for the set-up fee will be charged for the primary membership by default.
For memberships with an associated setup fee, only the setup fee appears on the current invoice.
Members or guests can hold multiple recurring memberships for the same business if a specific configuration is enabled at the organization level. To allow multiple recurring memberships, enable the allow or warn sale of membership to existing members setting. If the setting is not enabled, a member can hold only one recurring membership. In this case, if a guest with an active membership wishes to switch to another, the staff must first cancel or suspend the existing membership before selling a new one.
A maximum of one recurring membership can be added to an invoice or sold to a member in one instance. Although multiple non-recurring memberships can be included in the same invoice, Zenoti does not support adding more than one recurring membership per invoice.
Some businesses restrict guests from purchasing more than one recurring membership. Since the sale invoice acts as the base for all future drafts and liabilities, adding multiple recurring memberships to the same invoice would cause conflicts in billing schedules, payment tracking, and agreement enforcement.
Sell a recurring membership – first payment scheduled for a future date
When you sell a membership with the first payment scheduled for the future, the membership becomes active only after the first payment is successfully collected. The billing cycle starts from the day of collection. Also, the payment mode that you use for the first membership charge, like cash or credit card, is used for all the remaining membership drafts. However, if you pay the first charge using prepaid or gift cards, the default payment mode for the next drafts becomes cash.
You can change the payment mode after you sell the membership.
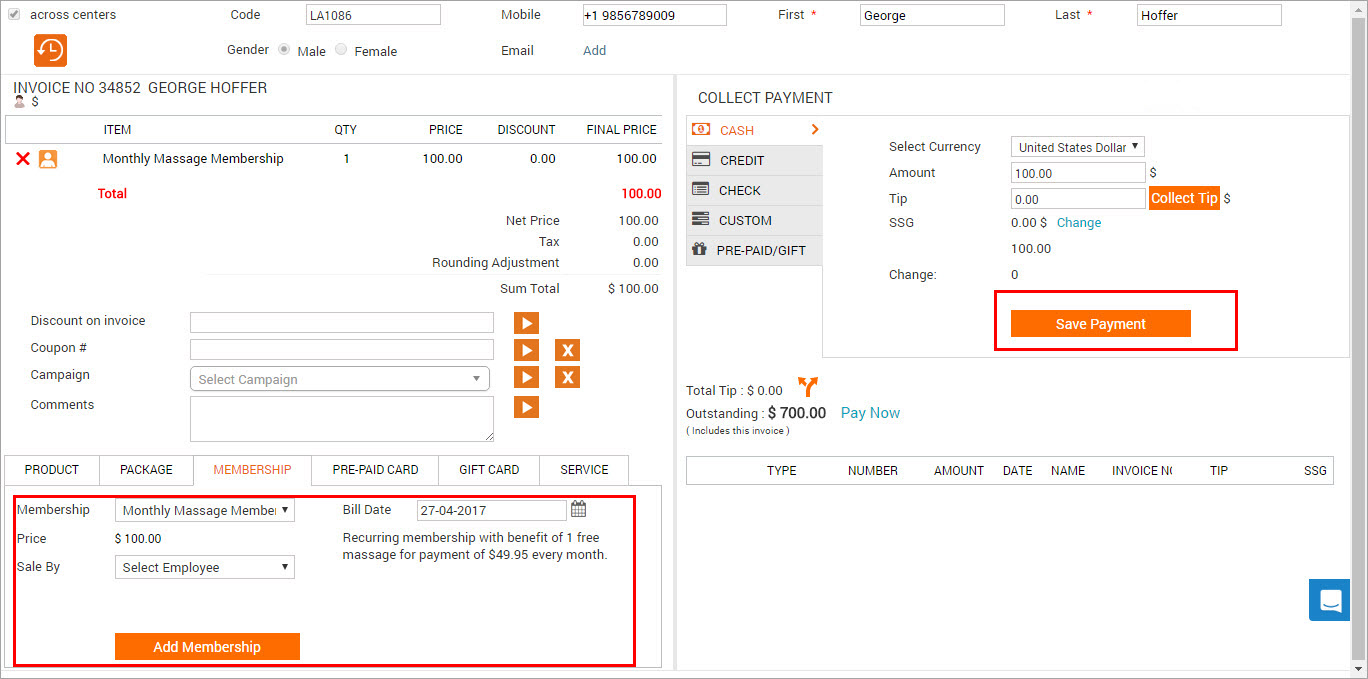
Open POS and enter the necessary guest details.
In the lower left-hand pane of the window, click the Membership tab.
From the Membership drop-down list, select the recurring membership that the guest wants to sign up for.
Note
Zenoti auto-fills the membership price and shows the description next to the Membership field. Check the details to see if you have selected the correct membership.
In the Sale By list, select the name of the employee who sold the membership.
In the Bill Date field, the current date is selected by default. Click the calendar icon next to the field to select a different date for membership.
Note
If the Default offset days for future sale is configured in the membership master, the default date is set accordingly. For example, if the Default offset days for future sale is set to 3 and you select a future membership on Nov 15th, the Bill Date will be set to Nov 18th.
Click Add Membership.
In the Collect Payment screen, select the payment type.
When you schedule the payment for a future date, the Collect Payment section shows the Save Payment button, instead of Add Payment.
Click Save Payment. An alert appears with the follow message:
Future bill date saved successfully and Recurring collection will start from <date>.
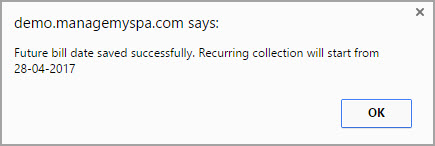
Click OK.
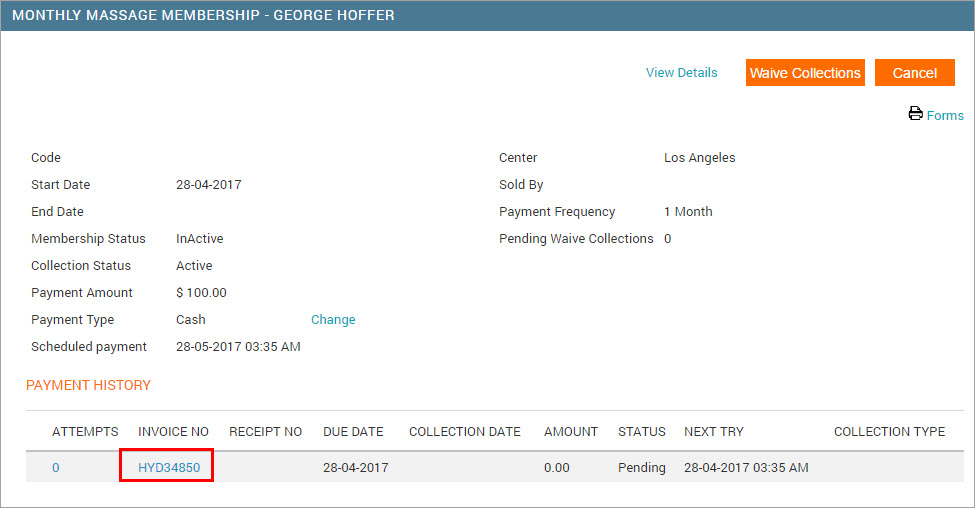
Collect the future payment
You can go to the membership details page in the Guest profile to check the open invoice. If the guest selects an Online Credit Card for payment, the amount is automatically collected from the card. If the guest uses other payments methods, such as Cash or Offline Credit card, you need to open the invoice and collect the payment here:
Guest History page > Memberships > [click] Membership name > Payment History
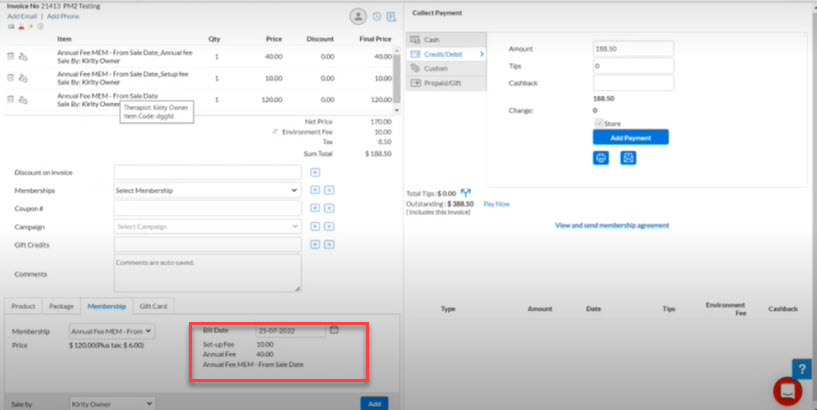
Sell membership with annual fee
Important
To enable annual fee collection for a membership and allocate an annual fee for a center, contact your administrator.
Open POS and enter the necessary guest details.
At the bottom-left corner, click the Membership tab.
From the Membership list, select the recurring membership that the guest wants to sign up for.
Note
Zenoti auto-fills the membership price, annual fee, and setup fee and shows the description, if any, next to the Membership field.
Read the description to check if you have selected the correct membership.
From the Sale by list, select the name of the employee who sold the membership.
In the Bill Date field, the current date is selected by default. Click the calendar icon next to the field to select a different date for the first membership due.
Click Add.
In the Collect Payment section, select the payment type. The same payment type is used for all the membership payments.
To collect fees, click Add Payment.
Sell a non-recurring membership
Open POS and enter the necessary guest details.
In the lower left-hand pane of the window, click the Membership tab.
From the Membership drop-down list, select the membership that the guest wants to sign up for.
Note
Zenoti auto-fills the membership price and shows the description next to the Membership field. Read the description to check if you have selected the correct membership.
In the Sale By list, select the name of the employee who sold the membership.
Click Add Membership.
Use the Collect Payment section to take payment for the membership.
You can optionally do the following while selling the membership:
If you want to apply and discount campaign for the membership, click Campaign list and select it. Click the arrow icon to apply the discount.
If the customer has a cashback or a custom coupon that is redeemable on the membership, in the top left-hand pane, enter the coupon number in the Coupon # field, and click the arrow icon next to it apply the coupon.
Sell a membership with setup fee
Open POS and enter the necessary guest details.
In the lower left-hand pane of the window, click the Membership tab.
From the Membership drop-down list, select the recurring membership that the guest wants to sing up for.
Note
Zenoti auto fills the membership price, setup fee and shows the description, if any, next to the Membership field. Read the description to check if you have selected the correct membership.
In the Sale By list, select the name of the employee who sold the membership.
In the Bill Date field, the current date is selected by default. Click the calendar icon next to the field to select a different date for the first membership due.
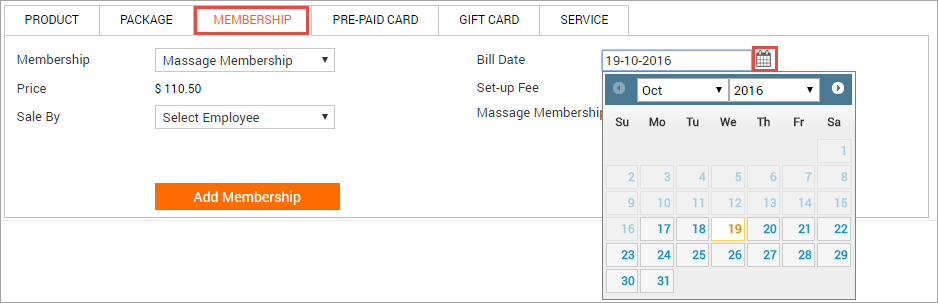
Click Add Membership. The following alert appears, letting you know that a separate invoice has been created for the first membership due

Only the setup fee is added to the current invoice.
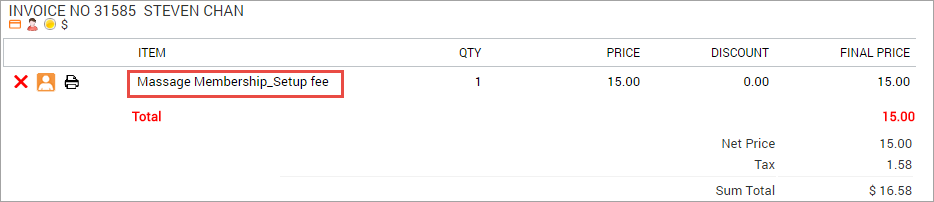
In the Collect Payment screen, select the payment type. The same payment type is used for all the membership payments.
Click Add Payment to collect the setup fee.
A separate invoice opens for the first membership due as follows: