Handle Ownership Change in Zenoti Payments
This article explains how to set up or update payment accounts in Zenoti Payments when a business changes ownership. It covers ownership transfer scenarios, KYC (Know Your Customer) requirements, and the steps to link or de-link centers to ensure uninterrupted payment processing.
This process applies only to merchant account setup and KYC verification. It does not cover contractual, billing, or operational handover details.
Overview
Franchise businesses using Zenoti Payments may transfer ownership of one or more centers between business entities. When this occurs, the associated merchant (business) account must be correctly reassigned and verified to maintain compliance and avoid payment disruptions
Ownership changes require timely KYC verification and correct linking of centers to the appropriate merchant account. The process differs depending on whether the new owner is already an existing Zenoti merchant or is onboarding for the first time.
Ownership transfer scenarios
Create a new merchant (business) account in Zenoti and provide all required business and bank information.
Refer to Onboard to Zenoti Payments article on how to create a new merchant account.
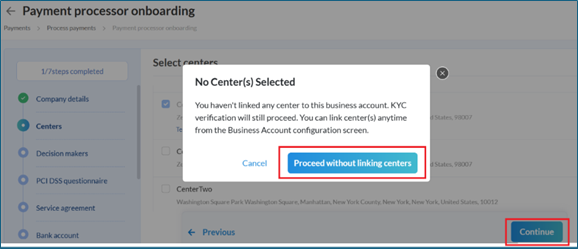
During onboarding, skip the step to link centers.
KYC verification starts automatically for the new account.
Initiate KYC at least 4–7 days before handover to avoid payment disruptions.
On the handover day:
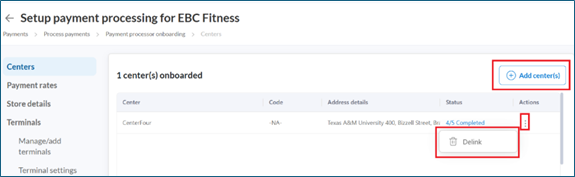
De-link the center(s) from the old merchant account. Record all terminal details (serial number, model, etc.) before de-linking, as you need this information to onboard the terminal in the new account.
Link the center(s) to the new merchant account and complete the linking process with all required details.
Configure the center and onboard payment terminals.
Note
Payment processing is unavailable until KYC verification is complete. KYC timelines depend on the acquiring bank and are outside Zenoti's control.
The buyer does not need to create a new merchant account.
On the handover day:
De-link the center(s) from the seller’s merchant account. Record all terminal details before de-linking.
Link the center(s) to the buyer’s existing merchant account and complete the linking process.
Configure the center and onboard payment terminals.
Note
De-linking requires OTP verification sent to the seller’s registered business account email. Ensure the outgoing owner is available to complete this step.
Usage guide
Follow the below steps to link or de-link centers:
From the business listing page, go to Center Configurations to view all centers linked to the business.
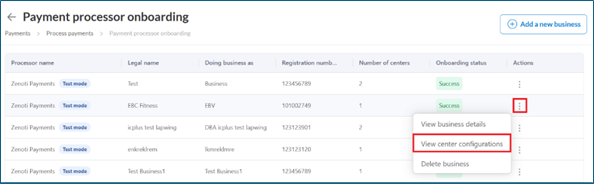
From the Center Configuration page, you can add or de-link centers.
Follow the below steps:
Under Payment Processor Onboarding, add a new business and complete the company details step.
At the center linking step, click Continue without adding a center.
Frequently asked questions
Q: What happens to chargebacks after ownership changes?
A: Liability moves to the new merchant account. Chargebacks are deducted from the new account, and resolved disputes are credited to it.
Q: Can refunds be issued for invoices created before the center was linked to the new account?
A: No. Refunds on historical invoices from the previous merchant account are not allowed.
Q: What happens to saved customer cards?
A: Zenoti uses global tokenization. Saved cards automatically link to the center after it is connected to the new merchant account.
Q: Can I use a separate bank account for my center without creating a new merchant account?
A: Yes. A single merchant account can have multiple bank accounts. Add the new bank account in business details, map it to the desired center, and complete bank verification.