Manage memberships
View Membership Insights
This article helps you view and interpret membership insights in Zenoti.
Overview
Membership insights provide a quick snapshot of how each membership is performing at your center. You can view key metrics such as active members, memberships sold, and online sales to better understand membership adoption and performance.
View membership insights for a specific membership
Follow these steps to view insights for an individual membership.
At the center level, navigate to Master data -> Memberships -> Manage memberships.
Click the name of a membership to open the membership details page.
On the membership details page, review the Membership Insights section on the right.
The Membership Insights section displays the following details:
Current active members
Total memberships sold
Memberships sold online
Date on which the membership was last sold
Date on which the membership was created
View membership insights for all memberships
Follow these steps to view insights for all memberships in a single, centralized view.
Navigate to Master data -> Memberships -> Manage memberships.
Review the list of memberships to see summary details for each record. At the center level, the list view displays sale price, applicable tax, and online availability status.
Use filters to narrow down the list of memberships. Available filters are
Status:
Center level: Active/Inactive
Organization level: Active in any center / Inactive in all centers
Recurrence type: Recurring/Non-recurring
Centers: Multi-select dropdown (available at the organization level)
To access more insights for any membership without opening the full details page, locate the membership record and click the information icon on the right.
This view displays information related to:
Current active members
Total memberships sold
Memberships sold online
Product discounts
Service credits
Service discounts
Date on which the membership was created
Date on which the membership was last sold
Modify a membership
This article explains how to edit recurring or non-recurring memberships in Zenoti, including what you can and cannot change. Use this information to make informed updates to membership settings without impacting historical data or membership logic.
Overview
Zenoti allows businesses to update active memberships to reflect operational or business changes. While you can edit many aspects such as discounts, product availability, and online visibility, certain core fields are locked to preserve the membership's structure and existing transactions.
If you need to create a variation of an existing membership, cloning it is recommended instead of editing the original.
Prerequisites
Ensure you have administrator access at the organization level.
Versioning must be understood before making edits (especially for organizations created after Jan 2020).
Modify a membership
At the organization level, click the Master data icon and navigate to Memberships.
Find and select the membership you want to modify. The Edit Membership page appears.
On the General tab, you can make changes to basic membership information. For instance, you can set the membership as active or inactive. You cannot change the following information on this tab:
Membership Identification
Expiration (Fixed, No Expiry)
Expiry Period (# of months or days)
Payment Type (Payment Frequency, Payment Installments)
Membership expires when credits are consumed
Redemption setting (Limit redemption based on last visit or frequency)
On the Service Credits tab, you can make changes to whether credits can be transferred. This tab appears only if you enable service credits for the membership. You cannot change the following information on this tab:
How often credits should be given? (Full membership period or Payment frequency)
Service Credit Quantity
Wait Time for Next Redemption
On the Service Discounts tab, you can make changes to how service discounts are offered. This tab appears only if you enable service discounts for the membership. You cannot change the following information on this tab:
Discount Type (Percentage or Flat)
On the Product Discounts tab, you can make changes to how product discounts are offered. This tab appears only if you enable product discounts for the membership.
On the Centers tab, you can make changes to center-based customizations applied to the membership. You cannot change the following information on this tab:
Setup fee
Initially Recognized Revenue (IRR)
Monthly Recognized Revenue (MRR)
Service Credit Revenue (SCR)
On the Forms tab, you can modify the list of forms that the customer must fill up to avail the services in the membership.
In the Catalog tab, you can modify how the membership is offered on Webstore and CMA.
On the Social tab, you can update social media information for the membership.
After you have made the changes, click Save.
You can exit the Edit Membership page on any tab.
Points to consider
Versioning of memberships is turned off by default for all new organizations. This does not affect organizations created before January 2020. What this means is if you edit a membership, any changes you make to a membership affect all current members and any new customers who purchase the membership. To learn more, refer to Fields that affect versioning article.
If you want to create a membership that is similar to an existing one, you should consider cloning the membership and making changes to the cloned membership.
You cannot directly add a service to a membership. Instead, memberships can be updated with service credits, enabling members to use the specific service. To update credits, use the Service Credits tab on the Edit Membership page.
Related articles
Manage Family Memberships
Use this article to set up and manage family memberships, including age-based pricing, member-level actions, freeze and restore fees, and relationship-based add-on charges.
Overview
Family memberships extend Zenoti’s add-on membership model and allow you to control pricing and actions at the individual member level while managing them under a single primary membership.
A family membership allows multiple related members, such as spouse and children, to share a membership while maintaining individual pricing, actions, and status.
With family memberships, you can:
Price memberships based on age and relationship using member pricing templates
Freeze, remove, or restore individual members
Apply fees based on how many members are affected
Treat primary and add-on members differently when required
Primary and Add-On Members
Every membership has one primary member
All other members are add-on members
Some actions depend on whether the primary member is selected
Member Pricing Templates
Member pricing templates control:
Age-based pricing
Relationship-based pricing
Freeze, restore, and re-instate fees
How Age-Based Pricing Works
The membership master defines which age buckets are eligible for sale.
The member pricing template defines pricing for those age buckets.
Zenoti applies pricing based on how these two configurations overlap.
Pricing Behavior Rules
If an age bucket exists in the template but not in the membership master, Zenoti does not allow sale for that bucket.
If a member moves into an age bucket not defined in the template, Zenoti keeps the existing price.
Zenoti updates pricing only when the member enters an age bucket explicitly priced in the template.
Example
If a member is priced at $50 for ages 10–20 and turns 20, Zenoti continues charging $50 until the member enters a bucket defined in the template.
Create Member Pricing Templates
To create new member pricing templates, follow the instructions below:
Step 1: Access Member Pricing Templates
At the organization level, go to Configuration > Memberships > Member pricing templates.
Click Add.
Step 2: Configure General Details
On the General tab:
Enter the template name and code.
Select the Add-on member pricing type. Options are Age group, Relationship, and Both.
Enter a description of the template.
Select the Active checkbox to ensure the template is active.
Click Next.
Step 3: Configure fees for primary member
Select the Age category for which you want to specify the fees.
Enter values for all the fees.
Specify the number of lock cycles.
Click Next.
Step 4: Configure fees for add-on members
Set up add-on member pricing based on age
On the Add-on member (Age) tab, specify the fees for add-on members whose pricing is based on age. This tab is applicable only when you select Age group as the Add-on member pricing type on the General tab and age buckets are enabled for your organization.
Select the Documents required for age-group based pricing checkbox to mandate document submission for application of age-based pricing.
Select the Age category for which you want to specify the fees.
Enter values for all the fees.
Note: These values can be overridden at the membership level.
Specify the number of lock cycles.
To consider an add-on member as the primary member when the existing primary member’s membership is frozen or cancelled, select the Consider for primary member checkbox.
Click Next.
Set up add-on member pricing based on relationship
On the Add-on member (Relationship) tab, specify the fees for add-on members whose pricing is based on relationship. This tab is applicable only when you select Relationship as the Add-on member pricing type on the General tab and relationship types are enabled for your organization.
Select the Documents required for relation based pricing checkbox to mandate document submission for application of relation based pricing.
Select the Relationship for which you want to specify the fees.
Enter values for all the fees.
Note: These values can be overridden at the membership level.
Specify the number of lock cycles.
To consider an add-on member as the primary member when the existing primary member’s membership is frozen or cancelled, select the Consider for primary member checkbox.
Click Next.
Step 4: Set up add-on member pricing based on age and relationship
Use the Add-on member (Age and relationship) tab to set up different fees based on member combinations.
Example:
Membership fee for Child: $60
Membership for Father: $100
Membership fee for Child when Father is also included: $50
To set up pricing as indicated above, follow these instructions:
Select Relationship from the Secondary member drop-down list.
From the Secondary member value drop-down list, select Father.
Select Relationship from the Add-on member drop-down list.
From the Add-on member value drop-down list, select Child.
Enter 50 in the Membership fee column.
Click Add.
Click Next.
Step 5: Select applicable centers
On the Centers tab, select the centers to which you want this template to apply.
Click Next.
Step 6: Configure online pricing
On the Catalog tab, select the Add-on member pricing template that determines the pricing guests see when purchasing the membership online.
Click Finish.
Manage members
Add family members to a membership
Open the primary member’s membership.
Click View Details.
Click Add Member.
Search for an existing guest or add a new guest.
Enter member details (name, age, relationship)
Confirm pricing and billing details.
Click Add to add the member as an add-on under the family membership.
Update pricing for add-on members
Open the primary member’s membership.
Click View Details.
To change the fees for an add-on member, click update in the Pricing model column.
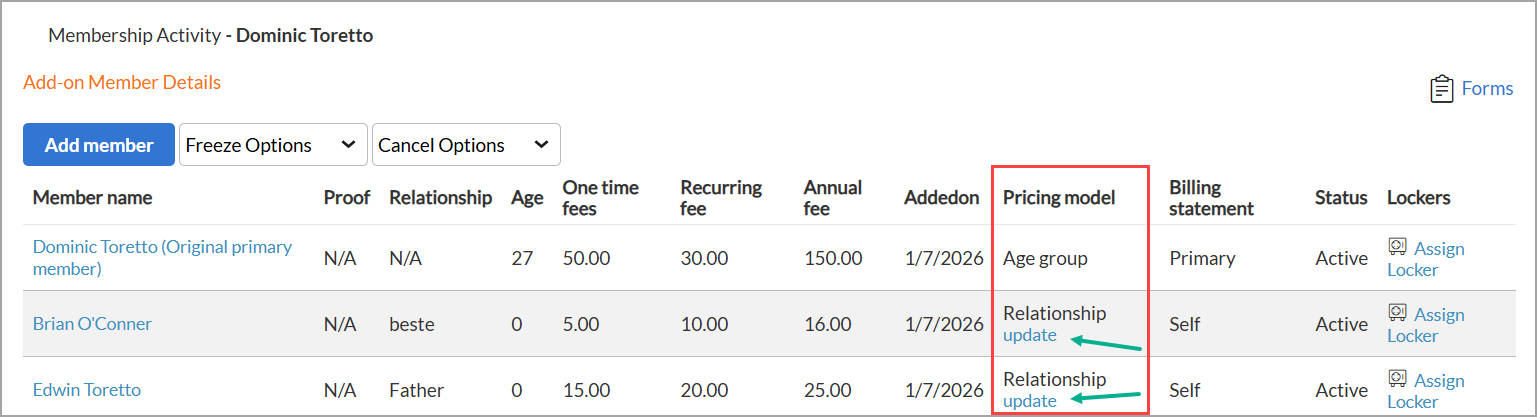
Update the fees as required.
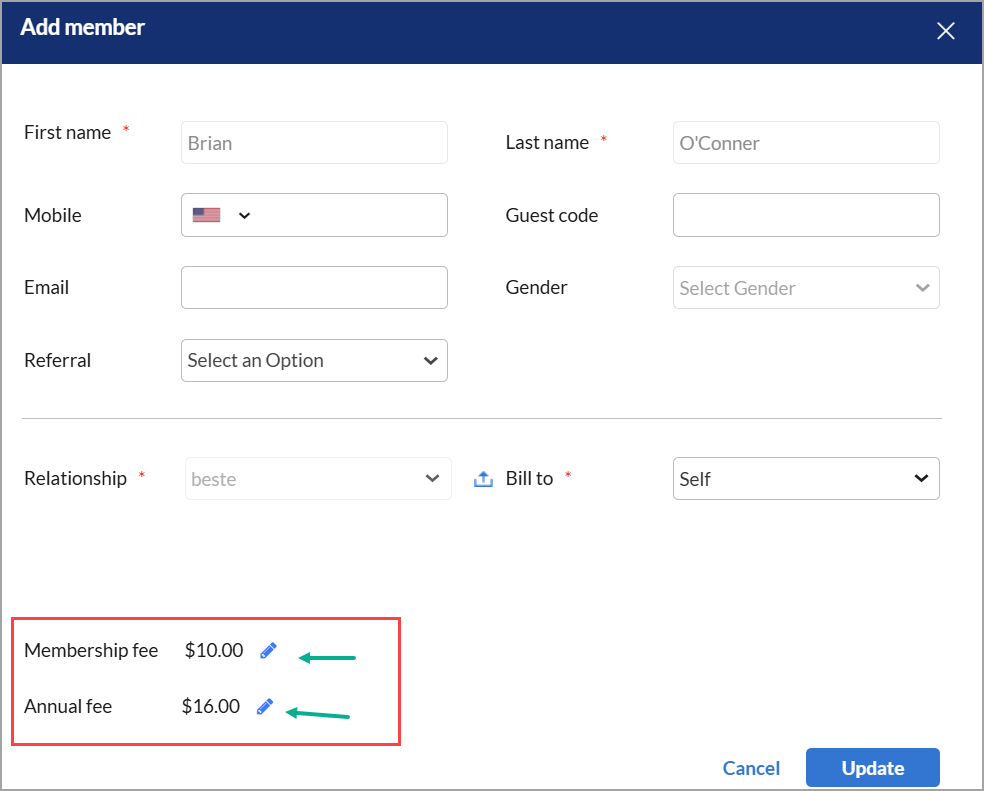
Click Update to save the changes.
Note: These changes are the membership level and do not affect the fees defined in the member pricing template.
Freeze and Unfreeze actions
Open the primary member’s membership.
Click View Details.
You can select from the following options in the Freeze Options drop-down list:
Freeze: Use this option to freeze a member’s membership. If you’re selecting the primary member, select an add-on member who should be treated as the primary member.
Note: If no secondary member is eligible for being a primary member, partial freeze is not allowed.
Edit unfreeze date: Use this option to change the unfreeze date of a member’s membership.
Edit scheduled freeze: Use this option to change the scheduled freeze date of a member’s membership.
Unfreeze: Use this option to unfreeze a member's membership instantly.
Select the required option and click Next.
On the summary window, perform the following actions:
Select the freeze and unfreeze dates
Change fees if necessary
Fill out the associated form
Add comments for reference
Select the new primary member (if you have chosen the current primary member for freeze action)
Review the details and click Proceed to finish.
Cancel and Reinstate actions
Open the primary member’s membership.
Click View Details.
You can select from the following options in the Cancel Options drop-down list:
Cancel: Use this option to cancel a member’s membership. If you’re selecting the primary member, select an add-on member who should be treated as the primary member.
Note: If no secondary member is eligible for being a primary member, partial cancellation is not allowed.
Edit scheduled cancellation: Use this option to change the scheduled cancellation date of a member’s membership.
Remove scheduled cancellation: Use this option to revoke the scheduled cancellation date of a member’s membership.
Revert cancellation before termination: Use this option to revert the cancellation of a member's membership before membership termination.
Reinstate terminated member: Use this option to reinstate a member's terminated membership.
Select the required option and click Next.
On the summary window, perform the following actions:
Select the cancellation and termination dates
Change/waive fees if necessary
Fill out the associated form
Select the cancellation reason
Select the new primary member (if you have chosen the current primary member for freeze action)
Review the details and click Proceed to finish.
Fields that affect versioning
If your organization was created before January 2020 and you make changes to the following fields, it will create a new version of the membership.
Note
Note: If you have opted to have versioning turned off, this does not affect you.
Under the General tab:
Membership Name
Membership Identification
Description
HTML Description
Appointment Category
Active
Expiration
Expiry Period
Freeze Fee
Payment Frequency
Payment Installment
Payment Frequency/Payment Installment
Lock In Period
Membership expires when credits are consumed
# of Members
Add different membership code for secondary member
Redemption Settings - Restrict Redemption to only selected services
Limit redemption based on
Need OTP Authorisation
Transfer of Membership Benefits
Sale Dates
Maximum Credit redemption per invoice
Commission
Commission - Commission Adjustment
Membership discount and benefit services contribute to free service amount
Terms & Conditions
Terms & Conditions Acceptance Message
Under the Benefits tab:
Discount Type
Benefits Period
Service Equality Template
Overall
Selecting or deselecting a center
Sale Price
Setup Fee
Credit Amount
Initially Recognised Revenue
Monthly Recognised Revenue
Service Credit Revenue
Freeze Fee
Set the default order of membership redemptions
This article explains how to configure the default order in which membership benefits (service credits or discounts) are applied to invoices. You can set a universal default across all centers or customize it for each center. This ensures better control and consistency in how benefits are redeemed.
Overview
Zenoti memberships may offer a combination of the following guest benefits:
Credits: Credits in a value higher than the membership price.
Service Credits: Free services that are included as part of the membership.
Discounts: Discount on specific (or all) services.
When guests have both service credits and discounts to use, you can define what should be applied by default to an invoice – service credits or discounts. Also, you can vary the default configurations per center. For example, Center A could apply service credits, while Center B applies discounts by default.
The following are the different default configurations that you can set up.
Apply service credits by default across all centers
At the organization level:
When guests use a service for which they have free credits from any membership, the service credit is automatically applied to the invoice. You cannot remove the service credit and apply discounts to the invoice. If the guest also has membership discounts, you can apply them only after the service credits are used.
Apply service credits by default at selected centers
When guests use a service for which they free credits from any membership, the service credit is automatically applied to the invoice. You cannot remove the service credit and apply discounts to the invoice. If the guest also has membership discounts, you can apply them only after the service credits are used.
Apply discounts by default at selected centers
When guests use a service for which any of their membership discounts apply, the discount is automatically applied to the invoice. If the guest also has service credits and wants to use them, you can remove the discount and apply the service credit.
Note
Once you remove a membership discount from the invoice, you cannot re-apply it.
Manually apply membership benefits to the invoice (no defaults)
When guests use a service for which any of their membership discounts apply, the discount is automatically applied to the invoice. If the guest also has service credits and wants to use them, you can remove the discount and apply the service credit.
Note
Once you remove a membership discount from the invoice, you cannot re-apply it.
Related articles
Transfer service credits
While you can add members to an existing membership, sometimes, guests may like to transfer or gift their membership service credits instead of adding new members to their membership or purchasing a gift card.
To accommodate such transfer requests, you can configure memberships at the organization level to allow the transfer of service credits.
Enable transfer of service credits
You can enable the transfer of service credits for a membership only at the organization level. This step appears only if you have set Membership Benefits to Service Credits or to Both.
You can access these options when creating a membership and when you edit a membership.
In the Service Credits tab, set Allow Service Replacement? to Yes.
From the Service Equality Template list, select the appropriate option. Services implied for the service credits are determined in the service equality template. You can create a new service equality template as an administrator at the organizational level, at Configuration > Memberships> Service equality templates
Tip
From the How often credits should be given? option, define how often service credits should be awarded to the customer.
One-Time: Allows the guests to use their free services and discounts throughout
the period of the membership.
Payment frequency: Guests accumulate benefits with each payment throughout the period of the membership.
Note
Service categories that have services configured are only displayed in the list. If all services configured to a service category are deleted, the respective category is not listed.
Click Save.
Display a membership plan on Webstore and CMA
This article covers the steps and settings required to make membership plans visible on your Webstore and Consumer Mobile App (CMA).
Overview
Zenoti's Webstore and CMA let your guests explore a digital catalog of your services, products, packages, and memberships online. If you want to show some of your membership plans in your mobile app or Webstore, use the settings explained below.
Prerequisites
The mobile application feature must be activated for the center before you can show the memberships in the app.
Configure catalog settings
You can access these settings in the Catalog tab when creating or modifying a membership.
Field | Description |
|---|---|
Show in Catalog | Select this checkbox to show membership in the Webstore and the consumer mobile application of the center. |
Display Name | Enter a display name for this membership in the catalog. |
Display Price | Enter the price of the membership. |
Display Order | Enter a display order from the top for this membership in the list of memberships shown in the catalog. |
Show Price | If you want to show the price of the membership in the catalog, select this checkbox. |
Allow customer to buy this membership | Select this checkbox to allow the visitors to buy the membership online. If you do not select this checkbox, the membership is only shown on the catalog and cannot be bought. |
Youtube Video ID | If you want to show a YouTube video of the membership, enter and Video ID of the video. To know the Youtube Video ID, pay the video in Youtube and look at the URL of the page. You can see a combination of numbers and letters after an equal sign (=) at the end of the URL. This is the ID you need to enter in this field Page |
Page Title | Enter the page title for this membership in the catalog. |
Meta Keywords | Enter the meta keywords for the membership. Meta keywords are a specific type of meta tag that appear in the HTML code of a webpage and help the search engines to understand the topics of the page, and also help it locate the page based on the search keywords. |
Meta Description | Enter a meta description for the membership in the catalog. A meta description is an HTML element that helps the search engines understand your page and show the page for relevant searches. |
HTML Description | Enter a description for the membership for the consumer mobile app and Webstore. Use HTML for rich descriptions and include images. After you enter the description, click the preview icon next to the box to check how it appears on the app or Webstore. |
Related articles
Use membership credits to purchase packages, gift cards, and more
This article explains how members can use their membership credits to purchase prepaid cards, which can then be redeemed to buy packages, gift cards, and more. This functionality offers flexibility to members and simplifies sales through prepaid card redemptions.
Overview
With this feature, members can use accumulated membership credits to buy prepaid cards. These prepaid cards can then be used just like cash to purchase other items including packages and gift cards across eligible centers.
This helps:
Expand how members use their credits
Encourage additional purchases and flexibility
Improve guest satisfaction through better redemption options
Prerequisites
This feature is not available by default. Contact your administrator to enable this at the organization level.
Activate this feature
Specify the membership credit amount that can be used for buying prepaid cards. You can specify this in the membership master:
On the Centers tab of the membership master, click the Credit Amount value for a center.
Enter the credit amount you want to allocate for services, products, and the common credit amount. The common credit amount can be used for services, products, and prepaid cards. Note that there is no specific allocation for prepaid cards.
Click Save.
However if you need to change the values for a certain guest, you can override the allocations on the Memberships tab in the guest profile.
Use this feature
Your members can now use existing membership credits to buy prepaid cards. These cards can then be used to purchase packages, gift cards, and more.
Example: John accrued $75 each month from Jan 01, 2024 to Apr 30, 2024. He now has membership credits worth $300 and wants to buy a package worth $225 using the existing membership credits. He can now buy a prepaid card worth $225 and use the prepaid card to buy the package.
Redeem the allocated membership credit to purchase a prepaid card on the POS. Close the invoice.
On a new invoice, select the item (package or gift card) that you intend to purchase and use the prepaid card you just bought as the payment method.