Regular loyalty program
Enrollment and points accrual
Enrollment
Any guest (existing or new) visiting a center is automatically enrolled into the Regular Loyalty Program (unless specifically restricted to members).
Points accrual
Points are accrued based on the amount spent to avail a service, buy a product, or for performing specific actions, for example, referring a new guest, giving feedback, etc.
Points are accrued when payment is made using cash, card, check, or custom payment. You can configure pre-paid card to award points as well.
Points accrued in a Regular loyalty programs is accrued based on your pre and post-tax settings.
Points are accrued immediately when an invoice is closed.
You can set an expiry for the accrued points.
Points accrual pre-tax and post-tax
For a Regular Loyalty Program and a Tiered Loyalty Program, you can specify if the points must be accrued or redeemed on the pre-tax or the post-tax amount. For more information on how you can configure this option, see Configuring a Regular Loyalty Program and Consider only Closed Invoices section of Configuring a Tiered Loyalty Program.
In a Nutshell
Pre-tax amount
Does not award points on the tax component of the invoice. Meaning, points are awarded only on the payment which is an income to the organization.
It is equivalent to offering a discount to a guest.
This setting is more organization friendly as points are awarded only on the amount spent by the guest towards a service or product and not the total amount.
Post-tax amount
Awards points on the complete invoice including tax. Meaning, points are awarded even on the tax component (not an income to the organization).
It is equivalent to direct payment like cash or check.
This setting is more guest friendly as points are awarded on the total amount spent.
Examples
Below are examples to understand how points are accrued in pre-tax scenario:
Points accrual: Pre-tax
If a guest avails a service worth $300, the tax is 5%, and if the guest is entitled to receive 20 loyalty point for every 100 dollars spent, let us see how points are accrued in a pre-tax scenario:
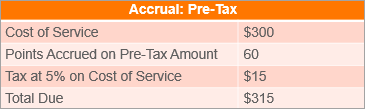
The guest spends $315 in total, but points are accrued on the pre-tax amount of $300.
Points accrual: Post-tax
If a guest avails a service worth $300, the tax is 5%, and if the guest is entitled to receive 20 loyalty point for every 100 dollars spent, let us see how points are accrued in a post-tax scenario:
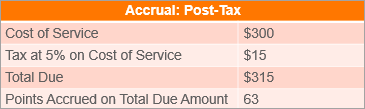
The guest accrues points on the total amount spent. In this case points are accrued on $315 payment.
Points reversal in a regular loyalty program
In a Regular Loyalty program, loyalty points are reversed based on the following:
If an invoice is refunded, the points are not reversed.
If an invoice is reopened, the accrued points for that invoice are reversed. When the reopened invoice is closed, points are accrued based on the new amount spent.
If an invoice is reopened, and if there are no balance points available to reverse (because the guest has already redeemed them), the guest's points balance will turn negative, and any points accrual will be used towards the clearing of the negative balance.
Examples:
1. If a guest avails a service worth $300, makes a payment, and 60 points are awarded. If the organization decides to refund the payment due to any reason (for example, guest is not satisfied with the service), here is what happens to the points:
The awarded points (60 in this case) are not reversed.
2. If a guest buys a product worth $300, makes a payment, and 60 points are awarded. If the guest decides to exchange the product for another product worth $250, here is what happens to the points:
When the invoice is reopened, the points awarded for the invoice (60 in this case) become zero.
When the invoice is closed again, new points are awarded (50 in this case).
Send loyalty points expiry reminder
The Send loyalty points expiry reminder is available when you are configuring a Regular loyalty program or a Tiered loyalty Program.
You can use this setting to specify how many days before the loyalty points expire must the guest receive a reminder that the points are about to expire.
To add a loyalty points expiry reminder, click Add reminder and enter the number of days before the points expiry you want the reminder to be sent.
Example: If you enter 14 in this field, a reminder is sent to all the guests whose loyalty points are set to expire after 14 days.
You can specify as many as 5 expiry reminders to be sent out at configured intervals. To add additional reminders, click Add reminder and enter the number of days.
Note
To configure and send loyalty points expiry reminder, you must be aware of the following:
Unless you click Save when you are configuring a Regular loyalty program or a Tiered loyalty Program, the reminder/s are not saved.
The Email/Text Notification template for Loyalty Points Expiry reminder must be turned on. For information on configuring the reminder, see Configuring Loyalty Points Notifications.
Extend loyalty points expiry date
If a guest requests you to extend the expiry date of the loyalty points accrued in a loyalty program (Regular or Tiered) that have expired or nearing expiry, you can do so from the guest's profile.
Important
To be able to extend the expiry date of loyalty points, you will need the Extend Expiry permission enabled for your role.
Enable the extend expiry permission for a role
By default, the Extend Expiry permission is disabled for all roles (including owners and managers).
At the organization level, click the Configurations icon.
Navigate to Security > Security Roles.
Select the user role.
Note
If you do not see Security Roles while logged in as an owner, contact Zenoti.
Click the Permissions tab.
Expand Guest Manager.
Under the Guests section, select the Extend Expiry checkbox.
The users with the configured role can now extend the expiry date of loyalty points from a guest's profile.
Extend the expiry date of loyalty points from a guest's profile
Access the guest profile.
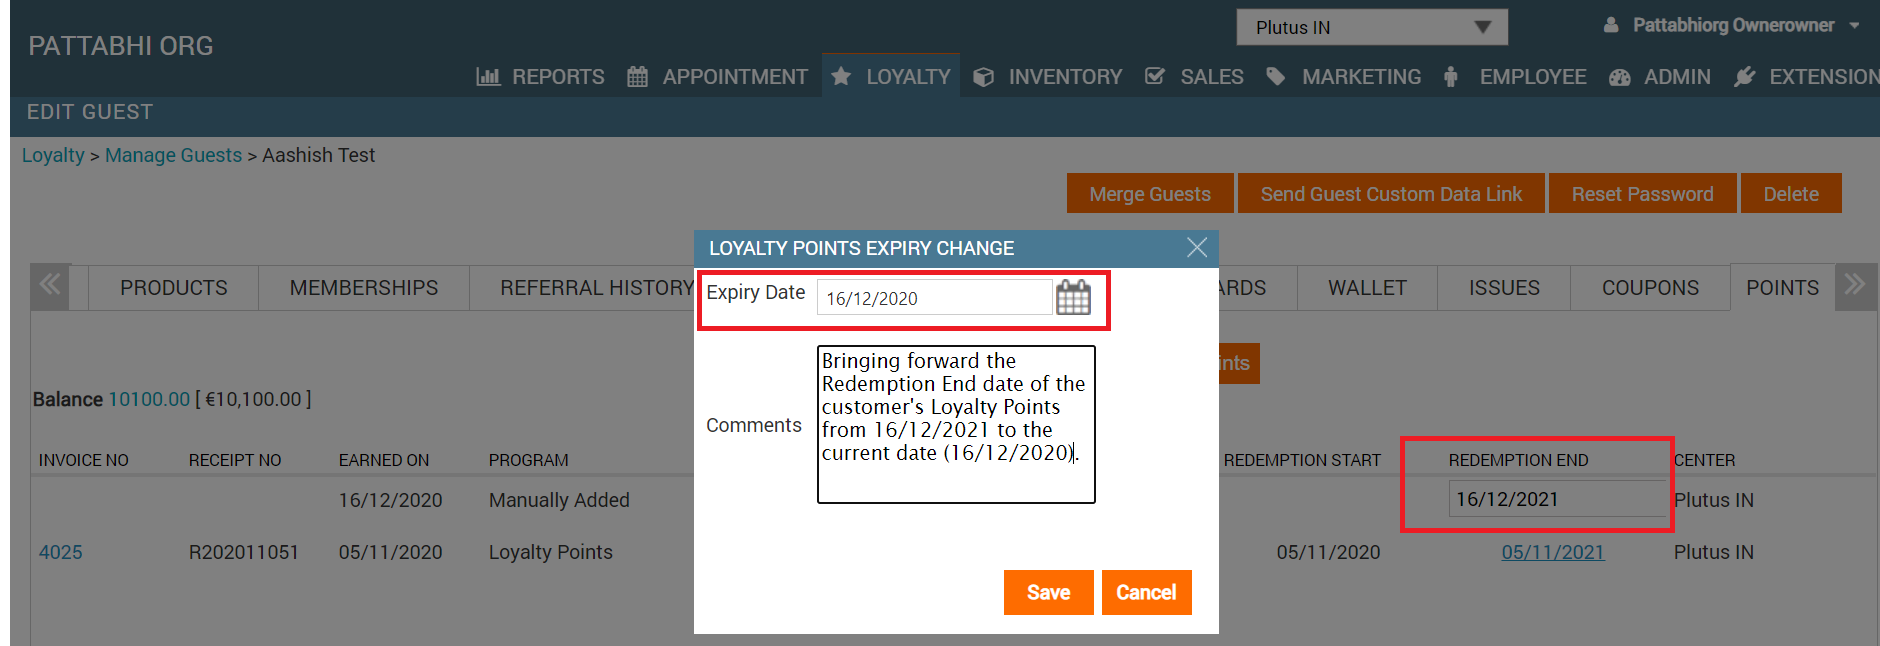
In the guest's profile, click the Points tab.
Locate the loyalty points that the guest wishes to extend the expiry of and click the corresponding Redemption End date.
Note
If you do not see the Redemption End date as an hyperlink, it could mean that you do not have the Extend Expiry permission for your role and you cannot extend the expiry date of loyalty points.

The Loyalty Points Expiry Change pop-up appears.
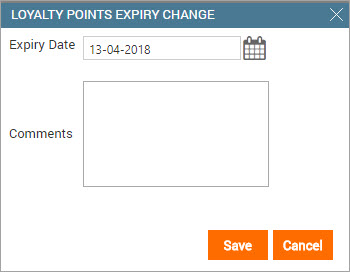
Click the Calendar icon and select a new date for points expiry.
Enter your comments for extending the expiry date and click Save.
The Redemption End date changes indicating that you have successfully extended the expiry date.
Bring forward the expiration date of loyalty points
If you want to expire a guest's loyalty points accrued in a loyalty program (Regular or Tiered), you can do so by bringing forward the loyalty points' expiry date from the guest's profile.
Important
To be able to bring forward the expiry date of loyalty points, you will need the Extend Expiry permission enabled for your role.
Enable the extend expiry permission for a role
By default, the Extend Expiry permission is disabled for all roles (including owners and managers).
At the organization level, as an Administrator or Owner, click the Configurations icon and navigate to Security > Security Roles.
Note
If you do not see Security Roles while signed in as an owner, contact Zenoti.
Click the job role.
Click the Permissions tab.
Expand Guest Manager.
Under the Guests section, select the Extend Expiry check box.
The users with the configured role can now bring forward the expiry date of loyalty points from a guest's profile.
Bring forward the expiry date of loyalty points from a guest's profile
In Zenoti, open the guest's profile details page.
Click the Points tab.
Locate the loyalty points that you want to expire, and then click the corresponding Redemption End date.
The Loyalty Points Expiry Change dialog box appears.
Note
If you do not see the Redemption End date as a hyperlink, it could mean that you do not have the required permissions for your role and you cannot advance the expiry date of loyalty points. Contact your Manager or Owner to grant you the appropriate permissions.
For the Expiry Date field, click the Calendar icon, and then select a new expiration date for the loyalty points.
Type your comments for expiring the guest's loyalty points, and then click Save.
The Redemption End date of the loyalty points is modified, indicating that you have successfully brought forward the expiry date.
Note
You cannot advance the Redemption End Date to a date earlier than the current date.
Expire loyalty points that have an expiry date as never expires
If you want to expire a guest's points accrued in a loyalty program (Regular or Tiered) that have expiry date as Never Expires, you can do so by modifying the loyalty points' expiry date from the guest's profile.
Important
To be able to select an expiry date of Never Expires loyalty points, you will need the Extend Expiry permission enabled for your role.
In this article, you will learn how to:
Enable the extend expiry permission for a role
By default, the Extend Expiry permission is disabled for all roles (including owners and managers).
At the organization level, as an Administrator or Owner, click the
Configuration icon and navigate to Security Roles.
Note
If you do not see Security Roles while signed in as an owner, contact Zenoti.
Click the user role.
Click the Permissions tab.
Expand Guest Manager.
Under the Guests section, select the Extend Expiry check box.
The users with the configured role can now bring forward the expiry date of loyalty points from a guest's profile.
Select an expiry date of never expires loyalty points from a guest's profile
In Zenoti, open the guest's profile details page.
Click the Points tab.
Under the Redemption End column, locate the required Never Expires loyalty points that you want to expire and then click the corresponding Never Expires link.
The Loyalty Points Expiry Change dialog box appears with the current date selected.
For the Expiry Date field, click the Calendar icon, and then select a new expiration date for the loyalty points.
Note
You cannot select the Expiry Date as a date earlier than the current date.

Type your comments for expiring the guest's loyalty points, and then click Save.
The corresponding Redemption End column details of the loyalty points is modified, indicating that you have successfully selected an expiry date for the guest's Never Expires loyalty points.

Loyalty points statement
The Loyalty Points Statement setting is available when you are configuring a Regular loyalty program or a Tiered loyalty program.
This setting allows you to send loyalty points statement to guests by email or text messages on periodic basis.
If you select this option, the following options are made available:
Send statement starting from: Select a date (either today or a date in future), starting which, the loyalty points statement is sent to the guests. Use the Edit loyalty point statement template to make changes to the statement that goes out to your guests. For more information, see Configuring Loyalty Points Notifications.
Statement frequency: Specify the statement frequency in months. After sending out a statement, Zenoti waits for the number of months you specify in this field (between 1 and 12) before sending out another statement.
Example: If you select 1, Zenoti sends out loyalty points statement once every month.
Note
The next statement date is auto calculated and is determined by your entry in the Send statement starting from and Statement frequency fields.
Note
For Loyalty Points Statement you must be aware of the following:
A guest whose loyalty points balance is zero for the entire statement period, does not receive a loyalty points statement.
A guest will receive a loyalty points statement (even if the guest's current loyalty points balance is zero) if the guest has accrued or redeemed points, or if the guest's points have expired during the statement period.
Every guest who is enrolled in a tier receives the statement.
The statement is sent to the guest usually 1-2 hours before your center opens.
For guests to receive Loyalty Points Statements, the Email/Text Notification template for Loyalty Points Statement must be turned on. For information on configuring the notification, see Configuring Loyalty Points Notifications.
Points accrual type for rebooked services
The Points accrual type for rebooked services setting is available when you are configuring a Regular loyalty program.
You can use this setting to reward guests with additional points when they rebook a service.
Note
A guest is considered to have rebooked a service when:
The guest visits a center, avails a service, and the invoice is closed.
The guest makes another booking on the same day (either at the center or online (Webstore or CMA)).
You can select one of the following options:
Flat value: Specify if fixed number of points should be rewarded for rebooking a service in addition to the points the guest accrues for availing the service.
Based on amount spent: Specify if points should be awarded as per the For Amount Spent criteria defined for Rebook a service.
Example for Flat Value:
If a guest rebooks a service worth $100, and the accrual type is Flat value, the points are accrued as follows:
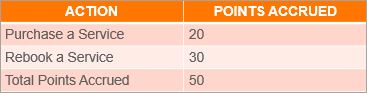
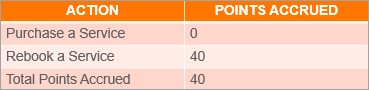
Example for Based on amount spent:
If a guest rebooks a service worth $100, and the accrual type is Based on amount spent, the points are accrued as follows:
Loyalty point accrual on custom payments
You can choose to accrue or award loyalty points to your guests even when they make custom payments. Previously, a guest was awarded loyalty points only when the guest made a payment using credit card, cash, or cheque.
To create a custom payment and enable Loyalty point accrual, perform the following steps:
At the organization level, click the Configuration icon.
Search for and select the Custom Payments from the Payments section.
Click Add on the top right corner.
In the Name field, enter a name for the custom payment.
Select the Award Loyalty Points check box.
Click Save.
You can enable Loyalty Point accrual for an existing custom payment as well by selecting the Award loyalty points check box for the custom payment type.
Accrual settings in regular loyalty program
You can use the Accrual Settings when you are configuring a Regular loyalty program to specify the points to be awarded for any of the pre-defined actions performed by a guest.
Make a note of the following:
You can choose to activate any of the 15 pre-defined actions, performing which, a guest can earn points specified for the action.
You can configure only 8 actions that will result in points getting added to the referrer.
The non-configurable options have NA against the action.
The accrual settings consist of the following four columns:
Action: Has a list of actions that you need to select and activate points accrual.
Points Earned: Enter the points to be awarded for the selected action.
For Amount Spent: Enter an amount to be spent by the guest to receive the number of points specified for the action.
Point to Referrer: Enter the number of points to be awarded to the referrer of a guest for an amount spent by the referred guest.
Note
The referrer of the guest continues to accrue points on actions by the referred guest for perpetuity.
Consider the following screenshot:
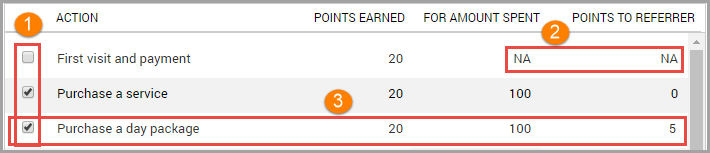
In the above image:
Two out of the three actions have been activated for points accrual.
Fields that have NA are non-configurable. Notice, that you cannot configure Points to Referrer for the first action.
For the third action, the entry means, if a guest spends $100 to purchase a day package, 20 points are awarded to the guest, and the referrer of the guest earns 5 points.
First visit and payment: The guest visits the center, avails a service, makes full payment, and the invoice is closed.
Note
Purchase of service is a must to accrue points on the first visit.
Purchase a service: The guest purchases a service (either at the center or online (Webstore or CMA)), makes full payment, and the invoice is closed.
Purchase a day package: The guest purchases a day package (either at the center or online (Webstore or CMA)), makes full payment, and the invoice is closed.
Rebook a service: The guest rebooks a service, avails the rebooked service, makes full payment, and the invoice is closed.
Note
A guest is considered to have rebooked when:
- The guest visits a center and avails a service, and the invoice is closed.
- The guest makes another booking on the same day (either at the center or online (Webstore or CMA)).
Purchase a product: The guest purchases a product (either at the center or online (Webstore or CMA)), makes full payment, and the invoice is closed.
Purchase a membership: The guest purchases a membership (either at the center or online (Webstore or CMA)), makes full payment, and the invoice is closed.
Purchase a Series and Custom package: The guest purchases a series and custom package (either at the center or online (Webstore or CMA)), makes full payment, and the invoice is closed.
Purchase a gift card: The guest purchases a gift card (either at the center or online (Webstore or CMA)), makes full payment, and the invoice is closed.
Provide feedback: The guest provides feedback, and it is captured in Zenoti.
Note
The feedback can be entered by the guest, front desk, or from an Employee or Customer Mobile Application.
Online – Signup: The guest creates a new account from the Webstore or from the Customer Mobile Application (CMA).
Online - Share feedback with other guests: The guest gives feedback, gives permission to share, and the feedback is reviewed and finally shared by marketing personnel on the organization's Webstore or social platforms (Facebook and Twitter).
Online - Book an appointment: The guest books an appointment from the Webstore or from the CMA, visits the center, takes the service, makes the payment, and the invoice is closed.
Referring a new guest: Award points for referring a new guest. The referrer gets points when the referred guest visits the center, takes a service, makes a purchase, pays in full and the invoice is closed.
Purchase of membership by referred guest: The referred guest purchases a membership (either recurring or non-recurring membership at the center or online (Webstore or CMA)) for the first time, makes full payment, and the invoice is closed.
Note
Points are awarded only the first time the referred guest purchases a membership. On subsequent membership purchases by the referred guest, no points are awarded to the referring guest.
Purchase of series and custom package by referred guest: The referred guest purchases a package (either series or custom at the center or online (Webstore or CMA)) for the first time, makes full payment, and the invoice is closed.
Note
Points are awarded only the first time the referred guest purchases a package. On subsequent package purchases by the referred guest, no points are awarded to the referring guest.
Welcome bonus for members: Award a fixed number of loyalty points (say, 500 points) as a welcome bonus when a member enrolls in a Regular loyalty points program. The points are awarded only when a guest purchases a membership (recurring or non-recurring) for the first time.
Note
a) You can select this option only when the setting, Restrict loyalty points program to members only, is set to Yes.
b) Zenoti does not award bonus points on subsequent membership purchases, while the guest is a member.
c) Rewarding welcome bonus points for members is also supported on Zenoti Mobile iOS and Android.
Manually add loyalty points
Guests are automatically awarded loyalty points for their purchases. In case you need to add loyalty points manually, Zenoti allows you to add them from the guest's profile.
Prerequisites
Role Permissions: To add loyalty points manually for a guest, your front desk or employees should have the Add Loyalty Points role permission.
Learn more: Assign Role Permissions to Manually Add the Loyalty Points.
Reasons: You should create one or more reasons with the type as Loyalty Points Update. These reasons must be used by your front desk or employee when they are manually adding the loyalty points to your guests.
Learn more: Create Reasons.
After you configure the above settings, your employees can add loyalty points to guests under the Regular Loyalty Program, as well as the Tiered Loyalty Program.
Manually add loyalty points for a guest
To add points to guests under any loyalty program, do the following:
At the center level, click the Guests icon.
Navigate to Manage Guests > Guest Name.
The guest profile opens.
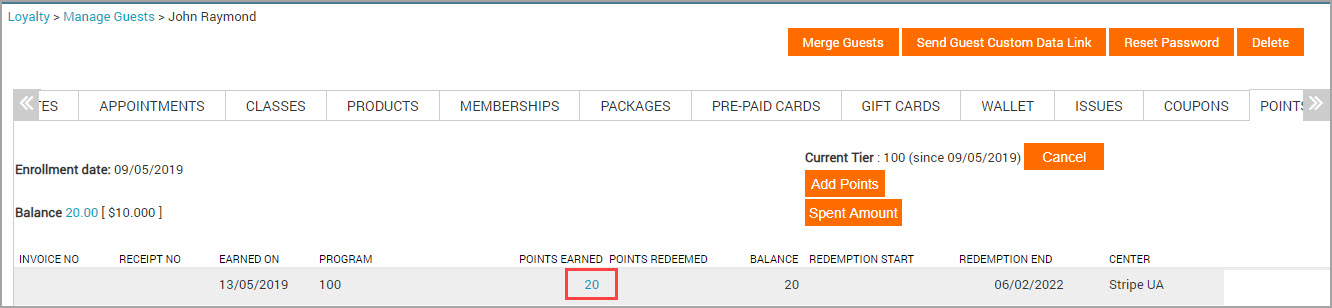
Click the Points tab.
The Points tab opens.

Click Add Points.
Note
Add Points appears only to those users who have the role permission enabled. The information on this page depends upon the loyalty program (Regular or Tiered).
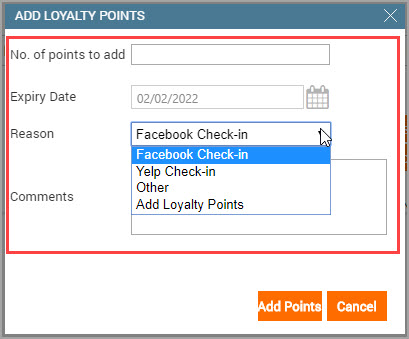
Add Loyalty Points pop-up opens.
Regular Loyalty Program
Tiered Loyalty Program
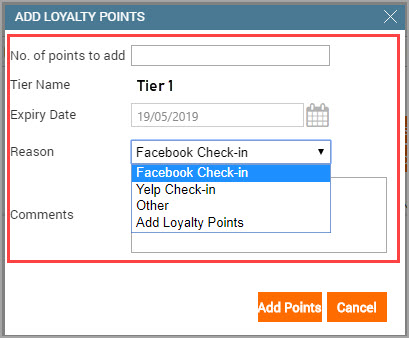
Complete the following fields:
No. of Points to Add: Enter the number of points that you want to add to your guest.
Tier Name: This appears only for guests under the tiered loyalty program. The name of the tier is auto-populated.
Expiry Date: The expiry date, by default, is set as per your loyalty points configuration settings (for regular loyalty program) or tier settings.
Reason: Select the appropriate reason.
Comments: Enter the comments stating the reason for manually adding the loyalty points.
Click Add Points.
The loyalty points are added to your guest.
Things to know:
When your front desk adds the loyalty points, the accrual messages are not sent to the guest, but Zenoti updates the loyalty points balance.
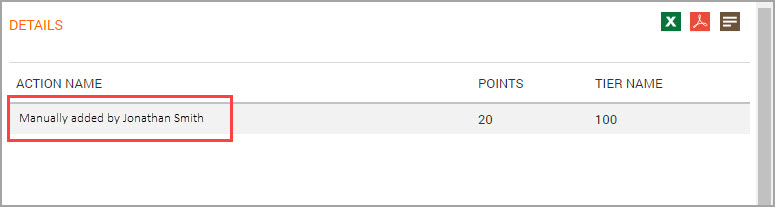
Click the loyalty points to open a pop-up, which shows the name of the employee who added the loyalty points.
The following loyalty points reports are affected:
a) Balance as on date
b) Balance as on date by guest
c) Expirations
d) Redemptions
e) Referred Points
f) Sales
Loyalty Program Reports show these points under the column Program Name. If you manually add points for a regular loyalty promotion, the program name will be Manually Added. If you manually add points for a tiered loyalty promotion, the program name will be the name of the tier.
The loyalty points are visible only in the center from which the employee is logged in. For example, If an employee adds loyalty points from center A, then the points are added to the guest profile in Center A. The guest’s base center is not considered.
You can manually add the points only from the center level.
Role Permission for Employees to Add Loyalty Points
To allow your employees to manually add the loyalty points to your guests, you need to give them Add Loyalty Points role permission.
At the organization level, click the Configuration icon.
Navigate to Security > Security Roles.
Click on the required role name.
Click the Permissions tab and expand Guest Manager.
Select the Add Loyalty Points check box.
Click Save.
The user now has the required permissions to manually add loyalty points.
Manually remove loyalty points for a guest
There may be instances where it becomes necessary to remove the loyalty points due to expiry or other reasons. You can efficiently handle the removal of loyalty points from guest profiles in the following ways:
Remove points on expiry date
At the center level, click the Guests icon.
Navigate to Manage Guests > Guest Name.
Navigate to the Points tab.
Click Add/Remove Points.
Only users with the role permission enabled can access Add/Remove Points
To specify the number of points to be removed from the guest profile, in the No. of points field enter the value.
To remove points on the same day as the Redemption End date on which the points are earned, from Type select the On expiry date option.
To choose the date for when the points should be removed from the guest, from the Expiry Date calendar select the date.
Points will be deducted on the chosen expiry date only if any of the guest's points are set to expire on that date.
For example, let's say a guest has a current balance of 100 loyalty points. 30 points have the Redemption End date of 25th April and 70 points have the Redemption date of 30th April.
If you enter 30 in the No. of points and set the Expiry Date to 25th April, 30 points will be deducted on 25th and the balance will be 70.
If you enter 30 in the No. of points and set the Expiry Date to 26th April, no points will be available for deduction as 30 points expired on the 25th and the next expiration is on 30th April.
To specify points deduction, select an appropriate option from the Reason drop-down list.
To provide additional context, enter a message in Comments.
Click OK.
If the values in the No. of points and Expiry date field do not match the balance on the specified redemption end date then you see the "Points to be reduced cannot be greater than the existing balance. The balance check happens on the selected expiry date, there are no balance points on the selected date. To remove points, expiry date should be the same as the earned record redemption end date" message.
Remove points closest to expiry date
At the center level, click the Guests icon.
Navigate to Manage Guests > Guest Name.
Navigate to the Points tab.
Click Add/Remove Points.
Add/Remove Points is only available to those users who have the role permission enabled.
To specify the number of points to be removed from the guest profile, in the No. of points field enter the value.
To remove points closest to expiry, from Type select the Remove from closest to expiry option.
Points will be deducted in order of expiry with the points closest to their expiration date deducted first. Then, points will be deducted from the lot with the next closest expiry date.
To specify points deduction, select an appropriate option from the Reason drop-down list.
To provide additional context, enter a message in Comments.
Click OK.
If the criteria to remove loyalty points do not match then you see the "Points to be reduced cannot be greater than the existing balance. The balance check happens on the selected expiry date, there are no balance points on the selected date. To remove points, expiry date should be the same as the earned record redemption end date" message.