FAQ and Troubleshooting
If an employee works in 2 centers and they have a role to change the payment type in one of the centers and not in the other, can they modify the payment type?
The employee can modify the payment type in any invoice belonging to the center in which they have role permission. In the other center where they do not have role permission, they can modify payment type in open and reopened invoices only.
If an employee opens the appointment book in multiple tabs and changes the center in one tab, what happens?
When an employee opens the appointment book in multiple tabs or windows of the same browser and changes the center in one of them, the system detects the change and automatically refreshes the other tabs to reflect the updated center. For example, if both tabs are initially set to center A and the employee switches the second tab to center B, the first tab will display the message: You have changed centers. This tab will refresh to reflect the change. The tab then reloads and switches to center B, ensuring both tabs remain in sync and preventing any booking inconsistencies.
Hide daily financial summary in Appointment Book
Some businesses do not want the daily financial information visible to their employees, such as the value of services provided and the number of guests.
To hide the daily financial summary, you have to disable the permission setting that controls the visibility of the appointment book footer.
At the organization level, click the Configurations icon.
Navigate to Security > Security Roles .>> Select a role > Appointments.
Select the desired role.
Go to the Permissions tab.
Expand the Appointment Book section.
Clear the Appointment Financial (Footer) setting.

Click Save.
The employees with the above permission cleared cannot view the daily financial summary at the bottom of the appointment book.
Not able to reopen, edit, or delete an old invoice
Edits, deletes, or any form of changes made to past invoices can cause data discrepancies that could lead to inaccurate financial reporting. To prevent this, Zenoti restricts the ability to makes changes to past financial data.
In this article, you will learn about the different known issues and workarounds that you can follow if you are not able to reopen, edit, or delete an invoice.
You cannot reopen an invoice if:
It has a package sale and package redemption.
It has a membership sale and membership redemption.
It has a gift card sale and gift card redemption.
It has a gift card sale and gift card redemption.
It has been refunded.
It has a membership for which the customer has accepted the terms and conditions.
It has an appointment marked as redo.
It has a financial lock.
You do not have the necessary permissions to reopen an invoice.
Workarounds for common invoice related queries
Query | Workaround |
Not able to reopen an invoice with a gift card redemption | Undo the gift card redemption. |
Not able to reopen an invoice with a package redemption | Undo the package redemption. |
Not able to reopen an invoice with a membership redemption. | Undo the membership redemption. |
Not able to reopen an invoice if there is a 90 days financial lock | |
Not able to delete or close an invoice beyond 90 days | Add a non-monetary custom payment to the invoice, close the invoice, and refund it. This way, the positive and negative transactions will nullify and not show up on your collections. |
You have the option to disable the 90 days lock period. However, there are implications to opting for this option.
How to check the current day’s open invoices and close the register?
If your business is set up to prevent register closure when there are open invoices, you must close all open invoices before you can close the register.
If you were able to close the register yesterday, then follow the steps in this article to identify and close any open invoices for the current day.
However, if it’s been a few days since you last closed the register, then you may have open invoices before today.
Find today’s open invoices
Open Appointment Book.
Click the three vertical ellipses icon to open the context menu.
Click Today’s Sales.
From the Status list, select Open.
To view a list of open invoices, click OK.
To open an invoice, click Show.
To close an invoice, collect payment and click Close Invoice.
Impacts and considerations
If there is a lock icon next to the invoice number, you must have permission to unlock an invoice. To enable the required permissions, contact your store owner or manager.
Close register
On Appointment Book, click the three vertical ellipses icon on the right-most corner.
To close the register, click Close Payments.
You can close the register directly from the redesigned Appointment Book after reconciling the day’s collections. You can close the register directly from the redesigned Appointment Book after reconciling the day’s collections. If your business blocks register closure with open invoices, you must close those invoices first. If your business blocks register closure with open invoices, you must close those invoices first.
How to close the register
In the redesigned Appointment Book, click Manage Register from the right pane.
Click Open Register and select the register (if multiple registers exist).
Click Close Payments.
Verify the Closing balance and click Close register.
If you see an alert about open invoices, click View open invoices blocking register closure and close them. You can also view open invoices using Manage cash register > View invoices affecting register closure.
If your business enabled Enable automatic register closure, the register closes automatically when transactions exist.
To learn more about register management, refer to the New Register Management article.
Rectify an invoice payment where the front desk staff added an incorrect cash transaction
Required permissions: Appointment Book > PaymentTypeChange, View Invoice Logs, DeletePostDataEntry, Edit Post Invoice Closure
To correct an incorrect payment transaction in Zenoti, follow the below steps.
Unlock the invoice
Navigate to the specific invoice and unlock it to allow changes to the payment method. If the invoice is under financial lock, you won't be able to unlock it. For more information, refer to manage invoices.
Delete the incorrect payment
Once the invoice is unlocked, delete the incorrect payment. Ensure you have the required permissions to delete payments. For more information, refer to reopen, edit, or delete an old invoice.
Re-record the correct transaction
After deleting the incorrect payment, re-enter the payment using the correct method (e.g., cash, credit card, debit card, etc.) from the POS.
Impacts and considerations
If the invoice is under financial lock and you cannot unlock it, contact the administrator or finance team for assistance. For more information, refer to secure your financial and inventory data.
Ensure you have the required permissions to perform these actions. Typically, permissions related to managing invoices and payments are controlled by user roles and settings in Zenoti. Consult your manager to verify and adjust your permissions if needed.
How to create overlapping blockouts for the same employee?
There are times when the front desk staff will have to overlap/double-book two block-outs for an employee on the Appointment Book.
Example: When there is a monthly therapist meeting that requires specific employees to be in attendance, the front desk staff will then overlap blockouts for therapists who cannot attend to guests during the blocked meeting time.
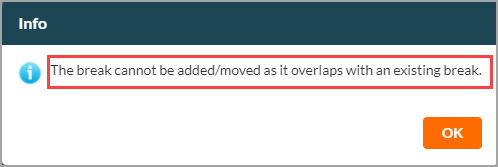
However, if Double Booking is set to warn, the system will trigger a warning dialog box when you try to double-book two block-outs with the same start and end time for an employee.
Workaround
To assist the process of double-booking block-out time for an employee without the system throwing an error, you will have to create two block-outs with different start and end times and then drag and drop the second blockout to the first blockout.
Example: Jess is a therapist at your salon. She is not available for appointments between 10:00 am to 10:15 am because of a mandatory staff meeting. You have to create two overlapping blockouts for her from 10:00 am to 10:15 am.
To overlap two blockouts
Open Appointment Book.
Ensure you are in the Therapist's view of the Appointment Book.
Locate the service provider on the left panel under Therapists.
To create a blockout from 10:00 AM to 10:15 AM, click and drag across the selected time period.
The Block Out Time window opens.
You can update the blockout details and click Save.
To create a blockout from 10:30 AM to 11:00 AM, repeat the previous two steps.
To overlap the two blockouts, drag and drop the 10:30 AM blockout to 10:00 AM blockout.
To set the end time, reduce the time for 10:30 AM blockout by 15 minutes.
Now you have two overlapping blackouts for Jess with the same start and end time.
How to find out which register an invoice belongs to?
To find out which register an invoice belongs to
Navigate to Reports > Financial > Collections.
Select the Collections by Transactions report.
Locate the Cash Register column.
This column lists the name of the register where the invoice was closed.
Which roles can see Appointment Book by default?
The following roles can view the Appointment Book by default:
Receptionist, Manager, Owner
These roles have the Add, Edit, and View Appointment Book permissions.
Note
The Therapist role does not have access to Appointment Book by default. An administrator or owner must turn on the Edit Appointment Book permission for Therapists to access Appointment Book.
How to find and close a particular guest's open invoices?
To find and close a particular guest's open invoices
Go to the Open tab.
This tab lists all the open invoices for that particular guest.
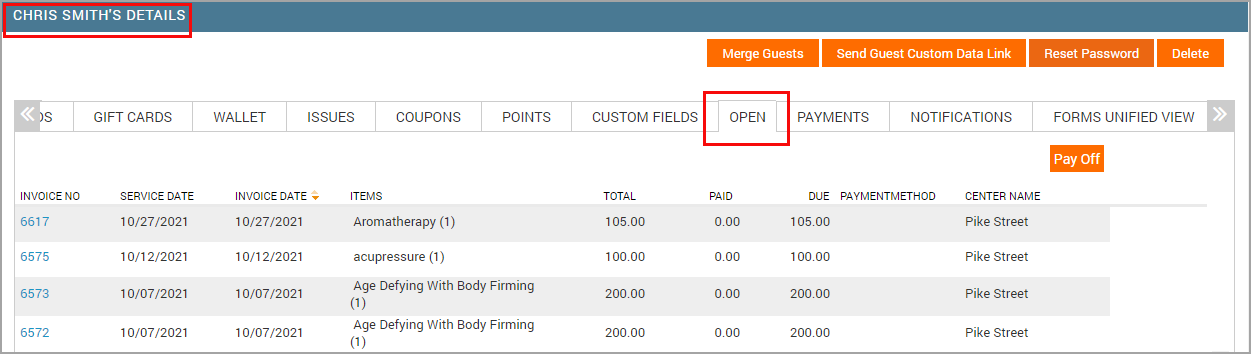
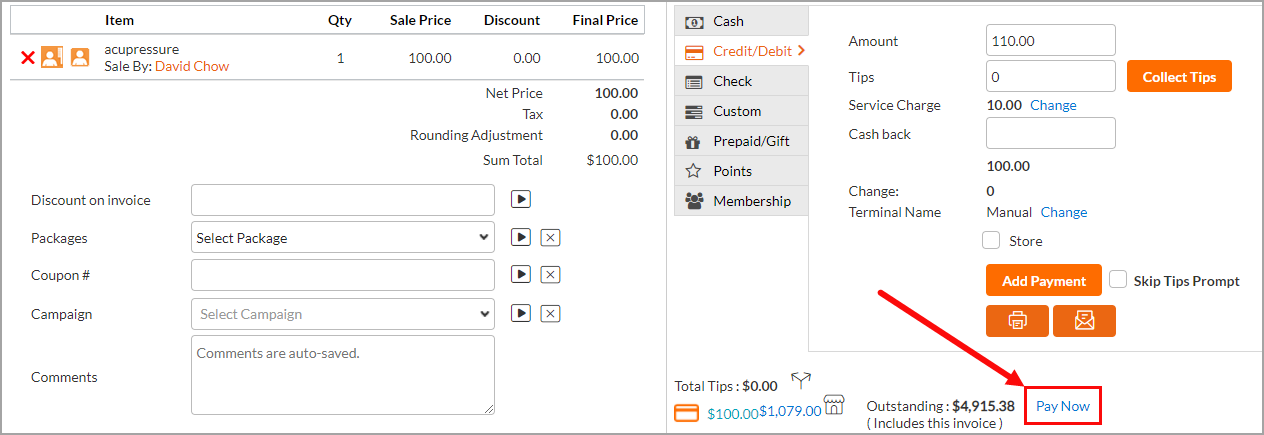
Click the appropriate invoice number.
Click Pay Now link and collect payment as you normally do.
Click Close invoice.
This invoice will no longer appear under the Open tab in the Guest Profile.
Hide guests' contact information from providers
Some businesses prefer to hide the contact information of guests from the service providers. To restrict the access of service providers or other employees from viewing guest details on the appointment book, you can alter the following setting on Zenoti Web:
Disable Access to Appointment Book on Desktop
Note
To hide guest details on both Zenoti Mobile and desktop, a combination of both settings will restrict the visibility of guest information on the platforms.
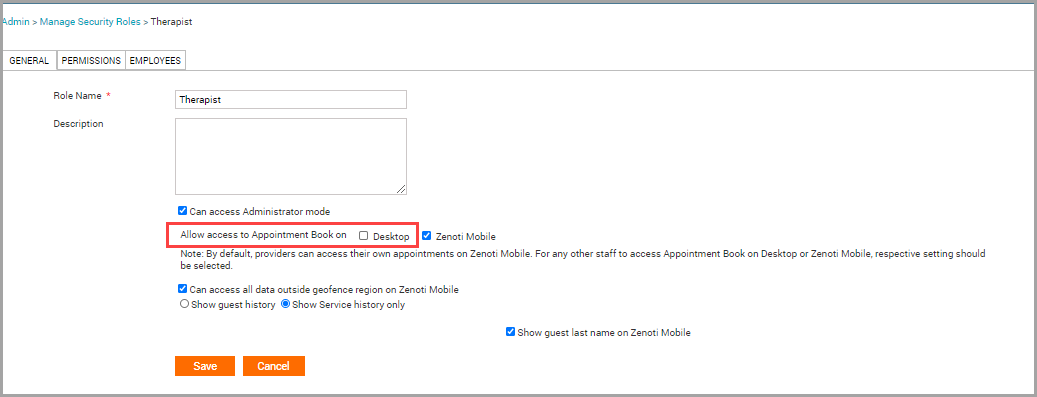
Disable Access to Appointment Book on Desktop
This permission allows you to restrict the service providers from accessing the guest information from the appointment book on the desktop.
Ensure you are at the organization level.
Navigate to Configurations > Security > Security Roles > Manage Security Roles.
Select the security role for which you want to change the setting (In this case, a therapist).
On the General tab, locate the Allow access to Appointment Book on setting.
Clear the Desktop checkbox, as shown in the image below.
Click Save.
Impact of Restricting Access to the Appointment Book on Desktop
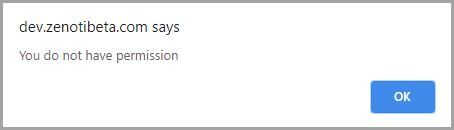
After restricting access to the appointment book on the desktop, service providers will not have permission to open the appointment book. If they try to access the appointment book, the following error message will appear:
Some activities the service providers won’t be able to perform after disabling their access to the appointment book:
View the appointment calendar
Book and manage appointments
Manage payments
Collect Payments
Manage invoices
Process refunds
Management guests
Close register
Manage notifications
Important
There will be an impact of this setting on the Zenoti Mobile app.
How do I search for No-Show appointments and close them?
In Zenoti, select the required center.
On the main menu, click the Appointment or Queue tab.
The Appointment Book screen opens, displaying the appointments of the current date by default.
Note
To search for No-Show appointments for a particular date in the past, use the calendar control in Appointment Book to select the required date.
Click any blank space on Appointment Book.
A context menu appears.
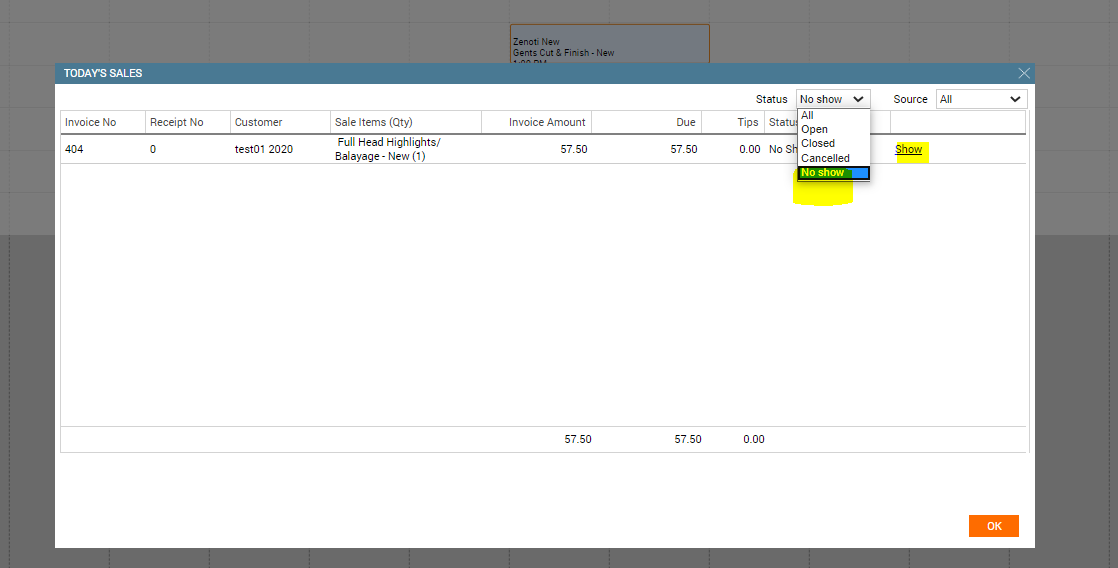
Click Today's Sales.
The Today's Sales dialog box appears, displaying the appointments of the selected date.
Click the Status list box, and then select No show.
The selected date's No-Show appointments appear.
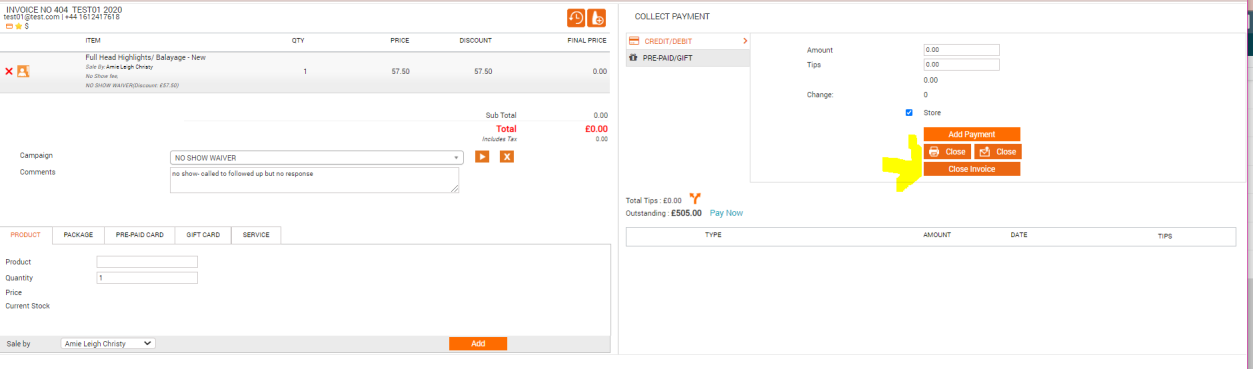
For the required No-Show appointment, click the Show link to view the invoice.
The No Show Fee invoice opens.
Note
For all No-Show appointments, Zenoti automatically creates an invoice to charge the No-Show fee from the guest.
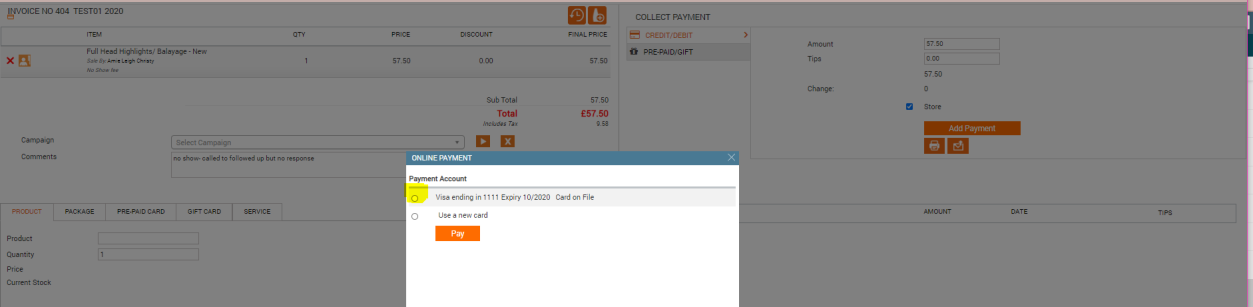
To charge the No-Show fee from the guest, click the Credit/Debit tab.
Use the saved card details of the guest or use a new card to collect payment for the No-Show fee, and then click Close Invoice.
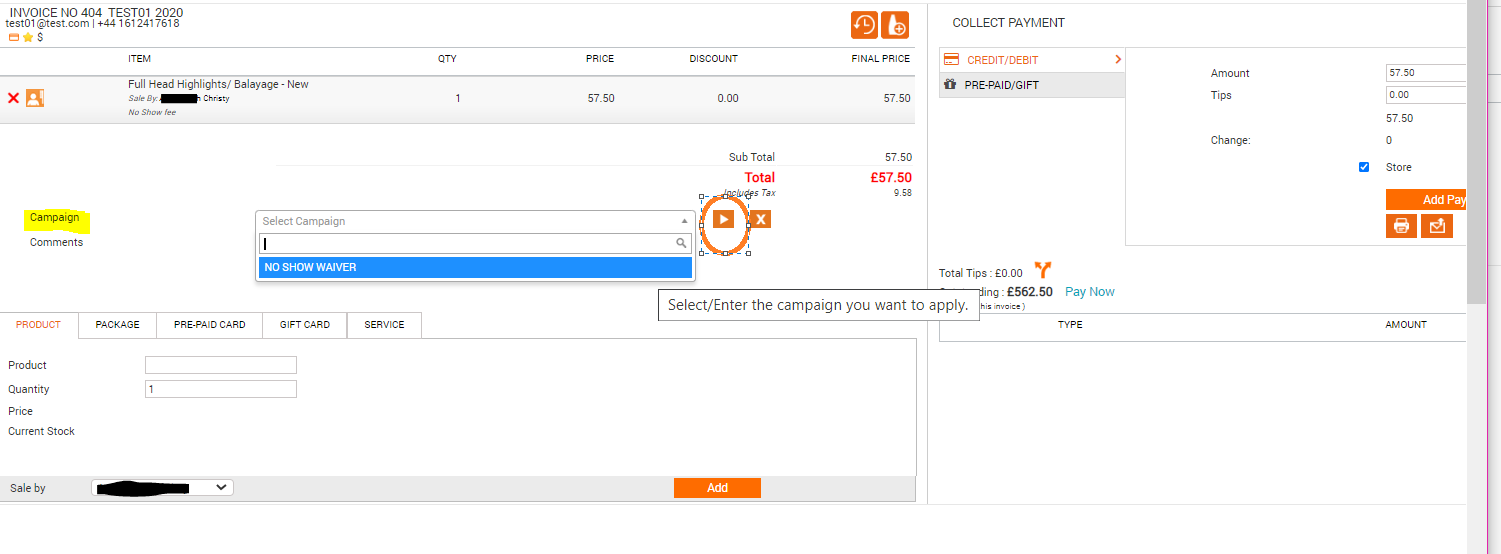
To waive the No-Show fee for the guest, click the Campaign list box and then select No Show Waiver.
Click the Apply Campaign icon, and then click Close Invoice.
Change the name of the sales person
Employees earn commission on sale of items such as a service, product, package, or membership. If the name of the salesperson in the 'Sale by' field is wrong, you must correct it to ensure employees get the accurate commissions.
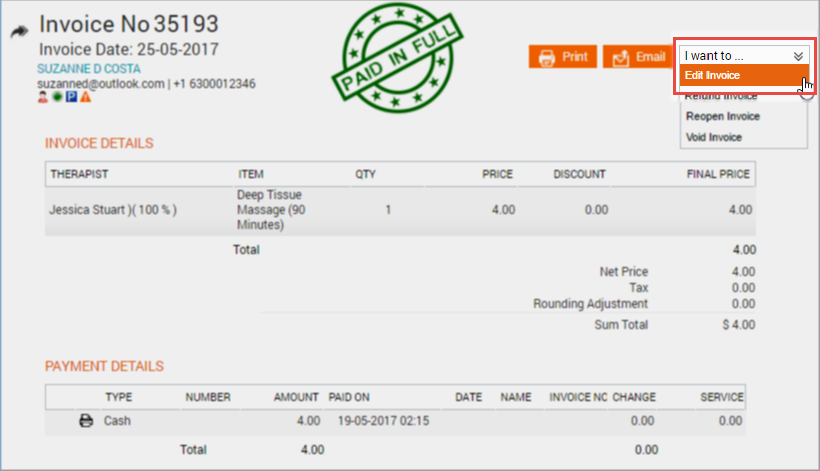
If you have already collected payment and closed the invoice, you can still edit the name of the person who made the sale.
In the I want to field, select Edit Invoice.

The edit page appears.
Click Sold By list and select the employee name.
Click Save.
I'm unable to move an appointment or a block out time
If you are unable to drag and drop an appointment or a block out time, check for the following:
Check if the zoom on the browser is more than 100%.
If the browser zoom is more than 100%, reset the zoom to 100% and try to move the appointment or the block out time.
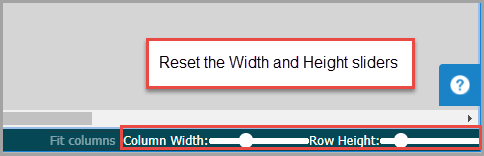
Check the column width and row heights in the Appointment Book.
Sometimes, if you have increased the appointment width and height in the Appointment Book, you might be unable to move an appointment or block out time.
Reset the Height and Width sliders by dragging them to the left and try to move the appointment or the block out time.
How to create a recurring block out time?
A block out time is basically 'busy time' when a provider is unavailable - the provider may be away for a number of reasons such as lunch, training, or break. Front-desk staff uses Block Out Time Types to show providers' unavailability on the Appointment Book.
In many cases, block out times may recur or repeat. For example, a provider may usually take a lunch break from 12.30 pm to 1 pm or a snack break from 4 pm to 5 pm. Front-desk staff can mark such repetitive breaks or block out times easily.
Click and drag your mouse across a time period against a provider on the Appointment Book.
The Block Out Time window appears.
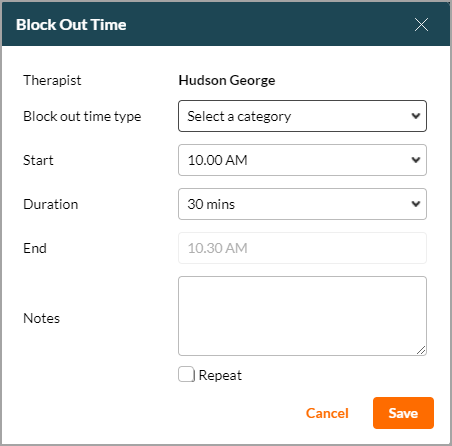
Select a Block Out Time Type such as Lunch. 3. Select Start time to specify when the Block Out Time should start.
Select Start time to specify when the Block Out Time should start.
Select the Duration for the Block Out Time. Zenoti automatically updates the End time based on the Duration you enter.
Enter Notes, if any.
The notes you enter appear in a small pop-up box when you hover your mouse on the block in the Appointment Book.
Select Repeat to repeat the Block Out Time.
Zenoti presents more options for you to set a schedule such that the Block Out Time repeats on a Daily, Weekly, Monthly, or Yearly basis. You can also specify when you want to start scheduling these repeated Block Out Time slots.
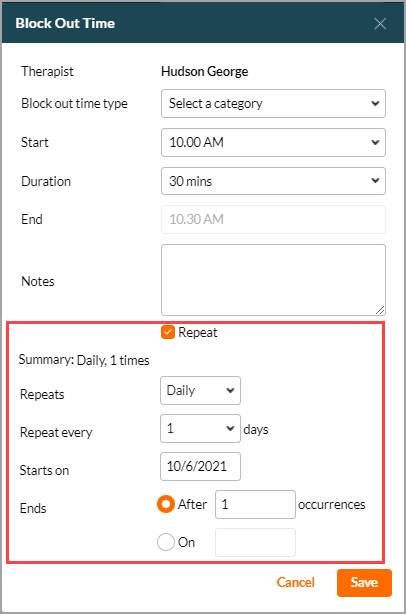
Click Save.
Zenoti saves the repeating block out time for the provider.
What do the different symbols in the Appointment Book mean?
To understand the meaning of the different symbols in the Appointment Book, click the information icon ( i ) at the top-right corner. This opens up the Help panel that describes what each symbol indicates.

Why is the appointment status in red?
Zenoti uses different colors to indicate different appointment statuses to allow front desk to effectively manage and track appointments and follow the due procedures.
An appointment status is red if you have missed adding one or more of the following for an appointment:
Guest's feedback: If your organization requires you to enter the guest's feedback after an appointment, and if you have not captured it for the appointment, the appointment status shows red.
Recommended Action: Enter the guest's feedback.
Educator rating: The employees you have marked as educators have not provided their rating for the service provider of the appointment.
Recommended Action: An educator must enter the rating.
Service custom data: If the appointment has mandatory custom services fields that are not filled, the appointment status shows red.
Recommended Action: Enter the required data in the custom service fields.
Product consumption: If a service requires you to enter the product consumption manually, and if you have not added the product consumption for the appointment, the appointment status shows red.
Recommended Action: Click the appointment, click Add Consumed Products, and add the product consumption details.

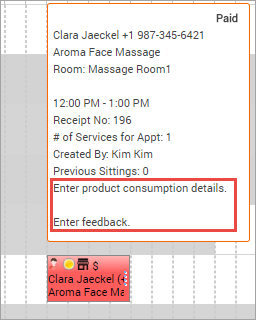
How do I know what caused the appointment status to turn red?
To know why the appointment status turned red, hover the mouse over the appointment.
In the appointment details pop-up, you will see one or more reasons (explained in the above section) why the appointment status shows red.
For example, the appointment status in the image below is red as the product consumption details and the guest feedback have not been entered.
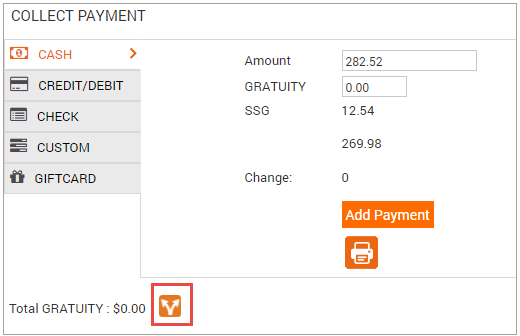
Can I split tips among therapists?
Yes. If your administrator has enabled the Allow splitting of Tips setting you can split tips among providers.
To split tips among providers, click the Split Tips icon on the Point of Sale (POS) window while collecting payment.
Note
If the setting 'Allow Splitting of Tips' is on: When this setting is on, Zenoti splits the tips between service providers (for invoices that have at least one service). If an invoice has only sale of items such as products, packages, and memberships then, the front desk must split the tips before closing the invoice (between employees named in the Sale By field of the invoice).
If the setting 'Allow Splitting of Tips' is off: When this setting is off, Zenoti apportions the tips to the employees named in the Sale By field of the invoice for various items (such as services, packages, memberships).
Can I collect multiple tips using a single credit card if I have an integrating payment processing set up?
No. If you have an integrating payment processing set up for your organization, Zenoti does not allow you to use the same credit card for collecting multiple tip amounts. However, as a workaround, you can:
Create a group appointment.
Collect the payment for the services and tips.
Split the tips between the therapists using the Split Tips option.
How to add or edit a center's VAT number?
At the center level, click the Configurations icon.
Navigate to Centers.
Select the center name.
On the General tab, navigate to the VAT # field and enter the number.
Click Save.
Modify services
Delete the payment methods added for the services by clicking the red cross icon against each payment method (if more than one).
Delete the service you want to remove from the invoice by clicking the red cross icon against it.
To add a service, click the Service tab, select the service, therapist, and then click Add Service.
Repeat for each service you want to add to the invoice.
Guests didn't receive appointment reminder notifications
An appointment reminder notification is triggered based on the time defined in your organization's setting.
For example, suppose your organization has been set to trigger an appointment reminder notification for appointments booked 1000 minutes before the appointment time. In that case, appointments booked within 1000 minutes of the appointment time will not trigger a reminder notification.
Why don’t employees appear in the Appointment Book?
Employees may not appear in the Appointment Book due to missing roles, unsaved schedules, or incorrect start dates. Here’s how to fix it.
Check the provider role:
Employees must have a provider role, such as Therapist or Practitioner, to appear in the Appointment Book.
At the center level, navigate to Employee> Employees.
Select the employee’s name.
Open the Employee Roles tab.
Add the correct provider role.
Save and verify their visibility.
Add employees to the schedule:
Employees without schedules won’t appear in the Appointment Book:
At the center level, navigate to Employee> Schedule at the center level.
Select the employee.
Set their shift times, status, and room if needed.
Save the schedule.
Verify the start date:
If the employee’s start date is in the future, they won’t appear on schedules.
At the center level, navigate to Employee> Schedule at the center level.
Check the Start Date field.
Update it if needed.
Save and refresh the Appointment Book.
Resolve conflicting roles:
If the employee still doesn’t appear, check for conflicting roles.
Review all roles in the employee’s profile.
Remove or adjust conflicting ones.
Ensure the correct provider role remains.
Save and confirm visibility.
Can I move an appointment if a discount, membership redemption, or campaign is applied to its invoice?
No. To move such an appointment, you must first manually remove any discount, membership redemption, or campaign applied to its invoice, and then move the appointment to another date.
Once you move the appointment, reapply the discounts, memberships, or campaigns.
How to print membership balance without taxes on receipts?
Clear the Balance with tax included checkbox in the POS configuration.
How is the tips percentage calculated?
When you configure a tips percentage for your center, Zenoti calculates it only on the total undiscounted service price of the invoice before taxes. The tips percentage does not apply to any retail items (such as products) in the invoice.
Example:
Consider that you have configured the tips percentage for your center at 20%.
Consider that you are collecting payment from a guest whose invoice includes the following:
- A Spa Manicure service priced at $14 (Plus Tax: $1.26, Discount: $2)
- A Spa Pedicure service priced at $16 (Plus Tax: $1.44, Discount: $2)
- An Anti-Dandruff Serum (product) priced at $22.32
Based on the above scenario, the Tip field in the Point of Sale window displays $6 as the tip amount.
Calculation: 20% of $30 (total actual service price, excluding taxes and discounts)
The tips calculation does not consider the product sale.
Why is an appointment missing product consumption details even when services have been set up to automatically track product consumption?
The appointment was probably created before associating products to the services. Hence, the product consumption is not tracked against the appointment.
Delete and rebook the services in the appointment to track product consumption.
Delete an invoice
Caution
Although Zenoti provides the functionality for deleting invoices, it recommends that you do not do it. You can void an invoice instead of deleting it.
To delete a closed invoice, you must first reopen it. Follow the below steps to reopen and delete a closed invoice:
Important
You can reopen and delete refunded invoices for any payment type except when payment is made using a card.
The Point of Sale window opens the invoice.
Delete all payments added to the invoice.

Go back to the Appointment Book and search for the same invoice—click an open slot, and then select Search Invoice No/Receipt No from the context menu.
The Search for an Invoice or Receipt dialog opens.
Enter the invoice number, and then press Enter or click the arrow button.
The invoice details appear with options to show or delete the invoice.
Click Delete.
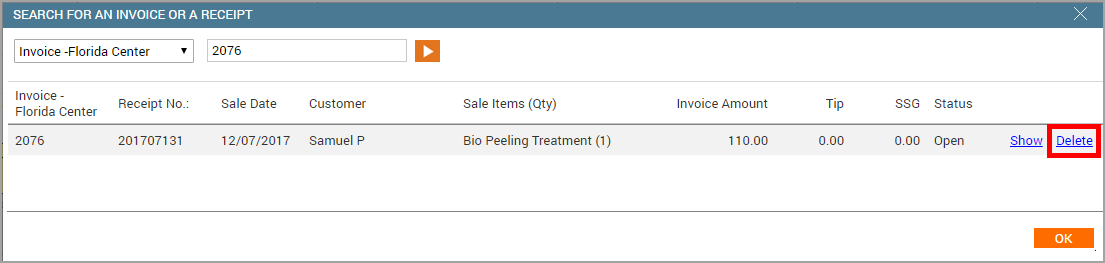
If prompted, enter your comments and click Delete.
Zenoti deletes the invoice and the corresponding appointment is no longer visible in the Appointment Book.
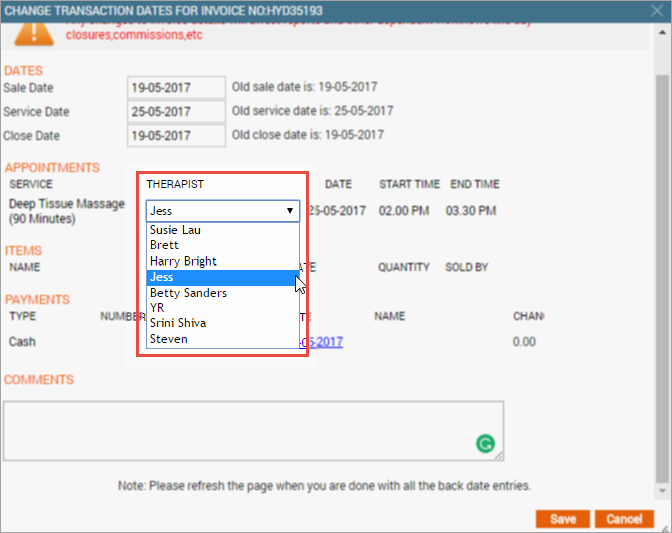
Backdate a closed invoice
Open the invoice whose date you want to change.
On the Invoice page, click I want to > Edit Invoice.
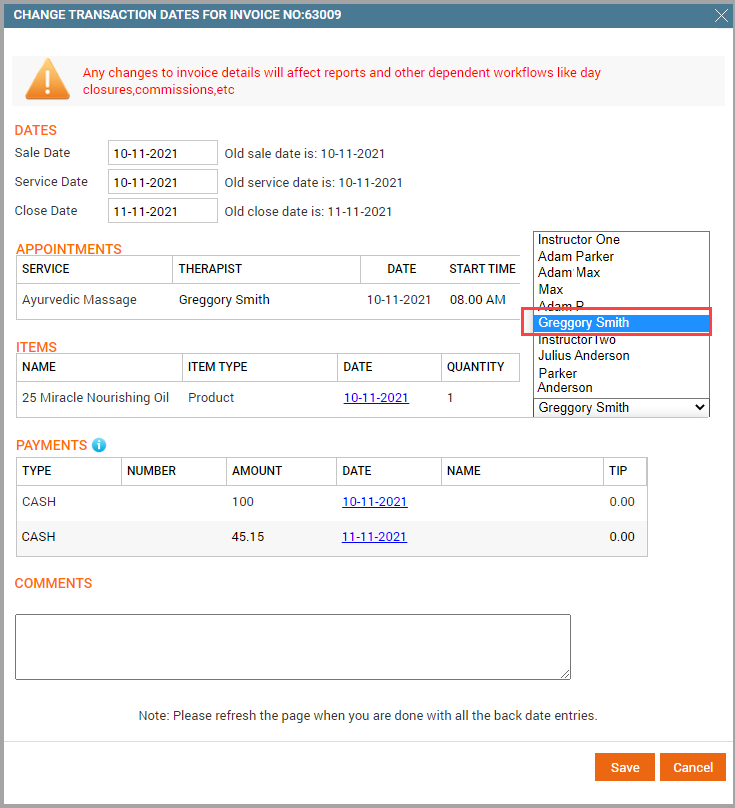
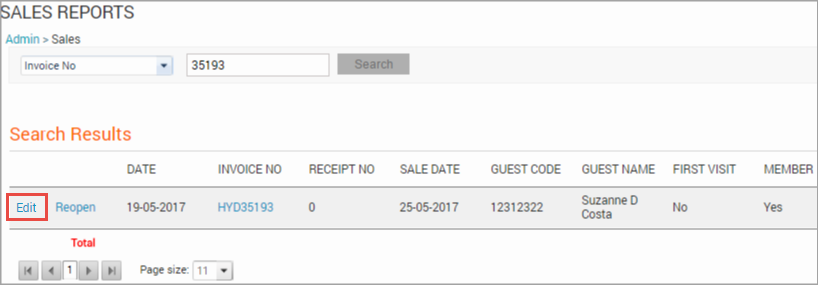
The Sales Reports page opens and displays the Change Transaction Dates window by default.
If the Change Transaction Dates page window does not appear by default, click Edit on the Sales Reports page.
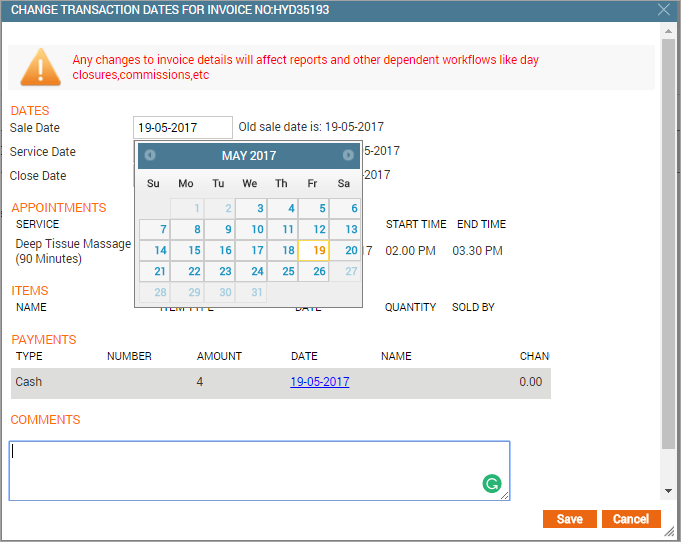
Change the dates on the invoice as appropriate, and then click Save.
Important
In the following screenshot, first update the payment details (see Payments section) and other details, if required. Lastly, edit the Close Date and then click Save.
Add comments
Yes, you can add comments in a closed invoice by accessing it either from the Appointment Book or from the Admin module. However, you must have the required permissions to edit a closed invoice.
Click an open slot, and then click Search Invoice No/Receipt No.
Click Show.
Select I want to>Edit Invoice.
Click Edit.
Add your comments in the Comments section, and then click Save.
You can also click the appointment whose invoice you want to edit and then click Show Invoice.
Why lock invoices
Your organization may prefer to lock invoices on which partial payments are made (and where the balance amount is due). In such cases, you may see a 'lock' icon on the invoice.
Zenoti recommends that you lock invoices to avoid potential fraudulent transactions such as:
Swindling the partial amount received through cash payments and deleting the record of such payments from the invoice.
Reducing the total due amount by applying discounts, coupons, or campaigns.
Actions You Cannot Perform on Locked Invoices
You cannot perform the following actions on locked invoices:
Apply discounts, coupons, or campaigns
Modify the amount for the services availed
Add new products
Sell memberships, gift or prepaid cards
Delete payments
Add comments
Actions You Can Perform on Locked Invoices
You can continue to perform the following actions on locked invoices:
Take payments
Add services or packages by modifying the appointment
I am Unable to Close the Register Because Invoices are Open
If your business is set up to prevent register closure when there are open invoices, here are the steps to find and close the open invoices.
This document shows you how to find the current day’s invoices and invoices from the past. However, to check for invoices from the past, make sure you have permission to access the Sales report
To find open invoices for the current day, follow the steps in the
To check and close the current day's open invoices section.
To find open invoices in the past, follow the steps in the
To check and close open invoices in the past section.
Check and close the current day's open invoices
Open Appointment Book.
To open the context menu, click any open slot.
Click Today’s Sales.
From the Status list, select Open.
Select the required invoice from the list and click Show.
The Take Payment dialog box opens.
Take payment and close the invoice.
On Appointment Book, click the three vertical ellipses icon on the right-most corner.
To close the register, click Close Payments.
Impacts and considerations
If there is a lock icon next to the invoice number, you must have permission to unlock an invoice. To enable the required permissions, contact your store owner or manager.
Check and close open invoices in the past
Click the Reports icon from the left-hand side of the page.
Ope the Sales report.
From the Select a report list, click Invoices.
From the Invoice Status list, select Open.
From the Sale Date list, select a time period.
You can also check for invoices that date back to a few days or weeks.
If you don’t find invoices within the selected time period, try to expand the window of your selection.
(Optional) Select an option in the Sold By and Closed By lists.
The All option is selected by default.
Click Refresh.
All open invoices for the selected time period appear.
To open an invoice, click the invoice number.
Take payment and close the invoice.
On Appointment Book, click the three vertical ellipses icon on the right-most corner.
To close the register, click Close Payments.
Change the therapist's name
Select I want to > Edit Invoice.
Click the Therapist drop-down list and select a different therapist.
Click Save.
How to modify an open invoice with an online credit card payment?
Void the payment or refund the invoice.
Edit the invoice as required.
Collect payment.
How do I delete notes from the guest profile?
Guest notes allow you to capture important information about your guests, such as the choice of shampoo, preference of cold water over hot water and others. This way, you can provide a more personalized experience for your guests.
Sometimes, you may want to remove a guest note due to reasons aplenty.
Open the guest profile for the guest you want to delete the notes.
Click Notes.
The Notes tab opens and displays all the existing notes for the guest.
To delete the note, click the trash icon.
The confirmation pop-up appears.
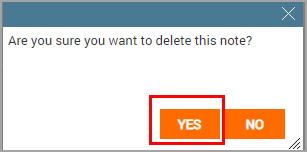
Click Yes to proceed.
The guest note is deleted.
How can rooms be managed and configured in Zenoti for scheduling and bookings?
To create and manage rooms, Go to Configuration (center level) > Business Details > Rooms, then select Add to create rooms.
To configure basic room details, set Name, Code, Description, Capacity, plus a Room Category and Color Code for easier Appointment Book selection.
To control how many bookings a room can take, use Capacity, then choose Allow to book more than capacity, or Allow only one appointment at a time.
To support parallel services in a room, enable Available for parallel services, the add the required parallel service group.
To limit a room to specific services, select allowed services in the Services tab. After linking, the room cannot be booked for other services.
To block a room for repairs or downtime, clear the service checkboxes to make it unavailable, then reselect them to reactivate bookings.
To add premium pricing for a specific room, define a Price Factor % in the Services tab to increase service pricing in that room.
Add rules by days and times, then restrict by membership, target segment, or gender as needed.
Set expiration before rule start time or before service start time to release the room.
To handle group appointments in one room, enable Allow only one group appointment at a time, respecting capacity and booking beyond capacity rules.
Enable Show in Catalog so rooms appear for Webstore and CMA bookings.
New rooms have no services assigned by default, so assign services before the room is usable.
FAQs on Walk-In Sale Mode
What items can I sell using walk-in POS?
Walk-In POS is only used to sell retail items. Since it takes time and effort to capture guest information, front-desk staff can quickly open the walk-in POS, add the retail items, payment type and proceed to close the invoice.
All other item tabs are inaccessible in the walk-in POS. If you want to sell another item (say a gift card), you will have to switch to the regular point of sale.
This allows the front-desk operation to move at a faster pace in a hassle-free style, especially for retail-heavy businesses.
How to find an existing invoice in the walk-in POS?
There are two ways you can access a walk-in sale invoice:
You can search directly for the invoice number.
Important
You cannot access the guest profile for a walk-in sale – the guest profile is blocked for a walk-in sale.
Can an invoice with the Walk-In sale be added to a group bill?
No, you cannot add an invoice with a walk-in sale to a group bill.
Can I convert a Walk-In sale invoice to a regular invoice?
A walk-in sale invoice cannot be converted to a regular invoice. You will have to create a new invoice using the regular POS for the purpose of making a regular sale or to sell items other than retail items.
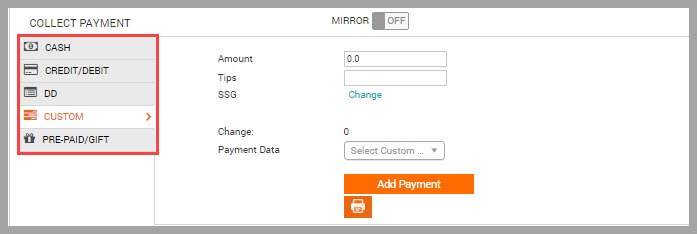
Which payment methods are supported in the walk-in POS?
All payment methods that do not require capturing a guest's information are supported in the walk-in POS. These include:
Cash
Credit Card (Card on file and saving a new card is not allowed)
Debit Card (Card on file and saving a new card is not allowed)
Gift Card*
Custom Payment
*Only supports gift cards for which the GC number is directly available. The Gift Card balance icon will not be shown in walk-in mode.
Important
Payment types (Such as points and membership) that require the front-desk staff to record guest information are not supported in walk-in POS.
Is it possible to refund a walk-in sale invoice?
You can refund an open and closed walk-in sale invoice.
You can also locate the invoice in Today's Sales report.
Is it possible to exchange a product included in a walk-in sale invoice?
You can exchange a product included in a walk-in sale invoice. However, if a prepaid card is auto-generated for the exchange, the balance for it cannot be edited.
Is there a separate report for walk-in sales?
There is no separate report to track walk-in sales. To look for data related to walk-in sales, the report can be filtered with the guest’s name as an online/walk-in sale.
What does BOOK mean on the Appointment book?
If you see the word BOOK displayed on the Appointment Book for an employee, it means the Employee Booking Interval is configured for that employee.
The word BOOK appears on the Appointment Book to indicate available booking intervals.
The label appears at each interval based on the value set (for example, every 30 minutes).
This setting is configured in the employee profile under Employee Booking Interval.
To remove the word BOOK, set the Employee Booking Interval to zero.
How can I enable and customize the redesigned Appointment Book in Zenoti?
To enable and customize the redesigned Appointment Book, you must turn it on at both the organization and center levels, then configure block settings.
Enable (Organization level)
Navigate to Configuration > Appointment and Queue management > Interface.
Turn on the Enable redesigned appointment booktoggle.
Click Save.
Optionally, turn on Enable focus mode when hovering on an appointment and click Save.
Enable (Center level)
At the center level, navigate to Configuration > Appointment and Queue management > Interface.
Turn on the redesigned Appointment Book setting (enables Redesigned Appointment Book, New guest profile, and New register).
Click Save.
Customize appointment blocks (Center level)
At the center level, navigate to Configuration > Customize block for redesigned appointment book.
Choose a base theme (Modern or Classic) and block color type (Status or Category).
Configure block text, hover details, appointment icons, and guest icons.
Save changes and refresh the Appointment Book to view updates.
How can I make room selection non-mandatory in the booking process?
To make room selection non-mandatory during booking, turn off the room requirement setting.
Go to Configuration at the organization or center level.
Search for Make it mandatory to select a room for all bookings.
Turn off the toggle.
Click Save.
Room selection will become optional for appointments and service bookings.
How can booking restrictions be managed effectively in Zenoti?
Zenoti supports booking restrictions through scheduling controls and guest-level online booking blocks. Zenoti does not have a setting to stop bookings after a specific future date. Instead, manage this using employee schedules.
Create schedules only for the next 2–3 months.
Guests can book only where availability exists.
You can block individual guests from booking online via Webstore and CMA. This is useful for repeat no-shows or frequent cancellations.
Go to Guests > Manage Guests.
Select the guest name.
From the General tab. enable the Block guest from online appointment booking checkbox.
This option depends on role permissions. Enable it at Configuration > Security > Security Roles > Permissions tab > Guest Manager > Block guests from online booking.
How do I customize the order of employees and services in Zenoti?
Zenoti lets you control the order in which employees and services appear in the Appointment Book and online booking. You can sort employees automatically or set a custom order using the Therapist Order screen.
Customize employee order in the Appointment Book
At the center level, navigate to Configuration > Appointments > Interface > Display.
Under Specify the display order for therapists, choose one option:
By name
By job
By schedule
By booking value
Custom
If you select Custom, click Configure.
In the Therapist Order window, enter the order number for each employee.
Click Save.
Customize the display order of service categories
At the center level, navigate to Configuration > Services > Service Categories.
Select the service category you want to update.
On the General tab, update the Display order value.
Repeat for other categories if needed.
Click Save.
Only active employees and deputed employees for that center appear in the Therapist Order list.
How do I manage and retrieve information about deleted appointments in Zenoti?
Zenoti lets you track deleted appointments using reporting filters and audit fields. You can view deleted records, identify who deleted them, and retrieve guest details.
At the center or organization levels, navigate to Reports > Appointments report.
Set filters for Date type, Date range, Center, and Appointment Source.
From the Appointment Status filter, select Deleted.
Click Refresh.
Click the Guest name in the report row to open the Guest profile.
From the Appointments tab, view the listings with Deleted status, along with the reason for deletion.
Click View logs to view who updated the booking entry, along with the updated date, old and new values, and the performed action.
How is utilization (%) calculated in Zenoti, and how can discrepancies or issues be resolved?
Utilization (%) in Zenoti measures how effectively scheduled or working hours are used for revenue-generating services. The exact formula varies by report because each report serves a different operational purpose.
ezPulse – Productive Utilization
Productive Utilization measures how much production time was actually spent performing services.
Formula: Actual Service Hours ÷ Stylist Production Hours × 100
If stylists logged 24 production hours and delivered services for 18 hours: Productive Utilization = (18 ÷ 24) × 100 = 75% This focuses only on service delivery efficiency, excluding breaks and block-outs.
Appointment Book – Utilization (%)
This reflects how scheduled time is consumed in daily operations.
Formula: (Service Hours + Paid Block Out Hours + Mandatory Break Hours) ÷ Total Scheduled or Clocked-In Hours × 100
Note
Double-booked appointments are included, which can inflate utilization compared to other reports.
Why utilization percentages may not match
Utilization can differ across reports due to:
Double-booked appointments counted in Appointment Book
Recovery time included only in some reports
Block-out types marked as included or excluded from utilization
Differences between scheduled hours and clocked-in hours
To resolve utilization discrepancies
Lunch or block-out hours may be excluded incorrectly. Edit the block-out type and enable the setting Include this time in employee utilization.
Negative or illogical utilization happens when non-bookable block-outs exceed scheduled hours. Ensure block-out hours do not exceed scheduled working hours.
Zero utilization despite bookings usually means scheduled or clocked-in hours are missing. Verify employee schedules or attendance entries for the selected date.
Refer to the Reports reconciliation article to learn more.
How can I manage add-on services in Zenoti, including editing, adding to appointments, and configuring with regular services?
You can manage add-on services by creating them as add-ons, linking them to main services, and adding them to appointments. Add-ons always work with a primary service and cannot be booked alone.
To associate an add-on with a main service,
At the organization level, navigate to Master Data > Services.
Open the main service.
Select the Add-Ons tab.
Choose the required add-on services.
Click Save.
Repeat these steps to associate the add-on with additional main services.
To add an add-on to an existing appointment,
Open the appointment from the Appointment Book.
Click the Edit option.
Select the + icon from the bottom panel.
Choose the required add-on.
Click Save.
You can add or remove an add-on for a main service anytime using the main service Add-Ons tab. However, after saving a service, you cannot convert a regular service into an add-on. From Master Data > Service > Add on. select or deselect the This service is an add-on checkbox.
How can I manage data and billing after an appointment is deleted?
Deleted appointments in Zenoti cannot be restored. If needed, you must create a new appointment again. Once deleted, the appointment disappears from the Appointment Book. You cannot reinstate it later.
To access guest photos after an appointment's deletion,
Navigate to the Guest profile.
Open the Gallery tab.
View the guest’s saved photos.
To access the forms after an appointment's deletion,
Navigate to the Forms tab from the Guest profile.
Use filters to narrow down the appointments that were deleted.
Open the form to review details. Editing is not allowed.
To view other data from deleted appointments,
Navigate to Reports > Operational > Appointments.
From Appointment Status, select Deleted.
Click Refresh.
View appointment notes, and any other relevant data.
How can I manage service prices and configure cancellation fees in Zenoti?
To update a service price,
Navigate to Master Data > Services, at the organization level.
Select the service you want to update.
Click the Centers tab.
Enter the new amount in the Sale Price field.
Click Save.
You can charge guests when they cancel within a defined time-frame.
At the organization level, navigate to Configuration > Appointments > Pricing and penalty > Cancellation.
Turn on Apply cancellation fee.
Select Set a flat amount or Set a percentage value.
Define the timeline in hours.
Click Save.
You can enable cancellation fee for a specific service.
At the organizational level, navigate to Master Data > Services.
From the General tab, select Allow cancellation fee.
Click Save.
This ensures the configured cancellation policy applies to that service.
How do I process tip refunds, fix tip allocation errors, and configure permissions in Zenoti?
You can refund tips, correct incorrect allocations, and control access through role permissions. Proper setup ensures refund options appear and reports remain accurate.
Configure refund permissions
At the organization level, navigate to Configuration > Security > Security roles.
Open the required roles and navigate to Permissions > Administrator.
Select the Tips checkbox under Refund.
Select the Edit checkbox under Transactional refund.
Refund a tip
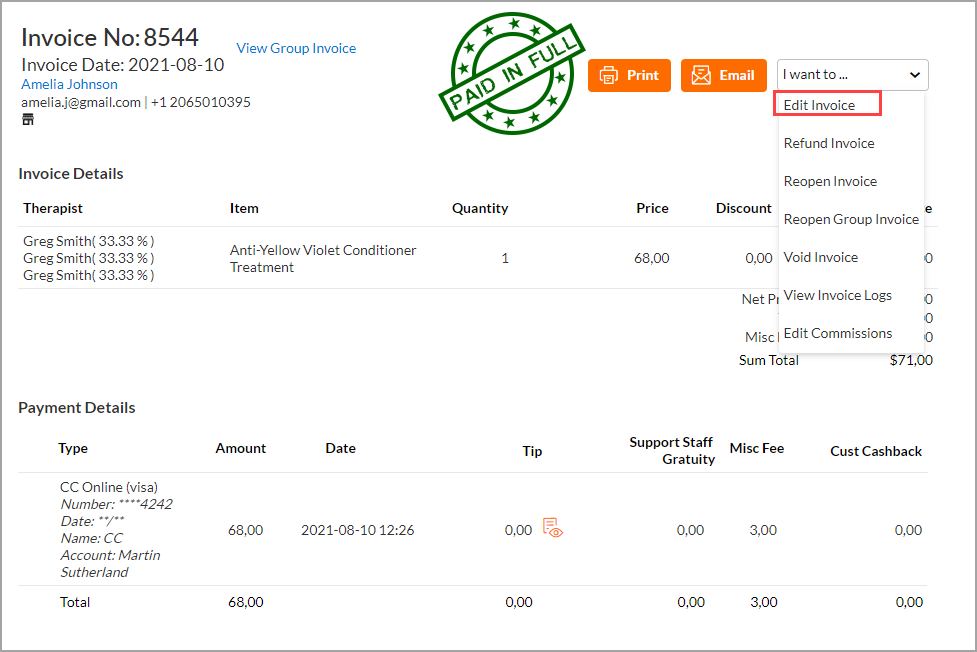
Open the invoice and select Refund invoice from the I want to drop-down.
Select Tips under Other Items.
Enter the refund amount.
Add required comments.
Click Proceed to Refund and confirm.
To refund an item and tip together, select the service or membership item along with the Tips.
If a tip was recorded incorrectly, open the invoice and refund the incorrect amount first. Complete the refund using the original payment method. Then re-collect the same amount on the invoice and enter it under the Tips field. Verify the totals are correct and close the invoice.
How can I analyze booking trends, sources, and scheduling patterns?
Zenoti provides several reports and dashboards that help you analyze booking behavior, customer preferences, and scheduling patterns. You can use tools such as the Online Booking Dashboard, Appointments report, and Sales – Accrual report to gain insights into how appointments are booked and scheduled.
To understand how many appointments are booked online compared to those created in-store, use the Online Reporting Details report.
At the organization level, navigate to Reports > Online Reporting Details.
Select the data type (for example, Online Appointment Data).
Choose a date filter such as Created Date or Appointment Date.
Select the desired date range.
Appointments Booked Online vs. In-store – Compare the volume of bookings created online versus those booked at the front desk.
Appointments by Webstore – Track appointments generated through the webstore.
Average Ticket Price Booked Online vs. In-store – Compare the average revenue value of appointments based on booking channel.
These metrics help determine whether customers prefer digital booking channels or in-store scheduling.
You can identify whether appointments were booked on the same day or scheduled in advance using the Appointments report.
At the organization or center levels, navigate to Reports > Appointments report.
Compare the following columns:
Booked Date
Appointment Date
If Booked Date = Appointment Date, the appointment was booked on the same day (often a walk-in). If Booked Date ≠ Appointment Date, the appointment was booked in advance. You can add columns such as Guest Name, Service, Employee, and Booking Source to further analyze booking behavior.
To analyze demand for specific services in the future, use the Sales – Accrual report.
At the organization level, navigate to Reports > Sales - Accrual report.
Apply the following filters:
Date Range: Select a future time period.
Item Type: Service.
Category/Sub-category: Filter for a specific service (for example, Massage → Lymphatic Massage).
Refresh the report to view scheduled services within that timeframe.
This helps identify which services are already booked and which may require promotional efforts.
By combining insights from the Online Booking Dashboard and reporting tools, you can better understand customer booking patterns, preferred booking channels, and service demand, helping you optimize scheduling and marketing strategies.
How can I export appointment data in Zenoti for different use cases?
You can export appointment data in Zenoti primarily using the Appointments Report, which allows you to extract data for various operational or reporting needs.
Export using the Appointments Report
At the organization level, navigate to Reports > Appointments.
Apply filters such as:
Date range (today, past, future, or specific period)
Appointment status (scheduled, completed, canceled)
Additional fields like Notes or Username.
Click Refresh.
Click Export and download the file in CSV or Excel format.
Common export scenarios
All past and future appointments: Set the date filter to include both past and future dates and export.
Today’s appointments with notes: Filter the date as Today, add the Notes column, refresh, and export.
Future appointments: Set the date filter for future dates only and export.
Bulk booking data: Use the report filters and include fields like Booked By (Username) before exporting.
Historical data: Select Appointment Date or Booking Date, export by yearly ranges, and combine files if needed.
How do cancellation fees and their collection policies work in Zenoti?
In Zenoti, cancellation fees can be applied automatically or collected manually based on how your cancellation policy and payment settings are configured.
When cancellation fees apply
Cancellation fees are charged when a guest cancels within a defined time window before the appointment.
Commonly, this is 24 hours, configured at the organization level under “Apply fees if the customer cancels in less than (hours)”.
Cancellations made earlier than the defined timeframe do not incur a fee.
Automatic collection of cancellation fees
Automatic collection works when:
The guest has a saved card on file.
Auto-collection of cancellation fee is enabled in Online Booking settings.
A cancellation policy with a fee is configured.
If these conditions are met, Zenoti automatically charges the cancellation fee when the appointment is canceled within the defined timeframe.
If automatic payment fails
If the saved card has insufficient funds or fails, the fee is not collected automatically.
An invoice remains open, and staff must collect the payment manually.
Online cancellation
The same cancellation policy and fee rules apply when guests cancel appointments online.
Why does the booking interface sometimes show the Booking Wizard and other times the bottom panel?
This is controlled by the Edit appointments booked from booking wizard setting at the center level. When enabled, appointments booked through the Webstore, CMA, or Booking Wizard open in the Booking Wizard. When disabled, all appointments open in the bottom panel regardless of how they were booked. Appointments created directly in the Appointment Book always open in the bottom panel.To change this behavior, go to Center level > Configuration > Appointment and Queue Management > Bookings > Service Rules and toggle Edit appointments booked from booking wizard on or off. This requires admin, franchise owner, or owner-level access.
How do I troubleshoot common booking issues and configuration challenges in Zenoti?
Certain time slots aren't showing as available: This is usually caused by provider schedules or center business hours not covering the desired times. Check that staff are scheduled to cover those hours — slots with no assigned provider won't appear online. Also verify that your center's business hours aren't shorter than your provider shifts by going to Center level > Configuration and searching for Business hours.
Appointments are visible elsewhere but missing in MyZen: This is typically a cache or sync issue. Log out of MyZen, clear recent apps on your device, relaunch, and log back in.
Online booking only shows the next available slot instead of letting guests choose a time: This happens when the Preferred time in Queue setting is disabled. Enable it in Admin Mode for the affected center to allow guests to select their preferred time.
Provider reassignment is triggering unexpected booking alerts: This occurs when a guest books with "Any" provider, the system auto-assigns one, and another guest then specifically requests that same provider. The reassignment triggers an alert. This is expected behavior and does not indicate a new booking.
Appointments appear inconsistently between the webstore and mobile app: Verify that the booking and payment details are correctly recorded in the online booking system. If the guest has been charged but the appointment isn't showing, consider rebooking to ensure it reflects accurately across platforms.
How do I manage display intervals, views, and fixed features in the Appointment Book?
Display interval settings apply to all locations: Appointment interval settings are configured at the organization level and apply across all centers. To update them, switch to the organization level in the top-right selector, then go to Configuration and search for Display interval. If you don't have access, contact your administrator.
Switching between Provider View and Room View: To see break block-outs and filter by scheduled providers, switch to Provider View in the Appointment Book. Breaks and provider availability are only visible in this view. Refresh the page after switching to see real-time updates.
The timeline layout cannot be customized: The placement of the timeline in the Appointment Book is fixed and cannot be moved or reconfigured. This applies to both the redesigned and legacy versions.
Why doesn’t an appointment appear in the Zenoti Appointment Book, and how can I resolve this?
The most common cause is a service or day package with a duration set to 0 minutes. When duration is zero, the appointment has identical start and end times, so no block appears in the Appointment Book. Fix an existing appointment with zero duration: Open the appointment from List View or the guest's profile, edit the service duration to a value greater than 0, and save. The appointment will then appear in the Appointment Book. Fix the service duration in Master Data: If the issue affects multiple appointments tied to the same service, go to Master Data > Services, find the service, update its duration to a realistic non-zero value, and save. Rebook any affected appointments to reflect the change. Fix a day package with zero duration: Edit the package configuration, assign a non-zero duration so the start and end times differ, and save. Verify the package is now visible in the Appointment Book.
Note
Changes to service durations in Master Data apply to future and active bookings only. Past appointments are not affected.
How do I cancel an appointment with prior payments in Zenoti?
Zenoti locks an invoice once a payment has been taken. The appointment cannot be cancelled until the payment is removed or reallocated.
Fully paid appointments
Open the invoice and refund the payment — either back to the guest's credit card, or to a prepaid card to store as a credit.
Add a note to the guest profile documenting the refund.
Cancel the appointment once the invoice is balanced.
Partially paid or prepaid appointments
Open the invoice and create a prepaid card for the deposit amount.
Expire the prepaid card to prevent accidental future use.
Close or void the invoice, then cancel the appointment.
Retaining credit when an authorization is no longer valid
Use the refund flow to split the payment between a custom placeholder and a prepaid card. This balances the invoice while preserving the client's credit for future bookings.