Batch and Expiry Management in Inventory
Important
This feature is only available to businesses using the on hand quantity model. It does not apply to those using the store and floor model.
This article explains how Zenoti’s Batch and Expiry Management feature enables precise inventory tracking by managing products at the batch level and monitoring expiry dates, the two core pillars of this functionality.
Designed for perishable, injectable, or high-value products, this feature ensures audit-ready traceability and improves control over product lifecycle.
The article also outlines how to enable and manage batch and expiry tracking across purchase, transfer, consumption, and audit workflows.
Overview
Zenoti's Batch and Expiry Management add a layer of precision to inventory tracking by introducing batch-level identifiers and expiry date tracking for products. This is especially valuable for businesses that handle medical consumables, perishable, injectables, skincare products, or other high-value sensitive items.
With this feature, you can:
Prevent the use of expired products and reduce product wastage
Trace product flow across centers and services for better accountability
Ensure audit readiness and meet internal or external compliance needs
Enable traceability for injectables and medical items
This is particularly valuable for medspas and clinics that use products like Botox or dermal fillers, where it is crucial to trace the exact batch used in a service or sold to a guest—enabling swift action in case of recalls.
Once batch tracking is enabled for a product, Zenoti enforces its usage across all relevant inventory actions— purchasing, transferring, consuming, auditing, returning, and adjusting. Batch tracking should be enabled only for high-value or injectable products. It is not required for all products.
Zenoti recommends operating on a FEFO (First Expire, First Out) model. In batch selection drop-down lists, batches closest to expiry are automatically shown first to help ensure compliance and minimize wastage.
Key terms
Batch: A set of products received together with the same expiry date and batch number.
Expiry Date: The last date on which a product can be used.
Batch Tracking: A setting that enables products to be managed at batch-level across the inventory lifecycle.
Default Batch: A placeholder batch auto-created for existing stock, with an expiry date set well in to the future.
Prerequisites
Batch tracking is enabled for products at the organization level and applies to products in all centers.
Inventory managers must have permission to perform audits and adjustments. For more information, refer to the Security role permissions for inventory manager functions article.
Limitations
Batch tracking cannot be disabled once enabled for a product. To stop tracking, deactivate the product and create a new one.
Products with negative inventory cannot have batch tracking turned on until quantities are corrected.
Checkout, conversion, and bundling are not supported for batch-enabled products.
Enable Batch Tracking for a product
At the organization level, navigate to Inventory > Products.
Open the product for which you want to enable batch tracking.
In the General tab, set Batch Tracking to Yes.

Review the confirmation message and click Continue to proceed.
Click Save.
Important
After batch tracking is enabled at the organization level, centers can perform an Inventory Audit to reclassify existing stock from the system-assigned Default Batch to correct batches with accurate expiry dates. This is not mandatory and can be done at the organization's discretion. Centers may continue using the Default Batch until they receive new stock. If an audit is not performed, the products will remain in the default batch, with their expiry automatically set to 01-01-2100.
Receive products via Purchase Orders
Navigate to Inventory > Orders.
Open the required Purchase Order.
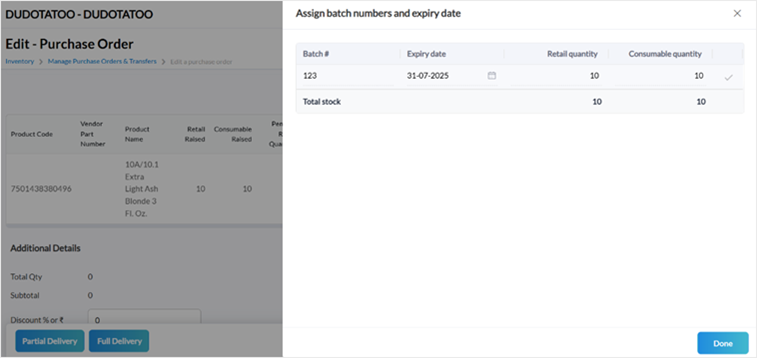
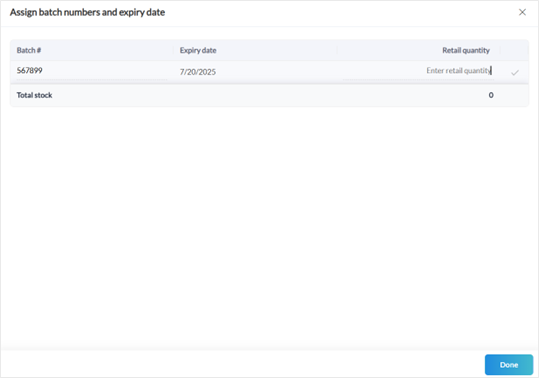
For batch-enabled products, click the Retail Received or Consumable Received field.
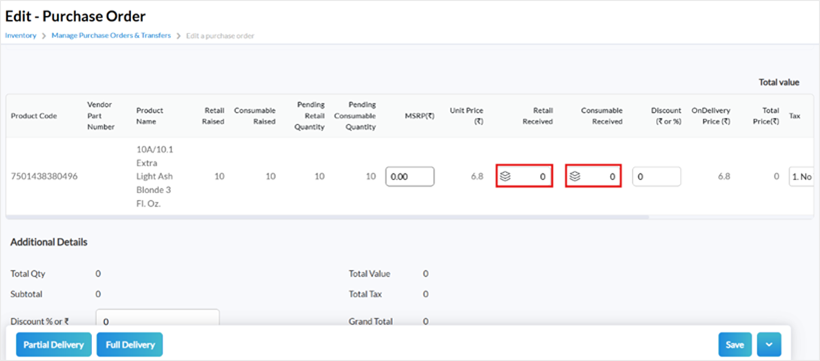
In the side panel, enter:
Batch Number
Expiry Date
Retail and/or Consumable Quantity
Click Done.
Important
This step is where batch numbers and expiry dates are officially recorded.
Click the tick mark to add multiple batches for the same product if required.
Mark the order as Partial Delivery or Full Delivery.
Click Save.
Transfer stock between centers
Batch tracking is strictly enforced for inter-center transfers.
At the sending center:
Go to Inventory > Orders > I want to... > Add Transfer.
Enter the destination center name in Transfer To.
Add the product and required retail/consumables quantities.
Click Save as draft.
Click Save and raise.
At the receiving center:
Open the transfer order from Manage Purchase Orders and Transfers.
Click the Retail to dispatch and Consumables to dispatch fields to update the batch details.
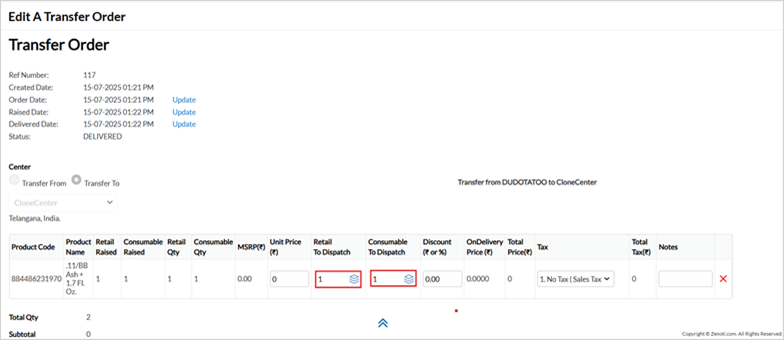
Confirm receipt using the dispatched batch number and quantities.
Click Done.

Enter the Unit Price, and click Save or Full Delivery.
Note
Expired batches cannot be transferred.
Add product consumption details for an appointment
Important
Front desk staff must strictly dispense products from the batch closest to expiry. Adherence to inventory discipline is critical to ensure compliance, prevent wastage, and maintain accurate batch traceability.
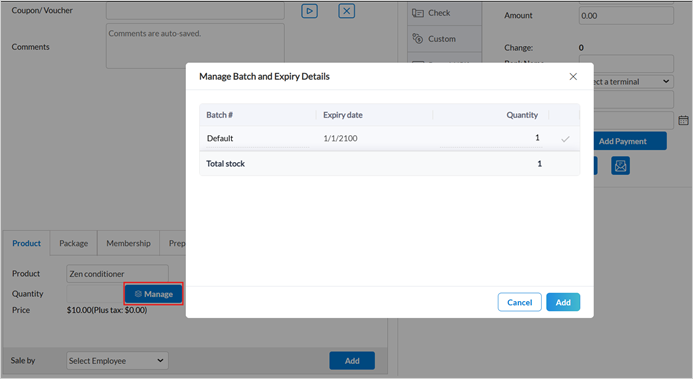
Add product consumption details from POS (Point of Sale):
Go to Appointment > POS and add the product to the invoice.
Click the Manage button for batch-enabled products.
Select the Batch and Quantity.
Click Add, then proceed to checkout.
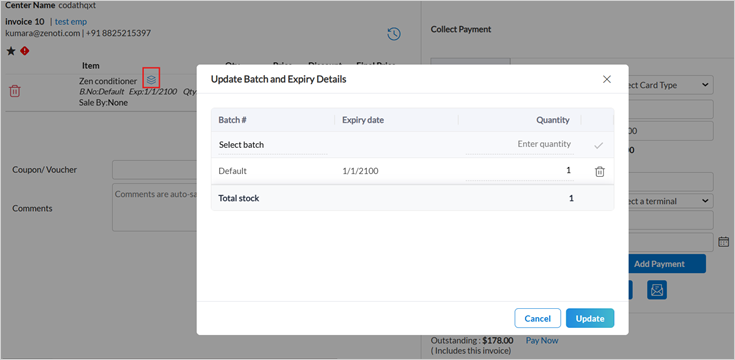
To update or edit batch details, select the batch icon at the item level.
Click Update, then proceed to checkout.
Add product consumption details from Appointment Book:
Open the service from the Appointment Book.
From the three-dot menu, select Add Consumed Products.

Note
This functionality is available from the Zenoti Mobile App also.
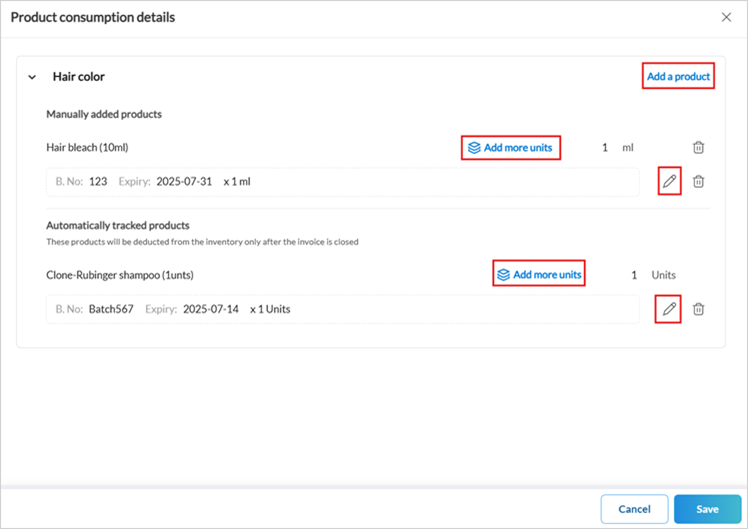
As defined in the Service Master, certain products are automatically tracked during a service. Products associated with the service but not auto-tracked will appear under Manually Tracked Products in the Product Consumption Details panel.
Click Add more units to assign batch entries for each product - this step is mandatory for all batch-enabled products.
Use the edit icon to modify the quantity as needed.
Note
You cannot edit the batch number or expiry date. To make changes, delete the entry and add it again with the correct details.
To include additional products (not already listed as auto or manually tracked) used during the service, click Add a product to manually include them.
Note
Only products associated with the service will be selectable.
Click Save.
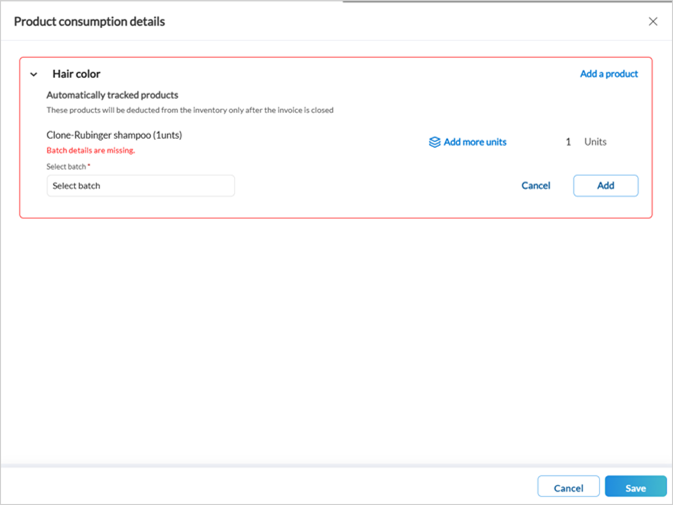
Important
Payment is not processed until all batch details are entered. If missing, you are redirected from the payment screen to the Product Consumption Details panel to complete the required entries.
Conduct Inventory Audits
Navigate to Inventory > Audit.
For each product, click the batch icon on the On Hand Quantity field.
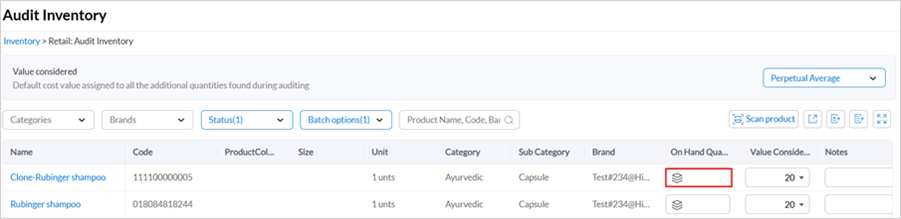
Enter Batch Number, Expiry Date, and Retail Quantity.
Click Done.
Select the required audit options.
Click Submit Audit.
Click Save and Submit.
Note
Zenoti recommends verifying products that expire within the next 12 months.
Note
Audit is not supported in the ZMA app for batch-enabled products.
Reconcile Inventory
Go to Inventory > Reconcile.
Click the batch icon to update the reconciled quantity.

Update the Retail Quantity.
Click Done.
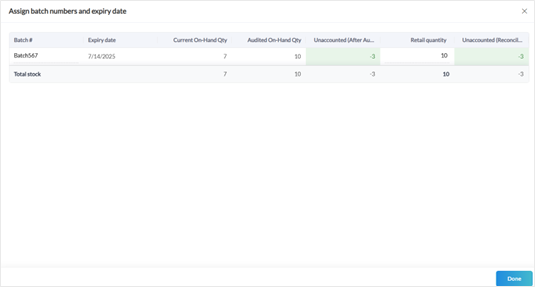
Click Submit Reconcile.
Click OK to finalize the reconciliation.
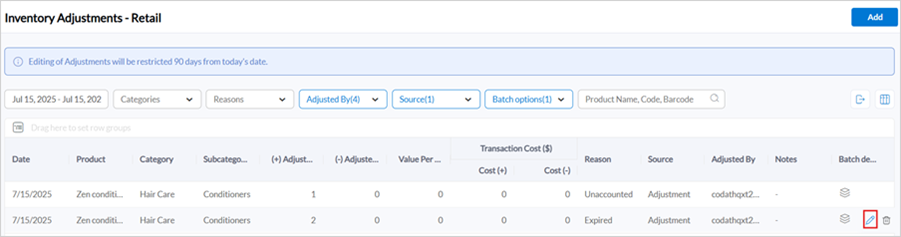
Make Inventory Adjustments
Go to Inventory > Adjustments.
Click Add.
In the Adjust store quantity by field, click the batch icon to select the appropriate batch.
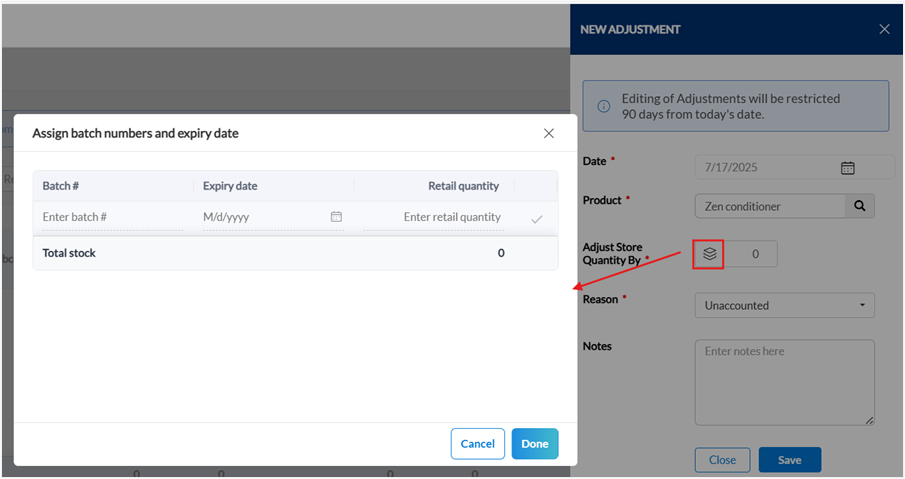
Choose the reason for adjustment such as Expired, Sample, Damaged, Unaccounted.
Click Save.
Use the Batch Options filter to narrow down the list and review specific batch-related entries.
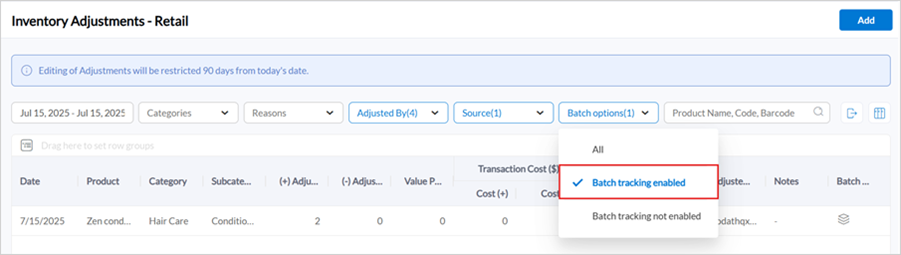
To modify the batch or other details of the adjustment, click the Edit icon.
Process product returns
Vendor returns
Go to Inventory > Orders > I want to... > Add Returns.
Select the Vendor and add Product and Quantity.
Click Add and then Submit. The stacked layer icon will appear in the Consumable received and Retail received section.
Click to update batch details and quantity.
Click Returned.
Click Save.
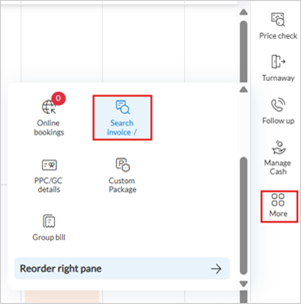
Return and refund a product sold in retail
To return a batch-enabled product, navigate to Appointments > More > Search invoice/receipt numbers.
Enter the invoice, receipt or online transaction number.
Click Search.
Click Return.
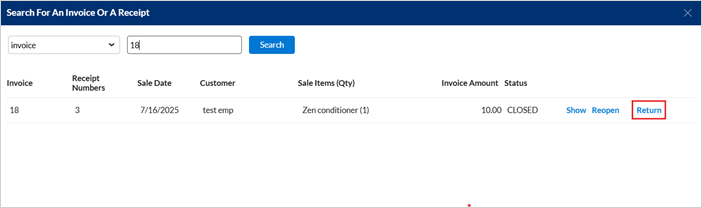
Select the batch enabled product and click the batch icon.
Add the refund quantity and click Done.
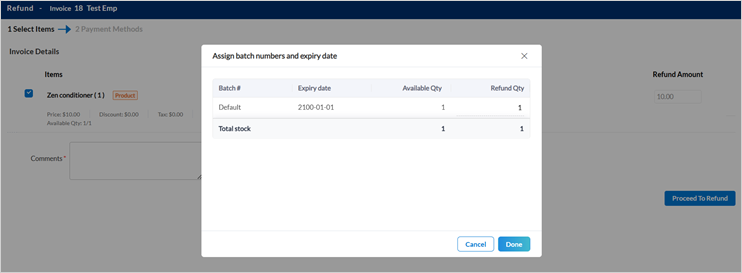
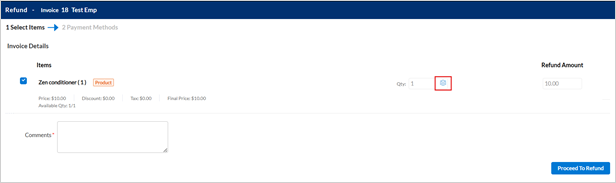
Click Proceed to refund.
Select the payment type and click Refund.
Click Process Refund and Close invoice to confirm the return.
Exchange a product sold in retail
Go to Guests > Manage Guests.
Select the name of the guest who wishes to return a product.
From the Products tab, click the exchange icon.

Click the batch icon from Return Quantity and Restock quantity to add the batch and quantity details.
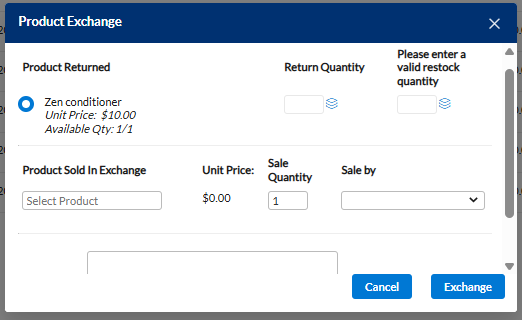
Chose the product for exchange in the Product Sold In Exchange field. If this product is batch-enabled, select the batch tracking icon to add batch and expiry details.
Verify or update the Unit Price, Sale Quantity and Sale By details.
Click Exchange.
Configure Inventory Alerts
You can manage Inventory Alerts at both the organization and center levels to stay informed about key stock-related events such as product expiry, low inventory, and data entry gaps.
Considerations
Alerts for Inventory actions are configured at the organization level by default. For more information refer to the Configure alerts article.
Centers can override alert configurations set at the organization level if needed. When a toggle is turned ON or OFF at the center level, it overrides the organization-level configuration for that specific center.