BBPOS setup and administration
Zenoti Payments and BBPOS
Overview and important notes on BBPOS Chipper 2X BT card reader
If you are using Zenoti Payments, you can use a Chipper 2X BT card reader (by BBPOS) to collect card payments either from Zenoti Mobile or in mirror mode.
Important Notes
Chipper 2X BT card reader is supported only in the USA and you can use it to process payments only from credit cards that do not require the guest to enter a PIN number.
The card reader can process debit card payments only if the debit card allows credit transactions and does not require the guest to enter a PIN.
To collect payments, you must have an iPad (with iOS 12 or higher) that has Zenoti Mobile installed.
The card reader can be connected to only one iPad at a time.
Do not manually pair the device. Pairing through the iOS Settings > Bluetooth page makes the device unavailable to connect to your Zenoti Mobile. Refer to Connect to a card reader to learn more.
BBPOS: Setup in Zenoti Payments
Setup BBPOS (Chipper 2X BT card reader) in Zenoti Payment Settings
Steps to setup BBPOS
To set up Chipper 2X BT as the card reader in Zenoti, do the following:
At the organization or the center level, click the Configuration icon.
Search for and select the Payment processor onboarding.
Expand Integrated Payment Processor and select the Terminals tab.

Under the Terminals section enter the following details:
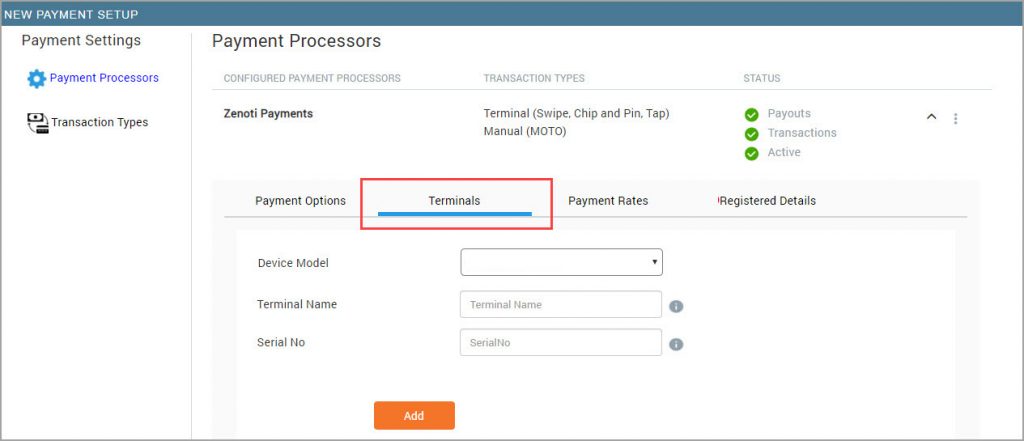 a. Terminal Name: Enter the name of your choice for the terminal. The name you specify here appears in the list of terminals on the Zenoti web and the list of card readers in the Zenoti Mobile. b. Serial Number: Enter the serial number that is on the back of your BBPOS card reader.
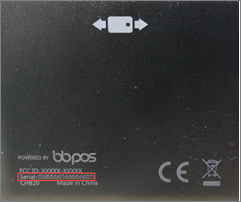
9. Click Add. : You cannot delete a terminal if it is the only one that is configured.
10. Click Save. You have successfully added BBPOS as a terminal in Zenoti.
BBPOS: Connect to Zenoti Mobile
Learn how to discover BBPOS card readers in close proximity and connect to any of them for taking payments
Important
Zenoti Mobile helps you discover the card readers (Bluetooth-enabled) that are in the Bluetooth range of your iPad. You can connect your Zenoti Mobile with any of the devices available in the Bluetooth availability range. Do not manually pair the device. Pairing through the iOS Settings > Bluetooth page makes the device unavailable to connect to your Zenoti Mobile.
To connect to a card reader
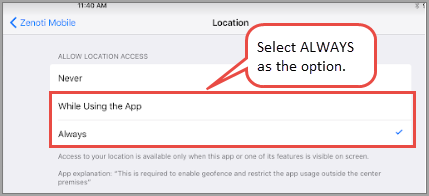
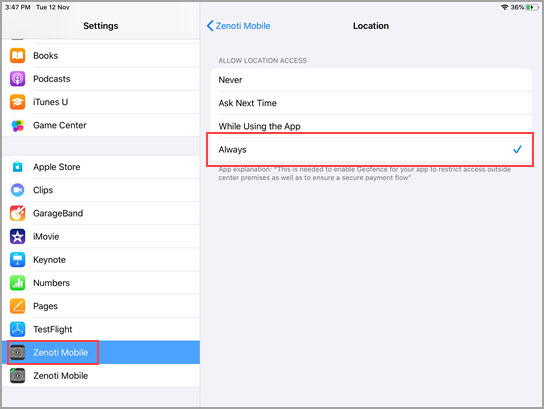
Enable Location Services for Zenoti Mobile. In iOS, go to Settings then find and tap Zenoti Mobile in the list. Then choose the Location option. Set it to Always.
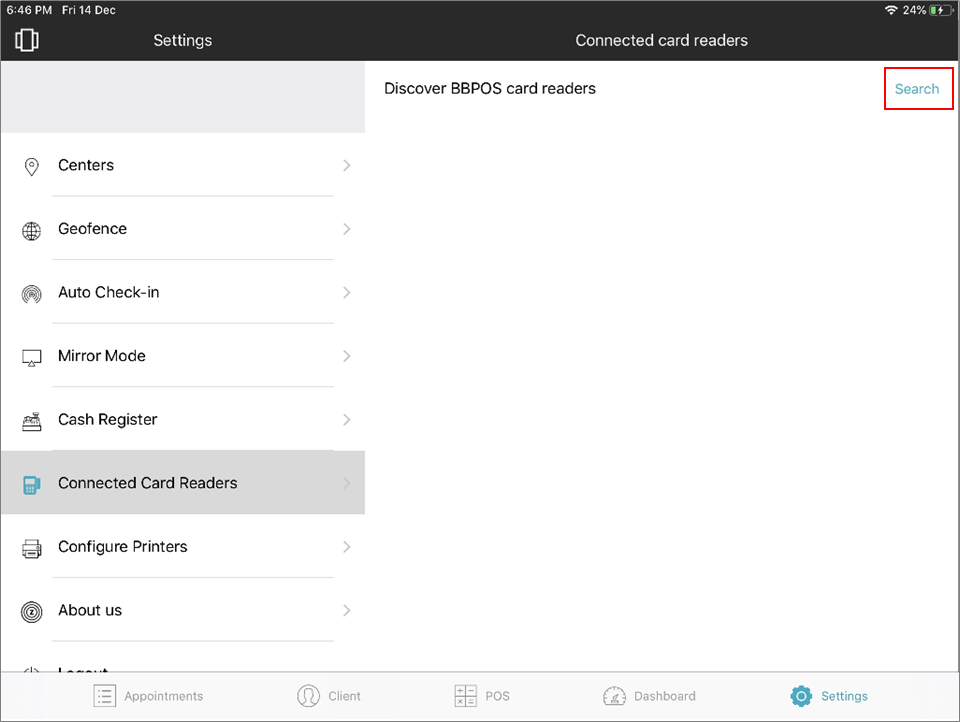
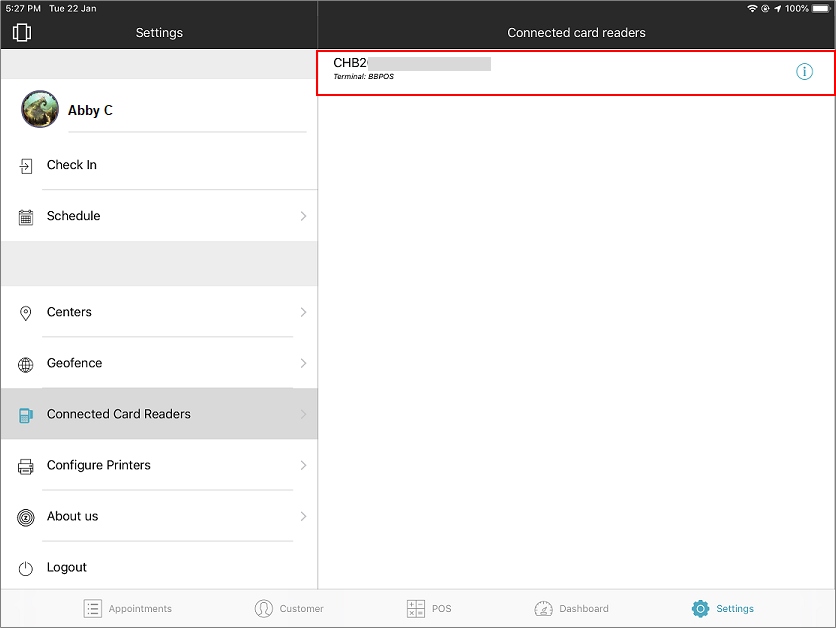
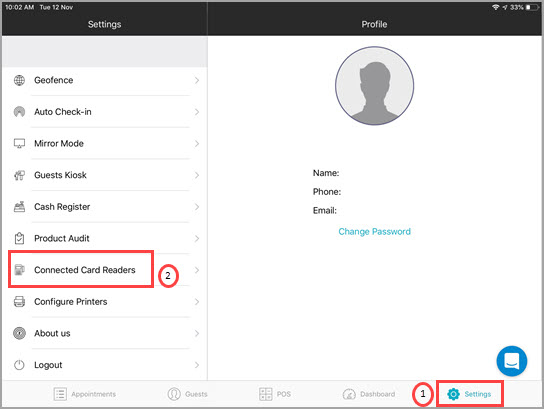
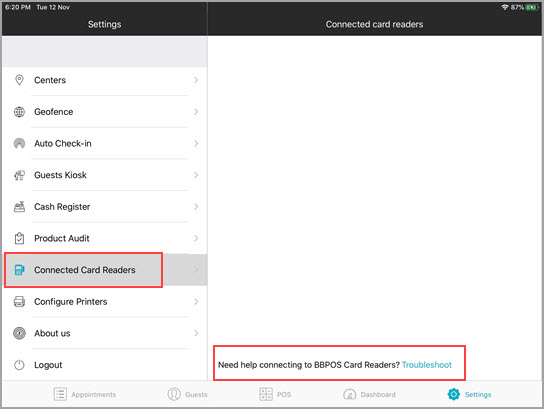
Open the Zenoti Mobile app. Tap Settings icon and go to Connected Card Readers. The Connected Card Readers screen appears.
Tap Search.
Zenoti Mobile shows the terminal name (configured in the Payment Processor page in Zenoti) as well as the serial number of the card readers, which are within the Bluetooth range of your iPad.
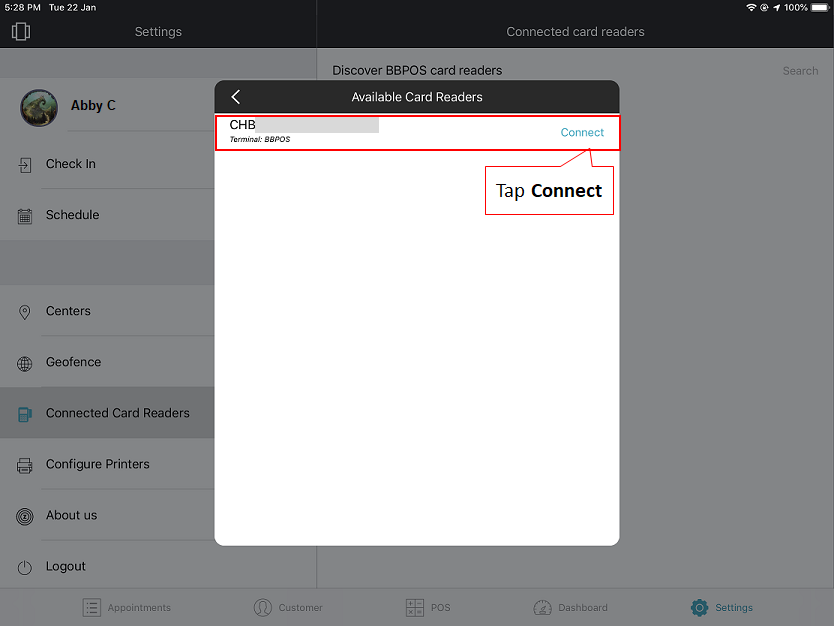
3. Tap Connect against the device number. An alert asking you to enable Auto-connection appears. Auto-connection will allow the Zenoti Mobile app to reconnect to the existing BBPOS card reader automatically when the front desk logs in or when the app is launched.
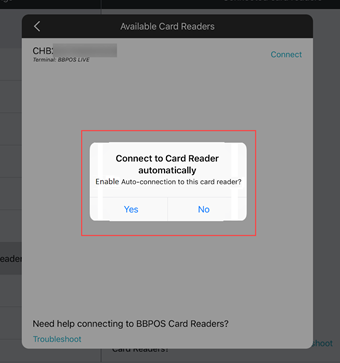 4. Tap Yes to enable Auto-connect. A success message appears.
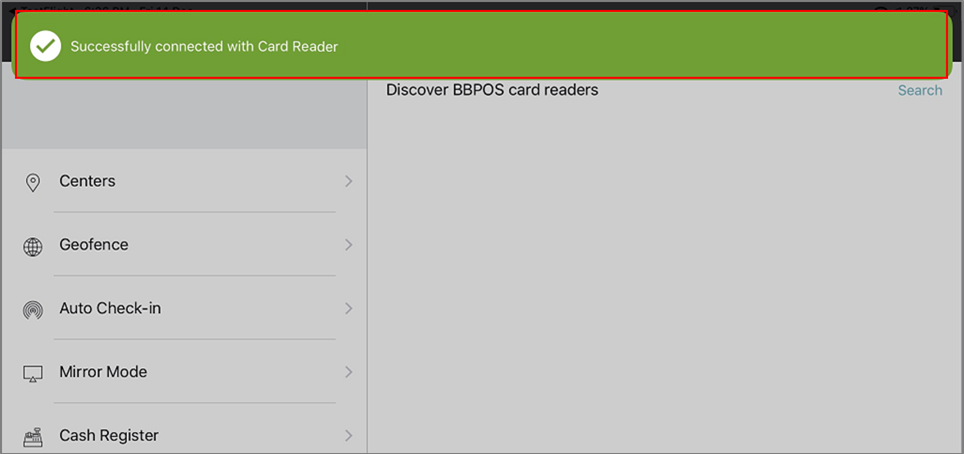
The card reader you are connected to appears in the list.
You can now collect payment using the device.
Disconnect a Card Reader to Connect to Other Card Reader in the Vicinity
When you want to connect Zenoti Mobile with a different card reader, you must disconnect from the currently connected reader first.
To disconnect the card reader
Tap Settings icon in Zenoti Mobile and tap Connected Card Readers. The serial number of the connected device appears.
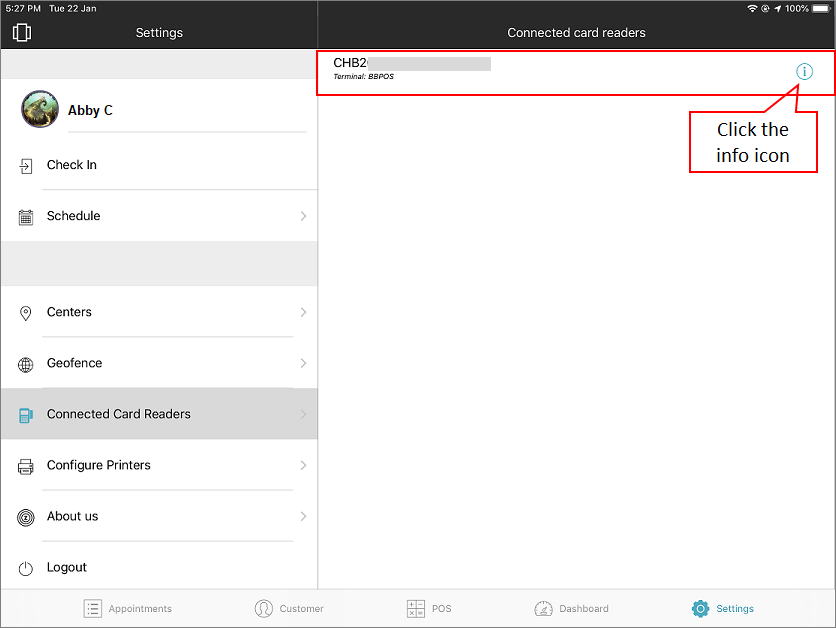
Click the info icon.
Stripe terminal screen appears. 3. Tap Disconnect the card reader.

A success message appears that the card reader is disconnected.
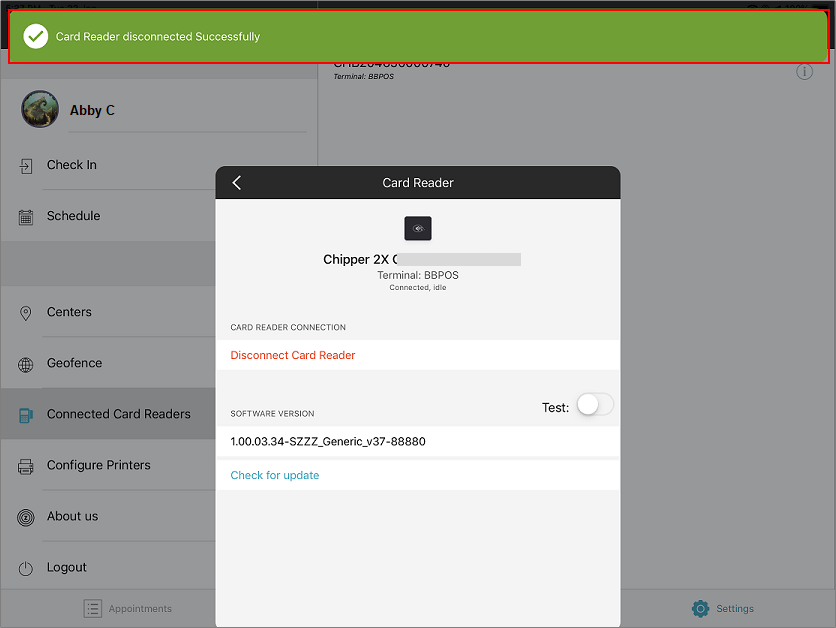
You can connect with another reader.
BBPOS: Collect Card Payments
Learn how to collect card payments from Zenoti Mobile and in mirror mode
Steps to collect payment from Zenoti Mobile
To collect payments from Zenoti Mobile, ensure the iPad (Zenoti Mobile) is connected to a BBPOS card reader. Once connected, do the following:
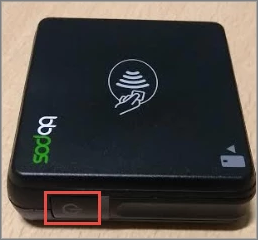
Click the Power button to wake up the BBPOS card reader, if it lapsed into sleep mode.
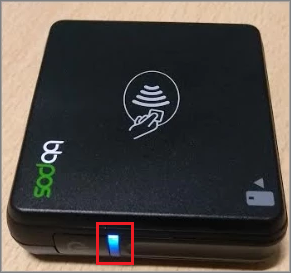
A blue light appears indicating that the card reader is on.
3. On the iPad, launch Zenoti Mobile.
4. Select the appointment for which you want to collect the payment. The appointment details appear to the right, with an option to Proceed for Payment.
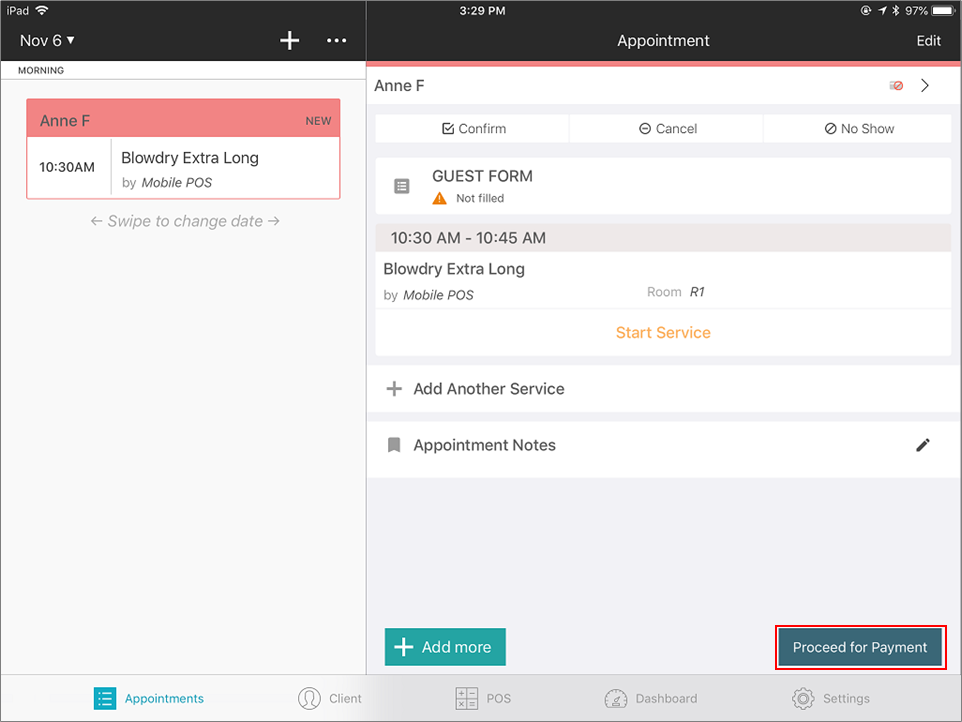
5. Tap Proceed for Payment. Various payment types appear.
6. Select Use Card Reader as the payment method.

Note
7. From the list of card readers, select your BBPOS card reader (appears with the name you specified in the terminal settings). : Select the checkbox Save card for future use, to save the card details to Zenoti so that guests can prefer to use the saved card for payments, in the future.

8. Tap Collect. Zenoti Payments screen appears prompting you to swipe the card.
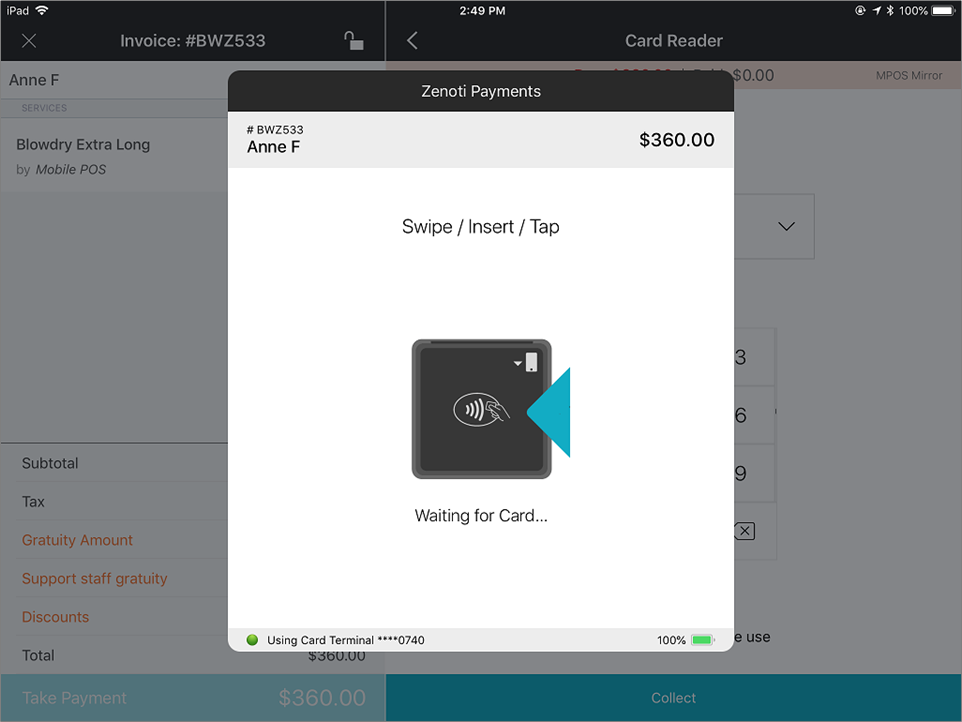
9. Swipe the card in Chipper 2X BT card reader. A screen showing the card reader's attempt to connect with the server appears.

If in the org settings, you have configured to take guest signature for completing the payment, the screen to capture signature appears, once the reader is connected to the server.
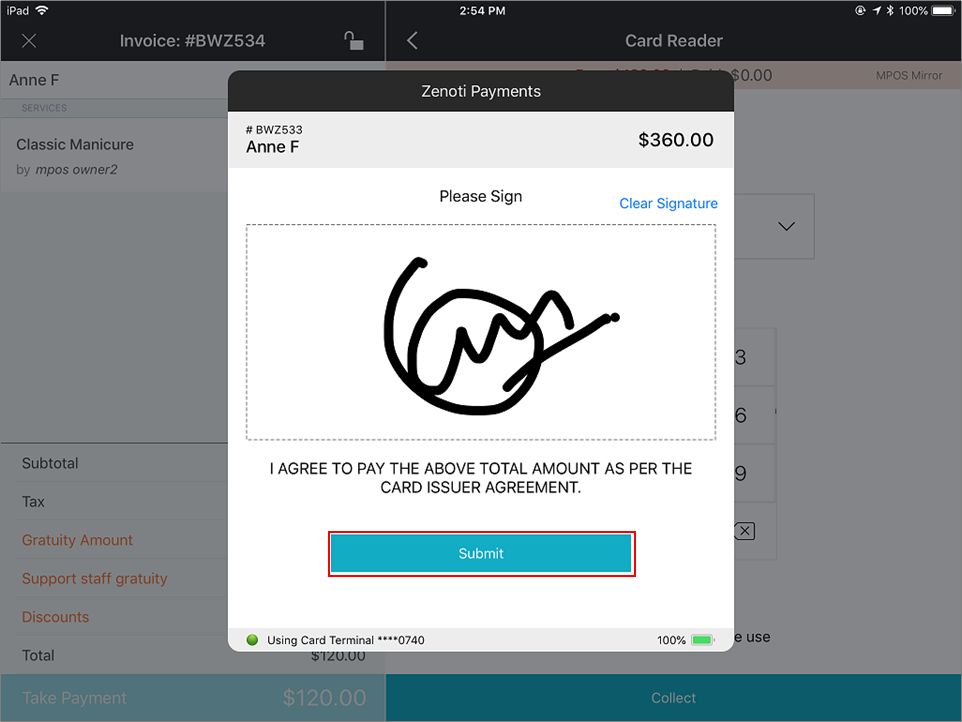
10. Have the guest sign in the Signature field. The payment confirmation screen appears, showing the account number, entry, amount, and other details.
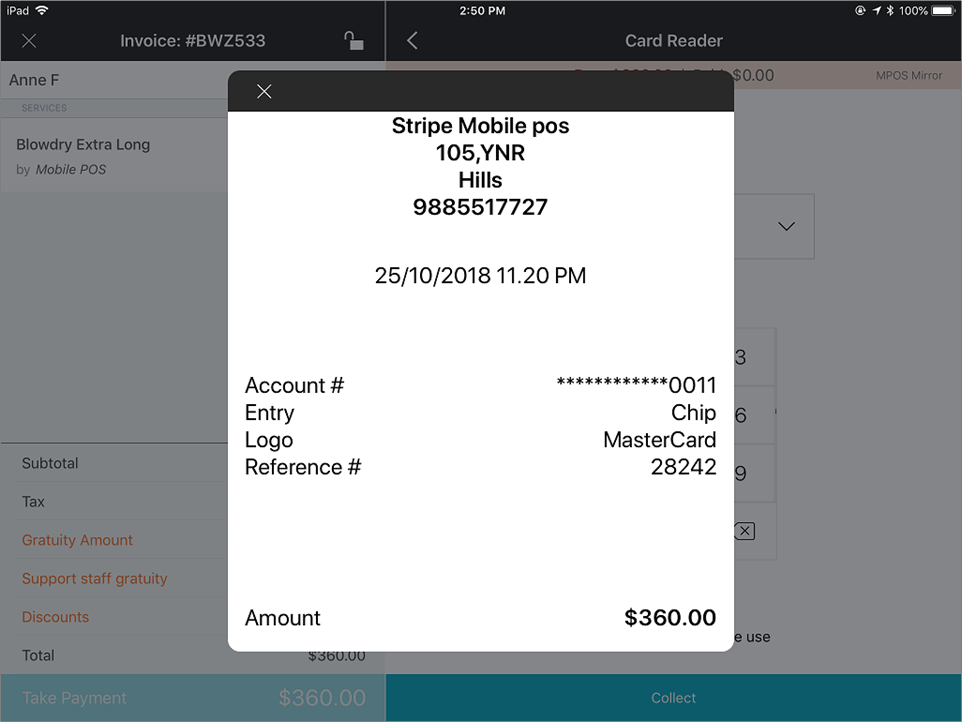
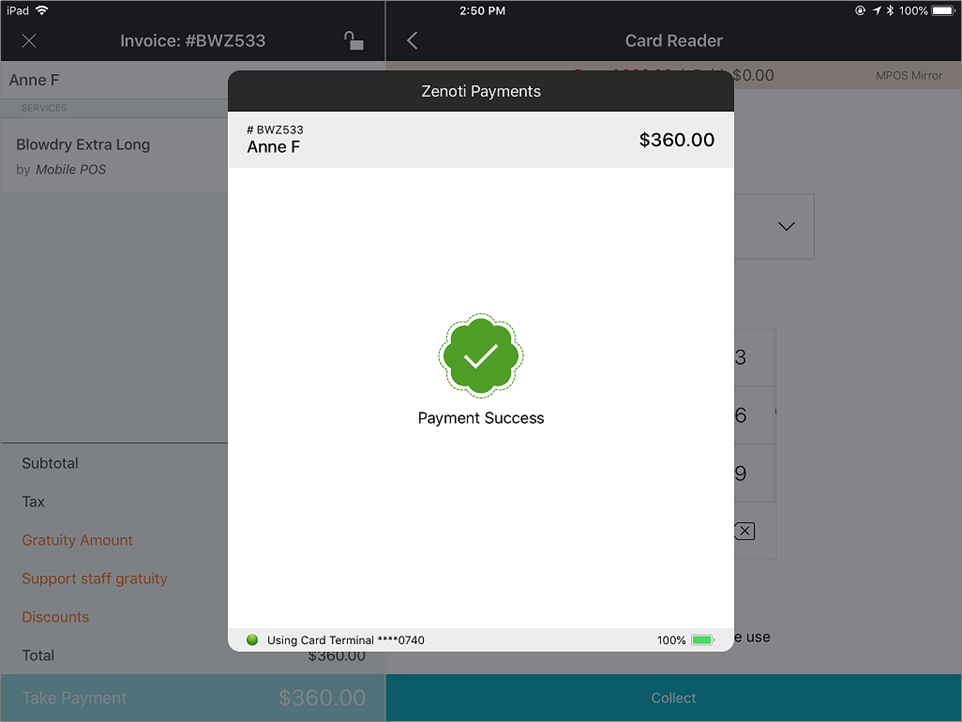
On closing the payment confirmation screen, the payment success screen appears.
Important
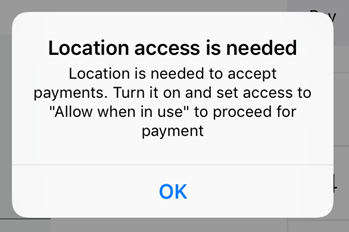
: If you are collecting payment using BBPOS for the first time, a prompt to allow access to your location appears; tap Allow.
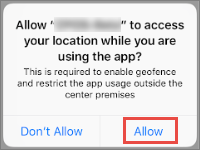
If you tap Don't allow, you will not be able to collect payments using BBPOS. See the FAQ & troubleshooting section (scroll below in this article) to learn about allowing location access.
Collect Card Payments in Mirror Mode
Ensure you have set up the mirror mode and do the following to collect payments in mirror mode:
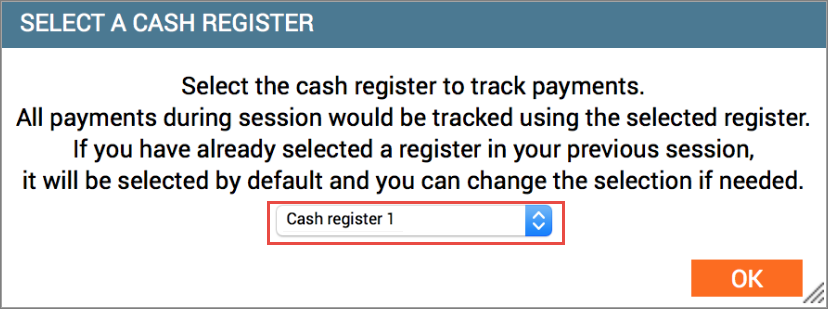
Log in to Zenoti web. You will be prompted to select a cash register. Select the same cash register that you selected in the Zenoti Mobile.
2. Open the Take Payment screen of the appointment.
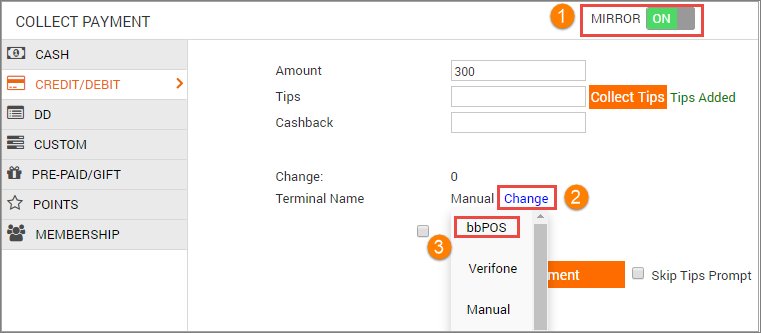
3. If the Mirror switch is set to OFF, change it to ON. The payment screen "mirrors" on the iPad.
4. For the Terminal Name, click the Change link and select your BBPOS card reader (appears with the name you specified in the terminal settings).
5. Click Add Payment. A prompt with the following options appears: a. Saved card details b. Use a New Card c. Use Card Reader d. Click Use Card Reader
The payment process continues in Zenoti Mobile.
BBPOS: Check and Install Firmware Updates
Learn how to check for firmware updates and install from Zenoti Mobile
Chipper 2X BT card reader is shipped to you with a certain version of the firmware. The firmware of the card reader helps connect the device with Zenoti Mobile via iPad to process card payments.
Occasionally, Stripe may release updates to the firmware that you need to install in the card reader.
In this article, you will learn how to check the updates and install them into the connected card reader from Zenoti Mobile.
Important Notes
To check and install firmware updates, Chipper 2X BT card reader should be connected to the Zenoti Mobile app from an iPad.
Only one card reader can be connected to an iPad at a time.
Do not manually pair the device. Pairing through the iOS Settings > Bluetooth page makes the device unavailable to connect to your Zenoti Mobile. The card reader will automatically pair with the iPad, while collecting a payment.
The card reader shows up in the Connected Card Readers list (under Zenoti Mobile Settings), only if at least one transaction was processed using the device.
To check and install firmware of BBPOS
Login to Zenoti Mobile. Appointments view appears by default.
Tap Settings. Settings screen appears.
Tap Connected Card Readers. The screen shows the device number of the card reader you are currently connected to.
Tap the info icon against the device number.
Stripe Terminal screen appears, showing the software version and a link: Check for updates.
5. Tap Check for update. If there are updates, the link: Install update appears. : If there are no updates to the firmware, a message appears that there is no update available.
6. Tap Install update. Zenoti installs the updates to the firmware of Chipper 2X BT card reader connected to it. Once the updates are 100% installed, a success message appears on the screen. You can proceed with taking payments using the card reader.
See Also
BBPOS: FAQ and Troubleshoot
FAQ and troubleshoot on using BBPOS (Chipper 2X BT Card reader) for processing card payments
Why am I seeing a Bluetooth scan timeout error?
You get the Bluetooth scan time out error if any of the following is true:
a. If the Chipper 2X BT card reader is not connected correctly.
Solution: Turn off the Chipper 2X BT card reader, wait for few seconds, turn it on, and tap Retry.
b. If the Serial number on the card reader is not matching with the one you entered in the Terminal Settings.
Solution: Ensure you have entered the correct serial number in the Terminal settings (Serial number will be on the backside of the card reader).
c. If you are trying to connect with more than one iPad at the same time.
Solution: You can connect your Chipper 2X BT card reader to only one iPad at a time.
d. If the card reader is not able to access your location.
Solution: On the iPad,
i. Go to device Settings of the iPad (not the Settings in Zenoti Mobile) > Select Zenoti Mobile > Location.
ii. For Allow Location Access, select the option Always.
2. When taking payments, the screen shows the following alert. What should I do?
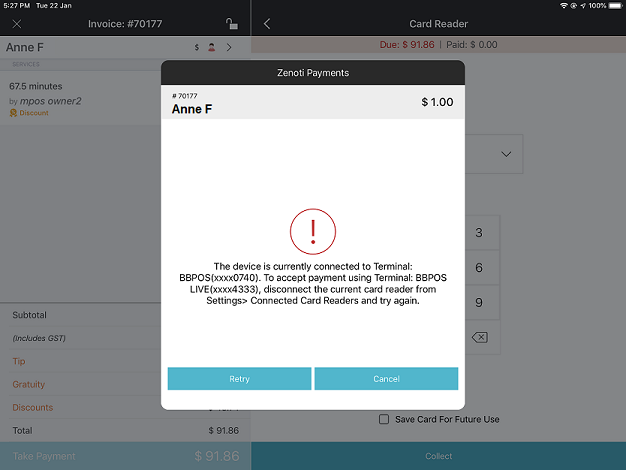
This alert appears when you select a BBPOS card reader (while taking payments) that is not connected to Zenoti Mobile. When you see this message, you can do any of the following:
Cancel the alert. From the Collect Payments screen, select the terminal that is connected to Zenoti Mobile and proceed with payment.
Disconnect the currently connected card reader and connect Zenoti Mobile with the other card reader you are trying to use. To learn how to connect, refer to the article: BBPOS: Connect to a Card Reader.
3. I'm unable to process payments using Chipper 2X BT card reader. Is there a way to complete payments? If none of the above solutions to fix the timeout work then, switch to Verifone card reader to collect payments. From the list of card readers in the Zenoti web or Zenoti Mobile, select the Verifone card reader and process the payment. If Verifone also fails, you can process card payments manually.
4. Can I connect my card reader with another iPad? You can connect your Chipper 2X BT card reader to only one iPad at a time. Read the article: Connect to a Card Reader to learn how to connect to a BBPOS device.
5. How can a guest enter the PIN on the BBPOS device? Guests can swipe the credit cards that do not require a PIN to make payments. BBPOS can process the payments only from the credit cards that do not require a PIN.
6. Why am I not able to process a debit card payment? Chipper 2X BT card reader can process debit card payments only if the debit card allows credit transactions and does not require the guest to enter a PIN.
7. Can we use the BBPOS device when charging the device? Yes
8. The BBPOS device's LED shows blue and red lights sometimes. What do they indicate? Whenever the BBPOS Chipper 2X BT card reader is turned on, the LED located beside the power button shows the card reader's status. Refer to the BBPOS Chipper 2X BT User Guide, available in Stripe Docs site. The external resources to BBPOS device here are being provided for informational purposes only. Zenoti bears no responsibility for the accuracy, legality, or the content of the external site or for that of subsequent links.
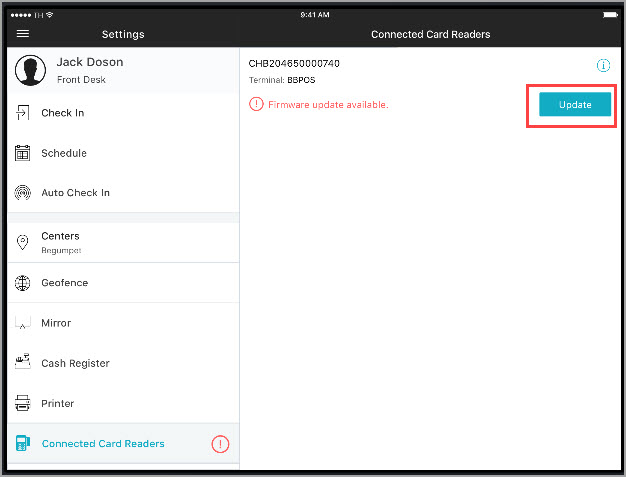
9. How can I check for updates to the BBPOS device? You will be notified of the device updates when you connect the BBPOS device to the iPad through the Connected Card Readers screen on the Mobile POS. Additionally, you can see a red badge on the Settings option of Mobile POS and also a red exclamation mark on the Connected Card Readers setting, if there is an updated available for your BBPOS device. 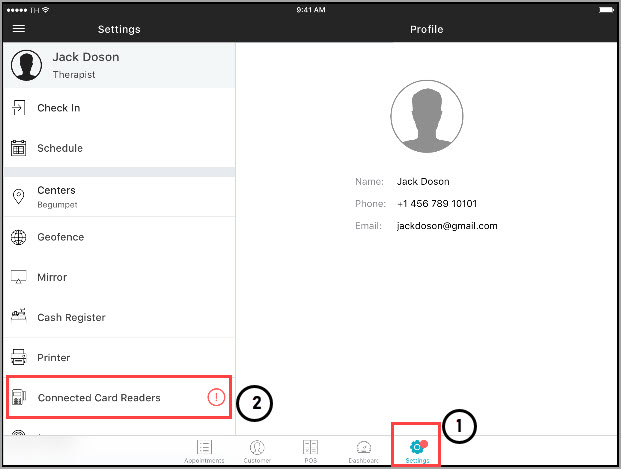
In the Connected Card Readers screen, you will see the name of the terminal along with an Update button. Click Update to download and install the available updates.
See Also
Zenoti Mobile (iOS): Use the Troubleshooting Wizard for BBPOS Connectivity Issues
Learn how you can use Zenoti Mobile’s Troubleshooting wizard to fix any connectivity issues of BBPOS
If you use Zenoti Mobile for day-to-day operations, it is recommended that you use the BBPOS 2X BT Chipper card reader for a seamless checkout experience.
If you encounter issues while collecting payments or while connecting the BBPOS card reader to your iPad, you can use the Troubleshooting wizard of Zenoti Mobile to solve these issues.
Ensure that the version of Zenoti Mobile is 1.21.0 or later
Ensure to turn ON your BBPOS device
To troubleshoot BBPOS connectivity issues
In Zenoti Mobile, tap Settings. The Settings screen appears.
Locate and tap the Connected Card Readers option.
Zenoti Mobile checks for Bluetooth and Location settings.
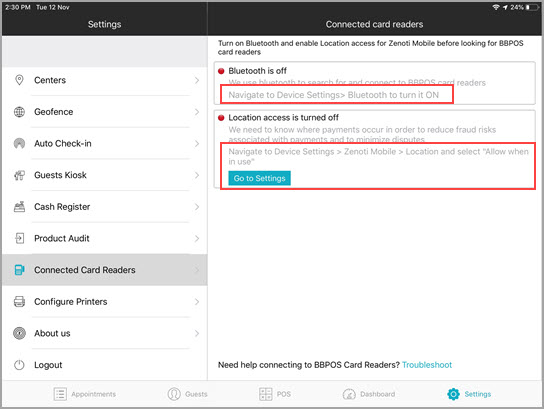
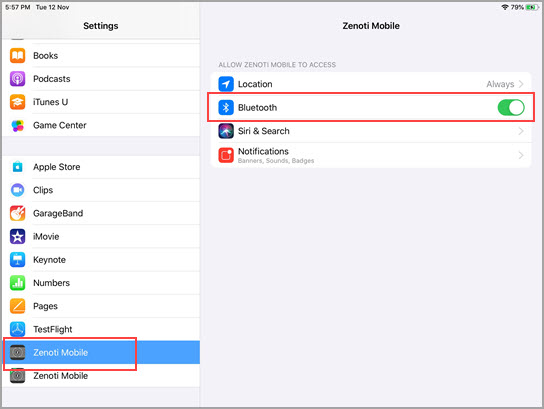
3. You must enable Bluetooth and location services. a. Bluetooth: - Device Level: Navigate to Settings > Bluetooth and turn ON the setting. - App Permissions: App permission for Bluetooth is required only for devices that have iOS 13 or higher. Navigate to Settings > Zenoti Mobile > Bluetooth.
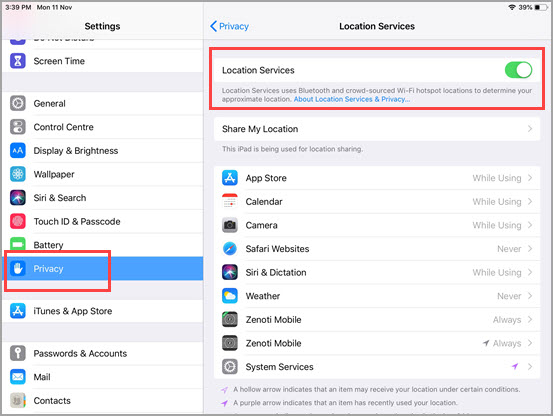
b. Location Services: - Device Level: Navigate to Settings > Privacy > Location Services and turn ON the setting. - App Permissions: You must give necessary app permissions to Zenoti Mobile on the iPad. Navigate to Settings > Zenoti Mobile > Location and select Always.
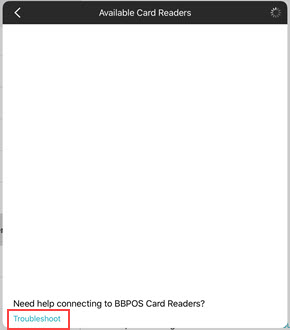
4. Return to the Connected Card Readers option on the Zenoti Mobile. 5. In the Discover Card Readers screen, tap Search. Zenoti Mobile searches for available card readers. 6. Do one of the following: a. If the BBPOS card reader is discovered: Tap Connect to establish a connection with the BBPOS card reader. b. If the BBPOS card reader is not discovered: Tap Troubleshoot to open the Troubleshooting wizard.
Note
The Troubleshooting wizard searches for nearby BBPOS devices for 30 seconds and displays a list of all the BBPOS devices that are turned ON in the following order: - Devices that are configured in the center settings. - Devices that are not configured in the center settings. : Such devices should be added as a terminal at the center level. Learn how to add BBPOS as a terminal at the center level.
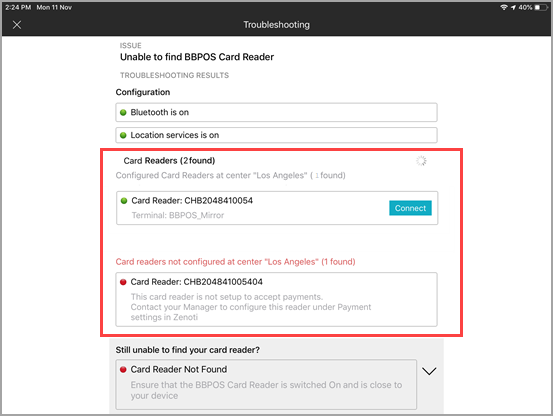
7. If your BBPOS device appears in the list, tap Connect. Zenoti Mobile connects with the selected BBPOS device and you are ready to collect payments. If no BBPOS devices are found within 30 seconds, the Troubleshooting wizard displays a prompt and recommends you take the following actions: - Check the battery level of the card reader - Check whether there are any updates available for the device - Check whether you have connected the BBPOS device to some other iPad. Ensure the card reader is connected to the appropriate iPad if you have multiple iPads in your center.
FAQs
What happens if I tap the Connected Card Readers setting without enabling Location Services?
Note
When you open the Zenoti Mobile app on your iPad, you will see a pop-up prompting you to enable the location services. : This prompt is displayed only once.
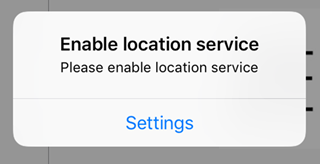
Tap Settings and navigate to Privacy > Location Services and turn ON the location services.
What happens if I open an invoice and tap Take Payment without enabling Bluetooth and Location Services?
If Bluetooth and Location Services are disabled, and if you try to collect payment by tapping Take Payment, Zenoti Mobile will display the following pop-ups:
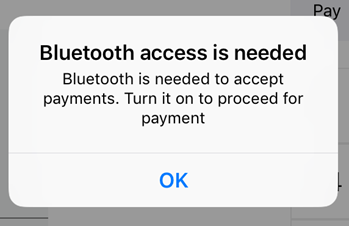
Enable Bluetooth and Location Services by tapping on the pop-ups.
I have connected the BBPOS device directly to the iPad via the Bluetooth settings. Do I still need to pair the device from the Zenoti Mobile app?
To use the BBPOS card reader for collecting payments, you must pair the card reader only using the Zenoti Mobile app. Do not connect the BBPOS device directly via the Bluetooth settings of the iPad. The device will still be visible in the Troubleshooting wizard, but you will not be able to establish a connection with it.
Is there another way to open to the Troubleshoot screen?
Yes. You can also open the Troubleshoot screen by navigating to Settings > Connected Card Readers > Troubleshoot.
Recommendations and Best Practices
To identify your BBPOS device correctly, Zenoti recommends you name the device appropriately at the time of adding the card reader as a terminal in the desktop POS. For example, if you have a BBPOS device for the front desk and a BBPOS device for the kiosk, you can name them BBPOS_Frontdesk and BBPOS_Kiosk respectively. Such a naming convention will help you to identify the appropriate device while troubleshooting.
If you have multiple iPads and multiple BBPOS devices in your center, we recommend that you label each of the iPads and the BBPOS devices appropriately. This will help in easy identification and will also reduce Bluetooth pairing issues.
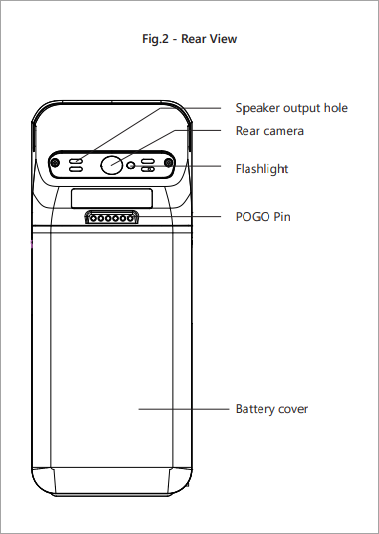
Stripe: Collect Payments on the BBPOS WisePOS E Terminal
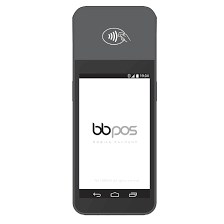
The BBPOS WisePOS E is a countertop card reader based on Android. The card reader is capable of Contactless, Chip & PIN, and Swipe transactions.
See the following image for a quick reference of the device:
To use the device for daily transactions, do the following:
Add the device as a terminal in Zenoti
Connect the device to the Internet
At the organization or the center level, click the Configuration icon.
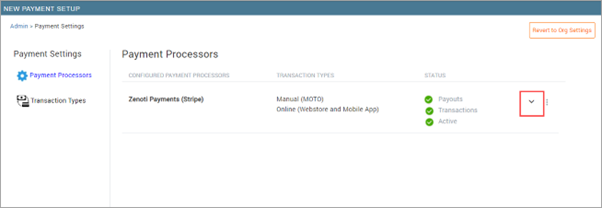
Search for and select the Payment processor onboarding.
For Zenoti Payments (Stripe), click the drop-down list to view more options.
Select the Terminals tab and click Add Terminal.
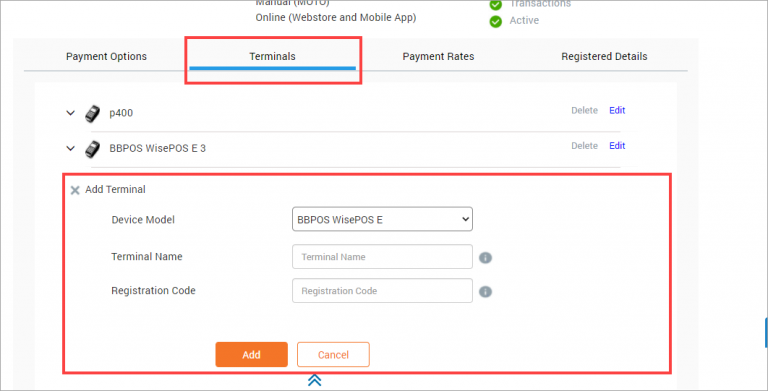
Enter the following details:
Device Model: From the drop-down list, select BBPOS WisePOS E if you are using this device directly with your computer. If you are using this device with Zenoti Mobile on an Apple iPad, select BBPOS WisePOS E Cloud.
Terminal Name: Enter a name of your choice. For example, if there are multiple BBPOS WisePOS E devices, you can name the device as BBPOS WisePOS E (Register 1), or BBPOS WisePOS E (iPad).
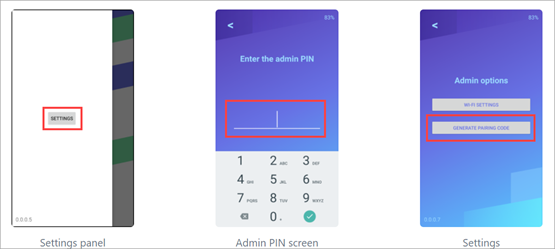
Registration Code: Enter the registration code of your device. Note: To know the registration code, on the BBPOS WisePOS E device, in the home screen, swipe right from the left edge of the screen and select Settings.The device will prompt you to enter the Admin Code. Enter the code 07139.From the Admin Options, select Generate Pairing Code. The device will display its registration code.
Click Add. You have successfully added BBPOS WisePOS E as a terminal for your business.
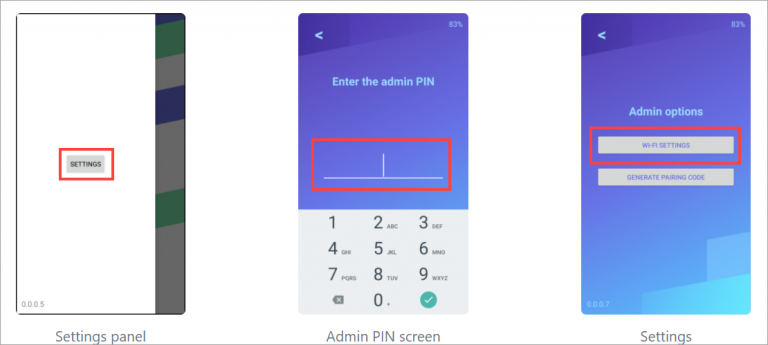
Turn ON the BBPOS WisePOS E device and wait until the home screen appears.
On the home screen, swipe towards right from the left edge of the screen. The Settings panel appears.
Select Settings. The device will prompt you to enter the Admin Code.
Enter 07139. The Settings menu appears.
Select WiFi Settings.
Select Add a Network. The device will scan for available networks and list the same.
Select your network. The device will prompt you to enter the WPA key (Network password).
Enter the password. The device is successfully connected to the Internet.You can now proceed to take payments on the device.
Frequently Asked Questions
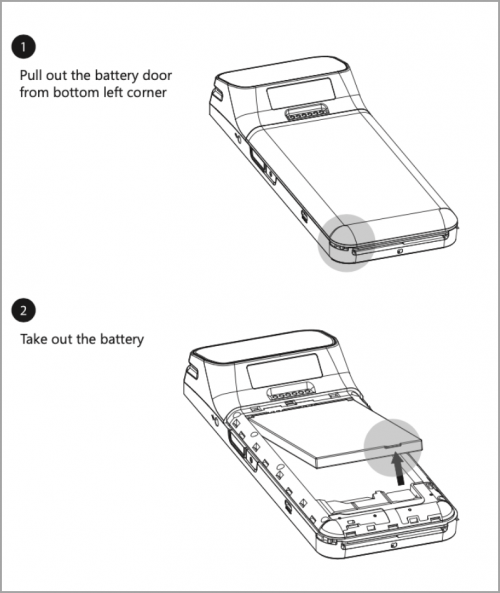
How can I remove the backplate of the card reader BBPOS WisePOS E?
Refer to the following image:
How do I navigate to the Settings screen?
Swipe right from the home screen of the terminal BBPOS WisePOS E. The Settings button appears. Tap the button and enter the Admin Code (07139) to view the options.
How can I charge the terminal BBPOS WisePOS E?
To charge the terminal, you must plug the device to a wall socket or an outlet using the USB Adaptor. Note: The USB Adaptor is sold separately.
Use Stripe Reader M2 for Collecting Payments
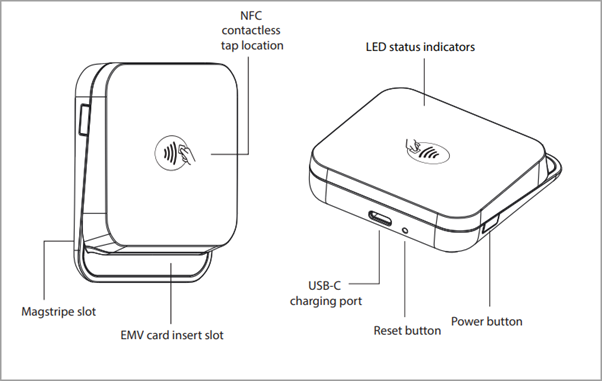
Stripe Reader M2 is an easy-to-use mobile card reader designed for fast, reliable payments. Stripe Reader M2 accepts EMV chip, contactless, and swipe payments. It’s battery-powered and connects to your iOS or Android-based point of sale application via Bluetooth.

Device Overview
Prerequisites
You must install the latest version of Zenoti Mobile App on your iOS or Android device.
Complete the following steps to collect payments using Stripe Reader M2
Add Stripe Reader M2 as terminal in Zenoti.
Connect Stripe Reader M2 to the mobile device (iOS or Android).
At the organization or the center level, click the Configuration icon.
Search for and select the Payment processor onboarding.
Expand Zenoti payments (Stripe) and select the Terminals tab.
Go to Terminals.
Enter the following information:
Device Model: From the drop-down list, select Stripe Reader M2.
Terminal Name: Enter a name for the device. Ensure to use a unique name for the device as it will help you identify the correct one in case of multiple devices.
Serial No: Enter the serial number of the device. You can find the serial number on the backside of the device.
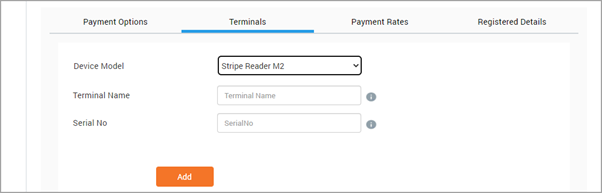
Click Add.
Open the Zenoti Mobile App.
Navigate to Settings > Connected Card Readers > Discover Stripe M2 Card Reader.
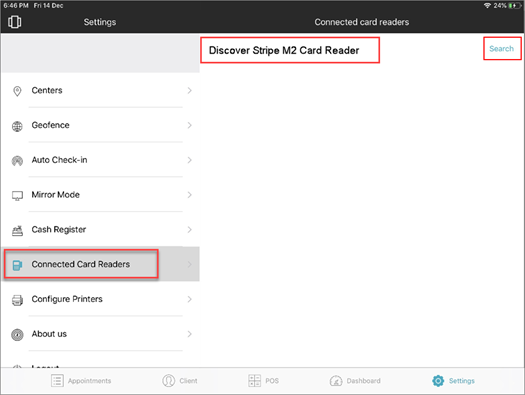
Ensure the Stripe Reader M2 is switched on and place it near your mobile device. Zenoti Mobile searches for the available devices and connects to Stripe Reader M2.
After Stripe Reader M2 is connected to Zenoti Mobile, you can start collecting payments.