Product returns and order returns
A return order is a form that you submit to your vendor or supplier to return products that are damaged/expired or received in excess.
You might return products because of the following reasons:
While receiving the order, if you see that the products are damaged or expired before you accept them in Zenoti. In this case, you can mark the delivery as partial and return the products to the vendor.
You don’t need to submit a return order for this.
After receiving a delivery, you check in the products to your store and accept them in Zenoti. When you unpack a product and you notice that, for example, the seal of a bottle is broken.
You need to return the products by using a return order.
When your guests have returned products that you sold from the POS or from the webstore.
You can return the products by using a return order.
Post Restock
After your staff has restocked the product, you can choose what you can do with the restocked product:
Action | Description |
|---|---|
Return to vendor | Return the product to the vendor from where you have purchased it. |
Resell | Resell the product, if let’s say the packaging got damaged but the product is in good condition, you can do the repackaging and sell it. |
Convert n Consume | Convert the product from retail to consumable and use it for professional supply. This increases the consumable quantity of the product. |
Transfer to Warehouse | Transfer the product to a center in your company that is a warehouse for damaged/expired products. You can do this when you do not want to discard it or have it in your center (for retail or professional supply), but track it in the future. |
Create a return order
After you have purchased products from a vendor or from the warehouse/corporate office (in case you are a franchise) and you want to use the products for professional supply or sell them to your guests, your staff or your guest complaints that the products are damaged/expired. You can return these products to your vendor using a return order.
Important
You can return products to only ONE vendor using one return order. To return products to multiple vendors, create a separate return order for each vendor.
Click the Inventory icon and navigate to Procurement > Orders.
The Manage Purchase Orders & Transfers page is displayed.

From the I want to… drop-down list, select the Add Returns option.
The Return Order page is displayed.
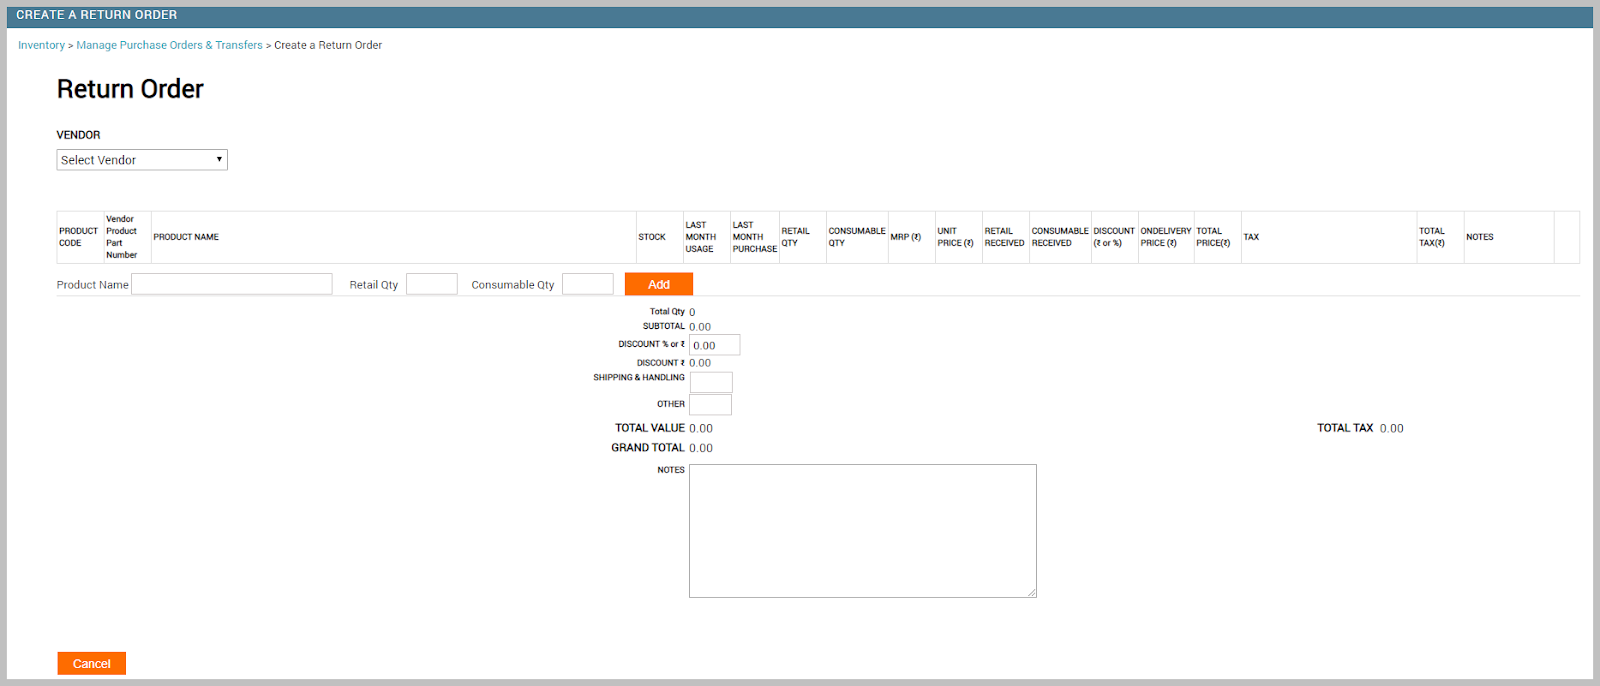
Select the vendor to which you want to return the products.
The vendor address and your center address details are displayed.
Important
If you do not see the desired vendor in the list, reach out to your Admin to make it available for your center.

Enter the product name. As you type, you would get suggestions for the product names only if the product is made available for the center and it is associated with the selected vendor.
Important
If you do not find the desired product in the list, reach out to your Admin to make it available for your center and the selected vendor.
After you add the products, you cannot change the vendor details. If you want to purchase it from a different vendor, delete the product entry and repeat steps 1-4.
Enter the return quantities in negative. Enter a quantity for retail, for consumable, or for both depending on whether you want to return retail, consumable, or both types of the product.
Click Add. The product is added and the following new fields are added to the form:
Product Code: The code defined by the Admin while adding the product in the Products page.

Vendor Product Part Number: If the product is a part, the vendor has a number for it which is defined in the Configuration > Products > Vendors > Manage Vendors > Products tab.
Example: LO-84327
Product Name: Name of the product
Example: Lotus Face Gel
Stock: Current stock count of the product (both retail and professional supply)
Note
If this quantity is negative, it indicates that the product is running out of stock. You need to conduct a stock count to know if there is any pilferage. Or, you can procure them from a vendor or from another center.
Last Month Usage: Number of units of the product that was used (retail and professional supply) in the previous month
Last Month Purchase: Number of units of the product (both retail and consumable) that was purchased in the previous month
Retail Qty: Retail product quantity for return
Note
This field has a 0 value, if you are not returning the retail quantity or the product is just a professional supply.
Consumable Qty: Consumable product quantity for return
Note
This field has a 0 value, if you are not returning the professional supply quantity or the product is just retail product.
MRP ($): Maximum retail price or Manufacturer Suggested Retail Price of the product
Unit Price ($): Vendor-defined price for each unit of the product for the center (from where the purchase order is being raised)
Discount ($ or %): Discount given by vendor for each unit of the product for the center (from where the purchase order is being raised)
OnDelivery Price ($): Price charged by the vendor for delivery of the product. It is usually the same as the unit price unless the vendor decides to give you better pricing. You can change this while receiving the delivery.
Total Price ($): (Retail Qty + Consumable Qty) x Unit Price
For example, if the Retail Qty is 20 and Consumable Qty is 30 and the unit price is $5, the Total price becomes (20 + 30) x 5 = $250
Tax: Vendor-defined tax for each unit of the product for the center. On delivery, if the vendor gives you better pricing, you can edit this tax.
Total Tax ($): (Retail Qty + Consumable Qty) x Tax
Notes: Any notes for returning the product
(Optional) Add more products to the order.
Click Save As Draft.
The return order is created with the status as Created.
When you create a return order, the stock level of the returned products is not affected.
Complete the following steps to submit the return order to the vendor:
Email the return order to the vendor.
This is applicable only if email notifications are enabled for your company. If not, you can print the order and send it to your vendor.
Raise a created return order
After you have created a return order, you can edit it before you can raise it in Zenoti. A raised order is not sent to the vendor. You have to print, scan, and send it to the vendor. Alternatively, you can email it from Zenoti, only if email notifications are enabled for your organization.
Click the Inventory icon and navigate to Procurement > Orders.
The Manage Purchase Orders & Transfers page appears.
Locate the order.
Click the desired Ref#.
The return order is opened for editing.
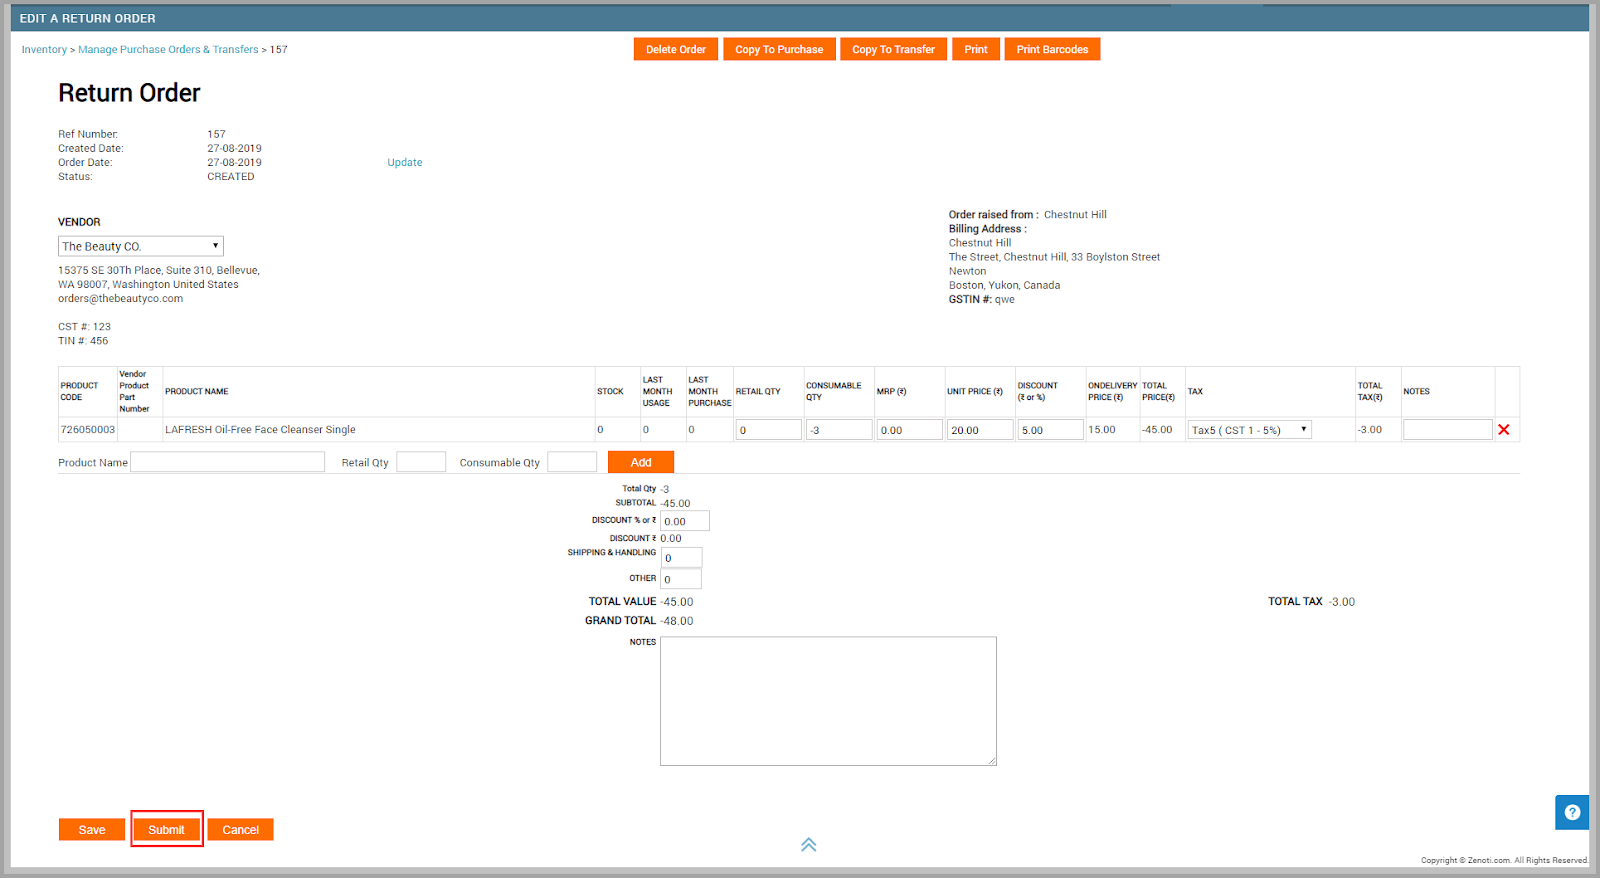
Click Submit.
The return order is raised and the status is updated to Raised.
The following two fields are used to record the undelivered quantities:
Retail Qty: (Retail Raised for return - Retail Received by vendor)
Consumable Qty: (Consumable Raised for return - Consumable Received by vendor)
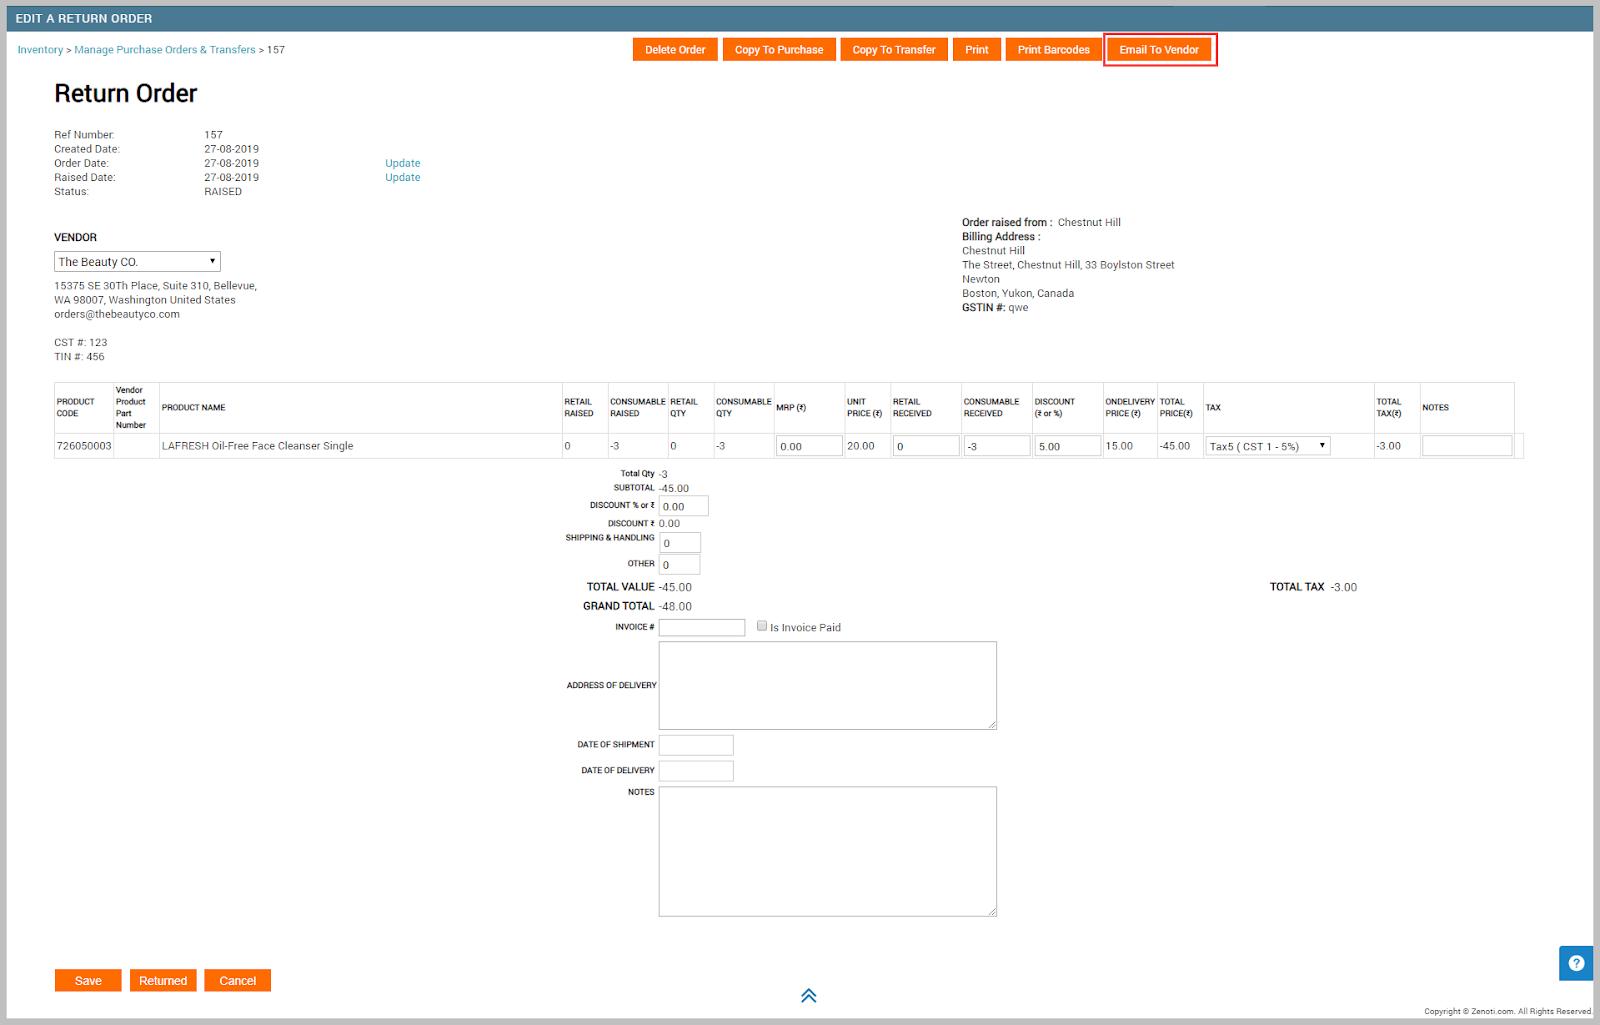
When you submit a return order, it is not sent to the vendor. You have to send it by printing it or by emailing it from Zenoti.
Complete the following steps:
Print the order or email it to the vendor
Mark an order as returned
After you have raised a return order and emailed it to the vendor, you have to wait for the vendor to confirm the return.
Click the Inventory icon and navigate to Procurement > Orders.
The Manage Purchase Orders & Transfers page is displayed.
Locate the order in Raised status.
Click the desired Ref#.
The return order is opened for editing.
Click Returned.
The order is marked as returned and the stock level is reduced. The status of the is also changed to Delivered.
You can view the returned products in the Inventory > Reports > Returns report.
Note
Note: First, try to enable this report for your organization. Refer to the Enable Specific Reports article for this. However, there is a chance that this report is not available for your organization. If so, you will not be able to see the report in the Reports > List of Reports section. If this is the case, reach out to your Zenoti representative to enable this report for you.
FAQ and troubleshooting
When a guest returns a product purchased through the POS, does that product automatically go back into the on-hand inventory?
No. The returned product does not get restocked automatically unless the org level setting Allow to restock returned products is enabled. And, if this setting is enabled, the product is restocked to the floor.
For businesses with no separate store and floor, if the setting is enabled, the product gets restocked and the On-Hand quantity is updated automatically.
Product returns from guests
Your guests can purchase products from POS or Webstore or, they can receive products as part of a series package (free and bundled products), or as gifts or promotional kits from your company on its anniversary. There’s a possibility that these products are damaged or expired.
When your guest returns a product, your company can choose if the front desk can discard it or restock it.
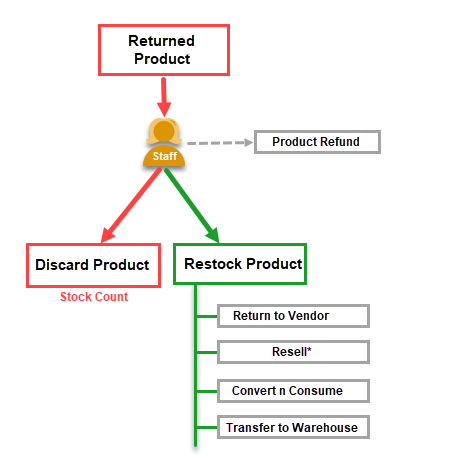
*You can learn about reselling a returned product in the Post Restock section in this article.
Discard: Refunds the product. This makes the product discarded and the entire returned quantity becomes the discarded quantity. You can view the Inventory > Reports > Returns to know more details about the return. After the staff discards a product, you must perform a stock count to have the correct quantity showing up in the current stock and other reports in Zenoti. Use notes while reconciling the product to record the reason for discarding.
Restock: Refunds the product and restocks it to the floor (or on-hand stock). In case the guest has purchased, let’s say, 3 bottles of a Hair Shampoo, and found 1 bottle as damaged, but returned all 3. The staff also checks and confirms that 1 bottle is damaged and cannot be restocked, the staff must be allowed to restock 2 bottles and discard 1 bottle. In Zenoti, you can allow the staff to enter restock quantity and discard quantity using the Configurations > Inventory > Stock Actions > Allow to restock returned products.
Note
Restock increases the on-floor (or on-hand) quantity of the product.
You can view the Inventory > Reports > Returns to know the sold quantity, restocked quantity, and the discarded quantity.
How to Return Products to Vendor?
In Zenoti, you can return products in one of the following ways:
Mark the delivery as partial to not consider the damaged/expired quantity.
Important
Current stock levels are not impacted by this approach.
Example: You have raised a purchase order for 20 bottles of Hair Conditioners for professional supply. While you are receiving a full delivery from the vendor, you notice that there are 2 bottles that are damaged. You can edit the received quantity in the purchase order as 18 bottles instead of 20 bottles and mark the delivery as Partially Delivered. You can also add a note in the purchase order for returning the products and email the purchase order in Partially Delivered state to the vendor.
Raise a purchase order with negative quantities to the vendor. You can copy a delivered purchase order and edit the quantities in negative.
Important
Current stock levels are impacted by this approach due to the negative quantities.
Submit a return order to the vendor.
Important
Current stock levels are impacted by this approach due to the negative quantities.
Lifecycle
In Zenoti, a return order goes through different stages right from it is created until it is marked as returned.

Stage | Description |
|---|---|
Created | Order is created and saved as draft. |
Raised | Order is submitted in Zenoti, but not sent to the vendor. Use the Email to Vendor option to send a PDF copy of the order. |
Updated | Raised order is edited and saved, for example, the credit note is added. |
Delivered | Order is marked as returned after the vendor confirms the return. |