Accounting Integration
Switch to a new accounting platform
Zenoti will enable the Reset Configuration button on the configuration page, where the integration is configured (at center level or at the organization level).
 |
When a business resets the integration, Zenoti does the following:
Removes current configuration and provider mappings.
Disables the sync jobs for items, guests, and locations
Disables data sync to the accounting platform of all pending syncs
Disables reports and marks past data (synced or pending) as Archived in reports
Deletes the connection and the Zenoti app from Xero and QBO
Click Reset Configuration.
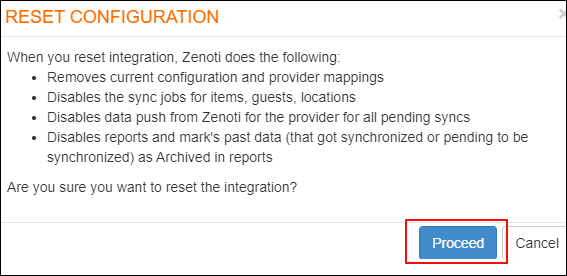 |
Click Proceed to continue to reset the configuration.
Simplified configuration for accounting integration
Generally, not all businesses need a multiple set of configurations to set up accounting integration in Zenoti.
To help such businesses easily set up the integration, we've simplified the configuration page.
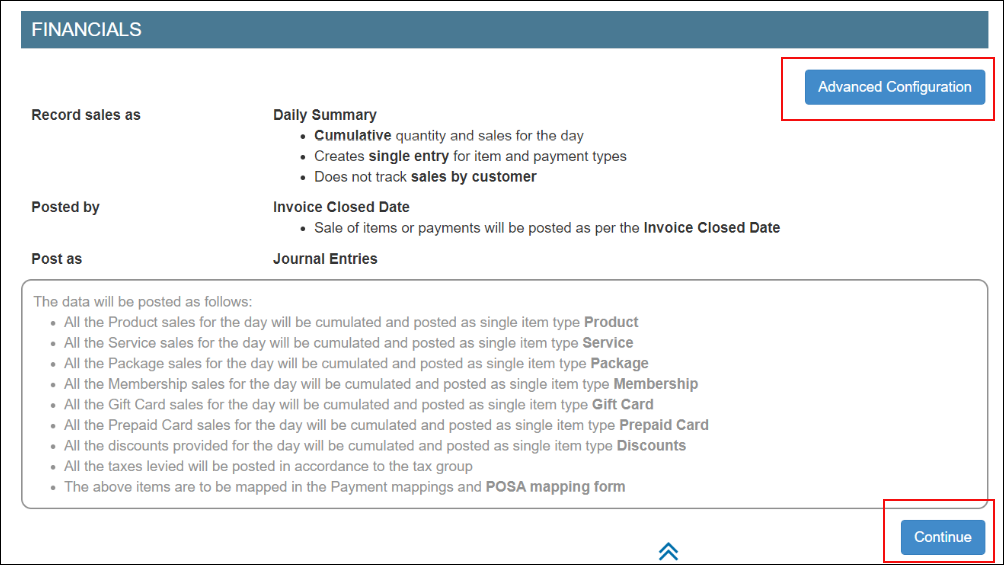 |
By default, Zenoti considers the following configurations:
Record sales as Daily Summary:
Cumulative quantity and sales for the day are considered
Single entry is created for items and payment types
Note
This configuration does not track sales by customers.
Post sale of items (for services the date when the services are performed) or payments based on Invoice Closed Date.
Post items as journal entries.
Default Value for Customer - Guest
Default Item for Membership Discount - Membership Discounts
Default Item for Package Discount - Package Discounts
Click Continue to accept the default configurations. To edit these configurations, click Advanced Configuration.
Accounting integration in Zenoti
Running a smooth and profitable business is always challenging. Accounting activities such as tracking sales, managing expenses, filing taxes, measuring liabilities, and reconciling cash-flows, are the most crucial and complex activity for any business.
With Zenoti, you can integrate with a third-party accounting platform that can help you track these complex activities and in turn, helps you to prepare the following book of accounts for your business:
Profit and loss accounts
Cash-flow statements
Balance sheets
Expenses
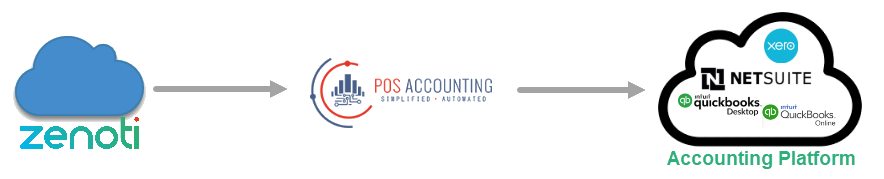
Zenoti partners with POSAccounting and supports integration with the following accounting platforms:
Xero
QuickBooks Desktop
QuickBooks Online
NetSuite
Businesses can choose to set up the integration at the organization level or at each center.
Based on where you want to set up the integration, click on the Configuration icon.
At the organization or center level, click Integrations.
Set up and authorize the accounting platform.
Expand the Provider section and select the accounting platform.
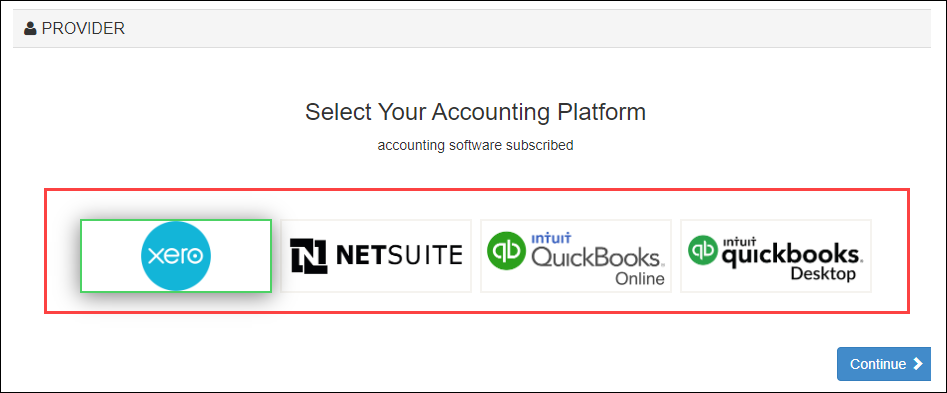
Click Continue to move to the next step.
The Configuration section appears. The fields in this section vary based on the accounting platform that you’ve selected.
Enter the details of the account that you have on the accounting platform.
Locations
In this step, you can choose to send data with or without locations.
If you want to enable the integration with locations, select the Multi-Location switch.

Sync Type
Select the way you want to sync the data.
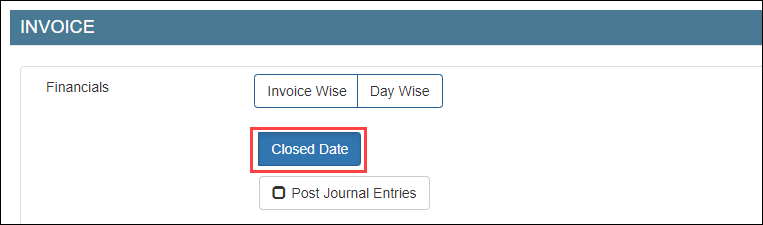
Important
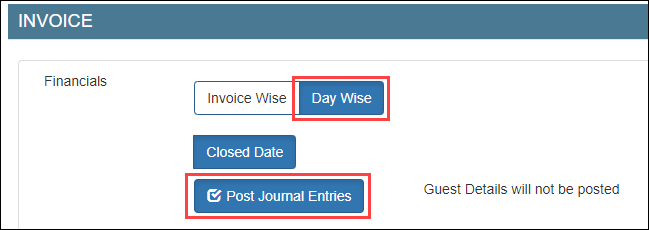
Ensure that you’ve enabled Closed Date. This is important as Zenoti syncs data based on the day when the invoice is closed.
You can choose to sync data in one of the following ways:
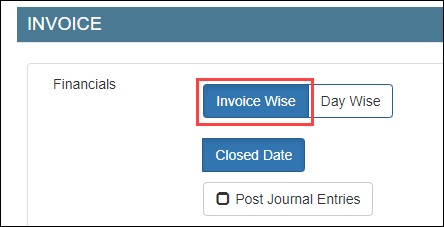
Invoice-wise
For each invoice in Zenoti, a corresponding invoice is created in the accounting platform.
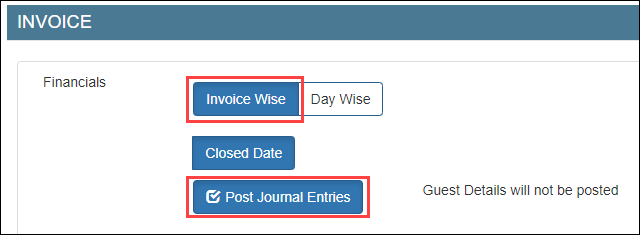
Invoice-wise as Journal entries
For each invoice in Zenoti, a corresponding invoice is posted as a journal entry in the accounting platform.
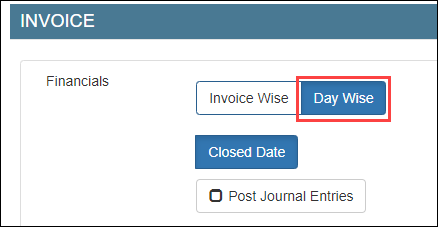
Day-wise
For all the invoices in Zenoti on a day, a corresponding summarized invoice is created in the accounting platform.
Day-wise as Journal entries
For all the invoices in Zenoti on a day, a corresponding summarized invoice is posted as a journal entry in the accounting platform.
Configure
Based on the sync type that you’ve selected in step-3, you can choose how to post your data from Zenoti to the accounting platform.
You can do the configuration either by:
Map
After you’ve completed configuring how data in Zenoti can be pushed to the accounting platform, you are ready to map data in Zenoti to data in the accounting platform.
If you’ve configured data by invoice, you have to map the following:
If you’ve configured data by journal entries, you have to map the following:
Sync
After you’ve mapped the data, you can sync data using one of the following ways:
Scheduled sync
To auto-sync data on a timely basis, reach out to Zenoti Support to set up scheduled sync for your business.
Reconcile
The last step is to reconcile data that you’ve synced from Zenoti to the accounting platform using the following Zenoti Reports:
Items
Customers
Sales Orders Summary
Inventory Orders
Sale Order Summary Details
Note
Zenoti has separate reports for each accounting platform: Xero Reports and QuickBooks Reports.
Set up and authorize Xero accounting integration
Xero is an online accounting software that allows you to track financials.
Zenoti's integration with Xero enables you to sync the financial data from Zenoti to your Xero account.
Important
Before you begin to set up and authorize Xero, ensure that you already have an account created on Xero.
To set up your Xero account details in Zenoti
If you are not on the integration page, based on where you want to set up the integration, click on the Configurations icon.
Select Integrations > Accounting.
Under the Configuration tab, expand the Account section.
You can see the fields relevant to Xero integration.
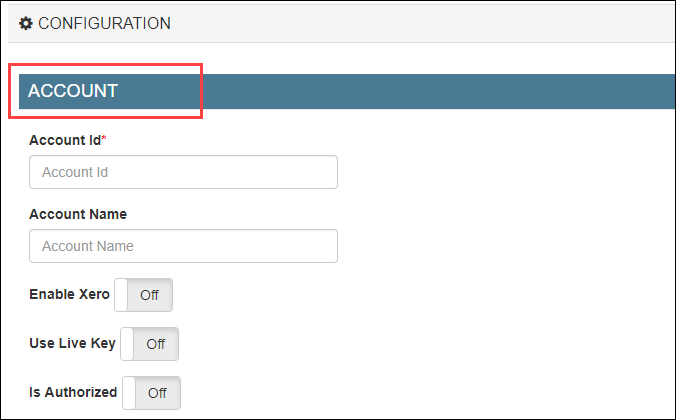
Enter the following details:
Account Id: Enter an identifier for your business. This can be any random combination of numbers. Zenoti will use this id while creating a company for your business in POSAccounting (a third-party connector for accounting integrations in Zenoti).
For example, 34567821.
Account Name: Enter the company name of your business. You may use the same name that you’ve provided in Xero.
For example, Spa Bliss.
Enable Xero: Select this switch to enable integration.
If you want to pause the sync, you can turn off this switch.
Use Live Key: If you want to test the integration, turn off this switch. After you are ready to integrate data, you must turn on this switch.
To authorize Zenoti to access your Xero account
Caution
This tab will be visible only after you configure the invoice and sync settings in the Configuration tab.
Expand the Authorize tab.
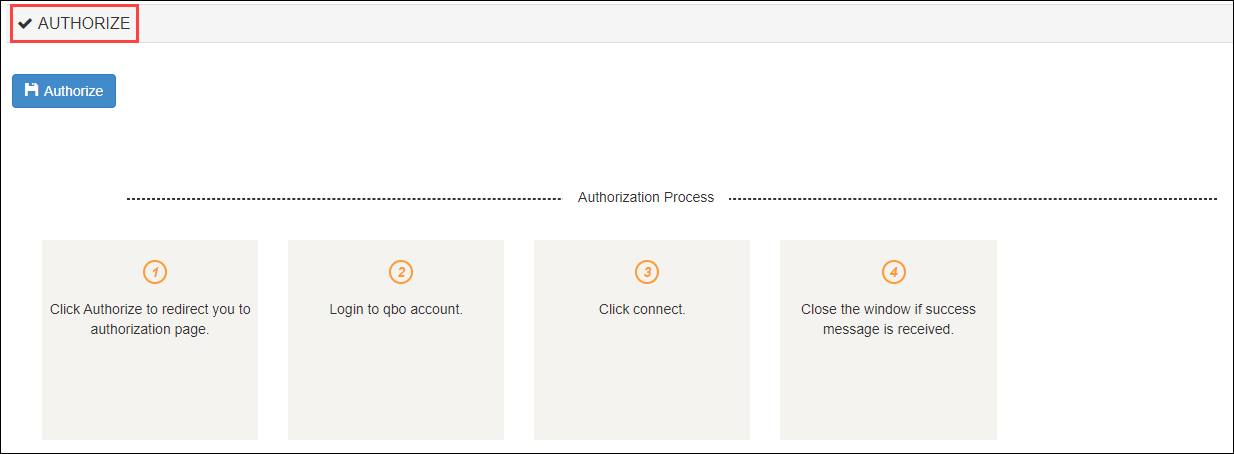
Click the Authorize button.
A new tab opens that will ask you for access to your Xero account to Zenoti.
Important
For some technical reasons, if the new tab does not open, you can see the authorization link in the Authorize section.
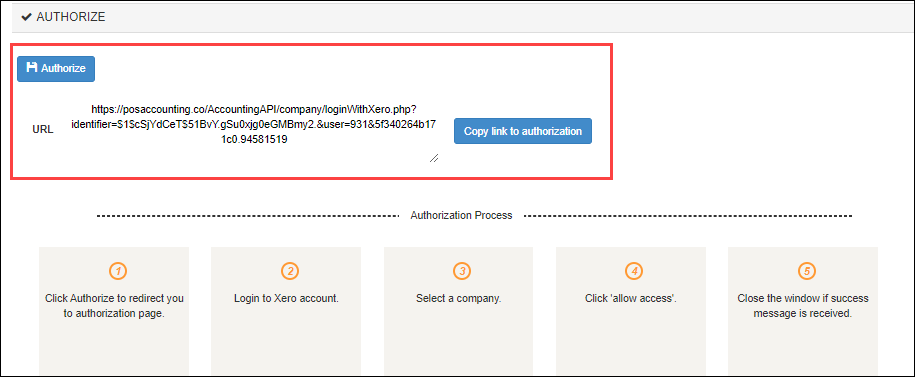
Copy and paste the authorization link in a new tab and press Enter.
If you have a single organization created for your business on Xero, you will see the following window:

However, if you have multiple organizations created for your business on Xero, you will see the following window:
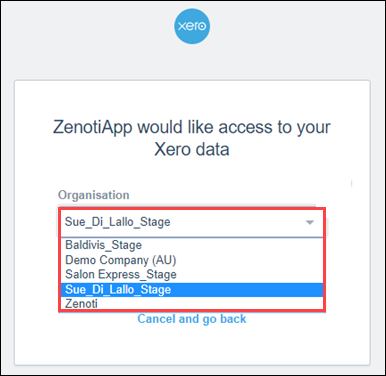
Select the organization to which you want to give access to Zenoti.
Click Allow access.
Zenoti now has access to your Xero account and you will see the following message.

To close the window, click Click here to close this window.
Turn on the Is Authorized switch.
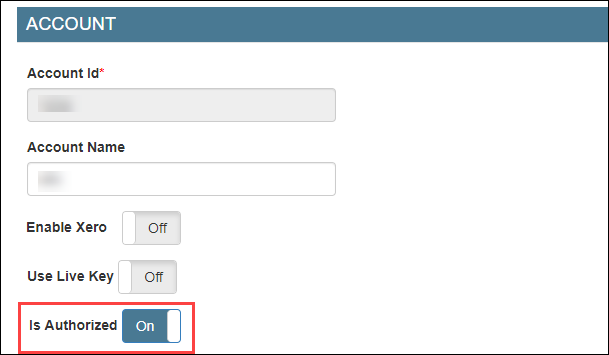
Click Save.
You’ve completed the authorization process for Xero.
If you've created locations in Xero, you must configure the location details. However, if you have not created locations in Xero, you must follow these steps (configure without location details).
Set up and authorize QuickBooks Online accounting
QuickBooks Online (QBO) is an online accounting software that allows you to track financials.
Zenoti's integration with QBO enables you to sync the financial data from Zenoti to your QBO account.
Before you begin to set up and authorize QBO, ensure that you have an account already created on QBO.
To set up your QuickBooks Online account details in Zenoti
At the organization level, click the Configurations icon.
Expand the Integrations tab.
Select Accounting.
Under the Configuration tab, expand the Provider section.
Select QuickBooks Online as the accounting platform.

Click Continue.
The Configurations tab expands and you can see the fields relevant to QuickBooks Online.
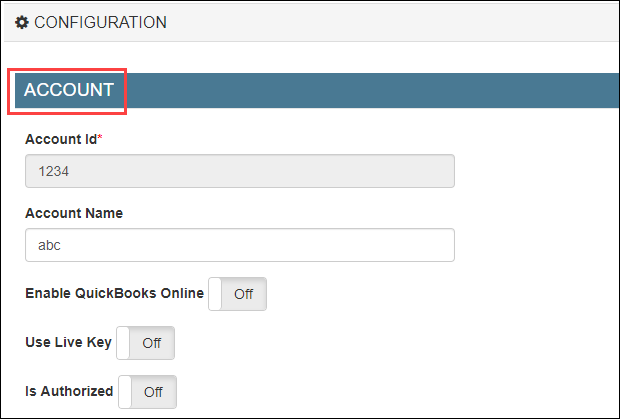
Enter the following details:
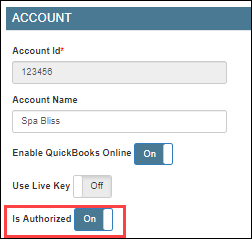
Account Id: Enter an identifier for your business. This can be any random combination of numbers. Zenoti will use this id while creating a company for your business in POSAccounting (a third-party connector for accounting integrations in Zenoti).
For example, 1234.
Account Name: Enter the company name of your business. You may use the same name that you’ve provided in QuickBooks.
For example, Spa Bliss.
Enable QuickBooks Online: Select this switch to enable the integration for the online version of the accounting platform.
If you want to pause the sync, you can turn off this switch.
Use Live Key: If you want to test the integration, turn off this switch. After you are ready to integrate data, you must turn on this switch.
To authorize Zenoti to access your QuickBooks Online account
Disclaimer
This tab will be visible only after you configure the invoice and sync settings in the Configuration tab.
Expand the Authorize tab.
Click the Authorize button.
A new tab opens that will ask you to give access to your QuickBooks account to Zenoti.
Important
For some technical reasons, if the new tab does not open, you can see the authorization link in the Authorize section.
Copy and paste the authorization link in a new tab and press Enter.
If you have a single organization created for your business on QuickBooks, you will see the following window:
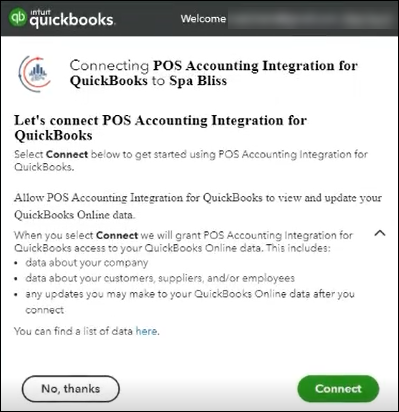
Click Connect.
Zenoti now has access to your QuickBooks account and you will see the following message.
To close the window, click Click here to close this window.
Turn on the Is Authorized switch.
Click Save.
If you've created locations in QuickBooks Online, you must configure the location details. However, if you have not created locations in QuickBooks Online, you must follow these steps (configure without location details).
Configure QuickBooks Desktop accounting with location details
Important
Ensure that you’ve created locations (classes) in QuickBooks Desktop.
To create tracking categories in QuickBooks Desktop
Login to your QuickBooks Desktop account.
Click Edit.
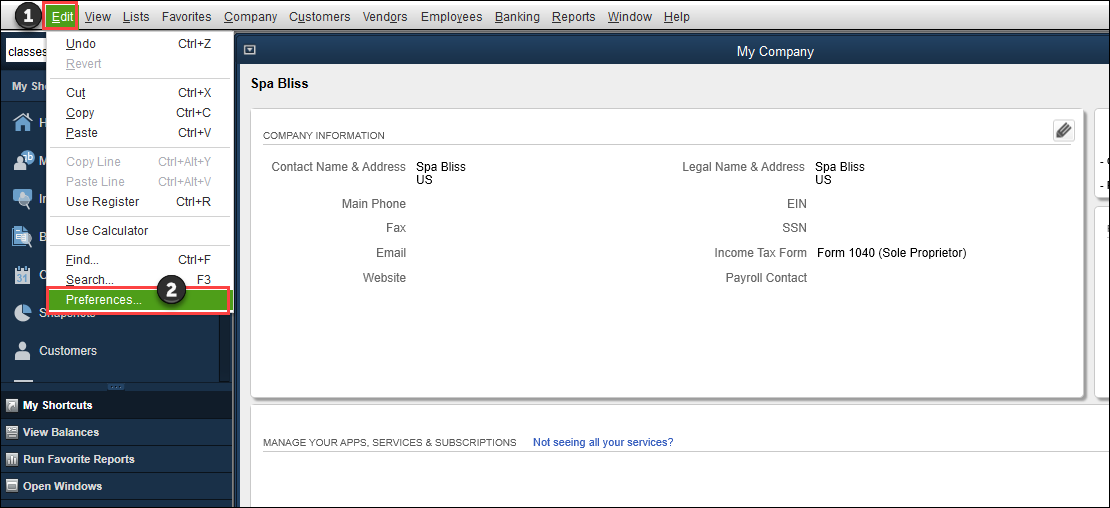
Click Preferences.
Click Accounting > Company Preferences.
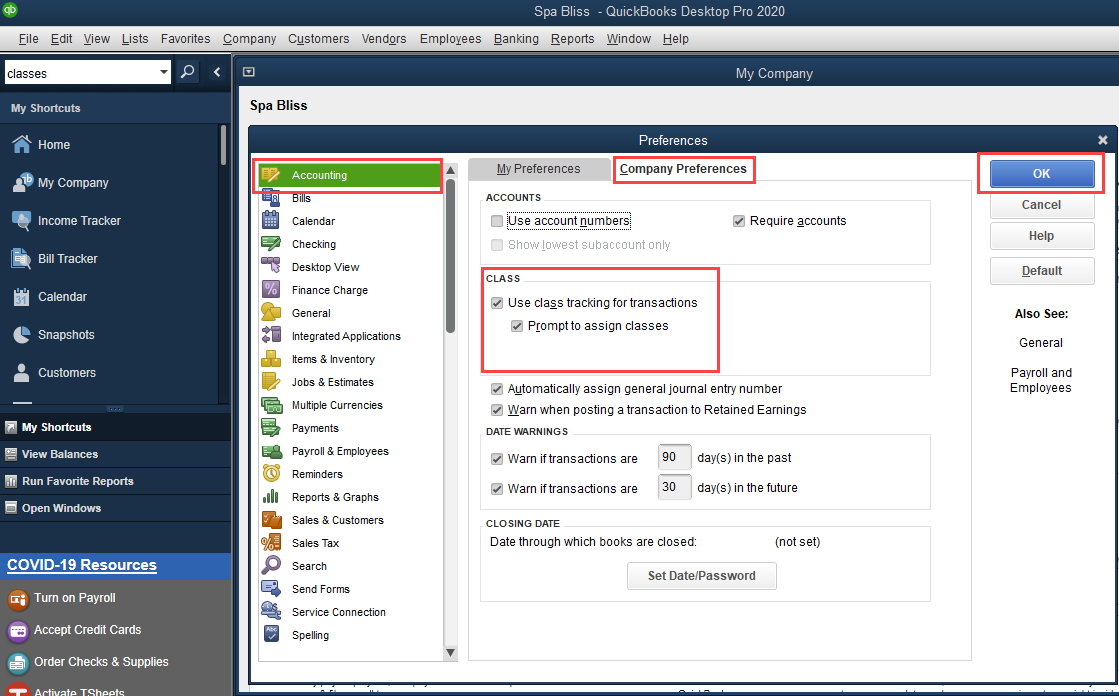
Under the Class section, select the Use class tracking for transactions and Prompt to assign classes.
Click Ok.
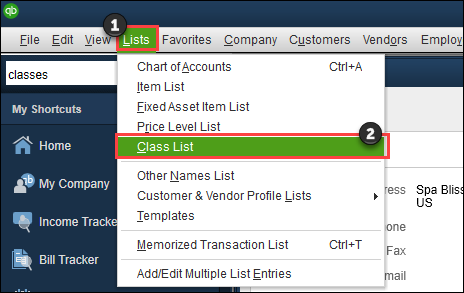
Navigate to Lists and click Class List.
To add a new class, from the Class menu, select New.
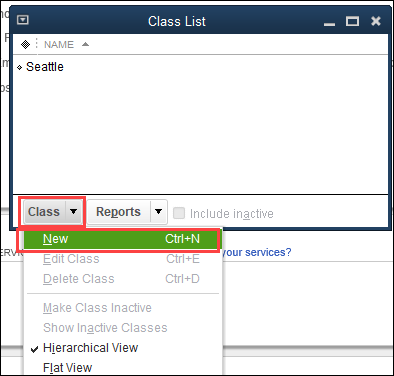
In the Class Name box, enter the name of the class. Keep this information handy to map the category options as location names in Zenoti.
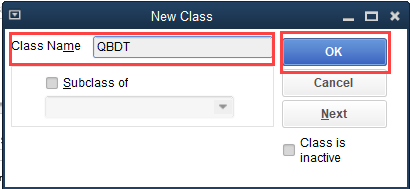
Click Ok.
The class is created.
To configure location details in Zenoti
At the organization or center level, click the Configurations icon.
Select Integrations > Accounting.
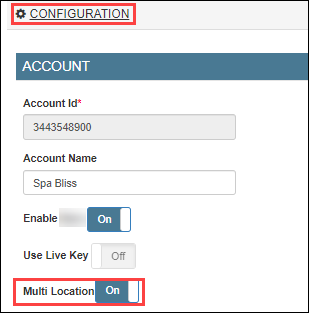
Expand the Configuration tab and navigate to the Account section.
Turn on the Multi-Location switch.
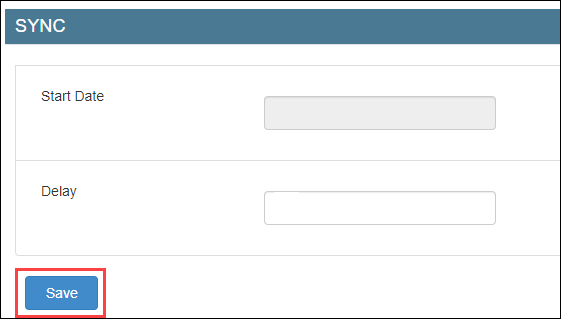
Navigate to the Sync section and click Save.
Expand the Locations tab.
In the Mapped Location box, enter the category option that you’ve entered in QuickBooks Desktop (Step 9 of location creation in QuickBooks Desktop).

Click Save.
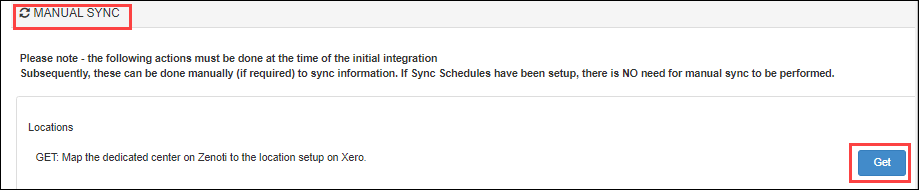
Expand the Manual Sync tab.
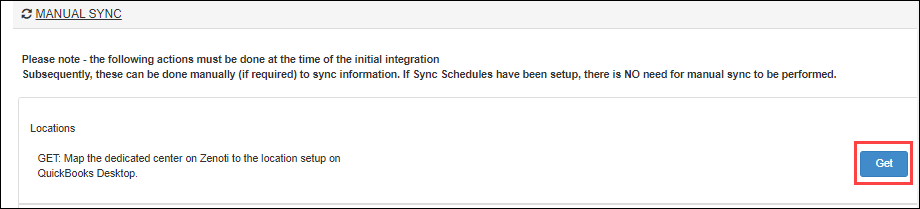
Click Get to sync the locations.
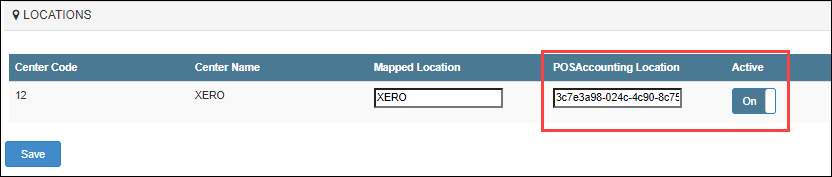
Expand the Locations tab.
Verify that the POSAccounting Location is updated and the Active switch is enabled.

You’ve completed locations mapping for QuickBooks Desktop.
To add locations in POSAccounting
Note
Ensure that you’ve completed mapping in the POSAccounting application.
Navigate and expand the POSAccounting Mapping tab.
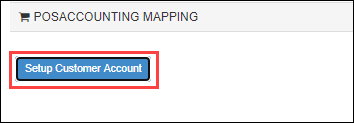
Click Setup Customer Account.
The POSAccounting page opens.
Navigate to Add Location.
Select Yes for multiple locations.
Enter the POSAccounting Location (Step 11 while configuring locations in Zenoti) as the Location id in POSAccounting.
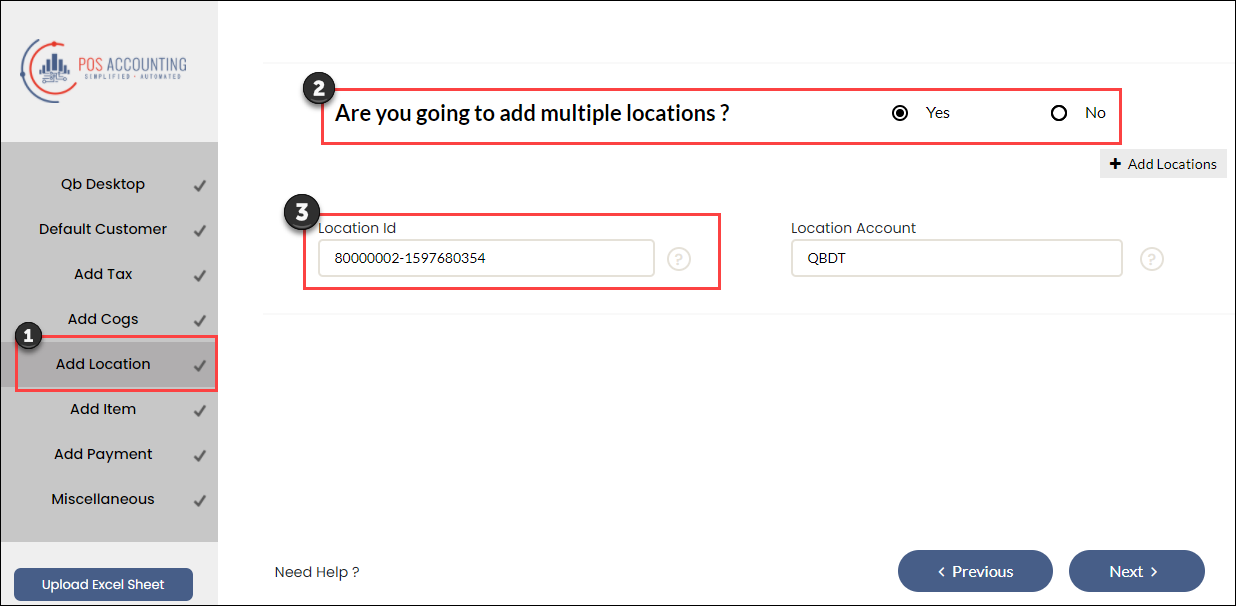
Enter the class (in QuickBooks Desktop) as Location Account in POSAccounting.
Manual sync for accounting integration
After you’ve completed mapping, you can start syncing the data from Zenoti to the accounting platform.
At the organization or center level, click the Configurations icon.
Select Integrations > Accounting.
Expand the Manual Sync tab.
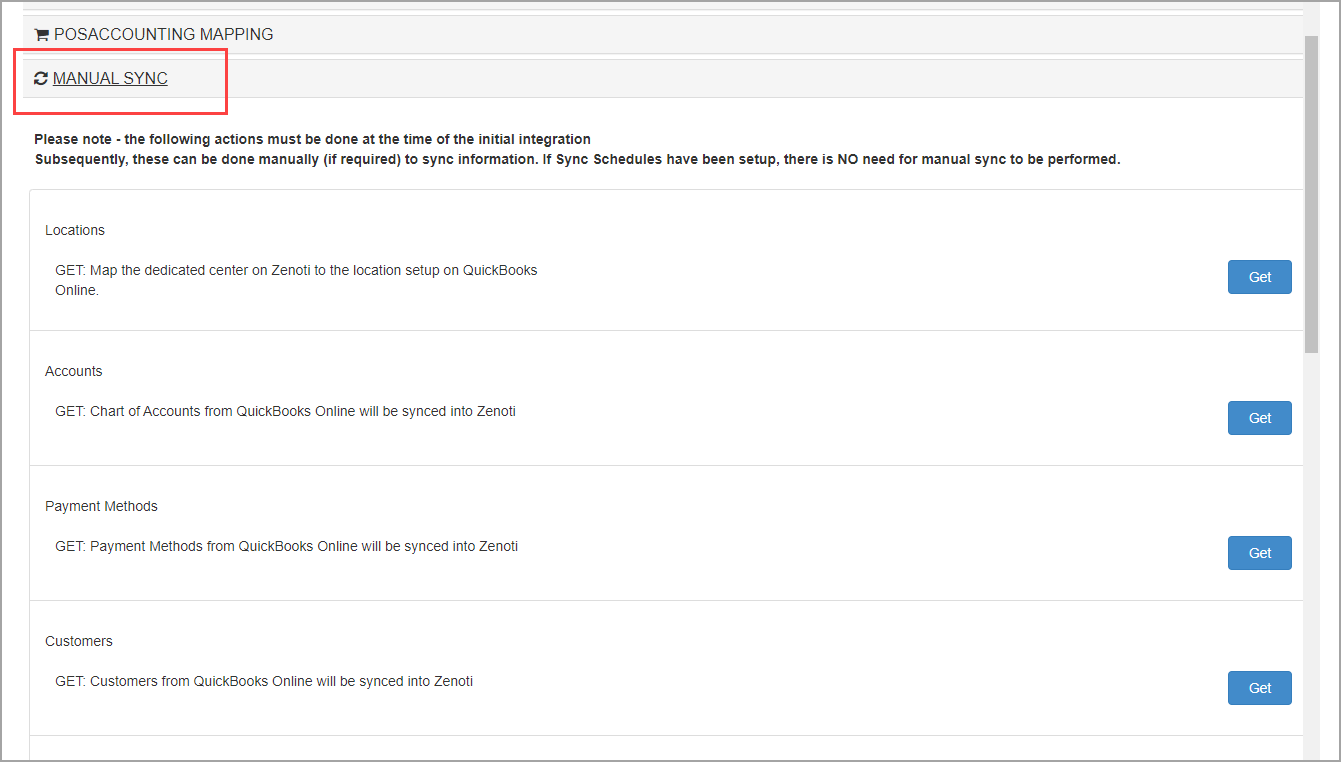
Sync items
Click the respective Get button to sync the following items from the accounting platform to Zenoti:
Locations: Locations in the accounting platform is synced with locations in Zenoti.
Note
If you’ve not enabled the Multi-Location switch, you can skip this step.
Accounts: Chart of accounts in the accounting platform is synced for the -------- mapping in Zenoti.
Payment Methods: Payment methods in the accounting platform is synced with payment types in Zenoti.
Note
This is required only for QuickBooks(Online and Desktop).
Customers: Customer details in the accounting platform is synced with configured customer details in Zenoti.
Taxes: Tax codes in the accounting platform is synced with tax groups in Zenoti.
Note
If you are posting tax as a separate item, you can skip this step.
Products: Inventory item codes in the accounting platform are synced with items mapped as Inventory item type in Zenoti.
When you are syncing products for the first time, select the Sync Type as All Products.

After the first sync, if you update any products in the accounting platform, select the Products Modified On or After option and the select date to sync the changes.

Services: Service codes in the accounting platform is synced with items mapped as Service item type in Zenoti.
When you are syncing services for the first time, select the Sync Type as All Services.

After the first sync, if you update any services in the accounting platform, select the Services Modified On or After option and the select date to sync the changes.

Non-Inventory Items: Non-Inventory item codes in the accounting platform is synced with items mapped as Non-Inventory Item type in Zenoti.
Other charge Items: Other charges in the accounting platform is synced with items mapped as Other Charge item type in Zenoti.
Bundle Items: Bundle items in the accounting platform is synced with items mapped as Bundle Items in Zenoti.
You can verify the sync, by using the Items report for the respective accounting platform. You can navigate to this report from Admin > Reports > Accounting Platform.
Sync transactions
Click the respective Get and Post buttons for the following transactions, to sync data from the accounting platform to Zenoti or vice-versa:
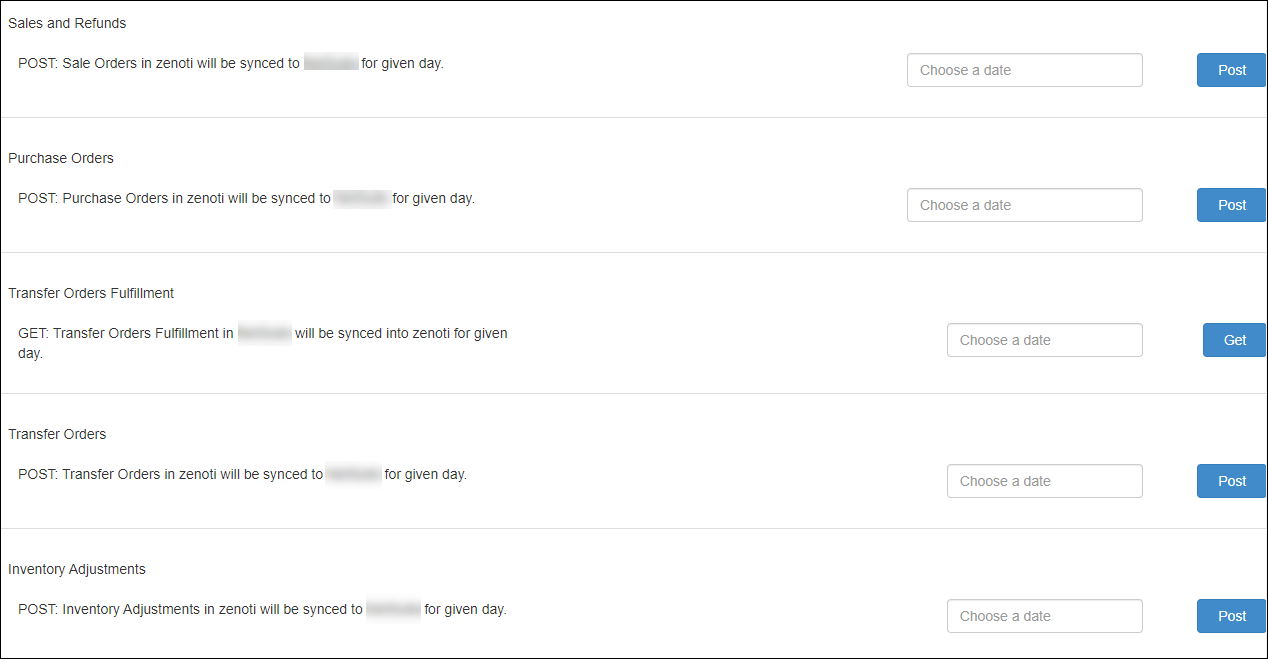
Sales and Refunds: Post the sales invoices generated in Zenoti to the accounting platform.
Purchase Orders: Post the purchase orders created in Zenoti to the accounting platform.
Note
You must specify the date for which you want to post the sale invoices or purchase orders to the accounting platform.
For NetSuite, you can see three more transactions that you can sync:
Transfer Orders: Post the transfer orders created in Zenoti to the accounting platform.
Inventory Adjustments: Post the inventory adjustments made in Zenoti to the accounting platform.
Transfer Orders Fulfillment: Get the delivered transfer orders in the accounting platform to Zenoti.
Note
You must specify the date for which you want to post the transfer orders and inventory adjustments to the accounting platform. For transfer orders fulfillment, specify the date for which you want to get the transfer orders fulfillment from the accounting platform.
Next step
The last step is to reconcile data that you’ve synced from Zenoti to the accounting platform using the following Zenoti Reports:
Items
Customers
Sales Orders Summary
Inventory Orders
Sale Order Summary Details
Note
Zenoti has separate reports for each accounting platform: Xero Reports, QuickBooks Reports, and NetSuite Reports.
Accounting integration: Post membership cross-center redemption
Disclaimer
This enhancement is done only for businesses where the value-based model is enabled.
Generally, businesses with multiple centers allow guests to redeem memberships across centers. For cross-center settlement, they need the amount to appear as payable for the center where the membership is sold, and as receivable for the center where the membership is redeemed.
Moreover, a business can choose to post the value of the membership for cross-center redemption.
Example
A guest purchased a $250 non-recurring membership from the LA center and redeemed it on a service worth $200 at the California center.
Based on the value model, when Zenoti syncs this redemption to the accounting platform, the value of the service $200 is posted as payable to the LA center and as receivable to the California center.
The difference between the sale and the redemption is the discount amount. In our example, the discount is $250 - $200 = $50.
At the organization level or center level, click the Configurations icon.
Select Integrations > Accounting.
Expand the Configuration tab and navigate to the Invoice section.
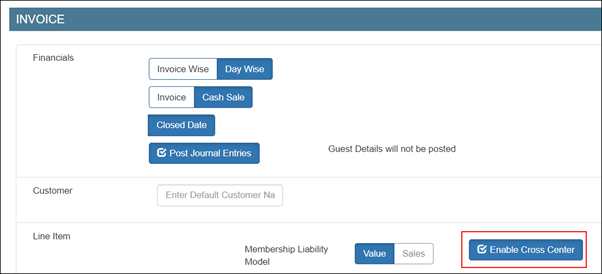
Select the Enable Cross Center check box.
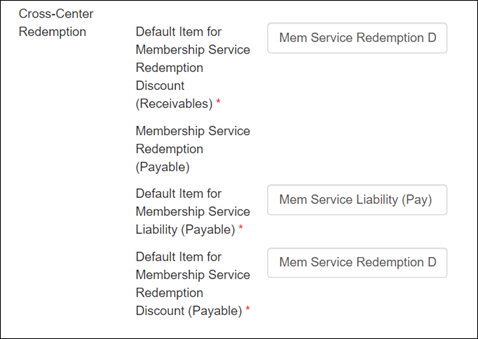
Default Item for Membership Service Liability (Payable): Enter the item to be used to post the redemption as payable for the sale center where there’s no redemption invoice – the redemption invoice is only in the center where the redemption was made.
Default Item for Membership Service Redemption Discount (Receivables): Enter the item to be used to post the difference in the sale and the redemption amount as a receivable discount for the center where redemption was made. This is to ensure if the centers want to receive the full amount or just the value amount (without discount).
Default Item for Membership Service Redemption Discount (Payable): Enter the item to be used to post the difference in the sale and the redemption amount as a payable discount for the center where the membership was sold.
Under the Sync section, click Save.
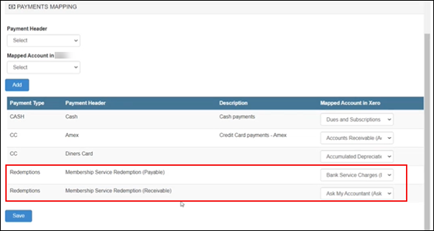
You can post the receivable amount as either an item or as a payment. However, you can post the payable amount as only journal entries.
To post redemption amount as journal entries, expand the Payments Mapping tab and add and map the chart of accounts for receivable and payable.
To post redemptions as invoices, expand the Item Type Mapping tab and add and map the chart of accounts for receivable.
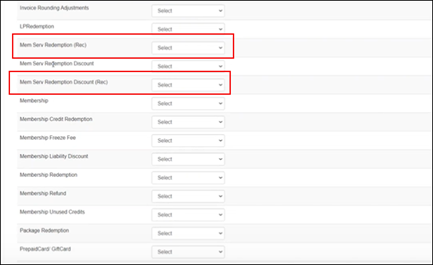
Click Save .
The integration is configured to post cross-center redemptions for memberships based on value.
Reports
Admin Sync – Sale Order Summaries report
You can verify the posting of cross-center redemptions for membership in this report.
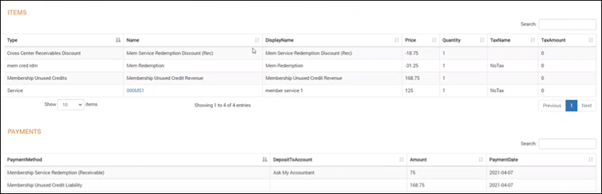
Sales Invoices Report

Configure Xero accounting with location details
Important
Ensure that you’ve created locations (tracking categories) in Xero.
To create tracking categories in Xero
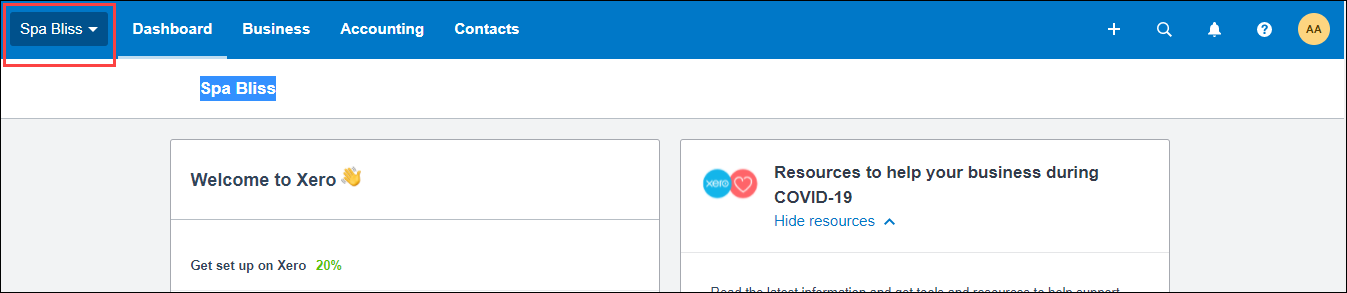
Login to your Xero account.
Click your company name.
For example, Spa Bliss.
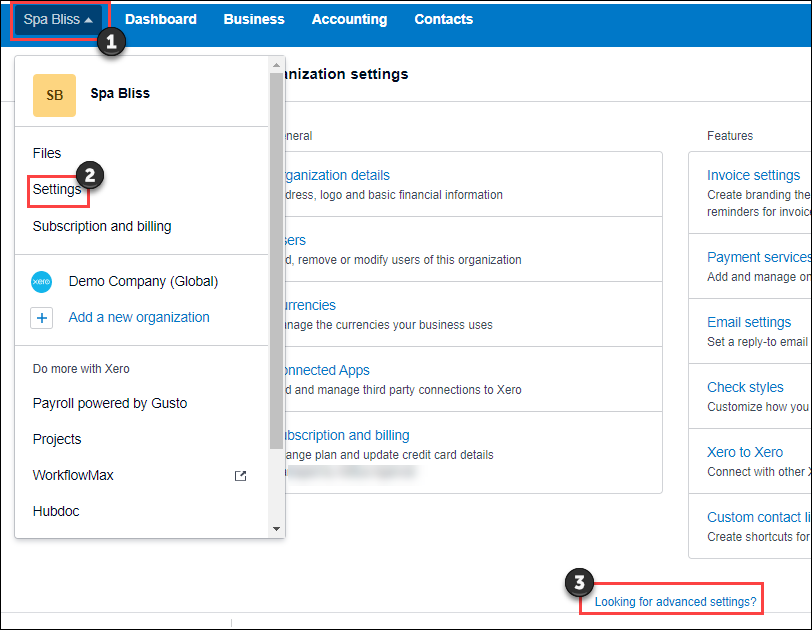
Click Settings and then click Looking for advanced settings?
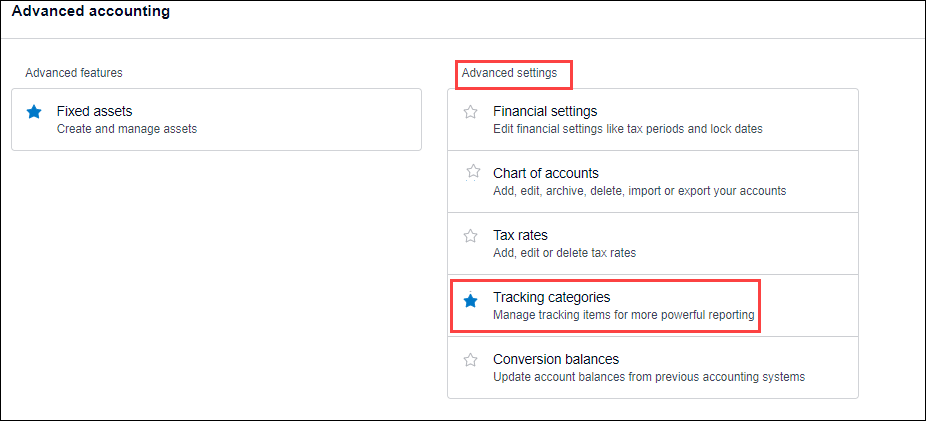
Click Tracking categories.
Click Add Tracking Category.
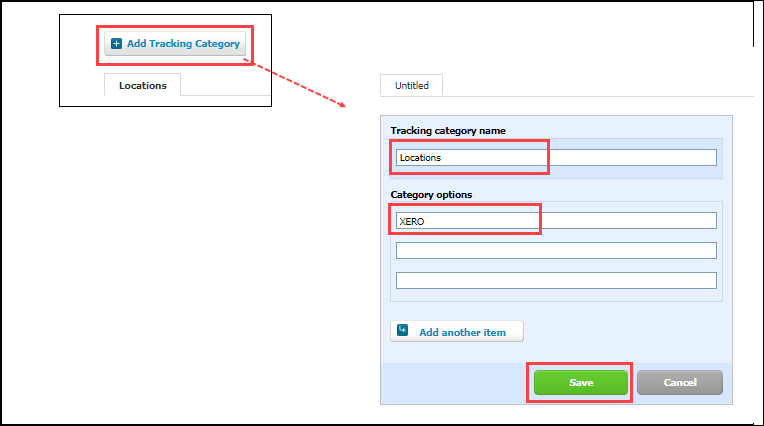
In the Tracking category name box, enter Locations.
In the Category options box, enter the center names.
Keep this information handy to map the category options as location names in Zenoti.
Click Save.
The tracking category is created.
To configure Xero with location details in Zenoti
At the organization or center level, click the Configurations icon.
Select Integrations > Accounting.
Expand the Configuration tab and navigate to the Account section.
Turn on the Multi-Location switch.
Navigate to the Sync section and click Save.
Expand the Locations tab.
In the Mapped Location box, enter the category option that you’ve entered in Xero (step 8 of location creation in Xero).

Click Save.
Expand the Manual Sync tab.
Click Get to sync the locations.
Expand the Locations tab.
Verify that the POSAccounting Location is updated and the Active switch is enabled.
You’ve completed locations mapping for Xero.
Keep POSAccounting Location handy as you will need this while adding locations in POSAccounting.
To add locations in POSAccounting
Note
Ensure that you’ve completed mapping in the ----POSAccounting---- application.
Expand the POSAccounting Mapping tab.
Click Setup Customer Account.
The POSAccounting page opens.
Navigate to Add Location.
Select Yes for multiple locations.
Enter the POSAccounting Location (Step 11 while configuring locations in Zenoti) as the Location id in POSAccounting.

Enter the category option (in Xero) as Location Account in POSAccounting.
Configure accounting integration by invoice
Based on the sync type you’ve selected, you can choose how to present your data from Zenoti to the accounting platform.
At the organization level, click the configurations icon.
Select Integrations > Accounting.
Expand the Configuration tab and navigate to the Invoice section.
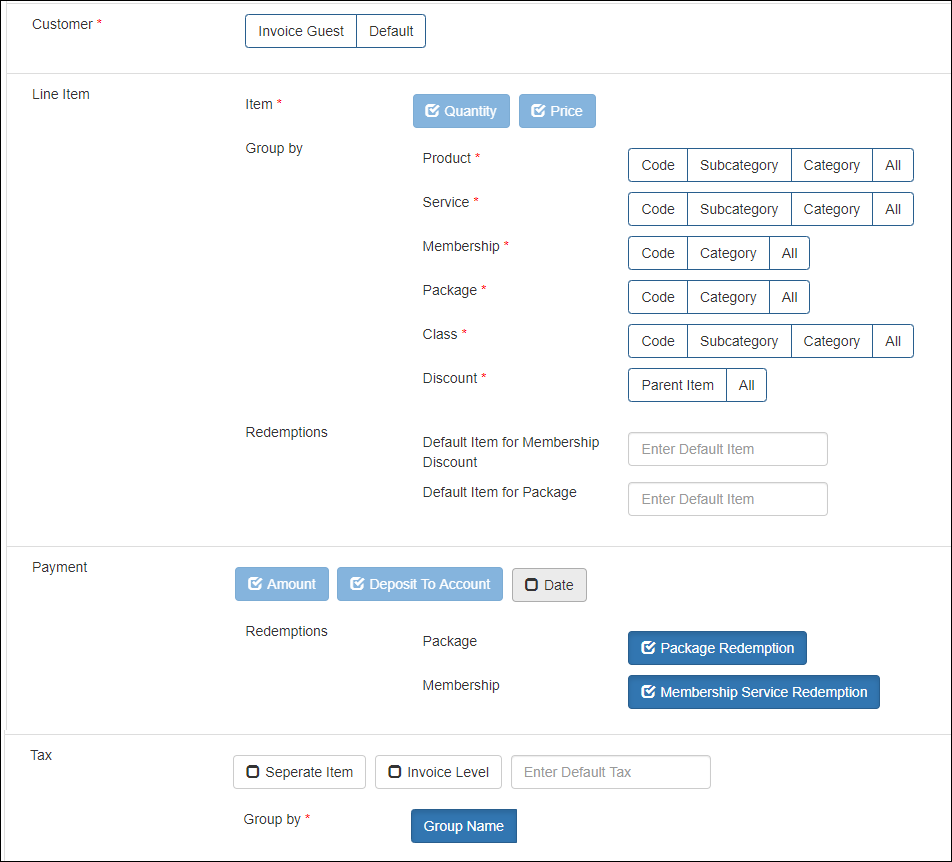
Customer: The name of the guest that you want to post for each invoice.
Select any one of the following options:
Invoice Guest: Select this option if you want to sync the guest name on the Zenoti invoice to the accounting platform.
Note
This is applicable only for the Invoice-Wise sync type.

Default: Select this option to post a default guest name for all invoices. Then, enter the default guest name in the box.

Line Item: In this section, you can configure how you want to post items to your accounting platform.
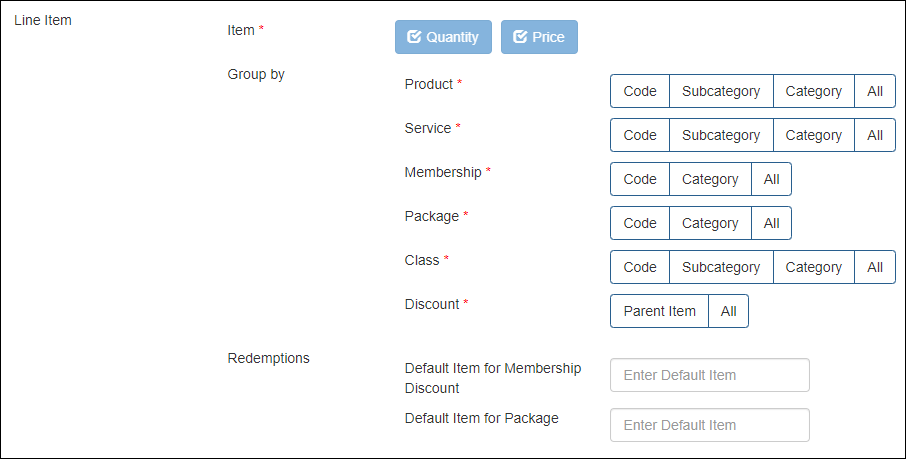
Item: Zenoti posts each item with Quantity and Price. These options are selected by default.
You can Group each item as follows:
Product
Code
Select this option to map each product in Zenoti to the respective item in the accounting platform
Important
Before you select this option, you must ensure that each product in Zenoti has a corresponding item with the same code in the accounting platform.
Subcategory
Select this option to map each product subcategory in Zenoti to the respective item in the accounting platform.
Important
Before you select this option, you must ensure that each product subcategory and subcategory code in Zenoti has a corresponding item with the same code in the accounting platform.
Category
Select this option to map each product category in Zenoti to the respective item in the accounting platform.
Important
Before you select this option, you must ensure that each product category and category code in Zenoti has a corresponding item with the same code in the accounting platform.
Default Item
Select this option to map all the products to the single item with item code as Product in the accounting platform.
Service
Code
Select this option to map each service in Zenoti to the respective item in the accounting platform.
Important
Before you select this option, you must ensure that each service in Zenoti has a corresponding item with the same code in the accounting platform.
Subcategory
Select this option to map each service subcategory in Zenoti to the respective item in the accounting platform.
Important
Before you select this option, you must ensure that each service subcategory and subcategory code in Zenoti has a corresponding item with the same code in the accounting platform.
Category
Select this option to map each service category in Zenoti to the respective item in the accounting platform.
Important
Before you select this option, you must ensure that each service category and category code in Zenoti has a corresponding item with the same code in the accounting platform.
Default Item
Select this option to sync all the services to the single item with item code as Service in the accounting platform.
Membership
Code
Select this option to map each membership in Zenoti to the respective item in the accounting platform.
Important
Before you select this option, you must ensure that each membership in Zenoti has a corresponding item with the same code in the accounting platform.
Category
Select this option to map each membership category in Zenoti to the respective item in the accounting platform.
Important
Before you select this option, you must ensure the following:
The Membership Category is Mandatory setting is enabled at the organization level.
Each membership has a category assigned in Zenoti.
Each membership category and category code in Zenoti has a corresponding item with the same code in the accounting platform.
Default Item
Select this option to map all memberships to the single item with item code as Membership in the accounting platform.
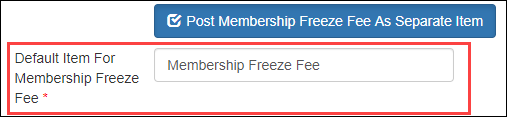
Post Membership Freeze Fee As Separate Item
Select this option to map membership freeze fee to a single item in the accounting platform. You can enter this item code (that you’ve in the accounting platform) in the Default Item For Membership Freeze Fee box.
Package
Code
Select this option to map each package in Zenoti to the respective item in the accounting platform.
Important
Before you select this option, you must ensure that each package in Zenoti has a corresponding item with the same code in the accounting platform.
Category
Select this option to map each package category in Zenoti to the respective item in the accounting platform.
Important
Before you select this option, you must ensure the following:
The Package Category is Mandatory setting is enabled at the organization level.
Each package has a category assigned in Zenoti.
Each package category and category code in Zenoti has a corresponding item with the same code in the accounting platform.
Default Item
Select this option to map all packages to the single item with item code as Package in the accounting platform.
Gift Cards
Zenoti maps all the gift cards to a single item GiftCard with the item code as in the accounting platform.
Prepaid Cards
Zenoti maps all the prepaid cards to a single item PrepaidCard with the item code as in the accounting platform.
Class
Note
You will see this section only if Classes/Fitness is enabled for your business.
Code
Select this option to map each class in Zenoti to the respective item in the accounting platform.
Important
: Before you select this option, you must ensure that each class in Zenoti has a corresponding item with the same code in the accounting platform.
Subcategory
Select this option to map each class subcategory in Zenoti to the respective item in the accounting platform.
Important
: Before you select this option, you must ensure that each class subcategory and subcategory code in Zenoti has a corresponding item with the same code in the accounting platform.
Category
Select this option to map each class category in Zenoti to the respective item in the accounting platform.
Important
: Before you select this option, you must ensure that each class category and category code in Zenoti has a corresponding item with the same code in the accounting platform.
Default Item
Select this option to map all the classes to the single item with item code as Class in the accounting platform.
Discount
Discounts in Zenoti are of three types:
Campaign-based discounts
Membership discounts
Package discounts
Parent Item
Select this option to map each discount type in Zenoti to the respective item in the accounting platform.
In Zenoti, a discount can be one of the following types:
Campaign-based discounts - Map each campaign code to an item in the accounting platform.
Membership discounts - These discounts get posted against the membership item that you’ve configured in the Line Item section for memberships.
Package discounts - These discounts get posted against the membership item that you’ve configured in the Line Item section for packages.
Manual discounts - Map all manual discounts to a single item Manual Discount in the accounting platform.
Price adjustments - Map all price adjusted amounts to a single item Price Adjustment in the accounting platform.
Important
Before you select this option, you must ensure that each discount type and its code in Zenoti has a corresponding item with the same code in the accounting platform.
For example, if there’s a campaign-based discount in Zenoti Thanksgiving Offer 10% with campaign code as TH10OFF, the item in the accounting platform must have the code as TH10OFF.
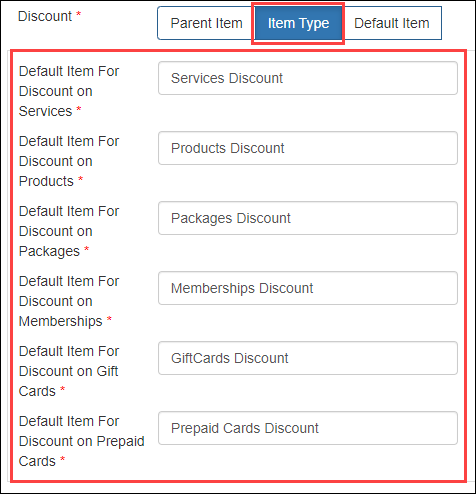
Item Type: Select this option to map discounts applied to an item type in Zenoti to the respective discount item in the accounting platform. You can enter the code of this discount item in the respective default item discount box for each item type.
For example, if you want to account all the service discounts under one item, let’s say Service Discount in the accounting platform with code as SD, enter SD in the Default Item For Discount on Services box.
Note
This configuration INCLUDES package redemption discounts and membership redemption discounts under the respective item type on which these redemptions are applied. For example, if a package is redeemed on a service, the redemption discount will be accounted under services discount.
- Default Item: Select this option to map all the discount types to a single item in the accounting platform. You can enter this item code (that you’ve in the accounting platform) in the Discount box.
Note
This configuration DOES NOT include package redemption discounts and membership redemption discounts - you need to configure these discounts separately.
Redemption
You can post the value of a redemption in any one of the following ways:
Based on the benefit actual price
If a liability (package or membership) was sold at $100 (with one benefit of $150), the redemption value that gets posted is $150.
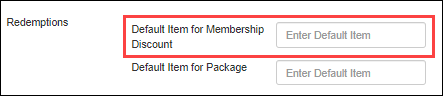
To configure this for packagesDo not select the Package Redemption checkbox.

Enter the default item name for the package redemption.

To configure this for memberships (with service benefits)Do not select the Membership Service Redemption checkbox.

Enter the default item name for the membership redemption.

Based on the liability price
If a liability (package or membership) was sold at $100 (with one benefit of $150), the redemption value that gets posted is $100 and the redemption discount that gets posted is $50.
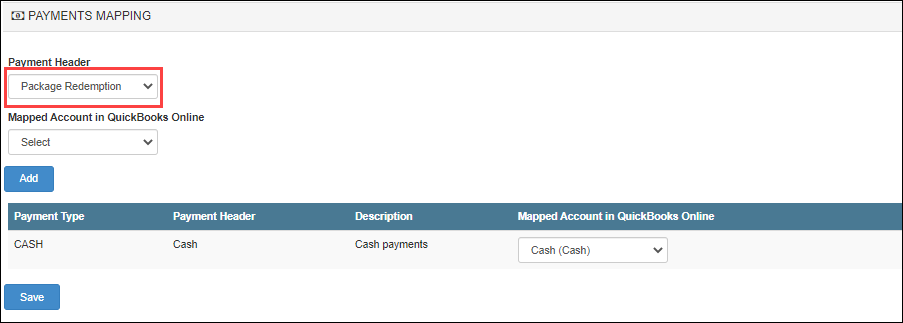
To configure this for packagesSelect the Package Redemption checkbox.

Enter the default item name for the package redemption discount.
Configure the package redemption as a payment in the Payment Mapping tab.
To configure this for memberships (with service benefits)Select the Membership Service Redemption checkbox.

Enter the default item name for the membership redemption.
Configure the membership service redemption as a payment in the Payment Mapping tab.
Payment
To configure payments, ensure that each payment type in Zenoti has a corresponding payment type in the accounting platform.
Amount: The payment transaction amount. This option is selected by default.
Deposit to Account: The chart of account to which the payment is mapped in the accounting platform. This option is selected by default.
Date: By default the payments are posted based on the closed date. However, to post payments based on the payment date, select the Date checkbox.
Note
If you’ve selected QuickBooks Desktop as the accounting platform, you will not see the Date checkbox.
Tax
You can post taxes in four different ways:
Item-level: By default, the tax amount is posted for each item in the accounting platform.
Important
Ensure that each tax group in Zenoti has a corresponding tax with the same code in the accounting platform.

Tax as a separate item (as tax group): The total tax amount is posted by the tax group name.
Important
Ensure that each tax group in Zenoti has a corresponding item with the same code in the accounting platform.

Tax as a separate item (as tax component): The tax amount is posted by the individual tax components (by names).
Important
Ensure that each tax group component in Zenoti has a corresponding item with the same name in the accounting platform.

Invoice Level: The total tax amount for an invoice is posted in the accounting platform.
Important
Ensure that each tax group in Zenoti has a corresponding tax with the same code in the accounting platform.
Irrespective of whether you post taxes based on item-level, as a separate item, or based on invoice level, you must enter the default tax group name in the Enter Default Tax box.

Expenses: Select this option to post retail cost of goods to the accounting platform.
Important
You can use this option only if your business tracks inventory in Zenoti.
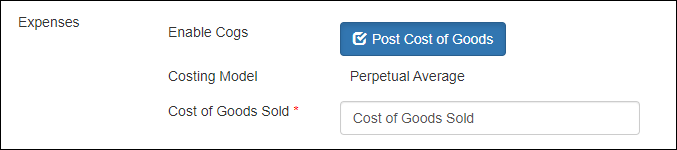
By default, Cost of Goods Sold is the name of the default item for cost of goods of retail products sold in Zenoti, which you must map to the corresponding chart of accounts in the POSAccounting Mapping form.
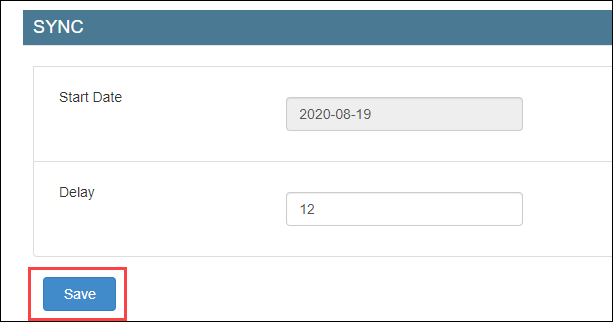
Navigate to the Sync section under the Configuration tab.
Start Date: Select the date from when you want to start posting your data to the accounting platform.
Delay: Specify the gap between each data posting.
Important
After you’ve set these two fields, reach out to Zenoti Support to enable auto-sync.
Click Save.
Next step
Post bank deposits and cash pay-ins to the accounting platform as journal entries
Generally, businesses use some amount of cash for pay-outs and petty expenses. As these transactions are not tracked, businesses cannot reconcile the cash deposits, cash added to the register, cash pay-outs and petty expenses with their bank statement.
For example, if the center manager of the LA center collected $500 on a day as cash, but deposited only $450 to the bank, the difference of $50 was not tracked anywhere.
Important
For cash-related transactions, a subsidiary is a cash register for a location or center.
Before you begin
At the organization level, enable the following settings from Invoice & Receipt:
Enable multiple cash registers: To post cash deposits, cash pay-outs, cash added, and petty expenses done from each register (subsidiary) as a separate entry. If you enable this setting, you will see the Post by Subsidiary options. However, if you do not enable this setting, all these transactions will be posted from the default register.
Maintain separate product sales: To view the product sales register as a subsidiary in mapping.
To configure posting of cash deposits, cash added, cash pay-outs, petty cash expenses as journal entries
At the organization or center level, click the Configurations icon.
Select Integrations > Accounting.
Expand the Configuration tab.
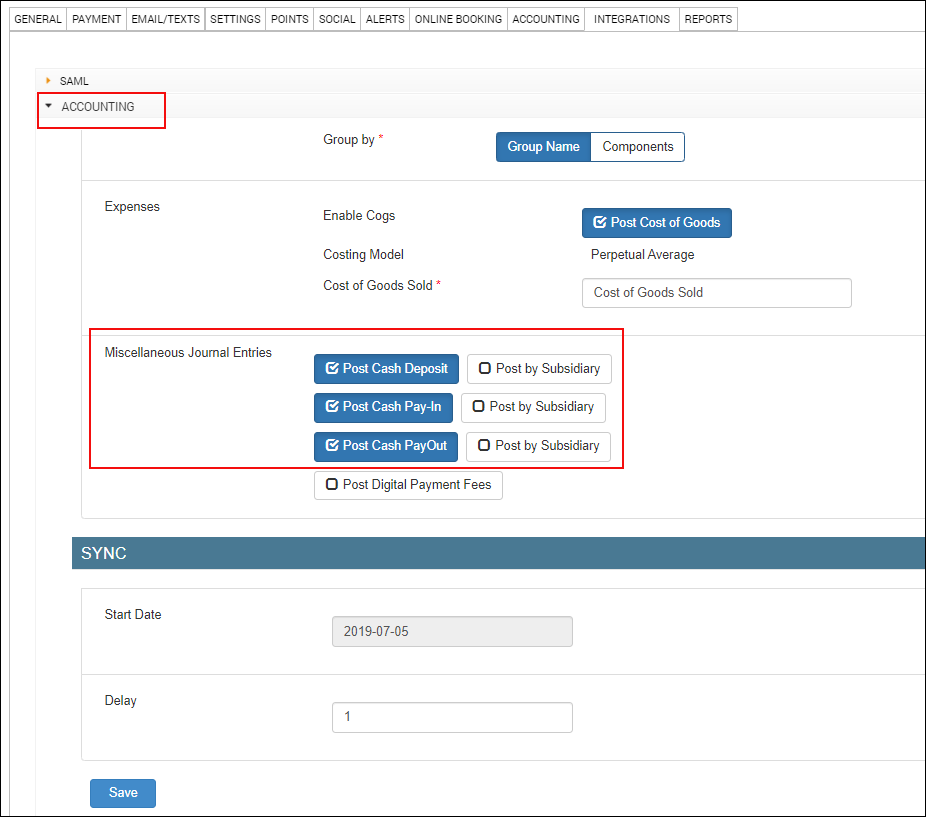
Navigate to the Invoice section and locate Miscellaneous Journal Entries.
Select the following checkboxes based on requirement:
Post Cash Deposit
You will see the Post by Subsidiary option if you've enabled the Enable multiple cash registers setting at the organization level.
Post Cash Pay-In
You will see the Post by Subsidiary option if you've enabled the Enable multiple cash registers setting at the organization level.
Post Cash Payout
You will see the Post by Subsidiary option if you've enabled the Enable multiple cash registers setting at the organization level.
Click Save.
Expand the Miscellaneous Journal Type Mapping section.
For each cash journal entry type, map the following details and click Add:
Journal Type: Select the entry - Cash Deposit, Cash Pay-In, or Cash Payout.
Location: Center for which you want to post the entry.
Subisdiary: Register for each location.
If you've selected the Post by Subsidiary option for the journal entry in the Configuration tab, you can see all the registers that are available for the selected locations.
If you've not selected the Post by Subsidiary option for the journal entry in the Configuration tab, you can see only the default register.
Important
If you've enabled the Maintain separate product sales organization-level setting, you will also see the product sales register as another default register.
Credit Account: Chart of accounts in the accounting platform for credit entry.
Debit Account: Chart of accounts in the accounting platform for debit entry.
Note
If the journal entry has a negative amount, the entries are reversed - the mapped Debit Account is credited and the mapped Credit Account is debited.
To manually sync data, expand the Manual Sync section and locate Miscellaneous Journal Entries.
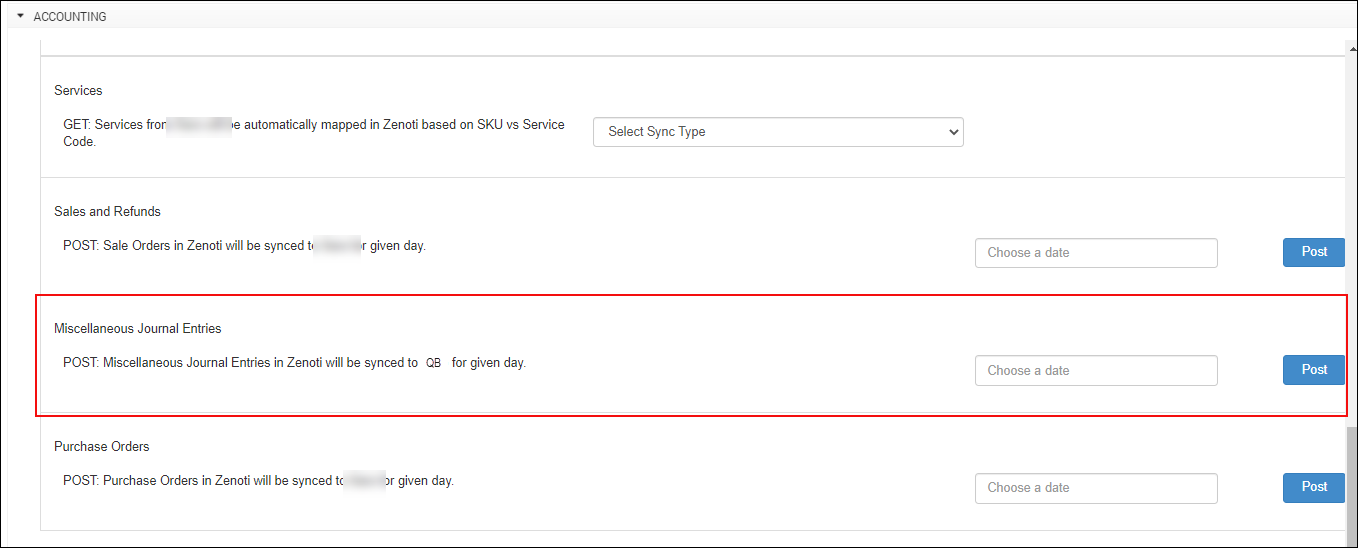
Select the date for which you want to post data.
Click Post.
Note
To add auto-sync schedules, reach out to Zenoti.
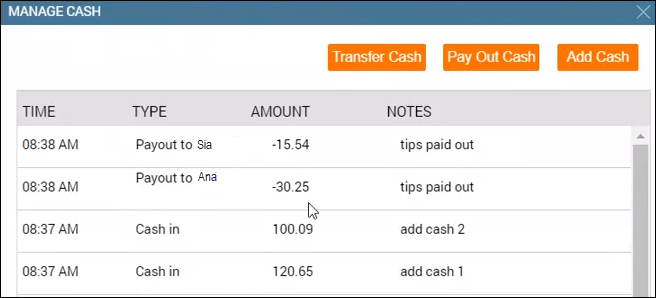
Sample transactions
Admin Sync report - Misc Journal Entries
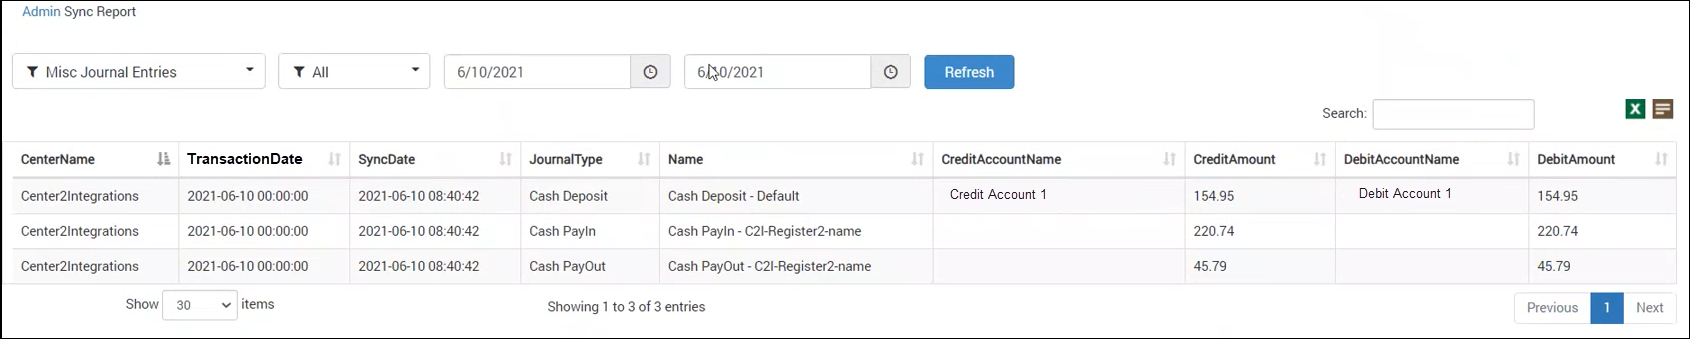
Admin Sync report - Sale Order Summaries

POSAccounting mapping by invoices for accounting integration
After you’ve completed configuring how data in Zenoti can be pushed to the accounting platform, you are ready to map data in Zenoti to data in the accounting platform.
Zenoti partners with POSAccounting to push data from Zenoti to the accounting platform.
At the organization level, click the Configurations icon.
Select Integrations > Accounting.
Expand the POSAccounting Mapping tab.
Click Setup Customer Account.
The POSAccounting window opens.
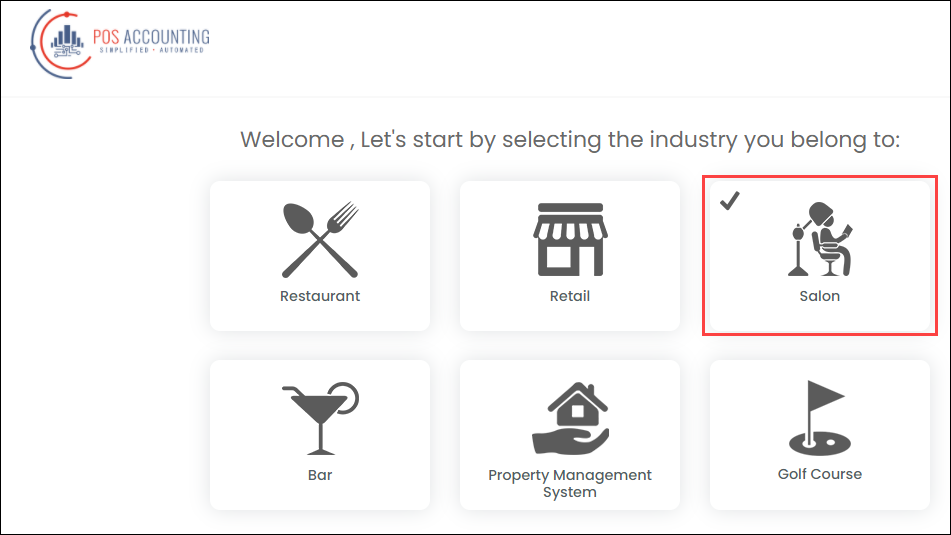
Select the business type as Salon.
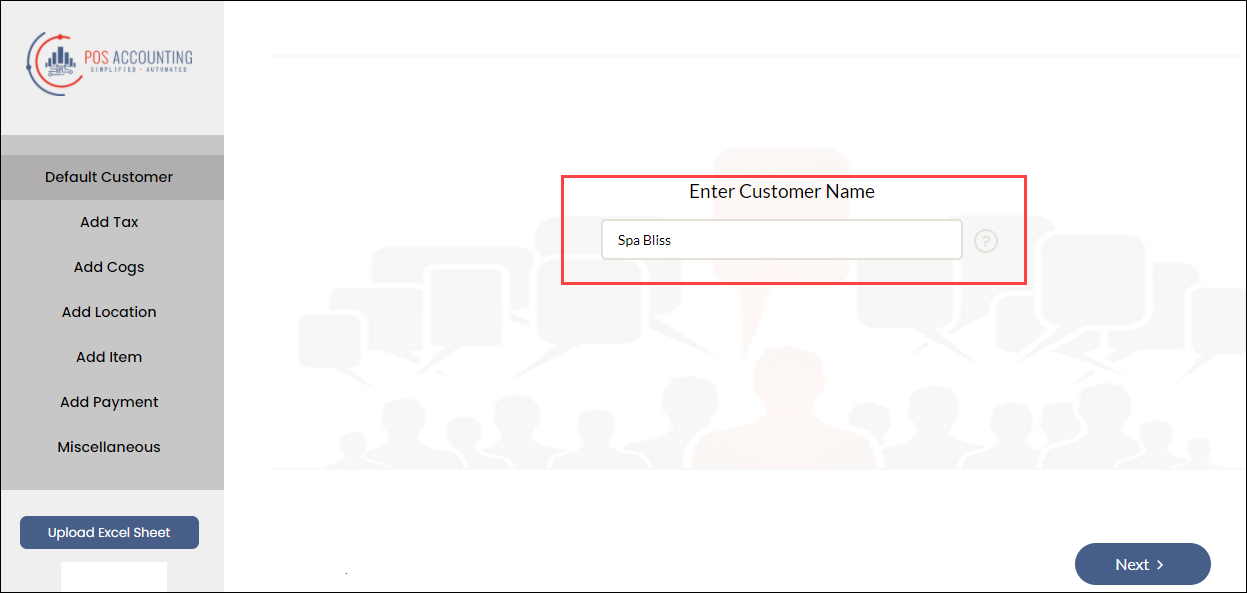
Enter the default customer name and click Next.
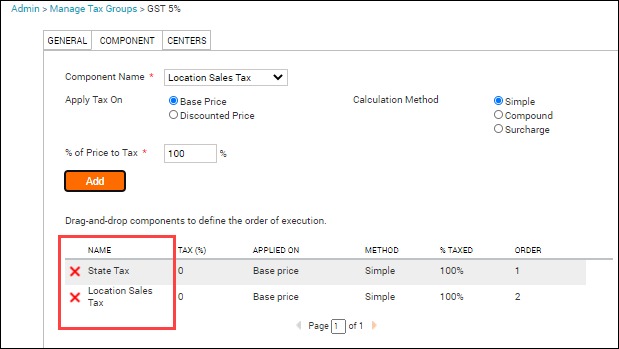
Add the tax details.

If you’ve configured to push tax by group name, enter the tax group code in Tax id and click Next.
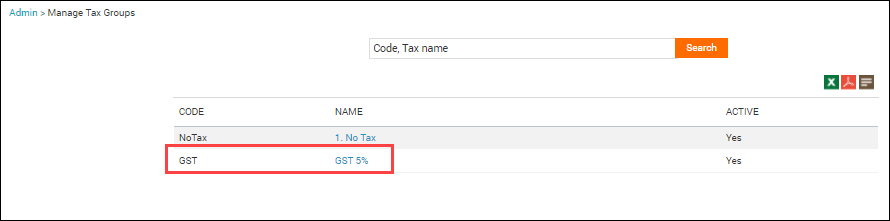
However, if you’ve configured to push tax by components, enter the tax component name in Tax id and click Next.
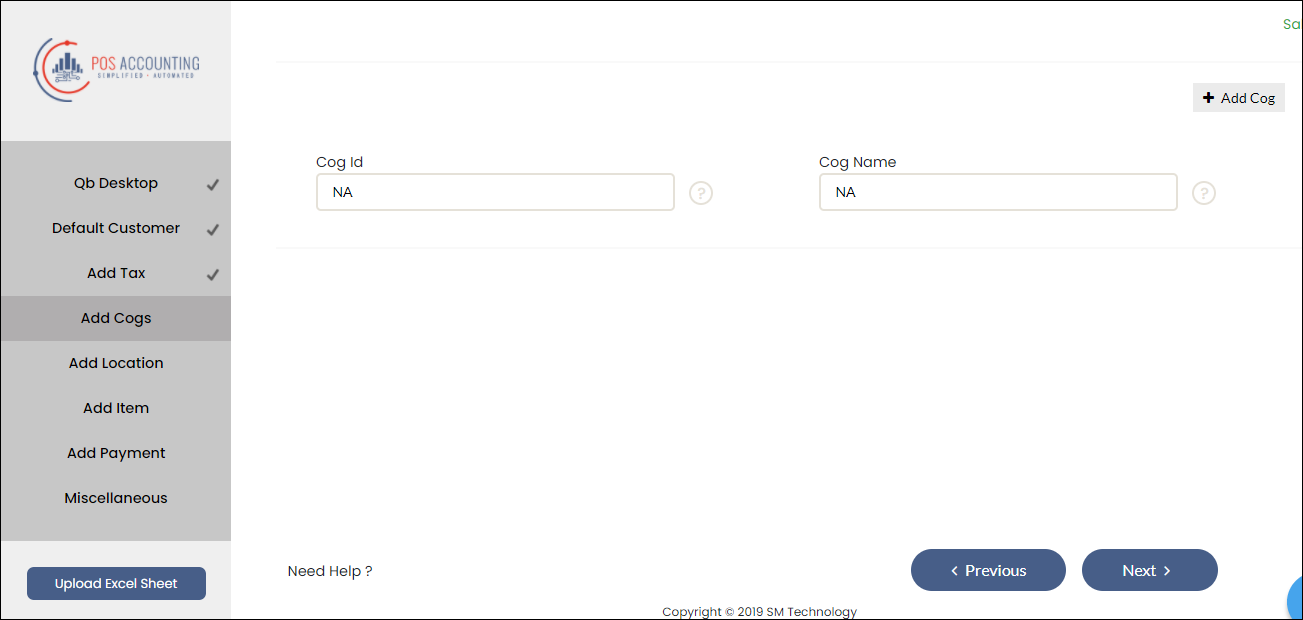
Currently, Zenoti does not post COGS data. You can ignore the Add Cogs section and enter any random values to continue.
To enable locations for your accounting platform, select locations, and enter the location details.
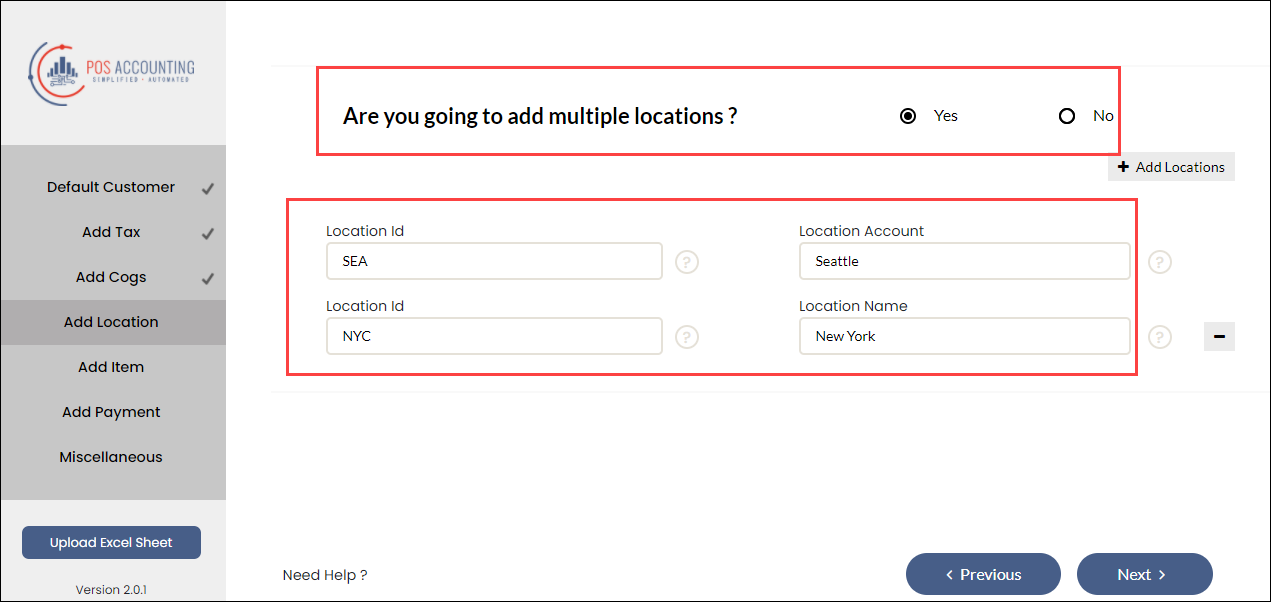
Read our help article on location mapping for Xero, QuickBooks Online, and QuickBooks Desktop.
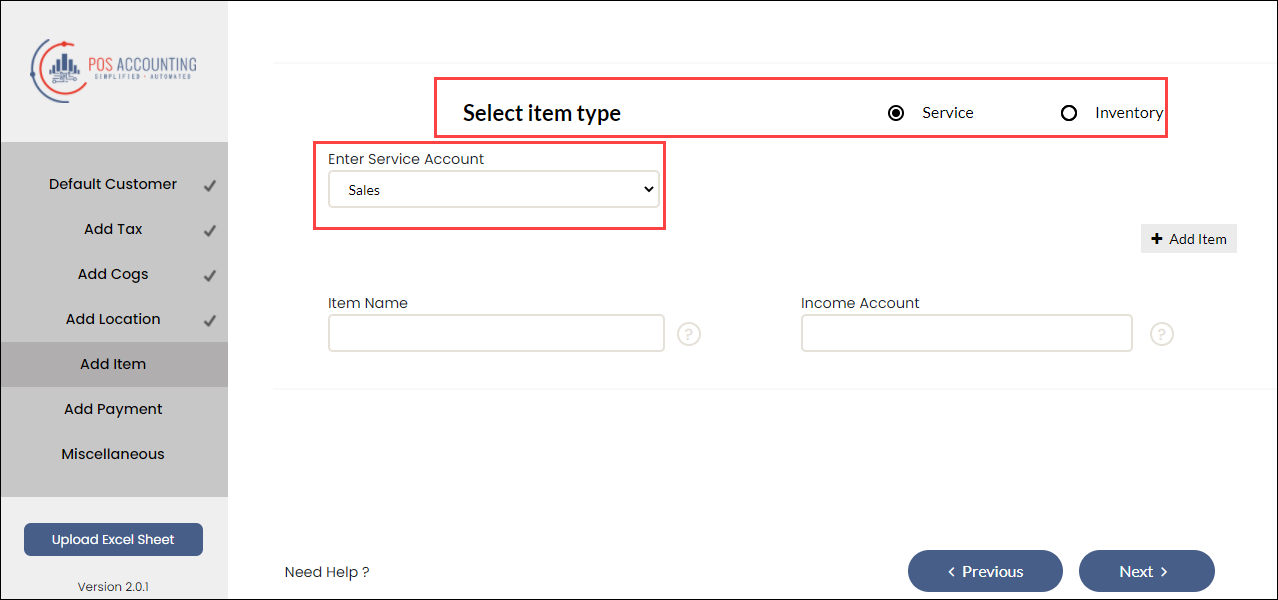
Enter the default sales account for Service and Inventory item types.
Enter the Zenoti payment type in the Payment Id box and the corresponding payment account (for Xero and NetSuite) or payment method (for Quickbooks Online and Quickbooks Desktop) in the Payment Account box.
If you want to configure refunds, from the Miscellaneous tab, select Yes for refunds.
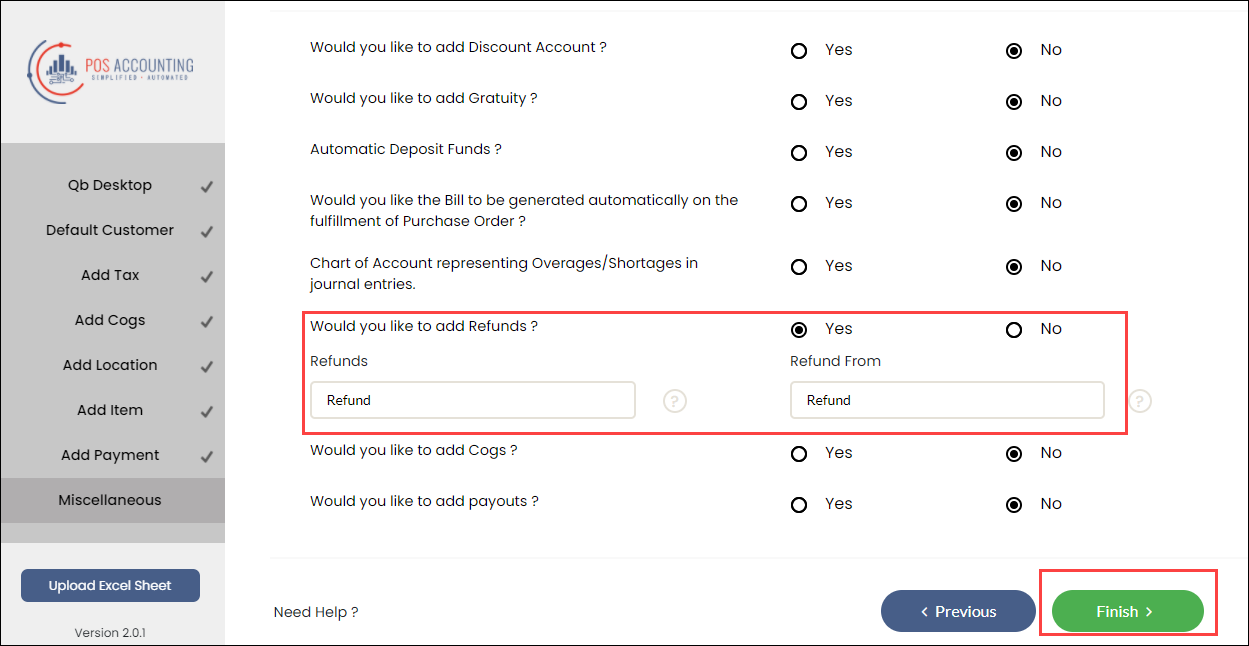
Click Finish.
You’ve mapped data as journal entries.