- Zenoti Help
- Release Notes
- Release Notes - January 27, 2026 (DRAFT)
Release Notes - January 27, 2026 (DRAFT)
Caution
This is a work-in-progress draft. The final version will be published on the day of the release, and the Release Notes will remain open for reviews until the release date.
We’ve enhanced the structure of our release notes to better serve your needs. Updates are now categorized under clear headings based on Add-ons, Core Product, Product Edition, Personas, and Modules.
This new format ensures you can quickly find updates most relevant to your role, understand the value each change delivers, and seamlessly adopt new features or enhanced workflows.
This Release Notes contains the following sections:
Announcements: Key updates and important information related to the release.
New Features: Newly introduced functionalities designed to enhance the product experience.
Enhancements: Improvements made to existing features for better usability and performance. Categorized features as Core Product, Product Editions, and Add-ons.
Additional Resources: Links to supporting materials such as guides, training, and documentation. This also includes references to the release notes for the patches included in this update.
Icon | Description |
|---|---|
![]() | Automatic update for all users. |
![]() | Employee: Enhancements or features for employee and payroll. |
![]() | Admin: Features specifically enhanced for admin users who manage the system configuration, including user roles, permissions, and system integrations. |
![]() | Business Owner/Center Manager: Updates implemented for the business owners or managers who are responsible for overall business strategy, growth, and decision-making. |
![]() | Front Desk Operator/Service Provider: Features that enhance the usability for front-desk staff who handle appointments, customer queries, payments, and guest interactions. |
![]() | Guests: Improvements made for the end-users or customers of the business who interact with Zenoti through online booking systems, self-service kiosks, and branded mobile apps. |
The following table provides a consolidated list of new features, announcements, and updates included in this release. Use this section to quickly scan all major changes before exploring detailed descriptions in the following sections.
Type | New Feature/Enhancement |
|---|---|
New Features | Inventory: Enhanced Inventory control with Batch and Expiry Management |
Enhancements |
|
New Features
Module: Inventory
This new feature helps businesses gain tighter control over inventory that requires strict tracking, such as perishable or regulated items. By recording product stock movement with batch numbers and expiry dates, businesses can minimize waste, maintain compliance, and ensure accurate audits. Once enabled, batch tracking cannot be turned off, preserving traceability at all times.
Business Scenario: Medspas often stock regulated products like Botox or dermal fillers that require strict inventory control. With Batch and Expiry Management, businesses can track stock by batch number and expiry date, minimize wastage, reduce revenue loss, and maintain full traceability. Staff can trace which batch was used for a guest or service, enabling swift action in case of recalls. The system supports FEFO (First-Expiry-First-Out), guiding staff to use products nearing expiry first.
The new Near Expiry report highlights such products, making it easy to take timely actions like accelerating usage, transferring them to other centers, or returning them to vendors—ensuring compliance, safety, and inventory accuracy.
Note: This feature is also available on ZMA v2 for phones and tablets.
How to use:
Navigate to Inventory > Products at the organizational level.
Search for and select a product you want to track by batch.
Go to the General tab.
Set the Batch Tracking option to Yes.
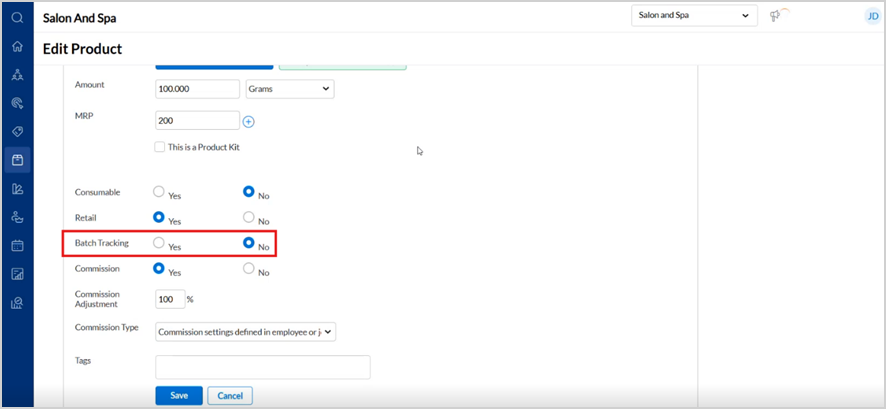
Click Save.
At the organization level, navigate to Configuration > Inventory >Batch Management and turn on Enable batch tracking and Show batch details on receipt for employee checkouts.
Note: Existing stock will be moved into a default batch with an automatically assigned expiry date.
While receiving stock in a Purchase Order, click the Batch Expiry icon.
Enter the Batch Number, Expiry Date, and Batch Quantity.
Click Done.
Note:
For transfer, the sender selects the batch/expiry, and the receiver confirms it from the dropdown.
Products can then be sold at POS or used in services with batch tracking in place.
Perform batch-level audits (Zenoti suggests recent batches), and apply adjustments for expired, damaged, or recalled stock. Expired items are automatically flagged and logged for compliance and inventory accuracy.
Enhancements
Core Product
Module: Employee
This enhancement introduces a new Cash Tips Report that allows business owners to generate reports for any custom date range.
Business Scenario: A multi-location spa pays employees biweekly but tracks commissions weekly based on declared cash tips. Without a report supporting custom date ranges, payroll staff had to rely on manual workarounds, causing delays and reporting inconsistencies. The new Cash Tips Report solves this by allowing flexible reporting across any custom period, aligning with real-world payroll needs.
How to use:
At the organization or center levels, navigate to Reports > Cash Tips Report.
Use the custom date picker to select any range.
Filter by Employees, Centers, or both.
Group by Employee Name, Employee Code, and Center Name to view subtotals.
Export the report in Excel, CSV, or Excel with Subtotals formats.
This enhancement enables employees to clock in and out without needing a predefined shift, empowering more flexible workforce management while keeping payroll, attendance, and reporting consistent and accurate.
Once enabled, this setting applies organization-wide and cannot be disabled to prevent inconsistencies in attendance and payroll records.
Business Scenario: Freelance stylists or interns often work without fixed schedules. This feature lets them clock in/out flexibly while maintaining accurate attendance and payroll records.
How to use:
At the organization level, navigate to Configuration > Employee > Employee attendance.
Turn on the Allow clock-in/clock-out without schedule toggle.
Review any conflicting settings that appear and update them as required.
Click Save.
![]() |
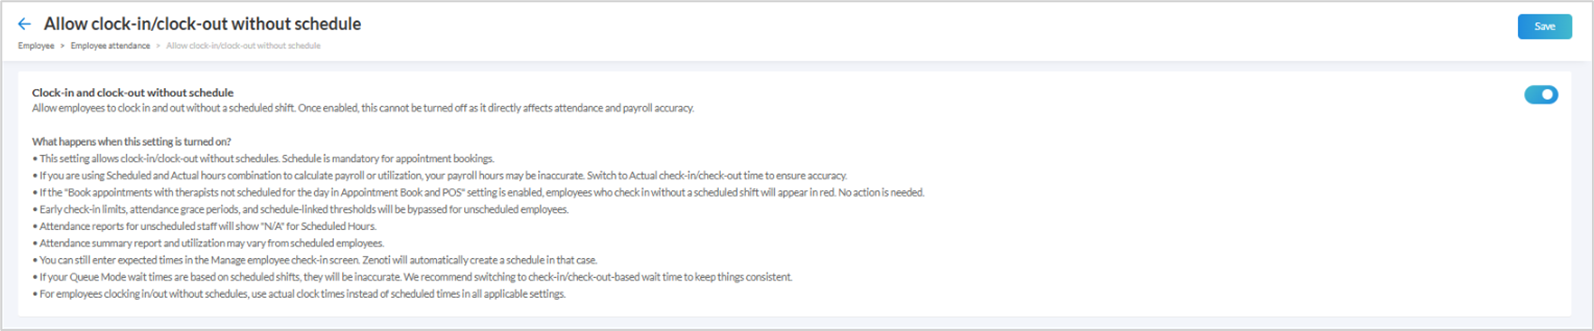
Note: The setting will now apply across all employees and centers in the organization. The feature is supported on ZMA and MyZen applications.
Managing employee data is now faster and more intuitive with enhanced capabilities on the Manage Employees page. Admins can now perform inline edits for names and nicknames, instantly view assigned security roles, and clone employee profiles with configuration flexibility. These improvements reduce navigation effort and boost accuracy.
Business Scenario: A multi-location spa chain is onboarding seasonal staff across centers. With the new clone feature, managers can quickly duplicate employee profiles with consistent settings. Inline edits and bulk updates reduce admin time, ensuring faster setup and fewer errors during peak hiring periods.
How to use:
At the organization or center level, navigate to Employee > Employees.
Click the copy icon in the listing to Clone employee by filling in the required fields and selecting configurations to copy.
Edit First name, Last name, or Nickname by clicking the field and updating it directly.
View assigned roles using the info icon beside each employee
Enable or disable online booking in bulk for selected employees via the bulk action toolbar.
Update job roles in bulk and confirm the same.
Zenoti introduces a modernized scheduling interface aimed at improving operational efficiency and employee engagement. The new layout offers intuitive controls, visibility into schedules, and smarter scheduling tools, making it easier for administrators to create, manage, and review shifts across teams. With collaborative features like employee approvals and cross-employee copying, the experience is more transparent and flexible than ever.
How to use:
At the center level, navigate to Configuration > Employee > Employee attendance > Schedule.
Turn on Switch to the new scheduling experience to enable the new UI.
Turn on Collaborative scheduling with employee approvals to allow employees to review draft schedules before publishing.
Set a default view (Day, Week, or Month) for personalized navigation.
Use options like Track non-working hours and Enable copying across employees to customize scheduling as per business needs.
You can now configure segmented service timings at the Job level, giving you greater control and consistency when managing services across teams. This enhancement brings segmented services in line with regular services and streamlines how service timings are set and maintained.
Once set for a specific job role, all employees assigned to that role will automatically follow the defined timings. This reduces configuration effort and maintains a standardized guest experience across providers.
Business Scenario: Imagine a spa with 20 therapists assigned to the same “Senior Therapist” role. With this update, you can define segmented service timings such as a 10-minute consultation, 40-minute service, and 5-minute wrap-up once at the job level. All therapists assigned to that job automatically inherit these timings, eliminating the need for repetitive configuration.
To make changes, administrators can update the segmented timings at the job level. The updated timings will automatically apply to all employees assigned to that job, with no need for manual edits.
How to use:
At the organization level, navigate to Employee > Jobs.
Select an existing job or create a new one.
Navigate to the Services tab and choose the Segmented Services.
From Service Time, click Edit.
Use the drop-down for Job service time to edit the service times.
Click Save.
Configure default timings for each segment, just like at the employee level.
All new employees assigned to this job will inherit these default segmented timings. Employee-specific overrides remain possible if needed.
Module: Inventory
Zenoti now allows administrators to customize inventory-related labels across the product to align with internal business terminology. These configured labels are reflected throughout all inventory modules, POS, mobile apps (POS and audit), reports, filters, and even My Zen. This feature enhances clarity, internal consistency, and usability.
Business Scenario: A global beauty brand with operations in the US, UK, and Australia refers to stock audits as “Stock Count” in the UK, but “Audit” in the US. With this feature, each region can configure the terminology that fits their operational norms, minimizing confusion and improving efficiency across regions.
How to use:
At the organization level, navigate to Configuration > Inventory > Labels.
For each inventory label, select a value from the dropdown:
Products used in services: Professional, Backbar, Consumable
Inventory audits: Stock Take, Stock Count, Audit
Reorder minimum level: Minimum, Alert
Reorder optimum levels: Optimal, Target, Desired
Default reorder quantity: Default, Order
Review the descriptive text next to each label to ensure correct selection.
Click Save.
The selected terms will now reflect across all Zenoti modules including POS, Mobile POS, Audit, My Zen, and Reports.
To improve transparency and accountability in inventory management, the Current Stock Report now includes optional audit-related information. This helps businesses understand when stock counts were last verified and by whom—providing context for current inventory levels. The report dynamically adjusts to reflect audit data as of a selected historical date and time.
How to use:
At the organization or center level, navigate to Reports > Inventory > Current Stock Report.
Use the Column Manager to enable Last Audited On and Last Audited By columns.
(Optional) Apply a historical filter to view audit data relevant to that point in time.
Review the updated report in the UI or export it as needed.
This enhancement allows users to assign a reason to each inventory variance during reconciliation using a new Reason column that leverages existing configurable Adjustment Reasons. These reasons will also appear in reports like the Stock Ledger and Adjustments Listing.
Previously, all variances defaulted to “Unaccounted,” creating extra work for finance teams. Now, users can select predefined reasons like “Expired” or “Damaged” to streamline audits and reporting.
How to use:
At the organization or center level, navigate to Inventory > Reconciliation.
Use the Reason dropdown to select an Adjustment Reason.
Leave the field blank to default to Unaccounted.
Save the reconciliation.
View reasons for the Stock Ledger, Adjustment Listing, and other reports.
This enhancement ensures that all products are now properly indexed and searchable using barcode, code, or name filters across organization and center levels.
How to use:
At the organization or center level, navigate to Master Data > Products.
Use the search bar and select filters like Name, Code, Tag, or Barcode.
Use filters to narrow down results as needed for easier management.
Module: Queue
Zenoti has enhanced the queue view to match the modernized appointment book layout. The update delivers a consistent and intuitive scheduling experience for front-desk teams and streamlines daily operations across centers.
What’s new:
Icons in queue view now reflect the selected theme, classic or modern.
This update applies to theme-specific icons when the redesigned appointment book is enabled at the organization or center level.
The top banner of the queue view, including the search bar and action icons, is now visually aligned with the rest of the redesigned interface.
Zenoti now allows segmented services, such as coloring sessions with application, processing, and styling steps, to be managed within Queue. This helps front desk staff easily track each service segment and assign available providers as guests progress through different stages.
Prerequisites:
Use existing segmented service setup.
At the organization level, switch on the Enable Admin Queue toggle.
Zenoti will automatically display each segment in the queue, with no additional settings required.
Module: Web POS
Zenoti now allows organizations to require a value in the additional invoice field before an invoice can be closed. This update ensures that critical information, such as consultation notes, or consent references, is never missed at the point of sale.
Business scenario:
Front-desk staff often miss filling optional fields during peak hours. This can lead to incomplete records and workflow delays. With this enhancement, admins can configure the field to be required, ensuring that no invoice closes without the essential details.
Note:
This applies to invoices on Web POS, supports manual, group, and auto-close flows. This is not applied to autopay or payment link flows.
How to use:
At the organization level, click Configuration.
Navigate to POS > Display.
Switch on the Make it mandatory to enter a value in the additional invoice field before closing invoices on web toggle.
Click Save.
Zenoti now supports an additional tax rounding method that aligns with common accounting practices. This method rounds tax values up per tax rate, which helps match values with external systems and simplifies reconciliation.
Key benefits
Supports region-specific tax rounding requirements
Helps match values with third-party finance tools
Applies to invoices, refunds, and reports
Available for both POS and online transactions
Note:
To enable this feature, contact your Zenoti representative.
Zenoti now supports tip payouts that exceed a stylist’s currently earned amount. This is useful in cases where tips from previous days remain uncollected.
To maintain control and accountability, such payouts require manager authorization. Only users with the appropriate role permission can approve these transactions.
This enhancement provides greater operational flexibility while ensuring secure and compliant handling of tip payouts.
Key Benefits:
Supports delayed or partial tip collections across days
Adds secure controls through manager login or PIN
Prevents unauthorized overpayments to stylists
How to use:
At the center level, click Configuration.
Navigate to POS > Register Management.
Switch on the Pay out stylists more tips than earned toggle.
To require a manager's login to approve the payout, switch on the Enforce manager authorization toggle.
Click Save.
When a stylist requests a tip payout that includes previously earned but unpaid tips, a Manager Authorization Required prompt appears. A manager must enter their credentials to approve the payout and proceed.
Zenoti now automatically records excess cash amounts over the center-defined float as a deposit during automatic register closures. This ensures accurate cash tracking at the end of each day or shift, even when the register is closed without manual review. It also minimizes corrections and supports streamlined reconciliation.
If expected cash is less than or equal to float - No deposit
If expected cash is greater than float - Deposit = Expected – Float
How to use:
At the center level, click Configuration.
Navigate to POS > Register Management.
Switch on the Enable Automatic Register Closure toggle.
Switch on the Handle excess cash over opening amount, during auto closures toggle.
Click Save.
Zenoti now defers shop cost finalization to the point of invoice closure. This change allows for any modifications made after booking, such as service or product cost updates, to be reflected accurately in the final invoice.
Business Scenario:
A guest books a service that includes a consumable product. The shop cost is initially estimated at booking. Before checkout, the staff updates the product or cost details. With this update, Zenoti captures the latest cost at invoice closure, ensuring accurate margins and reporting.
Module: Accounting Integration
Zenoti now allows users to reauthorize broken integrations directly from the interface. When a connection is lost, users will see a Reauthorize button, making it easier to resolve issues quickly without needing technical assistance.
Key Benefits
Restores integration access in just a few clicks
Reduces operational downtime and dependency on support teams
Improves visibility with clear integration status indicators
Module: Booking Wizard
Zenoti now allows administrators to set segmented service timings at the job level, not just at the employee profile level. This brings timing configuration for segmented services in line with regular services reducing repetitive setup and saving time for teams managing multiple employees in similar roles.
Key benefits:
Streamlines onboarding by applying timing defaults to all employees assigned to a job
Eliminates the need to configure segmented services individually for each employee
Maintains existing behavior, employee-level settings still override job-level ones
This enhancement improves operational efficiency, ensures consistency, and reduces administrative workload, especially useful in high-volume centers or multi-location businesses.
Zenoti has extended support for virtual appointments into the unified booking flow. This enhancement simplifies appointment management by consolidating virtual and in-person scheduling into a single interface.
How to Use:
Launch the unified booking interface.
Select a service or provider as per your flow preference.
Choose the virtual appointment option from the appointment type menu.
Use the Zoom icon in the booking wizard to configure session details.
Module: Appointments
Purpose:
Organizations can now support flexible staffing by allowing employees to clock in and clock out without a predefined schedule, while ensuring attendance, payroll, and reporting remain accurate and consistent. When enabled, this setting applies to the entire organization.
Business scenario:
Organizations with flexible or ad-hoc staffing, such as freelancers or on-call employees, often do not create schedules in advance. Earlier, attendance tracking required a schedule to be in place.
With this update, employees can clock in and out without a schedule, while schedules remain necessary to accept bookings and calculate utilization.
How to use:
At the organization level, go to Configuration.
Click on Employee.
Scroll to Employee attendance.
Click on Allow clock-in/clock-out without schedule.

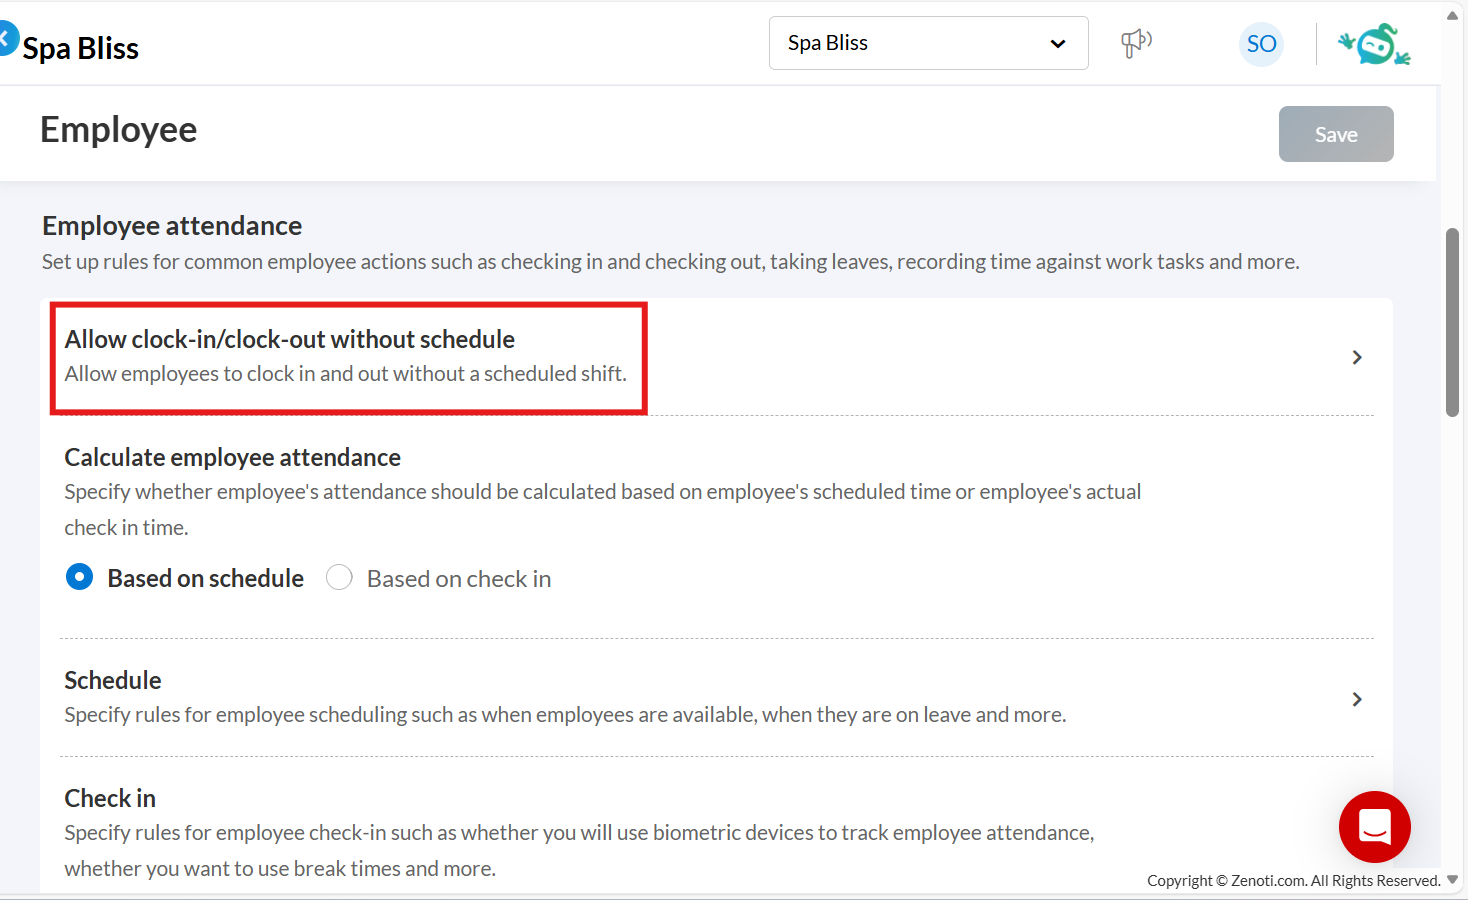
Turn on the Clock-in and clock-out without schedule toggle.
Purpose:
Previously, segmented service timings had to be configured individually for each employee. With job-level support now available, teams can set shared defaults once per role, reducing administrative effort and keeping service configurations consistent across employees.
Business scenario:
Today, administrators can configure both regular and segmented service timings at the employee profile level, but employee jobs support only regular service timing. This creates several challenges:
Segmented service defaults cannot be defined at the job level.
Administrators must manually configure segmented services for each employee.
Feature parity is inconsistent between regular and segmented services.
Managing large teams with similar service requirements becomes time-consuming and error-prone.
With this release:
Segmented service timing can now be configured at the job level, just like regular services.
System precedence remains consistent. Employee-level settings continue to override job-level settings where applicable.
All booking and operational flows across Webstore, Booking Wizard, Queue, Kiosk, and POS, now consistently apply job-level segmented service timings.
This significantly improves operational efficiency for administrators managing multiple employees with shared job definitions.
Purpose:
This update improves provider visibility, readability, and visual clarity in the Appointment Book, especially for businesses managing a large number of providers in vertical view. The changes focus on reducing visual clutter and making key information easier to scan during daily operations.
Business scenario:
Teams managing multiple providers need to quickly scan the Appointment Book to understand availability, provider status, and appointment context. This update addresses common challenges in high-density and compact layouts by introducing the following improvements:
Clearer provider information in hover states
Appointment Block hover text now includes a Request Type field shown in brackets next to the provider name and enabled by default.
Provider Name, Clock-in status, Job title, and Utilization are more clearly visible to support faster decision-making.
Improved readability in compact views
Right-hand text uses a fade effect instead of abrupt truncation to show more context.
When appointment status text is cut off at smaller sizes, it is displayed as a status dot.
Font sizes adjust at relevant breakpoints to maintain readability without overcrowding.
Reduced visual noise
The three-dot menu is hidden by default and appears only on hover.
Visual indicators for unscheduled hours have been refined to create a cleaner schedule view.
Clearer guest identification
The regular guest icon has been updated to be visually distinct from the new guest icon, making guest types easier to identify at a glance.
These enhancements make the Appointment Book more intuitive, scannable, and efficient, particularly for teams managing complex schedules with many providers.
Purpose:
This update enables administrators to configure skip week options at the center level, allowing front-desk staff to move across weeks more efficiently in the redesigned Appointment Book. It provides flexibility for centers with different booking patterns while keeping the calendar experience simple and consistent.
Business scenario:
Centers vary in how far ahead they typically schedule appointments. While some book only a few weeks in advance, others frequently create repeat bookings several months out. Previously, skip week options in the Appointment Book were fixed, limiting calendar navigation and slowing down workflows for centers with longer booking intervals.
By making skip week options configurable, centers can align calendar navigation with their operational needs, helping staff quickly jump to relevant dates and manage bookings more efficiently.
How to use:
At the center level, go to Configuration.
Click on Appointments.
Scroll to the Interface section and expand Display.
Go to Configure Skip Weeks option to define up to three skip week intervals. You can select any value between 1 to 52 weeks.
![]() |
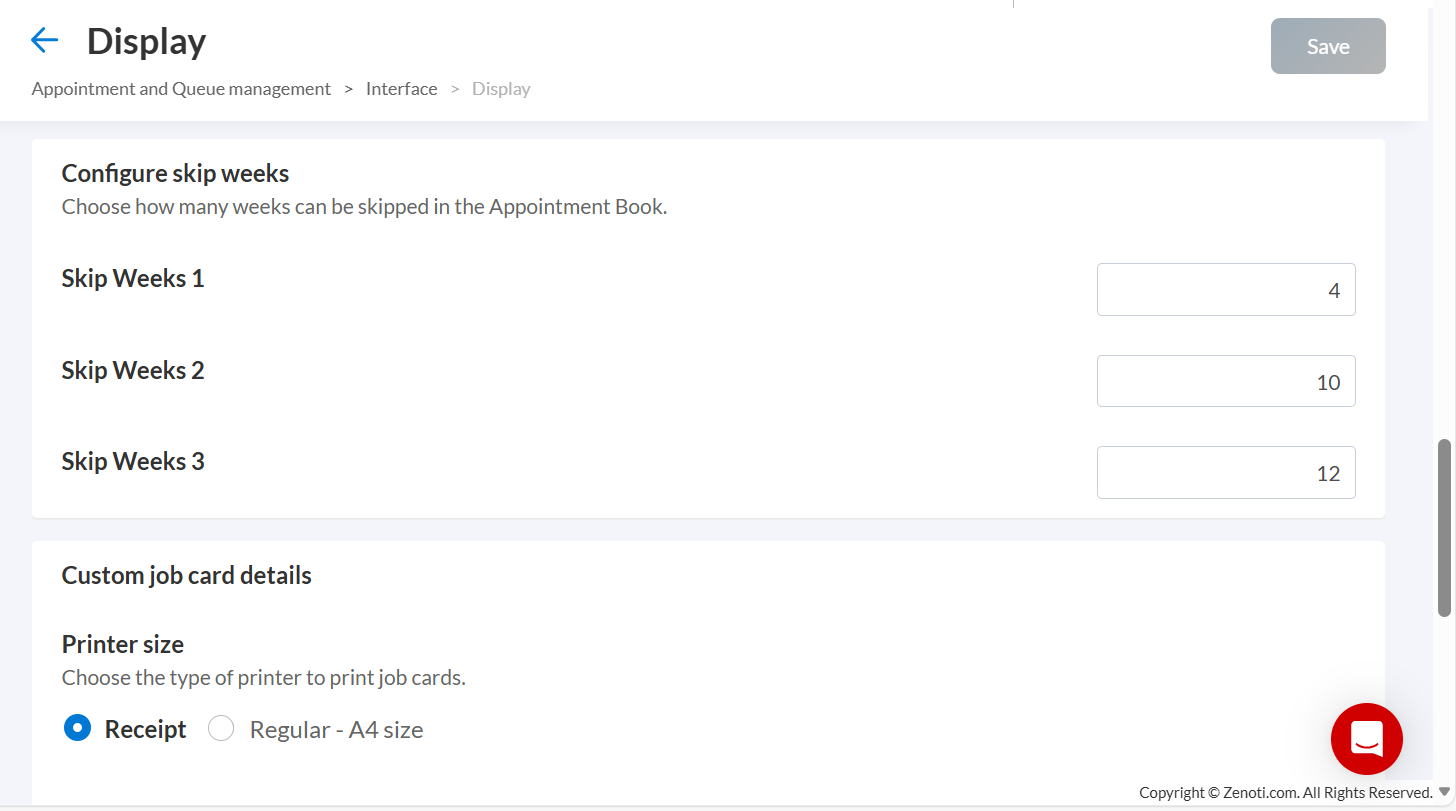
Note: For new centers, the default skip week options are +2, +3, and +4 weeks. If fewer than three values are configured, only the configured options will appear in the Appointment Book.
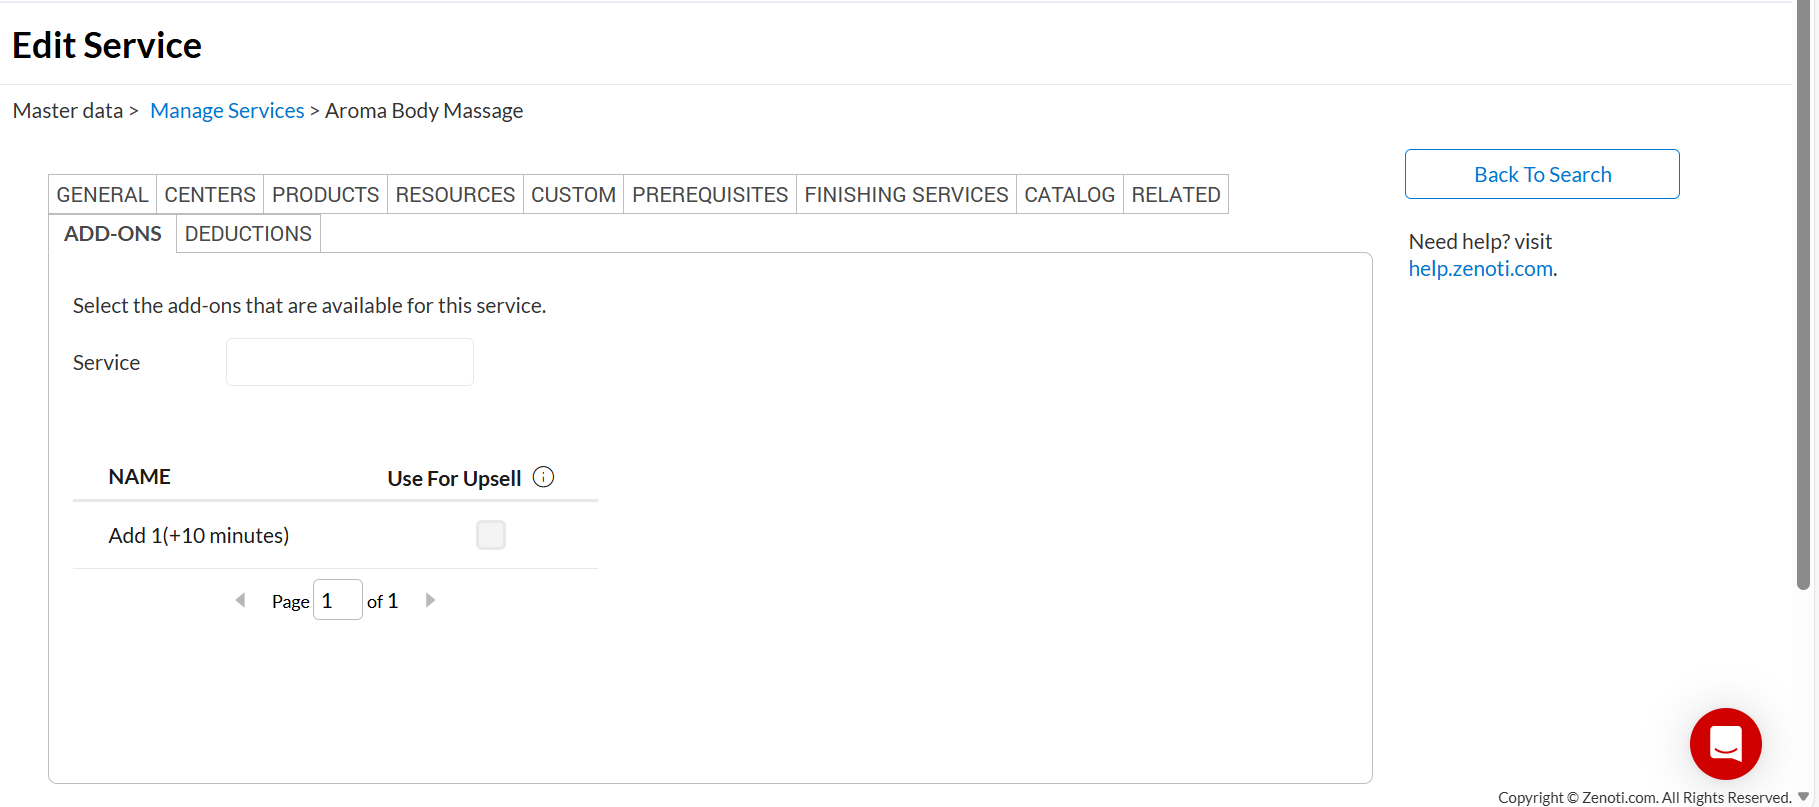
Purpose:
Timed add-ons, including duration and price, can now be added to segmented services, bringing consistency with how add-ons work for non-segmented services. The add-on’s time and price are applied to the first servicing segment, following the same scaling rules as that segment.
Business scenario:
Previously, segmented services did not support add-ons with duration, limiting flexibility during booking and increasing manual effort for front-desk teams. This resulted in inconsistent behavior across booking channels and made it difficult to offer time-based enhancements for segmented services.
With this update, timed add-ons can now be added to segmented services in the same way as other services. The add-on duration and pricing are consistently tied to the first servicing segment, ensuring predictable scheduling, accurate scaling, and a smoother booking experience.
How to use:
Navigate to Master Data and click on Services.
Select a segmented service from the list of services and go to the Add-ons tab of that service.
Add or associate add-ons with duration to the segmented service, just as you would for a non-segmented service.
![]() |
Once configured, these timed add-ons become available across all booking channels for that service.
Module: Reports
Zenoti has updated the Accounting Summary report to improve financial clarity. The report now separates totals into two distinct fields, Total to Collect and Total Collected, to represent actual sales and payments without inflating figures with advances or receivables.
The Adjustments for Advance & Receivables section is now introduced and displays excluded values separately. This change helps users reconcile with the Sales – Accrual report more easily and improves reporting accuracy during audits or month-end closures.
Business scenario:
On Day 1, a guest booked a $100 service but made no payment. The report shows $100 under Total to Collect and $0 under Total Collected. On Day 2, the guest pays $100. The report updates to reflect $100 under Total Collected only. Previously, both totals could reflect $200 cumulatively, causing confusion. Now, outstanding payments are tracked in the Adjustments for Advance & Receivables section, and totals reflect actual transaction timing, leading to more accurate financial reporting.
Zenoti has enhanced the Salon Summary report to provide accurate cash flow insights at the center level, especially for businesses operating multiple registers. Earlier, the report only captured the first and last register closures, which led to inaccurate opening and closing balances when more than one register was used.
With this update, the report now aggregates the opening and closing balances across all registers for the selected date. This ensures a complete and correct view of cash movement within the center, regardless of how many registers are active.
Business scenario:
A center uses three registers throughout the day. Each is opened and closed at different times. Previously, the report only considered one register's data, leading to underreported balances. Now, the opening balance reflects the total across all register openings, and the closing balance includes all register closures, giving the manager a true picture of the day’s cash flow.
Zenoti now allows users to define the start day of the week in the Master Center Metrics (MCM) report. This enhancement brings greater flexibility to how weekly data is grouped and ensures alignment with regional or business-specific calendars.
What’s New:
A Week Starts On filter is now available in the MCM report
You can choose any day, Sunday through Saturday, as the start of the week
Weekly totals and week numbers automatically adjust based on your selection. For example, if the week starts on Saturday and Jan 1 falls on a Wednesday, Jan 1–3 will be grouped into week 53 of the previous year.
How to use:
At the organization or center level, click Reports.
Search for and open the Master Center Metrics report.
From the Week starts on filter, select the date that defines the start of the week.
Click Refresh.
Zenoti has added info icons next to each column in the show/hide column panel across all reports. This enhancement helps users quickly understand what each column represents, before adding it to the report, making report customization faster and more intuitive.
What’s new:
Hovering over the icon displays a short description as a tooltip
Tooltips explain how data is calculated, for example, differences between Accrual, Cash, and Modified Cash views
Works across all reports and is optimized for desktop and tablet
Zenoti now supports transaction-level drilldowns in the Royalty report, giving users visibility into the exact services, products, and memberships that drive royalty amounts. This enhancement applies to all accounting types, Accrual, Modified Cash, and Cash, and improves audit readiness and transparency.
What’s new
Clickable values in Service Sales, Product Sales, Membership Charges, and Total Royalty columns
Opens the Sales – Accrual or Sales – Cash report based on the selected accounting type
Automatically applies filters for date range, item type, and center
Column values in the drilldown match the amounts shown in the Royalty report
Available in both the UI and exported versions
How to use:
At the center level, click Reports.
Search for and select the Business Payments: Royalty report.
Click to open the report.
To view detailed transactions, click the amount shown in the Service Amount column.
Productivity in the center-level Aveda Benchmark Report is now calculated based on service activity. Only employees who provide services on a given day are included in the productivity calculation, excluding non-service roles such as reception staff.
Business scenario:
A center may have employees such as receptionists or administrative staff who do not deliver services. With this update, productivity calculations include only employees who performed services on a given day, ensuring non-service staff are excluded from productivity metrics.
Module: Guest Profile
Purpose:
This update allows centers to define how the Guest Profile opens from the Appointment Book. Managers, owners, and ddmins can set a default display mode. They can choose from pop-up, mini slider, or slider. The Guest Profile opens in a consistent and predictable format that supports staff workflows when accessing guest details.
Business scenario:
Staff often access the Guest Profile directly from the Appointment Book. Depending on the task, they may prefer a quick view, a full slide-out panel, or a separate window. With this update, the center can set a default display mode so the Guest Profile opens in a predictable and preferred format when launched from the context menu.
How to use:
Search for Appointment and Queue Management in Configuration.
Turn on the New guest profile toggle.
Under Guest Profile Display Mode, select how the guest profile should open from the appointment book:
Compact View: Opens a compact side panel
Expanded View: Opens the full guest profile in a slide-out panel
New Window: Opens the guest profile in a separate window

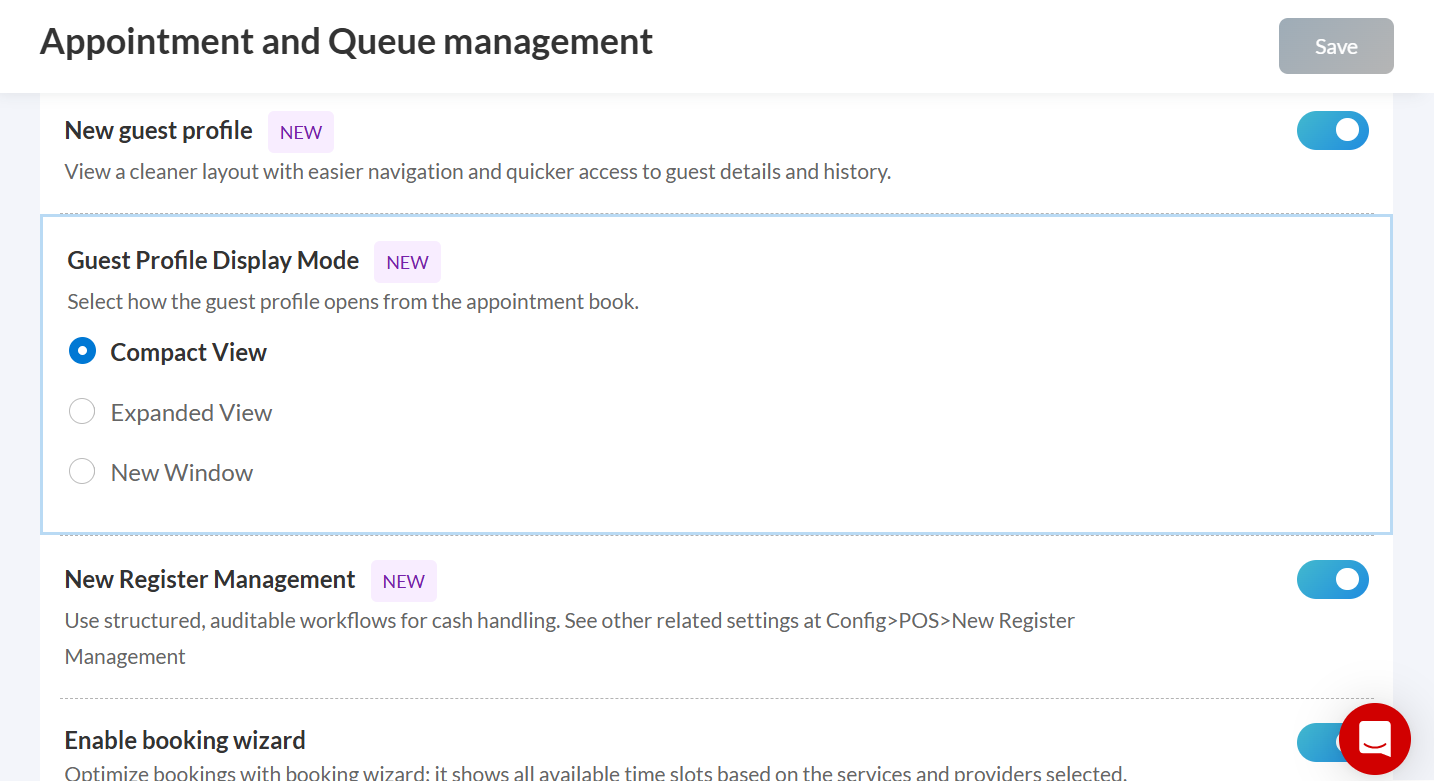
Click Save to apply the changes.
When staff open a guest profile from the appointment book, it will open using the selected display mode.
Duplicate cleanup workflows are now more efficient. When merging guests, users stay in the same place, and merge suggestions are ordered more intelligently. These improvements reduce unnecessary navigation, speed up cleanup for large datasets, and help users focus on relevant duplicate records.
Business scenario:
Stay in the same place after a merge
When users merge duplicate guests from lists that span multiple pages, they remain where they were after saving the merge. The system no longer returns users to the beginning.
If one or more guests are removed, the view is automatically filled with the next available guests from later pages.
If the final page becomes empty after merges, the system automatically moves to the previous page.
Total record counts remain accurate and up to date.
Improved ordering of guest merge suggestions
Merge suggestions are now arranged so that useful records appear first.
Invalid or placeholder values, such as blank entries, hyphens, repeated or zero-based phone numbers, and malformed email addresses, are moved to the bottom.
Valid mobile numbers, correctly formatted email addresses, and real names appear at the top.
Sorting by mobile number, email, and name follows natural alphanumeric order, making suggestions easier to scan and navigate.
Zenoti has improved the Memberships tab in the redesigned guest profile to make it easier for staff and members to understand what each membership includes, especially when multiple benefit types are involved.
Key benefits:
Displays total credits and available balance clearly
Shows each benefit type separately without mixing credits and monetary values
Highlights base services included with credit-based benefits for better clarity
This update helps staff explain memberships more accurately and ensures members know exactly what they can redeem, reducing confusion during bookings and checkout.
Zenoti now ensures consistent rules are applied when guests are added through the edit flow of a family booking. This update prevents incomplete profiles and missing relationship data, which can lead to downstream booking or payment issues.
Business scenario:
A front desk operator edits an existing family booking to add another guest. Previously, Zenoti allowed creating anonymous guests without mapping relationships or setting up card sharing, leading to incomplete records. Now, Zenoti enforces the same validations used in the create flow, ensuring proper family linkage and profile setup.
When adding a guest via the Edit option in a family/group booking:
Relationship with the host and card sharing settings must be specified.
An alert will appear if any information is missing.
Booking cannot proceed until all required information is entered.
Front desk staff can now click the guest name to instantly open the Guest Profile in a pop-up. This eliminates the need to manually copy or retype names into the appointment search, saving time and reducing errors.
Business scenario:
A guest arrives without an appointment and is added to the Waitlist. The front desk needs to check their membership or past services before booking. Instead of retyping the name in the search, staff now simply click the guest’s name to open the profile instantly, saving time and improving accuracy.
This enhancement allows Zenoti to capture revenue opportunities by supporting Add-ons in the Automated Waitlist. It reduces manual work for the front desk and ensures guests receive their preferred services seamlessly.
Business scenario:
A guest adds themselves to the Automated Waitlist through the Webstore for a facial but also wants an eye treatment add-on. Until now, the front desk had to manually adjust the booking or skip the add-on, leading to missed upsell chances. Now, both the guest and staff can include add-ons during waitlist entry or updates.
How to use:
In Waitlist flows (Create, Edit, Confirm), click the + Add-on button below the selected service.
Choose one or more Add-Ons from the dropdown menu.
Zenoti supports:
Timed Add-ons
Time scaling (provider time scaling, guest-specific durations)
Automated Add-on selections from the Webstore are now supported in the waitlist logic.
Note: This enhancement does not support add-on requests from channels other than the Webstore at this time.
Module: Gift Cards
Purpose:
This update improves VAT handling for gift cards in tax-inclusive organizations. VAT is applied at the appropriate stage based on how the gift card is used. For service-based gift cards, VAT is applied at purchase. For amount-based gift cards, VAT is applied at redemption. VAT is calculated from the items or services the gift card is applied to, ensuring accurate tax recognition and clearer financial reporting.
This change applies only to tax-inclusive organizations. VAT is derived from the items or services on which the gift card is redeemed, and the gift card itself does not have a separate tax amount.
To support this behavior in reporting, a new tax component is added to the Accounting Summary report to represent VAT collected during gift card redemptions. The Sales Accrual report includes a new Tax redeemed through gift card column, clearly separating VAT recognized at purchase from VAT recognized at redemption.
Purpose:
Customers can send digital gift cards by text message from the webstore or consumer mobile app. This delivery option lets buyers send gift cards directly to a recipient’s phone number, making it easier for recipients to access and redeem the gift card through the webstore or mobile app.
Business scenario:
A customer purchasing a gift card may want to send it directly to someone else without downloading or forwarding the gift card themselves. With text message delivery, the gift card is sent directly to the recipient’s phone, where they can open the link and redeem it through the webstore or mobile app.
How to use:
In the Webstore or Consumer Mobile App, select a gift card and choose Send by text message as the delivery method.
Enter the recipient’s name and phone number, and choose whether to send the gift card immediately or schedule it for a later date.
Preview the text message before completing the purchase.
Complete the purchase to send or schedule the gift card delivery.
The recipient will receive a text message with a link to view and redeem the gift card.
Product Edition
Module: Marketing
Zenoti now recommends standardized opt-in consent messaging wherever guest marketing consent is collected across the platform, such as Webstore, CMA, mobile apps, kiosks, and other guest-facing experiences. Using the suggested language, or language that is substantially similar, can help you align with regulatory guidelines such as TCPA and other comparable data protection and communication requirements, while reducing compliance risk and avoiding potential penalties.
Suggested Guest Marketing Opt-in Consent Language:
By checking this box, you agree to receive marketing text messages (e.g., promos, cart reminders) from [Company Name] at the number provided. These messages may be sent using an automatic telephone dialing system or other technology, even if your number is on a state or federal Do Not Call (DNC) list. Consent is not a condition of purchase. Message frequency varies. Msg & data rates may apply. You can opt out at any time by replying STOP or by clicking the unsubscribe link (where available). See our [Privacy Policy] and [Terms of Service].”
Business Owners, Marketing Teams
Zenoti now restricts the creation or scheduling of SMS and RCS marketing campaigns when the selected send time overlaps with configured quiet hours, helping businesses align with regulatory guidelines such as TCPA and other similar communication standards. If a campaign is scheduled to run during restricted hours, users will see an action restriction message and be prompted to adjust the schedule to an allowed time window.
This update helps reduce compliance risk by preventing marketing messages from being scheduled during quiet hours and promotes responsible communication with guests across the platform.
Module: Digital Forms
Zenoti now allows you to configure guest forms to become outdated after a specified number of days following submission, making it easier to identify information that may no longer be current. Once the configured timeframe has passed, the submitted form is shown with an Outdated status and a clear banner at the top of the form.
This status is displayed consistently across all platforms, including Zenoti Web, Zenoti for Mobile, ZMA, and CMA, helping teams quickly recognize outdated guest information and take appropriate action.
Add-On Product
Module: Payments
Manually entering payout bank details often results in errors—like wrong account numbers, incorrect routing codes, or low-quality documents—leading to delays and KYC rejections by Adyen. To streamline this, you can now securely verify your bank account online using third party providers.
You have two options:
Manual entry (existing method), or
Instant bank verification (new automated method)
To verify instantly:
Select Instant Verification on the Bank Setup page.
Choose your bank and log in securely.
Follow your bank’s authentication steps (such as OTP).
Confirm your account to link it to Zenoti.
Once verified, your bank details are saved automatically - no document uploads required.
Clear error messages: Users are guided with actionable messages for issues like invalid accounts, duplicates, cancellations, or connection failures.
Post-verification: The bank name becomes read-only on the billing page, and users must reaccept IC+ Billing T&C after adding or editing payout details.
We've made it easier to manage refunds by improving how refund failures are handled and shown - both at the transaction level and invoice level—across Web and Mobile POS. You’ll now see clearer guidance when a refund fails, and options to take the right action quickly:
Refund banners: Refund banners will now appear even when the invoice has a remaining balance.
Transaction-level refunds:
For open invoices, refund failures are reflected in the Appointments V2 notification area.
For closed invoices, the invoice remains closed, but refund failures are clearly indicated when opened, with the option to reopen for further action.
Invoice-level refunds: A Reopen & Adjust call-to-action (CTA) is now available on refund invoices in failure scenarios to reprocess and modify amounts.
Refund checks: Before the last item in a refund can be voided, Zenoti now ensures that the refund was successfully processed by the payment provider.
Mobile POS: These improvements are fully supported in the mobile POS system as well.
You can now enable Credit Card Surcharge for both Stripe and Adyen in the U.S., allowing eligible card processing fees to be passed to your guests in a compliant and transparent way - helping you save up to 100% of your credit card costs.
Key highlights:
You can configure how much of the fee to pass on to your guests, based on card brand and transaction type.
Zenoti automatically detects card brand and type (credit or debit) and applies the surcharge accordingly.
Surcharge settings can be accessed from the center configuration page in the payments onboarding section.
U.S. surcharge regulations and card network rules apply - please review the Terms & Conditions carefully before enabling.
Your existing Zenoti fee will change once surcharge is enabled.
For onboarding queries, contact: zenotisurchargehelp@zenoti.com.
We’ve made several improvements to Zenoti Payments to simplify your setup and daily operations.
T+1 Payouts now supported in Canada: Canadian centers can now select T+1 payout speed under Store Details.
IC+ billing model migration (Stripe & Adyen): You can now onboard, migrate, or revert between IC+ and blended billing models.
Self-service payout speed changes: Switch between T+1 and T+2 payout speeds, view rate changes, and schedule the update directly.
Surcharge configuration for Australia: Surcharge can now be toggled on/off. Previous rates are retained and re-applied. Changes require OTP verification.
New reports for reconciliation: Bank Deposit and Reconciliation Reports are now available for Adyen Balance, delivered in CSV format.
You can now select your legal entity type as part of the Zenoti Payments onboarding process.
Key highlights
You can now select Company, Sole Proprietorship, or Trust as your company type under Company Details. Country-specific KYC steps will be shown based on the selected type:
Company (default)
Sole Proprietorship
Trust (available only for Australia and New Zealand)
Sole Proprietorship onboarding is supported for the US, UK, Australia, and New Zealand, with a streamlined process to capture business and personal details, tax IDs, and bank information.
Trust Onboarding (AU & NZ only) includes additional steps to enter:
Trust details such as agreement type, addresses, and document upload
Trust members including settlor, trustee, protector, and beneficiary, with relevant validations and identity details
The legal entity type is auto-selected based on country and cannot be edited after selection.
If your business includes Medical Spa services, you'll now be required to provide additional details to accept HSA/FSA card payments:
During onboarding or when adding Medical Spa as a business line, you must list eligible services, explain your verification process, and upload practitioner details with valid licenses.

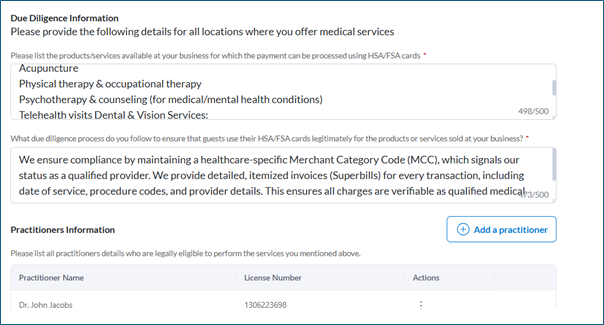
A license check will validate practitioner information before submission.
You must accept updated terms and conditions to proceed.
When linking existing centers to Medical Spa, you'll be guided through a quick setup process. A confirmation step ensures you're informed before any temporary pause in payment processing.
In special cases, Zenoti may allow exceptions. If so, the due diligence step can be skipped.
Previously collected data will be automatically migrated where applicable.
Module: Photo Manager
Downloading photos no longer requires the Photo Manager add-on to be enabled. Any user with the Download permission can now download photos, making it easier to access images uploaded through forms or other sources.
With proper guest consent, these images can be reused for marketing initiatives or shared with guests to improve engagement, without additional configuration or add-ons.
Module: Online Booking
Zenoti now allows businesses to control how verification codes are delivered for Webstore and CMA login, ensuring seamless authentication even for organizations without SMS capability. Organizations can now configure which verification code delivery channels are supported for Webstore and CMA authentication:
Both Email & SMS (default)
Email only
SMS only
This flexibility ensures that login with a verification code can remain the default authentication method, regardless of an organization’s available communication channels.
How it works:
At the organization level, click Configuration.
Navigate to Online Booking > Online booking settings > CX V3 > Common Settings for Webstore and CMA > Enable Login with verification code.
Select the mode of OTP delivery:
Both
Email only
SMS only
Based on the selected option:
The login UI dynamically shows only the relevant input field (email or mobile number)
Field validationautomatically adjusts to match the selected mode.
OTP generation and delivery are restricted to the enabled channel.
NOTE:
Ensure the selected OTP delivery mode aligns with the organization’s available delivery capabilities (SMS vendor or email).
The chosen mode must also be compatible with mandatory guest contact information requirements.
Zenoti now supports a 4-level service catalog hierarchy in Webstore V2, allowing businesses to display service subcategories alongside categories for a more structured and intuitive booking experience. This enhancement delivers a more intuitive browsing experience for guests, especially for organizations with complex service structures.
With 4-level hierarchy support, businesses can now offer granular service classification, enabling:
Easier service discovery
Cleaner navigation
Improved booking experience for guests
Module: Fitness
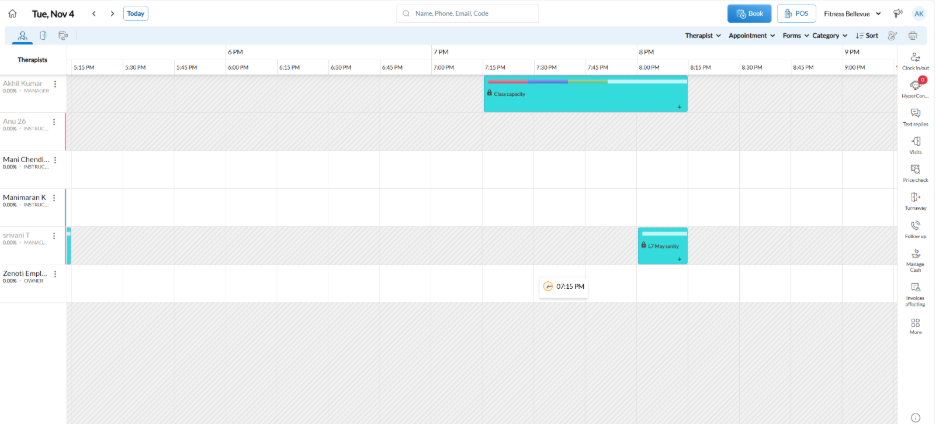
Front-desk staff use the New Appointment Book to view scheduled appointments and classes for the day. Class blocks show when classes occur but do not allow edits or management actions. Zenoti restricts all class-related actions to the Classes tab to prevent accidental changes and user confusion.
Business scenario:
A front-desk or operations user reviews the Appointment Book to understand daily schedules and class timings at a glance. When a class appears as a block, the user can see its timing but must open the Classes tab to manage or update the class. This separation ensures users follow the correct workflow when working with classes.
![]() |
Additional Resources
This section includes recently published patch release notes and a comprehensive up to date glossary for your reference.
Release date | Document type |
|---|---|
November 04, 2025 | |
October 07, 2025 | |
N/A |


