Conversion tracking in Google Platform
The three conversion tracking options available in Zenoti using Google are:
Google Analytics
Using Google Analytics you can track basic tracking functions, such as how many of your guests booked an appointment successfully, the services they booked, the e-commerce sales performance, and product performance. To set this up, you must Enable e-commerce tracking in Google Analytics first.
Google Ads
Using conversion tracking in Google Ads, you can keep tabs on the effectiveness of your ad clicks by measuring if they lead to valuable customer activity on your website, such as purchases, sign-ups, and form submissions.
Google Tag Manager
If you require advanced tracking capabilities, you can use Google Tag Manager, where you can use the data in the data layer for enhanced tracking.
Conversion tracking using Google Analytics
Important
The links to external resources provided in this article are for informational purposes only. Zenoti bears no responsibility for the accuracy, legality, or the content of the external site or for that of subsequent links.
To track conversions in Webstore using Google Analytics:
Step 1: Register your Webstore as a subdomain of your website
Step 2: Enable tracking ecommerce transactions for Google Analytics in Webstore
Step 3: Update references to Webstore
Step 1: Register your Webstore as a subdomain of your website
For tracking to work effectively, you must use a custom domain. Using the custom domain setup in Zenoti, you can customize the URL of your Webstore to be a subdomain of your website domain.
For example:
The existing Zenoti online booking URL for SpaBliss is as follows:
spabliss.zenoti.com/webstoreNew
SpaBliss owns the following domain:
spabliss.com
The domain name can be masked, as the subdomain of the domain SpaBliss owns, to the following URL:
booking.spabliss.com/webstoreNew
The masked URL internally redirects to the Zenoti booking URL.
Step 2: Enable tracking ecommerce transactions for Google Analytics in Webstore
After you customize the URL to your Webstore, your Webstore will now be a subdomain of your website. You must enable e-commerce transactions for Google Analytics in Webstore. This is a two-step process:
Beneath the Google Tag Manager script, paste the Google Analytics script.
Note
Zenoti customers with advanced tracking capabilities can use Google Tag Manager, where you can use the data in the data layer for enhanced tracking.
Step 3: Update references to Webstore
After you have customized the URL to your Webstore, as the URL has changed, you should update all the references to the Webstore to the updated URL. The principal locations that link to Webstore are:
Links in your website, such as the Book Now button in your home page and services page.
Any ads or campaigns that directly link to Webstore
Note
When you run a Google Ads campaign, after linking your Google Analytics account with Google Ads, you can import the transactions from Google Analytics to Google Ads.
Conversion tracking in Google Ads
Disclaimer
The links to external resources provided in this article are for informational purposes only. Zenoti bears no responsibility for the accuracy, legality, or the content of the external site or for that of subsequent links.
Conversion tracking in Google Ads helps you keep tabs on the effectiveness of your ad-clicks by measuring if they lead to valuable customer activity on your website, such as purchases, sign-ups, and form submissions.
Zenoti allows two methods of tracking conversions in Google Ads:
Caution
When you compare Google Ads conversions with transaction data in Google Analytics, you may find some discrepancies, and it is expected. This is due to the differences in attribution and conversion windows on both the platforms. Learn more
Track conversions directly in Google Ads
You could install the built-in Google Ads conversion tracking onto your Webstore using Google Tag Manager to track the conversion. Alternatively, you can also check the predefined GTM tags and triggers, which provides a JSON export, which has this part setup already.
Note
Zenoti supports direct tracking from Google Ads only via Google Tag Manager .
Here is how it works:
When a user reaches the Thank you page in your Webstore, after a purchase, the conversion tracking code gets triggered.
Google Ads checks if there was a prior ad click attached to it.
If there was a prior ad click, even if it is not the click that lead to the conversion, Google Ads considers this as a conversion. For example, consider this scenario:
Jane sees an ad to your Gold Massage service.
She clicks the ad, reviews the service, and closes the ad.
Later, she sees the same information in Facebook and clicks the link to the Gold Massage service page.
Then on the weekend, she books the massage by searching for the service in Google.
When she reaches the Thank you page, Google Ads finds that there was an ad click prior to her reaching there. Google Ads marks this as a conversion.
Import goals and e-commerce data from Google Analytics to track ad conversions
As you have already set up e-commerce tracking in Google Analytics, if you have Google Ads linked to your Google Analytics account, you could import the e-commerce data that you receive in Google Analytics to Google Ads. To set this up, you must install Google Analytics on all pages of your website, including the Thank you page of your Webstore.
Note
This setup imports all transactions as a single conversion action. If you want the conversions to be split into different service lines, you must implement the direct Google Ads tracking.
On the Thank you page of your Webstore, after a purchase, the conversion tracking code gets triggered.
Google Analytics does not check for a prior ad click; it just registers where the user came from:
If the last known source of the user is an ad click, Google Analytics sends the data to Google Ads.
If the last known source is not an ad click, Google Analytics does not send the data to Google Ads, even if there was an ad click prior to that.
For example, consider this scenario:
Jane sees an ad to your Gold Massage service.
She clicks the ad, reviews the service, and closes the ad.
Later, she sees the same information in Facebook and clicks the link to the Gold Massage service page.
Then on the weekend, she books the massage by searching for the service in Google.
When she reaches the Thank you page, Google Analytics finds that the last known source of Jane is not an ad click, but an organic Google search. Google Analytics does not send this data to Google Ads.
Use data layer for enhanced conversion tracking
Disclaimer
The links to external resources provided in this article are for informational purposes only. Zenoti bears no responsibility for the accuracy, legality, or the content of the external site or for that of subsequent links.
Google Tag Manager is an E-Marketing tag tool, which adds analytics and audience measurement functionality to your Webstore. To set it up, you must add Google Tag Manager to Webstore.
After the set up, you can use Google Tag Manager for customized tracking based on your needs. For customized tracking Google Tag Manager uses tags, triggers, and variables from dataLayers, which are virtual layers (JavaScript objects) that temporarily stores data that gets generated by visitors engaging with your Webstore.
Configure tags for the Data Layer provided by Zenoti
Currently, Zenoti provides dataLayer for purchase events, with the code structure formatted in Universal Analytics enhanced ecommerce dataLayer format. You must configure triggers and variables based on custom events available in the dataLayer.
Triggers:
To configure tags for the Zenoti dataLayer you must set up triggers based on custom events available in dataLayer. There are 4 types of dataLayer events we send:
Event | DataLayer Trigger |
|---|---|
Service Booking | bookingCompletedService |
Gift Card Purchase | bookingCompletedGiftCard |
Membership Purchase | bookingCompletedMembership |
Series Package Purchase | bookingCompletedPackage |
Tip
You can club all 4 custom events into 1 trigger using a RegEx based custom
eventbookingCompleted.*
Variables:
Data Layer variables enable Google Tag Manager to read a value from your dataLayer implementation and turn it into a variable that can be passed to tags, triggers, and other variables. For Google Tag Manager to recognize custom data in the dataLayer, you must use a dataLayer variable.
As Zenoti follows Universal Analytics enhanced ecommerce dataLayer format, you may already be able to configure and fetch the values you need.
Below are the key dataLayer variables and their paths for use in Google Tag Manager.
Variable | Path |
|---|---|
Purchase Revenue | ecommerce.purchase.actionField.revenue |
Transaction ID | ecommerce.purchase.actionfield.id |
Currency | ecommerce.currencyCode |
Service Line (Custom) | eventtype |
You can use the Service Line (Custom) variable (with name eventtype) as an additional dataLayer variable when you want to implement any additional tracking logic.
Conversion tracking with enhanced data layer support for Google Tag Manager
When a user visits your Webstore, Google Tag Manager tracks events using the enhanced data layer support. You can use the information from data layer for customized tracking and analysis in any web analytics tool, such as Google Analytics or Facebook Pixel. By capturing these events, you get all information about user actions and additional information for your business needs, such as:
The services, membership, or packages that the user added to the cart from a list of items that they viewed.
The number of times a product has been seen from a list that has other products, such as a service category page or a service listing page.
The product ID, price, and other information about the items that the user checked out.
Information about the final transaction
User sign-in, sign-up, forgot password, and reset password events
Service booking time slot
At the organization level, click the Configuration icon.
Navigate to Online booking > Online booking settings > Webstore V2.
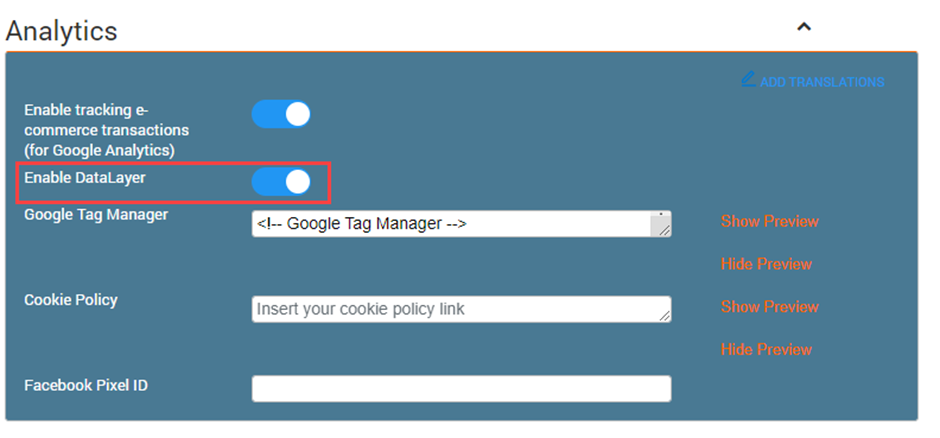
Expand the Analytics section.
Turn ON the Enable DataLayer
Click Publish.
The settings are saved and the changes are published.
Events tracked in Webstore
Standard events – Enhanced Ecommerce
A standard event is a predefined visitor action that is tracked by Google Tag Manager by default. Webstore tracks the following standard events in the data layer:
Event Name | Event Description |
Product Impressions | Measures how many times a product has been seen from a list that has other products, such as a service category page or a service listing page. |
Add to cart | Sends information to the analytics tool that a product (at an item level) has been added to the basket. Used for services, memberships, and packages. |
Remove from cart | Sends information to the analytics tool that a product has been removed from the basket. Used for services, memberships, and packages. |
Checkout | Measures every step in your Checkout process. This starts after a user has stopped adding products to the basket and starts the buying process. |
Purchase | Pushes all of the final transaction data into the analytics tool. |
Custom events
A custom event is a visitor action that takes place in the Webstore that isn’t a standard event. The following custom events are tracked using the data layer:
Event Name | Event Description |
User sign-in, sign-up, forgot password, reset password | Tracks user sign-in, sign-up, forgot password, and reset password events. |
List of locations | Measures the count of locations listed in the location listing, and the center's name. |
Slots in the service booking | Tracks the time slot of a service booking. |
Number of slots | Captures the count of slots listed for the visitor, and the different slots. |
Number of therapists | Captures the count and ID of all therapists listed for the visitor. |
Properties
For each of the events, the following properties are tracked.
Property name | Property description |
URL | The URL of the Webstore |
Center ID | The unique identifier of the center |
Center Name | The name of the center |
Organization ID | The unique identifier of the organization |
Account Name | The name of the organization account |
User ID | The unique identifier of the user. This is shown as Null when a user is not logged in. |
Types of events | Flows tracked |
Log-in | User Sign In User Sign up Forgot Password Reset Password |
Services | Add ons Variants Intro Pricing Day Packages Prerequisite and Post requisite services Group Booking Count of therapist Count of time slots |
Note: Only Checkout and Purchase events are tracked for count of therapist and count of time slots. | |
Gift Cards | Predefined gift cards
|
Custom gift cards
| |
Note: Only Checkout and Purchase events are tracked (Impressions, Add to cart and Remove from cart events are not tracked for gift cards). | |
Memberships | Recurring memberships Non-recurring memberships |
Note: All standard events (Impression, cart, checkout, and purchase) are tracked for memberships. | |
Series Packages | All series packages |
Note: All standard events (Impression, cart, checkout, and purchase) are tracked for series packages. | |
Deals | Deals |
Smart Marketing | Smart Marketing |
Location selector | List of center IDs and center names |
Webstore: Troubleshoot Issues with Google Analytics
When you use Google Analytics for your Webstore, it provides you with insights on how users land on your Webstore, check the services listed on your Webstore and book an appointment.
Using this information, you can gain insights on data such as the time of visit, pages visited, and time spent on each of the webpages, referring site details (such as the web address of this site), online campaigns that bring in the most traffic and conversions, the success rate of a campaign, and the situations which led to a guest from dropping the action before an appointment was booked.
However, if you do not set up Google Analytics correctly, it will result in data inaccuracies in the following areas:
To understand these issues better and to understand the solutions, you must first understand the meaning of the following terms:
Terminology
Client - ID: The Client ID (cid) is a unique identifier for a browser–device pair that helps Google Analytics link user actions on a site. By default, Google Analytics determines unique users using this parameter.
Conversion: An action taken by the user, online or offline, that contributes to the success of your business, (such as Sign Up, booking, and purchase of membership).
Direct Source: Website visits that arrived on your site either by typing your website URL into a browser or through browser bookmarks. In addition, if Google Analytics can't recognize the traffic source of a visit, it will also be categorized as Direct in your Analytics report.
Linker Tag: Conversion linker tags are tags deployed on any page that a user lands on when they click an ad or a promotion. These tags are used to measure data related to clicks so that conversions are measured effectively.
Medium: How a user reached your website (such as banner, organic traffic, referral, or social media).
Source: Where your website’s traffic originates (such as a search engine or a domain).
Tracking Parameters (UTM Parameters): Tracking parameters are specific text strings that you can append to URLs to track user behavior. This tracking helps you understand the effectiveness of your online marketing campaigns across traffic sources and publishing media. The following are the UTM parameters used by Google Analytics.
Parameter | Description | Example |
utm_source | Identifies the site (such as the search engine, site, publication, social media page, or other referrals) that sent the traffic to your website. This is a required parameter. | utm_source=google utm_source=newsletter4 |
utm_medium | Identifies the type of link the user clicked to reach your Webstore, such as an ad banner, cost per click (cpc) ad, or email newsletter. This is a required parameter. | utm_medium=cpc utm_medium=banner |
utm_campaign | Identifies a product promotion (such as a sale or a giveaway) or a strategic campaign (such as the introduction of a new feature, the launch of a new service, product launch, or partnership). This is a required parameter. | utm_campaign=spring_sale |
utm_term | Identifies search terms or paid search keywords. If you're manually tagging paid keyword campaigns, you should also use utm_term to specify the keyword. | utm_term=specialty+manicure |
utm_content | Identifies what specifically was clicked to bring the user to the site, such as a banner ad or a text link. It is often used to track which call-to-action links are more effective. | utm_content=bannerlink or utm_content=textlink |
Troubleshoot common issues in setting up Google Analytics for your Webstore
Why are the traffic sources to my website not getting tracked accurately?
When a user clicks your ad from a social media page, and the source of traffic does not get captured, you will lose valuable information on metrics such as campaign success.
To avoid this, you must:
Ensure that the following three UTM parameters are part of the URL that you use in the promotional channels you want to be associated with this custom campaign:
Campaign source (utm_source)
Campaign medium (utm_medium)
Campaign name (utm_campaign)
To create a campaign URL that contains these parameters, you can use Google’s free Campaign URL Builder tool. You can also create your URLs by yourself by adding values for the utm_source, utm_medium, and utm_campaign parameters.
The following is a sample URL with all the parameters:
https://spabliss.com?utm_source=Google&utm_medium=Banner&utm_campaign=Online_Sale&utm_id=123
Ensure that the parameter information is passed from your website to your Webstore.
You can use custom scripts to update the URLs in your website (such as your Webstore, Products, or Services) to include the three tracking parameters from your website URL. The custom script works in two steps:
Saves the tracking parameters from the Website.
Dynamically appends the parameters to the Webstore URL.
How can I ensure that conversion events are recorded correctly?
Conversion tracking in Google Ads lets you identify how well your ad campaign is generating sign ups, purchases, appointment bookings, and other key actions for your business. To ensure that conversion tracking works smoothly, you must:
Step 1: Create a conversion action in Google Ads
Sign in to your Google Ads account.
In the upper right corner, click the Tools icon, and under Measurement, click Conversions.
Click the Add button.
Click Website.
The New conversion action page opens.
From the Category drop-down list, select the type of action you’d like to track. There are categories available to classify actions for Sales, such as Purchase and Subscribe; Leads, such as Sign up and Book Appointments, and other activities.
In the Conversion name box, enter the name of the conversion you are tracking, such as “gold membership purchase” or “manicure booking.”
In the Value field select how you wish to track the value of each conversion.
In the Count section, select how to count these conversions.
Click Create and continue.
Your conversion action is created.
In the next step, you must install the tag to your website code. Even though you can add the tag manually, Zenoti suggests that you use Google Tag Manager to install the tag.
Step 2: Set up the conversion tracking tag using Google Tag Manager
To set up website conversion tracking for the first time, you'll need to add two code snippets to your website: the global site tag and the event snippet. You can use Google Tag Manager to add these two code snippets to your website.
In the Tag setup box, under Select how you want to install your tag, click Use Google Tag Manager.
Copy the Conversion ID and Conversion Label listed in this tab.
Switch to the Google Tag Manager and create a tag of type Google Ads Conversion Tracking.
In the Conversion ID and the Conversion Label fields, paste the Conversion ID and Conversion Label values obtained from step 2.
In the Triggering section, create a suitable trigger or select an existing one to determine when the conversion should be triggered. For example, you can add Thank You Page Discount Sale as a trigger so that when a user clicks the discount banner on your Thank You page, it is considered as a conversion.
Click Next.
Click Done to complete your tag setup.
Tags created in Google Tag Manager are not immediately active. To publish the changes you have made, on the Tag Manager Overview page, click Submit.
Click Preview to test your changes without publishing them to everyone.
Google Tag Manager will now install the code snippets to your website.
Why is one user getting tracked as two different users in Google Analytics?
To count the number of sessions, Google Analytics collects a Client-ID value every time a user accesses a page. Google Analytics then stores the Client-ID values in cookies per domain. Websites on one domain cannot access cookies set for another domain.
When you measure sessions across multiple domains, the Client-ID value must be transferred from one domain to the other. When your Webstore domain is different from your website domain, you must link the Client ID of your website with your Webstore. Otherwise, when a user navigates from your website to your Webstore, Google Analytics tracks this single user as two people.
For example, consider this scenario.
You own a business, SpaBliss, with the domain spabliss.com. Your Zenoti Webstore that is integrated with your website is spabliss.zenoti.com/webstoreNew.
A user clicked the link to your website from Facebook and reached your domain spabliss.com. The system that the user uses stores the following cookie which contains the client ID: GA1.1.905952901.1657093747
The user looks at the services that you offer and decides to book an appointment with you.
The user clicks the Book Now button on your home page.
They reach spabliss.zenoti.com/webstoreNew. As the domain for the Webstore is Zenoti.com and the domain for your website is spabliss.com, a new client ID is generated for the same user: GA1.1.806732432.2786095629
As the two client IDs do not match, Google Analytics tracks this user as two different users.
There are two methods that you can use to avoid this problem:
Method 1: Customize your URL so that the Webstore URL is in the same domain as your Website.
For example, if your website domain is spabliss.com and your Webstore URL is spabliss.zenoti.com/webstoreNew, you can customize your Webstore URL to booking.spabliss.com. As booking.spabliss.com is a subdomain of spabliss.com, tracking will not be affected at all.
Method 2: Use the “Linking” feature of Analytics code that allows the domain of your website to place the Client-ID in the URL parameters of a link, where the domain of your Webstore can access it.
For method 2, you must edit the global site tag (gtag) to be able to send event data to Google Analytics.
To link two domains using Method 2:
Copy the gtag given in every page of your website, immediately after the <head> tag. The following is a sample of a gtag with tracking ID UA-000000-2.
                                 <!-- Global site tag (gtag.js) - Google Analytics -->
<script async src="https://www.googletagmanager.com/gtag/js?id=UA-000000-2"></script>
<script>
  window.dataLayer = window.dataLayer || [];
  function gtag(){window.dataLayer.push(arguments);}
  gtag('js', new Date());

  gtag('config', UA-000000-2');
</script>
Edit the Google Analytics tracking function for the domain of your website and add the linker code (that links the domain of your website to zenoti.com) to it.
For example, if your domain is spabliss.com and your Webstore domain is spabliss.zenoti.com, then add the linker tag (that links the domain of your website to zenoti.com) to the Google Analytics tracking code snippet as given below:
gtag('config', 'UA-000000-2', { 'linker': { 'domains': ['spabliss.com', 'zenoti.com'] }});Edit the Google Analytics tracking function for the domain of your Webstore and add the linker code (that links the domain of your website to zenoti.com) to it.
For example, if your domain is spabliss.com and your Webstore domain is spabliss.zenoti.com, then add the linker tag to the Google Analytics tracking code snippet as given below:
gtag('config', 'UA-000000-2', { 'linker': { 'domains': ['spabliss.com', 'zenoti.com'] }});Note
If the Webstore URL is contained in a button, then you must use a custom function to decorate the URL (decorating is a method of adding extra information to the URL).
You must use the same Google Analytics account on your website that you use for the Webstore.
For more information, refer Google Analytics and Google Tag Manager: Overview.
Customize the URL of your Webstore
Zenoti allows you to customize the URL of your Webstore as per your business requirements.
For example, if your existing Zenoti online booking URL is spabliss.zenoti.com/webstore, the hostname can be masked to booking.spabliss.com.
The masked URL will internally redirect to the Zenoti booking URL.
Customizing your URL
Customizing your URL is a two-step process that must be performed by your Admin.
Step1: Contact your Domain provider (Go Daddy, HostGator, or others), and ask for the following:
A CNAME for your domain
Three SSL certificates
Step2: Share the CNAME and the SSL certificates with Zenoti Support.
Read on to understand more details about these steps.
Step 1: Configure a CNAME and Obtain SSL Certificates
CNAME:
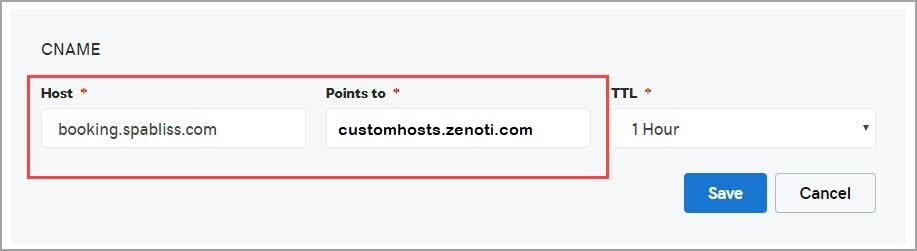
On the CPanel of your domain provider, configure the CNAME and enter the following values:
Host: Your current booking URL
Points to: customhosts.zenoti.com
For example: If your booking URL is booking.spabliss.com, enter the same in Host text box. In the Points to text box , enter customhosts.zenoti.com.
SSL Certificates: Contact your domain provider and obtain the following SSL Certificates to enable the SSL support for the newly added custom URL.
a). The PEM-encoded certificate stored in a file named <example_Certificate>.pem (public cert issued by the domain provider).
b). The PEM-encoded certificate chain stored in a file named <example_Certificate_Chain>.pem
c). The PEM-encoded, unencrypted private key stored in a file named <example_PrivateKey>.pem (generated from the public cert).
Note
: Zenoti supports SSL certificates that are 2048 bit encrypted.