Register and manage custom domain names for your Webstore in Zenoti
A custom domain for your Webstore makes it easier for your clients and other people to find and remember it with a unique web address, such as booking.spabliss.com Using the Custom Domain setup in Zenoti, you can customize the URL of your Webstore to be a subdomain of your website domain.
For example, if your existing Zenoti online booking URL is spabliss.zenoti.com/webstoreNew, and you own the domain spabliss.com, the hostname can be masked to booking.spabliss.com.
The masked URL internally redirects to the Zenoti booking URL.
To access the Custom Domain setup, at the organization level, navigate to Configuration > Online booking > Custom Domains.
On this page you can:
Register a new domain, if no domains are active or marked to be verified.
Manage your registered domain, if a domain is active or is marked to be verified.
Register a new domain in Zenoti
Using the Custom Domain setup in Zenoti, you can register a new domain for your Webstore to be a subdomain of your website domain.
At the organization level, click on the Configuration icon. Navigate to Online booking > Custom Domains.
The Add New Domain page appears.
Note
If you already have a registered custom domain, instead of Add New Domain, the Custom Domains Added page opens, from where you can manage the domain.
Learn how to edit, verify, or delete a registered domain.
Under the Domain and User Details section, in the Custom Domain Name box, enter the custom domain name.
For example, booking.spabliss.com
In the User Email Address box, enter the email address of the user setting up the account. The email ID entered here will be used to create a new Let’s Encrypt account for SSL management. The email ID is also used to validate domain ownership, and in the case of automated SSL management, to generate SSL certificate.
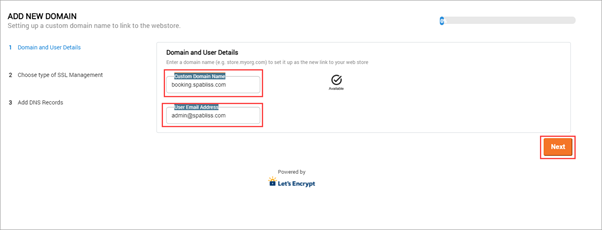
Click Next.
The Choose type of SSL management section appears.
Select from the following:
Automated SSL Management (Recommended): Use this option if you want Zenoti to set up and manage your SSL certification through an automated system. The necessary SSL certificates are generated through Let’s Encrypt, a certifying authority. This option also renews the SSL certificates automatically upon expiry.
Manual SSL Management: Use this option if you want to set up SSL binding with a certificate that you have already created for the domain name in use. You will have to upload the certificates for verification and storage to initiate SSL binding.
When you choose this option, SSL certificates must be renewed manually. You can search for SSL certificate will expire soon (manual SSL management) setting while set up alerts in Zenoti to trigger when SSL certificate is about to expire.
If you’ve selected Automated SSL Management in step-5, enter the following details in the Please fill in the below details to start SSL Management section:
Organization name
Locality
State
Country
Note
Zenoti automatically fills the information for the fields that are available in the General tab of the organization details. You cannot edit these automatically filled fields. You need to only enter the missing information.
Zenoti generates Certificate Signing Request (CSR). Let’s Encrypt uses the information in the CSR for the generation and renewal of SSL certificates.
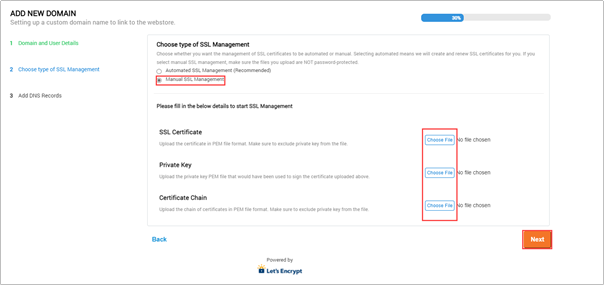
If you’ve selected Manual SSL Management in step-5:
Contact your Domain provider (Go Daddy, HostGator, or others), and ask for the following:
SSL Certificate (in PEM file format).
Private key used to sign the SSL certificate (in PEM file format).
Chain of certificates (in PEM file format). The file should not contain private key.
Upload the files in the relevant upload links.
Click Next.
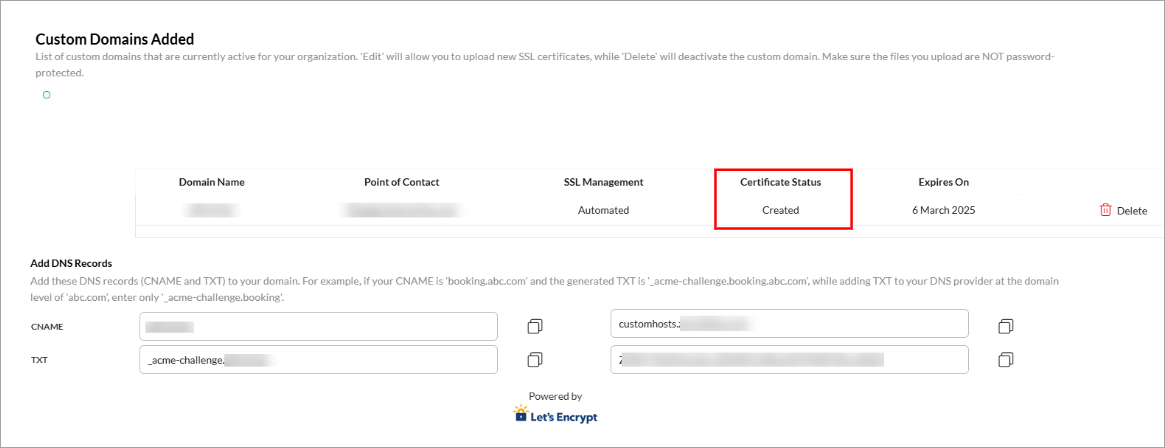
The Add DNS Records section appears.
Make a note of the CNAME and TXT records. Add these DNS records (CNAME and TXT) to your domain. For example, if your CNAME is 'booking.abc.com' and the TXT is '_acme-challenge.booking.abc.com', in your DNS provider at the domain level of 'abc.com', while adding CNAME key enter only 'booking' and while adding TXT key enter only '_acme-challenge.booking'.
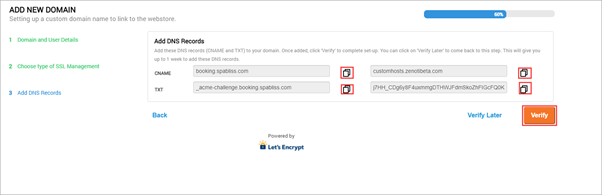
If you’ve already added the DNS records to your domain, click Verify to complete the ownership verification process and activate your domain.
For an extension of up to 1 week to add the DNS records to your domain, click Verify Later.
You must verify the domain ownership to activate the domain.
Status messages and descriptions
Status | Mode | Description | Action To Be Taken by the customer |
|---|---|---|---|
Pending Verification | Automated and Manual | Customer has not added DNS records and has not verified the Domain name. Verification is pending due to some issues. | Try verifying again after some time. |
Created | Automated | Certificate is created. | Wait for Certificate to be uploaded to Load balancer, after which the customer will have a valid SSL certificate. |
Uploaded | Manual | Certificate is uploaded/New certificate is uploaded in case of renewal. | Wait for Certificate to be uploaded to Load balancer, after which the customer will have a valid SSL certificate. |
Active | Automated and Manual | Certificate is uploaded to Load balancer. | No action required. Custom domain should be working now with the applied certificate |
Not Uploaded | Manual | Failed to upload SSL Certificate. | Click EDIT and upload the certificate again OR Try again after sometime. In case of failure. |
Not Generated | Automated | Failed to Generate SSL certificate. |
|
Expired | Automated and Manual | Certificate reached expiry. | Manual - Should Upload New Certificate. Automated - No action Required, Certificate will be picked for renewal |
Renewing | Automated | Certificate is Picked for renewal and will be renewed automatically | No action required. |
SSL Renewal Failed | Automated | Certificate Renewal Failed. |
|
Error messages and description
Error Message | Manual/Automated | Step in which error is shown | Reason | Action To Be Taken by the customer |
|---|---|---|---|---|
You have not uploaded all the required files. Upload SSL certificate, private key and certificate chain | Manual SSL | Step 2/ Domain Management on Renewal | All files are not uploaded | Ensure that all the files are uploaded. |
Validation failed for uploaded SSL Certificate. Ensure that you have uploaded a valid certificate issued for the corresponding domain | Manual SSL | Step 2/ Domain Management on Renewal | Uploaded certificates are not valid or issued for a different domain. | Ensure that uploaded certificates are valid and issued for the corresponding Domain. |
Some of the required information is missing. Fill all fields of the form. | Automated SSL | Step 2 | Some fields are missing. | 1. Fill all fields of the form. OR 2. One or more special characters are used. Remove special character |
Could not verify domain ownership. Please add the CNAME records given and click 'Verify' | Automated and Manual | Step 3 | CNAME is not entered in the Domain DNS records. | Should make sure that CNAME entry is made in the Domain DNS records with third party providers such as GoDaddy |
Could not verify domain ownership. Please add the TXTRecord records given and click 'Verify'. | Automated and Manual | Step 3 | TXTRecord not entered in the Domain DNS records | Ensure that TXTRecord entry is made in the Domain DNS records with third party provider such as GoDaddy |
Could not verify domain ownership. Please add the DNS records given and click 'Verify'. | Automated and Manual | Step 3 | DNSRecord not entered in the Domain DNS records | Ensure that DNS records are added in the Domain DNS records with third party provider such as GoDaddy |
Manage your registered domain in Zenoti
After you have a registered custom domain, you can use the Custom Domains set up to:
Edit a domain to upload a new SSL certificate, associated private key, and certificate chain (for domains with manual SSL management).
Delete a domain listing.
Verify the domain ownership.
External links:
Disclaimer
The link to external resources is provided for informational purposes only. Zenoti bears no responsibility for the accuracy, legality, or the content of the external site or for that of subsequent links.
To manage your registered domain
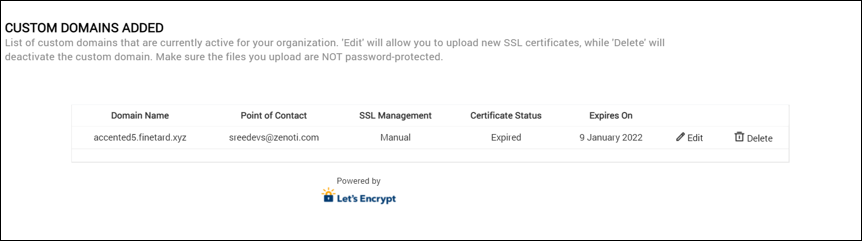
At the organization level, click the Configuration icon. Navigate to Online booking > Custom Domains.
The Custom Domains Added page appears.
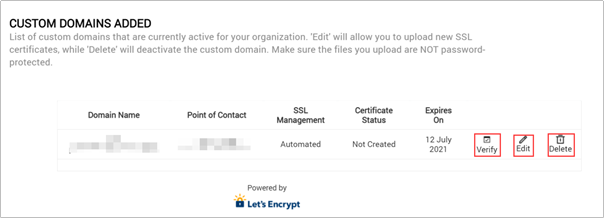
To upload a new SSL certificate, associated private key, and certificate chain:
Click Edit.
The Upload files window opens.
Upload the following files in PEM format:
SSL Certificate .
Private key used to sign the SSL certificate .
Chain of certificates. The file should not contain private key so that the file is compatible with the certificate manager requirements.
To delete a domain listing and register a different domain name, click Delete.
The domain gets removed from the list, marked as void and not pending ownership verification.
To verify the ownership of the custom domain that you opted to verify later,
Click Verify.
The Add DNS Records section opens.
Click Verify to complete the ownership verification process and activate the domain.
Your domain gets activated.
Status messages and descriptions
Status | Mode | Description | Action To Be Taken by the customer |
|---|---|---|---|
Pending Verification | Automated and Manual | Customer has not added DNS records and has not verified the Domain name. Verification is pending due to some issues. | Try verifying again after some time. |
Created | Automated | Certificate is created. | Wait for Certificate to be uploaded to Load balancer, after which the customer will have a valid SSL certificate. |
Uploaded | Manual | Certificate is uploaded/New certificate is uploaded in case of renewal. | Wait for Certificate to be uploaded to Load balancer, after which the customer will have a valid SSL certificate. |
Active | Automated and Manual | Certificate is uploaded to Load balancer. | No action required. Custom domain should be working now with the applied certificate |
Not Uploaded | Manual | Failed to upload SSL Certificate. | Click EDIT and upload the certificate again OR Try again after sometime. In case of failure. |
Not Generated | Automated | Failed to Generate SSL certificate. |
|
Expired | Automated and Manual | Certificate reached expiry. | Manual - Should Upload New Certificate. Automated - No action Required, Certificate will be picked for renewal |
Renewing | Automated | Certificate is Picked for renewal and will be renewed automatically | No action required. |
SSL Renewal Failed | Automated | Certificate Renewal Failed. |
|
Error messages and description
Error Message | Manual/Automated | Step in which error is shown | Reason | Action To Be Taken by the customer |
|---|---|---|---|---|
You have not uploaded all the required files. Upload SSL certificate, private key and certificate chain | Manual SSL | Step 2/ Domain Management on Renewal | All files are not uploaded | Ensure that all the files are uploaded. |
Validation failed for uploaded SSL Certificate. Ensure that you have uploaded a valid certificate issued for the corresponding domain | Manual SSL | Step 2/ Domain Management on Renewal | Uploaded certificates are not valid or issued for a different domain. | Ensure that uploaded certificates are valid and issued for the corresponding Domain. |
Some of the required information is missing. Fill all fields of the form. | Automated SSL | Step 2 | Some fields are missing. | 1. Fill all fields of the form. OR 2. One or more special characters are used. Remove special character |
Could not verify domain ownership. Please add the CNAME records given and click 'Verify' | Automated and Manual | Step 3 | CNAME is not entered in the Domain DNS records. | Should make sure that CNAME entry is made in the Domain DNS records with third party providers such as GoDaddy |
Could not verify domain ownership. Please add the TXTRecord records given and click 'Verify'. | Automated and Manual | Step 3 | TXTRecord not entered in the Domain DNS records | Ensure that TXTRecord entry is made in the Domain DNS records with third party provider such as GoDaddy |
Could not verify domain ownership. Please add the DNS records given and click 'Verify'. | Automated and Manual | Step 3 | DNSRecord not entered in the Domain DNS records | Ensure that DNS records are added in the Domain DNS records with third party provider such as GoDaddy |
Troubleshoot Custom Domain Verification Process
Setting up a custom domain is an essential step in making your webstore unique, but it can feel challenging if the DNS((Domain Name System) records are not configured properly. DNS records serve as instructions that guide the internet to direct guests to your webstore when they enter the custom domain. This article will walk you through the steps for verifying your custom domain, troubleshooting common issues, and ensuring that everything is set up correctly.
Overview of the domain verification process
When you configure a custom domain for your webstore, you must verify that the domain is correctly set up with the necessary DNS records. During this process, you will see different certificate statuses that indicate the progress or issues with your setup.
These are the certificate statuses you may encounter:
Pending Verification: This status means that the domain setup is not yet complete, and you have not clicked the Verify button to confirm the configuration.
Created/ Active: This status indicates that the DNS records are correctly set up and functioning as intended.
Failed: This status means that the domain configuration has failed due to issues with the DNS records or other problems in the configuration process. In this case, check your DNS settings, correct any errors, and verify the DNS records to resolve the issue.
Renewal Pending: This status means that your domain's SSL certificate is approaching its expiration date and is awaiting renewal. You will still need to verify that the DNS records are correct, as this could impact the renewal process.
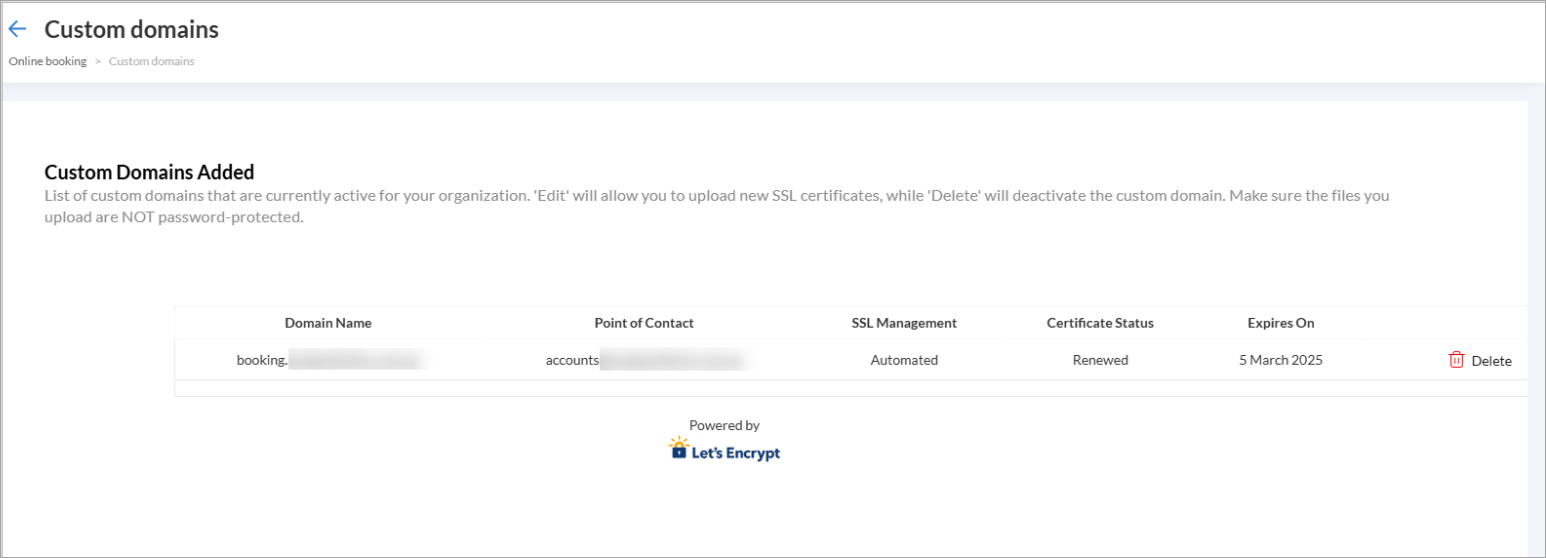
Renewed: This status indicates that the SSL certificate for the domain has been successfully renewed.
Check certificate status
After you have configured your custom domain, you will see a status on the certificate page.
If the status is Pending Verification, the DNS records (CNAME and TXT) are not yet verified. You must click Verify after adding the DNS records in the DNS portal.
If the status is Active or Created, you can see the existing CNAME and TXT records of the customer that is verified.
If the status is Active or Created, but the custom domain is not working, you must review the values for the CNAME and TXT in the DNS portal
Verify DNS configuration
You can use DNSChecker to confirm that your DNS records are properly set up. Follow these steps:
Check CNAME Records: Check your CNAME records. Ensure that the values match what is shown in the custom domain page.
Green Ticks: If the DNSChecker results show green ticks for all the records, this means that the configuration is correct, and you should be able to access your domain.
Red Crosses: If any results show red crosses, this indicates that there is an issue with your DNS configuration, and you need to review the values in your DNS portal.
Check TXT Records: Repeat the process for TXT records. If any issues arise, double-check your configuration.
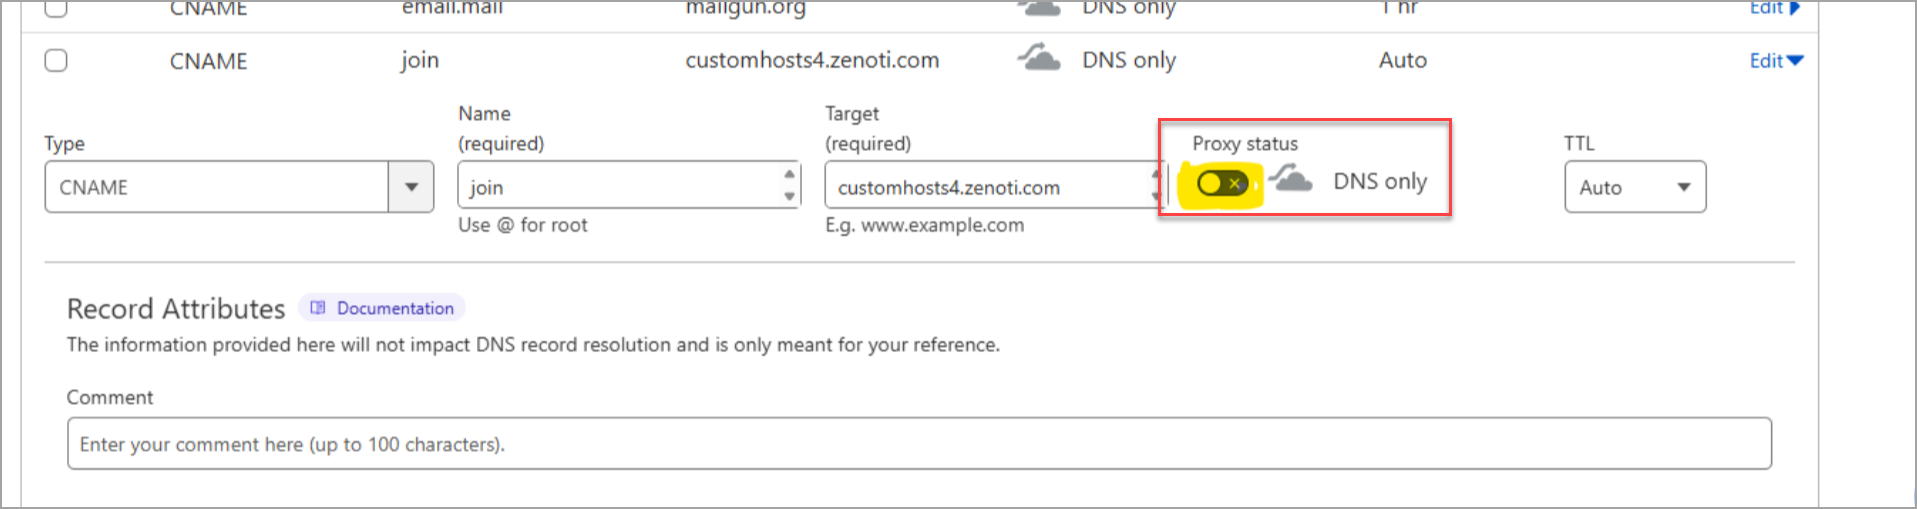
Note
If you are using Cloudflare to manage your DNS settings, make sure to disable the Proxy status for the relevant CNAME record.
Resolve DNS issues
Sometimes DNS records might not propagate immediately, and you may see issues in DNSChecker even though the configuration is correct. Follow these steps to resolve such issues:
Check DNS propagation: After updating DNS records in your DNS portal (For example, GoDaddy, Namecheap), it may take a few minutes to a few hours for changes to propagate across all servers.
Contact DNS provider: If you have waited for a reasonable amount of time and the records still do not show up as expected, reach out to your DNS provider (such as GoDaddy) for assistance. This issue is outside the control of Zenoti.
Provider-specific configuration notes
Different DNS providers may have slightly different configurations for CNAME and TXT records. Here are some things to keep in mind:
CNAME records: Ensure that your CNAME records are entered exactly as required. Some DNS providers might have slight variations in how they expect the records to be formatted. For example, one provider might expect a CNAME value like _abc.booking.welcome.com, while another might only accept _abc.booking.
TXT records: TXT records may differ depending on the provider. Some DNS portals may require the full domain name in the TXT record (For example, _abc.booking.welcome.com), while others may not.
Tip
Always verify the exact format with your DNS provider’s documentation