Manage Voice Call Settings
This article explains how to configure and manage call settings in HyperConnect, including voicemail, call recording, call forwarding, routing, greetings, and linking devices to users. This ensures optimized guest communication during and after business hours.
Overview
In HyperConnect, the Business Hours and Post Business Hours settings in the Voice configuration allow you to customize how calls are handled during and outside of your working hours. You can choose to enable voicemail for incoming calls, either using a pre-set greeting or by uploading a custom one. Additionally, you have the option to forward missed calls to voicemail or SmartBot, with flexible settings to specify the number of seconds before the call is redirected.
To use HyperConnect Voice, you need a stable internet connection and the same hardware as Zenoti. No additional hardware is required. For detailed information on supported physical phone devices, refer to the list of compatible devices for details. Here’s a breakdown of how these settings work and how you can configure them to meet your business needs.
Key Terms:
Voicemail Greeting: Pre-recorded message played when calls are missed.
Call Routing: System that defines how incoming calls are distributed.
Dynamic Phone Association: Associates a device with a browser session, not a specific user.
Static Phone Association: Permanently links a device to a specific employee.
Prerequisites
Ensure devices meet the supported hardware list.
Automatically Record Calls in HyperConnect
HyperConnect allows businesses to automatically record both incoming and outgoing calls with guests. This feature helps with compliance, quality assurance, training, and reviewing past conversations. Recorded calls are stored in call logs for easy access.
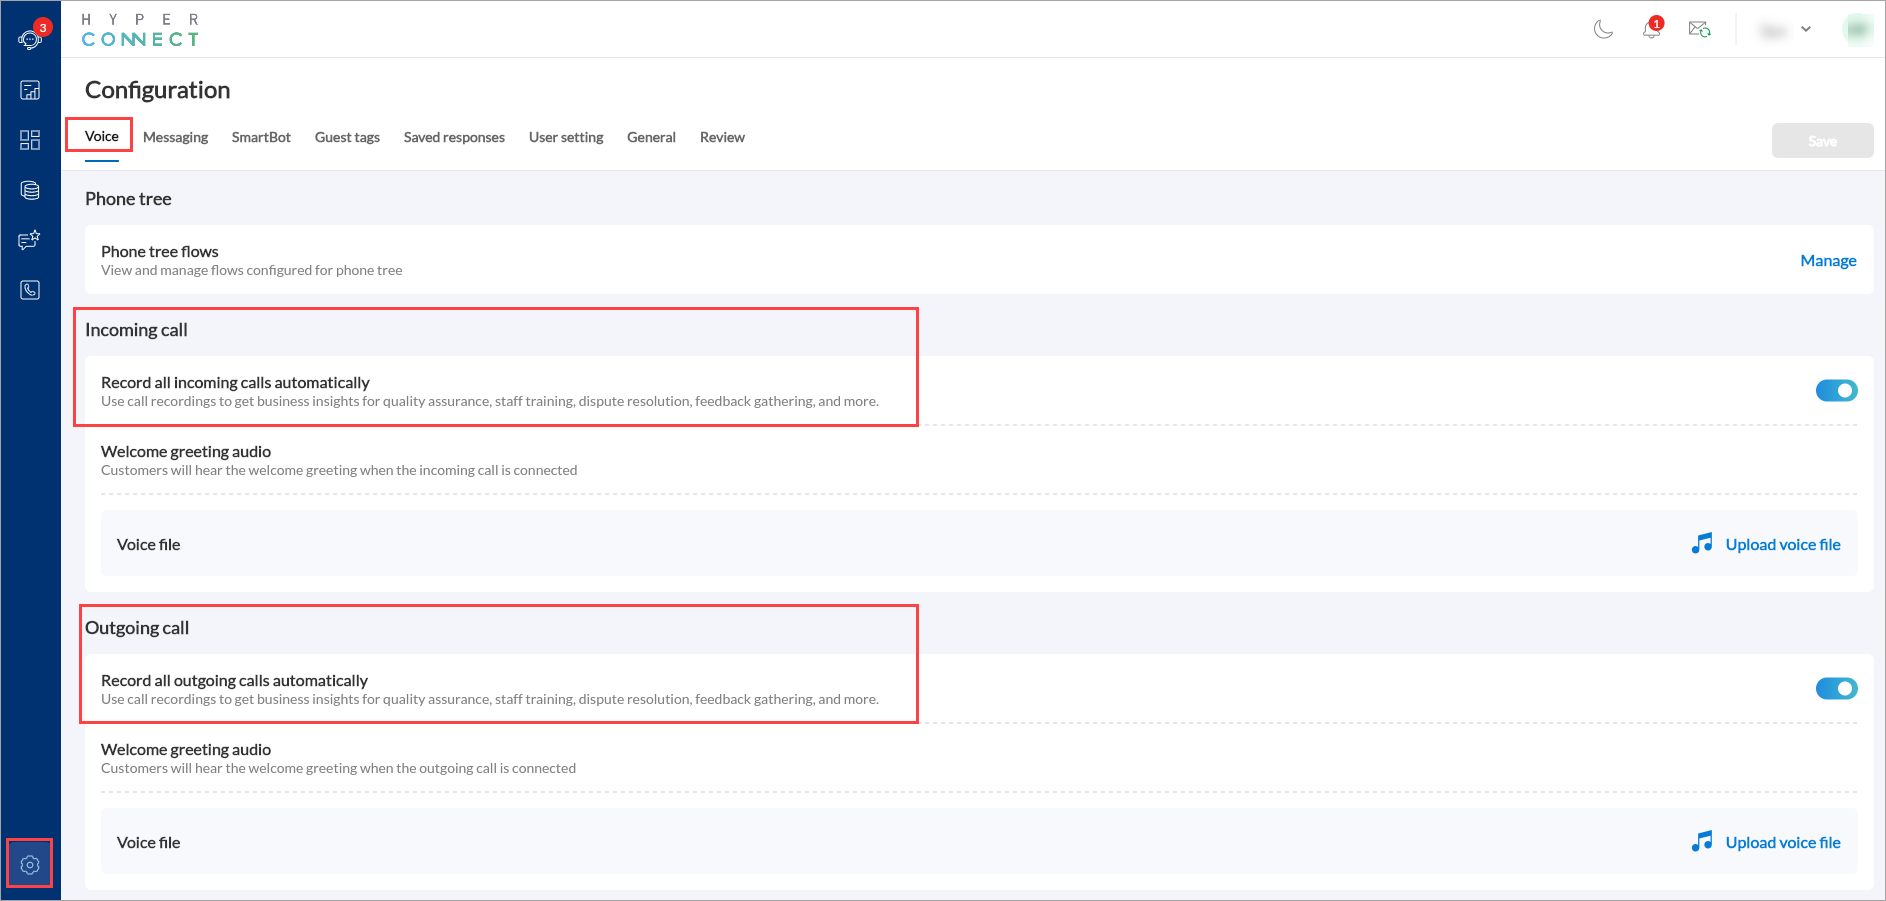
Record Incoming Calls
Launch HyperConnect.
Click the Settings icon.
From the Voice tab enable the Record all incoming calls automatically setting.
Click Save.
Note
If you have enabled the Record all incoming calls automatically setting, ensure this information is clearly stated in the incoming call welcome greeting message.
Record Outgoing Calls
Launch HyperConnect.
Click the Settings icon.
From the Voice tab enable the Record all outgoing calls automatically setting.
Click Save.
Note
If you have enabled the Record all outgoing calls automatically setting, ensure this information is clearly stated in the outgoing call welcome greeting message.
Once enabled, all calls will be recorded automatically based on the selected settings. You can access these recordings in your call logs anytime.
Set up Welcome Greeting for Calls
Creating a customized welcome greeting ensures a professional and engaging experience for your customers, whether they are calling during business hours or after. You can set up different greetings for incoming and outgoing calls by uploading an existing audio file.
Configure Welcome Greeting for Incoming Calls
Launch HyperConnect.
Click the Settings icon.
In the Voice tab, navigate to Welcome greeting.
To upload a welcome greeting, click Upload voice file.
Sample greeting: Thank you for calling [Your business name]. Your call may be recorded for quality assurance and training purposes. Our team will be with you shortly.

Click Save.
Note
If you have enabled the Record all incoming calls automatically setting, ensure this information is clearly stated in the welcome greeting message.
Impacts and considerations
The welcome greeting file must be in mp3 format and should not exceed 5MB.
Configure Welcome Greeting for Outgoing Calls
Launch HyperConnect.
Click the Settings icon.
In the Voice tab, navigate to Outgoing Welcome greeting.
To upload a welcome greeting, click Upload voice file.
Sample greeting: Thank you for calling [Your business name]. We are calling to provide an update on your request. Please hold while we connect you.

Click Save.
Note
If you have enabled the Record all incoming calls automatically setting, ensure this information is clearly stated in the welcome greeting message.
Regularly update the greeting to reflect changes in business hours, promotions, or important notifications.
Depending on local regulations, businesses may need to inform callers that their conversations are being recorded. Ensure compliance with your region’s laws.
Impacts and considerations
The welcome greeting file must be in mp3 format and should not exceed 5MB.
Set Up Call Hold Greeting
You can enhance the caller experience by personalizing the audio messages the guest hears while waiting.
Note
This feature is supported on web, soft phones, and physical phone devices.
Follow these steps to upload and configure a custom audio file for your call hold message.
Launch HyperConnect.
Click the Settings icon.
In the Voice tab, navigate to Hold greeting.
To upload a call hold greeting, click Upload voice file.
The call hold greeting file must be in mp3 format and should not exceed 5MB.
Sample greeting: Thank you for calling [Your business name]. We will be with you shortly. You can visit our website to explore our latest offers. We appreciate your patience!

Click Save.
Customize Voice Settings for Business and After-Hours Calls
The Business Hours and Post Business Hours settings in the Voice configuration allow you to customize how calls are handled during and outside of your working hours. Here’s a breakdown of how these settings work and how you can configure them to meet your business needs.
Business Hours Configuration
This section defines how incoming calls are managed during your specified operating hours.
Record a Voicemail for Missed Calls during Business Hours
To ensure that guests receive appropriate responses, businesses can have a pre-recorded message for the guest if no one answers during business hours. It can be customized to suit the business needs, such as providing alternative contact information or specific instructions.
Launch HyperConnect.
Click the Settings icon.
In the Voice tab, navigate to the Business hours configuration section.
Enable the Allow guests to leave a voicemail setting.
By default, there's a pre-set voicemail greeting. No changes are needed to use this greeting.
To upload a voicemail greeting, click Upload voice file and select a file from the browser.
Click Save.
Impacts and considerations
The voicemail greeting file must be in mp3 format and should not exceed 5MB.
Set up Call Forwarding during Business Hours
Businesses can forward incoming calls to a voicemail, SmartBot, or a number if they are unavailable during business hours. They can set the duration for routing calls during business hours by selecting one or more of the available options. Business hours typically refers to the hours your business operates (e.g., 9 AM to 5 PM).
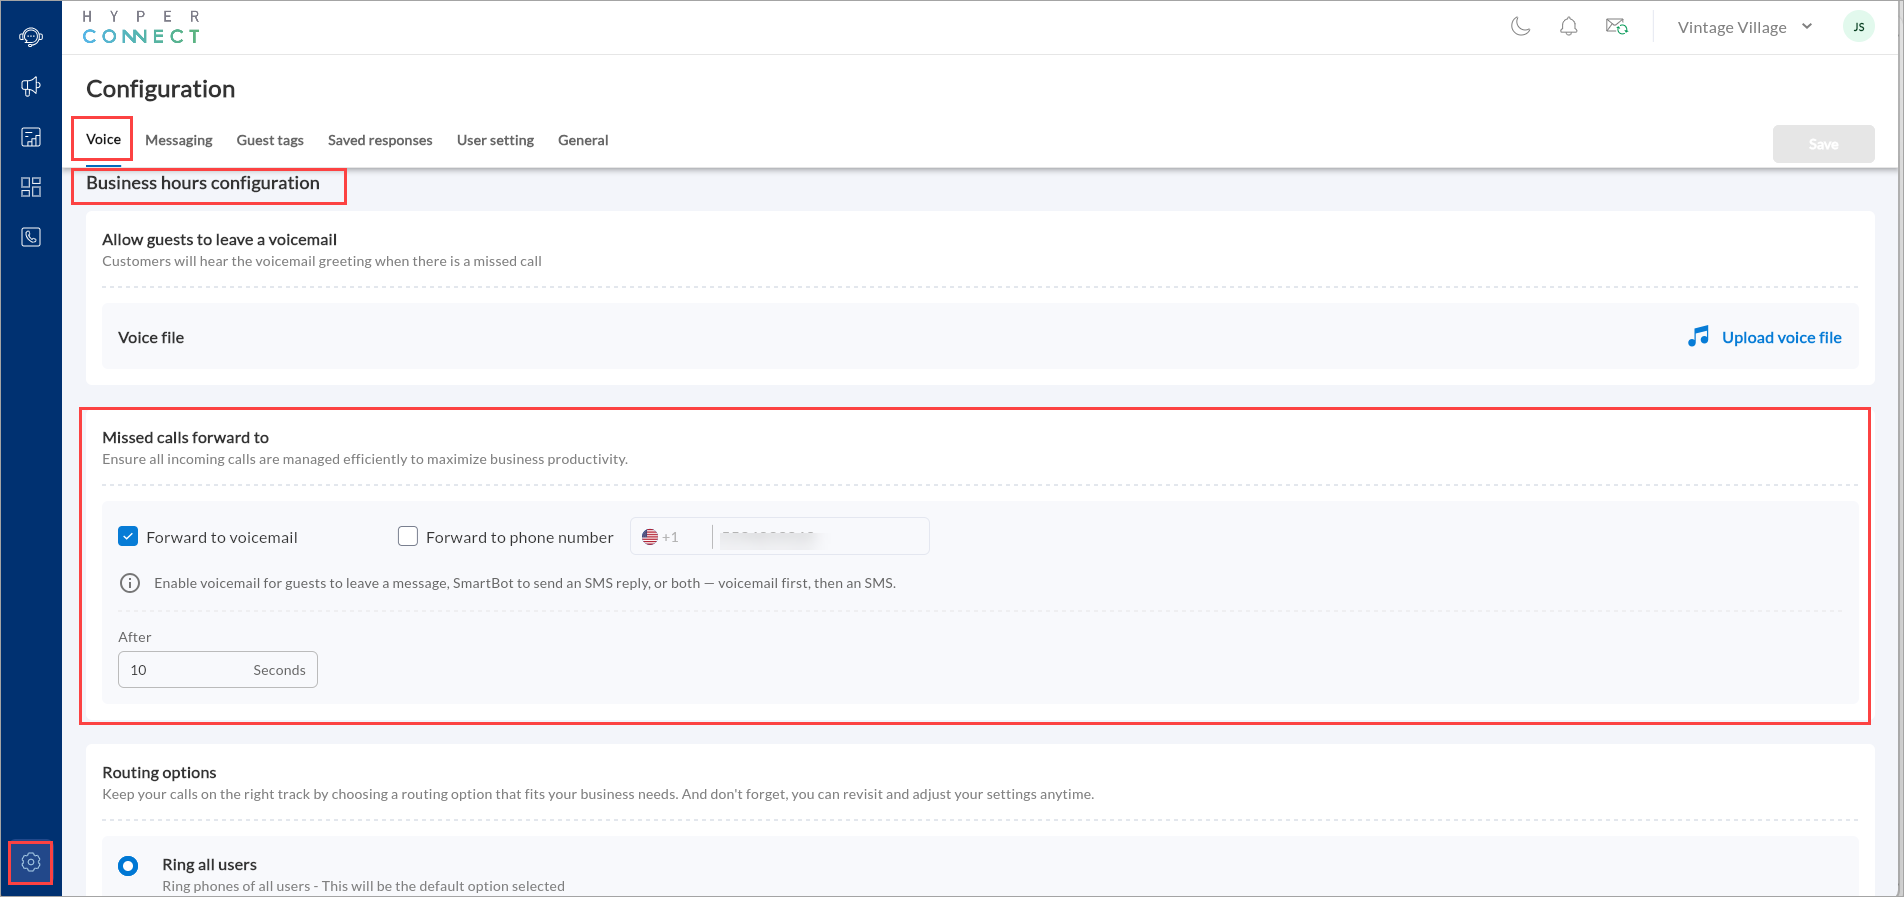
Forward Missed Calls to Voicemails during Business Hours
Businesses can forward missed calls to voicemails.
For example, during business hours (9 AM to 5 PM), calls can be routed to voicemail if unanswered after 15 seconds to ensure efficient handling of customer inquiries.
Launch HyperConnect.
Click the Settings icon.
From the Voice tab, navigate to the Business hours configuration section.
Select the Forward to voicemailcheckbox from the Forward Missed call to section.
To specify the duration after which the call is transferred to voicemail if it is unanswered during business hours, enter the value in the appropriate field.
Click Save.
Forward Missed Calls to SmartBot during Business Hours
Businesses can forward missed calls to SmartBot.
For example, during lunch hours (12 PM to 1 PM), calls can be routed to SmartBot after 30 seconds if not answered.
Launch HyperConnect.
Click the Settings icon.
From the Voice tab, navigate to the Business hours configuration section.
Select the Forward to SmartBot checkbox from the Forward Missed call to section.
To specify the duration after which the call is transferred to SmartBot if it is unanswered during business hours, enter the value in the appropriate field.
Click Save.
Forward Missed Calls to Phone Number after Business Hours
Stay accessible even after business hours by forwarding missed calls to an alternate number. This ensures that you never miss important calls, no matter the time.
For example, after 6 PM, you can set up automatic call forwarding to another number after 25 seconds of unanswered calls, keeping you connected when it matters most.
Launch HyperConnect.
Click the Settings icon.
From the Voice tab, navigate to the Post business hours configuration section.
Select the Forward to phone number checkbox from the Forward Missed call to section.
Select the country code and enter the desired phone number.
To specify the duration after which the call is transferred to a phone number if it is unanswered after business hours, enter the value in the appropriate field.
Click Save.
Post Business Hours Configuration
This section determines how incoming calls are handled outside of your regular operating hours. This ensures your business remains accessible to customers even when your team is offline.
Record a Voicemail for Missed Calls after Business Hours
When your team is unavailable outside business hours, a pre-recorded voicemail helps ensure guests receive an appropriate message. You can customize the voicemail to include business hours, alternative contact methods, or instructions on when the caller can expect a response.
Launch HyperConnect.
Click the Settings icon.
In the Voice tab, navigate to the Post business hours configuration section.
Enable the Allow guests to leave a voicemail setting.
By default, there's a pre-set voicemail greeting. No changes are needed to use this greeting.
To upload a voicemail greeting, click Replace and select a file from the browser.
Click Save.
Impacts and considerations
The voicemail greeting file must be in mp3 format and should not exceed 5MB.
Set up Call Forwarding after Business Hours
Businesses can forward incoming calls to a voicemail, SmartBot, or a number after business hours by selecting one or more of the available options. Outside business hours, cover times when the business is closed. This call transfer or redirection ensures that callers can leave a message even when immediate assistance is not available.
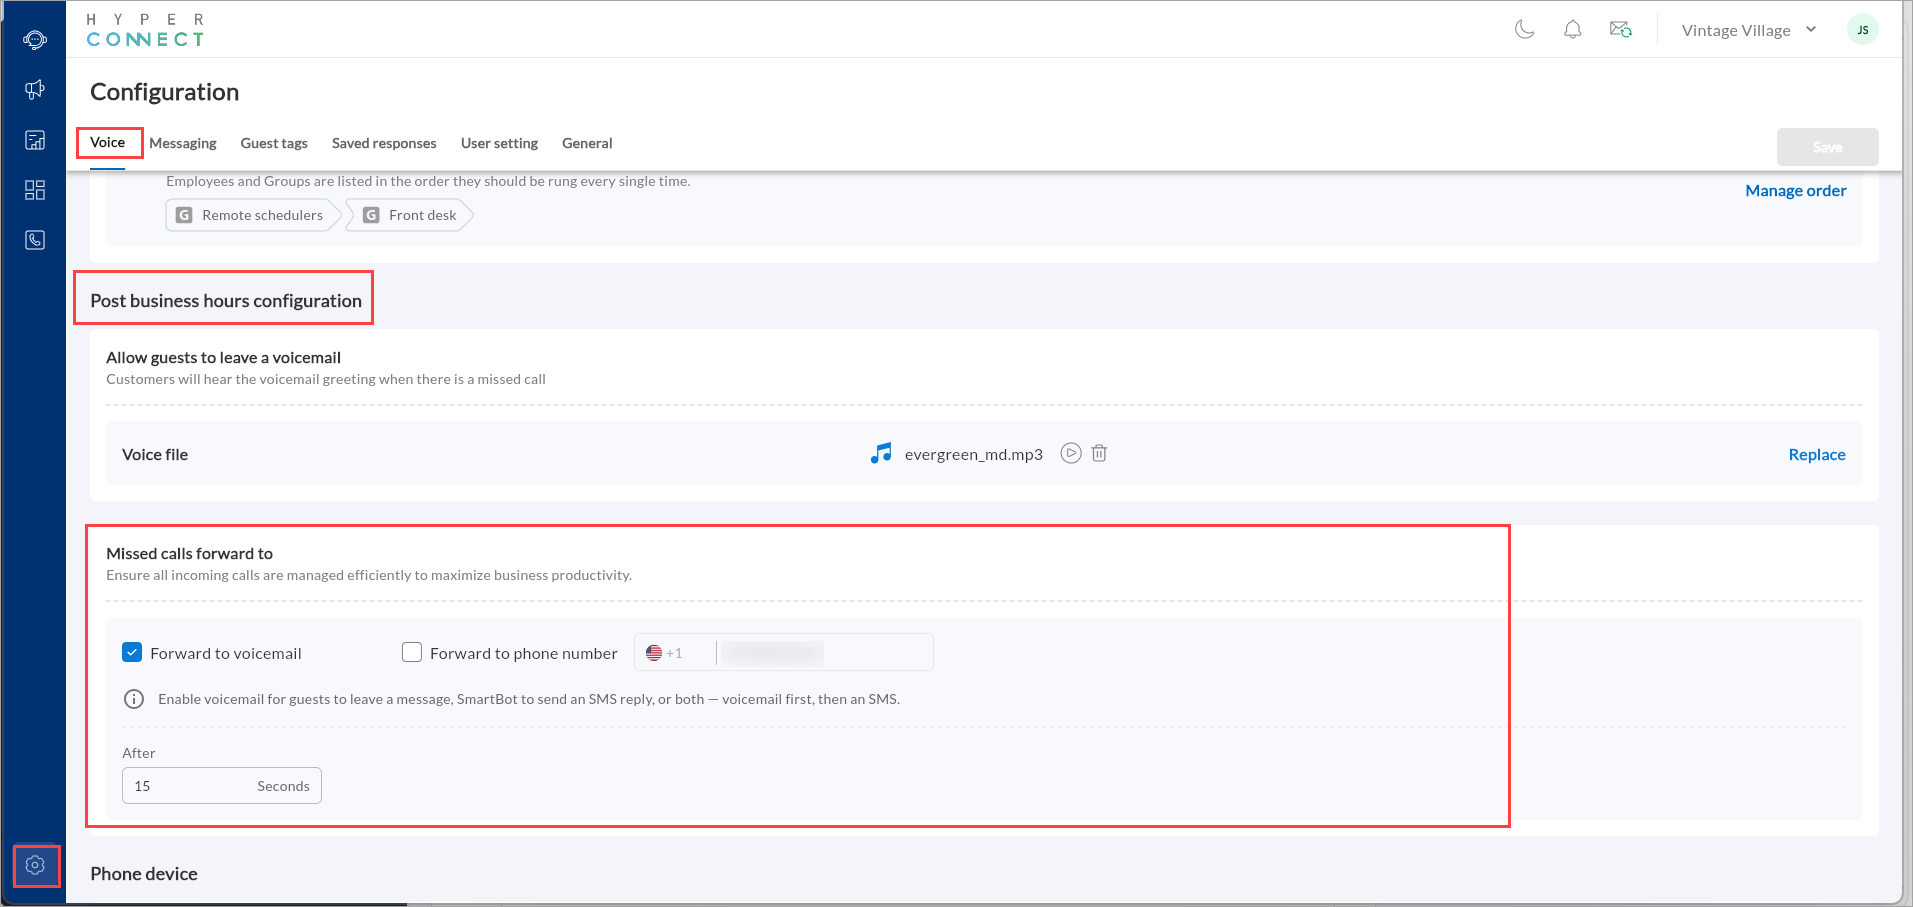
Forward Missed Calls to Voicemails after Business Hours
Businesses can forward missed calls to voicemails.
For example, during business hours (9 AM to 5 PM), calls can be routed to voicemail if unanswered after 15 seconds to ensure efficient handling of customer inquiries.
Launch HyperConnect.
Click the Settings icon.
From the Voice tab, navigate to the Post business hours configuration section.
Select the Forward to voicemailcheckbox from the Forward Missed call to section.
To specify the duration after which the call is transferred to voicemail if it is unanswered after business hours, enter the value in the appropriate field.
Click Save.
Forward Missed Calls to SmartBot after Business Hours
Let SmartBot handle customer inquiries outside your operating hours. The system can engage with callers and collect essential details when your team is offline.
For example: Between 5 PM and 9 AM, forward missed calls to SmartBot after 20 seconds of no response.
Launch HyperConnect.
Click the Settings icon.
From the Voice tab, navigate to the Post business hours configuration section.
Select the Forward to SmartBot checkbox from the Forward Missed call to section.
To specify the duration after which the call is transferred to SmartBot if it is unanswered after business hours, enter the value in the appropriate field.
Click Save.
Forward Missed Calls to Phone Number after Business Hours
Stay accessible even after business hours by forwarding missed calls to an alternate number. This ensures that you never miss important calls, no matter the time.
For example, after 6 PM, you can set up automatic call forwarding to another number after 25 seconds of unanswered calls, keeping you connected when it matters most.
Launch HyperConnect.
Click the Settings icon.
From the Voice tab, navigate to the Post business hours configuration section.
Select the Forward to phone number checkbox from the Forward Missed call to section.
Select the country code and enter the desired phone number.
To specify the duration after which the call is transferred to a phone number if it is unanswered after business hours, enter the value in the appropriate field.
Click Save.
Configure Call Masking in HyperConnect
With the Call Masking feature in HyperConnect, businesses can display a single, centralized phone number, such as your main contact center or head office on all outgoing calls. Whether the call comes from a local spa, salon, or clinic, your guests will always see the same trusted number.
Example: Let’s say your business has multiple spa locations, each with its own local phone number, but all guest calls should appear to come from your central contact center (Example+1 800 555 9876). When your front-desk associate at “Zenoti Spa” calls a client to confirm an appointment, the client’s phone will show +1 800 555 9876 instead of the spa’s local number. If the client calls back, they will reach your main contact center team, who can assist or route the call appropriately.
Launch HyperConnect.
Click the Settings icon in the top-right corner.
Navigate to the Voice tab.
Turn on the toggle labeled Enable the Call Masking feature.
In the Display Number field, enter the number you want guests to see.
For example, your contact center or head office number.
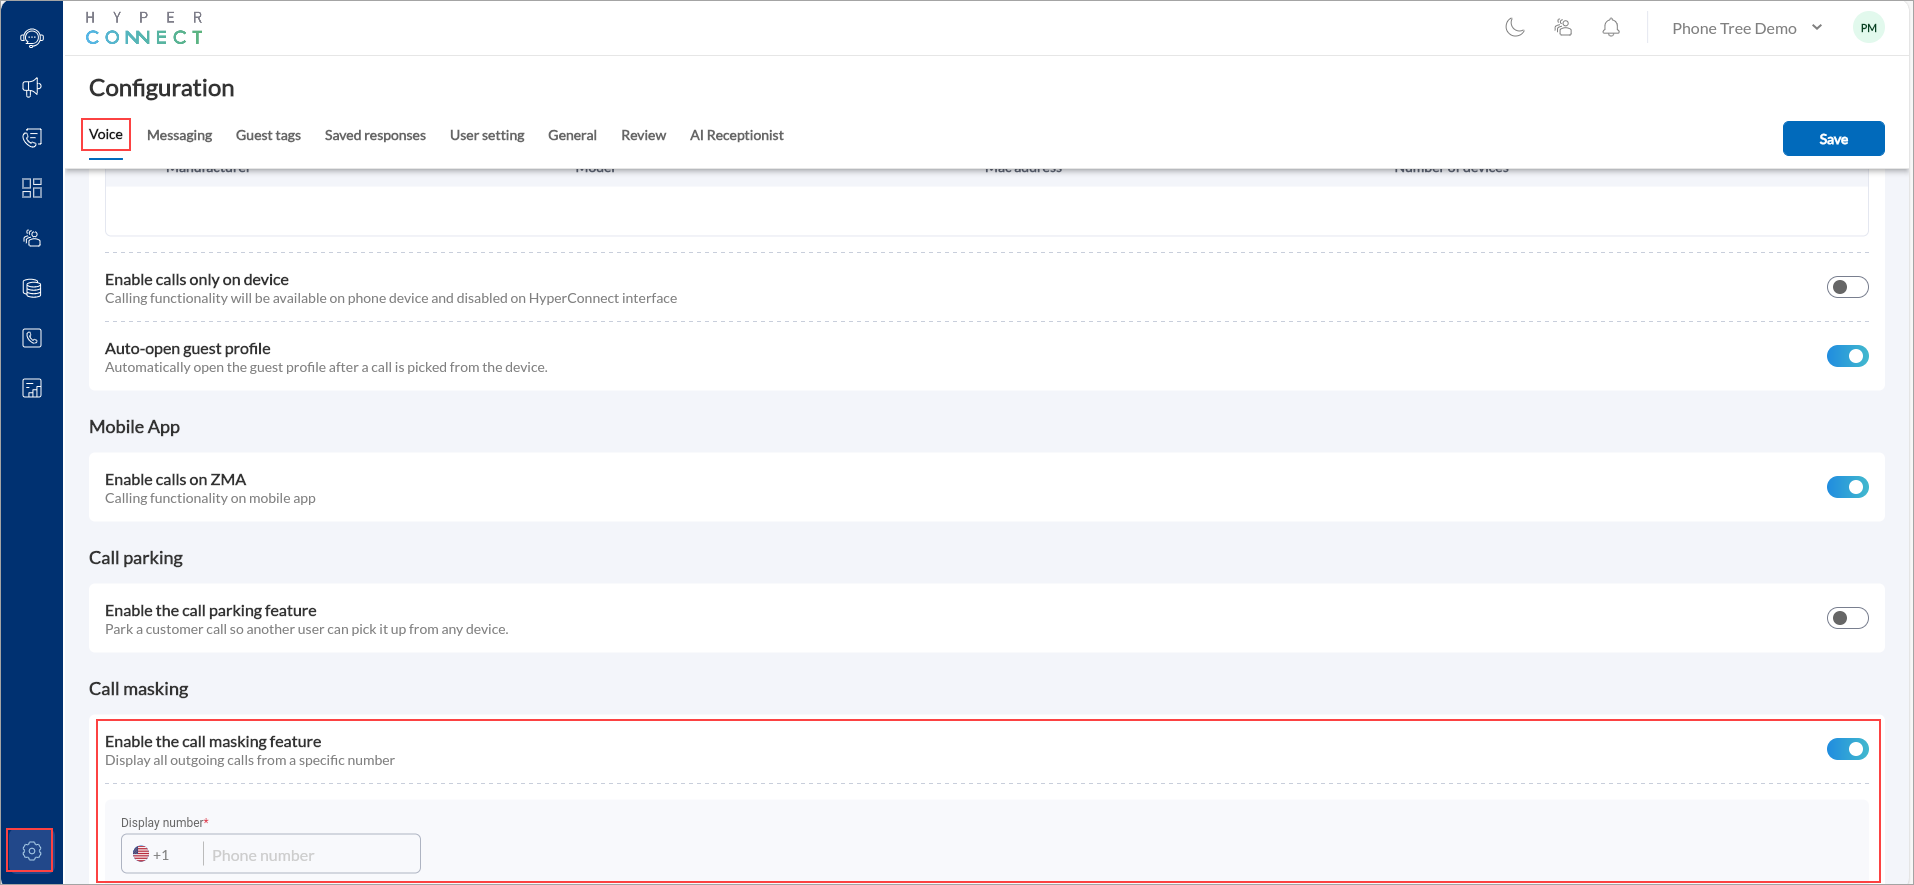
Click Save to apply the changes.
Once configured, all outgoing calls from your business locations or staff will automatically display this chosen number to guests.
Configure Call Parking in HyperConnect
The Call Parking feature in HyperConnect allows your team to temporarily place a live call on hold, so another team member can retrieve it from a different device or location. While the call is parked, guests hear custom hold music or a recorded message, creating a more professional and branded experience. Whether you are transferring calls between locations or simply need more time to assist a guest, Call Parking helps streamline communication without losing the personal touch.
Launch HyperConnect.
Click the Settings icon in the top-right corner.
Navigate to the Voice tab.
Turn on the toggle labeled Enable the call parking feature.
Enter the minimum call park time in seconds.
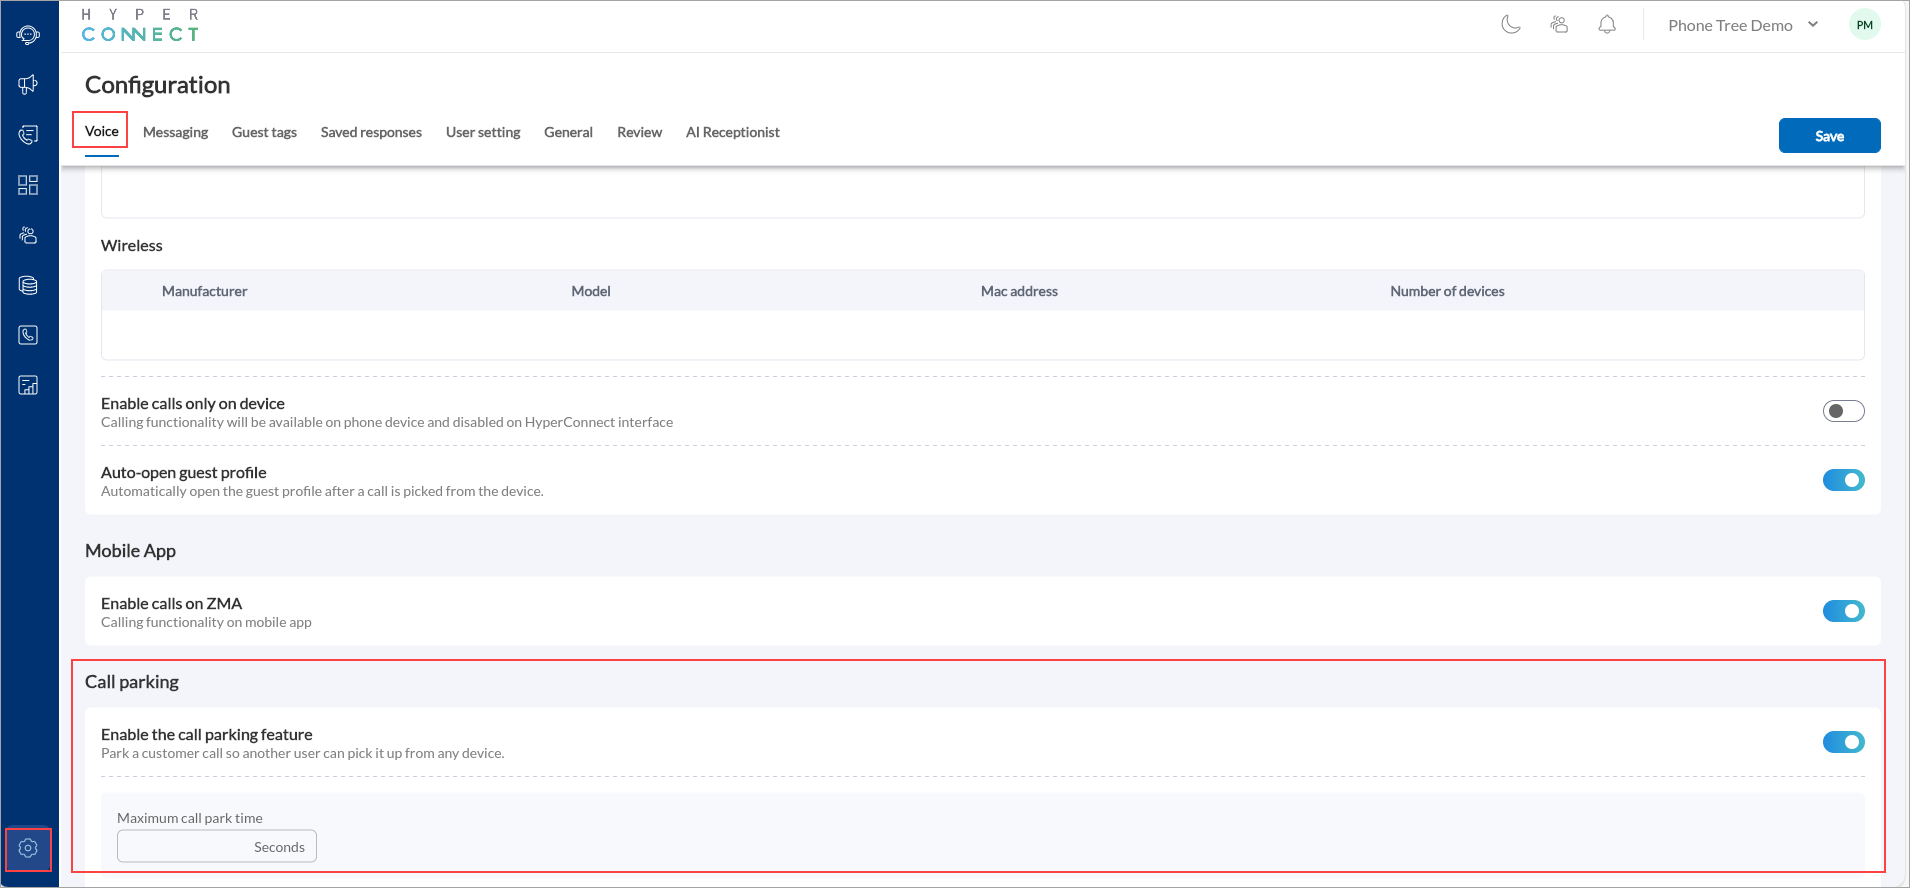
Calls can remain parked for the duration set in your settings.
If no one, retrieves the call will follow the configured fallback. Example: Redirect or Voicemail
While a call is parked, you can play custom hold music or recorded announcements..
Click Save.
Note: Only one call can be parked per slot. The number of concurrent parked calls depends on how many slots you have configured.
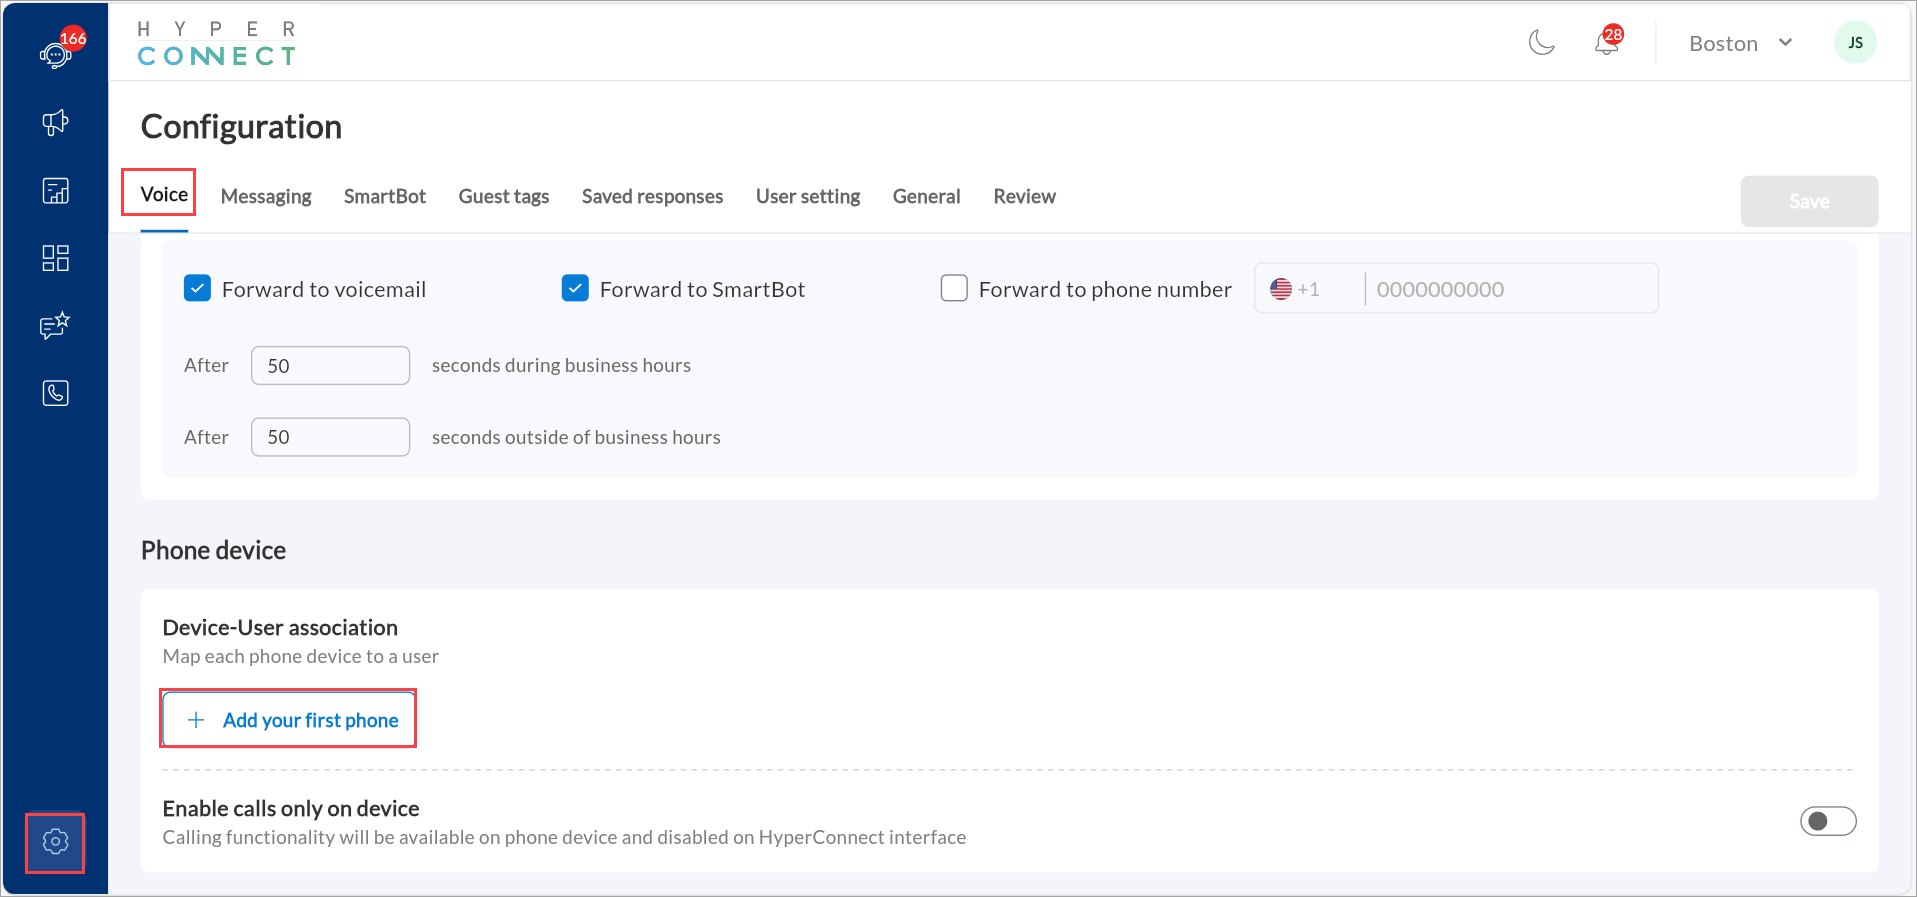
Link Devices to Users in HyperConnect
Linking devices to users in HyperConnect ensures that calls are directed to the appropriate agent or device. Follow these steps to link devices effectively:
Log in to HyperConnect using your Administrator credentials.
Navigate to the Configuration > Voice tab > Phone device section > Device-User association section.
Click Add your first phone.
Note
Physical Phones in HyperConnect
In HyperConnect, physical phones are categorized as either wired or wireless, and both types are managed in the Device-User association section. This page provides administrators with a clear overview of all physical devices linked to the system, allowing for efficient device management and assignment to agents.
In the Configuration wizard slide-out panel,
Select the phone Manufacturer from the dropdown menu (example, Yealink).
Choose the Model of the phone from the available options.
Enter the phone's Mac address to ensure proper recognition. To get the MAC address of the device, navigate to Menu > Status> Network > Mac Address.
Input the Machine ID to link the device to the setup.
Assign a Friendly Name for easy identification of the device.
From the Employee dropdown, choose either:
Specific Employee (Static): Assign the device permanently to one user.
Dynamic(Soft phone): Associates the phone with a specific browser session on a terminal. Any employee who logs into HyperConnect from that browser is automatically linked to the phone. Best for shared front desk computers.
Dynamic(Phone device): Associates the physical phone directly to an employee using their extension and PIN. The association is done from the device and remains active until another employee reassigns it. Ideal for restricted UI access environments.
Employees can now dynamically associate a phone directly from the device using:
Employee Extension
Association PIN
The PIN is used only for device association and is separate from the extension.
Click Add to finalize the device linkage. A confirmation message appears once the device is successfully linked to the extension.

Note
Ensure the Mac address and Machine ID are entered correctly to avoid configuration errors.
Use descriptive Friendly Names to easily differentiate between devices, especially in large setups.
Only administrators and managers can perform this task.
Note
Only users with Administrator or Manager roles can link devices to extensions.
Ensure the device is compatible with HyperConnect and has the latest firmware or software updates.
Regularly review linked devices to ensure proper configuration and avoid conflicts.
Dynamic Phone Association
Dynamic phone association allows businesses to link a physical phone to a terminal, rather than a specific employee. This means that any user who logs in from the same browser on that terminal will automatically be associated with the phone. When a call is answered, the correct guest profile is displayed for the logged-in user seamlessly and without manual reassignment.
Important
All employees must use the same browser on the terminal. For example: Chrome
The phone is tied to the browser session on a specific terminal.
Any user logging into HyperConnect from that browser will automatically be associated with the connected phone.
The correct guest profile pops up for the user who is logged in when a call is received.
To set up dynamic phone association, follow the steps mentioned in the Link Devices to Users in HyperConnect section.
To ensure smooth functioning:
Always use the same browser on the terminal (For example: Chrome).
Do not clear browser cache or use incognito or private browsing.
If the browser cache is cleared:
The phone will default to the last user who was logged in before the cache was cleared.
For example: If Adam Jones was the last user and clears the cache, the phone remains associated with Adam Jones.
In this case, the affected employee must: Go to Settings > Voice tab > Device-User Association. Re-mark the phone as dynamic.
Reset Physical Phone (Wireless Devices Only)
Perform a base reset to ensure the phone is ready for assignment:
On the phone, navigate to Menu > Settings > System Settings > Base Reset.
Enter PIN as 0000 and click OK.
Click OK when prompted to reset to factory settings.
After reset, update Date & Time Settings.
Spam Call Detection and Management in HyperConnect
HyperConnect includes intelligent spam call detection and management, powered by Twilio’s spam intelligence infrastructure. This helps businesses reduce unwanted spam and robocalls while maintaining control over how suspected spam calls are handled.
This feature allows you to:
Detect and flag suspected spam calls in real time
Automatically block spam calls (optional)
Show spam warnings while allowing agents to decide
View and manage blocked or spam calls
Mark numbers as safe
Access a Spam Call Report for monitoring and action
How to use:
Launch HyperConnect.
Click Settings and navigate to the Voice tab.
Scroll to the Spam Call section and toggle the Enable the spam call feature setting.
Choose how spam calls should be handled:
Automatically block spam calls: When enabled, suspected spam or robocalls are automatically blocked before they reach your team.
These calls will not appear in the call widget, and agents will not be interrupted. The system filters them out in real time based on intelligent spam detection.
Show a warning and allow the agent to decide: When enabled, suspected spam calls are allowed through but clearly labeled with a spam warning in the incoming call screen.
Agents can review the warning and choose whether to accept or reject the call. If accepted, the call proceeds normally, and all standard actions, such as viewing or creating a guest profile remain available.
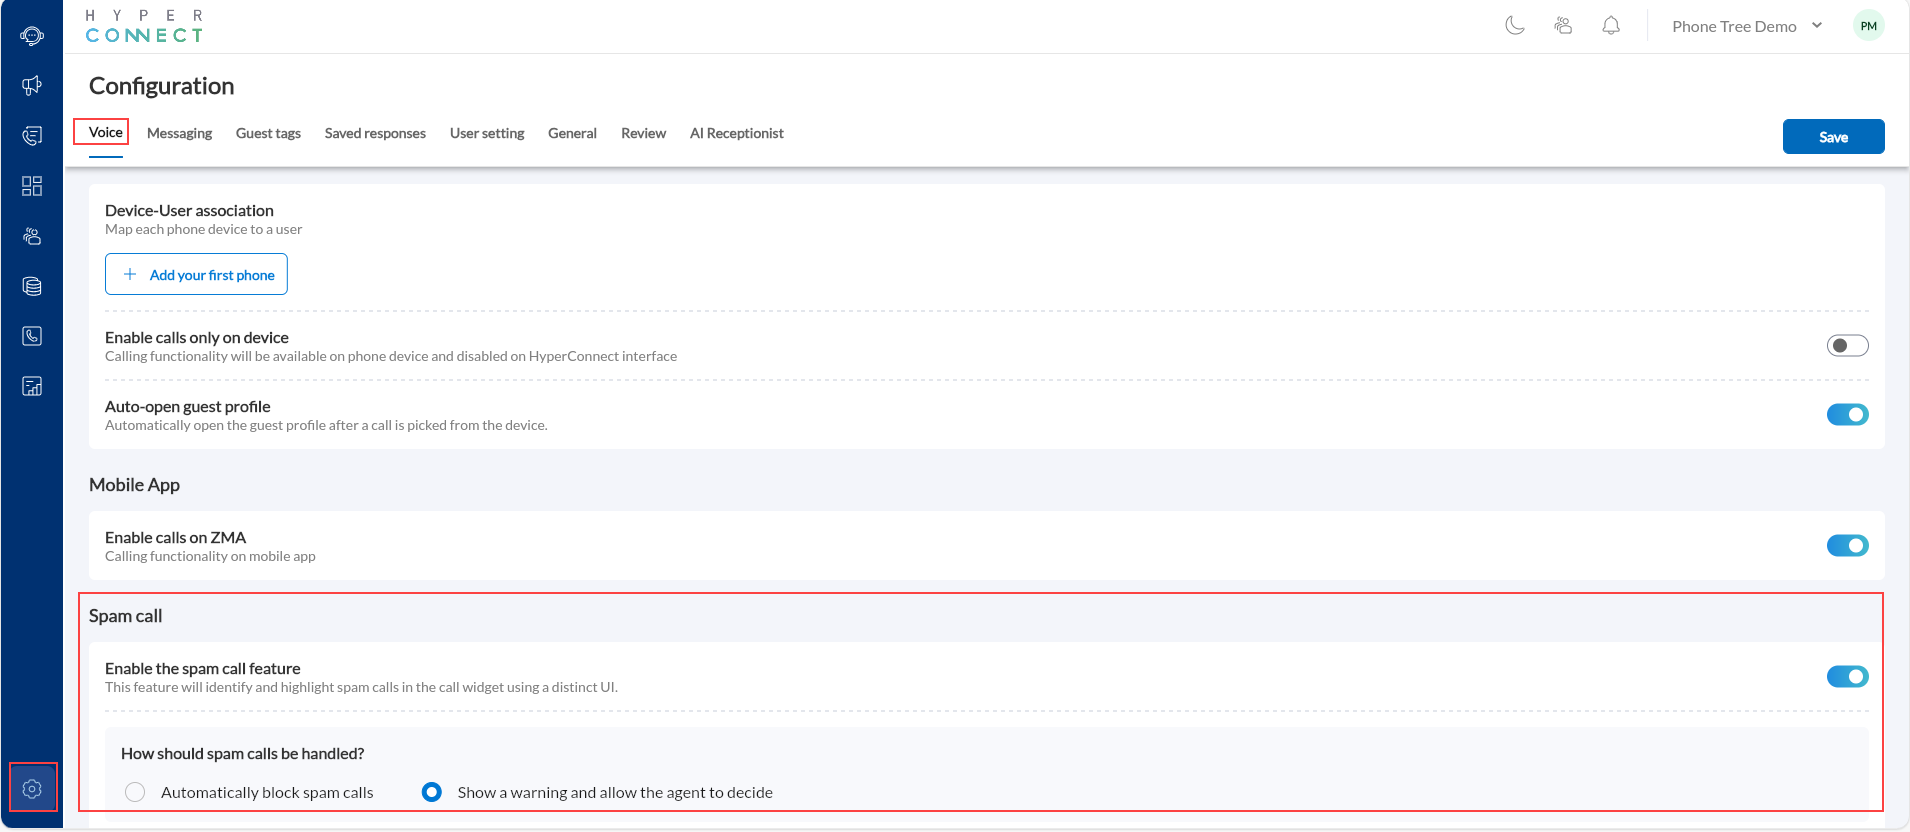
Click Save
When a suspected spam call comes in:
The call is visibly labeled as Spam.
The spam tag is prominently displayed on the incoming call screen.
Agents can make an informed decision based on the warning.
If the number is later marked as safe:
The spam label is removed.
The actual phone number is shown normally on future calls.
A dedicated Spam and Blocked Call report allows administrators to:
View all calls identified as spam
Review blocked calls
Monitor spam activity
Take corrective actions
Enable Emergency Calling in HyperConnect
Emergency Calling in HyperConnect allows your business to contact local emergency services, such as 911, directly from Zenoti’s phone system. When you enable this feature, Zenoti automatically shares your business address with emergency responders. This ensures they know exactly where to go during a fire, medical emergency, or other urgent situation.
This feature is essential for salons, spas, medspas, and fitness centers. We strongly recommend enabling it for every location to help keep your team and guests safe.
Why Emergency Calling Matters
Automatically transmits your business address to 911 or local emergency services.
Ensures first responders can quickly locate your business during a fire, medical emergency, or other urgent situation.
Requires a complete and accurate address as emergency teams rely on this information.
Follow these steps to enable the feature:
Launch HyperConnect.
Click the Settings icon.
From the Voice tab, turn on the Enable Emergency Calling toggle.
Once enabled, you will see the Emergency Address section appear below with multiple required fields:
Business name: Enter your salon, spa, or studio's legal or operating name
Address friendly name: Enter a recognizable name for this location (For example: "Downtown Spa" or "Main Location).
The Address Friendly Name helps you identify the configured location, especially if you manage multiple centers
Address line 1: Enter your street address
Address line 2: Enter suite, floor, or building information, if applicable
City: Enter your city
State: Enter your state or province
Postal code: Enter your ZIP or postal code
Country: Select your Country

You cannot save the emergency calling configuration unless you complete all required address fields. The mandatory fields are marked with an asterisk.
Click Save.
Enable Call Recording Privacy Protection in Zenoti Hyperconnect
The media redaction feature in Zenoti Hyperconnect automatically protects sensitive customer information during call recordings. When enabled, this privacy protection feature redacts personal information such as credit card numbers, social security numbers, and other sensitive data from call recordings and transcripts.
This allows your business to continue using call recordings for quality assurance, training, and AI-driven insights while maintaining compliance with data privacy regulations.
Once information is redacted, it is permanently removed from both the audio recording and the transcript. This ensures regulatory compliance and data security; however, the redacted information cannot be recovered later.
Why this matters:
AI-powered features such as call summarization, insight generation, and conversation analysis require calls to be recorded and transcribed. However, storing raw recordings can create compliance concerns if customers share credit card numbers, names, contact information, and other personally identifiable information.
With Media Redaction enabled:
Sensitive information is automatically removed from transcripts
Sensitive information is audibly redacted (beeped out) in recordings
Businesses can confidently store and analyze calls without compliance risk
How to use:
Launch HyperConnect.
Click the Settings icon.
From the Voice tab, locate Privacy protection settings.
Turn on the Enable media redaction toggle.
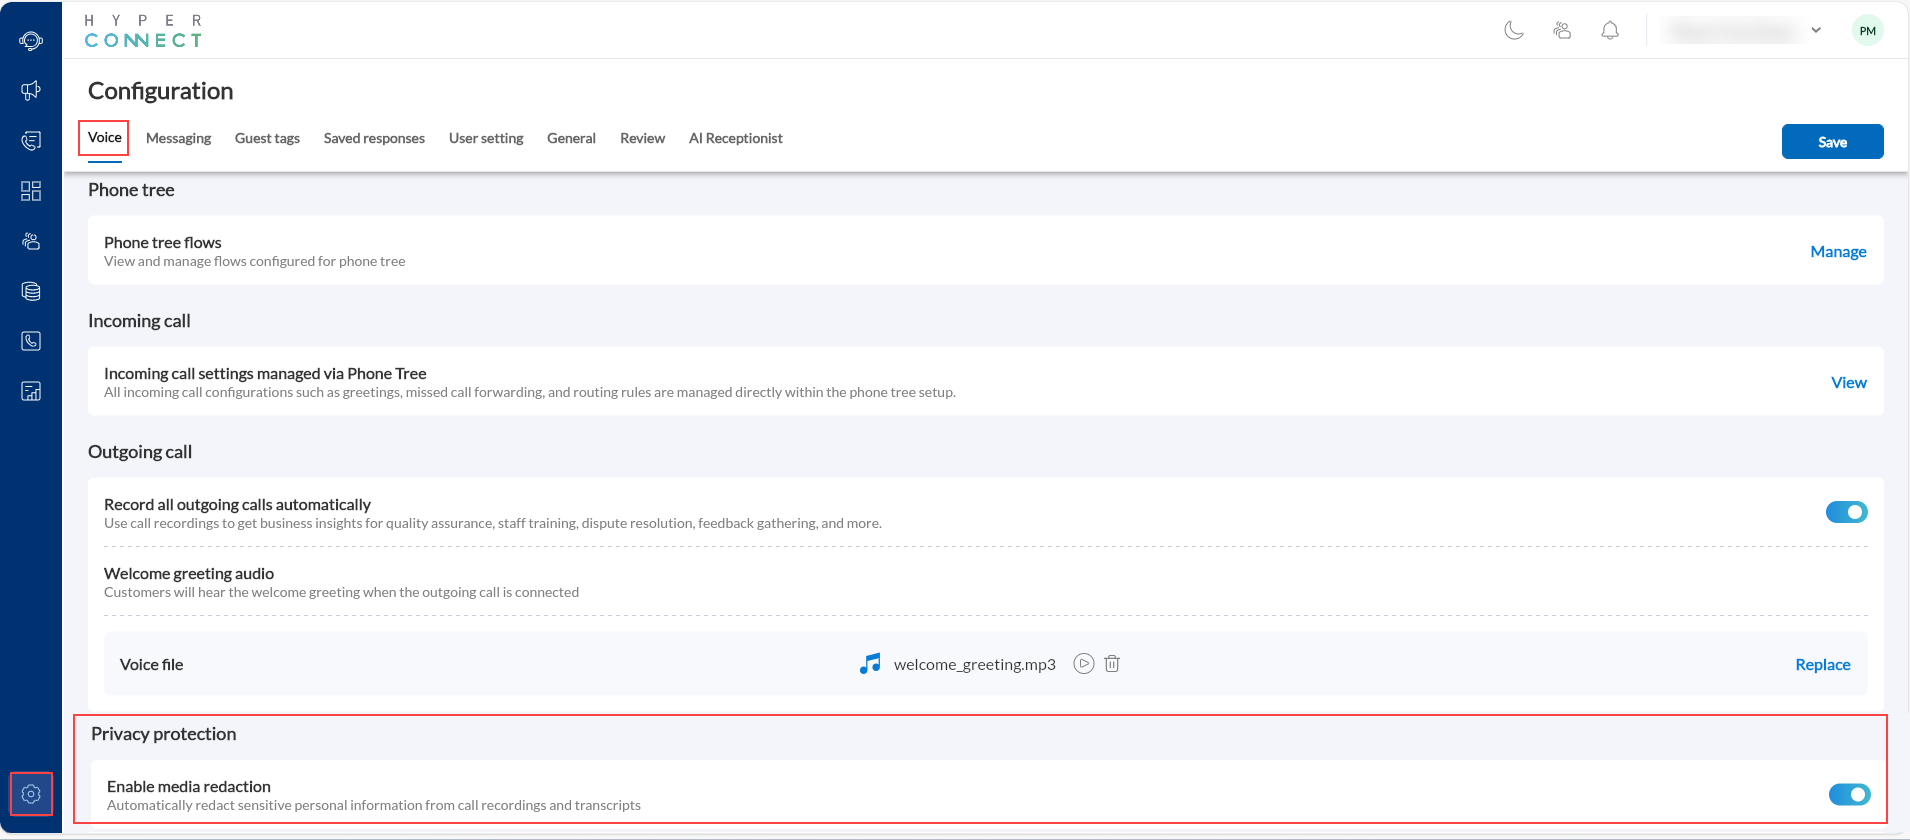
Click Save.
Enable Calls Only on Phone Device
Businesses can receive calls directly on their devices without these calls appearing on the soft phone or web interface. This allows businesses to use HyperConnect without having to manage calls on the computer. The front desk staff can access all call information on their phone devices, allowing them to handle calls solely through the device itself.
Launch HyperConnect.
Click the Settings icon.
In the Voice tab, navigate to Phone device.
Turn on the Enable calls only on device setting.
Click Save.
If you encounter issues with HyperConnect voice, refer to the Troubleshoot physical phone device section.
To configure caller ID settings in HyperConnect voice, reach out to a Zenoti representative or contact us at product_hyperconnect@zenoti.com.
Currently, HyperConnect does not offer integrations with CRM systems. For more information, reach out to us at product_hyperconnect@zenoti.com.