Treatment Visualizer
This article explains how to use Treatment Visualizer to capture or select a guest photo, choose treatment concerns, and generate AI-powered before-and-after visualizations to share with the guest during a consultation.
Important
This feature is currently in beta. To enable this feature, reach out to your Zenoti representative.
Overview
Treatment Visualizer is a tool built into the guest's Gallery that helps providers preview the likely outcomes of dermatology, aesthetics, and lip treatments. By layering simulated stages of improvement onto a real photo of the guest, Treatment Visualizer gives the guest a clear, side-by-side view of what a treatment plan can achieve.
Treatment Visualizer supports more confident consultations, helps providers justify treatment recommendations, and improves conversion from consultation to booking. For example, if a guest is considering treatment for melasma, the provider can open Treatment Visualizer, select Melasma as a concern, drag the stage slider through Stage 1, Stage 2, and Stage 3, and show the guest a realistic before-and-after generated from the guest's own photo.
Key Terms
Concern: A specific skin or aesthetic condition that you can visualize, such as Melasma or Frown Lines. Concerns are grouped into categories.
Stage: A predicted improvement level (Original, Stage 1, Stage 2, Stage 3) used by Treatment Visualizer to render incremental AI results for a concern.
Round: A single generated visualization. Each round is saved to the guest's gallery as a separate image.
Prerequisites
You must have the necessary permissions to view the guest profile and the Gallery tab.
You must have the necessary permissions required to access Photo Manager.
The device camera must be enabled to capture a new photo. To use an existing photo, the photo must be available in the guest's gallery.
Note
Treatment Visualizer is supported only on the Zenoti Mobile App (ZMA) for iPad and Android tablet devices.
Visualizations are supported only for face photos.
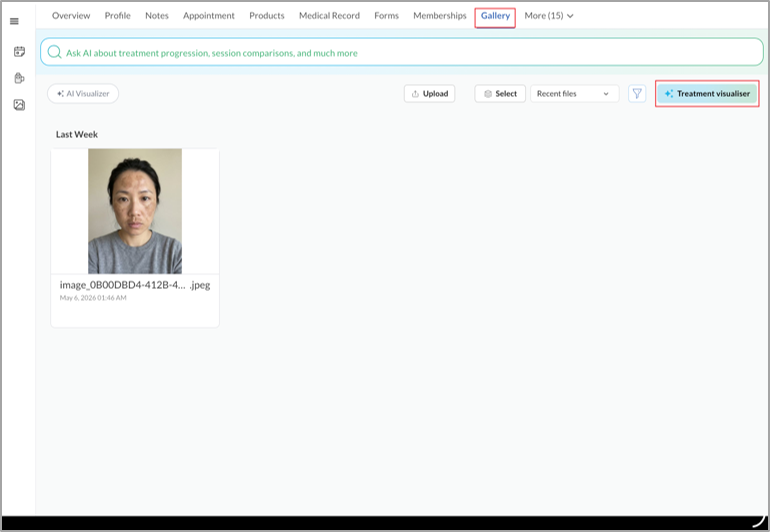
Access Treatment Visualizer
Treatment Visualizer opens from the guest's Gallery tab.
Navigate to the Gallery tab in the guest’s profile.
Click Treatment visualizer in the top-right of the gallery.
Capture a new photo
Treatment Visualizer opens in a camera view so you can capture a fresh photo of the guest.
Position the guest in front of the device camera.
Click the shutter button on the right side of the screen.
To retake the photo, click the retake icon. To use the photo, click the check icon.
Note: Use a well-lit, front-facing photo for the most accurate AI results.
Use an existing photo
Instead of capturing a new photo, you can select an existing photo from the Patient’s gallery.
In the camera view, click the gallery icon.
In the Patient gallery slide-out panel, click the photo you want to use.
Click the check icon to confirm the photo.
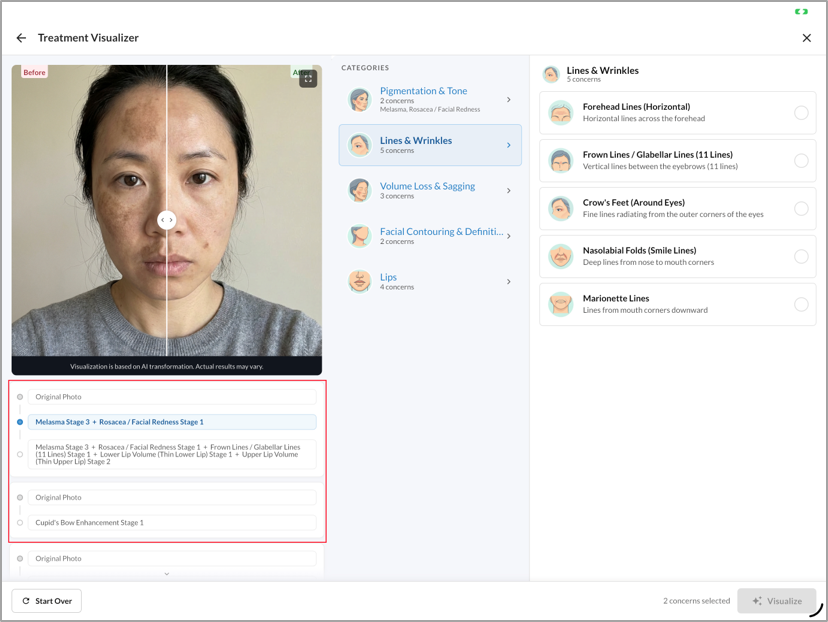
Select Concerns and Stages
After you confirm a photo, the concern-selection screen opens with the photo on the left, the Categories panel in the middle, and the concerns for the selected category on the right.
In the Categories panel, click a category, such as Pigmentation & Tone.
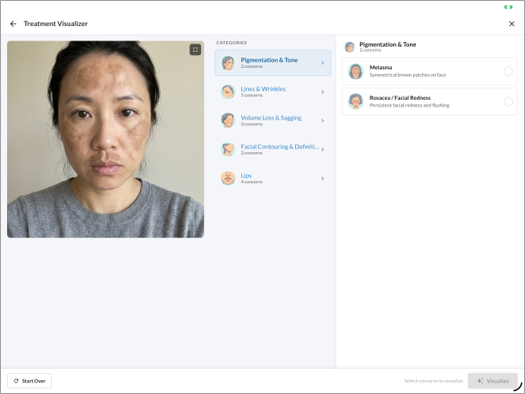
In the right panel, click the concern you want to visualize, such as Melasma. The concern card expands to show a stage slider.

Drag the slider to Stage 1, Stage 2, or Stage 3 to set the predicted improvement level.
To add more concerns, repeat the previous steps within the same category, or open another category and select concerns from it.
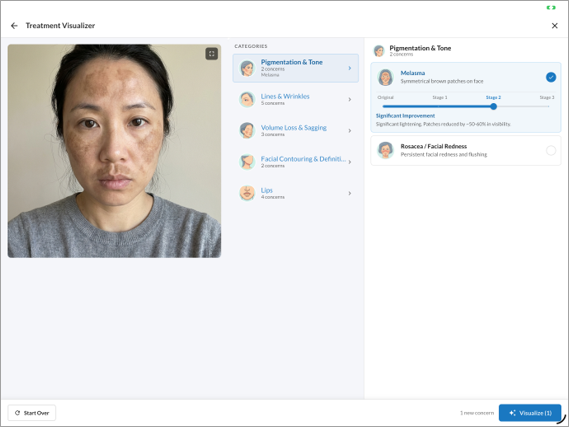
Generate and View the Visualization
After you select at least one concern, generate the AI visualization to show the guest a before-and-after preview.
Click Visualize in the bottom-right of the screen.
Drag the divider across the photo to switch between the before and after states.
To view the visualization in full-screen, click the expand icon in the top-right of the photo.
In the full-screen view, click the split icon to switch between the slider view and the side-by-side view.
To close the full-screen view, click the close icon.
Layer Additional Concerns onto a Result
After you generate a round, you can add more concerns and apply them to either the original photo or the latest result. Each new round is added as a separate entry in the round list below the photo.
Select additional concerns and stages from any category.
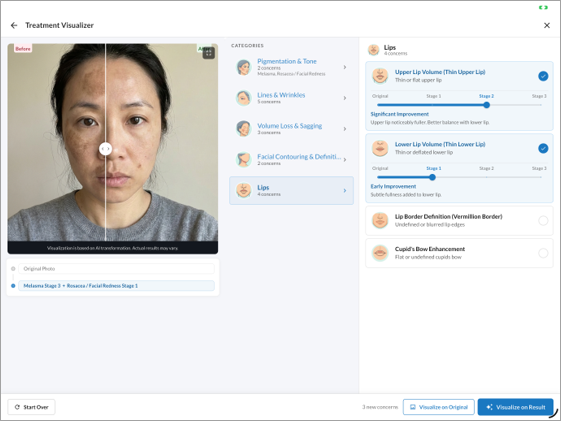
To render the new concerns on the unedited photo, click Visualize on Original.
To render the new concerns on top of the latest result, click Visualize on Result.
To switch between rounds, click an entry in the round list below the photo.
Start a New Visualization
To clear the current photo, concerns, and rounds and begin again, click Start Over in the bottom-left of the screen.
Access Saved Visualizations from the Gallery
Treatment Visualizer saves every round to the guest's gallery as a separate image, so the visualizations remain available for future consultations.
Open the guest's profile and click the Gallery tab.
Click AI Visualizer.
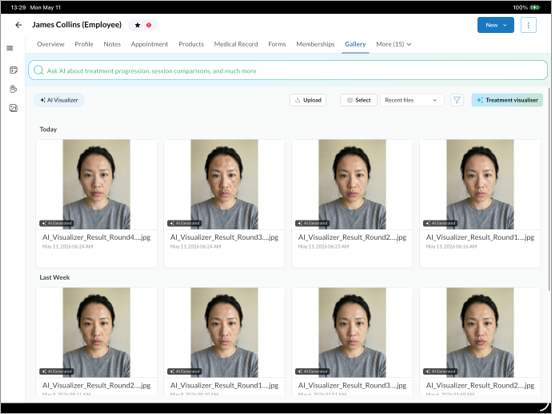
Locate the saved visualizations in the date groups.
Click a thumbnail to open the visualization in full-screen.
To act on multiple visualizations at once, click Select, and then select the checkbox on each visualization you want to act on.
From the action buttons at the bottom of the gallery, choose Delete, Add tags, Add to global gallery, or Compare.
Note: Saved visualizations are AI-generated previews. Zenoti recommends sharing them with the guest alongside the disclaimer that actual results may vary.
FAQs
What do Stage 1, Stage 2, and Stage 3 mean?
The stages represent levels of visible improvement, not specific treatments or timelines.
Stage 1 — Starter or early improvement.
Stage 2 — Noticeable or significant improvement.
Stage 3 — Optimal or best expected outcome.
Think of the stages as a visual journey rather than a fixed treatment plan. How quickly a guest reaches each stage depends on the treatment type, treatment frequency, and the guest's skin condition.
For example, a guest treating acne with topical skincare alone might reach Stage 1 in eight to 12 weeks and Stage 3 in six to nine months. The same guest combined with chemical peels and microneedling might reach Stage 2 in six to eight weeks. Treatment Visualizer shows what progress can look like, not how long it takes.
Can I customize the list of concerns for my organization?
Yes. By default, all available concerns appear in Treatment Visualizer, and providers choose which concern to visualize during a consultation. To narrow the list to only the concerns relevant to your services, map concerns to services.
At the organization level, navigate to Configuration > Photo Management > AI Photo Manager.
Review the concern-to-service mappings. Zenoti automatically suggests mappings using AI based on your service catalog.
Approve or edit the suggested mappings.
After the mapping is confirmed, only the assigned concerns appear in Treatment Visualizer. For example, if your business offers injectables but not acne treatments, Acne is not mapped to your services, and providers see only relevant concerns such as wrinkles or volume loss.
Can I create custom concerns for Treatment Visualizer?
No. Treatment Visualizer supports only the predefined list of concerns provided by Zenoti, which keeps AI output consistent across organizations.
You can create custom concerns for use in other modules, such as AI Photo Manager and Marketing Gallery filtering, but custom concerns do not appear in Treatment Visualizer. For example, if a guest books a consultation for wrinkles, the system can automatically surface before-and-after images tagged with wrinkles, which helps providers build trust during the consultation.
How do I view a visualization later?
Treatment Visualizer saves every generated round to the guest's Gallery under a separate AI Visualizer category.
Open the guest's profile and click the Gallery tab.
Click the AI Visualizer filter at the top of the gallery.
Click any thumbnail to open the visualization.
To compare a saved visualization with the original photo, open the visualization and click Reopen in Visualizer. The original photo and the visualization open together.
Are AI-generated images shown in the default gallery view?
No. AI-generated images are stored under a separate AI Visualizer category in the Gallery. To view them, click the AI Visualizer filter at the top of the gallery.
The category is separated by design, to keep the main gallery focused on actual guest photos and to avoid mixing real and AI-generated images.
Can I enable Treatment Visualizer for a specific location?
Currently, Treatment Visualizer is enabled at the organization level only.
When location-level control is available, you can enable Treatment Visualizer for any location that already has Photo Manager enabled. For example, if you operate 10 clinics and want to pilot Treatment Visualizer in two of them, you can enable the feature for only those two locations and leave the rest unchanged.
Is Treatment Visualizer available without Photo Manager?
No. Treatment Visualizer depends on Photo Manager for image capture, storage, and gallery workflows. Photo Manager must be enabled for your organization before you can use Treatment Visualizer.
How does the beta process work, and how do I enable Treatment Visualizer?
Treatment Visualizer is currently in closed beta. The feature is fully functional, but access is limited so that Zenoti can closely monitor usage and outcomes of the AI-generated images.
To request access, contact your Zenoti Customer Success Manager (CSM). After your organization is enrolled, the Zenoti team helps you with feature enablement, concern configuration, workflow setup, and onboarding.